|
|
|
Porsche, and the Porsche crest are registered trademarks of Dr. Ing. h.c. F. Porsche AG.
This site is not affiliated with Porsche in any way. Its only purpose is to provide an online forum for car enthusiasts. All other trademarks are property of their respective owners. |
|
|

  |

| Eric_Shea |
 Jun 4 2005, 12:07 PM Jun 4 2005, 12:07 PM
Post
#1
|
|
PMB Performance  Group: Admin Posts: 19,304 Joined: 3-September 03 From: Salt Lake City, UT Member No.: 1,110 Region Association: Rocky Mountains |
Well… pedal clusters seem to be a hot topic lately. We’re getting a tremendous amount of calls for them so I thought there’s probably others out there that are in need or thinking about repairing their pedal clusters.
The age-old adage applies, with a “30 something year old” (car that is) things are bound to begin to show wear. What happens to pedal assemblies often is brake fluid from a leaking master cylinder usually shoots directly into the car from the brake actuator rod. It ends up sitting in the “pan” of your pedal assembly. Brake fluid eats through the paint and works it’s magic on the 30-year-old nylon bushings that Porsche used to make things go smooth. The entire assembly sits under a layer of carpet and the pedal board. Not too many people get in there to check the status of their assembly (maybe this will spur you on). So there it sits… rusting away with crumbling old nylon bushings. Here’s what it takes to fix it. Let’s take a look at this fairly simple procedure. I’ll start with a list of tools needed: Ratchet Wrench 3” Extension 17mm Socket 13mm Socket 13mm Open end Wrench 5mm Allen Key or Allen Socket 3/16” Pin Punch (or, preferably, an air hammer with a pointed bit) 3/8” Pin Punch (or, preferably, an air hammer with a blunt bit) PB Blaster (or other good penetrant) Flat Head Screwdriver Needle Nose Pliers Step #1 – Get it Out. I’ll start with a little primer on removing the assembly. Start the night (or the week) before by removing your carpet and floorboard (now is the time to order your Engman board). Once the board is away from the pedal assembly area, spray the penetrating oil on the 13mm nuts that hold the pan to the floor. Next you’ll need to remove the steering rack cover from under the car. Remove two 17mm bolts from the back of the pan and two small 13mm bolts toward the front. The pan should drop right down along with a ton of gravel and spiders that have been going along for a free ride. Now remove the two 13mm nuts on either side of the master cylinder holding it to your firewall. Pull the master cylinder back off the studs. You may run into a little resistance with the rubber boot that slips around the brake actuator rod. The master cylinder should be fine hanging there with the brake lines attached. Back inside. Remove the access cover and disconnect the accelerator cable (ball and cup) and the clutch cable (clevis clip). With the clutch you pull the clip off the line, swing it upward and pull the pin out. Take care to lay the cables out so they won’t intertwine when reconnecting. This makes for an interesting display of RPM’s when the clutch is engaged. Pull up on your accelerator pedal and remove the rod that is pressed in the back. Hopefully your penetrating oil has soaked in well and you can now remove the 13mm nuts holding the pan to the floor with relative ease. The penetrant is a pretty important step because you don’t want to be welding another stud onto your floorpan, especially in this fragile area. Remove the assembly. This is a good time to check your accelerator pedal. With the spring encased in the rubber, it usually collects water at the base of the pedal and rusts the spring inside. If you have a wobbly pedal now is a great time to change it out. Again, use penetrating oil and be “very” careful with the 10mm nuts holding the pedal to the floor. It's out... Attached image(s) 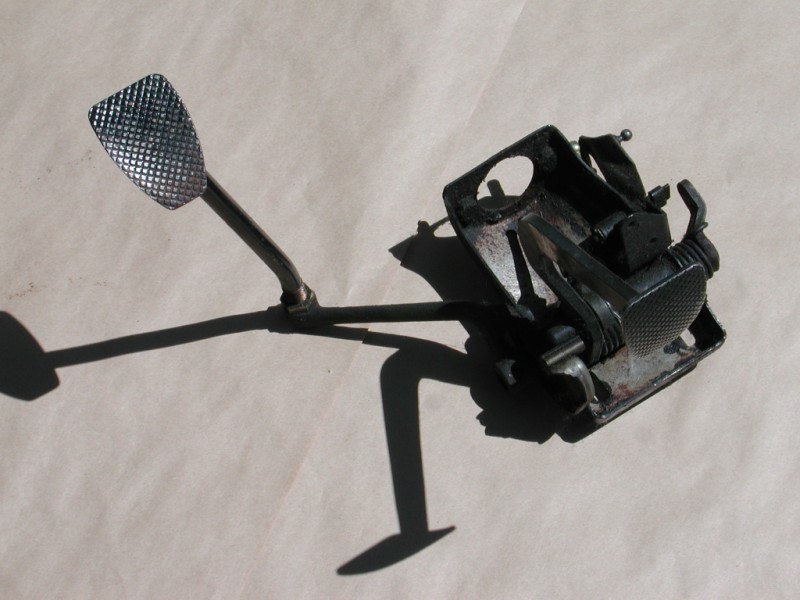
|
   |

 
|
| Eric_Shea |
Jun 4 2005, 12:08 PM
Post
#2
|
|
PMB Performance Group: Admin Posts: 19,304 Joined: 3-September 03 From: Salt Lake City, UT Member No.: 1,110 Region Association: Rocky Mountains |
Step #2 - Removing Ancillary Items
The old rusty, grungy pedal assemblies will require some force (generally) to get them apart. You don’t want to damage any of your more delicate items. Use the screwdriver to remove the brake light switch. You may want to take a good look at it or a digital picture of it first so you know how it goes back. Remove the accelerator pedal rod (ball and socket). Take the needle nose pliers and remove the cotter pins holding the accelerator bracket and the brake rod in place and remove both those items. One more thing I like to remove (or, semi-remove) is the clutch spring. Take a screwdriver and pry up the end that is hooked to the pedal pan. You’ll be removing that rod and sometimes the spring will snap and break under the load. Items off... Attached image(s) 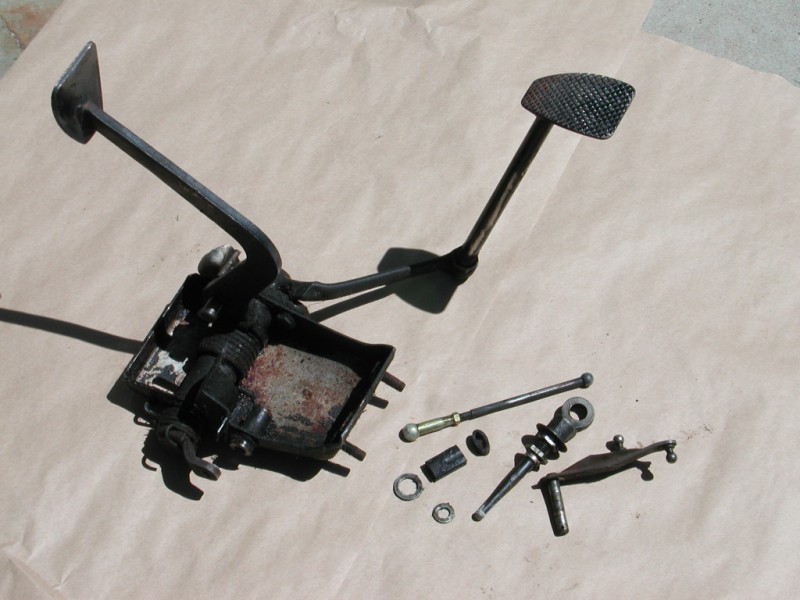
|
|
|
|
| Eric_Shea |
Jun 4 2005, 12:09 PM
Post
#3
|
|
PMB Performance Group: Admin Posts: 19,304 Joined: 3-September 03 From: Salt Lake City, UT Member No.: 1,110 Region Association: Rocky Mountains |
Load off the spring...
Attached image(s) 
|
|
|
|
| Eric_Shea |
Jun 4 2005, 12:11 PM
Post
#4
|
|
PMB Performance Group: Admin Posts: 19,304 Joined: 3-September 03 From: Salt Lake City, UT Member No.: 1,110 Region Association: Rocky Mountains |
Step #3 – Remove the Pedals
Here comes the fun part, removing the pedals from the assembly. Take the 3/16” pin punch and hammer out the pin holding the clutch pedal to the rod. This takes a bit of practice and some precarious perching on the vise. For the “easy way” I like to use an air hammer “and” the punch. The air hammer with a pointed bit will drive the pin in a ways where the punch can easily take over. Now, if you’re lucky, the clutch arm will simply spin right off. It may take a little effort and it may take a “LOT” of effort. If you’re running into problems here I recommend either soaking it in penetrating oil overnight, for a week, for a month… (you get the picture) or a combination of oil and heat using a high heat torch like MAPP or acetylene. Your nylon bushings will be toast but, that’s why we’re here anyway. Another trick that is “very” effective is the air hammer with a blunt bit. I’ve found that by propping the pan in the vise and giving a few bursts with the air hammer the rod will push right out. ***IMPORTANT*** Don’t wrench on this too much. Your “pan” is the only area of support when you’re attempting to get this rod and pedal apart. It bends quite easily. Once you have the clutch pedal removed you can remove the 13mm nut and slide the center shaft out that is supporting the brake pedal. Everything should fall into (or out of) place at this point. Use a screwdriver to pry out the old bushings. Here's a shot of the pin coming out... Attached image(s) 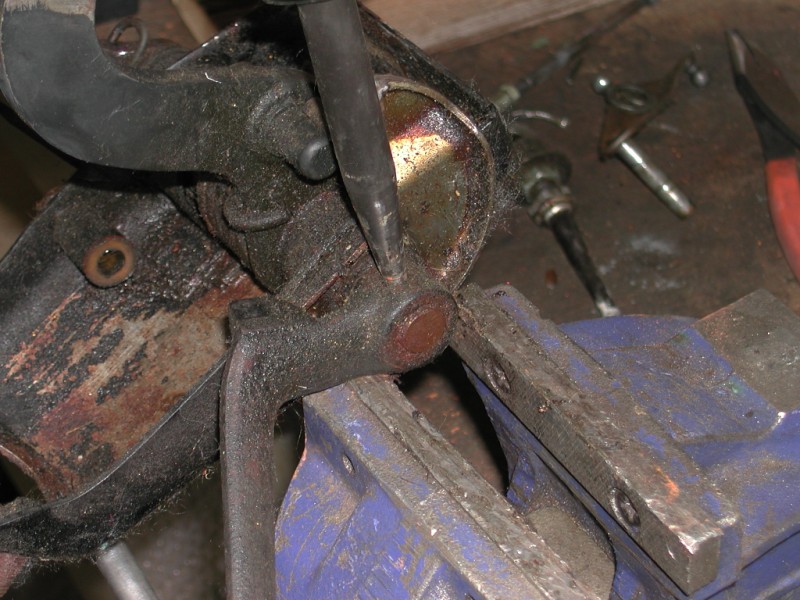
|
|
|
|
| Eric_Shea |
Jun 4 2005, 12:14 PM
Post
#5
|
|
PMB Performance Group: Admin Posts: 19,304 Joined: 3-September 03 From: Salt Lake City, UT Member No.: 1,110 Region Association: Rocky Mountains |
Clutch shaft coming out...
Attached image(s) 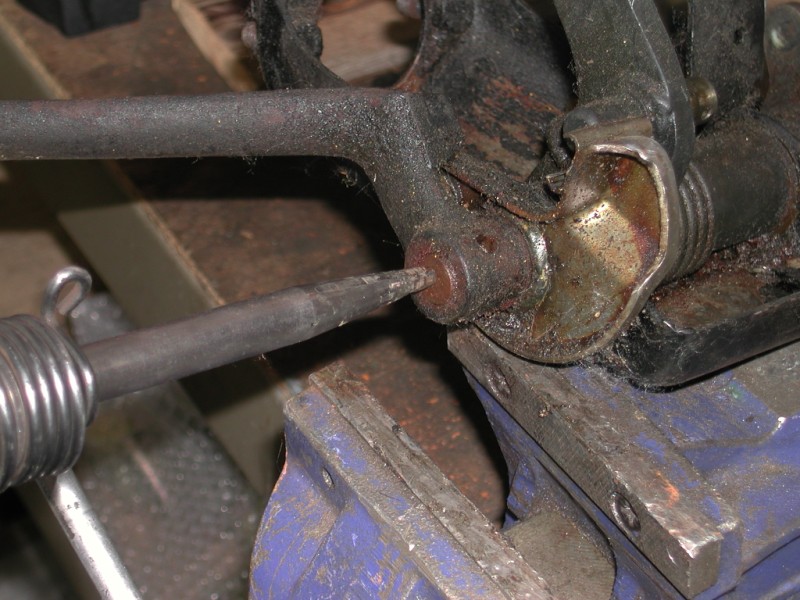
|
|
|
|
| Eric_Shea |
Jun 4 2005, 12:16 PM
Post
#6
|
|
PMB Performance Group: Admin Posts: 19,304 Joined: 3-September 03 From: Salt Lake City, UT Member No.: 1,110 Region Association: Rocky Mountains |
Removing the 13mm and pulling out the clutch tube allows the brake pedal to slide out...
Attached image(s) 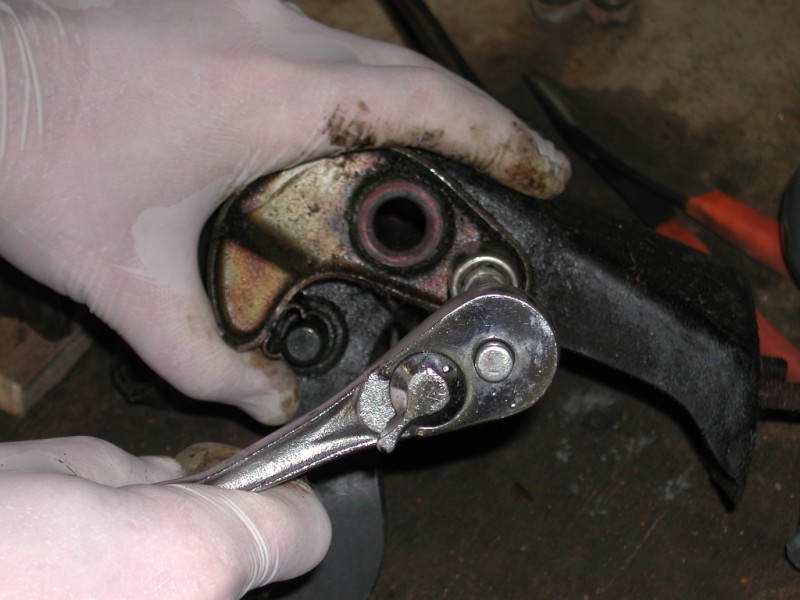
|
|
|
|
| Eric_Shea |
Jun 4 2005, 12:16 PM
Post
#7
|
|
PMB Performance Group: Admin Posts: 19,304 Joined: 3-September 03 From: Salt Lake City, UT Member No.: 1,110 Region Association: Rocky Mountains |
Here's what your nylon bushings look like... (IMG:http://www.914world.com/bbs2/html/emoticons/biggrin.gif)
Attached image(s) 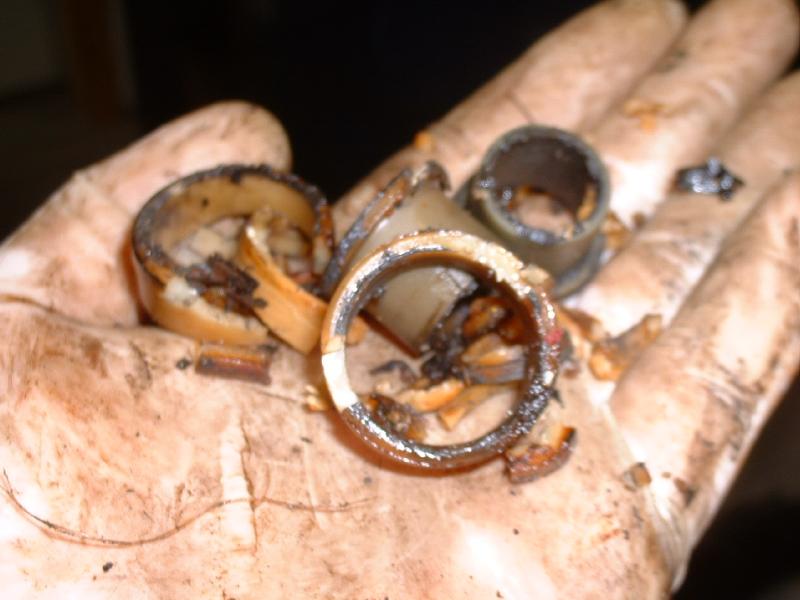
|
|
|
|
| Eric_Shea |
Jun 4 2005, 12:17 PM
Post
#8
|
|
PMB Performance Group: Admin Posts: 19,304 Joined: 3-September 03 From: Salt Lake City, UT Member No.: 1,110 Region Association: Rocky Mountains |
All the parts and pieces...
Attached image(s) 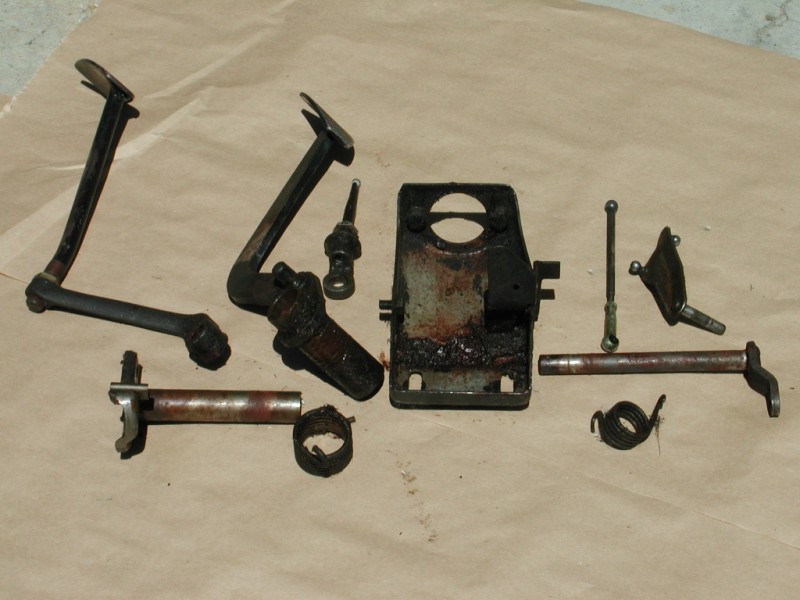
|
|
|
|
| Eric_Shea |
Jun 4 2005, 12:18 PM
Post
#9
|
|
PMB Performance Group: Admin Posts: 19,304 Joined: 3-September 03 From: Salt Lake City, UT Member No.: 1,110 Region Association: Rocky Mountains |
Step #4 – Prep the Metals
Your pan looks like hell right? You really need to get in there and prep this stuff before you put it back together. You’ll need to wire brush, sand blast or glass bead blast (best) them to bare metal. I realize that most people here won’t have a glass bead blasting cabinet in their garage but it’s well worth the effort or the $20.00 bucks to find someone who does. There’s nothing like refinishing bare metal for not only a good-looking result but also a long lasting result. I’ve used a couple of finishes with great success. POR-15 (or similar, I like Zero-Rust now, it comes in convenient spray cans and it’s what the military specs for the bottom of Hum-Vees) or “Plating” As most of you know, I’m plating them now. Not for the “Bling” factor (it does look nice however) but more for the protection. Let’s face it, 80% is going to be hidden behind the carpet. Plating isn’t going to flake and disintegrate like the paint. This is a good looking pan... (IMG:http://www.914world.com/bbs2/html/emoticons/blink.gif) Attached image(s) 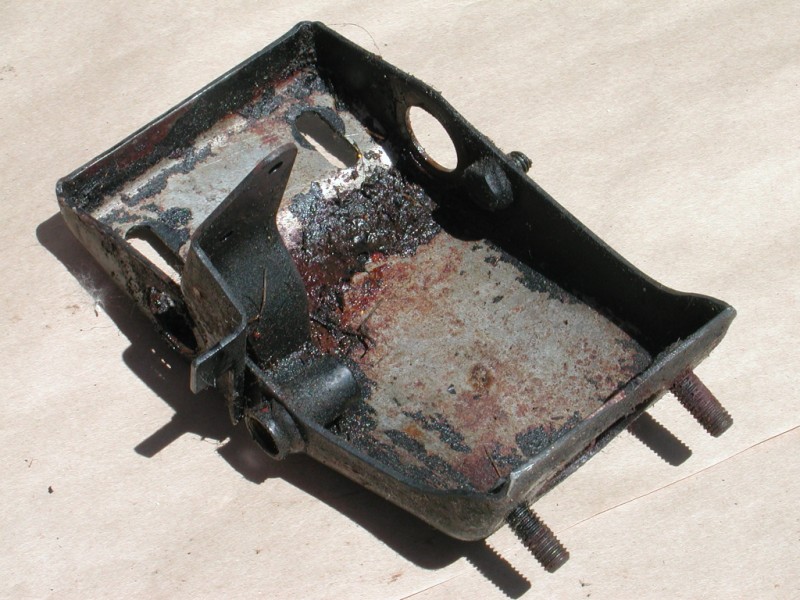
|
|
|
|
| Eric_Shea |
Jun 4 2005, 12:22 PM
Post
#10
|
|
PMB Performance Group: Admin Posts: 19,304 Joined: 3-September 03 From: Salt Lake City, UT Member No.: 1,110 Region Association: Rocky Mountains |
Step #5 – Reassemble
This should be fairly straightforward. If you’re using bronze bushings (which I recommend), the kit mentions their self-lubricating properties and to use light oil on assembly. I use small amounts of Mobil 1 Synthetic grease on both sides of the bushing. I don’t think it really matters either way. Lube them up and begin your reassembly process. Install the large bushings into the brake pedal. Slide the large brake spring over the pedal. Put the pedal in the pan and position it so the straight leg on the spring is resting against the bottom of the pan. The pedal should rest full forward. Next slide the clutch tube into the assembly and install the bushings. Make sure the brake pedal is on the backside of the “stop” and bolt the clutch tube/pedal stop into place. Install the clutch spring onto the clutch pedal shaft and slide the shaft through the bushings. Next press the clutch pedal onto the shaft and align the pinhole. Again, make sure the pedal is resting on the proper side of the stop. Use a vise to press the pin into the pedal and shaft. Much has been said about these pins and I believe from looking at factory roll pins and the ones now included in the kits that this has been rectified. However: I install these pins from the "top" of the arm making it nearly impossible for them to work their way loose and end up on the floor of your car. Install the remaining bushings. There should be three left, two for the accelerator and one to press into your clutch arm. If your nylon bushing is still in the arm, use a screwdriver to punch it out. Use a vise to simply press the new bronze bushing back in. The two accelerator bushings should be straightforward. Use new cotter pins to secure the accelerator and the brake actuator assemblies. This shows the brake pedal and clutch pedal on the proper side of the mount. The pin is being pressed in with the vise... Attached image(s) 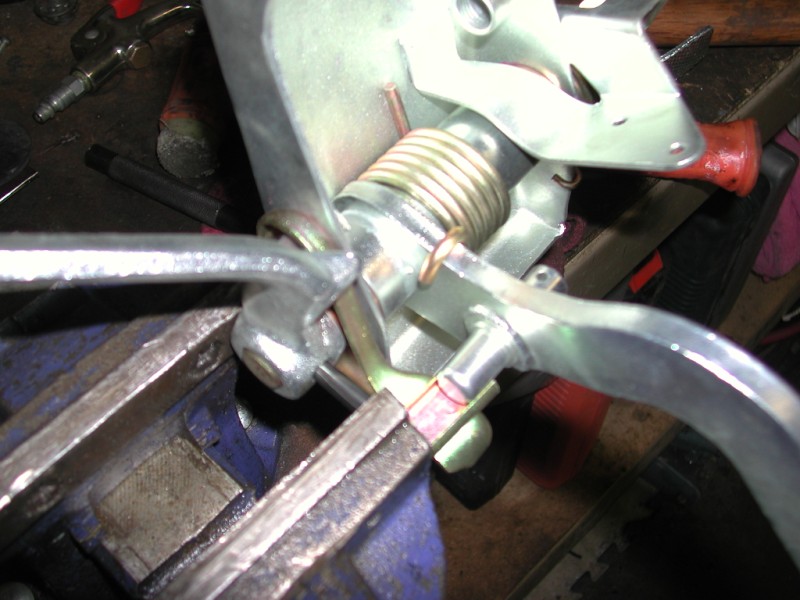
|
|
|
|
| Eric_Shea |
Jun 4 2005, 12:24 PM
Post
#11
|
|
PMB Performance Group: Admin Posts: 19,304 Joined: 3-September 03 From: Salt Lake City, UT Member No.: 1,110 Region Association: Rocky Mountains |
The plating makes it hard to get a good photo. Here's the accelerator assembly installed with the coter pin in...
Attached image(s) 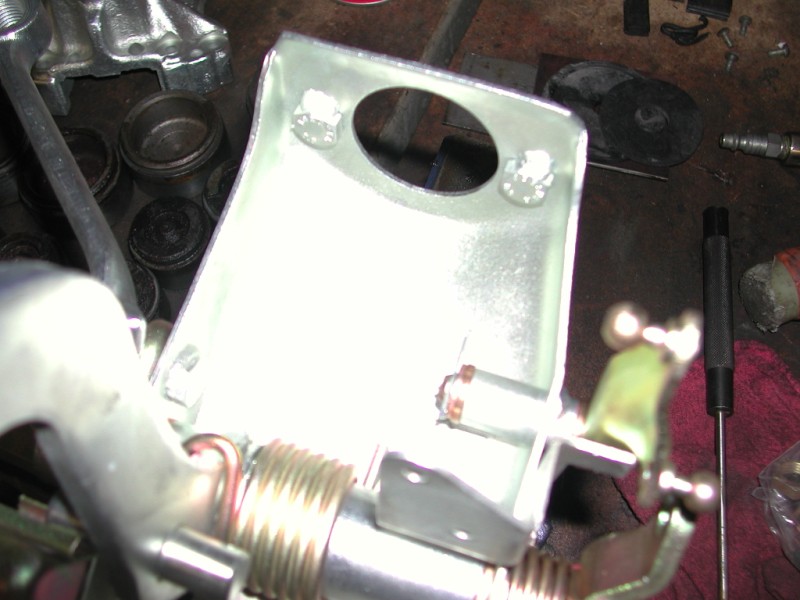
|
|
|
|
| Eric_Shea |
Jun 4 2005, 12:25 PM
Post
#12
|
|
PMB Performance Group: Admin Posts: 19,304 Joined: 3-September 03 From: Salt Lake City, UT Member No.: 1,110 Region Association: Rocky Mountains |
Here's a finished assembly showing the brake switch mount and the accelerator pedal rod. I glass bead blast the rod and redo the "Black Oxide" treatment.
Attached image(s) 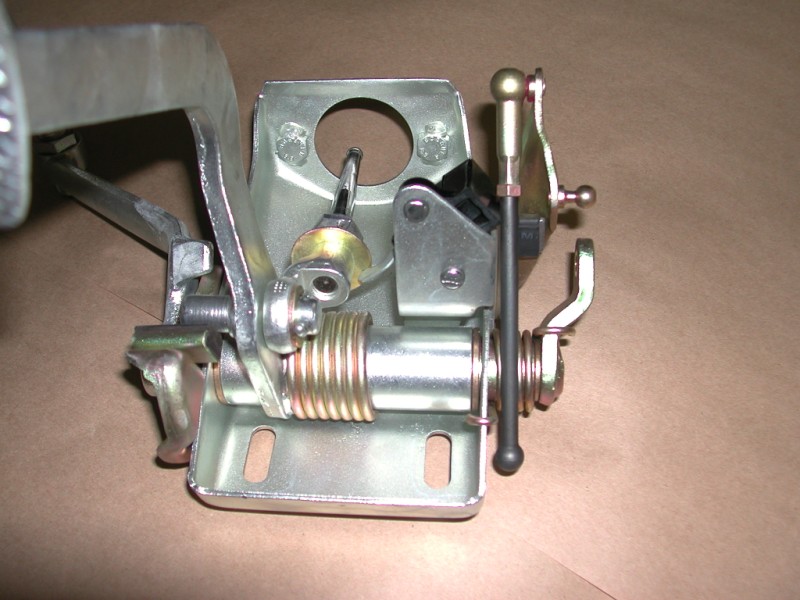
|
|
|
|
| Eric_Shea |
Jun 4 2005, 12:27 PM
Post
#13
|
|
PMB Performance Group: Admin Posts: 19,304 Joined: 3-September 03 From: Salt Lake City, UT Member No.: 1,110 Region Association: Rocky Mountains |
Step #6 – Installation
As the good book says… installation is the reverse of Step #1. Enjoy. As always, I hope someone can get some use out of this. I think if it causes only a few people to go look at their pedal assemblies it will be worth while. If yours is in good shape then it’s always a good time to clean it out (spring cleaning you know…), the spare change you find down there might even make it worth your while. (final step - box it up and send it to William Harris (IMG:http://www.914world.com/bbs2/html/emoticons/biggrin.gif) ) |
|
|
|
| echocanyons |
Jun 4 2005, 12:37 PM
Post
#14
|
|
Advanced Member Group: Benefactors Posts: 2,117 Joined: 24-December 02 From: Bay Area, CA Member No.: 7 Region Association: Central California |
Defininte classic
Nice write up Eric (IMG:http://www.914world.com/bbs2/html/emoticons/smilie_pokal.gif) |
|
|
|
| lapuwali |
Jun 4 2005, 12:38 PM
Post
#15
|
|
Not another one! Group: Benefactors Posts: 4,526 Joined: 1-March 04 From: San Mateo, CA Member No.: 1,743 |
Another classic...
I used a puller to remove my clutch pedal from the shaft. Patrick Pickerell and I also took an hour and a shop full of tools to remove the bloody roll pin first. I didn't put a new roll pin back in, I used a bolt and a nut instead. I had to press the clutch pedal back onto the shaft, too. |
|
|
|
| ewdysar |
Jun 4 2005, 12:46 PM
Post
#16
|
|
What happens here, stays here. Group: Members Posts: 558 Joined: 29-October 04 From: Altadena, CA Member No.: 3,030 |
Eric, great post, obviously a "classic" thread. (IMG:http://www.914world.com/bbs2/html/emoticons/smilie_pokal.gif) (IMG:http://www.914world.com/bbs2/html/emoticons/smilie_pokal.gif)
Also great promotion for your rebuild service (and others), let's us make a very informed decision on whether to tackle this ourselves. Thanks, Eric |
|
|
|
| Eric_Shea |
Jun 4 2005, 01:02 PM
Post
#17
|
|
PMB Performance Group: Admin Posts: 19,304 Joined: 3-September 03 From: Salt Lake City, UT Member No.: 1,110 Region Association: Rocky Mountains |
I fig'r, share the love.
It's not too difficult to do yourself but, if others want to add up the plating and blasting charges, I think what I offer is a good deal. I did the same thing with the rear calipers and I've had a few people call and e-mail thanking me for the info. It makes me just as happy when they can successfully do it themselves as it does for me to do it for them... |
|
|
|
| redshift |
Jun 4 2005, 01:21 PM
Post
#18
|
|
Bless the Hell out of you! Group: Members Posts: 10,926 Joined: 29-June 03 Member No.: 869 |
(IMG:http://www.914world.com/bbs2/html/emoticons/smilie_pokal.gif)
I want that in my car, without all the hassle of actually moving my arms. (IMG:http://www.914world.com/bbs2/html/emoticons/smile.gif) PM Later Erok, I have the plan! M |
|
|
|
| IanStott |
Jun 4 2005, 02:49 PM
Post
#19
|
|
Member Group: Members Posts: 226 Joined: 13-June 04 From: Moncton,New Brunswick,Canada Member No.: 2,199 |
Very nice, do you do it for others? If so how much if I just send you the whole assembly?
Ian Stott |
|
|
|
| RD Evans |
Jun 4 2005, 02:57 PM
Post
#20
|
|
Member Group: Members Posts: 112 Joined: 20-July 03 From: Temple, TX Member No.: 923 |
Thanks Eric for the great write up! The most important thing I learned from it...send you my pedal cluster for rebuild!
|
|
|
|
|
1 User(s) are reading this topic (1 Guests and 0 Anonymous Users)
0 Members:

|
Lo-Fi Version | Time is now: 8th June 2026 - 10:32 PM |
Invision Power Board
v9.1.4 © 2026 IPS, Inc.