|
|
|
Porsche, and the Porsche crest are registered trademarks of Dr. Ing. h.c. F. Porsche AG.
This site is not affiliated with Porsche in any way. Its only purpose is to provide an online forum for car enthusiasts. All other trademarks are property of their respective owners. |
|
|

  |

| aharder |
 May 17 2018, 11:39 AM May 17 2018, 11:39 AM
Post
#1
|
|
Advanced Member  Group: Members Posts: 4,379 Joined: 6-September 11 From: Dallas Texas Member No.: 13,524 Region Association: Southwest Region |
Well I finally got enough time to start the replacement of bushings and axle bearings in my trailing arms and I found a problem with the inside mount on the right side of the car and the bracket on the right side of the car. The left side of the car looks good.
I'm looking for recommendations on the best way to repair this This picture is the inside 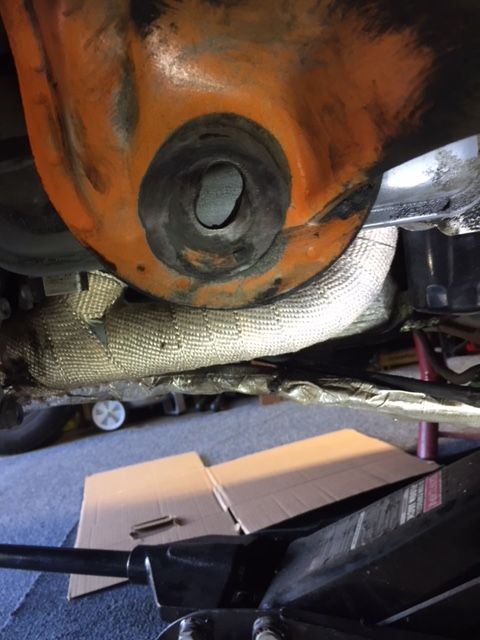 This is the outside  I'll be looking for another bracket in the classified section real soon. 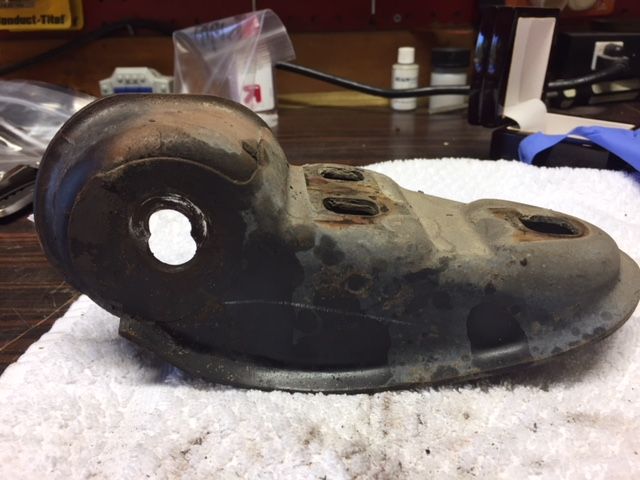 This is the nut and washer from the mount. 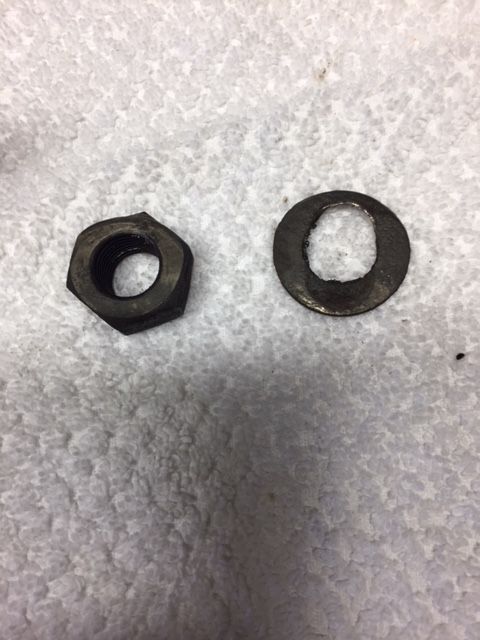 The bracket side did not have a washer under the nut, same for the left side of the car also, no washer on the bracket nut?? This is the inside of the bracket, what could have created this gouge in there? Anyone ever see anything like this? 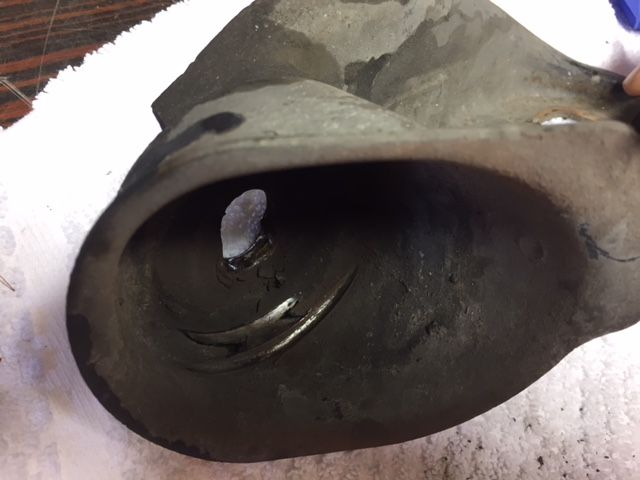 Suggestions? Thanks in advance |
   |

 
|
| tygaboy |
May 17 2018, 12:00 PM
Post
#2
|
|
914 Guru Group: Members Posts: 5,279 Joined: 6-October 15 From: Petaluma, CA Member No.: 19,241 Region Association: Northern California |
I would:
- Get another mount - Bolt it on, using its "good" hole to determine where the hole needs to be in the ear - Machine up what would essentially be a washer of the appropriate thickness with the hole sized to the factory opening (don't have that handy...) - Open up the hole in the ear (centered to the original hole) so the "washer" is a nice fit - Weld it the washer - Carefully grind the weld smooth - Celebrate with your favorite beverage! I'm sure others will weigh in with other suggestions. Best of luck with the repair! |
|
|
|
| flyer86d |
May 17 2018, 12:04 PM
Post
#3
|
|
Member Group: Members Posts: 422 Joined: 12-January 11 From: Corea, Maine Member No.: 12,585 Region Association: North East States |
Well, you have a choice. You could replace the suspension console in it’s entirety, or, if the existing one is solid and free of cracks, weld up the hole and redrill. The handling must have been diabolical!
Charlie |
|
|
|
| brant |
May 17 2018, 12:05 PM
Post
#4
|
|
914 Wizard Group: Members Posts: 11,618 Joined: 30-December 02 From: Colorado Member No.: 47 Region Association: Rocky Mountains |
its actually a very common problem
search on the website for "ovaled suspension mount" its repairable and absolutely needs to be. your rear alignment is shifting each time you accelerate and each time you turn or brake. its really bad for handling, and needs to be addressed. many members have repaired this in many different ways (I am a die hard fan of suspension bracing now after having the same situation 20 years ago) |
|
|
|
| tygaboy |
May 17 2018, 12:18 PM
Post
#5
|
|
914 Guru Group: Members Posts: 5,279 Joined: 6-October 15 From: Petaluma, CA Member No.: 19,241 Region Association: Northern California |
|
|
|
|
| Jeff Hail |
May 17 2018, 06:14 PM
Post
#6
|
|
Senior Member Group: Members Posts: 1,141 Joined: 3-May 07 From: LA/ CA Member No.: 7,712 |
QUOTE(tygaboy @ May 17 2018, 11:00 AM)  I would: - Get another mount - Bolt it on, using its "good" hole to determine where the hole needs to be in the ear - Machine up what would essentially be a washer of the appropriate thickness with the hole sized to the factory opening (don't have that handy...) - Open up the hole in the ear (centered to the original hole) so the "washer" is a nice fit - Weld it the washer - Carefully grind the weld smooth - Celebrate with your favorite beverage! I'm sure others will weigh in with other suggestions. Best of luck with the repair! Exactly! Don't use hardware store washers. Get something harder. Make a collar and bush the hole, weld both sides and grind the welds down. Then call Chris Foley and order a set of his mounts. Be done with it. |
|
|
|
| marksteinhilber |
May 17 2018, 06:27 PM
Post
#7
|
|
Member Group: Members Posts: 229 Joined: 18-October 12 From: Foothill Ranch, CA 92610 Member No.: 15,057 Region Association: Southern California |
QUOTE(tygaboy @ May 17 2018, 11:00 AM) I would: - Get another mount - Bolt it on, using its "good" hole to determine where the hole needs to be in the ear - Machine up what would essentially be a washer of the appropriate thickness with the hole sized to the factory opening (don't have that handy...) - Open up the hole in the ear (centered to the original hole) so the "washer" is a nice fit - Weld it the washer - Carefully grind the weld smooth - Celebrate with your favorite beverage! I'm sure others will weigh in with other suggestions. Best of luck with the repair! I agree, this is the repair I did, its all you need! |
|
|
|
| aharder |
May 18 2018, 11:05 AM
Post
#8
|
|
Advanced Member Group: Members Posts: 4,379 Joined: 6-September 11 From: Dallas Texas Member No.: 13,524 Region Association: Southwest Region |
Thanks for the feedback !!
|
|
|
|
| Rob-O |
May 18 2018, 08:11 PM
Post
#9
|
|
Senior Member Group: Members Posts: 1,251 Joined: 5-December 03 From: Mansfield, TX Member No.: 1,419 Region Association: Southwest Region |
And when you put the new nuts on the inside, by new ones from Porsche. They’re lock nuts. They have a slit in the side of them that causes the night to bind itself slightly on threads. Sometimes when they get replaced guys replace them with regular nuts or don’t torque them sufficiently.
|
|
|
|
| SirAndy |
May 18 2018, 09:31 PM
Post
#10
|
|
Resident German Group: Admin Posts: 41,611 Joined: 21-January 03 From: Oakland, Kalifornia Member No.: 179 Region Association: Northern California |
Weld up, re-drill, done ...
(IMG:style_emoticons/default/welder.gif) |
 |
|
| brant |
May 18 2018, 10:55 PM
Post
#11
|
|
914 Wizard Group: Members Posts: 11,618 Joined: 30-December 02 From: Colorado Member No.: 47 Region Association: Rocky Mountains |
QUOTE(Rob-O @ May 18 2018, 08:11 PM) And when you put the new nuts on the inside, by new ones from Porsche. They’re lock nuts. They have a slit in the side of them that causes the night to bind itself slightly on threads. Sometimes when they get replaced guys replace them with regular nuts or don’t torque them sufficiently. Last I checked new lock nuts were NLA I hope they are back but... |
|
|
|
| mgp4591 |
May 19 2018, 12:48 AM
Post
#12
|
|
914 Guru Group: Members Posts: 5,368 Joined: 1-August 12 From: Salt Lake City Ut Member No.: 14,748 Region Association: Intermountain Region |
QUOTE(aharder @ May 17 2018, 11:39 AM) Well I finally got enough time to start the replacement of bushings and axle bearings in my trailing arms and I found a problem with the inside mount on the right side of the car and the bracket on the right side of the car. The left side of the car looks good. I'm looking for recommendations on the best way to repair this This picture is the inside This is the outside I'll be looking for another bracket in the classified section real soon. This is the nut and washer from the mount. The bracket side did not have a washer under the nut, same for the left side of the car also, no washer on the bracket nut?? This is the inside of the bracket, what could have created this gouge in there? Anyone ever see anything like this? Suggestions? Thanks in advance I see you've already got hold of Mark on this... (IMG:style_emoticons/default/biggrin.gif) |
|
|
|
| ndfrigi |
May 19 2018, 01:51 AM
Post
#13
|
|
Advanced Member Group: Members Posts: 2,928 Joined: 21-August 11 From: Orange County Member No.: 13,474 Region Association: Southern California |
just curious! why is it the damaged is towards the bottom instead of above the original hole? I thought the damage should be on top because the weight of the car is against the trailing arm.
Or is it because the nuts on bought side of the trailing arm are not tight enough and when you brake, the body (both ear and bracket that holds the trailing arm) will lift that made the damage below the original hole. |
|
|
|
| Jeff Hail |
May 19 2018, 08:18 AM
Post
#14
|
|
Senior Member Group: Members Posts: 1,141 Joined: 3-May 07 From: LA/ CA Member No.: 7,712 |
QUOTE(ndfrigi @ May 19 2018, 12:51 AM) just curious! why is it the damaged is towards the bottom instead of above the original hole? I thought the damage should be on top because the weight of the car is against the trailing arm. Or is it because the nuts on bought side of the trailing arm are not tight enough and when you brake, the body (both ear and bracket that holds the trailing arm) will lift that made the damage below the original hole. I noticed the same thing, how would the shaft get past the narrow center of the eight on the pivot bracket? Modified camber?, bent trailing arm, pickup tweaked or a larger issue under the surface. That would be about 10mm worth of shim stack. The training arm bushing spigots been grinding away at it on the inside bottom. |
|
|
|
| ndfrigi |
May 19 2018, 10:07 AM
Post
#15
|
|
Advanced Member Group: Members Posts: 2,928 Joined: 21-August 11 From: Orange County Member No.: 13,474 Region Association: Southern California |
for sale outer trailing arm bracket from Bruce.
http://www.914world.com/bbs2/index.php?sho...=327241&hl= |
|
|
|
|
1 User(s) are reading this topic (1 Guests and 0 Anonymous Users)
0 Members:

|
Lo-Fi Version | Time is now: 2nd May 2024 - 11:12 PM |
Invision Power Board
v9.1.4 © 2024 IPS, Inc.