|
|
|
Porsche, and the Porsche crest are registered trademarks of Dr. Ing. h.c. F. Porsche AG.
This site is not affiliated with Porsche in any way. Its only purpose is to provide an online forum for car enthusiasts. All other trademarks are property of their respective owners. |
|
|

  |

| mb911 |
 Oct 28 2018, 09:46 AM Oct 28 2018, 09:46 AM
Post
#181
|
|
914 Guru  Group: Members Posts: 7,789 Joined: 2-January 09 From: Burlington wi Member No.: 9,892 Region Association: Upper MidWest |
Travis looks great.. Good job.
|
   |

 
|
| bbrock |
Oct 28 2018, 12:06 PM
Post
#182
|
|
914 Guru Group: Members Posts: 5,269 Joined: 17-February 17 From: Montana Member No.: 20,845 Region Association: Rocky Mountains |
I have to admit, after replacing a rusting frunk pan, it makes me cringe to see a perfectly good trunk cut open, but you did this one proud. (IMG:style_emoticons/default/thumb3d.gif)
As for using a shrinking disc, a monkey can do it. I'm proof of that! |
|
|
|
| TravisNeff |
Oct 29 2018, 10:05 PM
Post
#183
|
|
914 Guru Group: Members Posts: 5,082 Joined: 20-March 03 From: Mesa, AZ Member No.: 447 Region Association: Southwest Region |
Thanks for the kind words and advice everyone, I appreciate it.
I ordered a shrinking disk and it should get here by the weekend. In the meantime I took Chris' advice and I hammered and dollied the perimeter weld lines. Amazing that you relieve a little of tension and the floor starts to firm up. I ended up with a few more waves than when I started. I am not worried and believe that I can get it all straight in the end. I also welded in a cross brace and a 16g plate underneath. I was able to save my tow hook and will weld that on the bottom of the floor. There is no interference with the lower duct and it is all hidden away. Attached image(s) 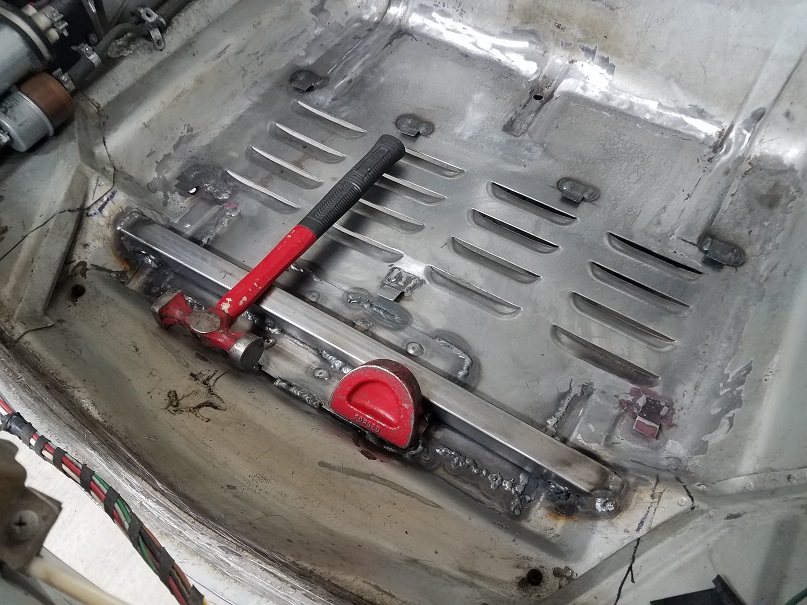
|
|
|
|
| TravisNeff |
Nov 1 2018, 10:06 PM
Post
#184
|
|
914 Guru Group: Members Posts: 5,082 Joined: 20-March 03 From: Mesa, AZ Member No.: 447 Region Association: Southwest Region |
I ventured into the unknown. Not many people share pics of the frame rail penetration from all angles. I started with 2 1.5" holes stacked. Turns out where I cut on the outside was close, but didn't match the inside. Also I did not cut far forward enough to clear the J tube.
Time to make lemonade. I ground down the flange on the front of the J Tube. Then enlarged the holes a little bit, and then a bit more. I will have to patch where I did my exploration cuts. I made a rectangular duct and had the idea that I could build in a splash shield along the front. Both -12 hoses fit, fittings passing through will be tight, but not impossible Attached image(s) 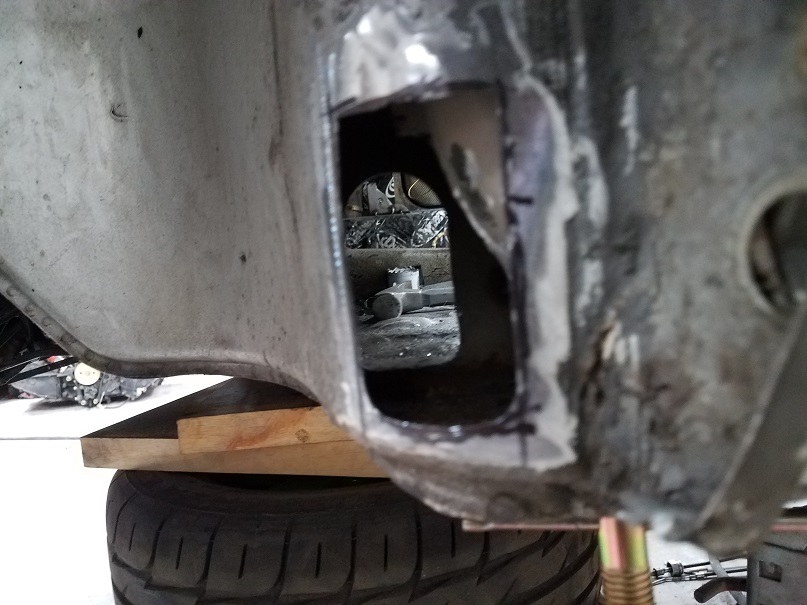 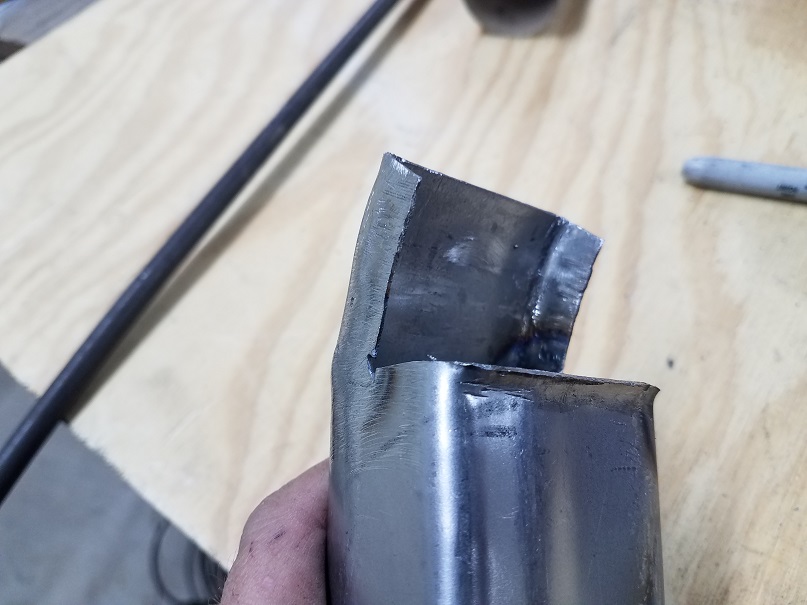 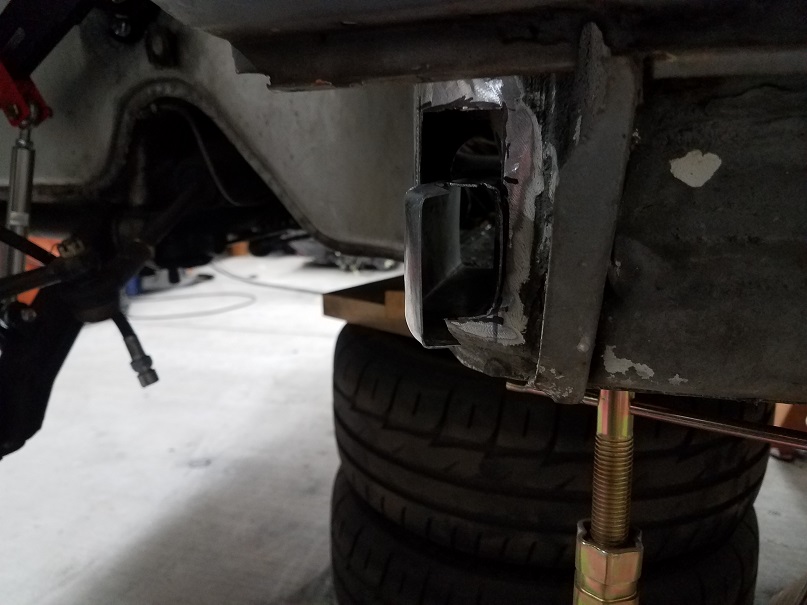 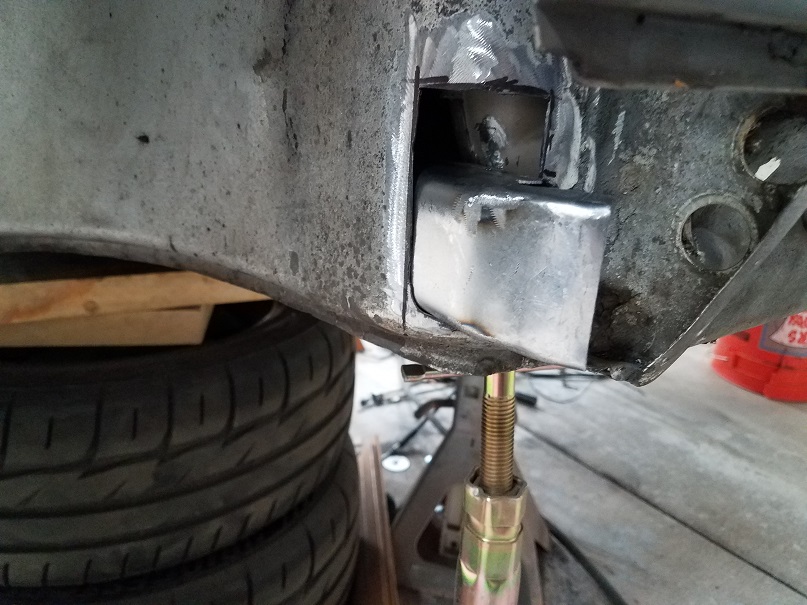
|
|
|
|
| TravisNeff |
Nov 2 2018, 03:54 PM
Post
#185
|
|
914 Guru Group: Members Posts: 5,082 Joined: 20-March 03 From: Mesa, AZ Member No.: 447 Region Association: Southwest Region |
I think I am turning into one of them tweakers.
Attached image(s) 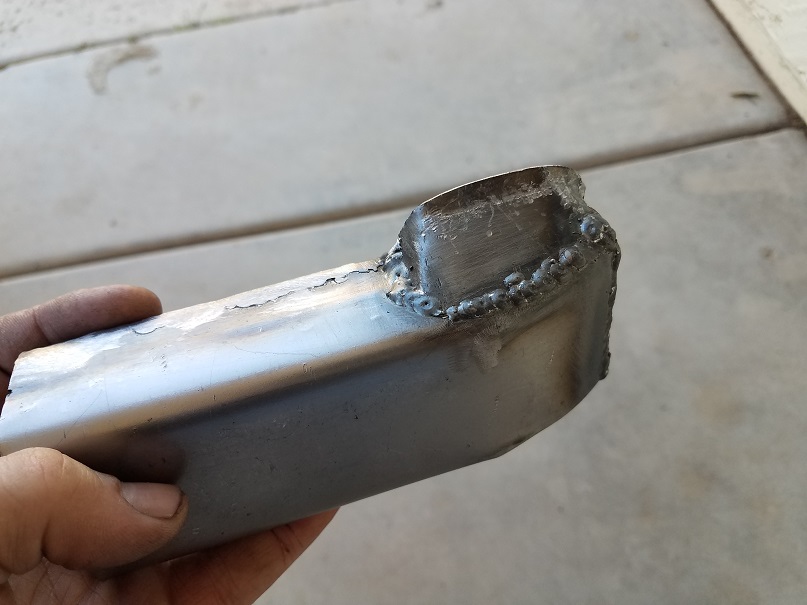 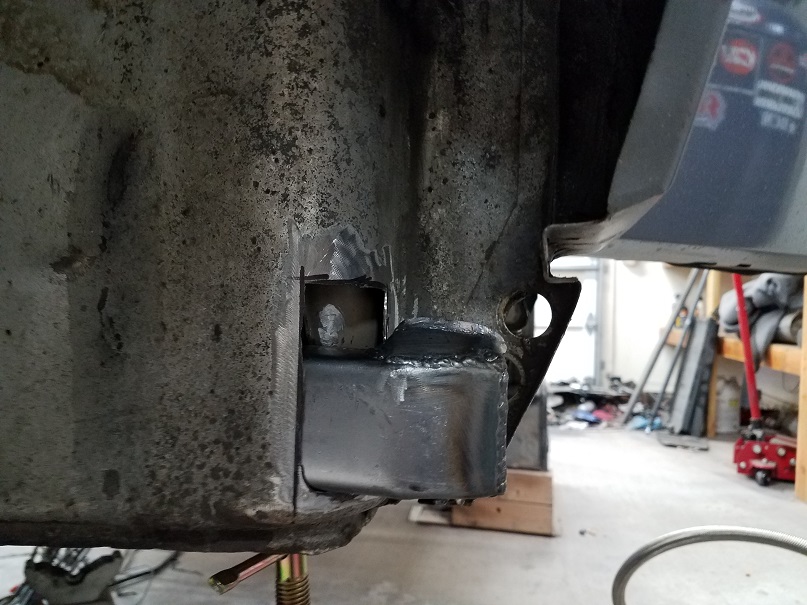 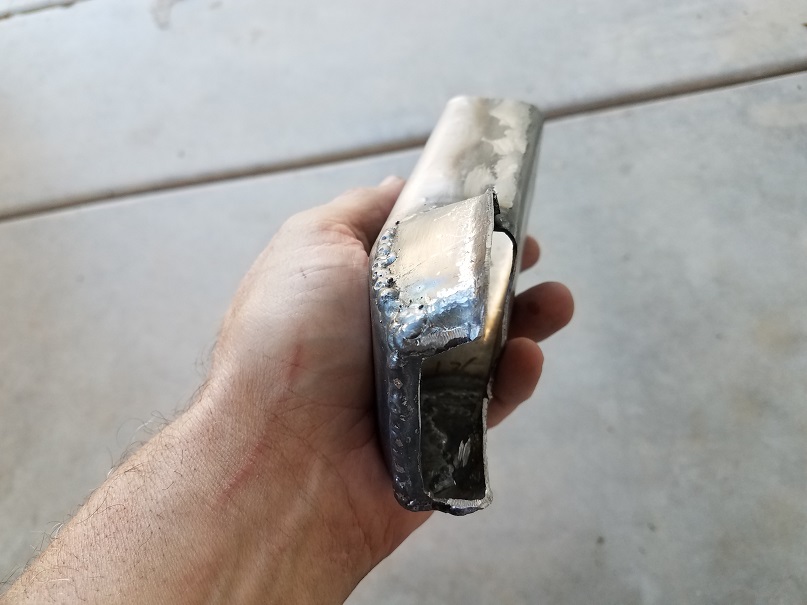
|
|
|
|
| 914forme |
Nov 3 2018, 07:35 AM
Post
#186
|
|
Times a wastin', get wrenchin'! Group: Members Posts: 3,899 Joined: 24-July 04 From: Dayton, Ohio Member No.: 2,388 Region Association: None |
Welcome to the dark side of this hobby. (IMG:style_emoticons/default/happy11.gif) You by no means have it as bad as some of us. Your new in this journey and well their are lots of us here to help you transgress into a make 3 times sort of guy, and never be quite satisfied with the end result.
. . . . . . . . . . I will give you a hint here! Make it once, get it on the car, move on to the next thing. There is always time to go back and redo it. Or you might not have to (IMG:style_emoticons/default/confused24.gif) because the joy of driving might just replace the joy of perfections. . . . It will never be perfect, it will never meet your own standards, it will never meet the standards of the Instagram trolls who see a perfect Weave TIG weld in Titanium and wonder why they can't do that with a MIG, when they have only welded for 2 weeks tops in total pull the trigger time. . . . . I want to say thank you for posting the details, the good and the bad, being willing to put it out there. As of today I will not get any 914 work done. So I am living via build threads like these. Thank you for putting it out here, thank you for taking the risk and asking the questions. Thank you for allowing us to be part of your journey. Enjoy the ride. . . . . . I do have a bit of fabrication and welding in my plans for today. But that involves putting a new discharge shoot on the 72" zero turn that I am re-powering also. Yes I do engine swaps on my power equipment also. I got it bad, maybe I need to bolt something on one of my 914s....... |
|
|
|
| mb911 |
Nov 3 2018, 08:15 AM
Post
#187
|
|
914 Guru Group: Members Posts: 7,789 Joined: 2-January 09 From: Burlington wi Member No.: 9,892 Region Association: Upper MidWest |
QUOTE(914forme @ Nov 3 2018, 05:35 AM)  Welcome to the dark side of this hobby. (IMG:style_emoticons/default/happy11.gif) You by no means have it as bad as some of us. Your new in this journey and well their are lots of us here to help you transgress into a make 3 times sort of guy, and never be quite satisfied with the end result. . . . . . . . . . . I will give you a hint here! Make it once, get it on the car, move on to the next thing. There is always time to go back and redo it. Or you might not have to (IMG:style_emoticons/default/confused24.gif) because the joy of driving might just replace the joy of perfections. . . . It will never be perfect, it will never meet your own standards, it will never meet the standards of the Instagram trolls who see a perfect Weave TIG weld in Titanium and wonder why they can't do that with a MIG, when they have only welded for 2 weeks tops in total pull the trigger time. . . . . I want to say thank you for posting the details, the good and the bad, being willing to put it out there. As of today I will not get any 914 work done. So I am living via build threads like these. Thank you for putting it out here, thank you for taking the risk and asking the questions. Thank you for allowing us to be part of your journey. Enjoy the ride. . . . . . I do have a bit of fabrication and welding in my plans for today. But that involves putting a new discharge shoot on the 72" zero turn that I am re-powering also. Yes I do engine swaps on my power equipment also. I got it bad, maybe I need to bolt something on one of my 914s....... (IMG:style_emoticons/default/agree.gif) And yes Stephen bolt something on the 914.. |
|
|
|
| TravisNeff |
Nov 3 2018, 02:33 PM
Post
#188
|
|
914 Guru Group: Members Posts: 5,082 Joined: 20-March 03 From: Mesa, AZ Member No.: 447 Region Association: Southwest Region |
Thanks for the encouragement Stephen. The further along I go, I keep repeating myself "nothing is perfect" and keep the momentum going.
Patched in the extra cutout. A 3" piece of PVC pipe I had laying around is just about right for replicating the bent around the corner of the tub. Had to trim the patch piece to fit the rectangular tube. Cleaned up the welds on my tweaker tube and its about ready to be glued in. Amazing that this started out a flat piece of sheet metal. Attached image(s) 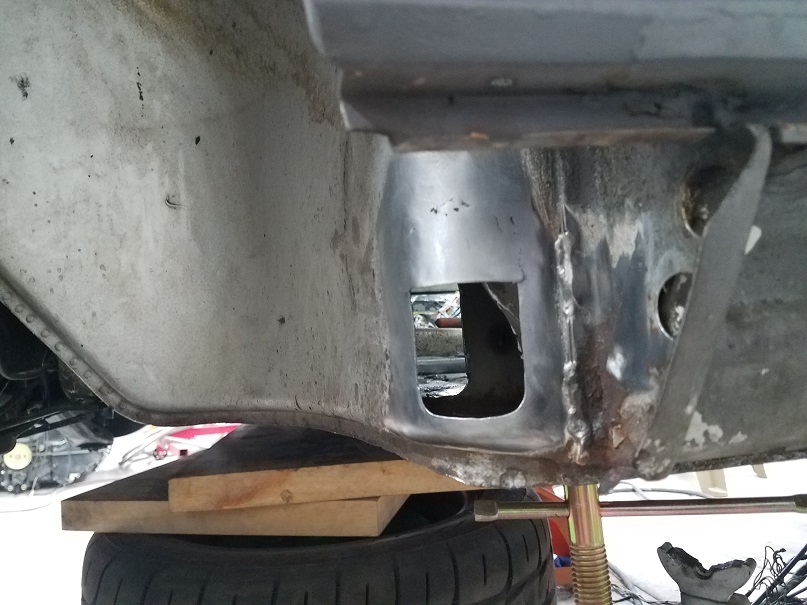  
|
|
|
|
| TravisNeff |
Nov 3 2018, 05:15 PM
Post
#189
|
|
914 Guru Group: Members Posts: 5,082 Joined: 20-March 03 From: Mesa, AZ Member No.: 447 Region Association: Southwest Region |
Lets see if the lines fit. I first cut the fuel evap holes into a big oval, that seemed to work ok. The turn after the first sill support to penetrate the cabin didn't make me feel all squiggly inside, so I cut the support out. It had some rust going on anyways, so I shed no tears.
Attached image(s) 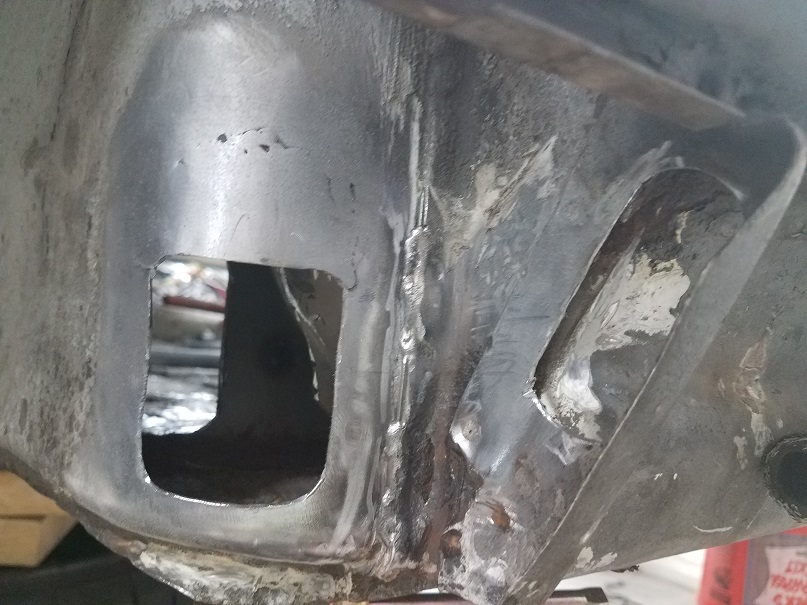 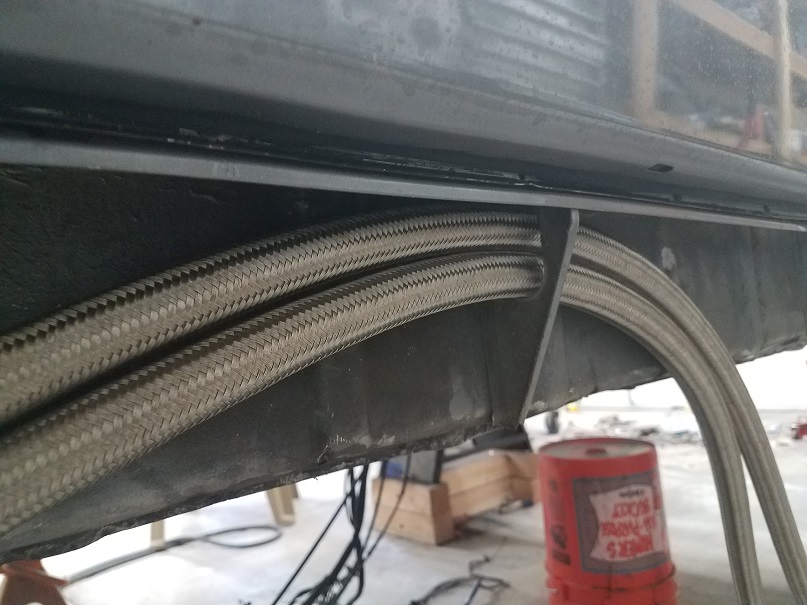 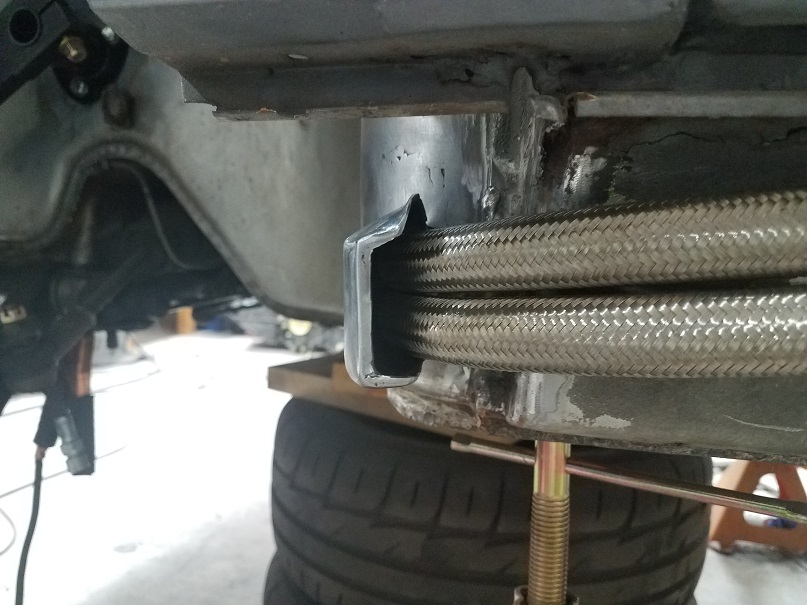 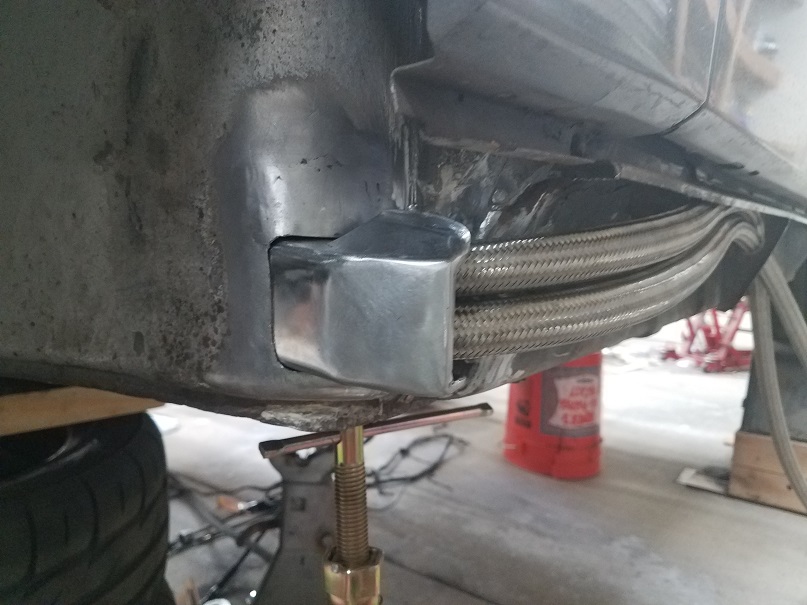
|
|
|
|
| bbrock |
Nov 3 2018, 05:26 PM
Post
#190
|
|
914 Guru Group: Members Posts: 5,269 Joined: 17-February 17 From: Montana Member No.: 20,845 Region Association: Rocky Mountains |
You HAVE to be happy with that!
|
|
|
|
| TravisNeff |
Nov 3 2018, 05:43 PM
Post
#191
|
|
914 Guru Group: Members Posts: 5,082 Joined: 20-March 03 From: Mesa, AZ Member No.: 447 Region Association: Southwest Region |
Yes I am very happy, its the coolest goddamn thing I have done so far.
|
|
|
|
| live free & drive |
Nov 3 2018, 06:08 PM
Post
#192
|
|
Member Group: Members Posts: 216 Joined: 29-June 16 From: New Hampshire Member No.: 20,159 Region Association: None |
You might try some of these PEX metal 90deg bend supports they will keep your hose from flattening and losing sectional area:
https://www.pexsuperstore.com/pex-accessori...ort-elbows.html They also come in 5/8" a 1" will take 1.5 OD tubing - 3/4" takes 1"OD tubing etc. They can be put on and taken off in situ. Several companies make them the Uponor brand is probably best; below is a 3/4" support, they lock on with friction: 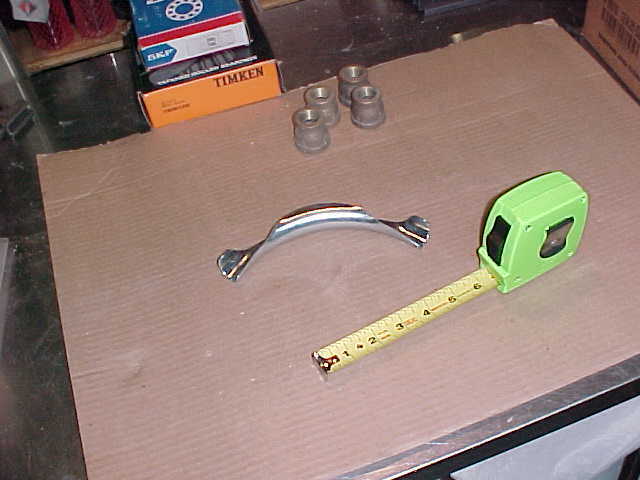 |
|
|
|
| sixnotfour |
Nov 3 2018, 10:32 PM
Post
#193
|
|
914 Wizard Group: Members Posts: 11,275 Joined: 12-September 04 Member No.: 2,744 Region Association: NineFourteenerVille |
https://www.summitracing.com/parts/ear-773412erl/overview/
Earl's Performance Hose Inner Support Springs |
|
|
|
| 914forme |
Nov 4 2018, 08:44 AM
Post
#194
|
|
Times a wastin', get wrenchin'! Group: Members Posts: 3,899 Joined: 24-July 04 From: Dayton, Ohio Member No.: 2,388 Region Association: None |
Okay learned something new today, Never thought that SS line would collapse in a tight bend. I knew they had a recommended bend radius.
Filled away |
|
|
|
| TravisNeff |
Nov 4 2018, 10:48 AM
Post
#195
|
|
914 Guru Group: Members Posts: 5,082 Joined: 20-March 03 From: Mesa, AZ Member No.: 447 Region Association: Southwest Region |
I am not sure what you guys are saying.
One post is saying I should look at external strain relief to make that 90 degree bend. The next post I think is being stated that an internal wire strain relief is what you want, rather than external. But not specifically that I need any strain relief at all (for either post). Minimum bend radius for -12 standard braided hose is 4.5 inches. What the hell does that mean? I have no clue so I looked it up. =90/360*2*3.14*4.5 Which comes out to 7.065 inches of length required to make a 90 degree bend. I am not sure if this is right or not. |
|
|
|
| TravisNeff |
Nov 4 2018, 11:02 AM
Post
#196
|
|
914 Guru Group: Members Posts: 5,082 Joined: 20-March 03 From: Mesa, AZ Member No.: 447 Region Association: Southwest Region |
Attempting to measure my overall length of the bend.
Attached image(s) 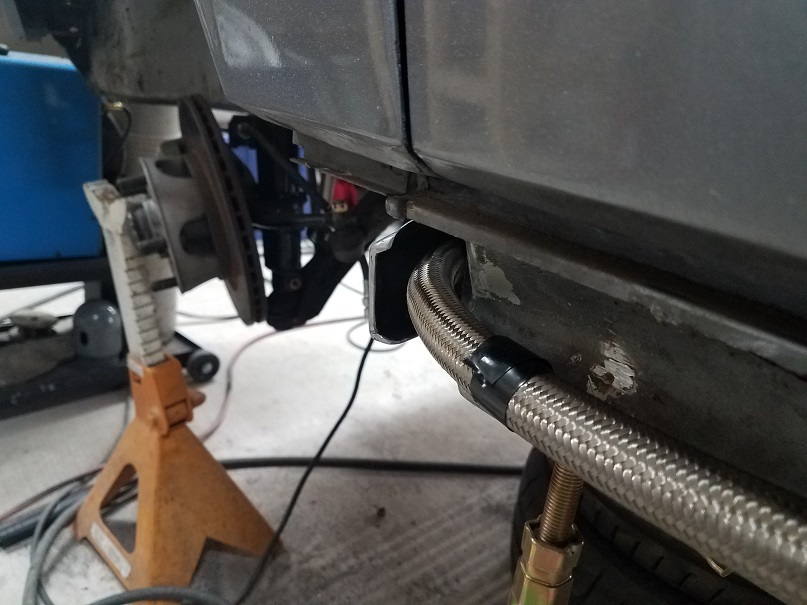  
|
|
|
|
| sixnotfour |
Nov 4 2018, 11:27 AM
Post
#197
|
|
914 Wizard Group: Members Posts: 11,275 Joined: 12-September 04 Member No.: 2,744 Region Association: NineFourteenerVille |
I am implying its the rubber that will collapse, that is why you support from the inside ... you will probably be fine..but cheap insurance...
I know alot of peeps have never had a problem... esp with new line and its basically a push system..no sucking made you (IMG:style_emoticons/default/idea.gif) (IMG:style_emoticons/default/happy11.gif) 7.0675 |
|
|
|
| TravisNeff |
Nov 4 2018, 11:32 AM
Post
#198
|
|
914 Guru Group: Members Posts: 5,082 Joined: 20-March 03 From: Mesa, AZ Member No.: 447 Region Association: Southwest Region |
I agree that would be cheap insurance. I just don't know how I would fish that wire down 3-4 feet of hose, that bend is right in the middle of the run. You monkeys had me up worrying about it all night and first thing this morning (IMG:style_emoticons/default/laugh.gif) I then realized that maybe I should try and find out if I need it at all.
|
|
|
|
| sixnotfour |
Nov 4 2018, 11:38 AM
Post
#199
|
|
914 Wizard Group: Members Posts: 11,275 Joined: 12-September 04 Member No.: 2,744 Region Association: NineFourteenerVille |
|
|
|
|
| bbrock |
Nov 4 2018, 11:42 AM
Post
#200
|
|
914 Guru Group: Members Posts: 5,269 Joined: 17-February 17 From: Montana Member No.: 20,845 Region Association: Rocky Mountains |
QUOTE(TravisNeff @ Nov 4 2018, 11:32 AM) I agree that would be cheap insurance. I just don't know how I would fish that wire down 3-4 feet of hose, that bend is right in the middle of the run. You monkeys had me up worrying about it all night and first thing this morning (IMG:style_emoticons/default/laugh.gif) I then realized that maybe I should try and find out if I need it at all. I'm a little confused about why it has to be an internal spring. In order to collapse, the cross section of the hose has to oval. I would think a strong spring tightly fitting the outside diameter of the hose should keep the cross section of the bend round and free flowing just as well, maybe even better since there is nothing inside restricting flow. I've seen that approach used in other applications. A quick Google turned up these: https://www.new-line.com/clamps/hose-wrap-s...tainless-spring Might be an alternative? (IMG:style_emoticons/default/confused24.gif) |
|
|
|
|
1 User(s) are reading this topic (1 Guests and 0 Anonymous Users)
0 Members:

|
Lo-Fi Version | Time is now: 3rd July 2026 - 10:16 AM |
Invision Power Board
v9.1.4 © 2026 IPS, Inc.