|
|
|
Porsche, and the Porsche crest are registered trademarks of Dr. Ing. h.c. F. Porsche AG.
This site is not affiliated with Porsche in any way. Its only purpose is to provide an online forum for car enthusiasts. All other trademarks are property of their respective owners. |
|
|


| 914 RZ-1 |
 Jul 11 2018, 09:55 PM Jul 11 2018, 09:55 PM
Post
#121
|
|
Porsche Padawan  Group: Members Posts: 684 Joined: 17-December 14 From: Santa Clarita, CA Member No.: 18,230 Region Association: Southern California |
So I painted my car. Got some orange peel, thought I'd see if anyone had ideas for getting rid of/minimizing it.
After painting: 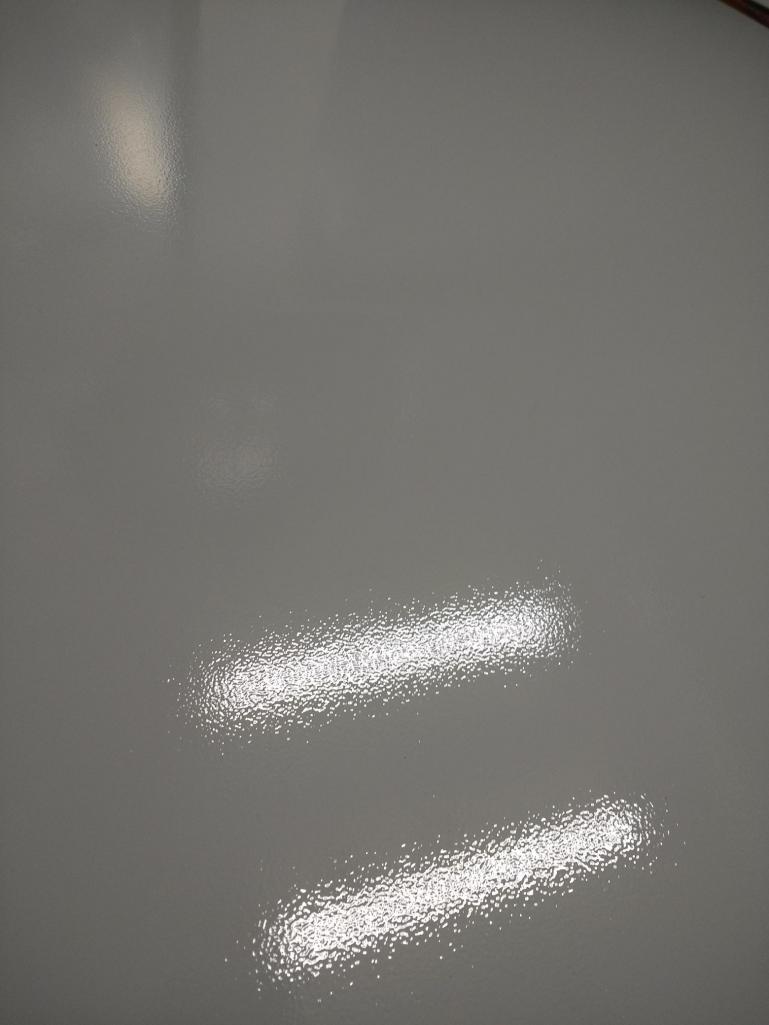 After sanding with 1000 grit. The lighter areas are where I sanded, the darker areas are the lower points of the orange peel: 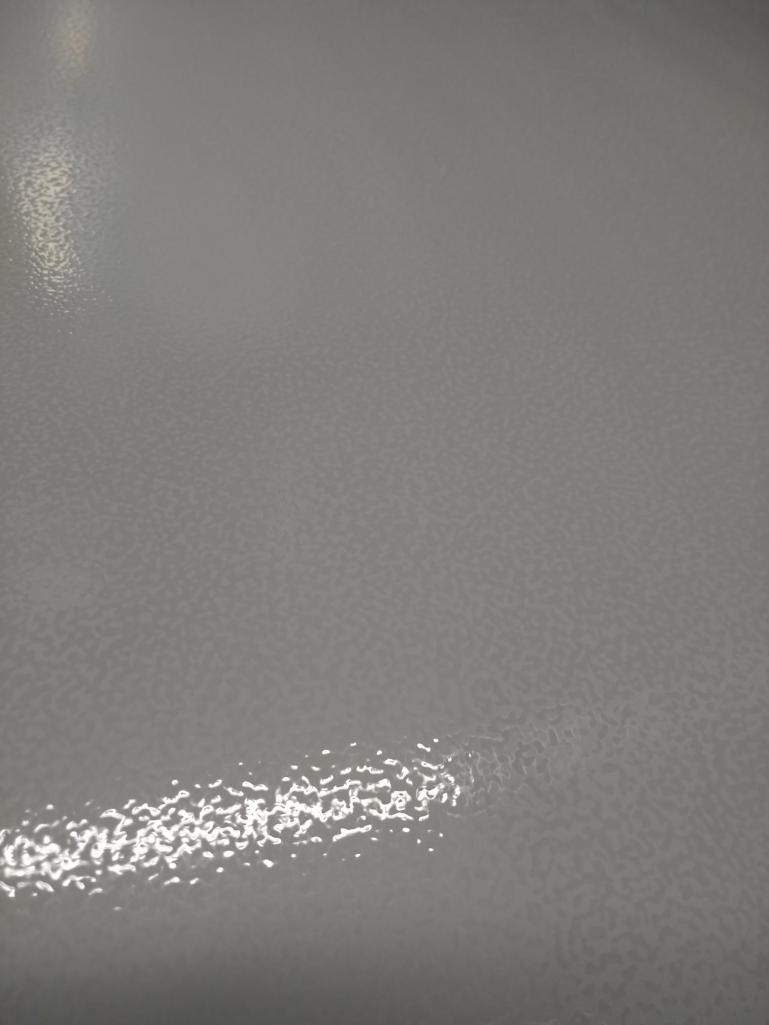 Option 1: I'm thinking I need to go to 800 grit, then 1000, 1500, 2000, then polish. Before I do I thought I'd see if anyone else thinks this is a good idea based on what they may have done. Option 2: I can re-paint it. I'm thinking I will sand with 400 grit to rough up the surface and then re-spray. Option 3: I can polish it more, but the orange peel is still noticeable on the smaller pieces I've tried. I used a Torq X polisher, white pad, Chemical Guys V32 polish. I thought it might get smoother as I polished it with finer and finer pads/compounds, but I don't want to burn thru the paint. I put 3 coats of paint on. |
   |

 
|
Posts in this topic
914 RZ-1 my adventures in painting the car thread Jul 11 2018, 09:55 PM porschetub Oh dear,let it dry and start again,your paint is t... Jul 11 2018, 11:30 PM Front yard mechanic Option 2 my vote Jul 12 2018, 07:30 AM Cairo94507 That's a bit of orange peel for sure. I would... Jul 12 2018, 07:38 AM burton73 You are going to need to go through the grits by s... Jul 12 2018, 10:24 AM Andyrew Single stage? What paint are you using?
Go 30% m... Jul 12 2018, 11:05 AM Andyrew What temp reducer are you using? and how hot was i... Jul 12 2018, 11:06 AM mb911 I would wet sand again.. Then see what you have le... Jul 12 2018, 11:08 AM jmitro definitely need to wet sand with finer and finer g... Jul 12 2018, 11:33 AM 914 RZ-1 Thanks to all. I appreciate you input.
I'm usi... Jul 12 2018, 06:53 PM
porschetub Oh dear,let it dry and start again,your paint is t... Jul 11 2018, 11:30 PM Front yard mechanic Option 2 my vote Jul 12 2018, 07:30 AM Cairo94507 That's a bit of orange peel for sure. I would... Jul 12 2018, 07:38 AM burton73 You are going to need to go through the grits by s... Jul 12 2018, 10:24 AM Andyrew Single stage? What paint are you using?
Go 30% m... Jul 12 2018, 11:05 AM Andyrew What temp reducer are you using? and how hot was i... Jul 12 2018, 11:06 AM mb911 I would wet sand again.. Then see what you have le... Jul 12 2018, 11:08 AM jmitro definitely need to wet sand with finer and finer g... Jul 12 2018, 11:33 AM 914 RZ-1 Thanks to all. I appreciate you input.
I'm usi... Jul 12 2018, 06:53 PM
 Spoke
It was in the 80's when I painted. I probably... Jul 16 2018, 11:08 AM Olympic 914 many years ago I clipped the front end of my teene... Jul 12 2018, 07:20 PM 914 RZ-1 Here is the result after wet-sanding with 800-1000... Jul 13 2018, 12:32 PM mb911
Here is the result after wet-sanding with 800-100... Jul 13 2018, 03:20 PM mepstein
Here is the result after wet-sanding with 800-10... Jul 13 2018, 03:30 PM ValcoOscar Yeah Jeff...I kinda think you need more paint also... Jul 13 2018, 03:31 PM ConeDodger Option 4: peel it and eat it. :rotfl: Jul 13 2018, 06:45 PM Andyrew Hand sand only. No DA sanding for color sanding. Jul 13 2018, 07:55 PM 914GT Also, use a guide coat to show missed sanding scra... Jul 13 2018, 08:46 PM 914 RZ-1 Here's the latest. I sanded with 400, cleaned ... Jul 16 2018, 10:23 AM Andyrew Flash time starts from when the paint first leaves... Jul 16 2018, 12:19 PM 914 RZ-1 I just to-read this and noticed that some people t... Jul 16 2018, 02:44 PM Dougster As far as the paint mix, only do what the tech she... Jul 16 2018, 04:00 PM Andyrew I think I spray at 20-25psi. With the nozzle a str... Jul 16 2018, 04:00 PM burton73
I think I spray at 20-25psi. With the nozzle a st... Jul 16 2018, 08:21 PM 914 RZ-1 Here's the latest:
Still a bit of orange peel... Jul 16 2018, 10:11 PM 914 RZ-1 One other thing: how long are the face mask filter... Jul 16 2018, 10:34 PM Andyrew Primer about 20 sessions. Not much VOC in the air.... Jul 16 2018, 11:02 PM porschetub Brave move going to that system for DIY newbie,cur... Jul 17 2018, 12:58 AM 914 RZ-1 So my a-hole neighbor called the HOA, the city and... Jul 25 2018, 06:33 PM bbrock That right there is why I live in the boonies, but... Jul 25 2018, 06:53 PM 914 RZ-1 So, I'm still getting some orange peel. I thou... Jul 31 2018, 04:17 PM burton73 How long are you letting it sit before you color s... Jul 31 2018, 04:29 PM Andyrew 1. Yes.
2. Pinholes are typically from something... Jul 31 2018, 04:30 PM burton73 After you color sand, wipe it clean and look at it... Jul 31 2018, 04:33 PM ValcoOscar Jeff-
Keep in mind, our current HOT weather patte... Jul 31 2018, 04:41 PM Perry Kiehl If you have a contaminant on the surface no amount... Jul 31 2018, 05:09 PM worn
If you have a contaminant on the surface no amoun... Jul 31 2018, 05:23 PM 914 RZ-1 Thanks all. Here are my responses:
I'm lettin... Jul 31 2018, 05:14 PM 914GT Don’t overlook the quality of your compressed ai... Jul 31 2018, 05:39 PM 914 RZ-1
Don’t overlook the quality of your compressed a... Jul 31 2018, 06:03 PM Andyrew
[quote name='914GT' post='2634214' date='Jul 31 2... Aug 1 2018, 11:09 AM 914 RZ-1
[quote name='914GT' post='2634214' date='Jul 31 ... Aug 1 2018, 12:54 PM mb911 Prepsol should be allowed to dry /evaporate before... Jul 31 2018, 05:54 PM 914 RZ-1 Here's the latest:
I painted both doors. I pu... Aug 1 2018, 10:06 AM Andyrew What kind of gun with what size tip are you sprayi... Aug 1 2018, 11:04 AM 914 RZ-1
What kind of gun with what size tip are you spray... Aug 1 2018, 12:52 PM Andyrew
What kind of gun with what size tip are you spra... Aug 1 2018, 01:08 PM 914 RZ-1
[quote name='914 RZ-1' post='2634443' date='... Aug 1 2018, 08:30 PM Costa05 I thought I read in one of your posts that you wer... Aug 1 2018, 12:22 PM 914 RZ-1
I thought I read in one of your posts that you we... Aug 1 2018, 12:59 PM Costa05
I thought I read in one of your posts that you w... Aug 1 2018, 02:27 PM aggiezig
Thats great. Check out the Eastwood videos on you... Aug 1 2018, 02:28 PM bbrock
Thats great. Check out the Eastwood videos on yo... Aug 1 2018, 02:42 PM aggiezig You already have a ton of great feedback on this t... Aug 1 2018, 02:25 PM 914 RZ-1
You already have a ton of great feedback on this ... Aug 1 2018, 08:37 PM 914 RZ-1 +3 on Kevin Tetz. I learned most of this from his ... Aug 1 2018, 08:41 PM mepstein
+3 on Kevin Tetz. I learned most of this from his... Aug 2 2018, 07:29 AM Olympic 914
+3 on Kevin Tetz. I learned most of this from his... Aug 2 2018, 09:00 AM mbseto Man this is a clinic. Almost makes me want to try... Aug 1 2018, 10:06 PM 914 RZ-1
Man this is a clinic. Almost makes me want to tr... Aug 2 2018, 06:23 PM Perry Kiehl FWIW, I have separate air hoses for only paint use... Aug 2 2018, 07:18 AM Rav914
Man this is a clinic. Almost makes me want to tr... Aug 2 2018, 09:17 AM 914 RZ-1 I found it! Thanks! :beer2:
https://www... Aug 2 2018, 06:17 PM aggiezig I think that with enough trial/error & practic... Aug 2 2018, 08:39 PM 914 RZ-1 Nice job! Yeah, it's taking me lots of pra... Aug 8 2018, 12:18 PM 914dave I had the same wrapped up in my paint. Tools incl... Aug 4 2018, 07:34 AM 914 RZ-1 So I got the suggested filter:
https://www.harborf... Aug 8 2018, 12:15 PM Andyrew
So I got the suggested filter:
https://www.harbor... Aug 8 2018, 12:42 PM 914 RZ-1 You need to put your regulator after the filter. Y... Aug 8 2018, 05:57 PM 914GT You are setting your pressure at the gun with the ... Aug 8 2018, 07:05 PM 914 RZ-1
You are setting your pressure at the gun with the... Aug 9 2018, 01:54 PM Andyrew Thinking back, I do remember having this issue onc... Aug 9 2018, 02:01 PM 914 RZ-1 I've got similar orange peel on my hoods; were... Aug 9 2018, 05:19 PM Andyrew Note. Spray the body side in one go, Not panel by ... Aug 9 2018, 02:03 PM 914 RZ-1 Yeah, that's what I'm doing. I actually ha... Aug 9 2018, 05:24 PM Andyrew Also noticed this review online.
"We review... Aug 9 2018, 02:05 PM 914 RZ-1 Wish I'd bothered to read the reviews. Maybe I... Aug 9 2018, 05:21 PM 914 RZ-1 I'm STILL getting orange peel.
To review, here... Aug 19 2018, 05:46 PM 914 RZ-1 A picture after wet-sanding with 800 for your view... Aug 19 2018, 05:54 PM Andyrew
A picture after wet-sanding with 800 for your vie... Aug 19 2018, 06:26 PM 914 RZ-1
A picture after wet-sanding with 800 for your vi... Aug 19 2018, 06:32 PM dakotaewing Please show pictures of your compressor, hoses and... Aug 19 2018, 06:01 PM 914 RZ-1
Please show pictures of your compressor, hoses an... Aug 19 2018, 06:31 PM Andyrew Ya, I put 7 coats on mine when I did it. Took 3 fo... Aug 19 2018, 06:55 PM Andyrew And I agree with temp. If your starting to spray a... Aug 19 2018, 07:01 PM dakotaewing Upon initial review, it would appear that part of ... Aug 19 2018, 07:54 PM 914 RZ-1
Upon initial review, it would appear that part of... Aug 19 2018, 08:54 PM Atech
[quote name='dakotaewing' post='2640512' date='Au... Aug 20 2018, 01:40 AM Atech
[i][quote name='dakotaewing' post='2640512' date... Aug 20 2018, 01:52 AM dakotaewing The water trap on the wall will only catch a small... Aug 19 2018, 09:35 PM aggiezig Lots of good tips about air and what not, but base... Aug 20 2018, 08:22 AM 914 RZ-1 I have been told that compressed air can be very h... Aug 26 2018, 02:54 PM mb911
I have been told that compressed air can be very ... Aug 26 2018, 03:17 PM porschetub
[quote name='914 RZ-1' post='2642822' date='... Aug 26 2018, 05:37 PM ConeDodger Get rid of that first length of hose of the compre... Aug 26 2018, 04:03 PM porschetub
Get rid of that first length of hose of the compr... Aug 27 2018, 12:22 AM IronHillRestorations I'll 2nd Ben's opinion. I think you proba... Aug 26 2018, 04:39 PM IronHillRestorations I've had more than one painter tell me that ea... Aug 26 2018, 08:30 PM gereed75 Lots of great info here. Don’t get overwhelmed. ... Aug 27 2018, 07:26 AM
Spoke
It was in the 80's when I painted. I probably... Jul 16 2018, 11:08 AM Olympic 914 many years ago I clipped the front end of my teene... Jul 12 2018, 07:20 PM 914 RZ-1 Here is the result after wet-sanding with 800-1000... Jul 13 2018, 12:32 PM mb911
Here is the result after wet-sanding with 800-100... Jul 13 2018, 03:20 PM mepstein
Here is the result after wet-sanding with 800-10... Jul 13 2018, 03:30 PM ValcoOscar Yeah Jeff...I kinda think you need more paint also... Jul 13 2018, 03:31 PM ConeDodger Option 4: peel it and eat it. :rotfl: Jul 13 2018, 06:45 PM Andyrew Hand sand only. No DA sanding for color sanding. Jul 13 2018, 07:55 PM 914GT Also, use a guide coat to show missed sanding scra... Jul 13 2018, 08:46 PM 914 RZ-1 Here's the latest. I sanded with 400, cleaned ... Jul 16 2018, 10:23 AM Andyrew Flash time starts from when the paint first leaves... Jul 16 2018, 12:19 PM 914 RZ-1 I just to-read this and noticed that some people t... Jul 16 2018, 02:44 PM Dougster As far as the paint mix, only do what the tech she... Jul 16 2018, 04:00 PM Andyrew I think I spray at 20-25psi. With the nozzle a str... Jul 16 2018, 04:00 PM burton73
I think I spray at 20-25psi. With the nozzle a st... Jul 16 2018, 08:21 PM 914 RZ-1 Here's the latest:
Still a bit of orange peel... Jul 16 2018, 10:11 PM 914 RZ-1 One other thing: how long are the face mask filter... Jul 16 2018, 10:34 PM Andyrew Primer about 20 sessions. Not much VOC in the air.... Jul 16 2018, 11:02 PM porschetub Brave move going to that system for DIY newbie,cur... Jul 17 2018, 12:58 AM 914 RZ-1 So my a-hole neighbor called the HOA, the city and... Jul 25 2018, 06:33 PM bbrock That right there is why I live in the boonies, but... Jul 25 2018, 06:53 PM 914 RZ-1 So, I'm still getting some orange peel. I thou... Jul 31 2018, 04:17 PM burton73 How long are you letting it sit before you color s... Jul 31 2018, 04:29 PM Andyrew 1. Yes.
2. Pinholes are typically from something... Jul 31 2018, 04:30 PM burton73 After you color sand, wipe it clean and look at it... Jul 31 2018, 04:33 PM ValcoOscar Jeff-
Keep in mind, our current HOT weather patte... Jul 31 2018, 04:41 PM Perry Kiehl If you have a contaminant on the surface no amount... Jul 31 2018, 05:09 PM worn
If you have a contaminant on the surface no amoun... Jul 31 2018, 05:23 PM 914 RZ-1 Thanks all. Here are my responses:
I'm lettin... Jul 31 2018, 05:14 PM 914GT Don’t overlook the quality of your compressed ai... Jul 31 2018, 05:39 PM 914 RZ-1
Don’t overlook the quality of your compressed a... Jul 31 2018, 06:03 PM Andyrew
[quote name='914GT' post='2634214' date='Jul 31 2... Aug 1 2018, 11:09 AM 914 RZ-1
[quote name='914GT' post='2634214' date='Jul 31 ... Aug 1 2018, 12:54 PM mb911 Prepsol should be allowed to dry /evaporate before... Jul 31 2018, 05:54 PM 914 RZ-1 Here's the latest:
I painted both doors. I pu... Aug 1 2018, 10:06 AM Andyrew What kind of gun with what size tip are you sprayi... Aug 1 2018, 11:04 AM 914 RZ-1
What kind of gun with what size tip are you spray... Aug 1 2018, 12:52 PM Andyrew
What kind of gun with what size tip are you spra... Aug 1 2018, 01:08 PM 914 RZ-1
[quote name='914 RZ-1' post='2634443' date='... Aug 1 2018, 08:30 PM Costa05 I thought I read in one of your posts that you wer... Aug 1 2018, 12:22 PM 914 RZ-1
I thought I read in one of your posts that you we... Aug 1 2018, 12:59 PM Costa05
I thought I read in one of your posts that you w... Aug 1 2018, 02:27 PM aggiezig
Thats great. Check out the Eastwood videos on you... Aug 1 2018, 02:28 PM bbrock
Thats great. Check out the Eastwood videos on yo... Aug 1 2018, 02:42 PM aggiezig You already have a ton of great feedback on this t... Aug 1 2018, 02:25 PM 914 RZ-1
You already have a ton of great feedback on this ... Aug 1 2018, 08:37 PM 914 RZ-1 +3 on Kevin Tetz. I learned most of this from his ... Aug 1 2018, 08:41 PM mepstein
+3 on Kevin Tetz. I learned most of this from his... Aug 2 2018, 07:29 AM Olympic 914
+3 on Kevin Tetz. I learned most of this from his... Aug 2 2018, 09:00 AM mbseto Man this is a clinic. Almost makes me want to try... Aug 1 2018, 10:06 PM 914 RZ-1
Man this is a clinic. Almost makes me want to tr... Aug 2 2018, 06:23 PM Perry Kiehl FWIW, I have separate air hoses for only paint use... Aug 2 2018, 07:18 AM Rav914
Man this is a clinic. Almost makes me want to tr... Aug 2 2018, 09:17 AM 914 RZ-1 I found it! Thanks! :beer2:
https://www... Aug 2 2018, 06:17 PM aggiezig I think that with enough trial/error & practic... Aug 2 2018, 08:39 PM 914 RZ-1 Nice job! Yeah, it's taking me lots of pra... Aug 8 2018, 12:18 PM 914dave I had the same wrapped up in my paint. Tools incl... Aug 4 2018, 07:34 AM 914 RZ-1 So I got the suggested filter:
https://www.harborf... Aug 8 2018, 12:15 PM Andyrew
So I got the suggested filter:
https://www.harbor... Aug 8 2018, 12:42 PM 914 RZ-1 You need to put your regulator after the filter. Y... Aug 8 2018, 05:57 PM 914GT You are setting your pressure at the gun with the ... Aug 8 2018, 07:05 PM 914 RZ-1
You are setting your pressure at the gun with the... Aug 9 2018, 01:54 PM Andyrew Thinking back, I do remember having this issue onc... Aug 9 2018, 02:01 PM 914 RZ-1 I've got similar orange peel on my hoods; were... Aug 9 2018, 05:19 PM Andyrew Note. Spray the body side in one go, Not panel by ... Aug 9 2018, 02:03 PM 914 RZ-1 Yeah, that's what I'm doing. I actually ha... Aug 9 2018, 05:24 PM Andyrew Also noticed this review online.
"We review... Aug 9 2018, 02:05 PM 914 RZ-1 Wish I'd bothered to read the reviews. Maybe I... Aug 9 2018, 05:21 PM 914 RZ-1 I'm STILL getting orange peel.
To review, here... Aug 19 2018, 05:46 PM 914 RZ-1 A picture after wet-sanding with 800 for your view... Aug 19 2018, 05:54 PM Andyrew
A picture after wet-sanding with 800 for your vie... Aug 19 2018, 06:26 PM 914 RZ-1
A picture after wet-sanding with 800 for your vi... Aug 19 2018, 06:32 PM dakotaewing Please show pictures of your compressor, hoses and... Aug 19 2018, 06:01 PM 914 RZ-1
Please show pictures of your compressor, hoses an... Aug 19 2018, 06:31 PM Andyrew Ya, I put 7 coats on mine when I did it. Took 3 fo... Aug 19 2018, 06:55 PM Andyrew And I agree with temp. If your starting to spray a... Aug 19 2018, 07:01 PM dakotaewing Upon initial review, it would appear that part of ... Aug 19 2018, 07:54 PM 914 RZ-1
Upon initial review, it would appear that part of... Aug 19 2018, 08:54 PM Atech
[quote name='dakotaewing' post='2640512' date='Au... Aug 20 2018, 01:40 AM Atech
[i][quote name='dakotaewing' post='2640512' date... Aug 20 2018, 01:52 AM dakotaewing The water trap on the wall will only catch a small... Aug 19 2018, 09:35 PM aggiezig Lots of good tips about air and what not, but base... Aug 20 2018, 08:22 AM 914 RZ-1 I have been told that compressed air can be very h... Aug 26 2018, 02:54 PM mb911
I have been told that compressed air can be very ... Aug 26 2018, 03:17 PM porschetub
[quote name='914 RZ-1' post='2642822' date='... Aug 26 2018, 05:37 PM ConeDodger Get rid of that first length of hose of the compre... Aug 26 2018, 04:03 PM porschetub
Get rid of that first length of hose of the compr... Aug 27 2018, 12:22 AM IronHillRestorations I'll 2nd Ben's opinion. I think you proba... Aug 26 2018, 04:39 PM IronHillRestorations I've had more than one painter tell me that ea... Aug 26 2018, 08:30 PM gereed75 Lots of great info here. Don’t get overwhelmed. ... Aug 27 2018, 07:26 AM  |
1 User(s) are reading this topic (1 Guests and 0 Anonymous Users)
0 Members:

|
Lo-Fi Version | Time is now: 2nd April 2026 - 10:05 PM |
Invision Power Board
v9.1.4 © 2026 IPS, Inc.