|
|
|
Porsche, and the Porsche crest are registered trademarks of Dr. Ing. h.c. F. Porsche AG.
This site is not affiliated with Porsche in any way. Its only purpose is to provide an online forum for car enthusiasts. All other trademarks are property of their respective owners. |
|
|

  |

| DRPHIL914 |
 Aug 11 2018, 04:49 PM Aug 11 2018, 04:49 PM
Post
#1
|
|
Dr. Phil  Group: Members Posts: 5,830 Joined: 9-December 09 From: Bluffton, SC Member No.: 11,106 Region Association: South East States |
beyond frustrated- i am going to have to source a replacement assembly with a good adjuster- anyone have one send my way cheap or free??
spent the better part of the last 4 hours trying to get the doors done. unable to complete because the drivers door bottom adjuster nut that is attached to the front track that also holds the triangle window was rusted bad and snapped off- second was , before that happened being unable to get triangle glass seal in(too long) and down enough so could not get door to shut. pulled it all back out and now i cant decide how to proceed! Attached thumbnail(s) 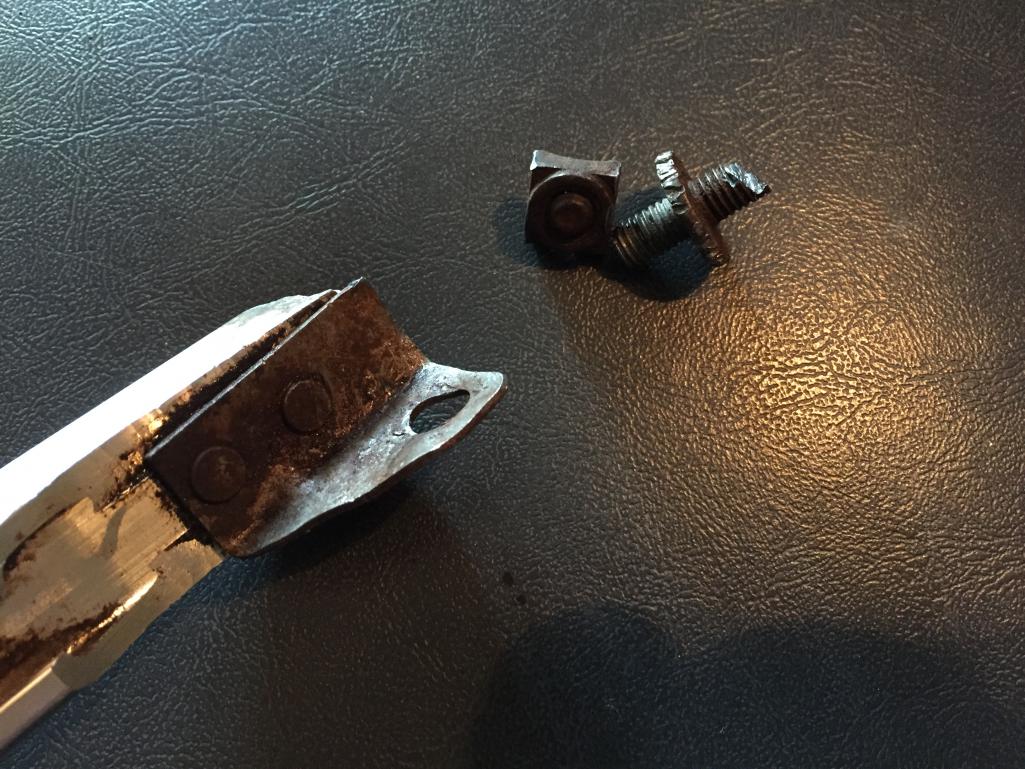
|
   |

 
|
| DRPHIL914 |
Aug 11 2018, 04:57 PM
Post
#2
|
|
Dr. Phil Group: Members Posts: 5,830 Joined: 9-December 09 From: Bluffton, SC Member No.: 11,106 Region Association: South East States |
i know that 914rubber makes almost all seals a bit on the tight and long side and i guess thats better than being short, BUT this front side of the triangle window seal is damn near impossible to get the front edge down into the door and tight so it wont stick up and stop the door from shutting but its just too long and too tight- i foight with it for an hour, it won and i give up. i wish i had just left my old seals on and not changed them out they were ok and didnt leak- whats done is done i cant turn back time , but i dont know if i can modify the adjustor in some way with a different bolt to make it work for now- i need to get these doors done and the glass in.
- prior to that i did get the new inner lock and latch mechanism in and the strike plates ans the door stay rebuilt on drivers side. also the new seals ans fuzzies- i will post all that on the other thread- my build thread. if anyone has had experience with this type of issue i would appreciate some help or advice. Dr. P. |
|
|
|
| horizontally-opposed |
Aug 11 2018, 05:00 PM
Post
#3
|
|
Advanced Member Group: Members Posts: 3,456 Joined: 12-May 04 From: San Francisco Member No.: 2,058 Region Association: None |
Let me guess...factory seals?
Been where you are, and done that. Takes a LOT of fiddling to get things to fit...and some creativity too. |
|
|
|
| DRPHIL914 |
Aug 11 2018, 05:33 PM
Post
#4
|
|
Dr. Phil Group: Members Posts: 5,830 Joined: 9-December 09 From: Bluffton, SC Member No.: 11,106 Region Association: South East States |
well if thr door shuts i can drive it with out a window i guess.
|
|
|
|
| DRPHIL914 |
Aug 11 2018, 05:34 PM
Post
#5
|
|
Dr. Phil Group: Members Posts: 5,830 Joined: 9-December 09 From: Bluffton, SC Member No.: 11,106 Region Association: South East States |
they are 914rubber seals- got the whole kit, fuzzies, etc
|
|
|
|
| Chris H. |
Aug 11 2018, 05:37 PM
Post
#6
|
|
Senior Member Group: Members Posts: 4,059 Joined: 2-January 03 From: Chicago 'burbs Member No.: 73 Region Association: Upper MidWest |
I might have that nut/bolt. Lemme look. You can have it if I find it.
|
|
|
|
| horizontally-opposed |
Aug 11 2018, 07:30 PM
Post
#7
|
|
Advanced Member Group: Members Posts: 3,456 Joined: 12-May 04 From: San Francisco Member No.: 2,058 Region Association: None |
QUOTE(Philip W. @ Aug 11 2018, 04:34 PM)  they are 914rubber seals- got the whole kit, fuzzies, etc Oh boy. I had heard these were better than the factory rubber. Although: I have a feeling that—no matter what rubber you use—a lot of it is patience, time, adjustments, and more. Did a dig, and this is the thread that helped me most: http://www.914world.com/bbs2/index.php?sho...p;#entry2000174 Soapy water helped, too. |
|
|
|
| Chris H. |
Aug 11 2018, 08:34 PM
Post
#8
|
|
Senior Member Group: Members Posts: 4,059 Joined: 2-January 03 From: Chicago 'burbs Member No.: 73 Region Association: Upper MidWest |
You just need this bolt/nut combo correct?
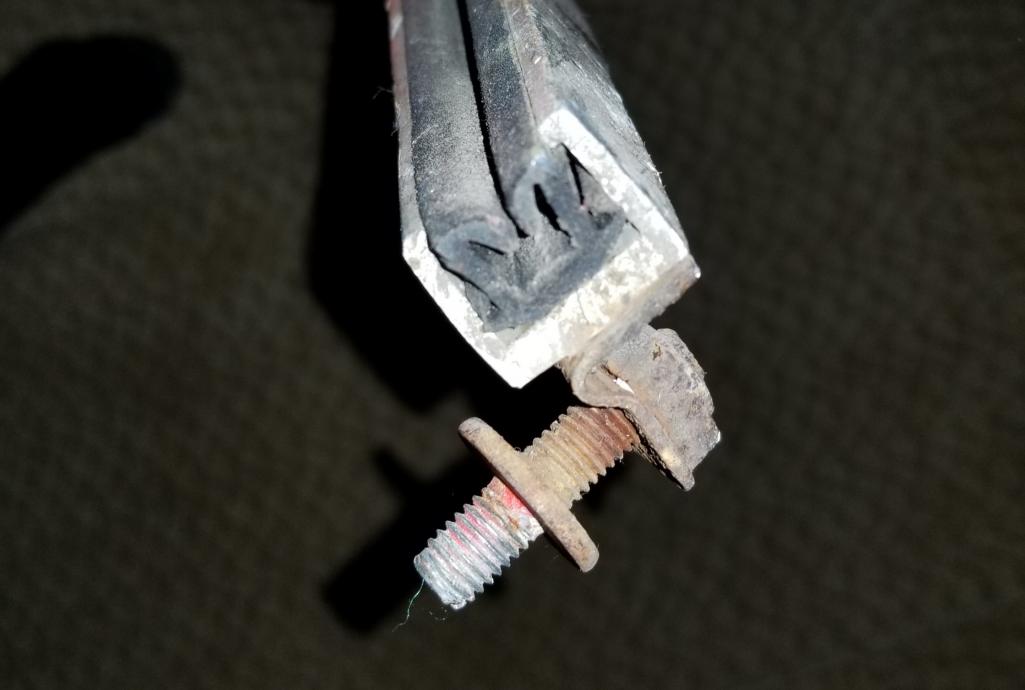 Might need a little PB Blaster to get it loose but it'll work. PM me your address if it's what you need. |
|
|
|
| raynekat |
Aug 11 2018, 10:18 PM
Post
#9
|
|
Advanced Member Group: Members Posts: 2,169 Joined: 30-December 14 From: Coeur d'Alene, Idaho Member No.: 18,263 Region Association: Pacific Northwest |
Philip W....I feel (and know) your frustration.
I too spent many hours trying to get these 914Rubber triangle rubber seals into place without much luck. I was ready to kill something for sure. Wasted many hours on something that should be fairly straightforward. I agree that the seals are too long to fit into the front part of the slot where they reside. I actually had some success with one side with modifying the triangle seal for better fitment. It required my wife's sharpest kitchen knife and some wire cutters. The forward part of the seal that is supposed to fit into the same groove as the inner door seal needs a lot of trimming for it lay in there correctly. I'll try to put some pics tomorrow on what I did and why.... I'm going at this a bit differently in fitting the rubber seal first, then coming in with the long window guide and quarter window next. I'm not trying to put the guide, window and seal into the door as a unit due to the fitment issues with the seal. Stay tuned and I'll post some more tomorrow. This is my last big task for the reassembly....getting these dang windows and doors put together. Ugh.... |
|
|
|
| 914_teener |
Aug 11 2018, 10:42 PM
Post
#10
|
|
914 Guru Group: Members Posts: 5,266 Joined: 31-August 08 From: So. Cal Member No.: 9,489 Region Association: Southern California |
QUOTE(Philip W. @ Aug 11 2018, 03:57 PM) i know that 914rubber makes almost all seals a bit on the tight and long side and i guess thats better than being short, BUT this front side of the triangle window seal is damn near impossible to get the front edge down into the door and tight so it wont stick up and stop the door from shutting but its just too long and too tight- i foight with it for an hour, it won and i give up. i wish i had just left my old seals on and not changed them out they were ok and didnt leak- whats done is done i cant turn back time , but i dont know if i can modify the adjustor in some way with a different bolt to make it work for now- i need to get these doors done and the glass in. - prior to that i did get the new inner lock and latch mechanism in and the strike plates ans the door stay rebuilt on drivers side. also the new seals ans fuzzies- i will post all that on the other thread- my build thread. if anyone has had experience with this type of issue i would appreciate some help or advice. Dr. P. Yes...did a thread on this. It is a VERY sequence dependent installation. My experience was that the mold needed relief for the metal tab where it fit....friction fit....needed to be cut. The otjer very important issue is that the adjustment screw in question needs to be installed in its correct postion as you push the seal down....towards the front of the car. It is a pain in the ass and requires a lot of patience and almost three hands. |
|
|
|
| DRPHIL914 |
Aug 11 2018, 11:02 PM
Post
#11
|
|
Dr. Phil Group: Members Posts: 5,830 Joined: 9-December 09 From: Bluffton, SC Member No.: 11,106 Region Association: South East States |
QUOTE(raynekat @ Aug 12 2018, 12:18 AM) Philip W....I feel (and know) your frustration. I too spent many hours trying to get these 914Rubber triangle rubber seals into place without much luck. I was ready to kill something for sure. Wasted many hours on something that should be fairly straightforward. I agree that the seals are too long to fit into the front part of the slot where they reside. I actually had some success with one side with modifying the triangle seal for better fitment. It required my wife's sharpest kitchen knife and some wire cutters. The forward part of the seal that is supposed to fit into the same groove as the inner door seal needs a lot of trimming for it lay in there correctly. I'll try to put some pics tomorrow on what I did and why.... I'm going at this a bit differently in fitting the rubber seal first, then coming in with the long window guide and quarter window next. I'm not trying to put the guide, window and seal into the door as a unit due to the fitment issues with the seal. Stay tuned and I'll post some more tomorrow. This is my last big task for the reassembly....getting these dang windows and doors put together. Ugh.... that would be great! i would like to see how you went about it. i was just getting to the point i didnt have any patients left- oh, i mean patience left- i was getting so close ans then not get the stupid thing to sid down enough so the door could shut was the end - i went to a movie with my daughter to clean my head . you see i really thought after i did all the front fuel lines and prep for the gas tank to go in in the morning, i would have bet that in maybe 2 hours id have them both in . geez . and im sitting here trying to get theis ready for Okteenerfest, and the next month will go by too fast. , i am waiting on parts and i cant move forward with out them, like my alternator harness! not here,( and i started the group buy and was #1 in line so why the heck... and the targa trim pieces, bumper tops, bla bla- then the stupid nut snaps!!!! - i know i can go get a bolt of the proper length, and bolt it in place but it wont be adjustable , or not easily anyway so do i wait to get a whole new assembly or just wing it? And it seem i cant adjust the door striker so that the door can shut tighter. passanger sode is perfect, i dont know but can you move back side that the strike plate bolts to so that the door can go in further ?? yikes , so many issues. i look forward to seeing how you made this work- tomorrow is another day! |
|
|
|
| DRPHIL914 |
Aug 11 2018, 11:07 PM
Post
#12
|
|
Dr. Phil Group: Members Posts: 5,830 Joined: 9-December 09 From: Bluffton, SC Member No.: 11,106 Region Association: South East States |
QUOTE(Chris H. @ Aug 11 2018, 10:34 PM) You just need this bolt/nut combo correct? Might need a little PB Blaster to get it loose but it'll work. PM me your address if it's what you need. yes, but the back side nut is attached to the track- i dont think the bracket comes off it is riveted to the track, i bent the bracket even after pb blaster! then it cam off the track and the screw was still stuck in the nut! i really messed it up- i think i will need a while new track that has a good bracket and nut/screw thats not rusted on tight- i suppose theis is a NLA part? |
|
|
|
| horizontally-opposed |
Aug 11 2018, 11:39 PM
Post
#13
|
|
Advanced Member Group: Members Posts: 3,456 Joined: 12-May 04 From: San Francisco Member No.: 2,058 Region Association: None |
QUOTE(Philip W. @ Aug 11 2018, 10:07 PM) QUOTE(Chris H. @ Aug 11 2018, 10:34 PM) You just need this bolt/nut combo correct? Might need a little PB Blaster to get it loose but it'll work. PM me your address if it's what you need. yes, but the back side nut is attached to the track- i dont think the bracket comes off it is riveted to the track, i bent the bracket even after pb blaster! then it cam off the track and the screw was still stuck in the nut! i really messed it up- i think i will need a while new track that has a good bracket and nut/screw thats not rusted on tight- i suppose theis is a NLA part? Last I checked, the tracks were plentiful at places like EASY. Trick was finding a good candidate without deep scratches and sending it to be redone in proper ano-brite finish (polished then clear anodized). I would think there is some way to get the bolt/stud off? Those are out there for sure... |
|
|
|
| Mikey914 |
Aug 12 2018, 01:31 AM
Post
#14
|
|
The rubber man Group: Members Posts: 12,772 Joined: 27-December 04 From: Hillsboro, OR Member No.: 3,348 Region Association: None |
Has Matt followed up with you. He did the install and still is working on the install guide, but has the steps laid out. Yes, the install needs to be done in a certain order, and there are some techniques to installing that help. This is not a easy install, that's why most body shops just tape around them if you let them.
Let me know if I need to reach out to him, but I thought he might already be on this. Mark |
|
|
|
| billh1963 |
Aug 12 2018, 07:30 AM
Post
#15
|
|
Car Hoarder! Group: Members Posts: 3,408 Joined: 28-March 11 From: North Carolina Member No.: 12,871 Region Association: South East States |
Phil...I got my GB harness in last week. If you are coming close by my way any time soon I'll give you mine and you can have yours shipped to me (or give it to me later when it comes in). I won't be using it for a while.
|
|
|
|
| Matty900 |
Aug 12 2018, 02:13 PM
Post
#16
|
|
Senior Member Group: Members Posts: 1,293 Joined: 21-February 15 From: Oregon Member No.: 18,454 Region Association: Pacific Northwest |
I did some video as I installed it in my car. I am working on getting it edited so it is watchable. I need to go work on my car now but will try and get it done tonight for you
|
|
|
|
| DRPHIL914 |
Aug 12 2018, 05:46 PM
Post
#17
|
|
Dr. Phil Group: Members Posts: 5,830 Joined: 9-December 09 From: Bluffton, SC Member No.: 11,106 Region Association: South East States |
QUOTE(Matty900 @ Aug 12 2018, 04:13 PM) I did some video as I installed it in my car. I am working on getting it edited so it is watchable. I need to go work on my car now but will try and get it done tonight for you great, thanks! |
|
|
|
| tmc914 |
Aug 12 2018, 07:20 PM
Post
#18
|
|
Member Group: Members Posts: 116 Joined: 24-September 17 From: Lowell, MA Member No.: 21,452 Region Association: North East States |
That triangle seal was difficult indeed. Started with the drivers side and then stopped when it came to the passengers side. Not worth it. Had to do a lot of extra cutting of the rubber, finally got the door to close properly. Do need 3 hands to make it work but somehow I did it with only 2 hands. It seemed like the grove the glass slides into at the bottom was not deep enough and the glass is pushing the whole arrangement deeper into the door than it should. Not going to try and fix it unless something pops loose. There is a lot of pressure on that triangle glass right now with the door closed.
|
|
|
|
| raynekat |
Aug 12 2018, 11:23 PM
Post
#19
|
|
Advanced Member Group: Members Posts: 2,169 Joined: 30-December 14 From: Coeur d'Alene, Idaho Member No.: 18,263 Region Association: Pacific Northwest |
QUOTE(tmc914 @ Aug 12 2018, 06:20 PM) That triangle seal was difficult indeed. Started with the drivers side and then stopped when it came to the passengers side. Not worth it. Had to do a lot of extra cutting of the rubber, finally got the door to close properly. Do need 3 hands to make it work but somehow I did it with only 2 hands. It seemed like the grove the glass slides into at the bottom was not deep enough and the glass is pushing the whole arrangement deeper into the door than it should. Not going to try and fix it unless something pops loose. There is a lot of pressure on that triangle glass right now with the door closed. I'd have to agree with a lot of what is said here. The 914Rubber piece does not fit all that well....especially at the front end where it fits both into the long narrow rectangular channel and where it also goes into the groove for the inner door seal. See pic below. The arrows where I labeled 1 and 2 are the part of the seal that goes down into the long narrow rectangular channel....yes? This section of the seal is a bit too long to fit into this channel. So I took a very sharp kitchen knife and made a short cut of approx. 1/8 - 1/4" along where you see arrow 3. This allowed the front part of this seal to go into the door more and allowing the seal to fit flush. The 2nd issue is the area I have circled with a 4. This is the very front part of the seal that is supposed to go into the same groove that the inner door seal also sits. If fact they will both butt up against each other flush if you've cut the inner door seal at the right place. This part of the 914Rubber seal needs a lot of trimming to get it to fit into this groove. I used a combination of wire snippers and again the very sharp kitchen knife to slowly whittle this leading edge into the correct shape to nicely fit into the groove. Once you've got both of these above mods complete, you'll have a chance at getting this 914Rubber window seal into place. 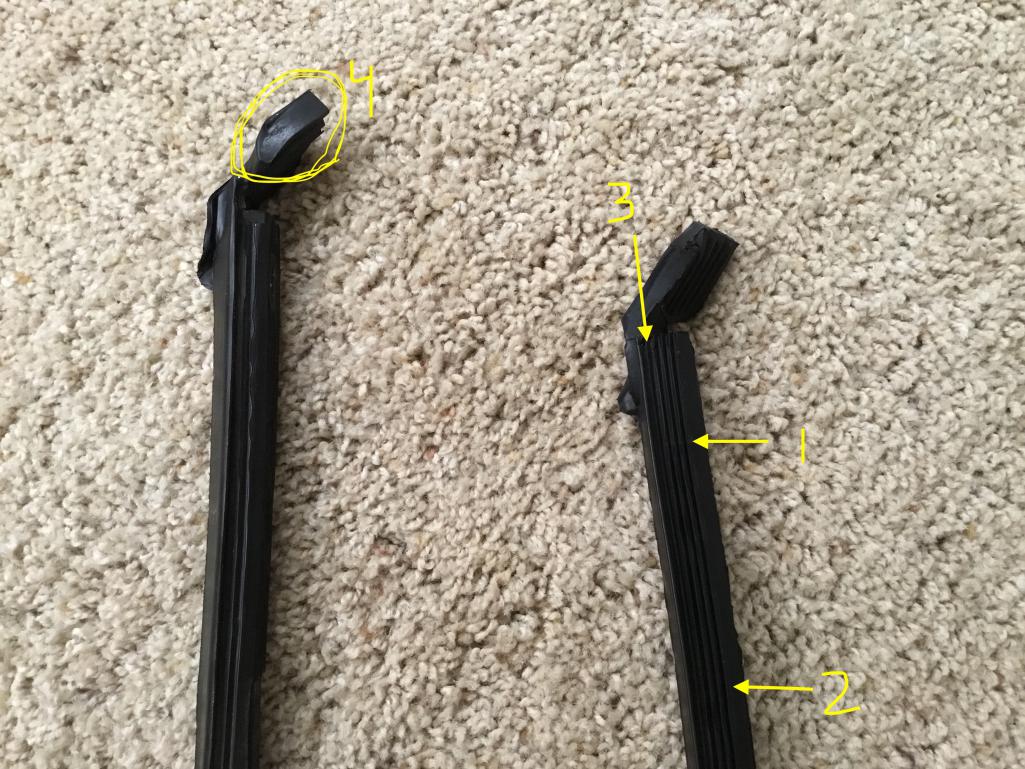 |
|
|
|
| raynekat |
Aug 12 2018, 11:24 PM
Post
#20
|
|
Advanced Member Group: Members Posts: 2,169 Joined: 30-December 14 From: Coeur d'Alene, Idaho Member No.: 18,263 Region Association: Pacific Northwest |
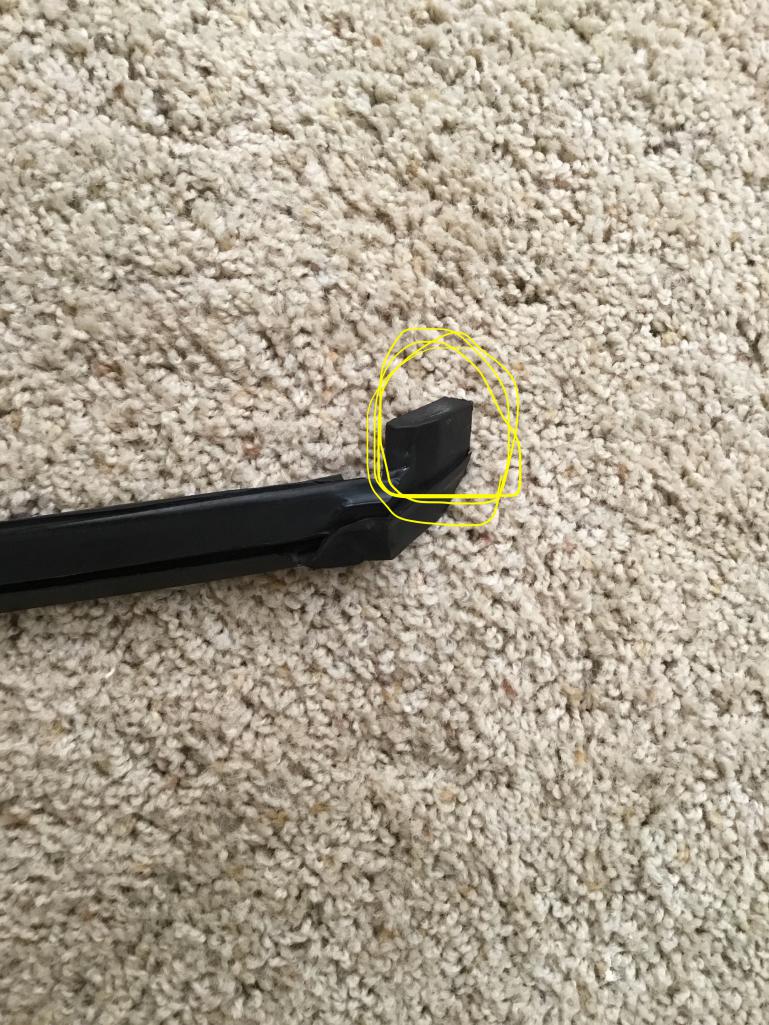
Here's another pic/view of the offending area of the 914Rubber seal that needs to be whittled down in order to fit into the same groove as the inner door seal.
 |
|
|
|
|
1 User(s) are reading this topic (1 Guests and 0 Anonymous Users)
0 Members:

|
Lo-Fi Version | Time is now: 12th July 2025 - 06:57 AM |
Invision Power Board
v9.1.4 © 2025 IPS, Inc.