|
|
|
Porsche, and the Porsche crest are registered trademarks of Dr. Ing. h.c. F. Porsche AG.
This site is not affiliated with Porsche in any way. Its only purpose is to provide an online forum for car enthusiasts. All other trademarks are property of their respective owners. |
|
|

  |

| raynekat |
 Aug 12 2018, 11:27 PM Aug 12 2018, 11:27 PM
Post
#21
|
|
Advanced Member  Group: Members Posts: 2,169 Joined: 30-December 14 From: Coeur d'Alene, Idaho Member No.: 18,263 Region Association: Pacific Northwest |
This view shows again where the leading edge of the 914Rubber window seal fits into the same groove as the inner door channel.
I have them nicely butting up against each other....vital if you're going to keep the water out. You can also see how nicely the remainder of the seal fits down into the long narrow rectangular door channel all the way back to the aluminum window guide. 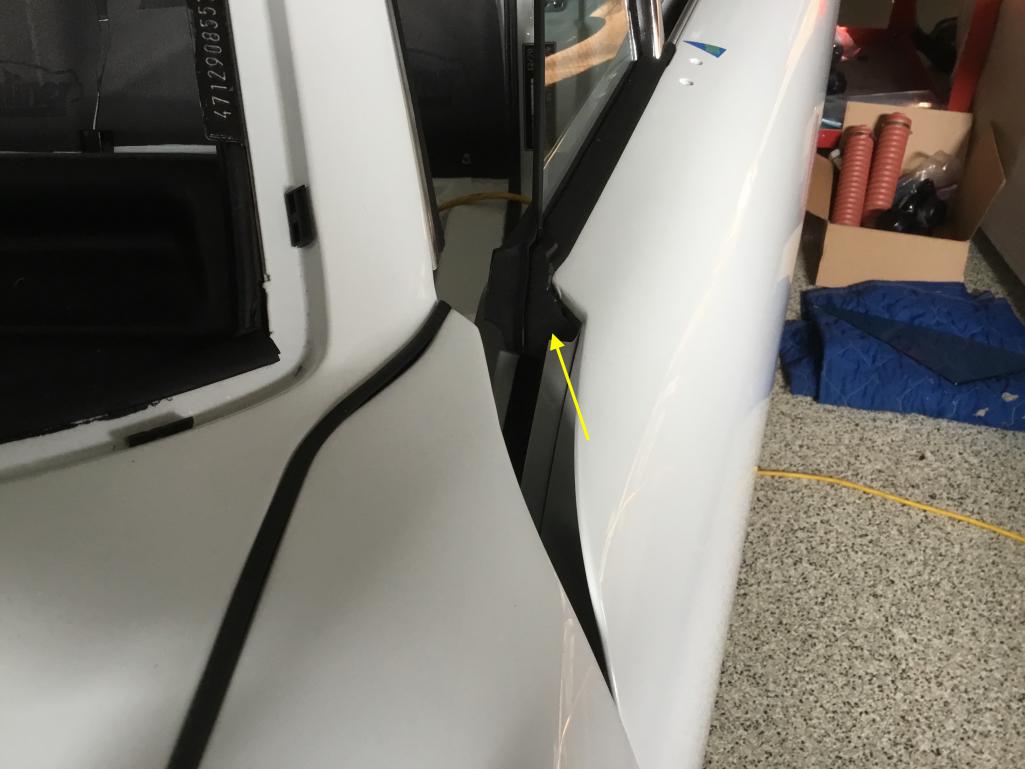 |
   |

 
|
| raynekat |
Aug 12 2018, 11:35 PM
Post
#22
|
|
Advanced Member Group: Members Posts: 2,169 Joined: 30-December 14 From: Coeur d'Alene, Idaho Member No.: 18,263 Region Association: Pacific Northwest |
Side view of the seal installation.
Again, it is sitting down into the slot very nicely after making the above mods to the seal. One thing to note where the arrow is pointing. It is said that this 914Rubber seal is supposed to be wider here thus sealing better. In my estimation, not really all that much. It is still too thin here to really seal all that well. I may slide another thin piece of rubber in here to fill out the space a bit better. You'll know what I mean when you get to this point. As opposed to trying to install the seal, window and window guide as one unit, I took a different tack. I installed the seal first, making sure it was correctly seated along the slot where it resides as well as at the very front that fits into the inner door seal groove. Next I came with the aluminum window guide, while holding the seal in it's place. You can attach the upper and lower bolts for the window guide at this point. Lastly I came in what the window. Front nose first followed by sliding the window down into the groove in the seal. I used lots of silicon lube spray for this last part. At the end, I installed the hard rubber piece that goes at the very top of the window guide and that holds the window down into place. This worked for me on the driver's side window. I'll be doing the passenger side likely tomorrow. Will keep you posted on any issues or "ah-ha's" if I get them. One note: I also used a small piece of wood to push the seal down into the door. I wouldn't use anything too sharp like a screwdriver, etc to do this. 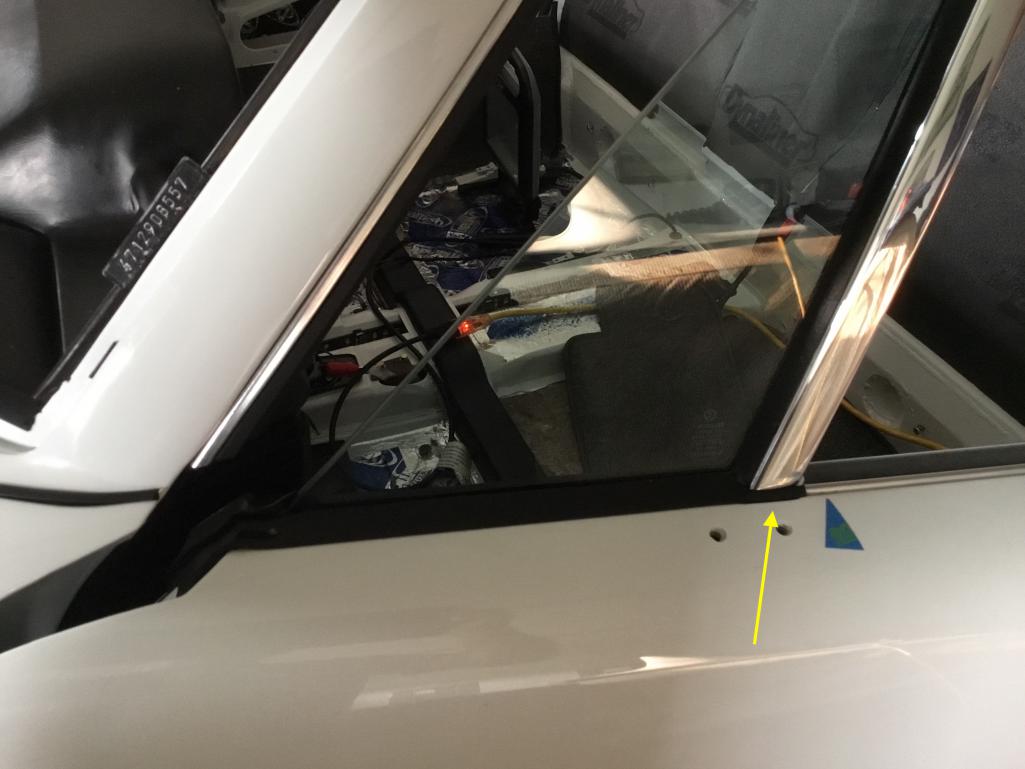 |
|
|
|
| carl k |
Aug 13 2018, 08:43 AM
Post
#23
|
|
Member Group: Members Posts: 76 Joined: 19-August 08 From: San Jose, CA Member No.: 9,440 Region Association: None |
  I have this driver's side frame if you need it. Unfortunately I'm on the left coast. -Carl |
|
|
|
| Mikey914 |
Aug 13 2018, 09:08 AM
Post
#24
|
|
The rubber man Group: Members Posts: 12,772 Joined: 27-December 04 From: Hillsboro, OR Member No.: 3,348 Region Association: None |
Guys on the width of the seal, you are comparing it to used seals that have been compressed for years. We actually used unused seals to model after. These seals are made to compress.
The big issue is that these seals are not easy to install, not even the factory ones. A major difference we made in this seal was the slot. We choose not to add it because the windows we had looked at (early ones specifically) showed that water did enter the door through this gap. In replacing this seal the alignment of the window is completely reset, it will require some re tweaking to make close correctly. Here is a link to the adjustment portion that will probably be of use to you - http://www.914world.com/bbs2/index.php?sho...p;#entry2000174 |
|
|
|
| DRPHIL914 |
Aug 13 2018, 09:18 AM
Post
#25
|
|
Dr. Phil Group: Members Posts: 5,830 Joined: 9-December 09 From: Bluffton, SC Member No.: 11,106 Region Association: South East States |
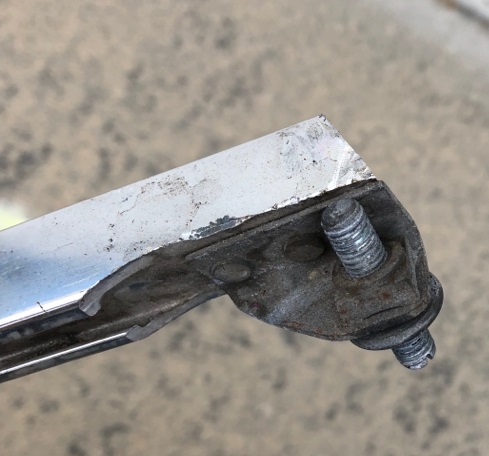
QUOTE(Mikey914 @ Aug 13 2018, 11:08 AM)  Guys on the width of the seal, you are comparing it to used seals that have been compressed for years. We actually used unused seals to model after. These seals are made to compress. The big issue is that these seals are not easy to install, not even the factory ones. A major difference we made in this seal was the slot. We choose not to add it because the windows we had looked at (early ones specifically) showed that water did enter the door through this gap. In replacing this seal the alignment of the window is completely reset, it will require some re tweaking to make close correctly. Here is a link to the adjustment portion that will probably be of use to you - http://www.914world.com/bbs2/index.php?sho...p;#entry2000174 Mark, that is a great point. I want to say thanks for reaching out to me over the weekend and having the link sent for the new vids. I don't want you to think that i thought it was a badly made product or that i was throwing you under the bus so to speak here. More than anything i just hit a frustration point with the whole thing and needed to vent. I think a big issue for me was the adjustment nut and bolt being rusted into place. not being able to take that off made it impossible to get it into place in the bottom so the upper rubber fitment became irrelevant, because with out removing that or screwing it in all the way its too long to get it down and in. I think once i get that fixed, i should be able to get ths another try, with having watched the video i am going to follow that and will report back here again to update the progress. I have a new adjustor bracket , nut and bolt coming from another member, so i will let you know in a few days - in the mean time i went to do the other side and same issue, so today it is soaking in PB blaster and i hope i can break it loose and try the install tonight. Phil |
|
|
|
| DRPHIL914 |
Aug 13 2018, 09:20 AM
Post
#26
|
|
Dr. Phil Group: Members Posts: 5,830 Joined: 9-December 09 From: Bluffton, SC Member No.: 11,106 Region Association: South East States |
QUOTE(carl k @ Aug 13 2018, 10:43 AM) I have this driver's side frame if you need it. Unfortunately I'm on the left coast. -Carl Carl, Thanks for the offer, i will let you know if i am able to use mine with a new nut and braket that is being sent. If that does not work, i will be glad to pay you for the shipping!! Phil |
|
|
|
| DRPHIL914 |
Aug 13 2018, 09:22 AM
Post
#27
|
|
Dr. Phil Group: Members Posts: 5,830 Joined: 9-December 09 From: Bluffton, SC Member No.: 11,106 Region Association: South East States |
QUOTE(raynekat @ Aug 13 2018, 01:35 AM) Side view of the seal installation. Again, it is sitting down into the slot very nicely after making the above mods to the seal. One thing to note where the arrow is pointing. It is said that this 914Rubber seal is supposed to be wider here thus sealing better. In my estimation, not really all that much. It is still too thin here to really seal all that well. I may slide another thin piece of rubber in here to fill out the space a bit better. You'll know what I mean when you get to this point. As opposed to trying to install the seal, window and window guide as one unit, I took a different tack. I installed the seal first, making sure it was correctly seated along the slot where it resides as well as at the very front that fits into the inner door seal groove. Next I came with the aluminum window guide, while holding the seal in it's place. You can attach the upper and lower bolts for the window guide at this point. Lastly I came in what the window. Front nose first followed by sliding the window down into the groove in the seal. I used lots of silicon lube spray for this last part. At the end, I installed the hard rubber piece that goes at the very top of the window guide and that holds the window down into place. This worked for me on the driver's side window. I'll be doing the passenger side likely tomorrow. Will keep you posted on any issues or "ah-ha's" if I get them. One note: I also used a small piece of wood to push the seal down into the door. I wouldn't use anything too sharp like a screwdriver, etc to do this. thanks for sharing this, looks like there is more than one way to skin a cat- a and btw that really looks super!!! |
|
|
|
| DRPHIL914 |
Aug 13 2018, 09:25 AM
Post
#28
|
|
Dr. Phil Group: Members Posts: 5,830 Joined: 9-December 09 From: Bluffton, SC Member No.: 11,106 Region Association: South East States |
maybe this should be a Tech Session #5 at Okteenerfest?
|
|
|
|
| Mikey914 |
Aug 13 2018, 10:47 AM
Post
#29
|
|
The rubber man Group: Members Posts: 12,772 Joined: 27-December 04 From: Hillsboro, OR Member No.: 3,348 Region Association: None |
Actually its on the schedule as door rebuild but the process is longer than an hour, so not sure how much we can compress into that short of a period of time. But I agree that this is a very technical install in that there is a certain order of operations as well as adjustments that need to be made after the fact.
And yes I have spill a few choice words doing mine, it is not easy, but when done you do get a sense of accomplishment. |
|
|
|
| DRPHIL914 |
Aug 13 2018, 11:02 AM
Post
#30
|
|
Dr. Phil Group: Members Posts: 5,830 Joined: 9-December 09 From: Bluffton, SC Member No.: 11,106 Region Association: South East States |
QUOTE(Mikey914 @ Aug 13 2018, 12:47 PM) Actually its on the schedule as door rebuild but the process is longer than an hour, so not sure how much we can compress into that short of a period of time. But I agree that this is a very technical install in that there is a certain order of operations as well as adjustments that need to be made after the fact. And yes I have spill a few choice words doing mine, it is not easy, but when done you do get a sense of accomplishment. i had fun watching the video because even trying to put plastic wrap on the window and wrap it can be a challenge! (IMG:style_emoticons/default/lol-2.gif) |
|
|
|
| DRPHIL914 |
Aug 22 2018, 06:27 AM
Post
#31
|
|
Dr. Phil Group: Members Posts: 5,830 Joined: 9-December 09 From: Bluffton, SC Member No.: 11,106 Region Association: South East States |
update:
well last night I decided I would try the passenger side since I had that window installed into the seal and on the rail, and I was able to get the adjustment screw loose. Same issue with the seal base being too long to fit into the door and front side not being able to be squeezed down in all the way, but I lubed it up, made a very slight trim to the bottom front as instructed by Mr. Matt and Mr. Mark. so once the track or frame bottom was in far enough to put the top screw in, and then the adjustment screw also at the bottom was in its hole, it looked like I had it in place and would work, but upon trying to shut the door, the front edge of the window and the seal on the car just don't line up. Huge gap at the top, and not the in or out adjustment that you would expect and be able to adjust with the screw at the bottom but rather the top edge is back too far, and the front is about a 1/4" too far forward and cant shut the door. now with out the window or seal the door alignment itself is perfect so that is not the issue., somehow the triangle and seal do not set back at the base, far enough back. and the frame somehow needs to angle more forward about a quarter inch at the top. but there isn't really an adjustment for that , with the 2 screws in place it should line up, so any ideas?? I don't have a pic sorry, I gave up as I was getting eaten by mosquitoes , just had had it again. 1 |
|
|
|
| DRPHIL914 |
Aug 22 2018, 06:52 AM
Post
#32
|
|
Dr. Phil Group: Members Posts: 5,830 Joined: 9-December 09 From: Bluffton, SC Member No.: 11,106 Region Association: South East States |
I may just put the windows, frames and seals in my trunk and bring them to Okeenerfest , Matt, maybe you can use my car as the sample for installation.
I have less than a month to try and get my gas tank, motor and whole interior including the sail vinyl etc all installed!! and I don't think this window stuff is going to get done. If the car runs and drives at least I can bring it, it might be with out windows. |
|
|
|
| DRPHIL914 |
Aug 23 2018, 08:58 AM
Post
#33
|
|
Dr. Phil Group: Members Posts: 5,830 Joined: 9-December 09 From: Bluffton, SC Member No.: 11,106 Region Association: South East States |
QUOTE(tmc914 @ Aug 12 2018, 09:20 PM) That triangle seal was difficult indeed. Started with the drivers side and then stopped when it came to the passengers side. Not worth it. Had to do a lot of extra cutting of the rubber, finally got the door to close properly. Do need 3 hands to make it work but somehow I did it with only 2 hands. It seemed like the grove the glass slides into at the bottom was not deep enough and the glass is pushing the whole arrangement deeper into the door than it should. Not going to try and fix it unless something pops loose. There is a lot of pressure on that triangle glass right now with the door closed. I am going to have to recheck the triangle glass groove depth. I had not really considered that as an issue. on my car the whole bottom of the seal is too long to set into the door groove. I re-tried the passenger side last night and did it 2 different ways, no luck, but closer in that when I pulled the glass out, and got the vertical frame lined up then adjusted in to proper place where the top angle cap was up into the frame seal properly with door closed, I then put the seal in with out the glass, but still too tight in front even with out any glass. so I did a slight trimming of that front bottom leading edge just as suggested by Mark and Matt to get this to sit donw into the channel and I am closer to getting this in, the door actually shut, but this is all with out the triangle glass not in the seal. I tried to slide the glass into the seal with out moving the frame out since it was lined up perfectly now, but that was not working either!! - I will probably leave the frame in place for now, I might end up driving the car up with out the triangle glass, I have to get this motor in the car and gas lines hooked up this weekend and try and get the car running, or it will not be there- I could be that guy that shows up in the Boxster! --- I hope not. - 3 weeks from today right?? shit I don't know how that is going to happen. |
|
|
|
| dr914@autoatlanta.com |
Aug 23 2018, 09:04 AM
Post
#34
|
|
914 Guru Group: Members Posts: 8,188 Joined: 3-January 07 From: atlanta georgia Member No.: 7,418 Region Association: None |
Have you tried the URO vent glass seals to compare? After all of this frustration, it is just not worth continuing to fool with a seal that is hard to fit. We often try several different brands before finding one that works best. Right now there are factory, URO and 914 rubber.
Fitting the seals and getting the doors and windows to close properly and not leak IS a hassle no doubt |
|
|
|
| DRPHIL914 |
Aug 23 2018, 09:11 AM
Post
#35
|
|
Dr. Phil Group: Members Posts: 5,830 Joined: 9-December 09 From: Bluffton, SC Member No.: 11,106 Region Association: South East States |
QUOTE(dr914@autoatlanta.com @ Aug 23 2018, 11:04 AM) Have you tried the URO vent glass seals to compare? After all of this frustration, it is just not worth continuing to fool with a seal that is hard to fit. We often try several different brands before finding one that works best. Right now there are factory, URO and 914 rubber. Fitting the seals and getting the doors and windows to close properly and not leak IS a hassle no doubt George, I have not tried another. I could get a factory one from our parts dept at local dealer, and I know you have the URO in stock as well, I am looking at getting their rear targa trim pieces. The windows came out smooth and the seals were in fairly good condition, I didn't really have a leak problem at that location, I should have left alone and reinstalled them as is but I cant go back now. I might just for comparison sake try and get one of the other brands to see where or if there is variation. This is the first timei have had any issue with a 914rubber seal. |
|
|
|
| Mikey914 |
Aug 23 2018, 10:47 AM
Post
#36
|
|
The rubber man Group: Members Posts: 12,772 Joined: 27-December 04 From: Hillsboro, OR Member No.: 3,348 Region Association: None |
You can try the URO seal, but if the top cap fits on, and the base is fully installed the window is at the proper height. How the window interacts with the door and top gap is an adjustment of the bar.
The only advantage / disadvantage the URO seal has is the hole that lets water into the door. You would not need to modify the tab to not have the hole. |
|
|
|
| DRPHIL914 |
Aug 23 2018, 11:04 AM
Post
#37
|
|
Dr. Phil Group: Members Posts: 5,830 Joined: 9-December 09 From: Bluffton, SC Member No.: 11,106 Region Association: South East States |
QUOTE(Mikey914 @ Aug 23 2018, 12:47 PM) You can try the URO seal, but if the top cap fits on, and the base is fully installed the window is at the proper height. How the window interacts with the door and top gap is an adjustment of the bar. The only advantage / disadvantage the URO seal has is the hole that lets water into the door. You would not need to modify the tab to not have the hole. what it looks like right now is when the window is in the seal ans installed in the track, its so tight and too wide and long so i cant get the front end and leading edge of the glass back down and back far enough to not hit that car seal, and then of course the door will not close, |
|
|
|
| Mikey914 |
Aug 23 2018, 11:20 AM
Post
#38
|
|
The rubber man Group: Members Posts: 12,772 Joined: 27-December 04 From: Hillsboro, OR Member No.: 3,348 Region Association: None |
To be honest this one had me swearing quite a bit too. The window in the front does tuck underneath however the back needs to rotate down so as long as the base of the seal is fully engaged into the door it should be a matter of the center of the track coming back just a little.
In other words adjustment for and aft |
|
|
|
| Matty900 |
Aug 23 2018, 12:16 PM
Post
#39
|
|
Senior Member Group: Members Posts: 1,293 Joined: 21-February 15 From: Oregon Member No.: 18,454 Region Association: Pacific Northwest |
QUOTE(Philip W. @ Aug 22 2018, 05:52 AM) I may just put the windows, frames and seals in my trunk and bring them to Okeenerfest , Matt, maybe you can use my car as the sample for installation. I have less than a month to try and get my gas tank, motor and whole interior including the sail vinyl etc all installed!! and I don't think this window stuff is going to get done. If the car runs and drives at least I can bring it, it might be with out windows. Happy to help. I am guessing that there may be a little adjustment left on the upper bolt on your rail. It is definitely a tight fit when they are new. I want to try and figure out exactly what your experiencing so I can try and address it in a final version of an installation video. I already have a few notes on things that I need to add to it. I appreciate anyone else's feedback too. https://www.dropbox.com/s/dg8pohr6s4o36jk/T...20edit.mp4?dl=0 (IMG:style_emoticons/default/beerchug.gif) See you at Okteenerfest |
|
|
|
| DRPHIL914 |
Aug 23 2018, 12:41 PM
Post
#40
|
|
Dr. Phil Group: Members Posts: 5,830 Joined: 9-December 09 From: Bluffton, SC Member No.: 11,106 Region Association: South East States |
QUOTE(Mikey914 @ Aug 23 2018, 01:20 PM) To be honest this one had me swearing quite a bit too. The window in the front does tuck underneath however the back needs to rotate down so as long as the base of the seal is fully engaged into the door it should be a matter of the center of the track coming back just a little. In other words adjustment for and aft QUOTE(Matty900 @ Aug 23 2018, 02:16 PM) QUOTE(Philip W. @ Aug 22 2018, 05:52 AM) I may just put the windows, frames and seals in my trunk and bring them to Okeenerfest , Matt, maybe you can use my car as the sample for installation. I have less than a month to try and get my gas tank, motor and whole interior including the sail vinyl etc all installed!! and I don't think this window stuff is going to get done. If the car runs and drives at least I can bring it, it might be with out windows. Happy to help. I am guessing that there may be a little adjustment left on the upper bolt on your rail. It is definitely a tight fit when they are new. I want to try and figure out exactly what your experiencing so I can try and address it in a final version of an installation video. I already have a few notes on things that I need to add to it. I appreciate anyone else's feedback too. https://www.dropbox.com/s/dg8pohr6s4o36jk/T...20edit.mp4?dl=0 (IMG:style_emoticons/default/beerchug.gif) See you at Okteenerfest I know we need a tight fit to not allow water past the seal, so I know it hst to be snug. The fore /aft adjustment is minmal, not much room for adjustment at all on the upper small bolt. The lower can shift a bit which will cause a counter-effect on the upper end, and if you move that lower bolt down/back the pivot will move upper forward and the leading edge of triange slightly down, which I did do and that did help, in fact it was almost a perfect fit at that point- with out the window though lol!! I am going to keep coming back to it but not until I get the motor in and car running, at that point I hope to have enough time to revisit this. Also I know these cars do vary a good bit due to the nature of manufacturing back in the day, so I am fully aware there will be differences in fit and finish from car to car. |
|
|
|
|
1 User(s) are reading this topic (1 Guests and 0 Anonymous Users)
0 Members:

|
Lo-Fi Version | Time is now: 12th July 2025 - 12:12 PM |
Invision Power Board
v9.1.4 © 2025 IPS, Inc.