|
|
|
Porsche, and the Porsche crest are registered trademarks of Dr. Ing. h.c. F. Porsche AG.
This site is not affiliated with Porsche in any way. Its only purpose is to provide an online forum for car enthusiasts. All other trademarks are property of their respective owners. |
|
|

  |

| VintageExcellence |
 Aug 20 2018, 05:31 PM Aug 20 2018, 05:31 PM
Post
#1
|
|
Member  Group: Members Posts: 52 Joined: 27-August 04 From: San Diego, CA Member No.: 2,636 |
I have not done many glue in windshields as most of my work is 911/912. I bought the butyl install stuff from 914rubber, just wondering if there is anything special to do?
Do you just evenly line the windshield channel with the material, install the spacer blocks and just put the windshield in place? Is it that simple? Leave it in the sun for a little bit? Here is where I am at. Attached thumbnail(s) 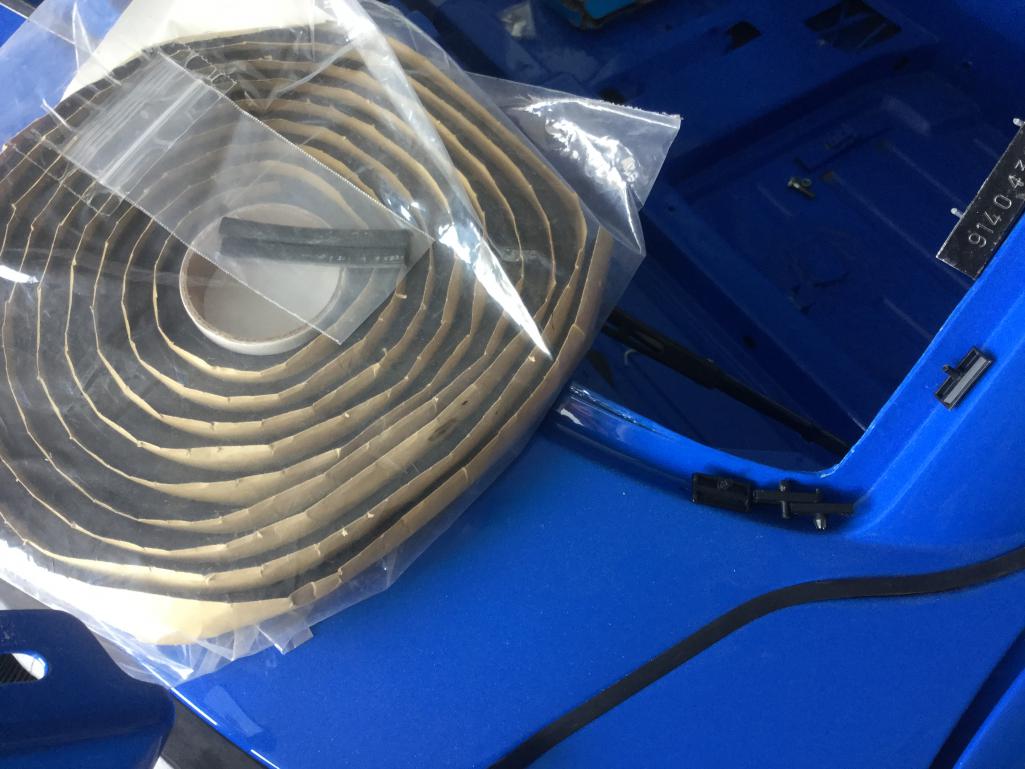
|
   |

 
|
| Larmo63 |
Aug 20 2018, 05:44 PM
Post
#2
|
|
Advanced Member Group: Members Posts: 4,264 Joined: 3-March 14 From: San Clemente, Ca Member No.: 17,068 Region Association: Southern California |
Mark, I'd have Ruffino do it.
He's done a million of them and he's fast. He uses the right size butyl too. Ruffino Windsheilds (714) 292-5811 |
|
|
|
| ConeDodger |
Aug 20 2018, 06:09 PM
Post
#3
|
|
Apex killer! Group: Members Posts: 23,588 Joined: 31-December 04 From: Tahoe Area Member No.: 3,380 Region Association: Northern California |
Looks good. You put all of the trim holders in place and set the pins. Line the inside edge of the butyl tape with the inside edge of the flange after using the primer. Prime the window as well. Don’t worry about excess as it will come right off with a razor blade. Put the placement spacers in place at the bottom of the window. Then, set the window in place. Works best with two but I did it by myself with two of those suction cup window tools. Then set the trim.
|
|
|
|
| rgalla9146 |
Aug 20 2018, 08:04 PM
Post
#4
|
|
Advanced Member Group: Members Posts: 4,554 Joined: 23-November 05 From: Paramus NJ Member No.: 5,176 Region Association: None |
Trial fit the glass first to establish correct location. Extend masking tape in a straight line from the frame onto the glass in four or five locations. Cut the tape in a straight line parallel with the edge of the glass.
Use the tape as a guide to place the glass accurately. Leave space between every clip and the edge of the glass to allow the trim to slip between the clip and the frame. I just did it this week. PM me....happy to help. |
|
|
|
| Mikey914 |
Aug 20 2018, 08:15 PM
Post
#5
|
|
The rubber man Group: Members Posts: 12,669 Joined: 27-December 04 From: Hillsboro, OR Member No.: 3,348 Region Association: None |
Not super easy, but definitely easier with a helper
This should help Attached image(s) 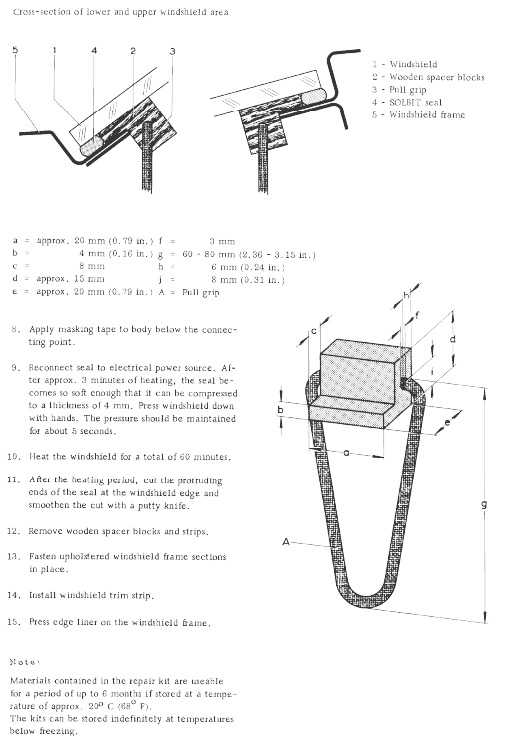 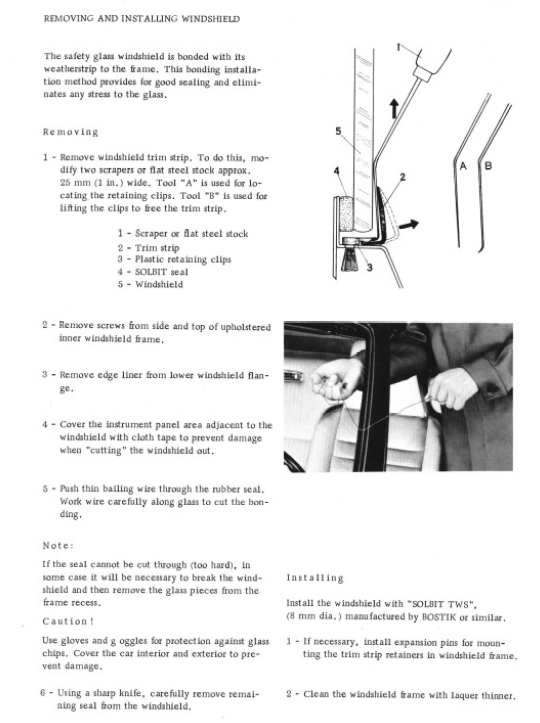 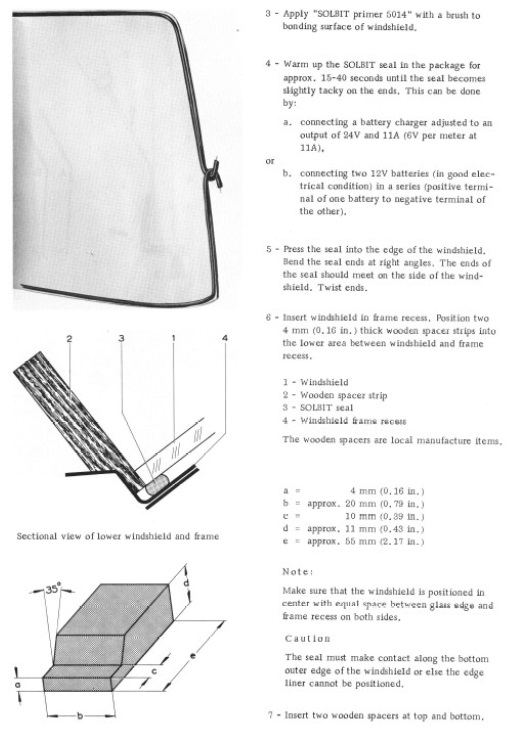 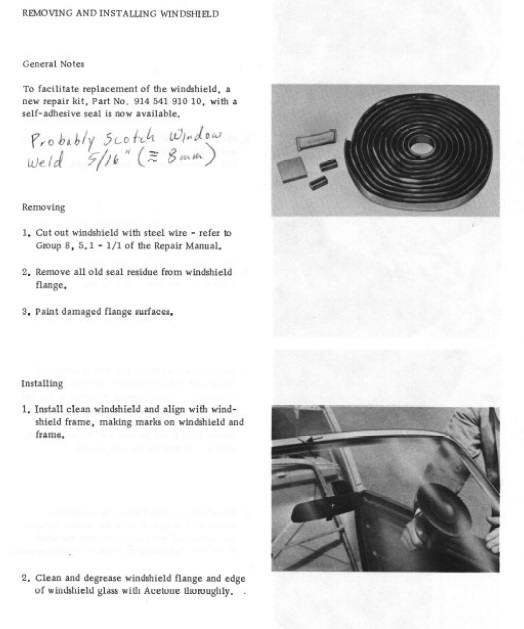 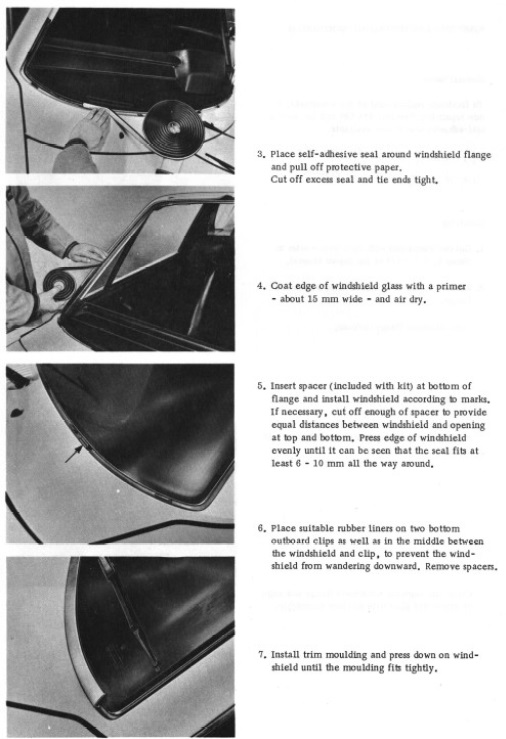
|
|
|
|
| aggiezig |
Aug 21 2018, 08:20 AM
Post
#6
|
|
Porsche Wannabe Group: Members Posts: 319 Joined: 13-January 16 From: Los Angeles, CA Member No.: 19,557 Region Association: Southern California |
Mark, thanks for posting that info. A few questions...
Are the setting blocks that you sell to be used instead of the 4mm wood spacers? How many linear feet of butyl tape is enough to do both front windshield and back window? Would a heat gun work to heat up the tape instead of the battery as suggested? (Not sure how they were managing that one?) What is the point of the twist where the two ends meet? |
|
|
|
| ConeDodger |
Aug 21 2018, 08:43 AM
Post
#7
|
|
Apex killer! Group: Members Posts: 23,588 Joined: 31-December 04 From: Tahoe Area Member No.: 3,380 Region Association: Northern California |
QUOTE(aggiezig @ Aug 21 2018, 11:20 AM)  Mark, thanks for posting that info. A few questions... Are the setting blocks that you sell to be used instead of the 4mm wood spacers? How many linear feet of butyl tape is enough to do both front windshield and back window? Would a heat gun work to heat up the tape instead of the battery as suggested? (Not sure how they were managing that one?) What is the point of the twist where the two ends meet? I did mine outside in Sacramento in the summer. That IS a heat gun! (IMG:style_emoticons/default/blink.gif) |
|
|
|
| ValcoOscar |
Aug 21 2018, 08:49 AM
Post
#8
|
|
Garage Life Group: Members Posts: 2,384 Joined: 19-November 13 From: SoCal Member No.: 16,669 Region Association: Southern California |
QUOTE(Larmo63 @ Aug 20 2018, 04:44 PM) Mark, I'd have Ruffino do it. He's done a million of them and he's fast. He uses the right size butyl too. Ruffino Windsheilds (714) 292-5811 (IMG:style_emoticons/default/agree.gif) Rufino is your guy if you are in SoCal. He did Wayne's car about a month ago. (Fullerton) Exceptional experience w quality results. Oscar |
|
|
|
| sb914 |
Aug 21 2018, 08:51 AM
Post
#9
|
|
Surf Guru Group: Members Posts: 4,303 Joined: 25-November 12 From: Brookings,Oregon Member No.: 15,191 Region Association: Southern California |
QUOTE(ValcoOscar @ Aug 21 2018, 07:49 AM) QUOTE(Larmo63 @ Aug 20 2018, 04:44 PM) Mark, I'd have Ruffino do it. He's done a million of them and he's fast. He uses the right size butyl too. Ruffino Windsheilds (714) 292-5811 (IMG:style_emoticons/default/agree.gif) Rufino is your guy if you are in SoCal. He did Wayne's car about a month ago. (Fullerton) Exceptional experience w quality results. Oscar (IMG:style_emoticons/default/agree.gif) he did mine as well as tons of others. |
|
|
|
| jcd914 |
Aug 21 2018, 09:11 AM
Post
#10
|
|
Advanced Member Group: Members Posts: 2,081 Joined: 7-February 08 From: Sacramento, CA Member No.: 8,684 Region Association: Northern California |
QUOTE(ConeDodger @ Aug 21 2018, 07:43 AM) QUOTE(aggiezig @ Aug 21 2018, 11:20 AM) Mark, thanks for posting that info. A few questions... Are the setting blocks that you sell to be used instead of the 4mm wood spacers? How many linear feet of butyl tape is enough to do both front windshield and back window? Would a heat gun work to heat up the tape instead of the battery as suggested? (Not sure how they were managing that one?) What is the point of the twist where the two ends meet? I did mine outside in Sacramento in the summer. That IS a heat gun! (IMG:style_emoticons/default/blink.gif) Lately in Sacramento you don't even need to be outside! The original adhesive rope or tape the factory manual is talking about had a heating wire running through it. You would hook each end of the wire to a battery or battery charger to heat up the adhesive. Further down in the article they refer to new self adhesive tape which is the butyl tape we now use. Yes the rubber blocks in 914rubber kit serve the same purpose as the wooden blocks at the base of the windshield. Jim |
|
|
|
| 76-914 |
Aug 21 2018, 10:27 AM
Post
#11
|
|
Repeat Offender & Resident Subaru Antagonist Group: Members Posts: 13,502 Joined: 23-January 09 From: Temecula, CA Member No.: 9,964 Region Association: Southern California |
(IMG:style_emoticons/default/agree.gif) with Roy.aka rgalla. Offer the glass up to the frame and mark as he mentioned but also do this. Check the distance from glass to metal at the 4 corners. If the frame is bent it will reveal itself now and you can easily pull the top back out to correct. People tend to grab the top of the drivers post when getting in/out and may have induced some warp. When you roll out the tape it will have a flat spot on 2 sides. If you can, keep the flats to the metal and glass sides. This just makes it a bit easier to mate up equally. If you don't it's not the end of the World. Once the glass is in place and lightly stuck look you can begin to seat it by firmly pressing across the top. bottom and sides of the glass. Do this in the hot sun and let the butyl tape reveal that it is in full contact as you move around the glass. Do not put force in a small area like the corners. I've over complicated and it is quite easy but take your time. Also, keep the glass on it's bottom or top edge when it's being stored or shipped. I laid one flat on the hood and it began to spider web with cracks 5 minutes later. (IMG:style_emoticons/default/chair.gif)
|
|
|
|
| Bartlett 914 |
Aug 21 2018, 11:32 AM
Post
#12
|
|
Advanced Member Group: Members Posts: 2,216 Joined: 30-August 05 From: South Elgin IL Member No.: 4,707 Region Association: Upper MidWest |
I keep the butyl in the fridge. This makes it easier to install as it is less sticky when cold. By the time I am about done installing it on the frame, it is beginning to get too tacky and sticks to your fingers.
|
|
|
|
| mepstein |
Aug 21 2018, 11:48 AM
Post
#13
|
|
914-6 GT in waiting Group: Members Posts: 19,272 Joined: 19-September 09 From: Landenberg, PA/Wilmington, DE Member No.: 10,825 Region Association: MidAtlantic Region |
QUOTE(Bartlett 914 @ Aug 21 2018, 01:32 PM) I keep the butyl in the fridge. This makes it easier to install as it is less sticky when cold. By the time I am about done installing it on the frame, it is beginning to get too tacky and sticks to your fingers. good tip. thanks |
 |
|
| dr914@autoatlanta.com |
Aug 21 2018, 11:54 AM
Post
#14
|
|
914 Guru Group: Members Posts: 7,864 Joined: 3-January 07 From: atlanta georgia Member No.: 7,418 Region Association: None |
we usually assemble the windshield chrome in one big rectangle on the blanketed hood of the car and with an assistant place it and clip into place
|
|
|
|
| Mikey914 |
Aug 23 2018, 12:44 AM
Post
#15
|
|
The rubber man Group: Members Posts: 12,669 Joined: 27-December 04 From: Hillsboro, OR Member No.: 3,348 Region Association: None |
QUOTE(aggiezig @ Aug 21 2018, 07:20 AM) Mark, thanks for posting that info. A few questions... Are the setting blocks that you sell to be used instead of the 4mm wood spacers? How many linear feet of butyl tape is enough to do both front windshield and back window? Would a heat gun work to heat up the tape instead of the battery as suggested? (Not sure how they were managing that one?) What is the point of the twist where the two ends meet? You will need 2 rolls for the front if you use the twist technique as shown, the rear is less than one roll, but sold as a "kit" that includes the 2 blocks. -Mark |
|
|
|
| larryM |
Aug 23 2018, 05:27 PM
Post
#16
|
|
emoze Group: Members Posts: 891 Joined: 1-January 03 From: mid- California Member No.: 65 Region Association: Northern California |
simple question
what size "tall") are the spacers used at bottom? that manual picture above says 4mm, but that seems 'way to "short" i just measured the old ones under my windscreen & they appear to be about 6mm +/_ , with "tapers" "up & outward" and the all around glass edge to frame spacing seems to be 6.5-7.5mm +/_, maybe up to 9mm at top edges - looks to me more like 6-8mm block needed under the glass to position it to be centered in the frame correctly 914Rubber pictures show tapered spacers & per telecon with Christopher says their setting block is 7cm long, 1/2cm deep (5mm), 1/4 cm "tall" or thick (2.5mm) - - that would be 'way too thin to center my glass in the frame i'm looking for a better option |
|
|
|
| Mikey914 |
Aug 25 2018, 11:34 PM
Post
#17
|
|
The rubber man Group: Members Posts: 12,669 Joined: 27-December 04 From: Hillsboro, OR Member No.: 3,348 Region Association: None |
The spacers are there only to provide isolation between the metal and glass should it shift. As you mentioned. I don't think the glass would drift that much, but it's a possibility.
|
|
|
|
| larryM |
Aug 28 2018, 10:00 PM
Post
#18
|
|
emoze Group: Members Posts: 891 Joined: 1-January 03 From: mid- California Member No.: 65 Region Association: Northern California |
QUOTE(Mikey914 @ Aug 25 2018, 10:34 PM) The spacers are there only to provide isolation between the metal and glass should it shift. per manual pics you posted 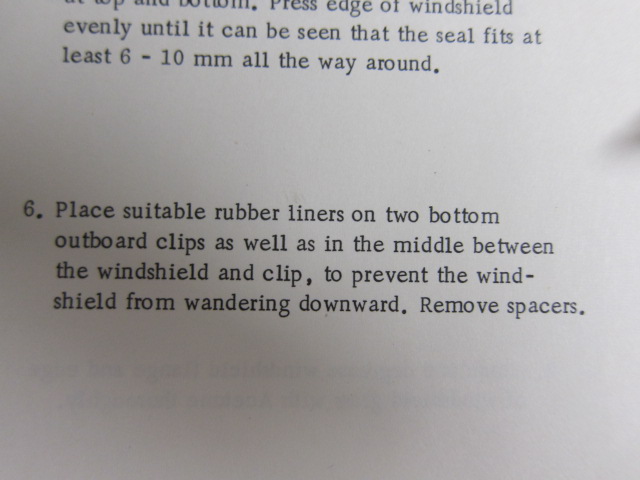 |
|
|
|
| dangrouche |
Aug 28 2018, 11:33 PM
Post
#19
|
|
dangrouche Group: Members Posts: 550 Joined: 1-May 04 From: San Francisco Bay Area Member No.: 2,012 Region Association: None |
here's my installation a bunch of years back; no problems since that time.
http://www.914world.com/bbs2/index.php?showtopic=235156 |
|
|
|
| Mikey914 |
Aug 29 2018, 12:23 AM
Post
#20
|
|
The rubber man Group: Members Posts: 12,669 Joined: 27-December 04 From: Hillsboro, OR Member No.: 3,348 Region Association: None |
The rubber stays the "spacers" in wood are removed.
|
|
|
|
|
1 User(s) are reading this topic (1 Guests and 0 Anonymous Users)
0 Members:

|
Lo-Fi Version | Time is now: 17th May 2024 - 08:03 PM |
Invision Power Board
v9.1.4 © 2024 IPS, Inc.