|
|
|
Porsche, and the Porsche crest are registered trademarks of Dr. Ing. h.c. F. Porsche AG.
This site is not affiliated with Porsche in any way. Its only purpose is to provide an online forum for car enthusiasts. All other trademarks are property of their respective owners. |
|
|

  |

| william harris |
 Jun 18 2005, 09:13 PM Jun 18 2005, 09:13 PM
Post
#21
|
|
914 Restorer  Group: Members Posts: 1,459 Joined: 9-January 04 From: Hamilton, MA Member No.: 1,539 |
Thanks for all the help guys. Let's see how we make out tomorrow. (IMG:http://www.914world.com/bbs2/html/emoticons/smile.gif)
|
   |

 
|
| Eric_Shea |
Jun 18 2005, 10:38 PM
Post
#22
|
||
|
PMB Performance Group: Admin Posts: 19,304 Joined: 3-September 03 From: Salt Lake City, UT Member No.: 1,110 Region Association: Rocky Mountains |
(IMG:http://www.914world.com/bbs2/html/emoticons/smilie_pokal.gif) Thank you! Proud to have them on that car (IMG:http://www.914world.com/bbs2/html/emoticons/wub.gif) Now that I think about it; to have them on Doug's, William's and your's is quite an honor. Made my day. (IMG:http://www.914world.com/bbs2/html/emoticons/beerchug.gif) |
||
|
|
|
||
| Doug Leggins |
Jun 18 2005, 11:59 PM
Post
#23
|
|
Senior Member Group: Benefactors Posts: 1,358 Joined: 6-February 03 From: Nashville, Indiana Member No.: 261 Region Association: None |
Eric,
I installed mine yesterday. VERY nice product! I'll send you another pic when I can get better lighting. Attached image(s) 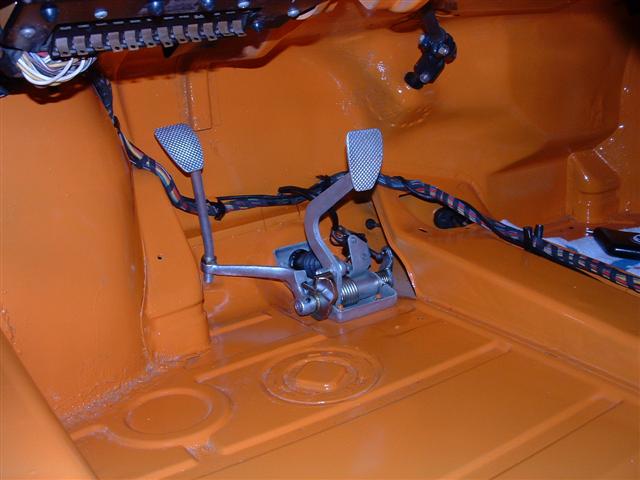
|
|
|
|
| Doug Leggins |
Jun 19 2005, 12:17 AM
Post
#24
|
||
|
Senior Member Group: Benefactors Posts: 1,358 Joined: 6-February 03 From: Nashville, Indiana Member No.: 261 Region Association: None |
William - THANKS for posting this topic. I installed my master cylinder yesterday And did not properly seat the lines in the grommets. I pushed the metal lines into the grommets as far as I could and assumed that was as far as they should go (IMG:http://www.914world.com/bbs2/html/emoticons/unsure.gif) . After seeing this post I knew that I did not have them inserted correctly.
Nothin like doing things over! I removed the master cylinder and started over. Tonight I followed Mark's steps.
I was able to get the metal lines inserted into the master cylinder easily on the bench. Then I fed the lines up through the 2 grommets that are located under where the gas tank goes. They fed in pretty easy just had to keep both of them moving. I fed the lines in until the front of the master cylinder hit the steering rack. Then I just compressed the bellows on the rear of the master cylinder and then the rear slid right through the opening. Be sure to get the brake rod aligned! ( I missed getting it aligned trying to do this myself (IMG:http://www.914world.com/bbs2/html/emoticons/headbang.gif) Got help and this was easy the second time.) Here's how I hooked up the lines. Attached image(s) 
|
||
|
|
|
||
| Doug Leggins |
Jun 19 2005, 12:19 AM
Post
#25
|
|
Senior Member Group: Benefactors Posts: 1,358 Joined: 6-February 03 From: Nashville, Indiana Member No.: 261 Region Association: None |
another
Attached image(s) 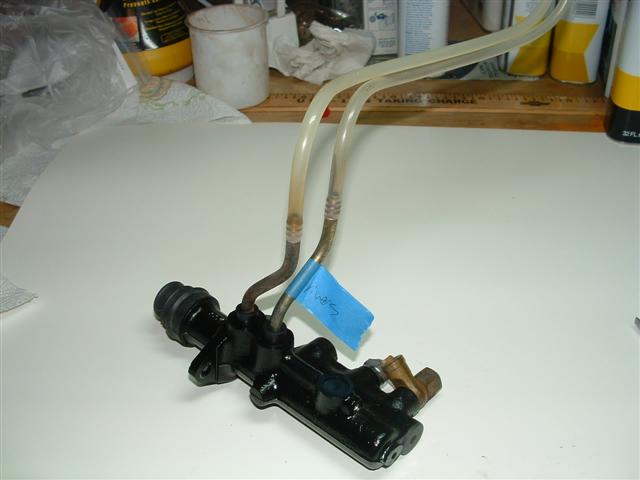
|
|
|
|
| Doug Leggins |
Jun 19 2005, 12:19 AM
Post
#26
|
|
Senior Member Group: Benefactors Posts: 1,358 Joined: 6-February 03 From: Nashville, Indiana Member No.: 261 Region Association: None |
top side
Attached image(s) 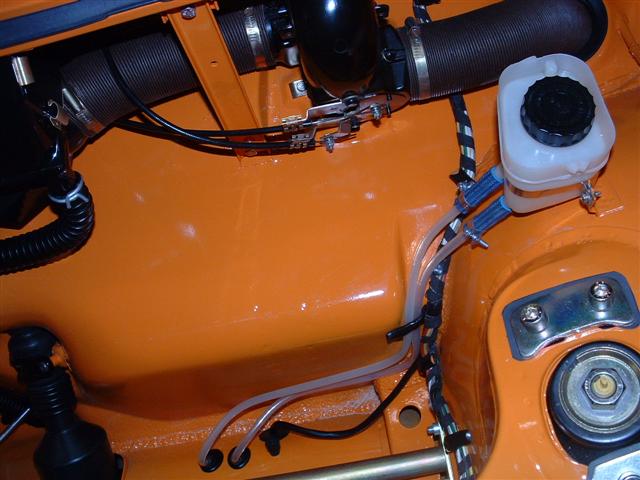
|
|
|
|
| jgiroux67 |
Jun 19 2005, 12:25 AM
Post
#27
|
|
Guitar Shredder Group: Members Posts: 593 Joined: 4-June 04 From: Turlock, CA Member No.: 2,157 |
I did this no problem. The MC was bolted in too.
How far down do you have to push the lines in? Hopefully I did it right. |
|
|
|
| Doug Leggins |
Jun 19 2005, 12:32 AM
Post
#28
|
|
Senior Member Group: Benefactors Posts: 1,358 Joined: 6-February 03 From: Nashville, Indiana Member No.: 261 Region Association: None |
I just compared the routing of the brake lines in Rob's pic and the routing that I did.
They do not match. Does it matter??? If I'm following the routing correctly, Rob's pics show the line from the front of the master cylinder reservoir connected to the rear connection on the master cylinder. My pics show that I connected the line from the front of the master cylinder reservoir to the front connection on the master cylinder. Will either routing work??? Or, do one of us need to .... |
|
|
|
| Gint |
Jun 19 2005, 09:29 AM
Post
#29
|
|
Mike Ginter Group: Admin Posts: 16,098 Joined: 26-December 02 From: Denver CO. Member No.: 20 Region Association: Rocky Mountains |
|
|
|
|
| william harris |
Jun 19 2005, 04:54 PM
Post
#30
|
|
914 Restorer Group: Members Posts: 1,459 Joined: 9-January 04 From: Hamilton, MA Member No.: 1,539 |
Thanks for the continuing pictures. Kinda wondered about front to front and back to back thing too. Does it make a difference? Got lazy today and let it slide. Somedays you just want to do easy stuff - spent about an hour trimming the seal that goes across the inside of the top of the windshield. Here's a tip to everyone - save the old rubber - I had the old piece and the cuts on each end were quite complicated. Would have never shaped it right without the old piece. (IMG:http://www.914world.com/bbs2/html/emoticons/biggrin.gif)
|
|
|
|
| watsonrx13 |
Jun 19 2005, 07:23 PM
Post
#31
|
||
|
Advanced Member Group: Members Posts: 2,735 Joined: 18-February 03 From: Plant City, FL Member No.: 312 Region Association: South East States |
Doug, I've been documenting the removal of all parts, so I installed them the way the came out, but I don't think it will make any difference if they are switched, remember, this is only a reservoir, not a proportioning valve, so you should be OK. |
||
|
|
|
||
| Doug Leggins |
Jun 19 2005, 09:59 PM
Post
#32
|
|
Senior Member Group: Benefactors Posts: 1,358 Joined: 6-February 03 From: Nashville, Indiana Member No.: 261 Region Association: None |
Rob - I agree. I don't think that it will make any difference which is front or back, as long as the routing of the plastic/metal tube is fine. I took the cap off of the reservoir today, pulled the screen and took a look inside. The bottom of the reservoir is divided into two sections but I don't think that it will have any affect on the front/rear issue.
I took a look at my 72 parts car today to compare. It still has the gas tank in it so I couldn't see the complete routing. I recruited some help to check it out. I went under to look at the lines coming through to the master cylinder. My helper grabbed a line near the master cylinder and moved it around. We did one at a time. I was able to see the corresponding line wiggle on the bottom side. Turns out that my routing on the 73 matches what I found on the 72. |
|
|
|
| Doug Leggins |
Jun 19 2005, 10:50 PM
Post
#33
|
||
|
Senior Member Group: Benefactors Posts: 1,358 Joined: 6-February 03 From: Nashville, Indiana Member No.: 261 Region Association: None |
There is a Tech Artical on the PP site, "Upgrading To A 19mm Master Cylinder". Pic #4 shows the lines inserted into the grommets. |
||
|
|
|
||
|
1 User(s) are reading this topic (1 Guests and 0 Anonymous Users)
0 Members:

|
Lo-Fi Version | Time is now: 14th July 2025 - 09:04 PM |
Invision Power Board
v9.1.4 © 2025 IPS, Inc.