|
|
|
Porsche, and the Porsche crest are registered trademarks of Dr. Ing. h.c. F. Porsche AG.
This site is not affiliated with Porsche in any way. Its only purpose is to provide an online forum for car enthusiasts. All other trademarks are property of their respective owners. |
|
|

  |

| John90290 |
 Dec 24 2018, 01:59 PM Dec 24 2018, 01:59 PM
Post
#1
|
|
Member  Group: Members Posts: 93 Joined: 4-March 18 From: Ventura, CA Member No.: 21,937 Region Association: None |
Adjusting the valves on my 1975 1.8 that I just put new pistons in. I’m going through the process as outlined on a few manuals but for some reason it doesn’t feel right? I’ve never done this before so the manuals I have don’t really have good pictures and the videos and such just say go to tdc and adjust. I get to the tdc mark but feel I need to turn it a bit more to get the valves on the number one to fully close. Also when I move on the the other cyclyndsrs after moving the crank 180 degrees, the ones I previously adjusted seem loose. Not sure if thes makes sense. I don’t want to get it back in the car and have it not run.
I’ve seen valve adjustment discussions on this forum before but couldn’t find them doing the search. |
   |

 
|
| 914Sixer |
Dec 24 2018, 03:02 PM
Post
#2
|
|
914 Guru Group: Members Posts: 8,879 Joined: 17-January 05 From: San Angelo Texas Member No.: 3,457 Region Association: Southwest Region |
Check to see if you have the CORRECT fan housing. 1.7 and 2.0 timing marks are different than 1.8. 1.8 is 7.5 degrees BTDC(Before Top Dead Center) @ 800-900 rpm.
|
|
|
|
| Rand |
Dec 24 2018, 03:11 PM
Post
#3
|
|
Cross Member Group: Members Posts: 7,409 Joined: 8-February 05 From: OR Member No.: 3,573 Region Association: None |
The epic Krusty method is in the classics forum
|
|
|
|
| aharder |
Dec 24 2018, 03:17 PM
Post
#4
|
|
Advanced Member Group: Members Posts: 4,388 Joined: 6-September 11 From: Dallas Texas Member No.: 13,524 Region Association: Southwest Region |
here's the Krusty method
http://www.914world.com/bbs2/index.php?sho...djusting+Valves |
|
|
|
| Mark Henry |
Dec 24 2018, 03:32 PM
Post
#5
|
|
that's what I do! Group: Members Posts: 20,065 Joined: 27-December 02 From: Port Hope, Ontario Member No.: 26 Region Association: Canada |
|
|
|
|
| bandjoey |
Dec 24 2018, 04:30 PM
Post
#6
|
|
bandjoey Group: Members Posts: 4,925 Joined: 26-September 07 From: Bedford Tx Member No.: 8,156 Region Association: Southwest Region |
QUOTE(Mark Henry @ Dec 24 2018, 03:32 PM)  hE'S jOKING. dON'T UNLESS YOU WANT TO TAKE THE MOTOR OUT TO GET THE BROKEN CHOPSTTICK OUT. (IMG:style_emoticons/default/biggrin.gif) Krusty is the right way. Read it about 6x and it'll make sense and easy to do. |
|
|
|
| TravisNeff |
Dec 24 2018, 04:59 PM
Post
#7
|
|
914 Guru Group: Members Posts: 5,082 Joined: 20-March 03 From: Mesa, AZ Member No.: 447 Region Association: Southwest Region |
Get the engine on TDC, on cyl number one both intake and exhaust valves should be slack. If they are not, spin the engine once more until it is on TDC again. Re-check, they should be slack and then check and adjust.
|
|
|
|
| iankarr |
Dec 24 2018, 06:09 PM
Post
#8
|
|
The wrencher formerly known as Cuddy_K Group: Members Posts: 2,472 Joined: 22-May 15 From: Heber City, UT Member No.: 18,749 Region Association: Intermountain Region |
You sure you have solid lifters? Hydraulic ones don’t get tight the way solid ones do. If you pull back on the rocker and it feels springy....
|
|
|
|
| Mark Henry |
Dec 24 2018, 06:30 PM
Post
#9
|
|
that's what I do! Group: Members Posts: 20,065 Joined: 27-December 02 From: Port Hope, Ontario Member No.: 26 Region Association: Canada |
QUOTE(bandjoey @ Dec 24 2018, 05:30 PM) QUOTE(Mark Henry @ Dec 24 2018, 03:32 PM) hE'S jOKING. dON'T UNLESS YOU WANT TO TAKE THE MOTOR OUT TO GET THE BROKEN CHOPSTTICK OUT. (IMG:style_emoticons/default/biggrin.gif) Krusty is the right way. Read it about 6x and it'll make sense and easy to do. Dats teh tooth! (IMG:style_emoticons/default/tooth.gif) |
|
|
|
| jvmarino |
Dec 24 2018, 10:50 PM
Post
#10
|
|
Member Group: Members Posts: 80 Joined: 22-March 09 From: Baltimore Member No.: 10,188 Region Association: None |
Make sure you are at TDC for the compression stroke. If you are 360 degrees out, the valves will seem really funky and the engine will not run at all. Made that mistake the first time, but never again.
|
|
|
|
| John90290 |
Dec 26 2018, 10:25 AM
Post
#11
|
|
Member Group: Members Posts: 93 Joined: 4-March 18 From: Ventura, CA Member No.: 21,937 Region Association: None |
QUOTE(aharder @ Dec 24 2018, 01:17 PM) Per Krusty's method he mentions 1.8L using Sodium exhaust valves. I have a picture of mine below. Are these the sodium ones? Attached image(s) 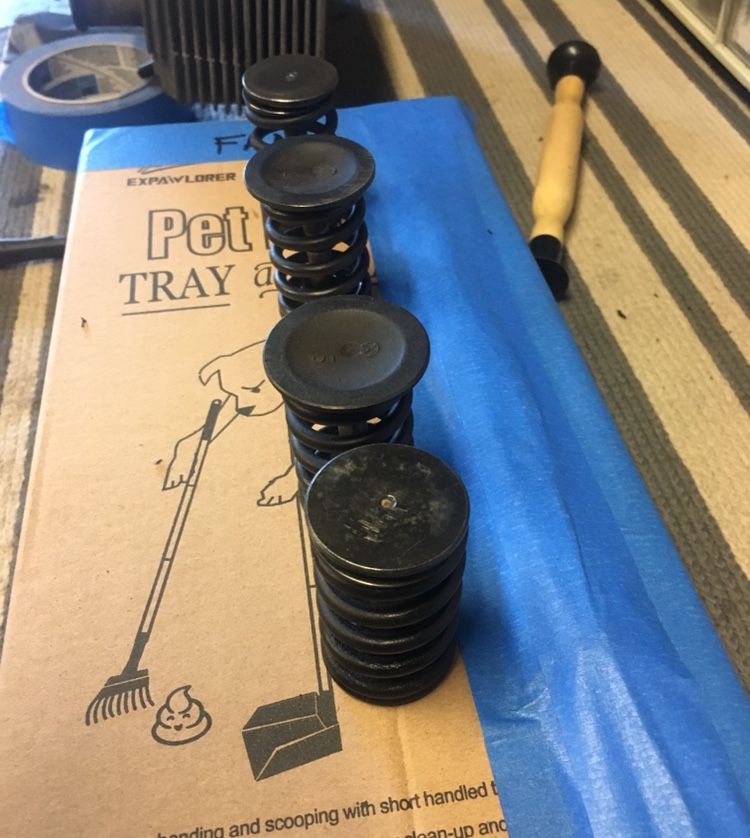
|
|
|
|
| TravisNeff |
Dec 26 2018, 10:36 AM
Post
#12
|
|
914 Guru Group: Members Posts: 5,082 Joined: 20-March 03 From: Mesa, AZ Member No.: 447 Region Association: Southwest Region |
Hmm, I thought only the 2.0 liter heads had sodium filled exhaust valves.
|
|
|
|
| TravisNeff |
Dec 26 2018, 10:36 AM
Post
#13
|
|
914 Guru Group: Members Posts: 5,082 Joined: 20-March 03 From: Mesa, AZ Member No.: 447 Region Association: Southwest Region |
Hmm, I thought only the 2.0 liter heads had sodium filled exhaust valves.
|
|
|
|
| TravisNeff |
Dec 26 2018, 10:37 AM
Post
#14
|
|
914 Guru Group: Members Posts: 5,082 Joined: 20-March 03 From: Mesa, AZ Member No.: 447 Region Association: Southwest Region |
Hmm, I thought only the 2.0 liter heads had sodium filled exhaust valves.
|
|
|
|
| ChrisFoley |
Dec 26 2018, 11:31 AM
Post
#15
|
|
I am Tangerine Racing Group: Members Posts: 7,924 Joined: 29-January 03 From: Bolton, CT Member No.: 209 Region Association: None |
The little dimple in the center of the valve face usually indicates a sodium filled valve.
|
|
|
|
| HAM Inc |
Dec 26 2018, 05:07 PM
Post
#16
|
|
Senior Member Group: Members Posts: 846 Joined: 24-July 06 From: Watkinsville,GA Member No.: 6,499 Region Association: None |
Like Chris said, the dimple usually indicates a sodium filled valve. You should see the mess it makes of the engine when those hollow old valves break.
And the valves aren't the only scary things in those pictures; those springs are terrifying! |
|
|
|
| John90290 |
Dec 26 2018, 07:36 PM
Post
#17
|
|
Member Group: Members Posts: 93 Joined: 4-March 18 From: Ventura, CA Member No.: 21,937 Region Association: None |
QUOTE(HAM Inc @ Dec 26 2018, 03:07 PM) Like Chris said, the dimple usually indicates a sodium filled valve. You should see the mess it makes of the engine when those hollow old valves break. And the valves aren't the only scary things in those pictures; those springs are terrifying! Most of the replacement valves I see on line have the dimples regardless of their sodium status. Here is one example. New AE Exhaust Valve Porsche 914 912 1976 https://rover.ebay.com/rover/0/0/0?mpre=htt...%2F152559390949 Please explain the spring comment if you can. Why are they terrifying? Thanks. |
|
|
|
| HAM Inc |
Dec 26 2018, 09:06 PM
Post
#18
|
|
Senior Member Group: Members Posts: 846 Joined: 24-July 06 From: Watkinsville,GA Member No.: 6,499 Region Association: None |
QUOTE(John90290 @ Dec 26 2018, 06:36 PM) QUOTE(HAM Inc @ Dec 26 2018, 03:07 PM) Like Chris said, the dimple usually indicates a sodium filled valve. You should see the mess it makes of the engine when those hollow old valves break. And the valves aren't the only scary things in those pictures; those springs are terrifying! Most of the replacement valves I see on line have the dimples regardless of their sodium status. Here is one example. New AE Exhaust Valve Porsche 914 912 1976 https://rover.ebay.com/rover/0/0/0?mpre=htt...%2F152559390949 Please explain the spring comment if you can. Why are they terrifying? Thanks. In my experience a dimpled O.E. valve is sodium filled. The same is generally true of aftermarket valves, but I would never argue that exceptions may exist. The springs are scary, at least the one in the foreground, because it's corroded and pitted. I have a hunch those are the original springs and valves. Any 40+years old spring is scary. Even one that's not corroded. |
|
|
|
| John90290 |
Dec 27 2018, 10:19 AM
Post
#19
|
|
Member Group: Members Posts: 93 Joined: 4-March 18 From: Ventura, CA Member No.: 21,937 Region Association: None |
Thanks for all the info gentlemen! I will try to look for the part number on the valve. Fortunately that’s not corrosion on the spring. Those things have been sitting uncovered on my work bench for a while so they got good dosing of sawdust and other debris from random other projects. They cleaned up nice but I agree, 40 year old anything is bound to break. I’m 48 and can attest to that;)
|
|
|
|
| euro911 |
Dec 27 2018, 02:22 PM
Post
#20
|
|
Retired & living the dream. God help me if I wake up! Group: Members Posts: 8,849 Joined: 2-December 06 From: So.Cal. & No.AZ (USA) Member No.: 7,300 Region Association: Southern California |
48? ... wait until you hit 65 (IMG:style_emoticons/default/laugh.gif)
Did you build the motor? ... are you sure the dimples on the cam and crank gears matched up? I had an adjustment issue where I adjusted the passenger side, then the driver's side and came back to verify the the passenger side - and found it was out (IMG:style_emoticons/default/sad.gif) I suspected worn cam bushings, and when I tore the motor apart, it was confirmed. BTW, I only use SS valves on a rebuild. |
|
|
|
|
1 User(s) are reading this topic (1 Guests and 0 Anonymous Users)
0 Members:

|
Lo-Fi Version | Time is now: 12th May 2024 - 01:18 PM |
Invision Power Board
v9.1.4 © 2024 IPS, Inc.