|
|
|
Porsche, and the Porsche crest are registered trademarks of Dr. Ing. h.c. F. Porsche AG.
This site is not affiliated with Porsche in any way. Its only purpose is to provide an online forum for car enthusiasts. All other trademarks are property of their respective owners. |
|
|

  |

| bbrock |
 Jun 19 2019, 10:18 AM Jun 19 2019, 10:18 AM
Post
#41
|
|
914 Guru  Group: Members Posts: 5,269 Joined: 17-February 17 From: Montana Member No.: 20,845 Region Association: Rocky Mountains |
Carbs are finally cleaned up and back together. The secret sauce was @mepstein 's magic vapor blasting. I replaced all rubber seals, gaskets, and accelerator pump diaphragm as well as replated the corroded hardware. They operate smooth and easy and I think will look great in the engine bay.
(IMG:http://www.914world.com/bbs2/uploads/post-20845-1560959943_thumb.jpg) I still need to order jets to match @72hardtop 's recommendations but wondering what initial settings are working for folks. Seems these recs vary. For example: Tomlinsons suggests setting bypass screws to 1/2 turn out from seated, idle mixtures 3 turns out, and idle speed so throttle plates have a .04 gap. Haynes suggests bypass closed, idle mixture 2 turns out, and idle speed 2 turns past contact. I know these are all approximations and either of them will probably be fine, but curious how 914 people are setting their carbs for first run. Also, I can't find much on adjustment of the accelerator pump other than they both need to pump the same. I know measuring the volume is probably best but can't find specs. One thread said to check the Haynes manual but mine says nothing on the topic. Can anyone tell me how I should set these? Thanks for all your help saving these old carbs (IMG:style_emoticons/default/beerchug.gif) Oh, I also rebuilt the stock dizzy so this is what I'll run initially. Everything I've read indicates this should work great. (IMG:http://www.914world.com/bbs2/uploads/post-20845-1558413627.jpg) |
   |

 
|
| rhodyguy |
Jun 19 2019, 10:55 AM
Post
#42
|
|
Chimp Sanctuary NW. Check it out. Group: Members Posts: 22,252 Joined: 2-March 03 From: Orion's Bell. The BELL! Member No.: 378 Region Association: Galt's Gulch |
Get the CB Weber manual. 2056? Refresh my memory. 32mm Venturi for starters. I'll get the rest of the #s off of my 44s reconfigured for a 2056 later.
|
|
|
|
| bbrock |
Jun 19 2019, 11:11 AM
Post
#43
|
|
914 Guru Group: Members Posts: 5,269 Joined: 17-February 17 From: Montana Member No.: 20,845 Region Association: Rocky Mountains |
QUOTE(rhodyguy @ Jun 19 2019, 10:55 AM)  Get the CB Weber manual. 2056? Refresh my memory. 32mm Venturi for starters. I'll get the rest of the #s off of my 44s reconfigured for a 2056 later. It's a stock 1970 engine with 8.0:1 pistons. I think the 28mm venturi should be good for this engine but open to opinions bearing in mind that I'm not all that interested in top end and willing to sacrifice a little performance for fuel economy. Is this the CB manual you're suggesting? (IMG:http://www.914world.com/bbs2/uploads_offsite/www.cbperformance.com-20845-1560964305.1.jpg) If so, that's one of the ones I have that I referenced as Tomlinsons before. No mention that I can find for adjusting accelerator pump but I'll look again. |
|
|
|
| rhodyguy |
Jun 19 2019, 11:19 AM
Post
#44
|
|
Chimp Sanctuary NW. Check it out. Group: Members Posts: 22,252 Joined: 2-March 03 From: Orion's Bell. The BELL! Member No.: 378 Region Association: Galt's Gulch |
OK, the 28s should be fine. A little short on the top end but off idle response should be smooth. The Weber info at aircooled.net is pretty good. The per cyl displacement loss is fairly insignificant. The 32s might be the best of both worlds.
|
|
|
|
| IronHillRestorations |
Jun 20 2019, 06:53 AM
Post
#45
|
|
I. I. R. C. Group: Members Posts: 6,949 Joined: 18-March 03 From: West TN Member No.: 439 Region Association: None |
Here's my carb tuning procedure from a March 03 post:
Assumptions: the carbs have the optimum jet and venturi package (if you have an unknown engine/cam good luck on this one), the float level in the carbs is correct, the cams are correctly timed, the valves are properly adjusted, the ignition timing is dead on, you have the proper spark plugs for your engine, the linkage is good, the fuel is good, the engine is good. Remember that the mixture and air bypass adjustment screws are precision needle valves, not head gaskets. Use your fingers to tighten them, not your fist. Start and warm up the engine. Make sure the two drop links for the throttle linkage are exactly the same length, and disconnected. You can use a 8mm thin ignition wrench to snap them off. Turn the mixture screws all the way in and then 5 half turns out. Turn the air bypass screws all the way in. Turn the idle speed screws out til it just touches, and then in 3 half turns. (3 barrels I go 5 half turns) Put on your hearing protection and start the car. Use your STE and find the barrel that pulls the most. We'll call this one baseline. Balance the barrel in the other carb that pulls the most with the idle speed screw. (if you have a Uni-syn, give it to someone you don't like and purchase a STE airflow meter) Go back to the other carb, with the baseline barrel. You will have one all the way in, then use the air bypass screws and balance the other two barrels. Go to the other carb and do the same thing. Snug the jamb nuts on the air bypass screws. All six barrels should pull the same amount of air at this point, if not repeat air adjustment procedure. Snap the throttle linkage drop links back on the carbs. If the idle changes then you need to barely adjust the linkage mounts so snapping the drop links on, doesn't change the side to side idle balance. Use the hand throttle or a vice grip and rag to lock the linkage between 1400 and 1800 rpm. Start back at the baseline barrel and adjust the mixture screw in or out, to get the smoothest running and highest idle, then turn it in 1/4 turn. Do the same with the five other mixture screws. If you have to turn the mixture screws more than two turns either way (from baseline), you've got the wrong jets. Recheck side to side and individual air balance, adjust as needed. Road test the car. If you get snapping and poping out the intake, it's generally a lean condition. If you get heavy exhaust fumes, or pboofing out the exhaust it's probably too rich. If you get a flat spot or popping out the intake at between 2800 and 3200 rpm, you probably need larger idle jets. That's a rough, five minute draft of my carb tuning proceedure, hope it helps! If it goes good it should take about 45 minutes, if not about three years. PK If it's running good but a little rich, you can turn each air bypass screw out to lean it out some, go a half turn out at a time and test drive. Make sure you turn all screws the same amount. This was written 16 years ago before wide band O2 sensors were economical and easy to install, get one it will make your carb tuning much easier. |
|
|
|
| Tdskip |
Jun 20 2019, 07:18 AM
Post
#46
|
|
Advanced Member Group: Members Posts: 3,783 Joined: 1-December 17 From: soCal Member No.: 21,666 Region Association: None |
QUOTE(Superhawk996 @ Mar 22 2019, 01:37 PM) Nah - your assumption was that they were dry stored and not exposed to humidity. That was a reasonable assumption. |
|
|
|
| mepstein |
Jun 20 2019, 07:35 AM
Post
#47
|
|
914-6 GT in waiting Group: Members Posts: 20,798 Joined: 19-September 09 From: Landenberg, PA/Wilmington, DE Member No.: 10,825 Region Association: MidAtlantic Region |
QUOTE(Tdskip @ Jun 20 2019, 09:18 AM) QUOTE(Superhawk996 @ Mar 22 2019, 01:37 PM) Nah - your assumption was that they were dry stored and not exposed to humidity. That was a reasonable assumption. I can imagine the disappointment pulling them out of the box when you were expecting a pristine pair. Storing the engine parts in a damp basement trashed all the internal parts of my bike engine and caused the PO to give up on the bike. Unlike Brent's carbs, the steel parts were too far gone to reuse. The aluminum cleaned up nicely. Attached image(s) 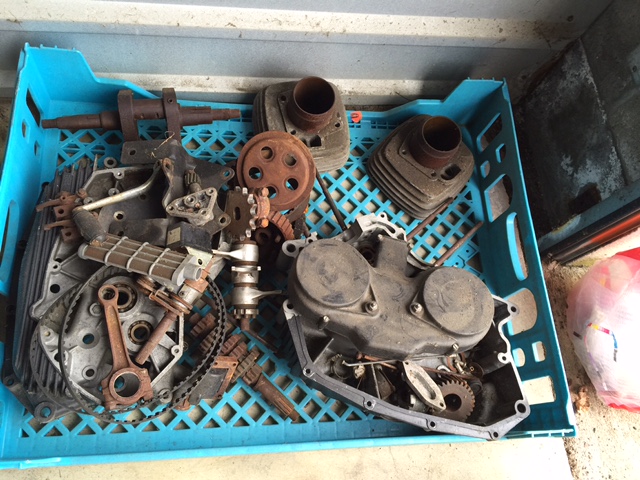 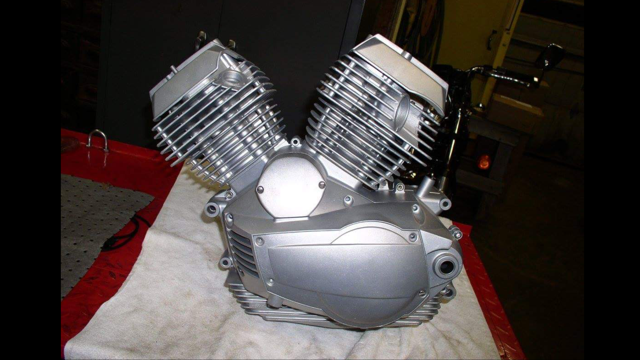
|
|
|
|
| ThePaintedMan |
Jun 20 2019, 02:23 PM
Post
#48
|
|
Advanced Member Group: Members Posts: 3,887 Joined: 6-September 11 From: St. Petersburg, FL Member No.: 13,527 Region Association: South East States |
Nice job. (IMG:style_emoticons/default/aktion035.gif) Highly recommend you spray the outside of those things with CRC 3-36 corrosion inhibitor. I hit all the ones I rebuild with it as well as the ones on my car every few months. Helps keep them looking nice and shiny and prevents the hardware from freezing up. 3-36 can be found at Grainger and a few other places.
|
|
|
|
| bbrock |
Jun 20 2019, 02:34 PM
Post
#49
|
|
914 Guru Group: Members Posts: 5,269 Joined: 17-February 17 From: Montana Member No.: 20,845 Region Association: Rocky Mountains |
QUOTE(ThePaintedMan @ Jun 20 2019, 02:23 PM) Nice job. (IMG:style_emoticons/default/aktion035.gif) Highly recommend you spray the outside of those things with CRC 3-36 corrosion inhibitor. I hit all the ones I rebuild with it as well as the ones on my car every few months. Helps keep them looking nice and shiny and prevents the hardware from freezing up. 3-36 can be found at Grainger and a few other places. Thanks George, Mark deserves all the credit. Even after soda blasting, they still had a lot of black staining from the corrosion. Mark's vapor blasting is what cleaned that off. I sprayed them with Boeshield T-9 to protect them. I learned about it here on the forums but don't remember where. I've been very happy with the result using it on my fan housing and a few other parts. (IMG:http://www.914world.com/bbs2/uploads_offsite/boeshield.com-20845-1561062843.1.jpg) |
|
|
|
| 72hardtop |
Sep 6 2020, 01:26 AM
Post
#50
|
|
Member Group: Members Posts: 120 Joined: 11-September 13 From: Seattle/HB Ca./Fujieda-Japan Member No.: 16,378 Region Association: Pacific Northwest |
What elevation you at? (My jetting is a few hundred above feet sea level)
Engine size? The distributor in the pic appears to have too much play at the end of the shaft. Shim it. When setting the AFR screws start approximately 3-4 turns from lightly seated position. As for the idle speed 1/2 turn in from first contact of the lever. Any further in and the throttle plates will begin to expose the progression circuits. Float height needs to be 10mm - 11.5mm with the gasket in place ball NOT depressed. Float drop (not as critical) 28-32mm Fuel pressure 3-3.5lbs max |
|
|
|
| porschetub |
Sep 6 2020, 02:17 AM
Post
#51
|
|
914 Guru Group: Members Posts: 5,130 Joined: 25-July 15 From: New Zealand Member No.: 18,995 Region Association: None |
QUOTE(Superhawk996 @ Mar 23 2019, 06:34 AM) (IMG:style_emoticons/default/unsure.gif) Wow. I'm looking for the eating crow emoji. Not what I had envisioned as NOS. Were they stored outdoors? (IMG:style_emoticons/default/agree.gif) a touch rough,just being honest. |
|
|
|
| IronHillRestorations |
Sep 6 2020, 11:50 AM
Post
#52
|
|
I. I. R. C. Group: Members Posts: 6,949 Joined: 18-March 03 From: West TN Member No.: 439 Region Association: None |
I went back and re-read some of this thread. I'd recommend disabling the cold start plungers. I've never seen those used on a 914, but I have seen where the mechanism got janked with, stuck and made it run fat as a hog, to the point of diluting the oil with gas.
You've taken the mechanism off, and properly blocked it off. I'd take the next step which is to tap the plunger bore for a 3/8 x 16 and install a brass hex socket head set screw to keep the plungers in place. I just did this on an engine about a month ago. I got some brass plugs off ebay. brass set screws I chucked up a 3/8 x 16 tap in my drill press and turned it by hand to start the tap, and make sure it was lined up. @bbrock Cold start disable on Weber carb |
|
|
|
| bbrock |
Sep 6 2020, 12:17 PM
Post
#53
|
|
914 Guru Group: Members Posts: 5,269 Joined: 17-February 17 From: Montana Member No.: 20,845 Region Association: Rocky Mountains |
I was surprised to see this old thread pop up again but appreciate the additional advice. Tapping and plugging the cold start circuit is on the to-do list for when I get back to finishing up the engine before first start. Thanks for the tip on those brass set screws Perry. They are on order now.
I will also double check the end play on the dizzy as suggested by @72hardtop before first start. I'm pretty sure I shimmed it but good idea to double check. To answer the other questions. I live at 6,000 ft. and a long day drive could run through anything from 3,000 - 10,000 ft. The engine is stock 2.0L (1911) with an Elgin 6408 cam and flat top Mahle pistons. |
|
|
|
| 72hardtop |
Nov 2 2020, 06:19 AM
Post
#54
|
|
Member Group: Members Posts: 120 Joined: 11-September 13 From: Seattle/HB Ca./Fujieda-Japan Member No.: 16,378 Region Association: Pacific Northwest |
My procedure....
Start and warm up the engine. Make sure the two drop links for the throttle linkage are exactly the same length, and disconnected. You can use a 8mm thin ignition wrench to snap them off. Turn the mixture screws all the way in (lightly seated) and then 4-5 half turns out. Turn the air bypass screws all the way in. Snug the jamb nuts on the air bypass screws. Turn the idle speed screws out and then in until they just touch the levers (then add 1/2 turn in) Should run like a tractor. Put on your hearing protection and start the car. Allow it to warm to normal operating temp prior to tuning. Use your SNAIL and find the barrel that pulls the most. We'll call this one baseline. Balance the barrel in the other carb that pulls the most with the idle speed screw. (if you have a Uni-syn, give it to someone you don't like and purchase a SNAIL airflow meter) Go back to the other carb, with the baseline barrel. You will have one all the way in, then use the air bypass screws and balance the two barrels to each other. Go to the other carb and do the same thing. Keep the idle speed low 850rpm or so. All four barrels should pull the same (within 1 point of each other) amount of air at this point, if not repeat air adjustment procedure. Snap the throttle linkage drop links back on the carbs. If the idle changes then you need to barely adjust the linkage mounts so snapping the drop links on, doesn't change the side to side idle balance. Start back at the baseline barrel and adjust the mixture screw in or out, to get the smoothest running and highest idle. (No further adjustment in) Do the same with the three other mixture screws. If you have to turn the mixture screws out more than two turns (from lightly seated), you've got the wrong jets. Recheck side to side and individual air balance, adjust as needed. Keep the idle speed low 850rpm or so. Road test the car. If you get snapping and popping out the intake, it's generally a lean condition. If you get heavy exhaust fumes, or popping out the exhaust it's probably too rich. If you get a flat spot or popping out the intake at between 2800 and 3200 rpm, you probably need larger idle jets. If you change/alter the timing, jet/s and or A/F mix screws you redo LBI on all screws. All tuning is done on an engine that is at normal operating temp. If the jetting is correct it should run like crap when cold idle/progression circuit). |
|
|
|
| Gint |
Nov 21 2020, 09:09 AM
Post
#55
|
|
Mike Ginter Group: Admin Posts: 16,108 Joined: 26-December 02 From: Denver CO. Member No.: 20 Region Association: Rocky Mountains |
I've had this thread open in a browser tab on my laptop for two months now, meaning to ask this question.
Regarding the post in this link, #41 in this thread. @mepstein - Mark, can you please tell me about your vapor blasting setup? I have a lot of part restoration to do. Ideally I'd like to do some dry ice lasting, but it's cost prohibitive. This vapor blasting idea interests me as the results here were fantastic. Thanks! Aha! Just re-read post #36 Apparently I need to read this thread @bbrock - I should also say that I'm a big fan of the your work. Thanks for posting your progress on 914world! This post has been edited by Gint: Nov 21 2020, 09:16 AM |
|
|
|
| bbrock |
Nov 22 2020, 07:13 PM
Post
#56
|
|
914 Guru Group: Members Posts: 5,269 Joined: 17-February 17 From: Montana Member No.: 20,845 Region Association: Rocky Mountains |
QUOTE(IronHillRestorations @ Sep 6 2020, 11:50 AM) I went back and re-read some of this thread. I'd recommend disabling the cold start plungers. I've never seen those used on a 914, but I have seen where the mechanism got janked with, stuck and made it run fat as a hog, to the point of diluting the oil with gas. You've taken the mechanism off, and properly blocked it off. I'd take the next step which is to tap the plunger bore for a 3/8 x 16 and install a brass hex socket head set screw to keep the plungers in place. I just did this on an engine about a month ago. I got some brass plugs off ebay. brass set screws I chucked up a 3/8 x 16 tap in my drill press and turned it by hand to start the tap, and make sure it was lined up. @bbrock Cold start disable on Weber carb @IronHillRestorations Well Perry, I've gotten myself into a bit of a pickle. I pulled the top off of one of my carbs today planning to tap the top of the cold start bores for the brass set screws you recommended. I rediscovered that the cold start pistons are seized in the bores from the same evil that caused me to start this thread in the first place. I tried soaking them with penetrating oil and then tapping them out gently but no luck. They are stuck. The good news is they are stuck in the down position where I want them, but I'm reluctant to try tapping the bores with the pistons in place so I decided to just put them back together and recheck after running the engine for a year to see if they loosen up. Wouldn't you know it that as I was pressing that little brass spring washer that locks the mechanism down, my screwdriver slipped and the washer and little air cap went shooting across my overstuffed and cluttered shop. I found the cap but after 4 hours of searching, still no washer yet. I can't find that part for sale. Wondering what my options are here. I was thinking maybe cut some brass rod to stick in that bore instead of the set screws so even if the pistons worked free, they couldn't go anywhere, but I think I'd still need that stupid spring washer to lock it into place. Thoughts? (IMG:style_emoticons/default/confused24.gif) And @Gint , thanks for the compliment. I am proof that any idiot who doesn't know what they are doing can fake a good result restoring one of these cars armed with all the great help on this forum! |
|
|
|
| nditiz1 |
Nov 22 2020, 08:10 PM
Post
#57
|
|
Senior Member Group: Members Posts: 1,272 Joined: 26-May 15 From: Mount Airy, Maryland Member No.: 18,763 Region Association: MidAtlantic Region |
I haven't ever converted them to disabled as they already had them and I didn't hook to a cable or they had block off plates, but I believe there is a kit that removes everything in the cold start system and gives you the block off plates to close them up so you shouldn't need to bother with finding that washer.
|
|
|
|
| bbrock |
Nov 22 2020, 08:26 PM
Post
#58
|
|
914 Guru Group: Members Posts: 5,269 Joined: 17-February 17 From: Montana Member No.: 20,845 Region Association: Rocky Mountains |
QUOTE(nditiz1 @ Nov 22 2020, 08:10 PM) I haven't ever converted them to disabled as they already had them and I didn't hook to a cable or they had block off plates, but I believe there is a kit that removes everything in the cold start system and gives you the block off plates to close them up so you shouldn't need to bother with finding that washer. I already have the kit. It is just a block off plate that removes the lever mechanism but you do have to keep all the guts in place to make it work. However, there is a lot of info here and on the Webs about how the little pistons in the cold start mechanism can get stuck in the open position which will make the engine run very rich and could scour the cylinders. What I was attempting was to follow Perry's procedure (see link a few posts up) to tap the bores and insert a brass set screw that holds that piston down so it can't migrate up and get stuck. As long as that piston remains seized in the bore like it is now, there will be no problem, but I'd like to have some assurance it can't work loose so I need to put something in there. Here's another thread on The Samba of someone using brass rod but I think they are still holding it in with the washer. |
|
|
|
| 914werke |
Aug 19 2021, 02:23 PM
Post
#59
|
|
"I got blisters on me fingers" Group: Members Posts: 11,687 Joined: 22-March 03 From: USofA Member No.: 453 Region Association: Pacific Northwest |
Interesting, I happen to be working on a customers 1.7L that happens to have a set of 40IDF Webers that also have this cold start mechanism,
1st for me. Besides a hole in a float, the pieces that makeup that cold start circuit were probably part of this problem, as they were a big mess. Id also be interested in the "Block off" parts & procedure as Ive got them apart for ultrasonic cleaning now. Would be nice to soda blast as the finish sure is nice but Im not set up for that..yet (IMG:style_emoticons/default/smile.gif) Edit: I followed the link to TheSamba thread. Looks like all I need is some brass rod & some calipers |
|
|
|
| IronHillRestorations |
Aug 20 2021, 04:47 AM
Post
#60
|
|
I. I. R. C. Group: Members Posts: 6,949 Joined: 18-March 03 From: West TN Member No.: 439 Region Association: None |
QUOTE(914werke @ Aug 19 2021, 12:23 PM) Interesting, I happen to be working on a customers 1.7L that happens to have a set of 40IDF Webers that also have this cold start mechanism, 1st for me. Besides a hole in a float, the pieces that makeup that cold start circuit were probably part of this problem, as they were a big mess. Id also be interested in the "Block off" parts & procedure as Ive got them apart for ultrasonic cleaning now. Would be nice to soda blast as the finish sure is nice but Im not set up for that..yet (IMG:style_emoticons/default/smile.gif) Edit: I followed the link to TheSamba thread. Looks like all I need is some brass rod & some calipers Weber enrichment disable I chucked the tap in a drill press (turned by hand) to tap the bores |
|
|
|
|
1 User(s) are reading this topic (1 Guests and 0 Anonymous Users)
0 Members:

|
Lo-Fi Version | Time is now: 5th July 2026 - 08:57 PM |
Invision Power Board
v9.1.4 © 2026 IPS, Inc.