I didn't want to hijack the other thread but have a question about my own Webers. They are Italian 40IDFs I bought in the late 80s or early 90s. Other than finger tight bolting them on to my engine to see how cool they looked, they have never been used. No fuel has touched them. I don't remember if I even opened them to set the float levels. BUT... they were stored in a humid basement for several years before I moved to a civilized climate. So, the magnesium housing is tarnished on the outside and the plating has deteriorated on a few of the levers and such. Pretty minor stuff from what I can see.
My question: is there is anything special I should do or check other than inspecting for corroded parts and normal setup as I prep these for service?
Full Version: Reviving NOS Webers
Are you really going to go through with it? After you have the "K" stamp on the suspension and 621 on the tin?

If nothing else I would take them apart and do a thorough cleaning and check the float levels. I have heard that they can have debris in them new out of the box.
 take them apart, clean, blow out*, etc.
Check the diaphragm it may have degraded.
*Note never blow out an assembled carb. It will destroy the float.
QUOTE(Mark Henry @ Mar 21 2019, 07:57 AM) 
take them apart, clean, blow out*, etc.Check the diaphragm it may have degraded.
*Note never blow out an assembled carb. It will destroy the float.
wrinkled floats
Be brave. Put on and see what they do.
If stored cool and dry the accelerator pump diaphragms are probably OK.
There is very little to go wrong with carbs with respect to passages, jets and floats if they were stored dry.
If you want put some fuel in the bowl and then pump the throttles if you get fuel down the throats the diaphragm is fine.
There is more to go wrong or get lost by disassembling if you don’t have too. The chance of not having to fiddle and tune after install is slim under the best of circumstances.
But then again - you might be plating them anyway. I’m jealous of your attention to detail.
If stored cool and dry the accelerator pump diaphragms are probably OK.
There is very little to go wrong with carbs with respect to passages, jets and floats if they were stored dry.
If you want put some fuel in the bowl and then pump the throttles if you get fuel down the throats the diaphragm is fine.
There is more to go wrong or get lost by disassembling if you don’t have too. The chance of not having to fiddle and tune after install is slim under the best of circumstances.
But then again - you might be plating them anyway.
I’m jealous of your attention to detail.
The float needle tip can harden with age so I replace those along with pump diaphragms. Check your fuel pressure you'll want 3 ~ 3.5 psi.
Your 40 IDF's may have come with 28mm venturi, this is fine for a stock 1.7 or 1.8 if you have a 2L I would recommend 32mm venturi.
Note: The vintage IDF's are not drilled for port vacuum, they have manifold vacuum only (the vacuum port is below the throttle plate). Depending on which distributor you are running you may or may not be fine with a lot of vacuum advance at idle?
I wanted my vacuum advance to drop out at idle so I set up an electric vacuum switch and control it with a micro switch on the carb linkage.
Tim
Just to add a little more context.
My car had been stored for at least a decade when I bought it. Im sure it was stored with fuel in it but it had evaporated long ago. i got it started without cleaning the carbs.
When getting things roughly tuned for my test drive I did diagnose and find a bad diaphragm on one accel pump and the diaphragm spring was long corroded away. I didn’t fix the diaphragm before I took the video in my thread of the car driving.
The moral of the story is carbs are more forgiving that most think.
Not trying to start a  storm but I don’t agree with the comment that needles will harden.
Needles are brass. There is no magic in material properties over time. Brass or stainless. Materials will work harden but even that is a stretch as needles are under no real load.
As I understood the situation these are basically new old stock and don’t even have any use.
storm but I don’t agree with the comment that needles will harden. Needles are brass. There is no magic in material properties over time. Brass or stainless. Materials will work harden but even that is a stretch as needles are under no real load.
As I understood the situation these are basically new old stock and don’t even have any use.
QUOTE(914_7T3 @ Mar 20 2019, 09:47 PM)
Are you really going to go through with it? After you have the "K" stamp on the suspension and 621 on the tin?
Nobody is going to notice carbs or FI if they have that beautiful '621' stamp to catch their eye.

Thanks everyone for the help. I think I remember Tomlinsons stressing the need to clean even brand new carbs in his book and will check the diaphragm. It's been so long since I've worked on carbs that I couldn't remember what might deteriorate with age.
QUOTE(tmessenger @ Mar 21 2019, 07:53 AM)
The float needle tip can harden with age so I replace those along with pump diaphragms. Check your fuel pressure you'll want 3 ~ 3.5 psi.
Your 40 IDF's may have come with 28mm venturi, this is fine for a stock 1.7 or 1.8 if you have a 2L I would recommend 32mm venturi.
Note: The vintage IDF's are not drilled for port vacuum, they have manifold vacuum only (the vacuum port is below the throttle plate). Depending on which distributor you are running you may or may not be fine with a lot of vacuum advance at idle?
I wanted my vacuum advance to drop out at idle so I set up an electric vacuum switch and control it with a micro switch on the carb linkage.
Tim
QUOTE(Superhawk996 @ Mar 21 2019, 08:04 AM)
Not trying to start a
storm but I don’t agree with the comment that needles will harden. Needles are brass. There is no magic in material properties over time. Brass or stainless. Materials will work harden but even that is a stretch as needles are under no real load.
As I understood the situation these are basically new old stock and don’t even have any use.
Yes, no use. None of the parts have even touched fuel. Only taken out of the box to see how they looked. But thanks for the tips on setup. That will be another bunch of questions as I get closer to test final assembly on the engine.
Here's a photo of the needle that came out of my vintage IDF's, the ones I got with the new kit have Vinton tips. Can't hurt to check yours and see what's in there and the condition? You'll want to check the float levels anyway they are typically off from the factory.
Tim
Click to view attachment
Not trying to start a storm but I don’t agree with the comment that needles will harden.
Needles are brass. There is no magic in material properties over time. Brass or stainless. Materials will work harden but even that is a stretch as needles are under no real load.
As I understood the situation these are basically new old stock and don’t even have any use.
Tim
Click to view attachment
QUOTE(Superhawk996 @ Mar 21 2019, 09:04 AM)
Not trying to start a
storm but I don’t agree with the comment that needles will harden. Needles are brass. There is no magic in material properties over time. Brass or stainless. Materials will work harden but even that is a stretch as needles are under no real load.
As I understood the situation these are basically new old stock and don’t even have any use.
Richard at PMO is a great sounding board for any weber carb rebuild, and he does not hesitate to lend advice. You could call him.
Here's a photo of the needle that came out of my vintage IDF's, the ones I got with the new kit have Vinton tips. Can't hurt to check yours and see what's in there and the condition? You'll want to check the float levels anyway they are typically off from the factory.
Tim
Click to view attachment
Not trying to start a storm but I don’t agree with the comment that needles will harden.
Needles are brass. There is no magic in material properties over time. Brass or stainless. Materials will work harden but even that is a stretch as needles are under no real load.
As I understood the situation these are basically new old stock and don’t even have any use.
QUOTE(tmessenger @ Mar 21 2019, 08:15 AM)
Here's a photo of the needle that came out of my vintage IDF's, the ones I got with the new kit have Vinton tips. Can't hurt to check yours and see what's in there and the condition? You'll want to check the float levels anyway they are typically off from the factory.
Tim
Click to view attachment
QUOTE(Superhawk996 @ Mar 21 2019, 09:04 AM)
Not trying to start a
storm but I don’t agree with the comment that needles will harden. Needles are brass. There is no magic in material properties over time. Brass or stainless. Materials will work harden but even that is a stretch as needles are under no real load.
As I understood the situation these are basically new old stock and don’t even have any use.

I learned something. Thank you.
My old IDFs from 80s had solid brass float needles and seats. When did they change to rubber tips? I see your point and I do agree rubber WILL harden with age.
I’ll double down though. Personally I would still just try them without disassembly.
Worst case you get a slight seepage past the needle, which runs up the bowl fuel level and it runs a bit rich. Other potential downside would be continual weepage past needle IF the fuel tank were higher than the carb resulting in gravity feed. This would lead to long term bowl flooding and continued fuel weeping into manifolds during storage which wouldn’t be cool: This isn’t possible in a 914 since tank is below carbs.
You'll want to replace all the original rubber parts with the newer Viton stuff due to ethanol in current gas. If you don't an old probably already degrading seal will fail quickly.
If you are putting them on a fresh engine with fresh rings you are going to want to make sure that they are close to jetted and set up right before you fire your engine for the first time. Mine were set up all wrong and were sitting for a long time before I used them. If they are pig rich you are going to have a harder time getting your rings to seat properly.

QUOTE(MarkV @ Mar 21 2019, 10:13 PM)
If you are putting them on a fresh engine with fresh rings you are going to want to make sure that they are close to jetted and set up right before you fire your engine for the first time. Mine were set up all wrong and were sitting for a long time before I used them. If they are pig rich you are going to have a harder time getting your rings to seat properly.
Good Point that I hadn't considered.

However, I don't think they would ever end up that rich from a leaky float needle though. That would be the more likely case if the jets and emulsion (air) tubes are grossly wrong. A quick plug pull after a brief start up will show where the mixture is and should be done anyway regardless.
This whole thing comes down to personality types. I'm a risk taker (see my signature). If you're a risk adverse person, I completely see the perspective of complete rebuild 1st.
Honestly the concern I have is that in taking apart NOS carbs you risk losing little things like accelerator pump check balls and/or getting the accelerator pump linkage adjusted properly again once it has been disassembled.
Likewise the risk of ethanol attacking the rubber is a longer term use vs. time degradation thing. Rubber stored in cool, dry dark, conditions ages pretty well.
My main point of the initial push back on the desire to rebuild 1st is:
1) Carbs are more robust than people give them credit for. Especially in an age of fuel injection, carbs are now viewed with mystery and mythology that just isn't warranted.
2) Do you take apart NOS parts (never used) as an OCD thing just to "make sure". The crazy extension of this is -- do you take apart your new_______ (place item here, car, TV, washing machine) to make sure it was put together right before you use it for the 1st time. What if you could get a NOS Transmission? Would you take it apart to make sure the gaskets and/or O-ring seals hadn't dried out or would you run it for a bit and then go from there.
Bottom line: Brent is fastidious and his attention to detail is top notch. He clearly has the ability to disassemble and reassemble with care. My money is betting that he's already ordered complete rebuild kits and has them apart on the bench already.

QUOTE(Superhawk996 @ Mar 22 2019, 10:13 AM)
Bottom line: Brent is fastidious and his attention to detail is top notch. He clearly has the ability to disassemble and reassemble with care. My money is betting that he's already ordered complete rebuild kits and has them apart on the bench already.
Thanks for the vote of confidence. I'm also a risk taker by nature but the reason I parked the car for 35 years was because I was tired of the frequent unscheduled roadside repairs and needed more reliable transportation. Now is the time to put it back together right.
One point about whether it is worth opening them up is that you have to open them to set the float level before first use anyway. Replacing diaphragms etc. is, of course, more work but I don't mind. That said, I just opened one of the carbs and it isn't pretty. Fing Midwest humidity! Nasty inside and every bit of plated hardware needs re-plating. I'm going to tear these down and may just take the bodies in for boiling out.
Click to view attachment
Now for setup, I was going to start a new thread on this down the road but since we are talking about it anyway... Here's what I have. Mostly stock GA 2.0 engine. The only mods are a reground carb cam and Mahle flat top (Euro) spec pistons. I've been unsuccessful tracking down the cam specs but it was done through the old Automotion and I suspect was actually farmed out to Web Cam and is their 86 street carb grind.
A few important notes before digging into the carbs.
- My house is at 6,000 ft. elevation and the majority of my driving will be between 4,000 and 10,000 ft.
- I will be install a bung for an O2 sensor for dialing in the carbs.
- Within reason, mpg and reliability/longevity are more important to me than hp. I'm not looking for a hyper-mileing dog but like 30+ mpg highway and don't want to sacrifice fuel economy just to squeeze ever last muscle fiber out of the engine.
You may ask why I am going with carbs then but that is another story and FI may be a future project. For now, it is these carbs.
The carbs:
I have the following:
Venturi - 28
Emulsion tubes - F11
Main jet - 115
Correction Jet - 200
Any other numbers I should post? What can you tell me about initial setup?
Also, these carbs actually did come set up with port vacuum. They are drilled and blanked on both the port and manifold sides and the port side already has a tube fitting installed.

Click to view attachment

Wow. I'm looking for the eating crow emoji.
Not what I had envisioned as NOS. Were they stored outdoors?
How about this one
I got
I got
Brent,
Those are in good shape for the age and amount of time just sitting.
They will rebuild just fine.
Take your time with removing parts....never never force anything that screws in or out.
If you can.. soak the carb before disassembly this will help....if no tank then spray with WD 40 or similar and soak soak soak...
All that yellow stuff that feels like sand grit is dried up fuel/additives
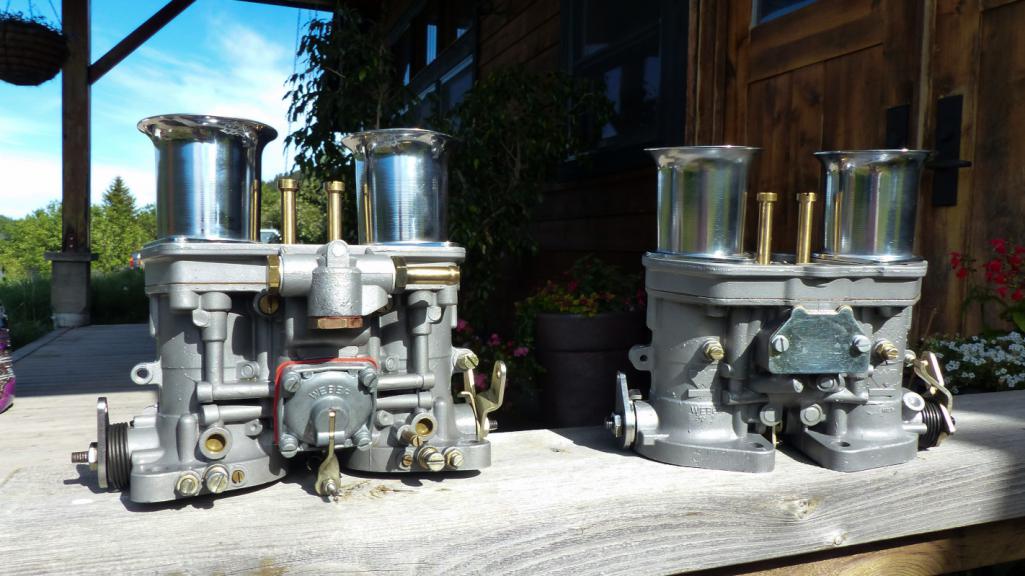
Here's a set of vintage 40 IDF model 18/19 that I just rebuilt
can't seem to find the before pic...but they were in very crappy condition
These have new shafts and sealed bearing in them so takes a little longer to rebuild.
The model 18/19 were made specifically for upgrades to the VW 1600-2000 engines T-1 to T4. They have the factory velocity stack / air horns (like Fiat 124 Abarth Spider)
and as you can also see they have the cold start circuit blocked off and not opened up on the inside.
Yours have the cold start...so be careful when taking apart as there are little springs under the two cone shaped things sticking up on the side with the cold start. Also a split brass washer holding it down...it will shoot across the garage and the parts are impossible to find.
Take your time and good luck on the rebuild.
Click to view attachment
Click to view attachment
Those are in good shape for the age and amount of time just sitting.
They will rebuild just fine.
Take your time with removing parts....never never force anything that screws in or out.
If you can.. soak the carb before disassembly this will help....if no tank then spray with WD 40 or similar and soak soak soak...
All that yellow stuff that feels like sand grit is dried up fuel/additives
Here's a set of vintage 40 IDF model 18/19 that I just rebuilt
can't seem to find the before pic...but they were in very crappy condition
These have new shafts and sealed bearing in them so takes a little longer to rebuild.
The model 18/19 were made specifically for upgrades to the VW 1600-2000 engines T-1 to T4. They have the factory velocity stack / air horns (like Fiat 124 Abarth Spider)
and as you can also see they have the cold start circuit blocked off and not opened up on the inside.
Yours have the cold start...so be careful when taking apart as there are little springs under the two cone shaped things sticking up on the side with the cold start. Also a split brass washer holding it down...it will shoot across the garage and the parts are impossible to find.
Take your time and good luck on the rebuild.
Click to view attachment
Click to view attachment
QUOTE(Superhawk996 @ Mar 22 2019, 12:34 PM)
Wow. I'm looking for the eating crow emoji.
Not what I had envisioned as NOS. Were they stored outdoors?
Might as well have been. Ever spent a summer in eastern Kansas? Born and raised there but I don't recommend it. They were stored in my basement. Humidity would get so high the concrete walls and even insulated pipes would sweat. I guess these things are pretty prone to galvanic corrosion. Luckily, it looks to be just cosmetic once the residue is cleaned out. Glad to be out of that soup.
I'm in Detroit and we get lots of humidity but nothing that would do that!
Entertained a job in St. Louis once. By the end of the interview in mid July I had already made up my mind; No Go.
Lived out near Cour d'Alene in very early 80's. Agree - can't wait to get back there and out of the humidity.
Entertained a job in St. Louis once. By the end of the interview in mid July I had already made up my mind; No Go.
Lived out near Cour d'Alene in very early 80's. Agree - can't wait to get back there and out of the humidity.
QUOTE(johnhora @ Mar 22 2019, 12:40 PM)
Brent,
Those are in good shape for the age and amount of time just sitting.
They will rebuild just fine.
Thanks for the advice and encouragement. I wasn't too worried about them but it still isn't what you want to see with a never been used carb. These have never had fuel in them though so the yellow is just another form of evil from the galvanic reaction I think. I'll be blocking off the cold start circuit as well.
I should add that have rebuilt a couple Holleys back in the day. These look easier.
Where's a good place to buy rebuild kits?
Pierce Manifold is very good as are others..
https://www.piercemanifolds.com/Default.asp
On the cold start...you can buy the exterior block off plate but you will need to reuse the interior parts...the spring holds down a little piston that is the real block off...when the lever is moved it raises the piston in the port lets fuel dump down the bottom of the carb.
look at the diagrams and it will make sense.
Yes old Holley's....have rebuilt many a 4 barrel and deuces
you are correct...same thing so you won't have any problems
they are easier and are totally made for rebuilds....unlike some of the Holley stuff
My DRLA 40's have some of that white staining that is permanently etched in the on the the float bowels. I got some of it off but it doesn't seem to affect anything. I am sure you will get them looking good again.
My carbs also came with 28mm vents and I changed them for 34's. That change made a huge difference in the way the car runs. Not sure why they came with 28's.... they might be more suitable for a smaller engine.
My carbs also came with 28mm vents and I changed them for 34's. That change made a huge difference in the way the car runs. Not sure why they came with 28's.... they might be more suitable for a smaller engine.
QUOTE(MarkV @ Mar 22 2019, 02:07 PM)
Not sure why they came with 28's.... they might be more suitable for a smaller engine.
That's a bit of a mystery to me as well because these were purchased as part of a Weltmeister kit from the old Automotion (when they still knew what a Porsche was), and specifically for a 2.0L. They supposedly were already set up (generally) for the engine although it seems 28 is in the generally acceptable range. So what's the better venturi for a stock 2L?

QUOTE(bbrock @ Mar 22 2019, 11:42 AM)
QUOTE(Superhawk996 @ Mar 22 2019, 12:34 PM)
Wow. I'm looking for the eating crow emoji.
Not what I had envisioned as NOS. Were they stored outdoors?
Might as well have been. Ever spent a summer in eastern Kansas? Born and raised there but I don't recommend it. They were stored in my basement. Humidity would get so high the concrete walls and even insulated pipes would sweat. I guess these things are pretty prone to galvanic corrosion. Luckily, it looks to be just cosmetic once the residue is cleaned out. Glad to be out of that soup.
Basement walls sweating is not a good thing at all. Is your house in a area with a high water table or is the foundation built around clay? Never mind galvanic corrosion, I'm worried about mold spores and you getting sick.
Consider buying a whole house dehumidifier. They integrate with your furnace and will out perform any wheel barrel style dehumidifier. The initial cost is salty, but you can save by doing the install yourself, also happy to walk you thru the control wiring.
Also consider buying a UV lamp for your HVAC equipment, its a effective way to kill any mold spores that may be already floating around.
Click to view attachment
QUOTE(bbrock @ Mar 22 2019, 01:23 PM)
QUOTE(MarkV @ Mar 22 2019, 02:07 PM)
Not sure why they came with 28's.... they might be more suitable for a smaller engine.
That's a bit of a mystery to me as well because these were purchased as part of a Weltmeister kit from the old Automotion (when they still knew what a Porsche was), and specifically for a 2.0L. They supposedly were already set up (generally) for the engine although it seems 28 is in the generally acceptable range. So what's the better venturi for a stock 2L?
Mine came with 28's on a stock 2 liter. I think small vents make for more torque and I think 28 is as small as they come. Me going to 34's on my 2056 might have been somewhat aggressive but I can tell you it drove like a bus with 28's on it. It didn't want to rev and it had tons of torque. On a stock 2.0 a 32 is probably the way to go. I bet on a 1.7 or a 1.8 a 28 would work great. My previous 74 1.8 was easy to lug and had a lot less torque.
QUOTE(timothy_nd28 @ Mar 22 2019, 02:33 PM)
Basement walls sweating is not a good thing at all. Is your house in a area with a high water table or is the foundation built around clay? Never mind galvanic corrosion, I'm worried about mold spores and you getting sick.
Thanks for your concern but we haven't lived there for over 15 years. We were newlyweds and still in college when we bought that house. It was a really neat house out in the boonies on a lake but we were quite poor and couldn't afford AC. The basement was unfinished and a typical dank, cinder block wall storage space very common in the area. Humidity runs 80% there in the summer so even with all the windows open, and a whole house attic fan running, any air hitting those cool concrete walls quickly dropped its moisture. Still not as bad as Florida. I woke up in the Everglades once thinking it was raining before I remembered that I was INSIDE my VW bus and the rain was just dew dripping off the roof liner.
We finished off the basement and added AC much later which ended the humidity problem but that was only a couple years before we moved. Now we have radon instead!
As noted, the 40s would have come with 28mm Venturi. Good vacuum signal down low. For a 2056 32mm vents would be more appropriate.
More good info guys. I appreciate it. This is making me think maybe the 28s are a decent starting point for a 1911cc stock engine.
Back in the day (meaning when I was younger and less edumacated). . .
I ran 32mm venturis on my 1.7L with a hot Weber cam. No torque but came alive between 3000 - 5000. It was fun on twisties where you could keep the rev's up. In the city . . . . not so much.
I wouldn't repeat that exercise again. Torque is really what makes for a driveable vehicle.
Agree 28's would be much better for torque and throttle response. May not be a bad place to start.
In the end you will need to tune it to your liking and once you start that, you'll have a much better idea of where you want to end up. Carbs are never perfect especially compared to a modern car with FI.
28mm vents will work fine,they will offer a great response down low and into the driving range we mostly use,check on carb size formula charts and from memory the 28 is only slighty too small,still sounds like you will be really close.
Yes larger vents will work but there is a trade off @ the bottom end within the range of the low speed (idle jets) due to decreased vacuum signal.
When I did my ''6'' Zeniths I first fitted 32mm vents ,engine bogged down low then felt like it was taking off @ higher rpm right up to the rev limiter,changed to 30mm vents and that really worked better,great response from idle to transition on to the mains.
Over size vents cause issues when fine tuning and also with fuel economy,my engine started better on the smaller vents as noted.
I finally got around to this project. I have the first one squeaky clean from a functional standpoint but the corrosion left dark stains in the bodies I wonder if anyone knows a magic trick to get rid of.
I have new accelerator pump diaphragms and all rubber seals coming from Pierce Manifold. My float needle valves are solid brass and look brand new so I didn't order replacements.
Here's what the body looked like after disassembly. Since this carbs have never been used, I wasn't surprised they came apart without any fights or mishaps. Plenty of nasty corrosion though.
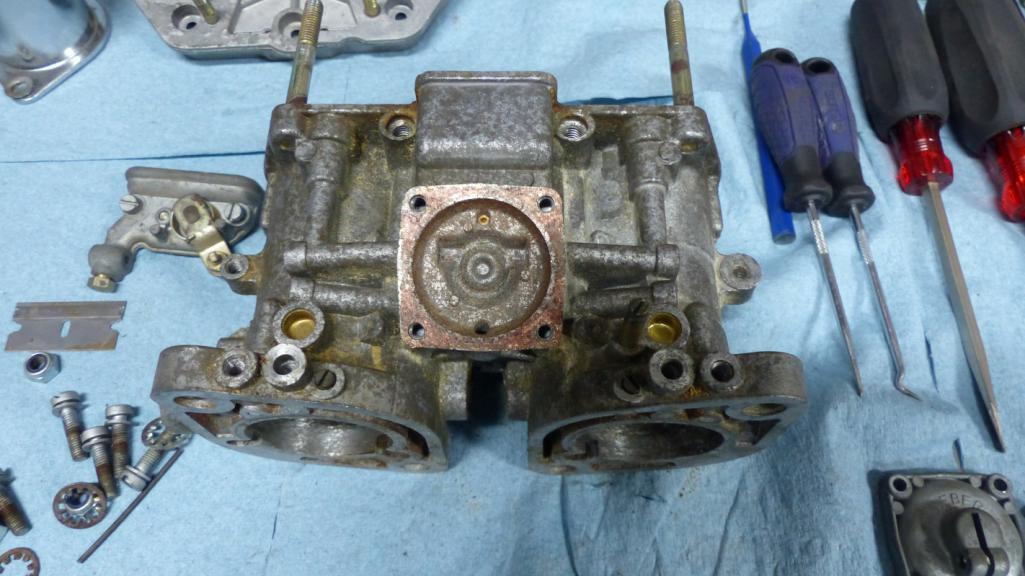
Since there was never any fuel in it to form petroleum based gunk and varnish, I skipped Berryman or any other strong solvents and just soaked the stripped body in diluted Pine-Sol, followed by rinse dry, then soda blasting, then rinse and dry. It's nice and clean, but rather ugly. Here's the worst side:
Click to view attachment
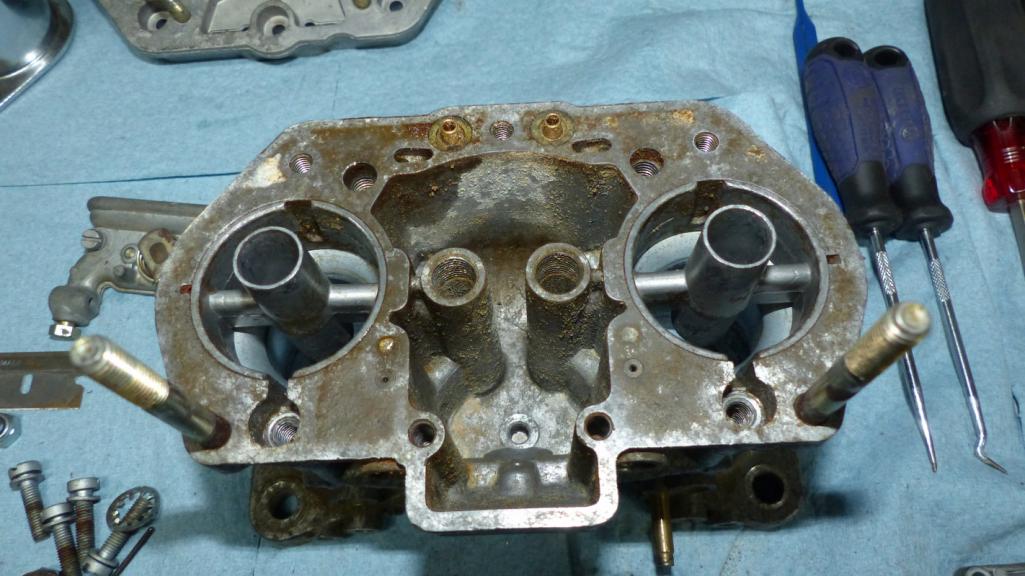
The other side had less corrosion and looks better, but not great:
Click to view attachment
The accelerator cover cleaned up nicely and is more what I was hoping the bodies would look like after soda blasting.
Click to view attachment
A few things I've tested in hidden spots to try to brighten the dark spots are: Mother's Mag Polish, white vinegar, Griot's Diablo wheel cleaner, Jay Leno's Garage wheel cleaner. None worked. I have not tried oven cleaner, lemon juice, or boiling in anything.
Anyone know any tricks to make these look new again? I'm getting worried there was some kind of protective coating applied that the corrosion took away. 
I have new accelerator pump diaphragms and all rubber seals coming from Pierce Manifold. My float needle valves are solid brass and look brand new so I didn't order replacements.
Here's what the body looked like after disassembly. Since this carbs have never been used, I wasn't surprised they came apart without any fights or mishaps. Plenty of nasty corrosion though.
Since there was never any fuel in it to form petroleum based gunk and varnish, I skipped Berryman or any other strong solvents and just soaked the stripped body in diluted Pine-Sol, followed by rinse dry, then soda blasting, then rinse and dry. It's nice and clean, but rather ugly. Here's the worst side:
Click to view attachment
The other side had less corrosion and looks better, but not great:
Click to view attachment
The accelerator cover cleaned up nicely and is more what I was hoping the bodies would look like after soda blasting.
Click to view attachment
A few things I've tested in hidden spots to try to brighten the dark spots are: Mother's Mag Polish, white vinegar, Griot's Diablo wheel cleaner, Jay Leno's Garage wheel cleaner. None worked. I have not tried oven cleaner, lemon juice, or boiling in anything.
Anyone know any tricks to make these look new again?
I'm getting worried there was some kind of protective coating applied that the corrosion took away.
If you send them to me, I'll vapor blast them and then ultrasonic clean. They will look like new. No charge.
I think we have an unusable weber body that I can vapor blast to see what kind of finish it leaves on the body. It tends to leave a peened or ball burnished finish.
@bbrock
examples on this thread. http://www.914world.com/bbs2/index.php?sho...37&hl=vapor
I think we have an unusable weber body that I can vapor blast to see what kind of finish it leaves on the body. It tends to leave a peened or ball burnished finish.
@bbrock
examples on this thread. http://www.914world.com/bbs2/index.php?sho...37&hl=vapor
QUOTE(mepstein @ May 21 2019, 09:08 PM)
If you send them to me, I'll vapor blast them and then ultrasonic clean. They will look like new. No charge.
I think we have an unusable weber body that I can vapor blast to see what kind of finish it leaves on the body. It tends to leave a peened or ball burnished finish.
@mepstein that would be awesome! It might be a few days before I can tear down and clean the other carb. I'll PM you when I'm close. You're the best!

At your altitude stay with the 28mm vent size combined with 47.5 idle jets, 120 mains, 200 air corrector jets, F11 tubes, Float height 10-11mm (w/gasket in place ball NOT depressed), fuel pressure no more than 3.5psi, float drop 28-32mm
As for LM-2 readings....
LBI it by ear don't use LM-2 for adjusting. End result should be in the 13-14AFR range at idle. Timing should be at min 7BTDC at idle (28BTDC full at 3200rpms) vac hose off.
WOT - 12.5:1 - low 13.2:1 or so
Part throttle/cruise....16-17AFR
Load = Throttle position
A 16-17AFR at part throttle/cruise is cooler running than 13AFR at cruise. No lean tune tuning with centrifugal only distributor. Get an SVDA on it.
QUOTE(72hardtop @ May 30 2019, 02:42 PM)
At your altitude stay with the 28mm vent size combined with 47.5 idle jets, 120 mains, 200 air corrector jets, F11 tubes, Float height 10-11mm (w/gasket in place ball NOT depressed), fuel pressure no more than 3.5psi, float drop 28-32mm
As for LM-2 readings....
LBI it by ear don't use LM-2 for adjusting. End result should be in the 13-14AFR range at idle. Timing should be at min 7BTDC at idle (28BTDC full at 3200rpms) vac hose off.
WOT - 12.5:1 - low 13.2:1 or so
Part throttle/cruise....16-17AFR
Load = Throttle position
A 16-17AFR at part throttle/cruise is cooler running than 13AFR at cruise. No lean tune tuning with centrifugal only distributor. Get an SVDA on it.
This is great info. Thanks for this. For the dizzy, I've decided to try the stock dizzy on this and see how it goes. Actually a DVDA which should work fine. If it doesn't, I'll swap it for a Pertronix SVDA. I have a NOS 050 I bought with the carbs way back when, but yeah, I'm not using it because I want vacuum advance.
QUOTE(72hardtop @ May 31 2019, 08:42 AM)
At your altitude stay with the 28mm vent size combined with 47.5 idle jets, 120 mains, 200 air corrector jets, F11 tubes, Float height 10-11mm (w/gasket in place ball NOT depressed), fuel pressure no more than 3.5psi, float drop 28-32mm
As for LM-2 readings....
LBI it by ear don't use LM-2 for adjusting. End result should be in the 13-14AFR range at idle. Timing should be at min 7BTDC at idle (28BTDC full at 3200rpms) vac hose off.
WOT - 12.5:1 - low 13.2:1 or so
Part throttle/cruise....16-17AFR
Load = Throttle position
A 16-17AFR at part throttle/cruise is cooler running than 13AFR at cruise. No lean tune tuning with centrifugal only distributor. Get an SVDA on it.
Very sound advice,the whole issue with the 09 is it advances to fast,these and the old 010's were basically made to work on industrial engines that required a fast advance when responding to a governor,and yes they made T4 industrial motors .
Fitted to a car engine this advance is just ok but causes somewhat of a "stumble'' as the advance is a little too much for the vacuum getting to the carb /carbs.
The Bosch original so called SVDA provided a slower increase in early advance from the vacuum side to the max set point of movement on the advance plate the mechanical side takes over till total advance is reached,so this all equals a smoother throttle response which tends to match better with carbs.
I have an original SVDA and a chinese knock-off, IMO the copy is pretty well made but will NEVER last as long as the Bosch,wee tip is to replace with Bosch the cap and rotor as not sure how good those parts are on the chinese unit.
On a fairly stock motor tuned well you will be fine ,rant over good luck.
Click to view attachment
Carbs are finally cleaned up and back together. The secret sauce was @mepstein 's magic vapor blasting. I replaced all rubber seals, gaskets, and accelerator pump diaphragm as well as replated the corroded hardware. They operate smooth and easy and I think will look great in the engine bay.
I still need to order jets to match @72hardtop 's recommendations but wondering what initial settings are working for folks. Seems these recs vary. For example: Tomlinsons suggests setting bypass screws to 1/2 turn out from seated, idle mixtures 3 turns out, and idle speed so throttle plates have a .04 gap. Haynes suggests bypass closed, idle mixture 2 turns out, and idle speed 2 turns past contact. I know these are all approximations and either of them will probably be fine, but curious how 914 people are setting their carbs for first run.
Also, I can't find much on adjustment of the accelerator pump other than they both need to pump the same. I know measuring the volume is probably best but can't find specs. One thread said to check the Haynes manual but mine says nothing on the topic. Can anyone tell me how I should set these?
Thanks for all your help saving these old carbs
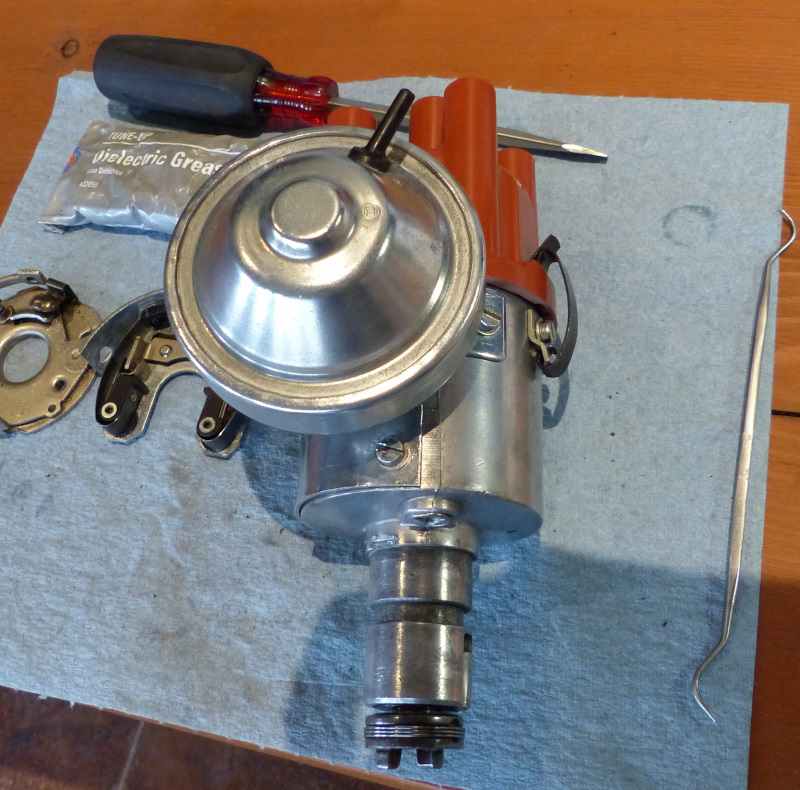
Oh, I also rebuilt the stock dizzy so this is what I'll run initially. Everything I've read indicates this should work great.
I still need to order jets to match @72hardtop 's recommendations but wondering what initial settings are working for folks. Seems these recs vary. For example: Tomlinsons suggests setting bypass screws to 1/2 turn out from seated, idle mixtures 3 turns out, and idle speed so throttle plates have a .04 gap. Haynes suggests bypass closed, idle mixture 2 turns out, and idle speed 2 turns past contact. I know these are all approximations and either of them will probably be fine, but curious how 914 people are setting their carbs for first run.
Also, I can't find much on adjustment of the accelerator pump other than they both need to pump the same. I know measuring the volume is probably best but can't find specs. One thread said to check the Haynes manual but mine says nothing on the topic. Can anyone tell me how I should set these?
Thanks for all your help saving these old carbs
Oh, I also rebuilt the stock dizzy so this is what I'll run initially. Everything I've read indicates this should work great.
Get the CB Weber manual. 2056? Refresh my memory. 32mm Venturi for starters. I'll get the rest of the #s off of my 44s reconfigured for a 2056 later.
QUOTE(rhodyguy @ Jun 19 2019, 10:55 AM)
Get the CB Weber manual. 2056? Refresh my memory. 32mm Venturi for starters. I'll get the rest of the #s off of my 44s reconfigured for a 2056 later.
It's a stock 1970 engine with 8.0:1 pistons. I think the 28mm venturi should be good for this engine but open to opinions bearing in mind that I'm not all that interested in top end and willing to sacrifice a little performance for fuel economy. Is this the CB manual you're suggesting?
If so, that's one of the ones I have that I referenced as Tomlinsons before. No mention that I can find for adjusting accelerator pump but I'll look again.
OK, the 28s should be fine. A little short on the top end but off idle response should be smooth. The Weber info at aircooled.net is pretty good. The per cyl displacement loss is fairly insignificant. The 32s might be the best of both worlds.
Here's my carb tuning procedure from a March 03 post:
Assumptions: the carbs have the optimum jet and venturi package (if you have an unknown engine/cam good luck on this one), the float level in the carbs is correct, the cams are correctly timed, the valves are properly adjusted, the ignition timing is dead on, you have the proper spark plugs for your engine, the linkage is good, the fuel is good, the engine is good.
Remember that the mixture and air bypass adjustment screws are precision needle valves, not head gaskets. Use your fingers to tighten them, not your fist.
Start and warm up the engine.
Make sure the two drop links for the throttle linkage are exactly the same length, and disconnected. You can use a 8mm thin ignition wrench to snap them off.
Turn the mixture screws all the way in and then 5 half turns out.
Turn the air bypass screws all the way in.
Turn the idle speed screws out til it just touches, and then in 3 half turns. (3 barrels I go 5 half turns)
Put on your hearing protection and start the car.
Use your STE and find the barrel that pulls the most. We'll call this one baseline.
Balance the barrel in the other carb that pulls the most with the idle speed screw. (if you have a Uni-syn, give it to someone you don't like and purchase a STE airflow meter)
Go back to the other carb, with the baseline barrel. You will have one all the way in, then use the air bypass screws and balance the other two barrels.
Go to the other carb and do the same thing.
Snug the jamb nuts on the air bypass screws.
All six barrels should pull the same amount of air at this point, if not repeat air adjustment procedure.
Snap the throttle linkage drop links back on the carbs. If the idle changes then you need to barely adjust the linkage mounts so snapping the drop links on, doesn't change the side to side idle balance.
Use the hand throttle or a vice grip and rag to lock the linkage between 1400 and 1800 rpm.
Start back at the baseline barrel and adjust the mixture screw in or out, to get the smoothest running and highest idle, then turn it in 1/4 turn.
Do the same with the five other mixture screws.
If you have to turn the mixture screws more than two turns either way (from baseline), you've got the wrong jets.
Recheck side to side and individual air balance, adjust as needed.
Road test the car.
If you get snapping and poping out the intake, it's generally a lean condition.
If you get heavy exhaust fumes, or pboofing out the exhaust it's probably too rich.
If you get a flat spot or popping out the intake at between 2800 and 3200 rpm, you probably need larger idle jets.
That's a rough, five minute draft of my carb tuning proceedure, hope it helps!
If it goes good it should take about 45 minutes, if not about three years.
PK
If it's running good but a little rich, you can turn each air bypass screw out to lean it out some, go a half turn out at a time and test drive. Make sure you turn all screws the same amount.
This was written 16 years ago before wide band O2 sensors were economical and easy to install, get one it will make your carb tuning much easier.
QUOTE(Superhawk996 @ Mar 22 2019, 01:37 PM)
How about this one
I got
Nah - your assumption was that they were dry stored and not exposed to humidity. That was a reasonable assumption.
QUOTE(Tdskip @ Jun 20 2019, 09:18 AM)
QUOTE(Superhawk996 @ Mar 22 2019, 01:37 PM)
How about this one
I got
Nah - your assumption was that they were dry stored and not exposed to humidity. That was a reasonable assumption.
I can imagine the disappointment pulling them out of the box when you were expecting a pristine pair.
Storing the engine parts in a damp basement trashed all the internal parts of my bike engine and caused the PO to give up on the bike. Unlike Brent's carbs, the steel parts were too far gone to reuse. The aluminum cleaned up nicely.
Nice job. Highly recommend you spray the outside of those things with CRC 3-36 corrosion inhibitor. I hit all the ones I rebuild with it as well as the ones on my car every few months. Helps keep them looking nice and shiny and prevents the hardware from freezing up. 3-36 can be found at Grainger and a few other places.
Highly recommend you spray the outside of those things with CRC 3-36 corrosion inhibitor. I hit all the ones I rebuild with it as well as the ones on my car every few months. Helps keep them looking nice and shiny and prevents the hardware from freezing up. 3-36 can be found at Grainger and a few other places.
QUOTE(ThePaintedMan @ Jun 20 2019, 02:23 PM)
Nice job.
Highly recommend you spray the outside of those things with CRC 3-36 corrosion inhibitor. I hit all the ones I rebuild with it as well as the ones on my car every few months. Helps keep them looking nice and shiny and prevents the hardware from freezing up. 3-36 can be found at Grainger and a few other places.Thanks George, Mark deserves all the credit. Even after soda blasting, they still had a lot of black staining from the corrosion. Mark's vapor blasting is what cleaned that off.
I sprayed them with Boeshield T-9 to protect them. I learned about it here on the forums but don't remember where. I've been very happy with the result using it on my fan housing and a few other parts.

What elevation you at? (My jetting is a few hundred above feet sea level)
Engine size?
The distributor in the pic appears to have too much play at the end of the shaft. Shim it.
When setting the AFR screws start approximately 3-4 turns from lightly seated position. As for the idle speed 1/2 turn in from first contact of the lever. Any further in and the throttle plates will begin to expose the progression circuits.
Float height needs to be 10mm - 11.5mm with the gasket in place ball NOT depressed. Float drop (not as critical) 28-32mm
Fuel pressure 3-3.5lbs max
This is a "lo-fi" version of our main content. To view the full version with more information, formatting and images, please click here.