|
|
|
Porsche, and the Porsche crest are registered trademarks of Dr. Ing. h.c. F. Porsche AG.
This site is not affiliated with Porsche in any way. Its only purpose is to provide an online forum for car enthusiasts. All other trademarks are property of their respective owners. |
|
|

  |

| Mblizzard |
 Jul 23 2019, 08:58 AM Jul 23 2019, 08:58 AM
Post
#41
|
|
Advanced Member  Group: Members Posts: 3,033 Joined: 28-January 13 From: Knoxville Tn Member No.: 15,438 Region Association: South East States |
Finally back in the country! Now for building!
Got the case time certs installed last night. Thanks to Bill's guidance it went perfectly.  the Raceware head studs are expensive but quality for sure. Will build the crank tonight! |
   |

 
|
| Mblizzard |
Jul 25 2019, 08:20 AM
Post
#42
|
|
Advanced Member Group: Members Posts: 3,033 Joined: 28-January 13 From: Knoxville Tn Member No.: 15,438 Region Association: South East States |
Was making progress! Got the gears on the crank and was ready to add the rods.
Something did not seem right. A quick check of sizes indicated 55mm rods = Type 1 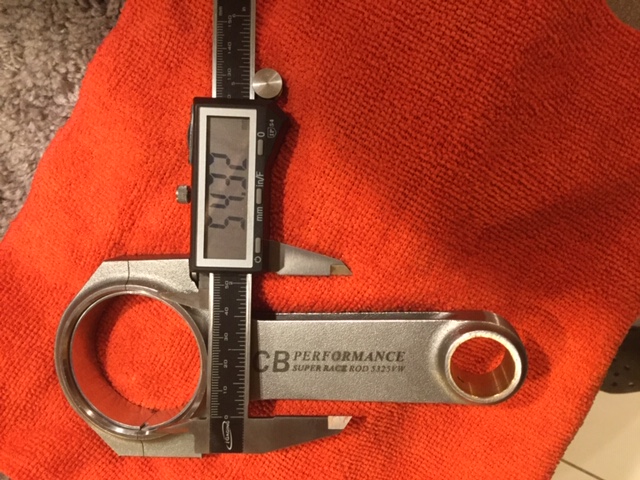 but a 50mm crank = stock 2.0L 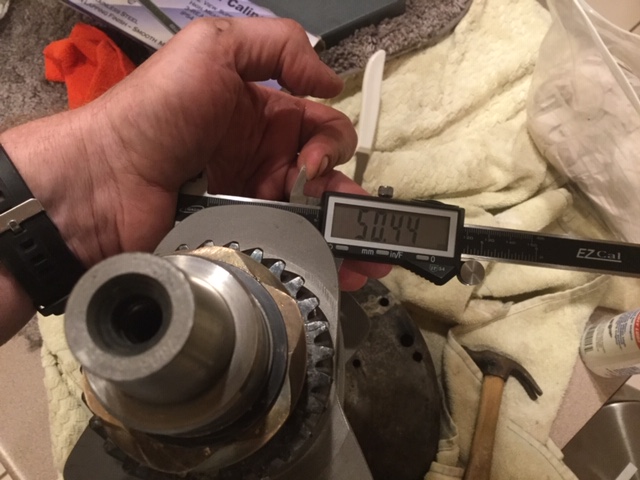 5mm is likely too much tolerance in rod bearings! (IMG:style_emoticons/default/headbang.gif) Crank was suppose to be Type 1 journals. Have already balanced all of the components. Hopefully can just get new rods. |
|
|
|
| Mblizzard |
Aug 1 2019, 06:58 AM
Post
#43
|
|
Advanced Member Group: Members Posts: 3,033 Joined: 28-January 13 From: Knoxville Tn Member No.: 15,438 Region Association: South East States |
Well not a lot of progress as of late. Still sorting out the rod issue but Charles at the Type 4 Store has been great in working with me on the issue!
Really have to thank Len Hoffman. He is fast tracking my heads at the ceramic coater so I can get them by Aug 9. (IMG:style_emoticons/default/pray.gif) Cant wait to see the LE-200 heads with the coating done. Combined with the Tangerine Racing 1-3/4 headers and Evo Muffler it ought to breath well! He is setting them up with a 1mm step so with zero deck height in the jugs I will be at 9.99:1 compression. Everyone likely says NO on the deck zero height but the pistons have valve cut outs that should allow for clearance. I will check of course! As long as the pistons are not sticking out of the jugs I should not need any cylinder shims. If needed, I can add as much as .5mm (0.02 in) deck height and only reduce the compression to 9.5:1. I have ordered those shims just in case! |
|
|
|
| Betty |
Aug 1 2019, 11:39 AM
Post
#44
|
|
Driver Group: Members Posts: 511 Joined: 10-December 04 From: Hurst, TX Member No.: 3,255 Region Association: South East States |
QUOTE(Mblizzard @ Aug 1 2019, 07:58 AM)  Well not a lot of progress as of late. Still sorting out the rod issue but Charles at the Type 4 Store has been great in working with me on the issue! Really have to thank Len Hoffman. He is fast tracking my heads at the ceramic coater so I can get them by Aug 9. (IMG:style_emoticons/default/pray.gif) Cant wait to see the LE-200 heads with the coating done. Combined with the Tangerine Racing 1-3/4 headers and Evo Muffler it ought to breath well! He is setting them up with a 1mm step so with zero deck height in the jugs I will be at 9.99:1 compression. Everyone likely says NO on the deck zero height but the pistons have valve cut outs that should allow for clearance. I will check of course! As long as the pistons are not sticking out of the jugs I should not need any cylinder shims. If needed, I can add as much as .5mm (0.02 in) deck height and only reduce the compression to 9.5:1. I have ordered those shims just in case! (IMG:style_emoticons/default/cheer.gif) (IMG:style_emoticons/default/first.gif) (IMG:style_emoticons/default/cheer.gif) (IMG:style_emoticons/default/aktion035.gif) (IMG:style_emoticons/default/cheer.gif) (IMG:style_emoticons/default/smilie_pokal.gif) (IMG:style_emoticons/default/cheer.gif) (IMG:style_emoticons/default/smash.gif) (IMG:style_emoticons/default/cheer.gif) (IMG:style_emoticons/default/sawzall-smiley.gif) (IMG:style_emoticons/default/cheer.gif) (IMG:style_emoticons/default/type.gif) (IMG:style_emoticons/default/cheer.gif) (IMG:style_emoticons/default/driving.gif) (IMG:style_emoticons/default/cheer.gif) (IMG:style_emoticons/default/cheer.gif) (IMG:style_emoticons/default/cheer.gif) (IMG:style_emoticons/default/beer3.gif) |
|
|
|
| Mblizzard |
Aug 3 2019, 08:05 PM
Post
#45
|
|
Advanced Member Group: Members Posts: 3,033 Joined: 28-January 13 From: Knoxville Tn Member No.: 15,438 Region Association: South East States |
Moving forward. Man Nickies are beautiful.
 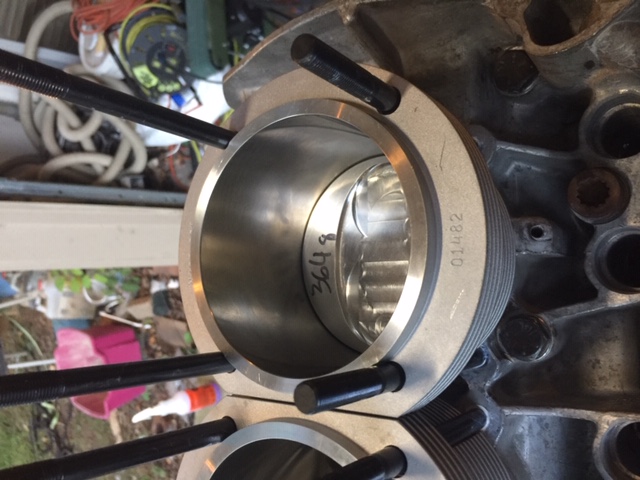 Clark this is for you.  |
|
|
|
| Mblizzard |
Aug 6 2019, 03:00 PM
Post
#46
|
|
Advanced Member Group: Members Posts: 3,033 Joined: 28-January 13 From: Knoxville Tn Member No.: 15,438 Region Association: South East States |
Went through the mock up process all things seem to rotate and be clear. I felt I had a couple of points on the crank to case clearance that were a bit tight so I took a bit more off the case to provide clearance.
Checked deck height at 0.43 mm which with the 1 mm step the wise Len Hoffman machined into my heads will give me about a 9.5:1 compression ratio. The heads will be here Wednesday! (IMG:style_emoticons/default/piratenanner.gif) Taking everything back apart for final inspection and cleaning for final assembly. Of course I forgot that the gasket set does not come with the windage tray seal so I had to order one. I heard of people leaving them out completely any thoughts on that? Should start final assembly this weekend! |
|
|
|
| ClayPerrine |
Aug 6 2019, 08:53 PM
Post
#48
|
|
Life's been good to me so far..... Group: Admin Posts: 15,430 Joined: 11-September 03 From: Hurst, TX. Member No.: 1,143 Region Association: NineFourteenerVille |
QUOTE(Mblizzard @ Aug 6 2019, 04:00 PM) Went through the mock up process all things seem to rotate and be clear. I felt I had a couple of points on the crank to case clearance that were a bit tight so I took a bit more off the case to provide clearance. Checked deck height at 0.43 mm which with the 1 mm step the wise Len Hoffman machined into my heads will give me about a 9.5:1 compression ratio. The heads will be here Wednesday! (IMG:style_emoticons/default/piratenanner.gif) Taking everything back apart for final inspection and cleaning for final assembly. Of course I forgot that the gasket set does not come with the windage tray seal so I had to order one. I heard of people leaving them out completely any thoughts on that? Should start final assembly this weekend! You and I are in a competition to see who can get closest to Okteenerfest to get their car running. (IMG:style_emoticons/default/biggrin.gif) |
|
|
|
| Mblizzard |
Aug 7 2019, 04:16 AM
Post
#49
|
|
Advanced Member Group: Members Posts: 3,033 Joined: 28-January 13 From: Knoxville Tn Member No.: 15,438 Region Association: South East States |
QUOTE(ClayPerrine @ Aug 6 2019, 06:53 PM) QUOTE(Mblizzard @ Aug 6 2019, 04:00 PM) Went through the mock up process all things seem to rotate and be clear. I felt I had a couple of points on the crank to case clearance that were a bit tight so I took a bit more off the case to provide clearance. Checked deck height at 0.43 mm which with the 1 mm step the wise Len Hoffman machined into my heads will give me about a 9.5:1 compression ratio. The heads will be here Wednesday! (IMG:style_emoticons/default/piratenanner.gif) Taking everything back apart for final inspection and cleaning for final assembly. Of course I forgot that the gasket set does not come with the windage tray seal so I had to order one. I heard of people leaving them out completely any thoughts on that? Should start final assembly this weekend! You and I are in a competition to see who can get closest to Okteenerfest to get their car running. (IMG:style_emoticons/default/biggrin.gif) What Mental stage is yours in? |
|
|
|
| Mblizzard |
Aug 9 2019, 11:55 AM
Post
#50
|
|
Advanced Member Group: Members Posts: 3,033 Joined: 28-January 13 From: Knoxville Tn Member No.: 15,438 Region Association: South East States |
Got a nice little package from Mr. Hoffman today!
 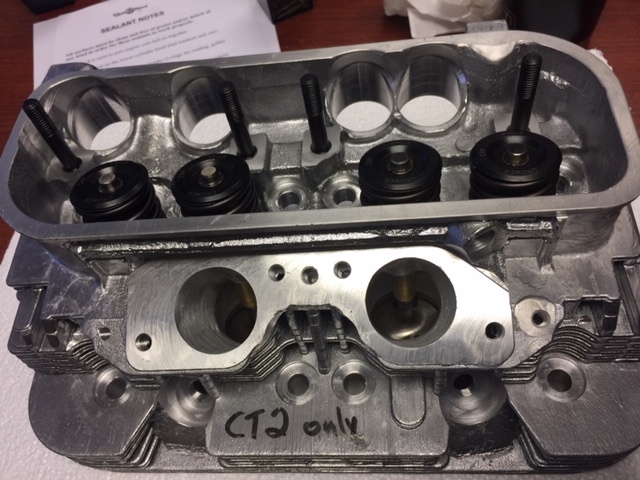 Nice LE-200 heads with ceramic! |
|
|
|
| Mblizzard |
Aug 13 2019, 06:33 AM
Post
#51
|
|
Advanced Member Group: Members Posts: 3,033 Joined: 28-January 13 From: Knoxville Tn Member No.: 15,438 Region Association: South East States |
Well as others have seen, things got ugly!
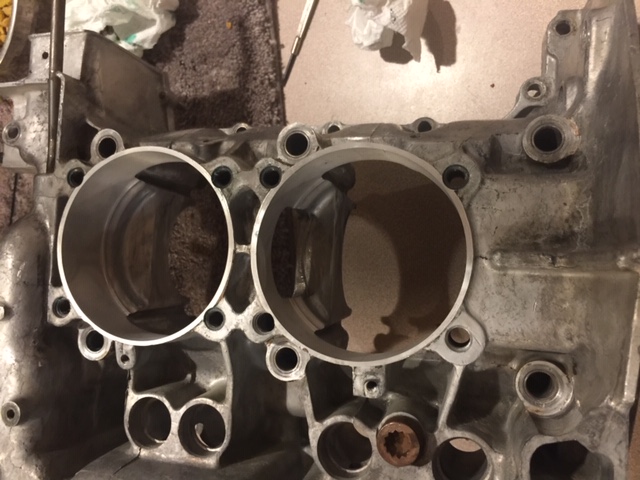 I have no idea how it happened. Bearing was fine, clearance checked out with plasti-gauge, and turned super smoothly! With the advice from some really good people I decided to go with a new case. It is at the shop being opened for the 102s by Friday! But now the painful part, new Time certs, for RaceWare head bolts, new bearings main and cam, and rush charges at the shop. OUCH $$$$$$ Hope to start putting together this weekend! |
|
|
|
| 914forme |
Aug 13 2019, 07:00 AM
Post
#52
|
|
Times a wastin', get wrenchin'! Group: Members Posts: 3,896 Joined: 24-July 04 From: Dayton, Ohio Member No.: 2,388 Region Association: None |
You will always pay when you rush.
My suggestion if you re going to put this engine together in a weekend. Clean up while you are waiting. Get everything you will need laid out on the table(s) all tools, all chemicals, parts everything. White board note pad what ever and build a check list. All tools and supplies applicators etc... must go back to the spot. Count your danm rags. I use paint pens also to mark when bolts and studs have been torqued. Torque, mark, torque mark. Clean tools put them back on the table in the same spot. Count all my rags, sponges, qtips what the not. You are an engine surgeon , you must be precise and know what, where and why. Take the upcoming days to prep well, and you will be ready to get it done. HAVE A FREAKING CHECK LIST AND USE IT! Don't know how many times I have skipped a step and paid hard for it latter. The more I am rushed the worse it gets. I built an engine once, got it fired up, and promptly left the oil fill cap off of it. That almost cost me a nice race engine. I was trying to get to an event the next day. Do not be like this bone head. Learn from my mistakes. All my car guy friends seem to have a similar story. |
|
|
|
| Mblizzard |
Aug 13 2019, 07:16 AM
Post
#53
|
|
Advanced Member Group: Members Posts: 3,033 Joined: 28-January 13 From: Knoxville Tn Member No.: 15,438 Region Association: South East States |
QUOTE(914forme @ Aug 13 2019, 05:00 AM) You will always pay when you rush. My suggestion if you re going to put this engine together in a weekend. Clean up while you are waiting. Get everything you will need laid out on the table(s) all tools, all chemicals, parts everything. White board note pad what ever and build a check list. All tools and supplies applicators etc... must go back to the spot. Count your danm rags. I use paint pens also to mark when bolts and studs have been torqued. Torque, mark, torque mark. Clean tools put them back on the table in the same spot. Count all my rags, sponges, qtips what the not. You are an engine surgeon , you must be precise and know what, where and why. Take the upcoming days to prep well, and you will be ready to get it done. HAVE A FREAKING CHECK LIST AND USE IT! Don't know how many times I have skipped a step and paid hard for it latter. The more I am rushed the worse it gets. I built an engine once, got it fired up, and promptly left the oil fill cap off of it. That almost cost me a nice race engine. I was trying to get to an event the next day. Do not be like this bone head. Learn from my mistakes. All my car guy friends seem to have a similar story. So true! But I am going back to the beginning and cleaning everything over again between now and the weekend. On the first go I set myself small incremental goals for each night which seemed to work well. Tonight is pull rods, timing gear, and dizzy off crank. But I think i will write it all out just to be sure! Went back and reordered some parts that I don't like to use over like woodruff keys. I know they are fine to reuse but... Also going to go back through and check all of my clearances and such. That would be a good list to have for stock builds. |
|
|
|
| Mblizzard |
Aug 15 2019, 08:42 AM
Post
#54
|
|
Advanced Member Group: Members Posts: 3,033 Joined: 28-January 13 From: Knoxville Tn Member No.: 15,438 Region Association: South East States |
OK so I am getting back on track.
Big shout out to Jorge at European Motor Works as I am sure he put a few things down to work on my new case but he got it done in record time! 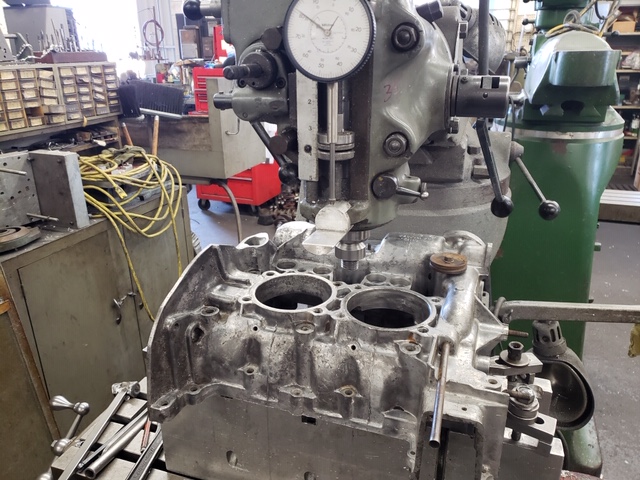 Opened for 102, line bored, and he even drilled and tapped the galley plugs. 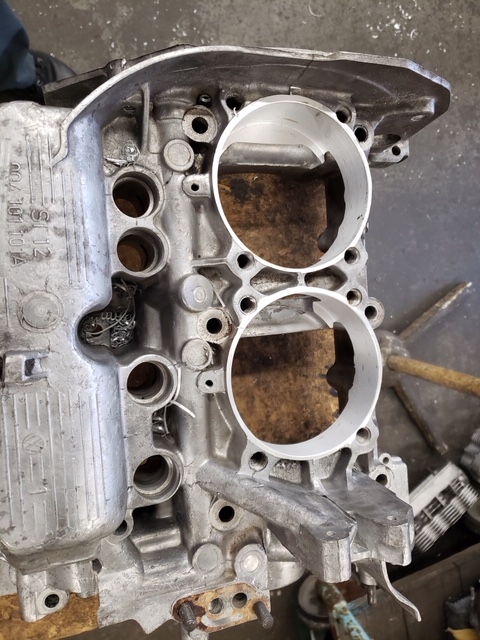 I will have to clearance a few points for the crank when it gets here but this should get me back on track. My local shop offered to pay for the whole case but because I was asking them to rush I agreed to split it with them. OK so whats the cost of this mistake? New case and machine work $550 New Time certs for Raceware Head bolts $70 New crank and cam bearings $200 Miscellaneous parts $50 Lost build time of over a week $??? But in the long run it will be cheap as compared to trying to implement some type of crap fix (IMG:style_emoticons/default/stromberg.gif) using something like JB Weld and then losing the whole engine its very cheap. |
|
|
|
| mepstein |
Aug 15 2019, 10:19 AM
Post
#55
|
|
914-6 GT in waiting Group: Members Posts: 19,254 Joined: 19-September 09 From: Landenberg, PA/Wilmington, DE Member No.: 10,825 Region Association: MidAtlantic Region |
One of our guys was building an engine for himself. 3.0 six. He either forgot a circle clip or didn't seat it all the way in the piston. Engine ran for 5 minutes and then let go inside. It wasn't pretty or cheap.
|
|
|
|
| malcolm2 |
Aug 15 2019, 10:25 AM
Post
#56
|
|
Advanced Member Group: Members Posts: 2,745 Joined: 31-May 11 From: Nashville Member No.: 13,139 Region Association: South East States |
QUOTE(Mblizzard @ Aug 3 2019, 09:05 PM) Moving forward. Man Nickies are beautiful. Clark this is for you. I am so happy you remembered (learned, or already knew from) my mistake. Now make sure you do that on the FINAL assembly. (IMG:style_emoticons/default/piratenanner.gif) |
|
|
|
| Mblizzard |
Aug 22 2019, 06:46 AM
Post
#57
|
|
Advanced Member Group: Members Posts: 3,033 Joined: 28-January 13 From: Knoxville Tn Member No.: 15,438 Region Association: South East States |
Well things are back to square 1 essentially Well maybe not that far back.
But new crank arrives today. Had Jorge verify the bolt fit. 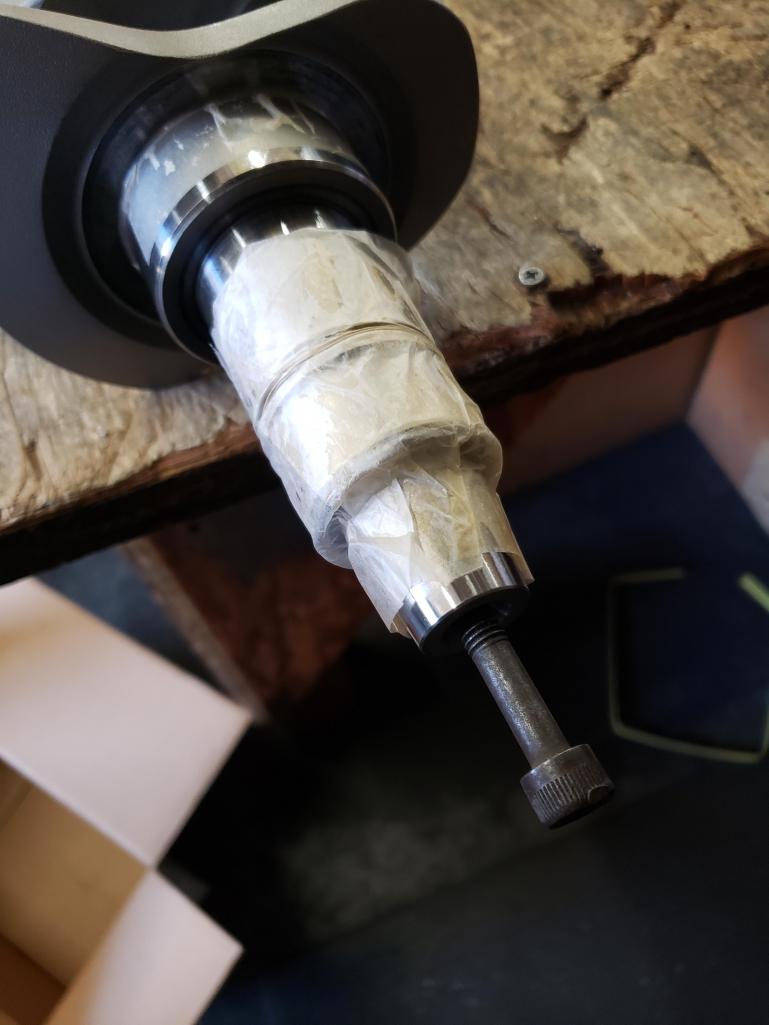 May not be real smart but I am capable of learning! Verified clearances of the 78mm crank in new case. All good there. Took crank timing gear and dizzy drive off old crank. Amazing how easy this is with a press! Tonight. Put new Raceware time serts in case. Install head bolts Clean case for assembly Verify rod fitment and clearance on new crank. Put crank timing gear and dizzy drive on new crank. Clean all parts for assembly. Been knocking out a few other things like adding new 914 Rubber alternator harness. Makes it look very nice! 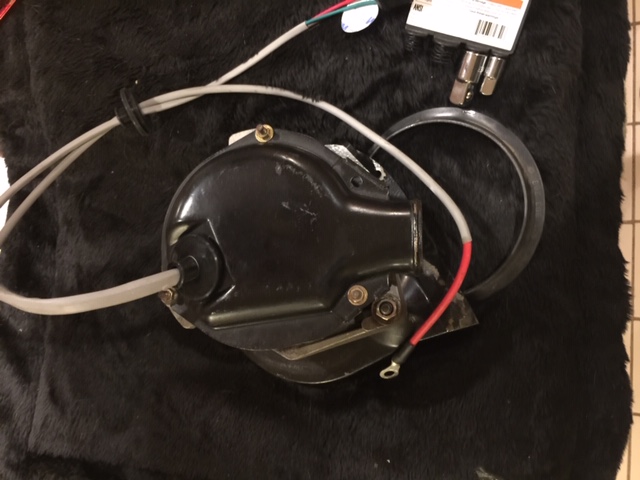 Got all tin cleaned and ready. |
|
|
|
| DRPHIL914 |
Aug 22 2019, 07:20 AM
Post
#58
|
|
Dr. Phil Group: Members Posts: 5,764 Joined: 9-December 09 From: Bluffton, SC Member No.: 11,106 Region Association: South East States |
Mike it looks like you just may make it on time!! you are going to be chasing it down to the wire like I did last year!
|
|
|
|
| Betty |
Aug 22 2019, 04:01 PM
Post
#59
|
|
Driver Group: Members Posts: 511 Joined: 10-December 04 From: Hurst, TX Member No.: 3,255 Region Association: South East States |
(IMG:style_emoticons/default/cheer.gif) (IMG:style_emoticons/default/cheer.gif) (IMG:style_emoticons/default/cheer.gif) (IMG:style_emoticons/default/cheer.gif) (IMG:style_emoticons/default/cheer.gif) (IMG:style_emoticons/default/cheer.gif) (IMG:style_emoticons/default/cheer.gif) (IMG:style_emoticons/default/cheer.gif) (IMG:style_emoticons/default/cheer.gif) (IMG:style_emoticons/default/cheer.gif) (IMG:style_emoticons/default/driving.gif) (IMG:style_emoticons/default/beerchug.gif)
|
|
|
|
| Mblizzard |
Aug 24 2019, 05:15 PM
Post
#60
|
|
Advanced Member Group: Members Posts: 3,033 Joined: 28-January 13 From: Knoxville Tn Member No.: 15,438 Region Association: South East States |
14-hours in the garage and the short block is done!
Couple of minor set backs during the build. Funny seemed to have no clearance issues on the first mock up. But in the end cam bolts were to long and had to be ground down and removing a few broken sheet metal screws sucked up some time and finding a lost rod bearing that was not anywhere in the garage but eventually found its way to my pocket sucked up more time (IMG:style_emoticons/default/headbang.gif) Tomorrow get the PCs on and start setting up the valve train. Did not get time for many photos. Man am I tired. |
|
|
|
|
1 User(s) are reading this topic (1 Guests and 0 Anonymous Users)
0 Members:

|
Lo-Fi Version | Time is now: 3rd May 2024 - 07:06 AM |
Invision Power Board
v9.1.4 © 2024 IPS, Inc.