|
|
|
Porsche, and the Porsche crest are registered trademarks of Dr. Ing. h.c. F. Porsche AG.
This site is not affiliated with Porsche in any way. Its only purpose is to provide an online forum for car enthusiasts. All other trademarks are property of their respective owners. |
|
|

  |

| oakdalecurtis |
 Jul 6 2019, 03:34 PM Jul 6 2019, 03:34 PM
Post
#21
|
|
Oakdalecurtis  Group: Members Posts: 1,325 Joined: 5-June 15 From: Oakdale, Ca Member No.: 18,802 Region Association: Central California |
QUOTE(Rand @ Jun 17 2019, 02:15 PM)  Oil and filter won't fix this. Not sure why someone would suggest that as an answer. Those are band aids on something more important. Take it for what you will. If the OP is forthright, start doing compression and leakdown tests and report back. “Changed to the pen racing oil and my car runs way cooler!! Thanks bro! Also way less smoking. I do need to do my valve guides but not this year. My car is going in for paint finally after 22 years.” flag.gif Here’s why Rand.... (IMG:style_emoticons/default/beerchug.gif) |
   |

 
|
| mitchdiego1 |
Jul 16 2019, 11:27 AM
Post
#22
|
|
Newbie Group: Members Posts: 42 Joined: 19-May 19 From: oceanside ca Member No.: 23,145 Region Association: Southern California |
UPDATE: compression is looks solid across cylinders. (1)138 -(2)137 - (3)135 - (4)138. Getting rid of points and condenser today with electronic ignition.
|
|
|
|
| mitchdiego1 |
Jun 4 2021, 02:36 AM
Post
#23
|
|
Newbie Group: Members Posts: 42 Joined: 19-May 19 From: oceanside ca Member No.: 23,145 Region Association: Southern California |
Well a lot of things happened over the last time I wrote, started taking my car apart. Lost number 3 valve seat back in December of 2020 so I took the motor out and putting new barrels/pistons/heads on. I have my throttle body with Phil. I heard good things about him. Funny my car was running perfect. My truck lost a lifter so I put it in the shop and had a new LS motor put in. I was thinking, cool I can drive my 914 as my daily driver while the truck was getting fixed. I had my wife follow me in her car so I could check for smoke. So I have a video of the car running great, no smoke but before we got home I stopped at the parts store to get brake fluid. Came out and tried to start the car and BOOM, big backfire, then clunking noise. I new right away that I either sucked a valve or lost a valve seat, and sure enough it was #3 intake valve seat. (IMG:style_emoticons/default/sad.gif) (IMG:style_emoticons/default/sad.gif) Well the car sat for 3 months before I did anything I was so bummed. Just dropped a ton of money in my truck. I want to thank all you 914 guys out there because you have given me the confidence to dive into this project, which is almost ready for sealer. p.s. I did weld up the hell hole and it came out ok. won't be a show car but it will outlast me! (IMG:style_emoticons/default/biggrin.gif)
    |
|
|
|
| windforfun |
Jun 4 2021, 10:55 AM
Post
#24
|
|
Senior Member Group: Members Posts: 1,779 Joined: 17-December 07 From: Blackhawk, CA Member No.: 8,476 Region Association: None |
QUOTE(Jgilliam914 @ Jun 17 2019, 05:22 PM) I also had it when the crankcase was over filled once Ditto. The 1.7 uses only about 3.7 quarts. Porsche OEM 20W50 oil is a good way to go too. |
|
|
|
| mitchdiego1 |
Aug 28 2021, 01:31 PM
Post
#25
|
|
Newbie Group: Members Posts: 42 Joined: 19-May 19 From: oceanside ca Member No.: 23,145 Region Association: Southern California |
(IMG:style_emoticons/default/piratenanner.gif) ok just about ready to drive
Attached thumbnail(s) 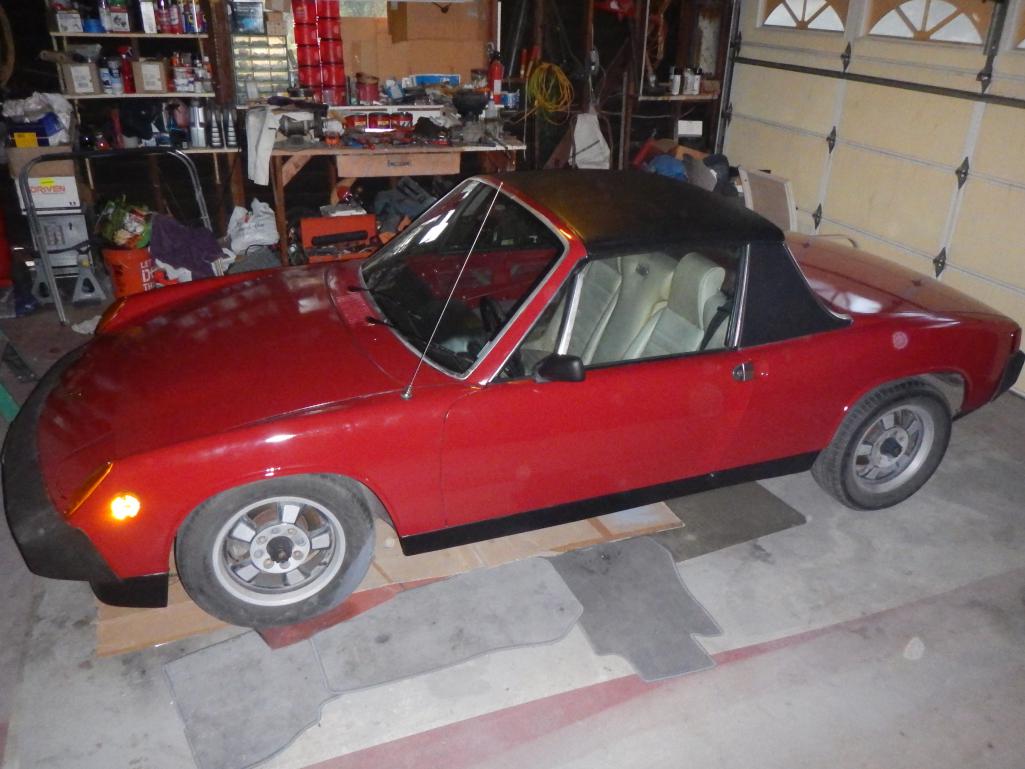
|
|
|
|
| mitchdiego1 |
Aug 28 2021, 01:39 PM
Post
#26
|
|
Newbie Group: Members Posts: 42 Joined: 19-May 19 From: oceanside ca Member No.: 23,145 Region Association: Southern California |
(IMG:style_emoticons/default/aktion035.gif) after taking everything a part. months of sanding and prep work. finally
Attached thumbnail(s) 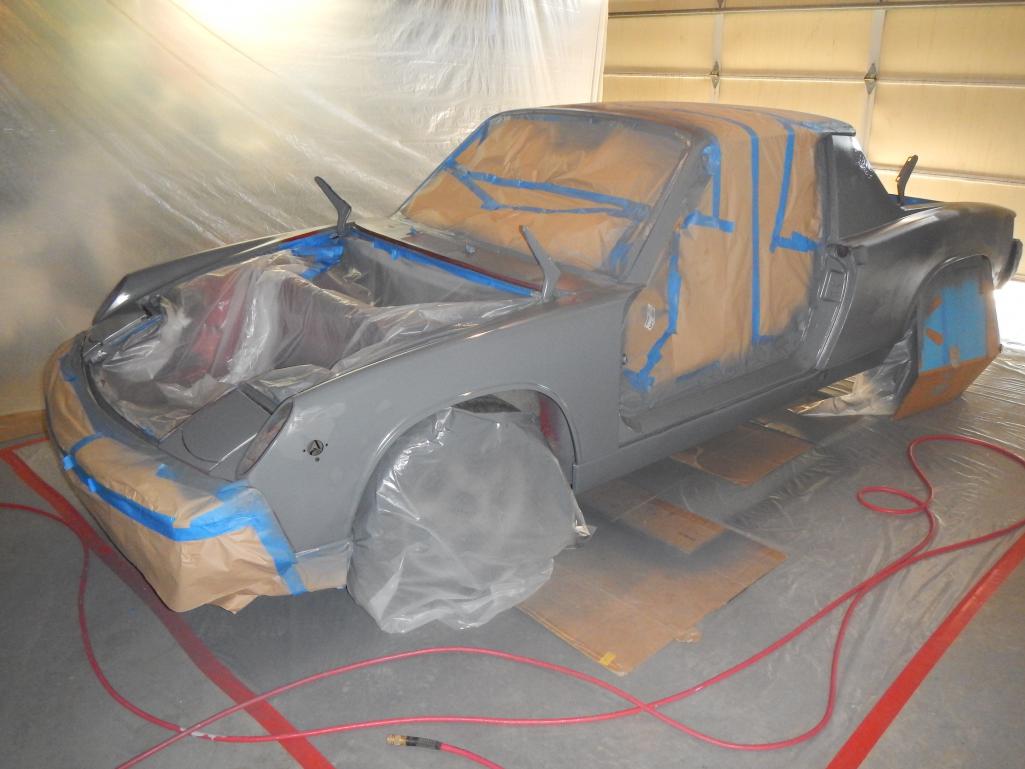
|
|
|
|
| mitchdiego1 |
Aug 28 2021, 01:42 PM
Post
#27
|
|
Newbie Group: Members Posts: 42 Joined: 19-May 19 From: oceanside ca Member No.: 23,145 Region Association: Southern California |
(IMG:style_emoticons/default/wacko.gif) I remember at one point I said to my self "What have I done?!"
Attached thumbnail(s) 
|
|
|
|
| mitchdiego1 |
Aug 28 2021, 01:57 PM
Post
#28
|
|
Newbie Group: Members Posts: 42 Joined: 19-May 19 From: oceanside ca Member No.: 23,145 Region Association: Southern California |
(IMG:style_emoticons/default/headbang.gif) Sand Sand Sand
Attached thumbnail(s) 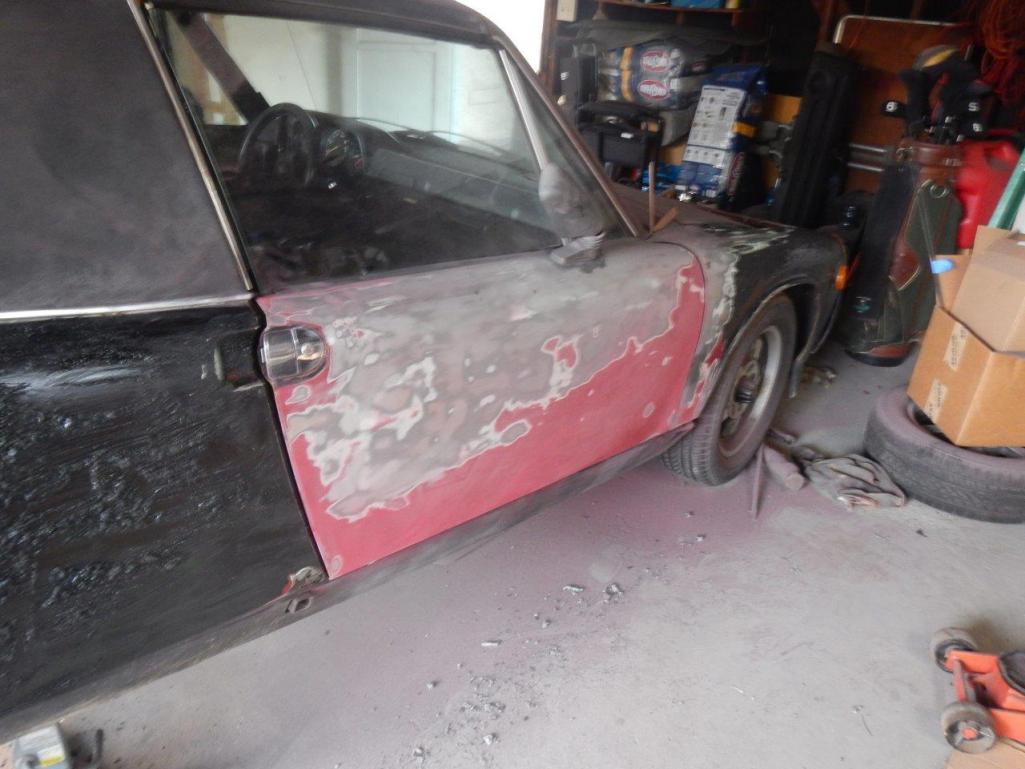 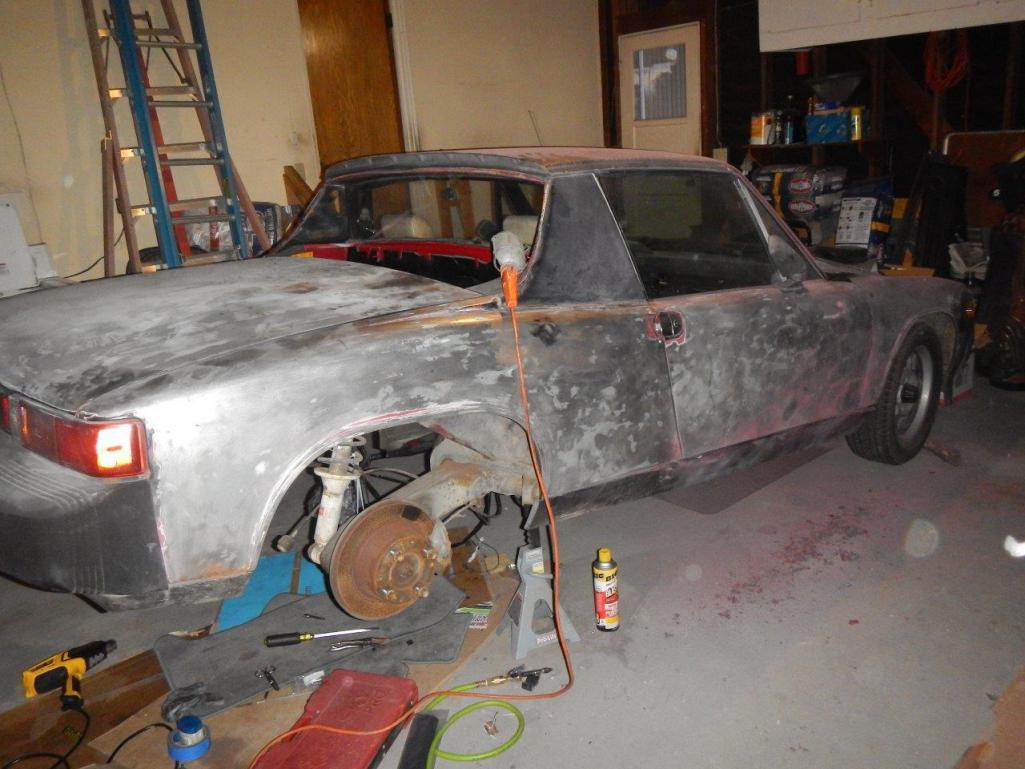 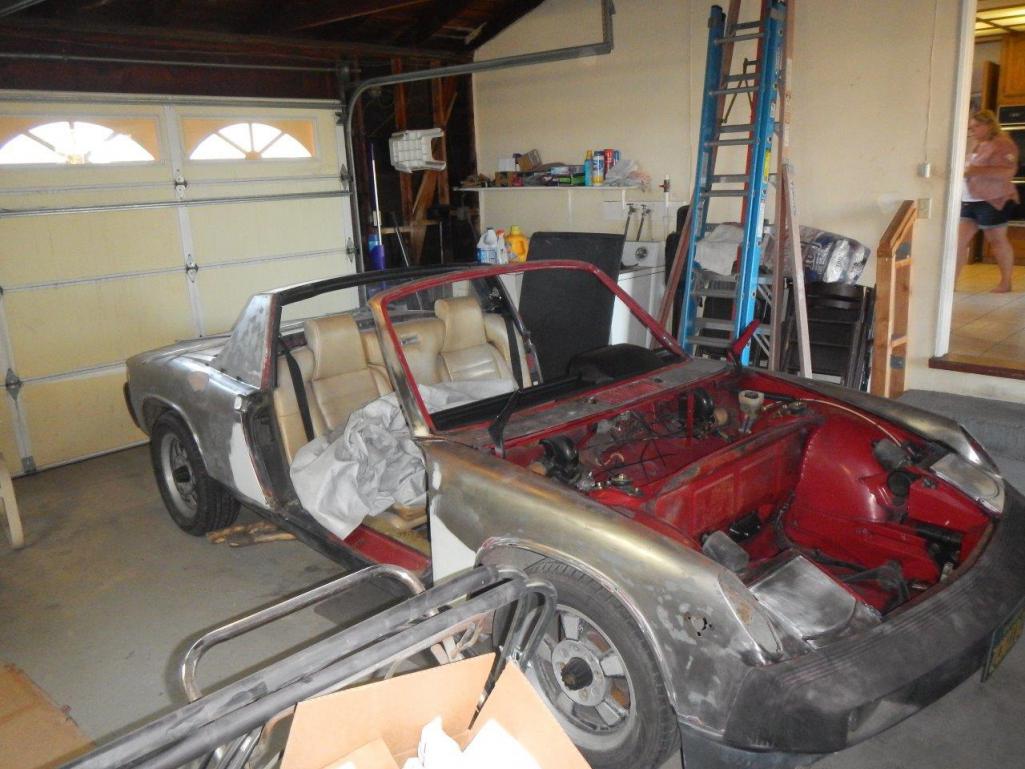
|
|
|
|
| mitchdiego1 |
Aug 28 2021, 02:01 PM
Post
#29
|
|
Newbie Group: Members Posts: 42 Joined: 19-May 19 From: oceanside ca Member No.: 23,145 Region Association: Southern California |
(IMG:style_emoticons/default/welder.gif) Weld lead body fill
Attached image(s) 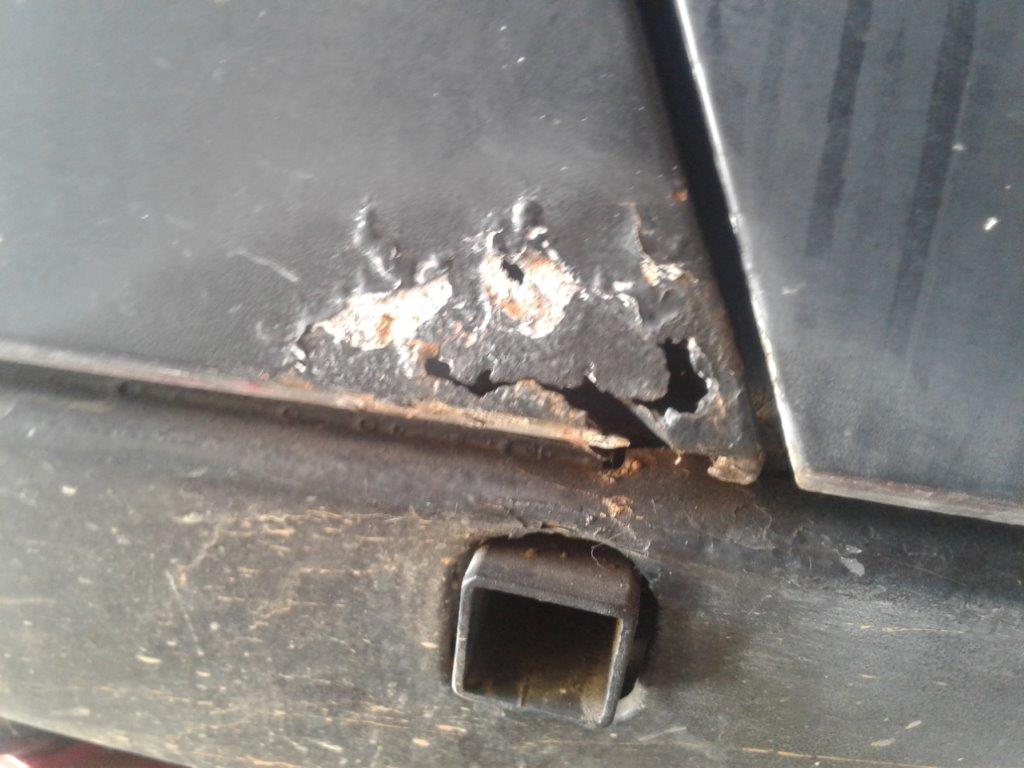 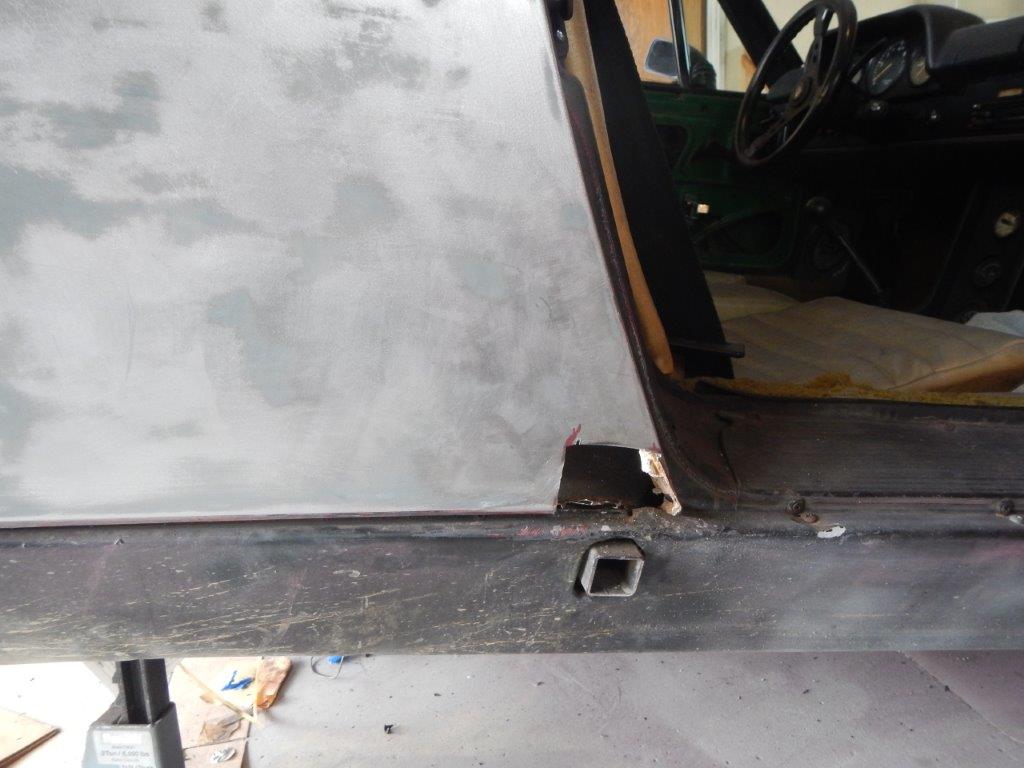  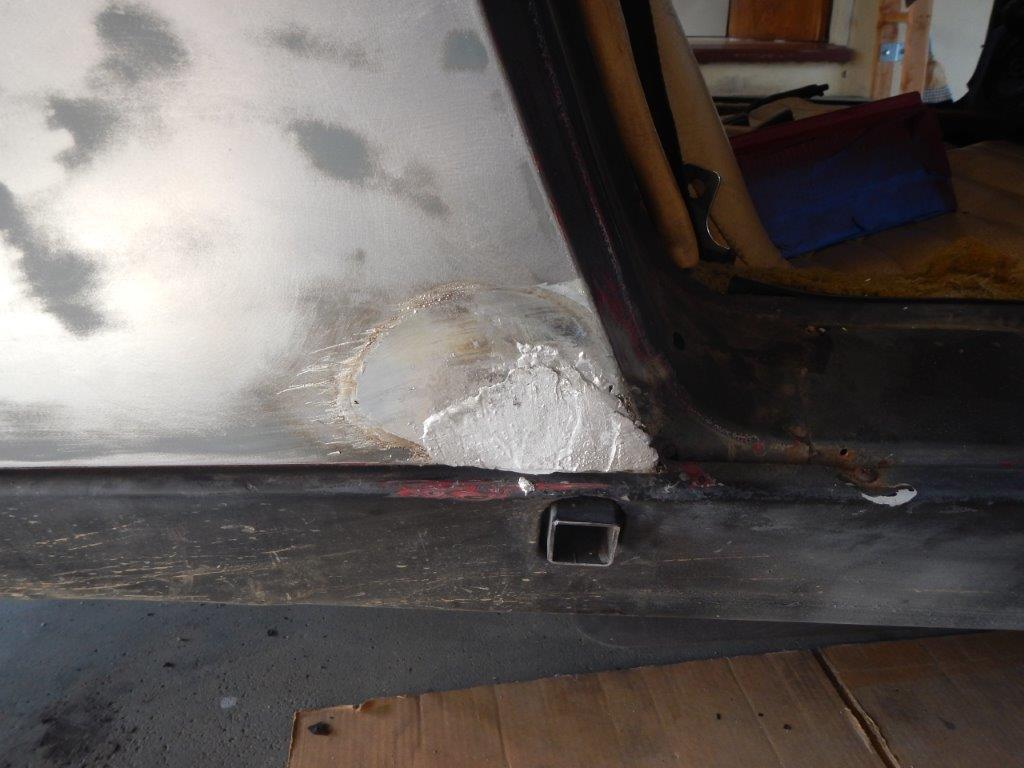 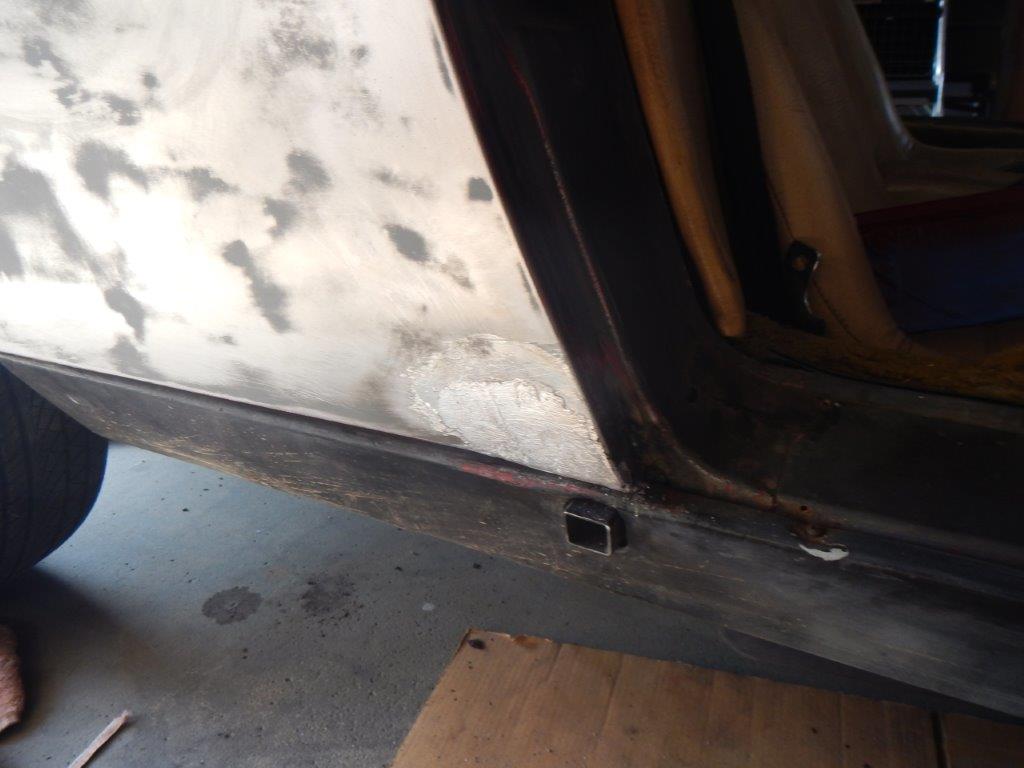 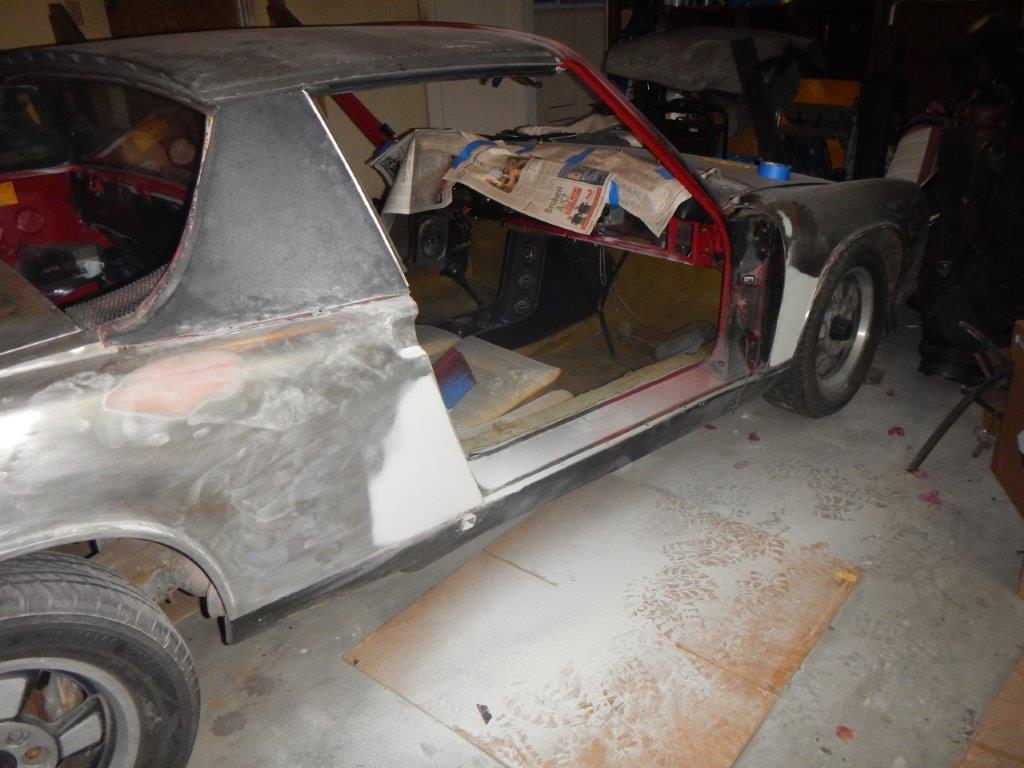
|
|
|
|
| Cairo94507 |
Aug 28 2021, 03:08 PM
Post
#30
|
|
Michael Group: Members Posts: 9,734 Joined: 1-November 08 From: Auburn, CA Member No.: 9,712 Region Association: Northern California |
Nice progress. Do yourself a huge favor and remove the bumpers, lights, rockers, strip the vinyl from the sail panels. Prepare those areas well and your paint job will go to the next level. Be sure to prepare the fender well lips too. Seems the inner lip is often over looked and after the car is painted it really shows up. Also the bottoms of the doors and fenders- the parts you really do not see unless you lay on the ground. Little bit of a pain to prepare if you do not have a lift or the car up on blocks, but well worth the effort.
Also, please carefully tape any areas you do not want to get paint on. Overspray is a dead give away of a low budget, hap-hazard job. Buy good quality tape (3M) and get a good roll of painters paper so the paint does not bleed through. Tape tightly so overspray does not get into the trunks, interior, etc. Do not assume having the trunk closed will keep overspray from contaminating the interior of the trunk. Tape and paper the inside of the trunk then close the trunk. Be sure to tape off any holes that overspray will enter. Locks, mirrors, door handles, emblems, trim etc. Tape them off from the back. Be sure to clean all those areas throughly first then tape. That way when you unmask, you don't have to then clean them with fresh paint in the area. Paint work is 90% about the prep work really. Spraying color is relatively simple with good equipment and a bit of practice. Which brings me to another point, if you have not sprayed cars before, try to find and old hood, door, what ever to practice on first. Air pressure settings and the distance from the panel as well as speed at which you move are all pretty critical to a good job. Check between coats for any contaminants, dirt in the paint. Have some really fine sandpaper/scuff pad to clean those spots up before you apply the next coat. You would be surprised how much junk can get in the paint if you don't have a paint booth. I painted my 1st 914 in my friend's garage. We cleaned the garage really well first, blew it out to get all of the cobwebs, etc. out. Took everything we could out of the garage for maximum room and to avoid any overspray getting on stuff. We then draped the walls with cheap painter's plastic tarps to cover the walls and make the garage as clean as possible. Also propped a residential fan into a garage window and then sealed the rest of the window with plastic to suck air/dust out of the garage as I painted. I borrowed a few rolling lights from my cousin's body shop to make sure I had no shadows when painting. Then the next day we wet the floor down with a hose before we began spraying to keep dust from blowing up off the floor as I walked around shooting color. Then I wiped the car down 3 times with wax and grease remover before finally applying color. I used a new rag each time and then finally a tack cloth. Don't forget a respirator and a paint suit. That way you keep your lungs clean and a paint suit keeps junk from falling off your clothing as you work. The end result was a terrific paint job that looked like glass once I color sanded, cut and polished. The spraying was the easy part. (IMG:style_emoticons/default/beerchug.gif) |
|
|
|
| mitchdiego1 |
Sep 10 2021, 07:52 AM
Post
#31
|
|
Newbie Group: Members Posts: 42 Joined: 19-May 19 From: oceanside ca Member No.: 23,145 Region Association: Southern California |
QUOTE(Cairo94507 @ Aug 28 2021, 02:08 PM) Nice progress. Do yourself a huge favor and remove the bumpers, lights, rockers, strip the vinyl from the sail panels. Prepare those areas well and your paint job will go to the next level. Be sure to prepare the fender well lips too. Seems the inner lip is often over looked and after the car is painted it really shows up. Also the bottoms of the doors and fenders- the parts you really do not see unless you lay on the ground. Little bit of a pain to prepare if you do not have a lift or the car up on blocks, but well worth the effort. Also, please carefully tape any areas you do not want to get paint on. Overspray is a dead give away of a low budget, hap-hazard job. Buy good quality tape (3M) and get a good roll of painters paper so the paint does not bleed through. Tape tightly so overspray does not get into the trunks, interior, etc. Do not assume having the trunk closed will keep overspray from contaminating the interior of the trunk. Tape and paper the inside of the trunk then close the trunk. Be sure to tape off any holes that overspray will enter. Locks, mirrors, door handles, emblems, trim etc. Tape them off from the back. Be sure to clean all those areas throughly first then tape. That way when you unmask, you don't have to then clean them with fresh paint in the area. Paint work is 90% about the prep work really. Spraying color is relatively simple with good equipment and a bit of practice. Which brings me to another point, if you have not sprayed cars before, try to find and old hood, door, what ever to practice on first. Air pressure settings and the distance from the panel as well as speed at which you move are all pretty critical to a good job. Check between coats for any contaminants, dirt in the paint. Have some really fine sandpaper/scuff pad to clean those spots up before you apply the next coat. You would be surprised how much junk can get in the paint if you don't have a paint booth. I painted my 1st 914 in my friend's garage. We cleaned the garage really well first, blew it out to get all of the cobwebs, etc. out. Took everything we could out of the garage for maximum room and to avoid any overspray getting on stuff. We then draped the walls with cheap painter's plastic tarps to cover the walls and make the garage as clean as possible. Also propped a residential fan into a garage window and then sealed the rest of the window with plastic to suck air/dust out of the garage as I painted. I borrowed a few rolling lights from my cousin's body shop to make sure I had no shadows when painting. Then the next day we wet the floor down with a hose before we began spraying to keep dust from blowing up off the floor as I walked around shooting color. Then I wiped the car down 3 times with wax and grease remover before finally applying color. I used a new rag each time and then finally a tack cloth. Don't forget a respirator and a paint suit. That way you keep your lungs clean and a paint suit keeps junk from falling off your clothing as you work. The end result was a terrific paint job that looked like glass once I color sanded, cut and polished. The spraying was the easy part. (IMG:style_emoticons/default/beerchug.gif) |
|
|
|
| mitchdiego1 |
Sep 10 2021, 07:55 AM
Post
#32
|
|
Newbie Group: Members Posts: 42 Joined: 19-May 19 From: oceanside ca Member No.: 23,145 Region Association: Southern California |
QUOTE(mitchdiego1 @ Sep 10 2021, 06:52 AM) QUOTE(Cairo94507 @ Aug 28 2021, 02:08 PM) Nice progress. Do yourself a huge favor and remove the bumpers, lights, rockers, strip the vinyl from the sail panels. Prepare those areas well and your paint job will go to the next level. Be sure to prepare the fender well lips too. Seems the inner lip is often over looked and after the car is painted it really shows up. Also the bottoms of the doors and fenders- the parts you really do not see unless you lay on the ground. Little bit of a pain to prepare if you do not have a lift or the car up on blocks, but well worth the effort. Also, please carefully tape any areas you do not want to get paint on. Overspray is a dead give away of a low budget, hap-hazard job. Buy good quality tape (3M) and get a good roll of painters paper so the paint does not bleed through. Tape tightly so overspray does not get into the trunks, interior, etc. Do not assume having the trunk closed will keep overspray from contaminating the interior of the trunk. Tape and paper the inside of the trunk then close the trunk. Be sure to tape off any holes that overspray will enter. Locks, mirrors, door handles, emblems, trim etc. Tape them off from the back. Be sure to clean all those areas throughly first then tape. That way when you unmask, you don't have to then clean them with fresh paint in the area. Paint work is 90% about the prep work really. Spraying color is relatively simple with good equipment and a bit of practice. Which brings me to another point, if you have not sprayed cars before, try to find and old hood, door, what ever to practice on first. Air pressure settings and the distance from the panel as well as speed at which you move are all pretty critical to a good job. Check between coats for any contaminants, dirt in the paint. Have some really fine sandpaper/scuff pad to clean those spots up before you apply the next coat. You would be surprised how much junk can get in the paint if you don't have a paint booth. I painted my 1st 914 in my friend's garage. We cleaned the garage really well first, blew it out to get all of the cobwebs, etc. out. Took everything we could out of the garage for maximum room and to avoid any overspray getting on stuff. We then draped the walls with cheap painter's plastic tarps to cover the walls and make the garage as clean as possible. Also propped a residential fan into a garage window and then sealed the rest of the window with plastic to suck air/dust out of the garage as I painted. I borrowed a few rolling lights from my cousin's body shop to make sure I had no shadows when painting. Then the next day we wet the floor down with a hose before we began spraying to keep dust from blowing up off the floor as I walked around shooting color. Then I wiped the car down 3 times with wax and grease remover before finally applying color. I used a new rag each time and then finally a tack cloth. Don't forget a respirator and a paint suit. That way you keep your lungs clean and a paint suit keeps junk from falling off your clothing as you work. The end result was a terrific paint job that looked like glass once I color sanded, cut and polished. The spraying was the easy part. (IMG:style_emoticons/default/beerchug.gif) |
|
|
|
| mitchdiego1 |
Sep 10 2021, 08:07 AM
Post
#33
|
|
Newbie Group: Members Posts: 42 Joined: 19-May 19 From: oceanside ca Member No.: 23,145 Region Association: Southern California |
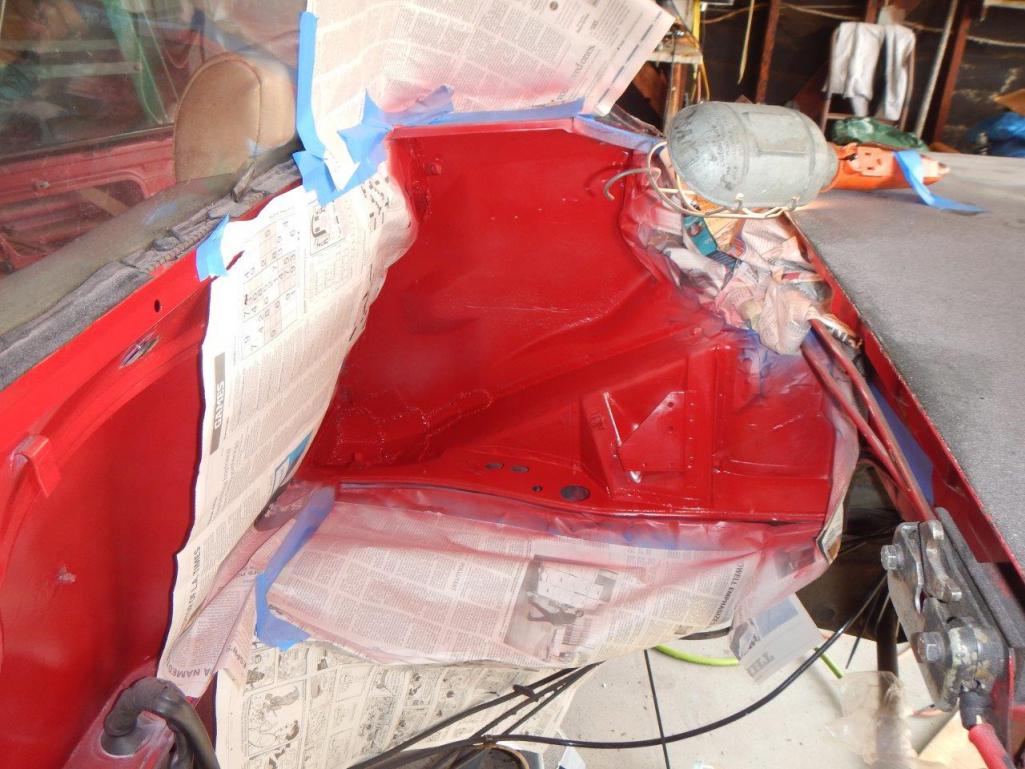
Thanks, I actually did remove the sail panels, and went to my local upholstery outlet. UFO and bought the vinyl. I have to color sand the car still as I am no painter. The primer coats all came out sweet so I thought I had this painting thing down, but found out the primer is much more forgiving than paint. Also, my dad accidently opened the garage door on my second coat of paint and a bunch of junk fell on my car. I didn't notice it until after my third coat dried and I opened up the garage and saw the junk in my paint. No worries though, I didn't build my car to be a show car. Just want it to last another 20 years for me to enjoy.
Attached image(s) 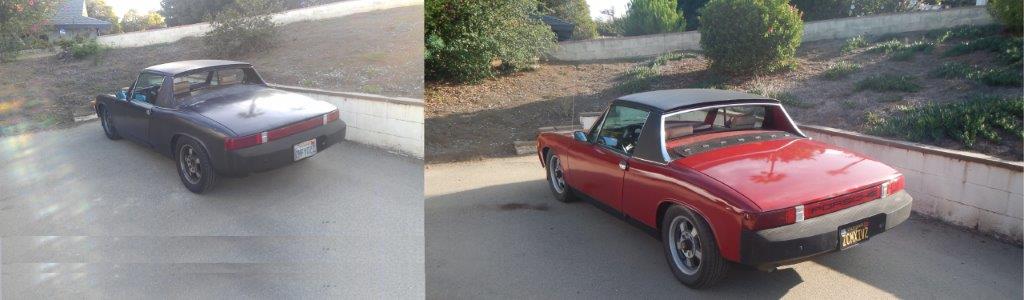
|
|
|
|
| Steve |
Sep 10 2021, 08:11 AM
Post
#34
|
|
914 Guru Group: Members Posts: 5,578 Joined: 14-June 03 From: Orange County, CA Member No.: 822 Region Association: Southern California |
QUOTE(mitchdiego1 @ Jul 16 2019, 10:27 AM) UPDATE: compression is looks solid across cylinders. (1)138 -(2)137 - (3)135 - (4)138. Getting rid of points and condenser today with electronic ignition. I would do a leak down test. It's most likely bad exhaust valve guides. You will hear and maybe feel the air coming out of the tail pipe during the test, if it is bad exhaust valve guides. |
 |
|
| mitchdiego1 |
Sep 10 2021, 08:23 AM
Post
#35
|
|
Newbie Group: Members Posts: 42 Joined: 19-May 19 From: oceanside ca Member No.: 23,145 Region Association: Southern California |
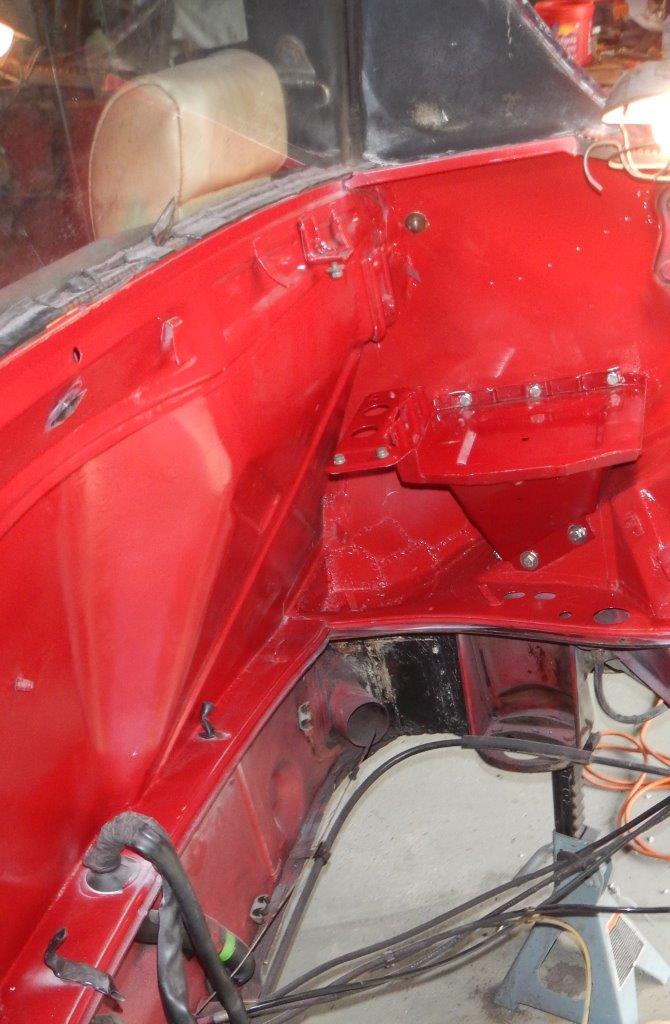
QUOTE(Steve @ Sep 10 2021, 07:11 AM) QUOTE(mitchdiego1 @ Jul 16 2019, 10:27 AM) UPDATE: compression is looks solid across cylinders. (1)138 -(2)137 - (3)135 - (4)138. Getting rid of points and condenser today with electronic ignition. I would do a leak down test. It's most likely bad exhaust valve guides. You will hear and maybe feel the air coming out of the tail pipe during the test, if it is bad exhaust valve guides. You Steve, I lost a valve seat in number three last December so I decided to rebuild the whole car and had new barrels and heads put on. I let the car sit about 4 months before deciding to go all in. It took about 4 months of weekends and some weekdays to get the car finished. I still have some color sanding, finish the windshield squirters and headlights. But I have the car back on the road and enjoying it!!! Thanks for the advice. Attached thumbnail(s) 
|
|
|
|
| Rand |
Sep 10 2021, 01:50 PM
Post
#36
|
|
Cross Member Group: Members Posts: 7,409 Joined: 8-February 05 From: OR Member No.: 3,573 Region Association: None |
The lead body thing... I appreciate. But. That metal needs to be fresh steel to be strong, not just filled with lead. Lead is used for finish work, not structural work.
|
|
|
|
| rhodyguy |
Sep 10 2021, 06:17 PM
Post
#37
|
|
Chimp Sanctuary NW. Check it out. Group: Members Posts: 22,072 Joined: 2-March 03 From: Orion's Bell. The BELL! Member No.: 378 Region Association: Galt's Gulch |
Good work. Nice job. You're braver than I am.
|
|
|
|
| mitchdiego1 |
Sep 23 2021, 02:44 PM
Post
#38
|
|
Newbie Group: Members Posts: 42 Joined: 19-May 19 From: oceanside ca Member No.: 23,145 Region Association: Southern California |
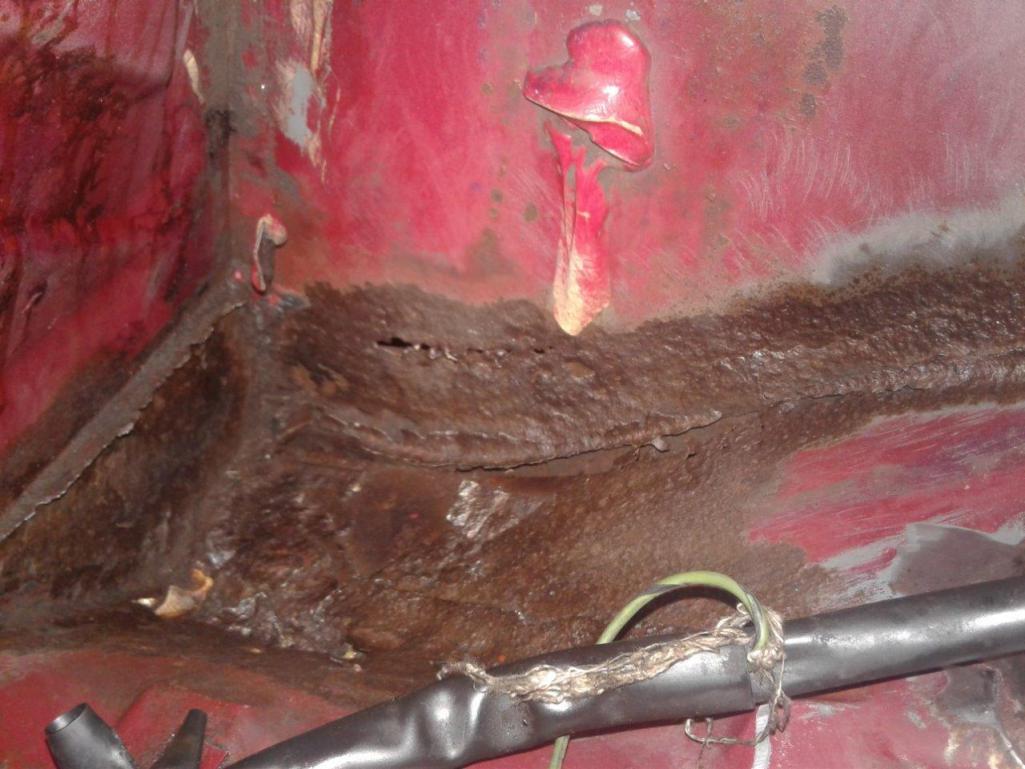
QUOTE(Rand @ Sep 10 2021, 12:50 PM) The lead body thing... I appreciate. But. That metal needs to be fresh steel to be strong, not just filled with lead. Lead is used for finish work, not structural work. Understood, did weld the area cut out Attached image(s) 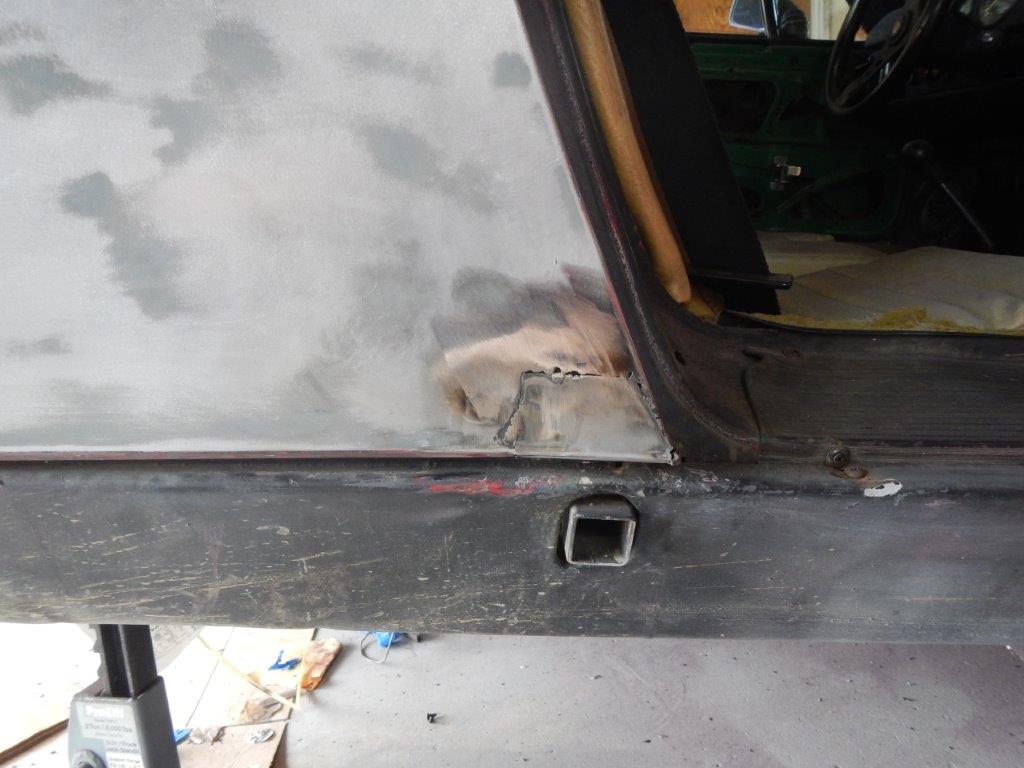
|
|
|
|
| roblav1 |
Sep 23 2021, 07:02 PM
Post
#39
|
|
Senior Member Group: Members Posts: 528 Joined: 18-September 12 From: KY Member No.: 14,943 Region Association: MidAtlantic Region |
QUOTE(flyer86d @ Jun 17 2019, 05:47 PM) Valve guides and valve stem seals. Charlie Concur |
|
|
|
| mitchdiego1 |
Sep 25 2021, 08:11 PM
Post
#40
|
|
Newbie Group: Members Posts: 42 Joined: 19-May 19 From: oceanside ca Member No.: 23,145 Region Association: Southern California |
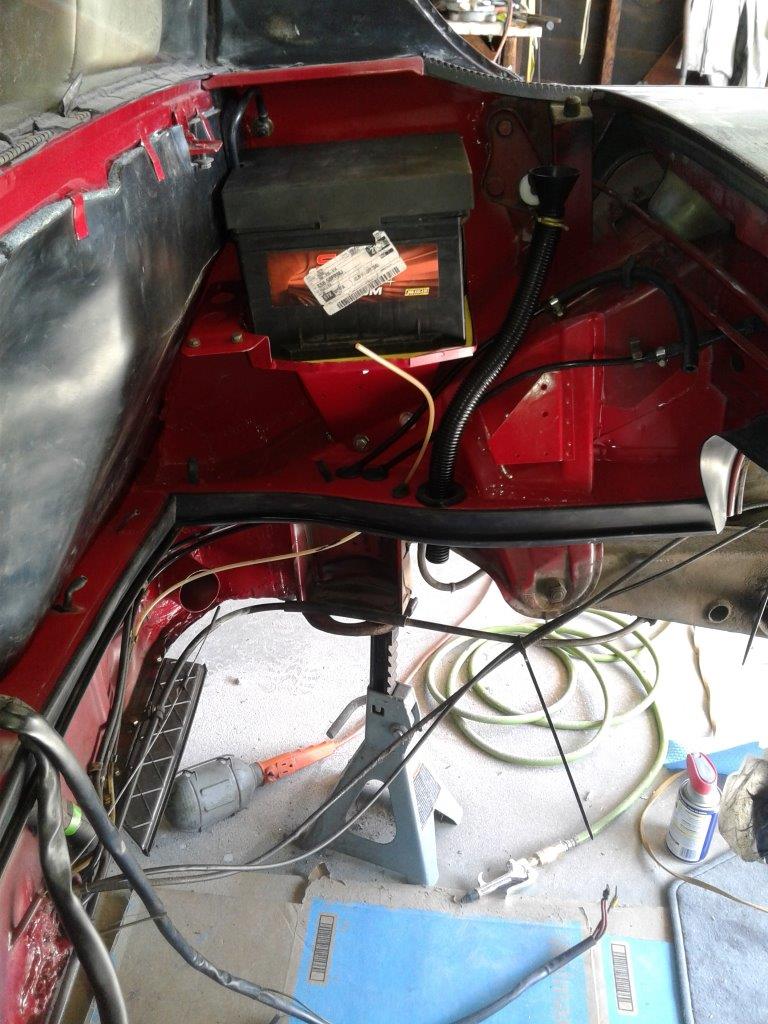
Well, I guess I should have started another thread because I really goofed this one up. I started a couple of years ago asking about my smokey car, but since then I had to rebuild the motor due to me loosing #3 valve seat. I rebuilt the complete top end including barrels and did all the body work. I put in a couple of photos completely out of any kind of order. I welded the hell hole and other rusty problem spots. This is by no means a show car or complete original resto. I did my best with the money my wife would let me spend on the money pit (as she calls it) It looks a million time better if you look at some of the before photos. Again, should have started a rebuild thread. Sorry I really am not very good a posting or body work. Thanks to all the advice you guys are great. (IMG:style_emoticons/default/aktion035.gif)
|
|
|
|
|
1 User(s) are reading this topic (1 Guests and 0 Anonymous Users)
0 Members:

|
Lo-Fi Version | Time is now: 6th May 2024 - 06:35 PM |
Invision Power Board
v9.1.4 © 2024 IPS, Inc.