|
|
|
Porsche, and the Porsche crest are registered trademarks of Dr. Ing. h.c. F. Porsche AG.
This site is not affiliated with Porsche in any way. Its only purpose is to provide an online forum for car enthusiasts. All other trademarks are property of their respective owners. |
|
|

  |

| collinvon |
 Jun 20 2019, 09:46 AM Jun 20 2019, 09:46 AM
Post
#21
|
|
Newbie  Group: Members Posts: 42 Joined: 11-June 19 From: St. Paul, Minnesota Member No.: 23,207 Region Association: Upper MidWest |
QUOTE(IronHillRestorations @ Jun 20 2019, 10:39 AM)  It's pretty straightforward, just be sure to see how it's in there (pics prior to disassembly help) and make sure it goes back in correctly. It's basically held in the slot on the rocker shaft bracket by spring pressure, and keeps pressure on the end of the tube. In doing my first rebuild a few years ago (35) I mistakenly trapped the spring under the rocker shaft bracket and was fortunate to find the problem before it killed my engine. Sounds good! Thanks again for all the info. (IMG:style_emoticons/default/beerchug.gif) |
   |

 
|
| collinvon |
Jun 25 2019, 11:42 AM
Post
#22
|
|
Newbie Group: Members Posts: 42 Joined: 11-June 19 From: St. Paul, Minnesota Member No.: 23,207 Region Association: Upper MidWest |
Alright, so I was able to pull the motor this last weekend, and it really wasn't too bad at all.
I had a new set of DANSK push rod tubes come in today, one is pretty messed up on both ends: (IMG:http://www.914world.com/bbs2/uploads_offsite/i.imgur.com-23207-1561484540.1.jpg) (IMG:http://www.914world.com/bbs2/uploads_offsite/i.imgur.com-23207-1561484541.2.jpg) So I'm hoping to be able to clean and reuse one that's already on there. Has anyone used these before? I'm curious if they hold up well. Second question: Do I have to remove them one cylinder at a time with said cylinder being at TDC? And third question/finding: I was trying to check my valve measurements before I pull the rockers, and it was either a miracle the car was running, or I am doing something incorrectly. I was able to see the notch on the flywheel and the notch on the fan, both at the top of the engine and they lined up perfectly. I'm assuming that means I'm at either TDC for one or three. I had the distributor cap off as well, and when it was pointing to cylinder one, there was no play at all in the rockers for either intake or exhaust on cylinder one and I am unable to get a feeler gauge in there at all. There was play on cylinder 2 intake and cylinder 4 exhaust. Also worth noting, that there was no play at all on cylinder three either. Please correct me if I'm wrong, but it is my understanding that I should be able to adjust both intake and exhaust for cylinder one when it is TDC, and 2 intake and 4 exhaust at the same time? |
|
|
|
| iankarr |
Jun 25 2019, 12:13 PM
Post
#23
|
|
The wrencher formerly known as Cuddy_K Group: Members Posts: 2,473 Joined: 22-May 15 From: Heber City, UT Member No.: 18,749 Region Association: Intermountain Region |
No, you don't need to be at TDC when you pull the tubes / rods. But definitely keep track of which rod is which, and it couldn't hurt to note the orientation as well.
Sucks about that damaged tube. The flanges aren't really critical, since only the O-rings contact the bore...but I'd be concerned that the tube is out of round. Good idea to just re-use the best of your old ones. Yes, if the flywheel notch aligns with the case split and the fan mark is visible in the front notch, you should be at TDC on #1. If you have chromoly pushrods, 'loose zero' would be normal. Just loose enough to spin the rod, but not enough to put in a feeler gauge. As for the "Cap'ns method" of adjusting other valves when 1 is at TDC...it makes perfect sense, but I find it confusing when I'm under the car. It only saves a few revolutions of the flywheel and doing one at a time is easier to keep straight. Not worth it for me, but maybe for people who abbreviate the month "June" (IMG:style_emoticons/default/smile.gif) |
|
|
|
| MarkV |
Jun 25 2019, 12:18 PM
Post
#24
|
|
Fear the Jack Stands Group: Members Posts: 1,493 Joined: 15-January 03 From: Sunny Tucson, AZ Member No.: 154 Region Association: None |
I always use the Crusty method. Just seems easier to me.
http://www.914world.com/bbs2/index.php?showtopic=28758 |
|
|
|
| collinvon |
Jun 25 2019, 12:52 PM
Post
#25
|
|
Newbie Group: Members Posts: 42 Joined: 11-June 19 From: St. Paul, Minnesota Member No.: 23,207 Region Association: Upper MidWest |
QUOTE(cuddy_k @ Jun 25 2019, 01:13 PM) No, you don't need to be at TDC when you pull the tubes / rods. But definitely keep track of which rod is which, and it couldn't hurt to note the orientation as well. Sucks about that damaged tube. The flanges aren't really critical, since only the O-rings contact the bore...but I'd be concerned that the tube is out of round. Good idea to just re-use the best of your old ones. Yes, if the flywheel notch aligns with the case split and the fan mark is visible in the front notch, you should be at TDC on #1. If you have chromoly pushrods, 'loose zero' would be normal. Just loose enough to spin the rod, but not enough to put in a feeler gauge. As for the "Cap'ns method" of adjusting other valves when 1 is at TDC...it makes perfect sense, but I find it confusing when I'm under the car. It only saves a few revolutions of the flywheel and doing one at a time is easier to keep straight. Not worth it for me, but maybe for people who abbreviate the month "June" (IMG:style_emoticons/default/smile.gif) Thanks again for the advice! Shouldn't I be able to check the current adjustments for cylinder one when it's at TDC? I guess that's where most of my confusion is at the moment. |
|
|
|
| collinvon |
Jun 25 2019, 01:05 PM
Post
#26
|
|
Newbie Group: Members Posts: 42 Joined: 11-June 19 From: St. Paul, Minnesota Member No.: 23,207 Region Association: Upper MidWest |
QUOTE(MarkV @ Jun 25 2019, 01:18 PM) I always use the Crusty method. Just seems easier to me. http://www.914world.com/bbs2/index.php?showtopic=28758 Hey Mark, Thanks for the link! As I mentioned to Cuddy, I don't have any clearance at all right now for cylinder 1 at TDC, which seems like a big issue because the tolerances are so small. However, the motor was running fairly well before I pulled it out. |
|
|
|
| IronHillRestorations |
Jun 25 2019, 09:30 PM
Post
#27
|
|
I. I. R. C. Group: Members Posts: 6,717 Joined: 18-March 03 From: West TN Member No.: 439 Region Association: None |
Just make sure you are on TDC#1 not #3. If the engine is on a stand, I do one set at a time, which requires more rotations of the crankshaft
|
 |
|
| Mcraneiowa |
Dec 9 2020, 09:42 PM
Post
#28
|
|
Member Group: Members Posts: 82 Joined: 16-June 20 From: IA Member No.: 24,387 Region Association: None |
I currently have my engine out. Can the engine be placed on end as it would be easier to view everything since I don’t have an engine stand. Would it have any effect on lifters, etc. being on its end while replacing the tube seals. About ready to start this process, just a bit more grime to clean up!
|
|
|
|
| isdyl |
Dec 10 2020, 12:32 PM
Post
#29
|
|
Member Group: Members Posts: 113 Joined: 13-June 18 From: Woking, UK Member No.: 22,217 Region Association: England |
Hi - sorry to butt in with a quick question, but I'm just fixing a leak at the moment and am a bit stuck. I thought I was just going to change the tube seals, but have found one tube has a hole in it! It's one that won't slide out fully annoyingly, so does this mean I have to take the engine out please?? I really hope not. Is there another option like maybe lowering the engine a bit somehow?
Regards, Dylan Attached image(s) 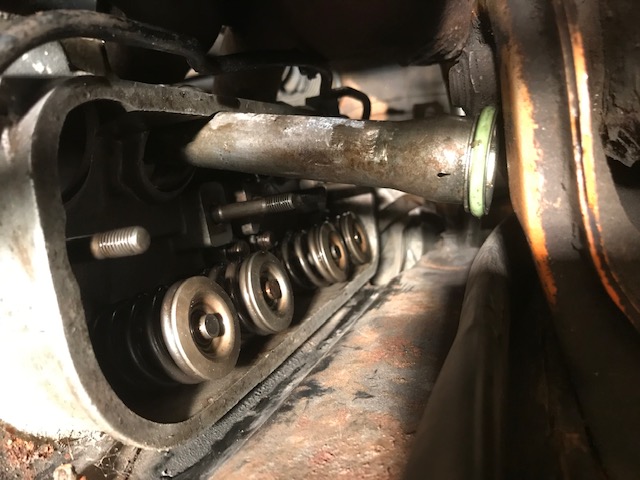
|
|
|
|
| iankarr |
Dec 10 2020, 04:12 PM
Post
#30
|
|
The wrencher formerly known as Cuddy_K Group: Members Posts: 2,473 Joined: 22-May 15 From: Heber City, UT Member No.: 18,749 Region Association: Intermountain Region |
If that tube has a hole in it anyway, maybe just bend it till it comes free?
Also. @ironhillrestorations is right...When you think you're at #1 TDC, pull the distributor cap and ensure you're pointing to the #1 terminal. If you're at #3, you need to go round again. @Mcraneiowa Way easier to work on the engine when it's on a stand. If you tilt it on its side be prepared for an oily mess. You can get a stand at HF cheep and a yoke from this guy... https://www.thesamba.com/vw//classifieds/de...l.php?id=606308 |
|
|
|
| isdyl |
Dec 13 2020, 12:55 PM
Post
#31
|
|
Member Group: Members Posts: 113 Joined: 13-June 18 From: Woking, UK Member No.: 22,217 Region Association: England |
Thanks but I still need to get a new tube back in. Although I've bought a new set of tubes, I I'm considering repairing the hole in the tube now to avoid moving the engine. Does anyone know what temperature these tubes get to please?
Thanks |
|
|
|
| maj75 |
Dec 13 2020, 02:51 PM
Post
#32
|
|
Member Group: Members Posts: 69 Joined: 26-May 20 From: Lighthouse Point, FL Member No.: 24,317 Region Association: None |
The tubes are drain back routes for oil from the head. If you rotate that tube so that the hole is at the top, no oil should leak out. Maybe some oil vapor, condensation. Should get you by until you can pull the motor.
|
|
|
|
| ndfrigi |
Dec 13 2020, 03:05 PM
Post
#33
|
|
Advanced Member Group: Members Posts: 2,928 Joined: 21-August 11 From: Orange County Member No.: 13,474 Region Association: Southern California |
If you just want to replace one tube for now, I think you can lower the rear tranny by placing a floor jack to support the middle between engine and tranny (under the flywheel area) then loosen the bolts of both side of the engine mount bar by the engine support console and also loosen or unbolt tranny mount so you can lower the rear tranny until you get the tube out away from the suspension console mount.
Or place one floor jack in the middle of the mount bar and one floor jack in the middle of tranny. Just make sure to be very careful when you start lowering the rear tranny and not damaging the engine mount bar bolts. I’m sure you get the idea with this. |
|
|
|
| ClayPerrine |
Dec 13 2020, 03:37 PM
Post
#34
|
|
Life's been good to me so far..... Group: Admin Posts: 15,459 Joined: 11-September 03 From: Hurst, TX. Member No.: 1,143 Region Association: NineFourteenerVille |
If you put a floor jack under the engine crossbar, then remove the bolt holding that side of said crossbar to the chassis, you should be able to drop that side of the motor down far enough to get the pushrod tube out of the head.
You may need to loosen the other side of the crossbar to get enough movement. Good luck! Clay |
|
|
|
| isdyl |
Dec 13 2020, 04:11 PM
Post
#35
|
|
Member Group: Members Posts: 113 Joined: 13-June 18 From: Woking, UK Member No.: 22,217 Region Association: England |
Thank you all - I'll give it a go!
Regards, Dylan |
|
|
|
| isdyl |
Dec 14 2020, 11:28 AM
Post
#36
|
|
Member Group: Members Posts: 113 Joined: 13-June 18 From: Woking, UK Member No.: 22,217 Region Association: England |
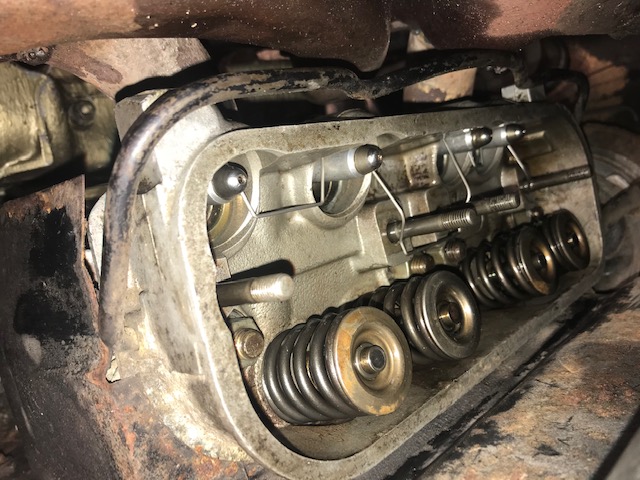
Hi, I've changed one tube and repaired the hole in the other with JB Weld Extreme Heat. I think there's a fair chance it won't last long but I'm just going try it. I'm just struggling with this funny wire retainer. Is there a diagram somewhere of how it should go please? It was in the wrong place previously and has damaged my push rods.
 |
|
|
|
| IronHillRestorations |
Dec 14 2020, 12:51 PM
Post
#37
|
|
I. I. R. C. Group: Members Posts: 6,717 Joined: 18-March 03 From: West TN Member No.: 439 Region Association: None |
Sorry, I don't have pics. The slot in the rocker shaft retainers goes to the bottom and that's where the upper bends of the retaining wire goes, the lower bends go against the end of the push rod tube. You have to put the rocker shafts in first and then the wire.
|
|
|
|
| isdyl |
Dec 14 2020, 12:59 PM
Post
#38
|
|
Member Group: Members Posts: 113 Joined: 13-June 18 From: Woking, UK Member No.: 22,217 Region Association: England |
Ah, ok thanks - I'll put the rocker shafts in and hopefully it will be clearer. That's great.
Regards, Dylan QUOTE(IronHillRestorations @ Dec 14 2020, 12:51 PM) Sorry, I don't have pics. The slot in the rocker shaft retainers goes to the bottom and that's where the upper bends of the retaining wire goes, the lower bends go against the end of the push rod tube. You have to put the rocker shafts in first and then the wire. |
|
|
|
| isdyl |
Dec 15 2020, 06:52 AM
Post
#39
|
|
Member Group: Members Posts: 113 Joined: 13-June 18 From: Woking, UK Member No.: 22,217 Region Association: England |
Ok I think I got it in correctly. It's quite tricky because of the access but your description was actually quite good thanks. I found it's important to get the spring against the tube ends first and then bend into the slots. If the spring goes down the tube by accident it's quite hard to bend into the slots anyway.
The leak is now just from the cover gasket! QUOTE(isdyl @ Dec 14 2020, 12:59 PM) Ah, ok thanks - I'll put the rocker shafts in and hopefully it will be clearer. That's great. Regards, Dylan QUOTE(IronHillRestorations @ Dec 14 2020, 12:51 PM) Sorry, I don't have pics. The slot in the rocker shaft retainers goes to the bottom and that's where the upper bends of the retaining wire goes, the lower bends go against the end of the push rod tube. You have to put the rocker shafts in first and then the wire. |
|
|
|
|
1 User(s) are reading this topic (1 Guests and 0 Anonymous Users)
0 Members:

|
Lo-Fi Version | Time is now: 14th May 2024 - 07:50 AM |
Invision Power Board
v9.1.4 © 2024 IPS, Inc.