Home  |  Forums  |  914 Info  |  Blogs
 
914World.com - The fastest growing online 914 community!
 
Porsche, and the Porsche crest are registered trademarks of Dr. Ing. h.c. F. Porsche AG. This site is not affiliated with Porsche in any way.
Its only purpose is to provide an online forum for car enthusiasts. All other trademarks are property of their respective owners.
 

Welcome Guest ( Log In | Register )

 
Reply to this topicStart new topic
> 74 914 Rustoration
eatpez
post Oct 28 2019, 08:16 PM
Post #1


Newbie
*

Group: Members
Posts: 18
Joined: 4-October 18
From: Michigan
Member No.: 22,543
Region Association: North East States


I picked up this roller last year and my brother picked one up as well. The original intension was a pair of Hayabusa builds, but I'm not so sure anymore, so I'm starting a new thread. The car was more or less complete and cheap. The longs and suspension points were solid, so I figure it was something I could work with.

Late this summer, I finally got back into the car, and the plan now is to take my time and make decisions as I go. Naturally, that means the first thing that needed to be done was to strip the car down to the bare chassis and tackle the rustoration first. This is especially interesting to me because the last time I restored a 914 was 25 years ago and I never got the chance to learn how to do body/suspension work. I'm using it as an opportunity to learn how fabricate and weld.

This will be my new thread and I'll be digging up pictures and posting updates with progress as I dig them up.


Attached thumbnail(s)
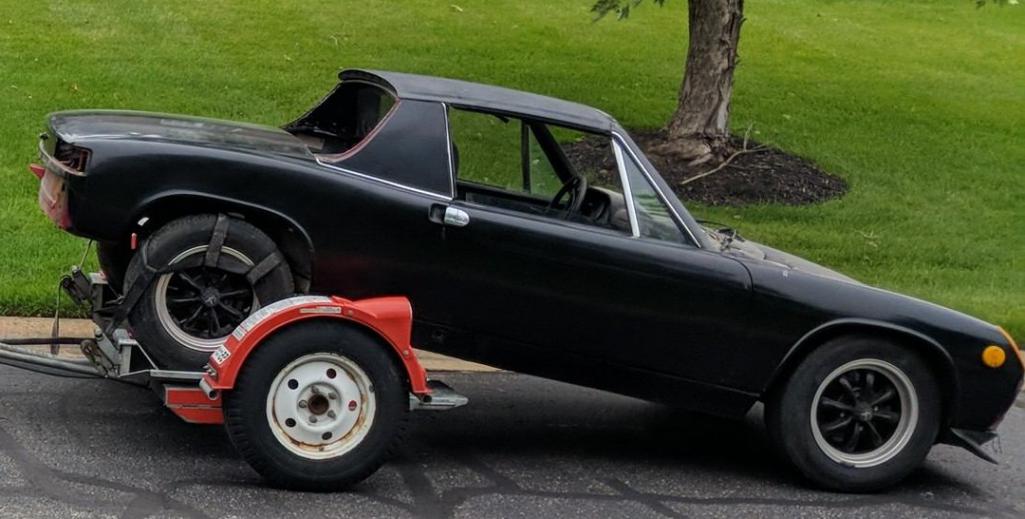
Attached Image
User is offlineProfile CardPM
Go to the top of the page
+Quote Post
pistorman
post Oct 28 2019, 11:16 PM
Post #2


Newbie
*

Group: Members
Posts: 14
Joined: 8-October 19
From: Spring, TX
Member No.: 23,546
Region Association: Southwest Region


I have found myself pretty much in the same situation with a 1976 model. I have my own thread but I have yet to decide whether this is a car I am going to restore this car or seek a better one. But I have fixed cars with rust before, so I look forward to your thread.
User is offlineProfile CardPM
Go to the top of the page
+Quote Post
ndfrigi
post Oct 28 2019, 11:25 PM
Post #3


Advanced Member
****

Group: Members
Posts: 2,928
Joined: 21-August 11
From: Orange County
Member No.: 13,474
Region Association: Southern California


I’m also on the same status 74 project.

Attached Image
Attached Image
User is offlineProfile CardPM
Go to the top of the page
+Quote Post
Superhawk996
post Oct 29 2019, 05:00 AM
Post #4


914 Guru
*****

Group: Members
Posts: 5,769
Joined: 25-August 18
From: Woods of N. Idaho
Member No.: 22,428
Region Association: Galt's Gulch


(IMG:style_emoticons/default/welcome.png)

Since you have a couple of Hayabusa's maybe you should do a Hayabusa based V8 like the Lotus that was pumping out 450+ HP if your bother bails on his project.

Could be an interesting build.
User is offlineProfile CardPM
Go to the top of the page
+Quote Post
eatpez
post Nov 5 2019, 07:45 PM
Post #5


Newbie
*

Group: Members
Posts: 18
Joined: 4-October 18
From: Michigan
Member No.: 22,543
Region Association: North East States


I don't have many pictures of the tear down, but I want to start with the history of this car's color.

The factory color code is L96M, marathon blue metallic and in the places where it's still fresh, I really am growing fond of it. I may match it when it comes time to paint. Especially since it was available on the 914-6 and my current inclination is to put a 3.0/3.2L engine in it.

It looks like it was then painted white, then red, then black with some kind of horrible brown primer after the white. The black paint job (and the red) were definitely not professional jobs - overspray everywhere and poorly bonded, etc.

I warmed up the rear quarter panel with a propane torch and managed to get a second removed in one piece. It measured with my calipers at 1mm thick.

Attached Image
User is offlineProfile CardPM
Go to the top of the page
+Quote Post
Superhawk996
post Nov 27 2019, 06:56 AM
Post #6


914 Guru
*****

Group: Members
Posts: 5,769
Joined: 25-August 18
From: Woods of N. Idaho
Member No.: 22,428
Region Association: Galt's Gulch


(IMG:style_emoticons/default/smilie_pokal.gif)

Keep posting. How's this build going?
User is offlineProfile CardPM
Go to the top of the page
+Quote Post
Garland
post Nov 27 2019, 08:18 AM
Post #7


Restoration Fanatic
***

Group: Members
Posts: 1,328
Joined: 8-January 04
From: ......Michigan......
Member No.: 1,535
Region Association: Upper MidWest


QUOTE(Superhawk996 @ Nov 27 2019, 07:56 AM) *

(IMG:style_emoticons/default/smilie_pokal.gif)

Keep posting. How's this build going?


(IMG:style_emoticons/default/agree.gif)

A Michigan build!
User is offlineProfile CardPM
Go to the top of the page
+Quote Post
eatpez
post Dec 3 2019, 07:45 PM
Post #8


Newbie
*

Group: Members
Posts: 18
Joined: 4-October 18
From: Michigan
Member No.: 22,543
Region Association: North East States


Okay, pictures that I did take during the teardown and inventory of the chassis are coming with the next post. I wanted to mention the best addition to my tool arsenal for the project so far.

The lugs, suspension, steering rack, trailing arms, etc. gave me fits - the car had obviously been sitting (and rusting) for years. I tried, propane, PB blaster, mechanical leverage (up to 6-7' with cheater), and an air impact gun. No dice.

Once I got this setup, along with the #6 heating tip, all I ever needed to do was heat the stuck nut/bolt until it just started to glow red and every single time the fastener came loose without any issue whatsoever.

I wish I had this sucker 25 years ago when I did my last 914 project. All hail my trusty little HF oxy/acetylene torch!


Attached image(s)
Attached Image
User is offlineProfile CardPM
Go to the top of the page
+Quote Post
mepstein
post Dec 3 2019, 07:59 PM
Post #9


914-6 GT in waiting
***************

Group: Members
Posts: 19,253
Joined: 19-September 09
From: Landenberg, PA/Wilmington, DE
Member No.: 10,825
Region Association: MidAtlantic Region


The guys at the shop showed me how to make friends with the hot wrench. I just use a MAP torch but it works well.
User is offlineProfile CardPM
Go to the top of the page
+Quote Post
eatpez
post Dec 3 2019, 08:12 PM
Post #10


Newbie
*

Group: Members
Posts: 18
Joined: 4-October 18
From: Michigan
Member No.: 22,543
Region Association: North East States


Here are the pictures I took during the teardown. The neighbor's cat was interested in what was going on - you can see the car has been through many colors and as I learned in going over it - also had many battle scars.

Attached Image

The rear panel was really weak in a few places, as well as the rear trunk pan, and I decided that I was going to replace the entire panel instead of doing the fabrication work to clean it up. More on that later.

The area blocked in red, more pictures to come, was evidence of an old accident where front half of the inner front fender was replaced but the damage also affected the area where the sway bar comes through as well as the bracket just under it. I've since found a donor piece to patch it in later. Thanks to Garold down in NW Indiana for hooking me up with some hunks off of one of his chassis (more pictures to come on that too).

Attached Image

Attached Image

Attached Image

The longs and suspension points were solid, but it I plan on replacing: rear panel, rear trunk pan, floor plan, front trunk floor plan in addition to the fab work to fix up the firewall and the engine bay (hell hole, battery tray).

Typical lower windshield rust.

Attached Image


Attached image(s)
Attached Image Attached Image Attached Image
User is offlineProfile CardPM
Go to the top of the page
+Quote Post
eatpez
post Dec 3 2019, 08:25 PM
Post #11


Newbie
*

Group: Members
Posts: 18
Joined: 4-October 18
From: Michigan
Member No.: 22,543
Region Association: North East States


Here are a few examples of what I found during disassembly:

1. At some point someone thought it would be great to just weld in a piece of plate with a few stitches and the seat rails to that. The floor definitely needs to go and I'm considering boxing it in for re-enforcement. Those decisions will be deferred until after I have the chassis restoration done and decide on the powertrain.

Attached Image

2. A view of the inner passenger side front well - to the left of the pink line in the seam where the repair was made from accident damage, but the area circled in orange is also still out of shape and since this is where the sway bars come through and the a-arm attaches underneath, I've got a donor section that I'm going to swap in here.

Attached Image

In general, I'm working back to front on the chassis, mainly because I need to get the rear done so I can use the bumper mount points to get it up on a rotisserie.
User is offlineProfile CardPM
Go to the top of the page
+Quote Post
eatpez
post Dec 12 2019, 08:03 PM
Post #12


Newbie
*

Group: Members
Posts: 18
Joined: 4-October 18
From: Michigan
Member No.: 22,543
Region Association: North East States


Here are a few more pictures from the disassembly.

A wide shot of the rear fender:

Attached Image

After removing the rear panel, I noticed bomdo and accident damange, removing a little paint to see how bad it was:

Attached Image

And here is a close up, way to much bondo and not enough work with a body hammer by the PO. As a result, if I can find someone who has the rear half of the passenger rear fender around, I'll take it and replace the entire section - especially because the rear section around the taillight is out of shape as well.
Attached Image

That's a lot of bondo.

Also pulling the wiring completely out was a tedious as usual, especially getting the rear section up through the firewall and center tunnel. Why that little turn is in there at the rear of the center tunnel is beyond me.

Attached Image

Next up some shots from removal of the rear panel.
User is offlineProfile CardPM
Go to the top of the page
+Quote Post
eatpez
post Dec 12 2019, 09:33 PM
Post #13


Newbie
*

Group: Members
Posts: 18
Joined: 4-October 18
From: Michigan
Member No.: 22,543
Region Association: North East States


Here are some pictures from removal of the rear panel which after doing it was a real chore and I probably would have been better served doing the fabrication to repair the weak spots in the one on the car.

First of course are all the spot welds and these were the easy ones.

Attached Image

Then there were the seams where it meets the rest of the car and the area near the cups for the rear trunk tops included some lovely lead body filler making it hard to determine where the seam actually was in the area of the rear trunk seal channel.

Attached Image

I don't have a ton of pictures of this process, but here is a shot of the seam at the side of the rear panel. It appears that the factory put the rear on after the inner panel and then attached the outer fender panels afterwards, creating a sandwiched seam which was a real pain to get to release without creating too much damage.

Attached Image

Finally after a ton of work on spot welds and even more finesse I was able to get the rear panel off. Since I am replacing the rear of the trunk pan, I simply used the oxy/acetylene torch to cut around the mount for the towing hook. I still have yet to clean that stuff up so it can go back on later.

Attached Image

Here are the brackets from the rear panel after they came out of the blasting cabinet. I still have to do the side cups and the towing and bumper mounts. I have those set aside.

Attached Image

User is offlineProfile CardPM
Go to the top of the page
+Quote Post
eatpez
post Dec 12 2019, 10:04 PM
Post #14


Newbie
*

Group: Members
Posts: 18
Joined: 4-October 18
From: Michigan
Member No.: 22,543
Region Association: North East States


Next up was removing the rear half of the trunk pan. So many spot welds to drill out. This was just the cross member support bracket.

Attached Image

Next up the rough cut to get most of the metal out of the way. Compared to the rear panel, this was really straightforward.

Attached Image

Laid down some tape to mark the cut line for the final cut after trimming the Restoration Design panel.

Attached Image

Test fit of the new section - not bad at all.

Attached Image

Next up is sealing the cross member channel with POR-15 now that it's open. And it's hard to tell from the pictures, but I'm also going to replace the front part of the trunk pan using a section from a donor car. Somehow, it got really banged up and bent from underneath at some point - hammer and dolly work won't cut it. And besides, I could use the welding practice.

Things are going a little slower now that it's cold in Michigan; all I have is a propane heater in the garage - sure wish mine were heated.
User is offlineProfile CardPM
Go to the top of the page
+Quote Post
Rogerz33
post Dec 12 2019, 10:24 PM
Post #15


Newbie
*

Group: Members
Posts: 9
Joined: 12-December 19
From: GA
Member No.: 23,730
Region Association: South East States


QUOTE(ndfrigi @ Oct 28 2019, 11:25 PM) *

I’m also on the same status 74 project.

Attached Image
Attached Image

That looks like a fun project!
User is offlineProfile CardPM
Go to the top of the page
+Quote Post
bkrantz
post Dec 12 2019, 10:51 PM
Post #16


914 Guru
*****

Group: Members
Posts: 7,742
Joined: 3-August 19
From: SW Colorado
Member No.: 23,343
Region Association: Rocky Mountains


Looks like we are are the same plan and state of progress. Fixing dodgy repairs sure gets interesting.
User is offlineProfile CardPM
Go to the top of the page
+Quote Post
eatpez
post Dec 26 2019, 04:08 PM
Post #17


Newbie
*

Group: Members
Posts: 18
Joined: 4-October 18
From: Michigan
Member No.: 22,543
Region Association: North East States


Post your build threads and I'll follow along. I really enjoy the entire process as much as I enjoy driving the end result. (IMG:style_emoticons/default/beerchug.gif)
User is offlineProfile CardPM
Go to the top of the page
+Quote Post
Superhawk996
post Dec 26 2019, 04:30 PM
Post #18


914 Guru
*****

Group: Members
Posts: 5,769
Joined: 25-August 18
From: Woods of N. Idaho
Member No.: 22,428
Region Association: Galt's Gulch


Nice work. Keep going. Looks like you've got a serious project on your hands. (IMG:style_emoticons/default/smilie_pokal.gif) (IMG:style_emoticons/default/welder.gif)
User is offlineProfile CardPM
Go to the top of the page
+Quote Post
jmitro
post Dec 26 2019, 08:31 PM
Post #19


Senior Member
***

Group: Members
Posts: 713
Joined: 23-July 15
From: Oklahoma
Member No.: 18,986
Region Association: None


that's a lot of heavy metal work. reminds me of my car; it was very tedious but gratifying in the end.

nice job, keep going (IMG:style_emoticons/default/beerchug.gif)
User is offlineProfile CardPM
Go to the top of the page
+Quote Post

Reply to this topicStart new topic
1 User(s) are reading this topic (1 Guests and 0 Anonymous Users)
0 Members:


- Lo-Fi Version Time is now: 3rd May 2024 - 02:47 AM