|
|
|
Porsche, and the Porsche crest are registered trademarks of Dr. Ing. h.c. F. Porsche AG.
This site is not affiliated with Porsche in any way. Its only purpose is to provide an online forum for car enthusiasts. All other trademarks are property of their respective owners. |
|
|

  |

| drgchapman |
 Jul 1 2005, 10:43 AM Jul 1 2005, 10:43 AM
Post
#1
|
|
Current Stable  Group: NoClassifiedAccess Posts: 922 Joined: 20-September 04 From: Portland, OR Member No.: 2,789 Region Association: Pacific Northwest |
How do you put the new ones in? Old ones came out in two pieces, real easy. I tried to press them in with a c-clamp......just squishes 'em .
|
   |

 
|
| skline |
Jul 1 2005, 10:46 AM
Post
#2
|
|
Born to Drive Group: Members Posts: 7,910 Joined: 26-December 02 From: Costa Mesa, CA Member No.: 17 Region Association: Southern California |
Talk to Aaron Cox, he has it down to a science and does them in about 3 minutes per drop link.
|
|
|
|
| MarkG |
Jul 1 2005, 10:49 AM
Post
#3
|
|
Member Group: Members Posts: 314 Joined: 24-May 04 From: Colorado Springs Member No.: 2,102 |
I greased mine, then used channel locks as a vise, squeezed them right in
|
|
|
|
| 914helo |
Jul 1 2005, 10:53 AM
Post
#5
|
|
Member Group: Members Posts: 235 Joined: 29-September 04 From: Southern Utah Member No.: 2,859 Region Association: None |
I used a little bit of grease and carefully squeezed them in with a vise. Seemed to work pretty well.
|
|
|
|
| skline |
Jul 1 2005, 11:13 AM
Post
#6
|
|
Born to Drive Group: Members Posts: 7,910 Joined: 26-December 02 From: Costa Mesa, CA Member No.: 17 Region Association: Southern California |
I think he clamps them with a hose clamp to keep them from collapsing and then heats them up to make them soft and wets them witha lubricant and they slide right in. I think he is coming by here today so I will have him post.
|
|
|
|
| drgchapman |
Jul 1 2005, 12:14 PM
Post
#7
|
|
Current Stable Group: NoClassifiedAccess Posts: 922 Joined: 20-September 04 From: Portland, OR Member No.: 2,789 Region Association: Pacific Northwest |
Thanks guys, there in. (IMG:http://www.914world.com/bbs2/html/emoticons/smilie_pokal.gif) Greased 'em.......squeezed 'em in with a c-clamp, some pushing on the bulging edge.........grease...wonderful stuff.
Gary |
|
|
|
| watsonrx13 |
Jul 1 2005, 04:16 PM
Post
#8
|
|
Advanced Member Group: Members Posts: 2,734 Joined: 18-February 03 From: Plant City, FL Member No.: 312 Region Association: South East States |
I just recently completed this, with Paul's (URY914) assistance, here's my description:
'The plastic bushings are very stiff and can be difficult to install. The steps I used to install them was to first place the hollow end next to the link and place both in a vice. Slowly tighten the vice and carefully 'persuade' the bushing into the ring using a flat-bladed screwdriver. At this point DO NOT put any grease on the bushing or the link. Once the bushing's ring has been inserted into the ring, remove from the vice. Apply a small amount of grease on the edge of the bushing, then place the ring, with the solid section of the bushing up, over the open jaws of the vice then beat into place. ' Here's the link to my websie Attached image(s) 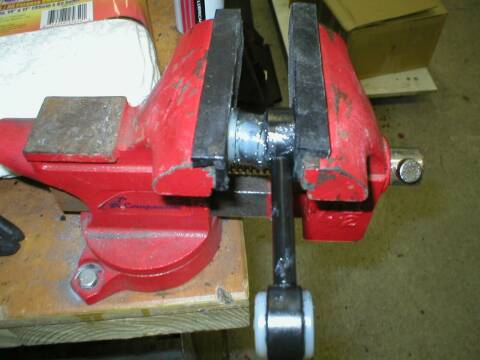
|
|
|
|
| watsonrx13 |
Jul 1 2005, 04:17 PM
Post
#9
|
|
Advanced Member Group: Members Posts: 2,734 Joined: 18-February 03 From: Plant City, FL Member No.: 312 Region Association: South East States |
Here's the description of installing them:
'I added some grease into both sections of each bushing. Then, start by putting the bushing on the shock absorber end, cover with a rag and hit sharply with a rubber hammer. Next, place the sway bar end into the other bushing and slowly tighten with a c-clamp. Notice the position of the c-clamp. The link will have a tendency to move around, so hold it in position. Tighten c-clamp until sway bar end is firmly in positon. ' Attached image(s) 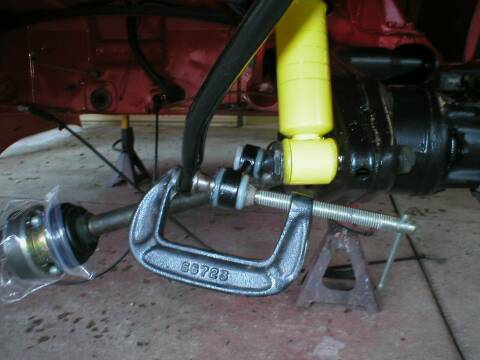
|
|
|
|
| watsonrx13 |
Jul 1 2005, 04:19 PM
Post
#10
|
||
|
Advanced Member Group: Members Posts: 2,734 Joined: 18-February 03 From: Plant City, FL Member No.: 312 Region Association: South East States |
BTW Gary, glad you were able to get you're bushings installed, just thought I'd add my description in case someone else searched the web site... |
||
|
|
|
||
|
1 User(s) are reading this topic (1 Guests and 0 Anonymous Users)
0 Members:

|
Lo-Fi Version | Time is now: 20th May 2024 - 05:38 PM |
Invision Power Board
v9.1.4 © 2024 IPS, Inc.