|
|
|
Porsche, and the Porsche crest are registered trademarks of Dr. Ing. h.c. F. Porsche AG.
This site is not affiliated with Porsche in any way. Its only purpose is to provide an online forum for car enthusiasts. All other trademarks are property of their respective owners. |
|
|

  |

| Coondog |
 Nov 18 2019, 07:24 PM Nov 18 2019, 07:24 PM
Post
#1
|
|
Advanced Member  Group: Members Posts: 2,089 Joined: 24-September 15 From: Apple Valley Calif Member No.: 19,195 Region Association: Southern California |
Put in a new Cone Screw, but it only went this far. I really put the muscle to it along with a dap of lock tight.
Is this correct or am I doing something wrong ?? 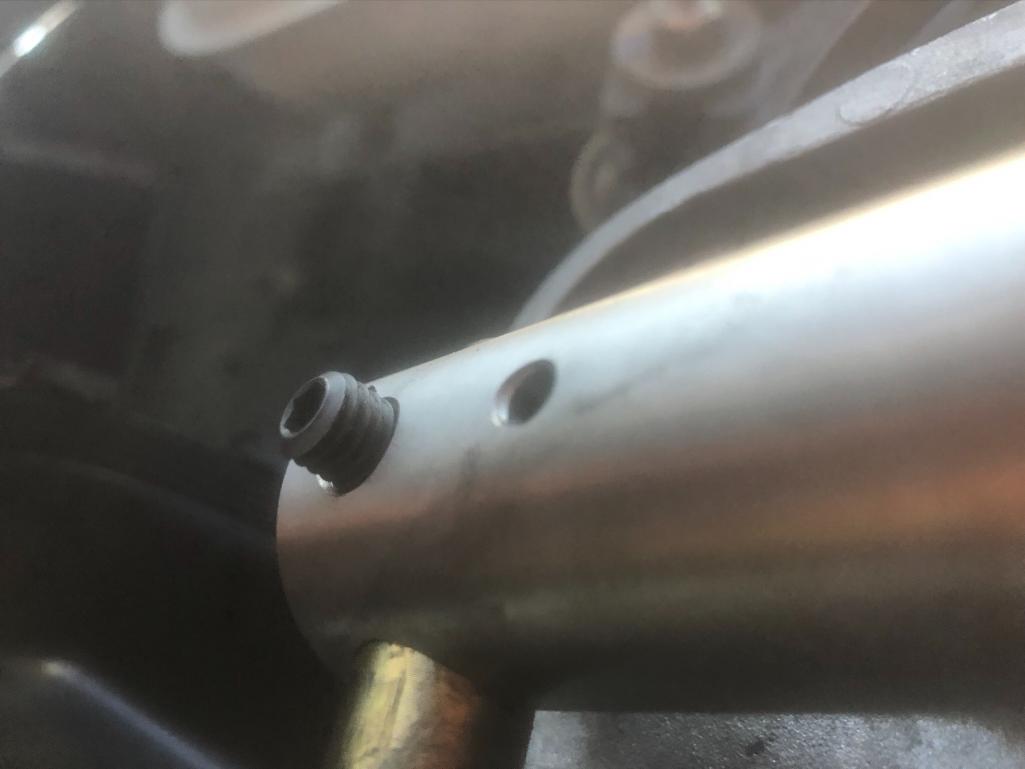 |
   |

 
|
| dr914@autoatlanta.com |
Nov 18 2019, 07:36 PM
Post
#2
|
|
914 Guru Group: Members Posts: 7,850 Joined: 3-January 07 From: atlanta georgia Member No.: 7,418 Region Association: None |
what ever you are screwing it into does not look like a factory part. On a factory part it must go in all of the way
QUOTE(Coondog @ Nov 18 2019, 06:24 PM)  Put in a new Cone Screw, but it only went this far. I really put the muscle to it along with a dap of lock tight. Is this correct or am I doing something wrong ?? |
|
|
|
| second wind |
Nov 18 2019, 07:37 PM
Post
#3
|
|
Senior Member Group: Members Posts: 851 Joined: 30-December 10 From: Los Angeles, California Member No.: 12,543 Region Association: Southern California |
I learned the hard way NOT to use lock tite on these cone screws. Just keep putting in new ones. It is a very sick feeling when the little allen wrench just spins in the screw. As far as your primary question no idea....just where is that on the car?
gg |
|
|
|
| ndfrigi |
Nov 18 2019, 07:42 PM
Post
#4
|
|
Advanced Member Group: Members Posts: 2,928 Joined: 21-August 11 From: Orange County Member No.: 13,474 Region Association: Southern California |
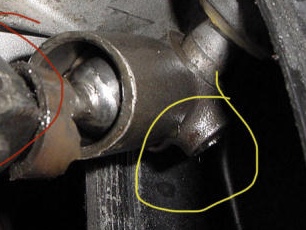
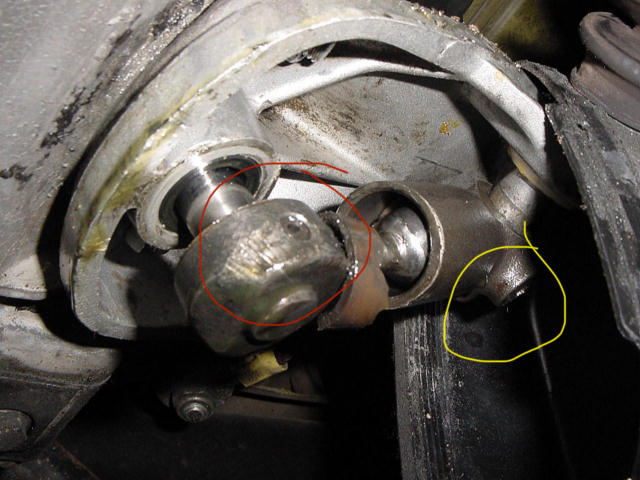 Sir Greg’s car has an after market shifting parts. The yellow circled is the one. |
|
|
|
| Coondog |
Nov 18 2019, 07:43 PM
Post
#5
|
|
Advanced Member Group: Members Posts: 2,089 Joined: 24-September 15 From: Apple Valley Calif Member No.: 19,195 Region Association: Southern California |
QUOTE(dr914@autoatlanta.com @ Nov 18 2019, 05:36 PM) what ever you are screwing it into does not look like a factory part. On a factory part it must go in all of the way QUOTE(Coondog @ Nov 18 2019, 06:24 PM) Put in a new Cone Screw, but it only went this far. I really put the muscle to it along with a dap of lock tight. Is this correct or am I doing something wrong ?? Patrick Motorsports shift rod and sleeve. |
|
|
|
| mepstein |
Nov 18 2019, 07:54 PM
Post
#6
|
|
914-6 GT in waiting Group: Members Posts: 19,262 Joined: 19-September 09 From: Landenberg, PA/Wilmington, DE Member No.: 10,825 Region Association: MidAtlantic Region |
Make sure to use some blue lock tight
|
|
|
|
| Krieger |
Nov 18 2019, 08:15 PM
Post
#7
|
|
Advanced Member Group: Members Posts: 4,706 Joined: 24-May 04 From: Santa Rosa CA Member No.: 2,104 Region Association: None |
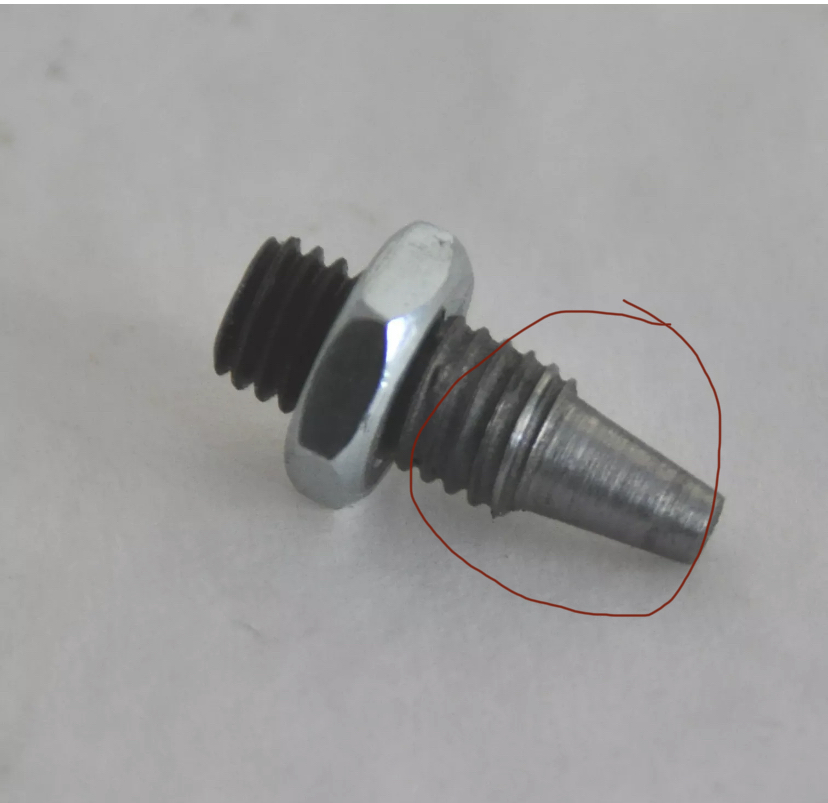
Doesn't look like your in the hole... (IMG:style_emoticons/default/biggrin.gif) It looks like there are only a few threads engaged.
|
|
|
|
| ndfrigi |
Nov 18 2019, 08:17 PM
Post
#8
|
|
Advanced Member Group: Members Posts: 2,928 Joined: 21-August 11 From: Orange County Member No.: 13,474 Region Association: Southern California |
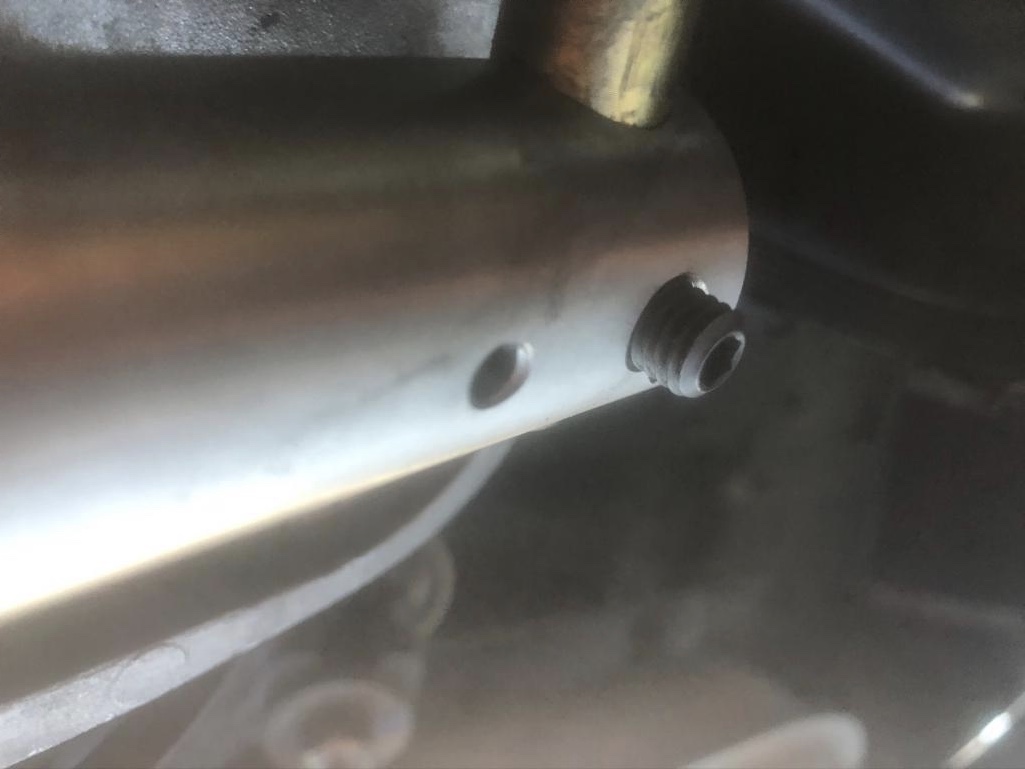
comparison from stock and PMS part. The stock has the bump where the cone screw goes in.
  |
|
|
|
| Coondog |
Nov 18 2019, 08:43 PM
Post
#9
|
|
Advanced Member Group: Members Posts: 2,089 Joined: 24-September 15 From: Apple Valley Calif Member No.: 19,195 Region Association: Southern California |
Nice detective work Noel.... (IMG:style_emoticons/default/smile.gif)
|
|
|
|
| 914forme |
Nov 19 2019, 04:26 AM
Post
#10
|
|
Times a wastin', get wrenchin'! Group: Members Posts: 3,896 Joined: 24-July 04 From: Dayton, Ohio Member No.: 2,388 Region Association: None |
The factory part is cast, like was pointed out it has a bump for thread engagement. The PMS part looks machined from a tube, interesting design, not sure why they changed it? Tangerine still uses the stock casting. (IMG:style_emoticons/default/confused24.gif)
If you still have the stock casting, take measurements of the the overall distance from the inner edge to the outer side of the casting where the Cone Screw fits, then compare. It is the only way you will know. (IMG:style_emoticons/default/confused24.gif) Hopefully like pointed out your good, with that much of the screw showing blue loctite would do the trick, I would go with Red, as you can get heat to it with a fine pencil tipped torch or a piece of metal heated to red, and then placed on it to transfer the heat, to the screw. Even if you did strip the Allen section, it is just 4mm, you have enough exposed that you should be able to get something clamped on. If it became a huge issue, then I would use a nut, spin it on, and weld it to the cone screw. Giving grip to remove and the heat to bust the "Red" loctite out of it death grip on your cone screw. Or you carry a bag of them with you, and a 4mm wrench and replace them when they fall out. You could also safety wire them if you never wanted to worry about it again. |
|
|
|
| malcolm2 |
Nov 19 2019, 06:11 AM
Post
#11
|
|
Advanced Member Group: Members Posts: 2,745 Joined: 31-May 11 From: Nashville Member No.: 13,139 Region Association: South East States |
how many threads do you think you have engaged? The factory bump uses them all.
|
|
|
|
| mepstein |
Nov 19 2019, 07:00 AM
Post
#12
|
|
914-6 GT in waiting Group: Members Posts: 19,262 Joined: 19-September 09 From: Landenberg, PA/Wilmington, DE Member No.: 10,825 Region Association: MidAtlantic Region |
The JWest linkage kit uses a hex head bolt. No problem to install or remove.
|
|
|
|
| jmitro |
Nov 19 2019, 07:23 AM
Post
#13
|
|
Senior Member Group: Members Posts: 713 Joined: 23-July 15 From: Oklahoma Member No.: 18,986 Region Association: None |
either that is a different bolt size/thread pitch OR the depth of thread engagement is much shallower than the factory part, so the bolt remains proud, not flush
|
|
|
|
| rhodyguy |
Nov 19 2019, 07:29 AM
Post
#14
|
|
Chimp Sanctuary NW. Check it out. Group: Members Posts: 22,079 Joined: 2-March 03 From: Orion's Bell. The BELL! Member No.: 378 Region Association: Galt's Gulch |
Jwest=hex bolt with tapered tip AND jam nut. Reusable. 0 loctite.
|
|
|
|
| GregAmy |
Nov 19 2019, 07:37 AM
Post
#15
|
|
Advanced Member Group: Members Posts: 2,291 Joined: 22-February 13 From: Middletown CT Member No.: 15,565 Region Association: North East States |
Does the Patrick part have a hole in the shaft into which the cone screw inserts? If not, then you're not supposed to use a stock cone screw, you're supposed to use a tapered tip screw (assuming supplied with the part).
If you use a cone screw on a solid shaft it'll fall out right quickly. Edit: just to explain why that is, a cone screw slides snugly into a tapered hole; it works on shear on that cone. A tapered tip screw screws down into the steel shaft and, while it makes a slight indentation on the shaft, works primarily on friction. This is why, if you're tightening down the [strike]tapered[/strike] correction: CONE screw so damned hard that you're stripping out the Allen head, you're doing it wrong. It needs to be snug, and you use blue Loc-Tite to keep the screw from backing out, not hammering it home. |
|
|
|
| Coondog |
Nov 19 2019, 08:48 AM
Post
#16
|
|
Advanced Member Group: Members Posts: 2,089 Joined: 24-September 15 From: Apple Valley Calif Member No.: 19,195 Region Association: Southern California |
QUOTE(GregAmy @ Nov 19 2019, 05:37 AM) Does the Patrick part have a hole in the shaft into which the cone screw inserts? If not, then you're not supposed to use a stock cone screw, you're supposed to use a tapered tip screw (assuming supplied with the part). If you use a cone screw on a solid shaft it'll fall out right quickly. Edit: just to explain why that is, a cone screw slides snugly into a tapered hole; it works on shear on that cone. A tapered tip screw screws down into the steel shaft and, while it makes a slight indentation on the shaft, works primarily on friction. This is why, if you're tightening down the tapered screw so damned hard that you're stripping out the Allen head, you're doing it wrong. It needs to be snug, and you use blue Loc-Tite to keep the screw from backing out, not hammering it home. Thanks, I will investigate more on the tapered tip screw, and yes PMS installed it with a cone screw. |
|
|
|
| Bartlett 914 |
Nov 19 2019, 09:24 AM
Post
#17
|
|
Advanced Member Group: Members Posts: 2,215 Joined: 30-August 05 From: South Elgin IL Member No.: 4,707 Region Association: Upper MidWest |
A little hijack here about cone screws. These have a plastic button that acts as a dampener so the screw stays put. Once used it no longer has sufficient grip to hold the screw in place therefore new ones are recommended.
I purchase a bag of 1/8" nylon balls. Very cheap? 100 cost about the same as one cone screw. Heat the old screw and the plastic button will pop out easily. Put the nylon ball in the hole and press in place using a vise. When screwing on place, some of the ball will be cut off and it will seem that it is not working but I have found out it is working and it is only the excess being cut off. I never need to get new screws! |
|
|
|
| Chi-town |
Nov 19 2019, 10:20 AM
Post
#18
|
|
Senior Member Group: Members Posts: 850 Joined: 31-August 18 From: Disneyland Member No.: 22,446 Region Association: Southern California |
QUOTE(Bartlett 914 @ Nov 19 2019, 07:24 AM) A little hijack here about cone screws. These have a plastic button that acts as a dampener so the screw stays put. Once used it no longer has sufficient grip to hold the screw in place therefore new ones are recommended. Or just put a dab of blue loctite on it and be done. (IMG:style_emoticons/default/confused24.gif) |
|
|
|
| ndfrigi |
Nov 19 2019, 10:25 AM
Post
#19
|
|
Advanced Member Group: Members Posts: 2,928 Joined: 21-August 11 From: Orange County Member No.: 13,474 Region Association: Southern California |
txted this image also to sir Greg yesterday.
 |
|
|
|
| Coondog |
Nov 19 2019, 10:47 AM
Post
#20
|
|
Advanced Member Group: Members Posts: 2,089 Joined: 24-September 15 From: Apple Valley Calif Member No.: 19,195 Region Association: Southern California |
QUOTE(Bartlett 914 @ Nov 19 2019, 07:24 AM) A little hijack here about cone screws. These have a plastic button that acts as a dampener so the screw stays put. Once used it no longer has sufficient grip to hold the screw in place therefore new ones are recommended. I purchase a bag of 1/8" nylon balls. Very cheap? 100 cost about the same as one cone screw. Heat the old screw and the plastic button will pop out easily. Put the nylon ball in the hole and press in place using a vise. When screwing on place, some of the ball will be cut off and it will seem that it is not working but I have found out it is working and it is only the excess being cut off. I never need to get new screws! I believe that PMS reinstalled the same cone screw when I switched headers last summer. I remember them telling me they had to put a slight bend in the shift rod. That tells me they had to RR it. |
|
|
|
|
1 User(s) are reading this topic (1 Guests and 0 Anonymous Users)
0 Members:

|
Lo-Fi Version | Time is now: 12th May 2024 - 08:22 PM |
Invision Power Board
v9.1.4 © 2024 IPS, Inc.