|
|
|
Porsche, and the Porsche crest are registered trademarks of Dr. Ing. h.c. F. Porsche AG.
This site is not affiliated with Porsche in any way. Its only purpose is to provide an online forum for car enthusiasts. All other trademarks are property of their respective owners. |
|
|

  |

| BeatNavy |
 Dec 3 2019, 08:07 AM Dec 3 2019, 08:07 AM
Post
#1
|
|
Certified Professional Scapegoat  Group: Members Posts: 2,924 Joined: 26-February 14 From: Easton, MD Member No.: 17,042 Region Association: MidAtlantic Region |
I recently did an engine drop and while I have my teener up in the air I decided to do the back side / underneath cleanup I've been meaning to do for a while -- removing decades old undercoating, looking for rust, generally cleaning up the nastiness that has accumulated (I swear, I'm amazed at just the level of plain dirt that stuck up under everything).
Anyway, to the topic at hand, this effort includes cleaning up the heatshield and the underside of trunk. Had to hacksaw off the mounts to remove the bugger, and I've removed most of the rust and welded in a couple of patches. It won't win any beauty contests, but it'll be miles better than before. So, how to remount? Do I fabricate/recreate the mounts? But welding really isn't an option in that space. I gather -6's had these bolted from inside the trunk, correct (did they use the same standoff mounts)? Just looking for ideas for relatively easy mounting and removal for cleaning and maintenance, preferably with readily available hardware. TIA. (IMG:style_emoticons/default/santa_smiley.gif) |
   |

 
|
| GregAmy |
Dec 3 2019, 08:28 AM
Post
#2
|
|
Advanced Member Group: Members Posts: 2,268 Joined: 22-February 13 From: Middletown CT Member No.: 15,565 Region Association: North East States |
Any photos of what they're supposed to look like?
I mount stand-off heat shields for the race cars in a couple of ways. If the backside is blind I'll use small rivnuts for a threaded boss, then use a bolt from the front side with a spacer in between. If the backside is not blind and/or I need a flush-ish surface on the backside, I'll use a button-head cap screw through a hole and use a nut on the near side to secure it to the panel; then I'll use a spacer to stand that off. If I need a truly flat(ter) surface on the backside, I'll use a machine screw that's available from Lowe's. Drawing a total blank on what it's called but it has a large flat-washer head with a square carriage screw underside. Drill the appropriate hole for the carriage screw to fall through then tack-MIG the screw in place. Used a ton of those to make an undertray/splitter... Edit: "Elevator bolts": https://www.lowes.com/pl/Elevator-bolts-Bol...ware/4294710928 Punch through a panel and secure, makes a nice stud on the other side. If you want to get really fancy, look into Click-Bond adhesive mount studs. Wicked cool stuff but $pendy... https://www.clickbond.com/product-detail/he...y-bulkhead-stud |
 |
|
| infraredcalvin |
Dec 3 2019, 08:47 AM
Post
#3
|
|
Distracted Member Group: Members Posts: 1,510 Joined: 25-August 08 From: Ladera Ranch, CA Member No.: 9,463 Region Association: Southern California |
how about welding standoffs to body, undercoating treatment, then plug weld the heat shield to the mounts...
|
|
|
|
| BeatNavy |
Dec 3 2019, 12:32 PM
Post
#4
|
|
Certified Professional Scapegoat Group: Members Posts: 2,924 Joined: 26-February 14 From: Easton, MD Member No.: 17,042 Region Association: MidAtlantic Region |
Good ideas, thanks fellas. I like the idea of maybe welding studs, like those elevator bolts, on underside of trunk and using a spacer. Or maybe welding fabricated spacer tabs on (like original) but maybe riveting up from underneath.
Those Click Bond studs do look nice, but maybe overkill. |
|
|
|
| rgalla9146 |
Dec 3 2019, 05:46 PM
Post
#5
|
|
Advanced Member Group: Members Posts: 4,545 Joined: 23-November 05 From: Paramus NJ Member No.: 5,176 Region Association: None |
0
Attached thumbnail(s)  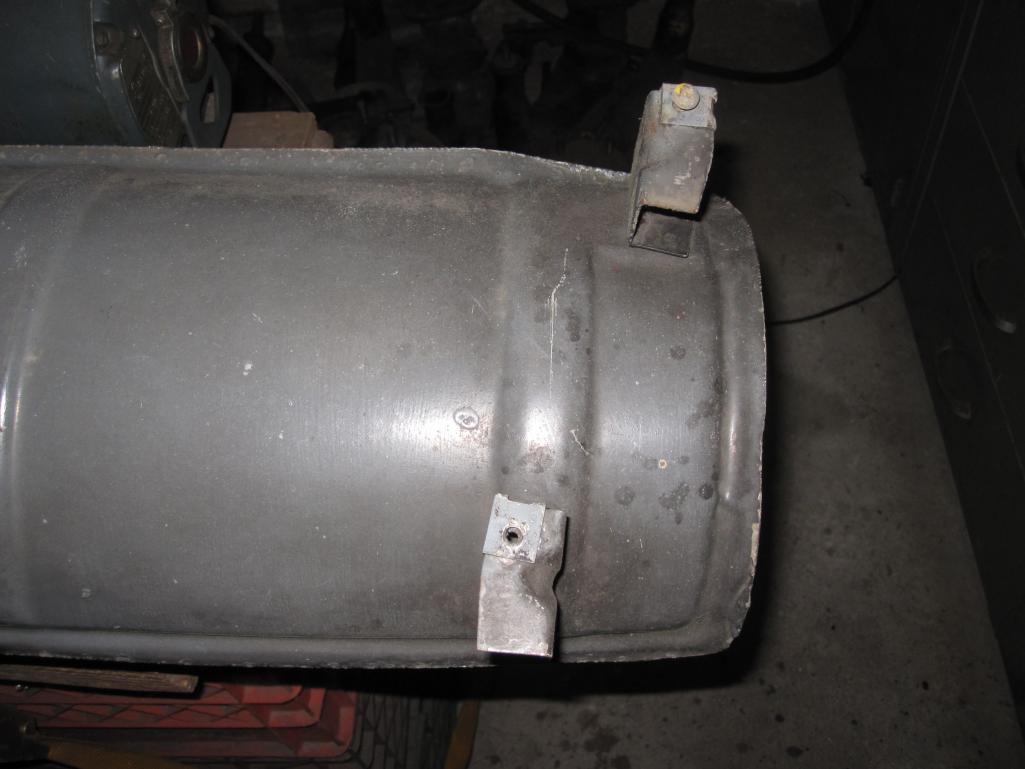
|
|
|
|
| rgalla9146 |
Dec 3 2019, 05:47 PM
Post
#6
|
|
Advanced Member Group: Members Posts: 4,545 Joined: 23-November 05 From: Paramus NJ Member No.: 5,176 Region Association: None |
Fabricate six stand offs using the originals as a guide, then weld them to the heat
shield. Be sure to drill a hole in the top flange of each mount. Hold the shield against the floor in the correct position. Use a scratch awl to mark the position of each hole in the floor. Attach with nuts and bolts or push-on clips and sheet metal screws. |
|
|
|
|
1 User(s) are reading this topic (1 Guests and 0 Anonymous Users)
0 Members:

|
Lo-Fi Version | Time is now: 29th April 2024 - 11:48 AM |
Invision Power Board
v9.1.4 © 2024 IPS, Inc.