|
|
|
Porsche, and the Porsche crest are registered trademarks of Dr. Ing. h.c. F. Porsche AG.
This site is not affiliated with Porsche in any way. Its only purpose is to provide an online forum for car enthusiasts. All other trademarks are property of their respective owners. |
|
|


| Highland |
 Jan 20 2020, 05:39 PM Jan 20 2020, 05:39 PM
Post
#1
|
|
Senior Member  Group: Members Posts: 512 Joined: 8-August 11 From: San Diego, CA Member No.: 13,418 Region Association: Southern California |
I've seen the old threads on removing the gauge bezels for glass cleaning and gauge repair. I tried this on my combo gauge and buggered the bezel, although it is still usable. I was wondering if there is an updated technique.
Also, are these bezels available anywhere for sale? I already checked with Palo Alto Speedometer. |
   |

 
|
  |
Replies(1 - 4)
| 914forme |
Jan 20 2020, 06:22 PM
Post
#2
|
|
Times a wastin', get wrenchin'! Group: Members Posts: 3,896 Joined: 24-July 04 From: Dayton, Ohio Member No.: 2,388 Region Association: None |
Ah no, small tool gently pry around the lip. I then take some small pliers with smooth jaws and shape the metal back into proper shape.
Getting them back on, take a hard wood dowel and roll the edge bit over the flange while pushing the cup down on a towel on a solid surface. Gently continue moving the metal gently for best results. Video on how to do it. I am sure VDO makes a press to do this. This is how the factories do it now. But I have an idea for one with replacement rings. LOL, I would need 5 dies and most likely about 25 rings to get it the way I would want it, and then a fixture for a small lever press. Something similar to these two for installation 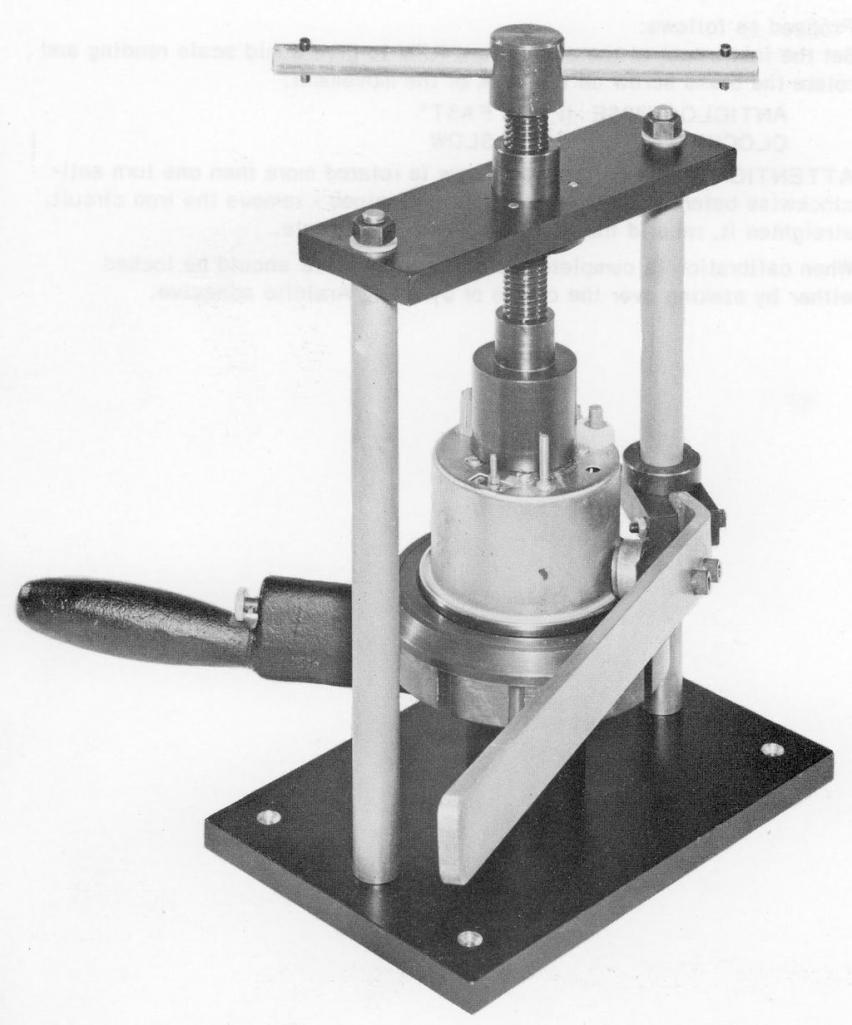 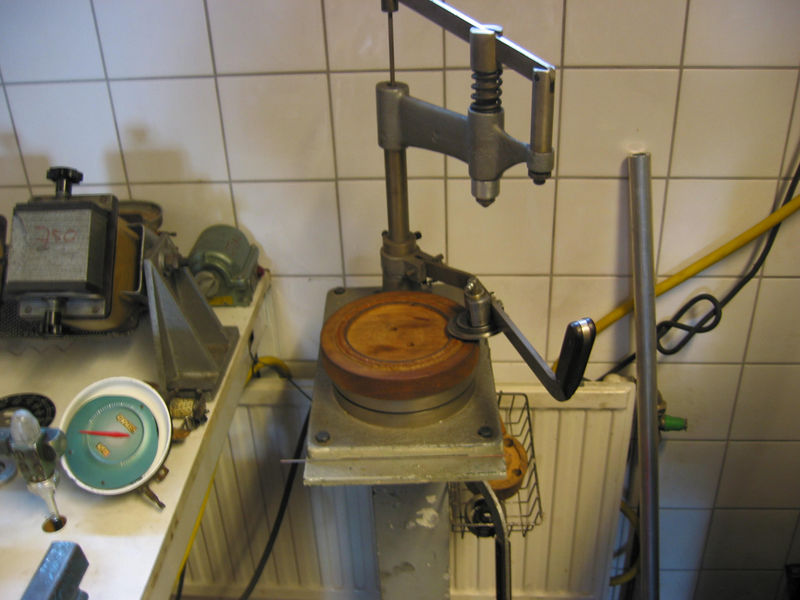 And if you have a lathe getting the bezel off is easy, as is installing a different one. But cutting the bezel off is only done when it is stuck hard, or someone has epoxied it onto the can. (IMG:style_emoticons/default/headbang.gif) |
|
|
|
| JawjaPorsche |
Jan 21 2020, 04:17 AM
Post
#3
|
|
Advanced Member Group: Members Posts: 3,463 Joined: 23-July 11 From: Clayton, Georgia Member No.: 13,351 Region Association: South East States |
Our 914 guru Ian Karr explains how to do it:
https://m.youtube.com/watch?v=r3xJxEiIlIQ&a...x=5&t=12sCx |
|
|
|
| Retroracer |
Jan 21 2020, 11:51 AM
Post
#4
|
|
Senior Member Group: Members Posts: 609 Joined: 7-July 13 From: Bend OR Member No.: 16,100 Region Association: Pacific Northwest |
Guys - thanks for posting these; a nice reference for those Who Mess With Gauges.
Stephen - particularly impressed with your rotary resealing press design! - Tony |
|
|
|
| 914forme |
Jan 21 2020, 12:44 PM
Post
#5
|
|
Times a wastin', get wrenchin'! Group: Members Posts: 3,896 Joined: 24-July 04 From: Dayton, Ohio Member No.: 2,388 Region Association: None |
@Retrorace Tony thank you. If you have not noticed I have a problem with tools and over engineering solutions. (IMG:style_emoticons/default/screwy.gif) To me it is just right.
Version 2.0 I will use a DC lathe motor and spindle to drive it at slow speeds, one lets thing to have to do. LOL. Thinking about it, I might just build a tool for the lathe, chuck it up, and use the tailstock to apply the pressure keeping everything centered and seated, and add the wheel to tool post . Then I could do it via CNC. Version 4, (IMG:style_emoticons/default/screwy.gif) see that's how my brain works, and why I redo everything several times. |
|
|
|
|
1 User(s) are reading this topic (1 Guests and 0 Anonymous Users)
0 Members:

|
Lo-Fi Version | Time is now: 5th May 2024 - 07:39 PM |
Invision Power Board
v9.1.4 © 2024 IPS, Inc.