|
|
|
Porsche, and the Porsche crest are registered trademarks of Dr. Ing. h.c. F. Porsche AG.
This site is not affiliated with Porsche in any way. Its only purpose is to provide an online forum for car enthusiasts. All other trademarks are property of their respective owners. |
|
|

  |

| Tdskip |
 Sep 30 2020, 10:24 AM Sep 30 2020, 10:24 AM
Post
#61
|
|
Advanced Member  Group: Members Posts: 3,766 Joined: 1-December 17 From: soCal Member No.: 21,666 Region Association: None |
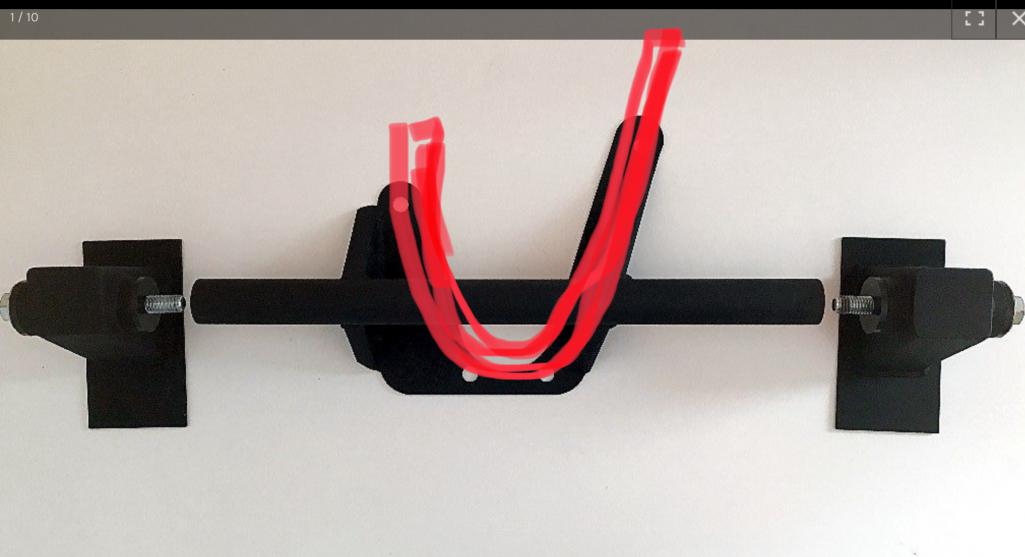
QUOTE(RichPugh @ Sep 30 2020, 10:54 AM)  QUOTE(Tdskip @ Sep 30 2020, 08:21 AM) One other way to go it is to add spacers on the mount (provided they are very strong), like the green shown here on the u-shaped piece. This is what I mentioned above too... just using spacers for the fore/aft adjustment and figuring our another way to "lift" the engine up. Maybe Bob @ Naro will help. We have (at least) 2 identical situations... 'Live Free & Drive' is having identical issues. Maybe Naro made a bad batch? So, in theory, if you welded the existing mount 3/4 higher than instructions and then added 1/2 spacer we should be OK? |
   |

 
|
| mb911 |
Sep 30 2020, 10:45 AM
Post
#62
|
|
914 Guru Group: Members Posts: 7,753 Joined: 2-January 09 From: Burlington wi Member No.: 9,892 Region Association: Upper MidWest |
QUOTE(Tdskip @ Sep 30 2020, 08:24 AM) QUOTE(RichPugh @ Sep 30 2020, 10:54 AM) QUOTE(Tdskip @ Sep 30 2020, 08:21 AM) One other way to go it is to add spacers on the mount (provided they are very strong), like the green shown here on the u-shaped piece. This is what I mentioned above too... just using spacers for the fore/aft adjustment and figuring our another way to "lift" the engine up. Maybe Bob @ Naro will help. We have (at least) 2 identical situations... 'Live Free & Drive' is having identical issues. Maybe Naro made a bad batch? So, in theory, if you welded the existing mount 3/4 higher than instructions and then added 1/2 spacer we should be OK? Yes that is what I figured as well. |
|
|
|
| Mark Henry |
Sep 30 2020, 10:55 AM
Post
#63
|
|
that's what I do! Group: Members Posts: 20,065 Joined: 27-December 02 From: Port Hope, Ontario Member No.: 26 Region Association: Canada |
QUOTE(Mark Henry @ Sep 25 2020, 12:09 PM) I mounted the bulkhead mount to the motor, then I raised the engine and trans into position and bolted up the rear trans mounts. I got the engine raised up to where I wanted it to sit and I tack welded the mount in place. I put in enough tack welds to hold the weight of the engine, took out the jack and confirmed that it was sitting correct with full weight. In lining up my home made bulkhead mount I found several areas I had to mod and/or clearance before I tacked it in. I got it right first time but I could have easily cut out the tack welds and reposition it if needed. Only when I was totally happy and tacked in did I remove the engine/trans and fully weld in the mount. -Bolt the mount and the transmission to the engine. -Put it in the car and bolt up the rear transmission (to body) mount bolts. -Use your jack to get the correct height of the front. -install the seal, hook it on under the engine tin edge, get it perfect before you weld. -Weld the tacks in an easy to grind out area in case you make a mistake. -Tack it well enough to hold the weight and check. -Check your seal, not too tight... not too loose, it should hook on the engine tin perfectly. -Remove engine/transmission and finish welding. Doing it this way my seal hooks perfectly onto the tin. Except for finding center I used no measuring tools for the job, I let the trans mounts do that job. I'd say my engine placement is as perfect as you can get. My shift rod is straight but it only clears by 1/4" and I have a Tangirine shifter console mod. |
|
|
|
| RichPugh |
Sep 30 2020, 11:09 AM
Post
#64
|
|
Member Group: Members Posts: 132 Joined: 28-October 14 From: Baltimore, MD Member No.: 18,068 Region Association: MidAtlantic Region |
QUOTE So, in theory, if you welded the existing mount 3/4 higher than instructions and then added 1/2 spacer we should be OK? Welding the ears in 3/4" higher would/could result in interference complication with the rear brake bias unit (that can currently just move upward slightly and remain connected as is). I was going to leave my 'ears' in place on the firewall and re-engineer the cradle portion of the mount... the U-shaped plate that mounts to the engine case, if it was cut off and either re-welded in a 3/4" higher position, or re-cut and drilled higher and welded in new... Not sure. It's a lot to deal with. I didnt want to pull the engine back out so... I guess I'm going to have to at this point. |
|
|
|
| RichPugh |
Sep 30 2020, 11:13 AM
Post
#65
|
|
Member Group: Members Posts: 132 Joined: 28-October 14 From: Baltimore, MD Member No.: 18,068 Region Association: MidAtlantic Region |
QUOTE Bolt the mount and the transmission to the engine. -Put it in the car and bolt up the rear transmission (to body) mount bolts. -Use your jack to get the correct height of the front. -install the seal, hook it on under the engine tin edge, get it perfect before you weld. -Weld the tacks in an easy to grind out area in case you make a mistake. -Tack it well enough to hold the weight and check. -Check your seal, not too tight... not too loose, it should hook on the engine tin perfectly. -Remove engine/transmission and finish welding. Doing it this way my seal hooks perfectly onto the tin. Except for finding center I used no measuring tools for the job, I let the trans mounts do that job. I'd say my engine placement is as perfect as you can get. My shift rod is straight but it only clears by 1/4" and I have a Tangirine shifter console mod. Did you have to relocate the rear brake bias unit? How high off the firewall bottom ledge is the centerline of the bolt holes in your ears? How long ago did you do this? This was my initial thought process too but like a good boy, I followed the instructions (IMG:style_emoticons/default/confused24.gif) Lesson learned... but my ears are already welded. I know for a fact I could not have had them welded any higher without removing and relocating the rear brake bias unit. |
|
|
|
| JOEPROPER |
Sep 30 2020, 11:22 AM
Post
#66
|
|
The answer is "no" unless you ask... Group: Members Posts: 1,209 Joined: 21-November 15 From: White Plains New York Member No.: 19,387 Region Association: North East States |
Maybe you could weld to the front of the U shaped bracket, a piece and drill holes to mount to the front of the engine. This would put the engine / trans assembly back a little further in addition to raising the engine in the engine bay... 2 pieces of channel may work for that with a little work to make it look okay...
|
|
|
|
| Mark Henry |
Sep 30 2020, 11:29 AM
Post
#67
|
|
that's what I do! Group: Members Posts: 20,065 Joined: 27-December 02 From: Port Hope, Ontario Member No.: 26 Region Association: Canada |
QUOTE(RichPugh @ Sep 30 2020, 01:13 PM) QUOTE Bolt the mount and the transmission to the engine. -Put it in the car and bolt up the rear transmission (to body) mount bolts. -Use your jack to get the correct height of the front. -install the seal, hook it on under the engine tin edge, get it perfect before you weld. -Weld the tacks in an easy to grind out area in case you make a mistake. -Tack it well enough to hold the weight and check. -Check your seal, not too tight... not too loose, it should hook on the engine tin perfectly. -Remove engine/transmission and finish welding. Doing it this way my seal hooks perfectly onto the tin. Except for finding center I used no measuring tools for the job, I let the trans mounts do that job. I'd say my engine placement is as perfect as you can get. My shift rod is straight but it only clears by 1/4" and I have a Tangirine shifter console mod. Did you have to relocate the rear brake bias unit? How high off the firewall bottom ledge is the centerline of the bolt holes in your ears? How long ago did you do this? This was my initial thought process too but like a good boy, I followed the instructions (IMG:style_emoticons/default/confused24.gif) Lesson learned... but my ears are already welded. I know for a fact I could not have had them welded any higher without removing and relocating the rear brake bias unit. I actually cut out, modified and welded in a couple of gussets in the brake bias area. I had to clearance a few out other areas, one to clear the shiftrod boot. But note mine was an RJ mount copy that was copied by someone unknown to me, I scavanged in parts from a 911 mount and the plans had a few mistakes as well. (IMG:style_emoticons/default/sawzall-smiley.gif) (IMG:style_emoticons/default/smash.gif) (IMG:style_emoticons/default/welder.gif) |
|
|
|
| ClayPerrine |
Sep 30 2020, 11:51 AM
Post
#68
|
|
Life's been good to me so far..... Group: Admin Posts: 16,542 Joined: 11-September 03 From: Hurst, TX. Member No.: 1,143 Region Association: NineFourteenerVille |
Unfortunately, all of our parts are not produced by highly trained Porsche factory engineers with lots of experience and lots of testing.
Bob's mounts, like the Rich Johnson mount are made by talented enthusiasts with lots of time and limited money. They don't really get the same level of testing factory parts do. So you are likely to have issues like this one. Plus, after almost 50 years, these cars have been customized so much that no two cars are alike. So we build this stuff, and hope everyone understands that it will require tweaking for your use case. I have been friends with Rich Johnson since the middle 90s. He makes great parts, and I have one of his conversion mounts in the 4.0L car. When I converted it from a 2.4 to the 4.0 engine, I had to buy a different mount because the half that fits on the 2.4 won't fit on to a 3.6 engine case. We built a jig on a 901 trans, and made the transmission mounts for the Cayman trans fit the jig. We put the engine and trans in the car, and the trans mounts were almost 2 inches to the rear. I thought the jig was wrong, but when I pulled the engine/trans back out, I found the 3.6 engine mount was about 2 inches thicker than the 2.4 engine mount. This was done to clear the pulleys on the 3.6. It made the engine tin too short on the front too. Because I have a clewett serpentine belt setup on this engine, I shortened the plate in the front mount to the same height as the 2.4 mount. Then everything fit correctly. That is an example of "You may have to tweak it to get it to fit your application right." (IMG:style_emoticons/default/sawzall-smiley.gif) (IMG:style_emoticons/default/smash.gif) (IMG:style_emoticons/default/welder.gif) |
|
|
|
| Steve |
Sep 30 2020, 11:53 AM
Post
#69
|
|
914 Guru Group: Members Posts: 6,038 Joined: 14-June 03 From: Laguna Niguel, CA Member No.: 822 Region Association: Southern California |
QUOTE(Mark Henry @ Sep 30 2020, 10:29 AM) QUOTE(RichPugh @ Sep 30 2020, 01:13 PM) QUOTE Bolt the mount and the transmission to the engine. -Put it in the car and bolt up the rear transmission (to body) mount bolts. -Use your jack to get the correct height of the front. -install the seal, hook it on under the engine tin edge, get it perfect before you weld. -Weld the tacks in an easy to grind out area in case you make a mistake. -Tack it well enough to hold the weight and check. -Check your seal, not too tight... not too loose, it should hook on the engine tin perfectly. -Remove engine/transmission and finish welding. Doing it this way my seal hooks perfectly onto the tin. Except for finding center I used no measuring tools for the job, I let the trans mounts do that job. I'd say my engine placement is as perfect as you can get. My shift rod is straight but it only clears by 1/4" and I have a Tangirine shifter console mod. Did you have to relocate the rear brake bias unit? How high off the firewall bottom ledge is the centerline of the bolt holes in your ears? How long ago did you do this? This was my initial thought process too but like a good boy, I followed the instructions (IMG:style_emoticons/default/confused24.gif) Lesson learned... but my ears are already welded. I know for a fact I could not have had them welded any higher without removing and relocating the rear brake bias unit. I actually cut out, modified and welded in a couple of gussets in the brake bias area. I had to clearance a few out other areas, one to clear the shiftrod boot. But note mine was an RJ mount copy that was copied by someone unknown to me, I scavanged in parts from a 911 mount and the plans had a few mistakes as well. (IMG:style_emoticons/default/sawzall-smiley.gif) (IMG:style_emoticons/default/smash.gif) (IMG:style_emoticons/default/welder.gif) AFAIK vellios (rip) designed the mount first and then Rich Johnson copied it. I have the Rich Johnson mount. Couldn’t be happier with it. Tilting the engine with the Other mount makes no sense if you have heat exchangers, etc in the way. I also have no shift rod or engine height issues. My shift rod is a straight rod with no bends. Worked fine with the previous 2.7 and now 3.2 power plant. |
 |
|
| Mark Henry |
Sep 30 2020, 12:35 PM
Post
#70
|
|
that's what I do! Group: Members Posts: 20,065 Joined: 27-December 02 From: Port Hope, Ontario Member No.: 26 Region Association: Canada |
QUOTE(Steve @ Sep 30 2020, 01:53 PM) AFAIK vellios (rip) designed the mount first and then Rich Johnson copied it. I have the Rich Johnson mount. Couldn’t be happier with it. For all I know my mount could have been copied from a Vellios. (IMG:style_emoticons/default/confused24.gif) To do a /6 you either need deep pockets or you have to be handy. (IMG:style_emoticons/default/biggrin.gif) These days maybe a bit of both. (IMG:style_emoticons/default/shades.gif) |
|
|
|
| RichPugh |
Sep 30 2020, 01:37 PM
Post
#71
|
|
Member Group: Members Posts: 132 Joined: 28-October 14 From: Baltimore, MD Member No.: 18,068 Region Association: MidAtlantic Region |
QUOTE(JOEPROPER @ Sep 30 2020, 01:22 PM) Maybe you could weld to the front of the U shaped bracket, a piece and drill holes to mount to the front of the engine. This would put the engine / trans assembly back a little further in addition to raising the engine in the engine bay... 2 pieces of channel may work for that with a little work to make it look okay... This is actually a good idea. Instead of cutting the original u-shaped mounting plate off, just cut a new plate, weld it to the existing plate, drill new holes in it and thru the old plate for the correct height position and space it off the engine a bit more to make the fore/aft adjustment needed to push it rearward. This seems much less daunting than re-engineering the bar or the whole cradle portion or re-welding the ears up higher creating more problems. |
|
|
|
| Tdskip |
Oct 1 2020, 12:31 PM
Post
#72
|
|
Advanced Member Group: Members Posts: 3,766 Joined: 1-December 17 From: soCal Member No.: 21,666 Region Association: None |
Like this - with the red being thicker steel to help located it back toward the rear of the car?
 |
|
|
|
| mb911 |
Oct 1 2020, 06:19 PM
Post
#73
|
|
914 Guru Group: Members Posts: 7,753 Joined: 2-January 09 From: Burlington wi Member No.: 9,892 Region Association: Upper MidWest |
QUOTE(Tdskip @ Oct 1 2020, 10:31 AM) Like this - with the red being thicker steel to help located it back toward the rear of the car? Personally I would just make the mounting flange thicker. |
|
|
|
| porschetub |
Oct 2 2020, 05:30 PM
Post
#74
|
|
914 Guru Group: Members Posts: 5,090 Joined: 25-July 15 From: New Zealand Member No.: 18,995 Region Association: None |
QUOTE(RichPugh @ Sep 26 2020, 01:32 PM) QUOTE Not mounting the bar to the engine and then mounting the engine with transmission and bolting up the rear mounts is the OP's big mistake. This step must be done every time...I don't give a flying fuchs who made the mount. Lesson learned. Listening to the manufacturers installation rules/guidelines/instructions was my mistake. It simply DOES NOT position the engine in a good place (for my goals, at least)... so... I can do what you suggested, re-welding the mounts to the firewall in a higher, more ideal position but it doesnt fix the situation with the engine being about 1/2" too far forward closer to the firewall. The firewall kinda pitches backwards slightly so it might move it back marginally. I will either: 1. Drop the engine, re-engineer the crossbar/cradle portion of the Naro mount to position the engine UP 3/4" and further rearward about 1/2"... Decent work but massive improvement. 2. Re-weld the firewall mounts up 3/4" UP and deal with the forward positioning... not ideal but better. 3. Leave it just as it is and just mod a shift rod bar to work... probably what I'll do in the interim. Sorry to see you have this situation,not uncommon to see an engine too low,mine was by 15mm so because it was a copy of an original "6" setup I was able to modify the mount on the case by moving the centre bolt tube that runs the bolt to the rubber mount. The fact that your engine is also too far fwd is strange and tells me there is some issue with the design...seems odd the member/vendor hasn't chimed in (IMG:style_emoticons/default/poke.gif) (IMG:style_emoticons/default/confused24.gif) . I would expect your trans bolts will be somewhat out of square with the fwd position you have now ??. Options you provided ; 1. yes and IMO the best but not easiest solution as you will have to re:engineer the centre bar by cutting it and using flat bar steel to create required offset up and fwd,you will need to jig it up to get this right. 2. I can't see how you would manage to cut/relieve the welds on the b/head and then you still have the issue of alignment for and aft. 3. you could but you may find its more of a bandage and may later on make you wish you had taken option #1. From what I have seen you don't want the engine tin a tight fit on the sealing rudders otherwise installation of the engine can be rather hard ,after I moved my engine up I found removing the side tin was the only way the engine go up fully otherwise you start bending the tin,but it is still in a better position height wise or atleast in my case. Maybe a mod on the case mount could be the only solution but don't really know,good luck sorting (IMG:style_emoticons/default/beer.gif) . |
|
|
|
| sixnotfour |
Oct 2 2020, 09:09 PM
Post
#75
|
|
914 Wizard Group: Members Posts: 11,212 Joined: 12-September 04 Member No.: 2,744 Region Association: NineFourteenerVille |
here is the numbers to help
http://www.914world.com/bbs2/index.php?sho...=346616&hl= |
|
|
|
| Tdskip |
Oct 3 2020, 08:51 AM
Post
#76
|
|
Advanced Member Group: Members Posts: 3,766 Joined: 1-December 17 From: soCal Member No.: 21,666 Region Association: None |
QUOTE(sixnotfour @ Oct 2 2020, 10:09 PM) Very helpful, thank you. I woke up dreaming about this last night, sad but true, so I should probably figure out an approach and just be done with it. I am leaning towards mounting the Naro Mount as instructed on the firewall, thereby not having to deal with the rear brake stuff, but extending the engine mount up by adding in additional steel plate. The thickness of the additional steel plate will move the engine back away from the firewall and I should be able to readily raise the bolt holes by the 3/4 of an inch necessary. @md911 I think that’s what you suggested, and it seems like a viable option I’ll be at with some heartburn from having to fabricate and shape the new mounting surface. One open question that I don’t believe it’s been addressed – it looks to me like the Naro Mount may transmit more in VH then one that uses regular engine mounts. Yes/no/maybe? |
|
|
|
| mb911 |
Oct 3 2020, 09:15 AM
Post
#77
|
|
914 Guru Group: Members Posts: 7,753 Joined: 2-January 09 From: Burlington wi Member No.: 9,892 Region Association: Upper MidWest |
For those not yet having installed one I would suggest this unit.. No I don't get a kickback or have anything to do with the company but this is the simplest and allows the most clearance of any mount on the market.
 |
|
|
|
| RichPugh |
Oct 3 2020, 03:33 PM
Post
#78
|
|
Member Group: Members Posts: 132 Joined: 28-October 14 From: Baltimore, MD Member No.: 18,068 Region Association: MidAtlantic Region |
QUOTE Very helpful, thank you. I woke up dreaming about this last night, sad but true, so I should probably figure out an approach and just be done with it. I am leaning towards mounting the Naro Mount as instructed on the firewall, thereby not having to deal with the rear brake stuff, but extending the engine mount up by adding in additional steel plate. The thickness of the additional steel plate will move the engine back away from the firewall and I should be able to readily raise the bolt holes by the 3/4 of an inch necessary. @md911 I think that’s what you suggested, and it seems like a viable option I’ll be at with some heartburn from having to fabricate and shape the new mounting surface. One open question that I don’t believe it’s been addressed – it looks to me like the Naro Mount may transmit more in VH then one that uses regular engine mounts. Yes/no/maybe? First off... Definitely more vibration. It's essentially a solid mount just with a urethane bushing. I think i'm gonna do the same thing... Weld a new "U" shaped plate to the existing one and re-drill the mounts about 3/4" - 7/8" higher and the thickness of the new face should push it back almost enough to put the trans mounts square in their seats. It might need another 1/4" spacing off the case... will find out. Pulling the engine back out tomorrow (IMG:style_emoticons/default/headbang.gif) |
|
|
|
| Tdskip |
Oct 3 2020, 03:55 PM
Post
#79
|
|
Advanced Member Group: Members Posts: 3,766 Joined: 1-December 17 From: soCal Member No.: 21,666 Region Association: None |
QUOTE(RichPugh @ Oct 3 2020, 04:33 PM) QUOTE Very helpful, thank you. I woke up dreaming about this last night, sad but true, so I should probably figure out an approach and just be done with it. I am leaning towards mounting the Naro Mount as instructed on the firewall, thereby not having to deal with the rear brake stuff, but extending the engine mount up by adding in additional steel plate. The thickness of the additional steel plate will move the engine back away from the firewall and I should be able to readily raise the bolt holes by the 3/4 of an inch necessary. @md911 I think that’s what you suggested, and it seems like a viable option I’ll be at with some heartburn from having to fabricate and shape the new mounting surface. One open question that I don’t believe it’s been addressed – it looks to me like the Naro Mount may transmit more in VH then one that uses regular engine mounts. Yes/no/maybe? First off... Definitely more vibration. It's essentially a solid mount just with a urethane bushing. I think i'm gonna do the same thing... Weld a new "U" shaped plate to the existing one and re-drill the mounts about 3/4" - 7/8" higher and the thickness of the new face should push it back almost enough to put the trans mounts square in their seats. It might need another 1/4" spacing off the case... will find out. Pulling the engine back out tomorrow (IMG:style_emoticons/default/headbang.gif) Frustrating to be sure. Not sure I want to deal with the NVH... |
|
|
|
| live free & drive |
Oct 3 2020, 04:50 PM
Post
#80
|
|
Member Group: Members Posts: 213 Joined: 29-June 16 From: New Hampshire Member No.: 20,159 Region Association: None |
The Naro mount has Delrin bushings - the Patrick mount has urethane bushings with a steel center sleeve -which I believe to be a better set up for anything but a full-on race car (NVH-wise).
|
|
|
|
|
1 User(s) are reading this topic (1 Guests and 0 Anonymous Users)
0 Members:

|
Lo-Fi Version | Time is now: 28th April 2026 - 03:54 PM |
Invision Power Board
v9.1.4 © 2026 IPS, Inc.