|
|
|
Porsche, and the Porsche crest are registered trademarks of Dr. Ing. h.c. F. Porsche AG.
This site is not affiliated with Porsche in any way. Its only purpose is to provide an online forum for car enthusiasts. All other trademarks are property of their respective owners. |
|
|

  |

| waltonsm |
 Jun 12 2020, 11:53 PM Jun 12 2020, 11:53 PM
Post
#1
|
|
Member  Group: Members Posts: 93 Joined: 27-June 14 From: United States Member No.: 17,561 Region Association: Pacific Northwest |
After seeing some recent posts, I decided it was finally time to thank everybody on this forum for years of encouragement and scope creep on my long term project. As with every real project, this will never be done, and there are certainly many things I would do differently a second time around. But I am 80% of the way there, and I am enjoying driving it as much as I am working on it for the last year or so.
I plan to add more photos of my build process over the next few weeks. You may see some of the advice you gave me realized, and probably some bad or good ideas in metal, fiberglass, and wood. Hopefully I can help someone else out too. -Steve Here are some recent photos: 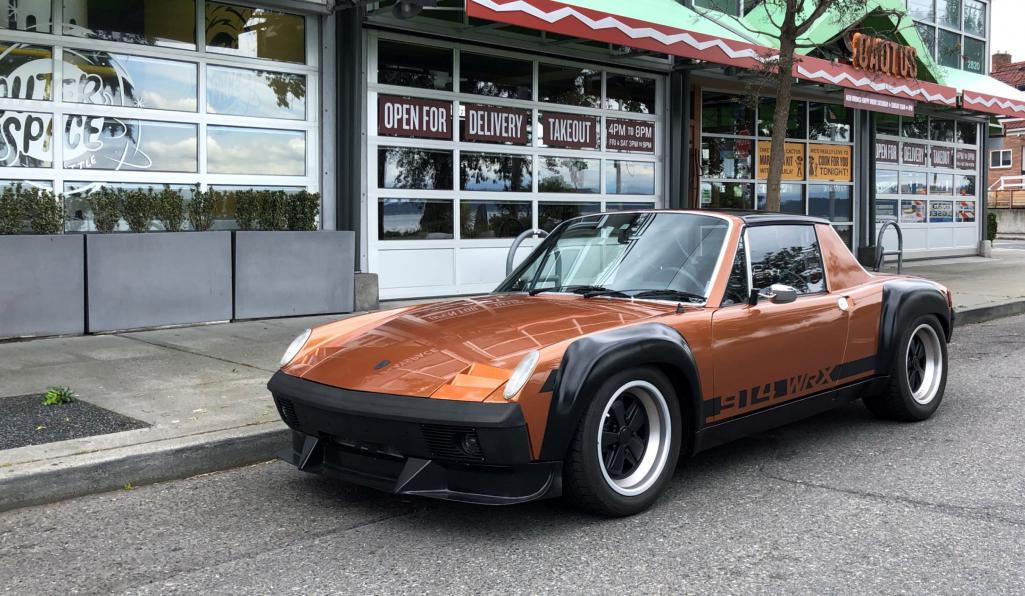 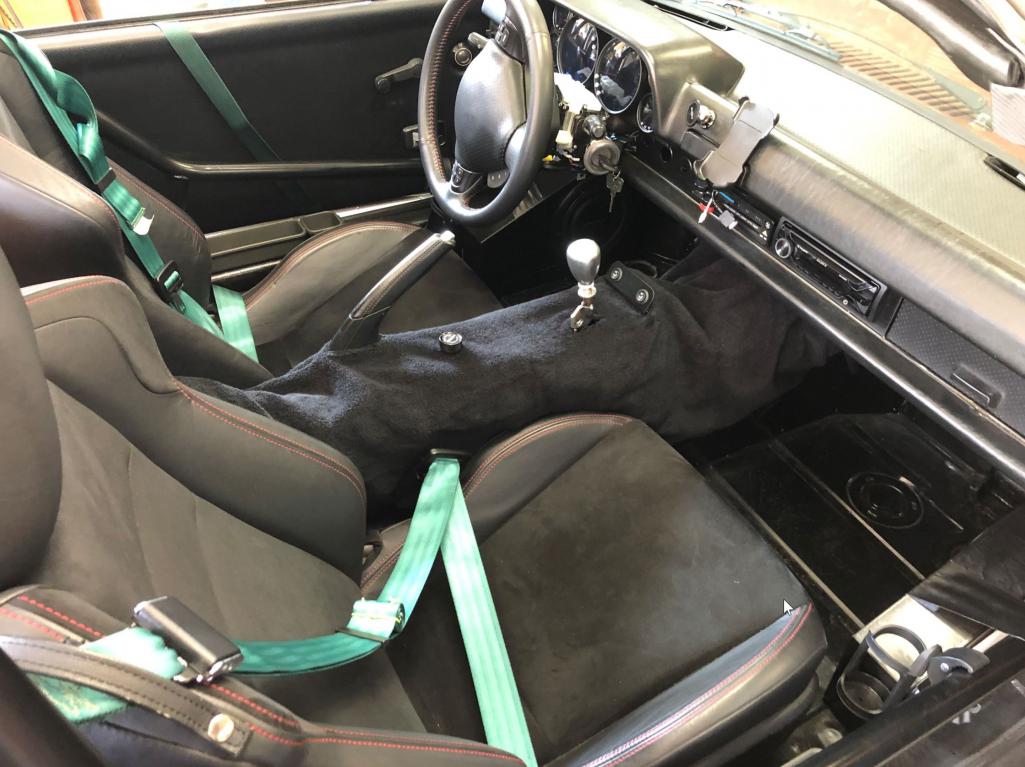 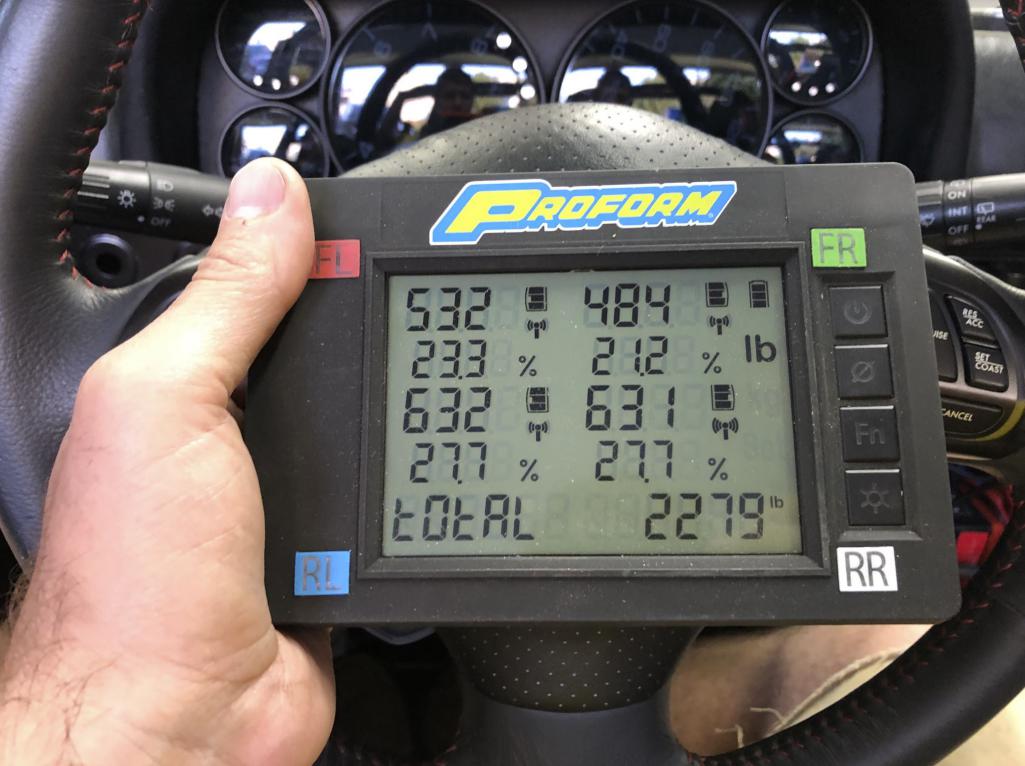 And a few from about 4 years ago: 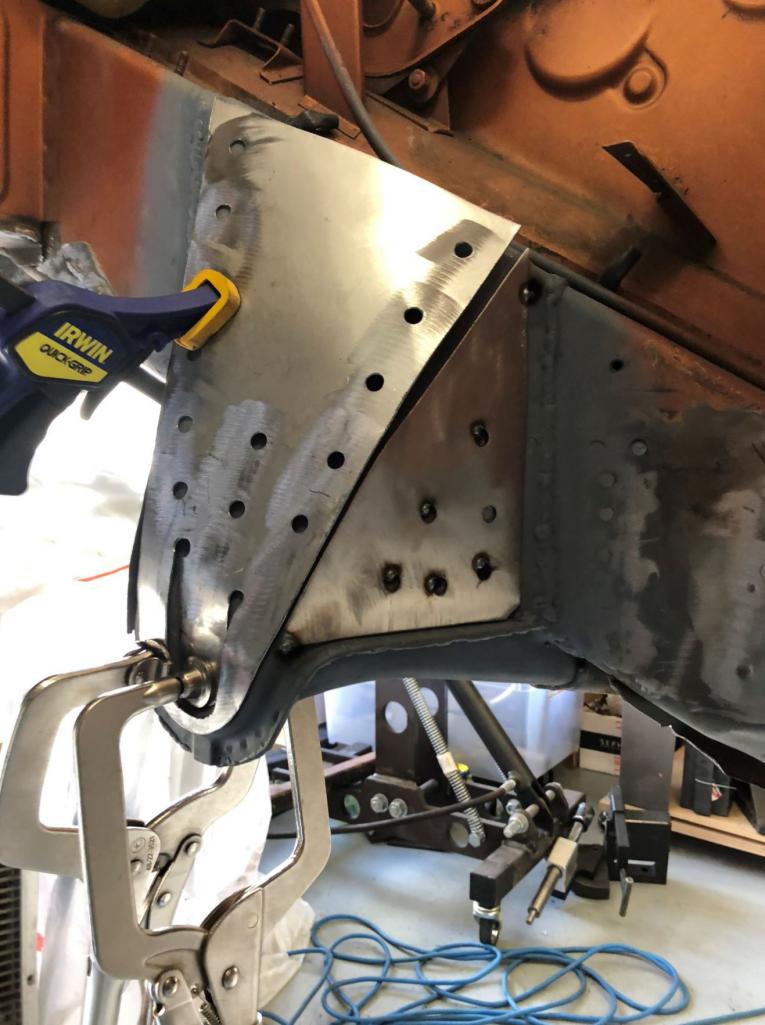 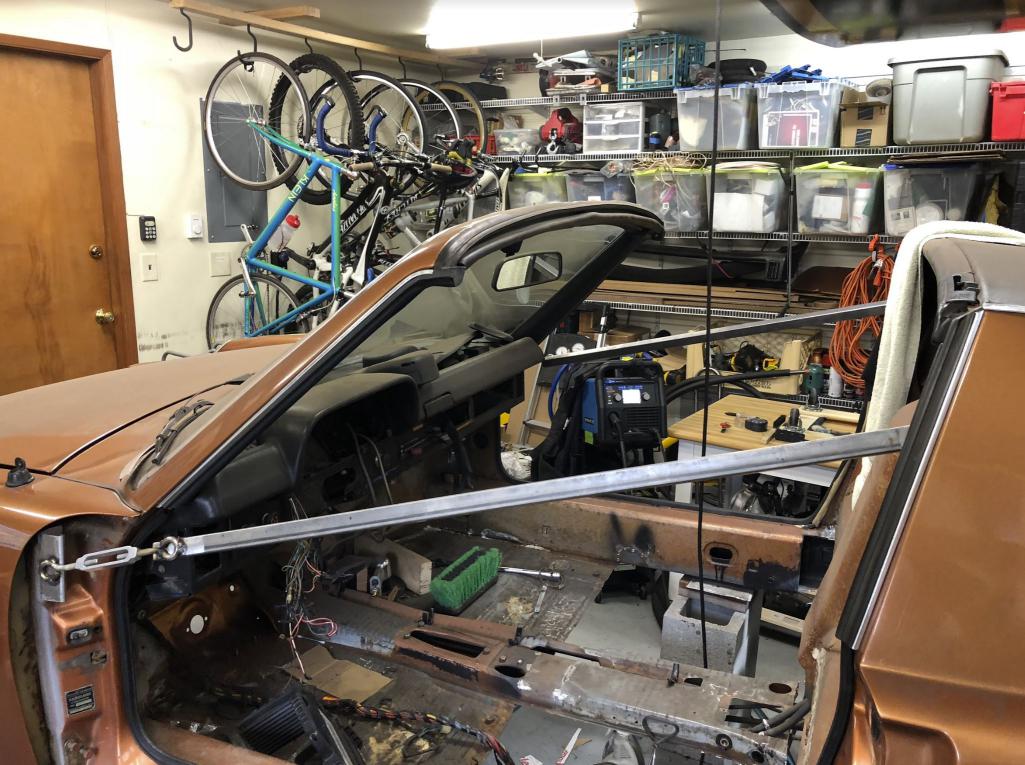 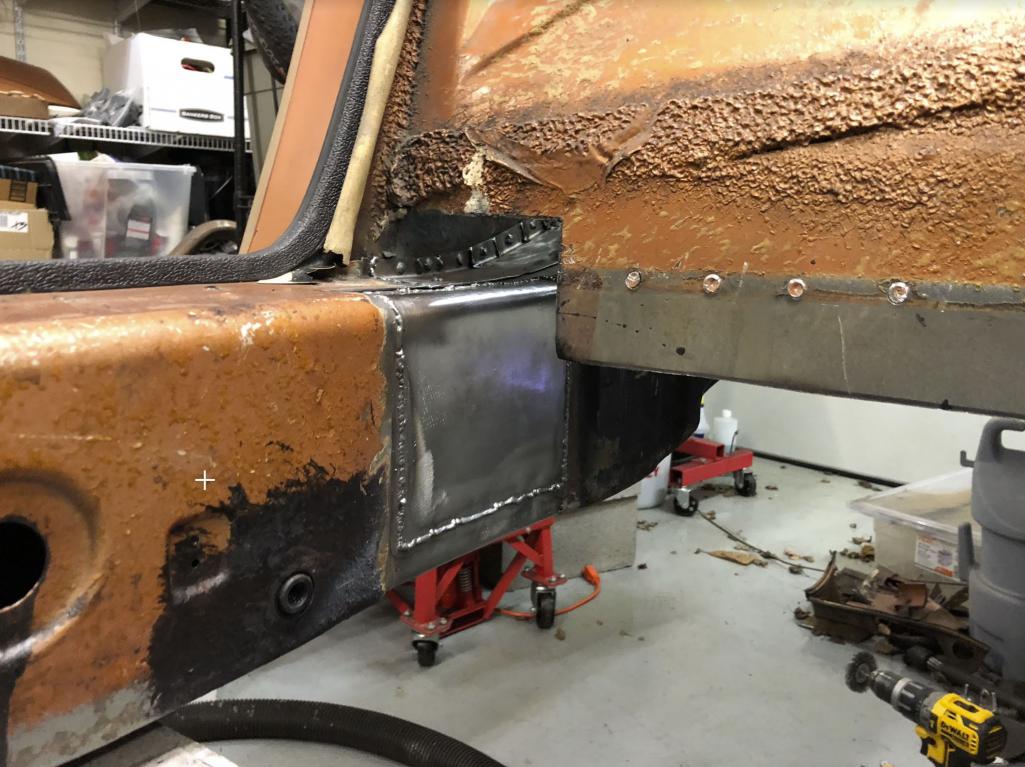 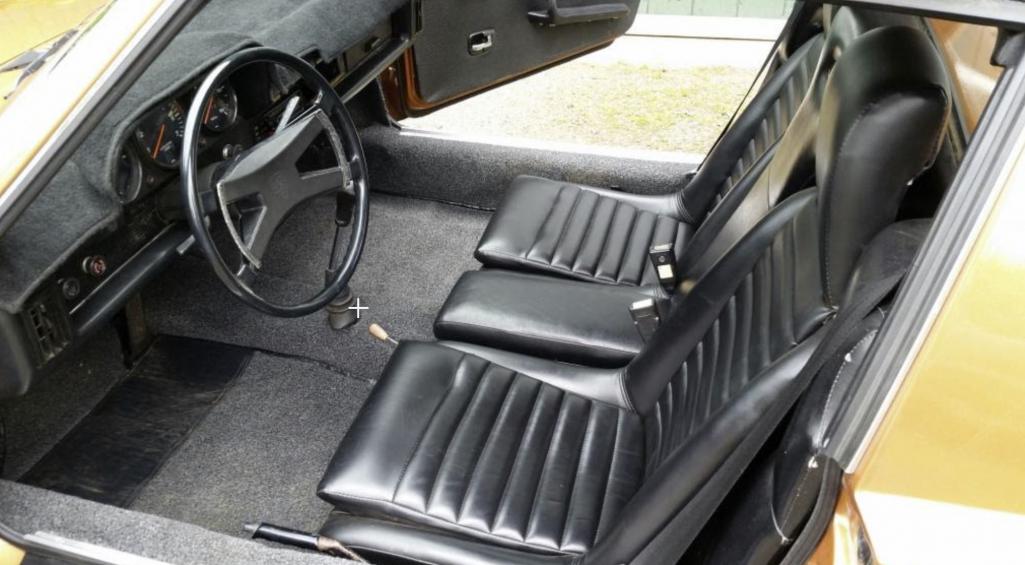 |
   |

 
|
| waltonsm |
Jun 12 2020, 11:58 PM
Post
#2
|
|
Member Group: Members Posts: 93 Joined: 27-June 14 From: United States Member No.: 17,561 Region Association: Pacific Northwest |
some milestones:
   [attachmentid=748 [attachmentid=748227] 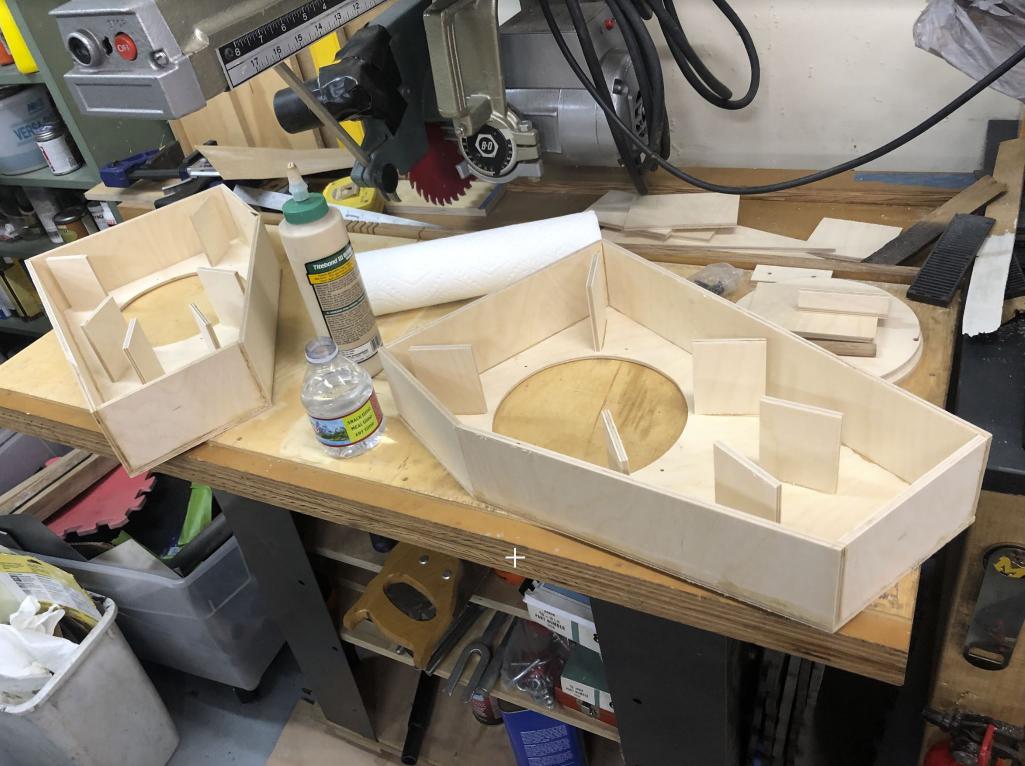 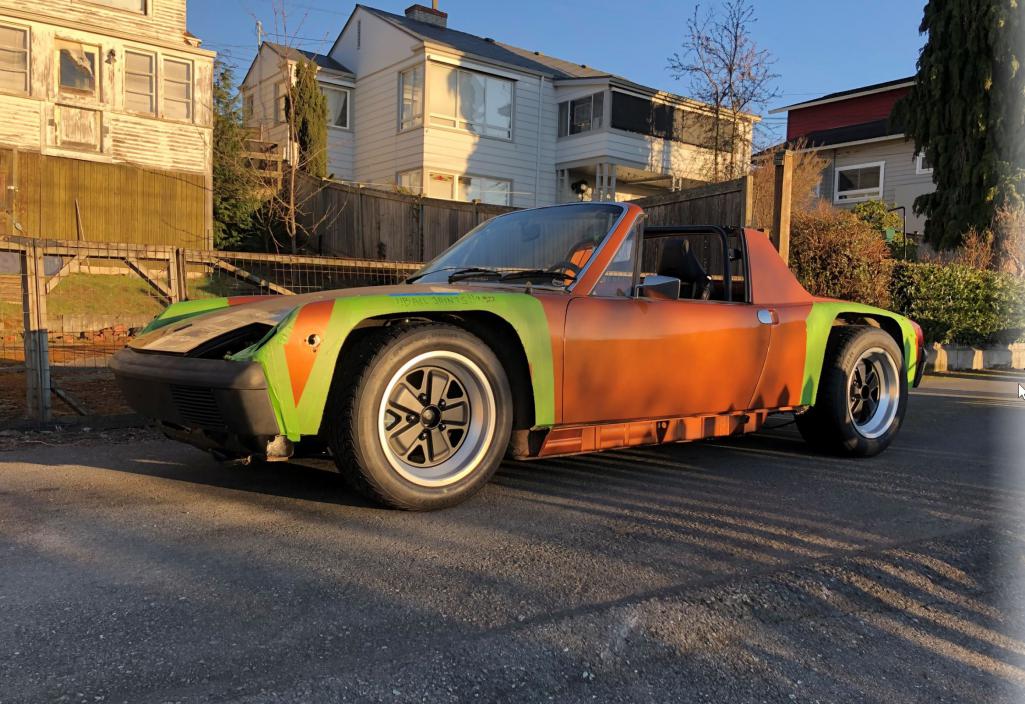  [attachmentid [attachmentid=748232] 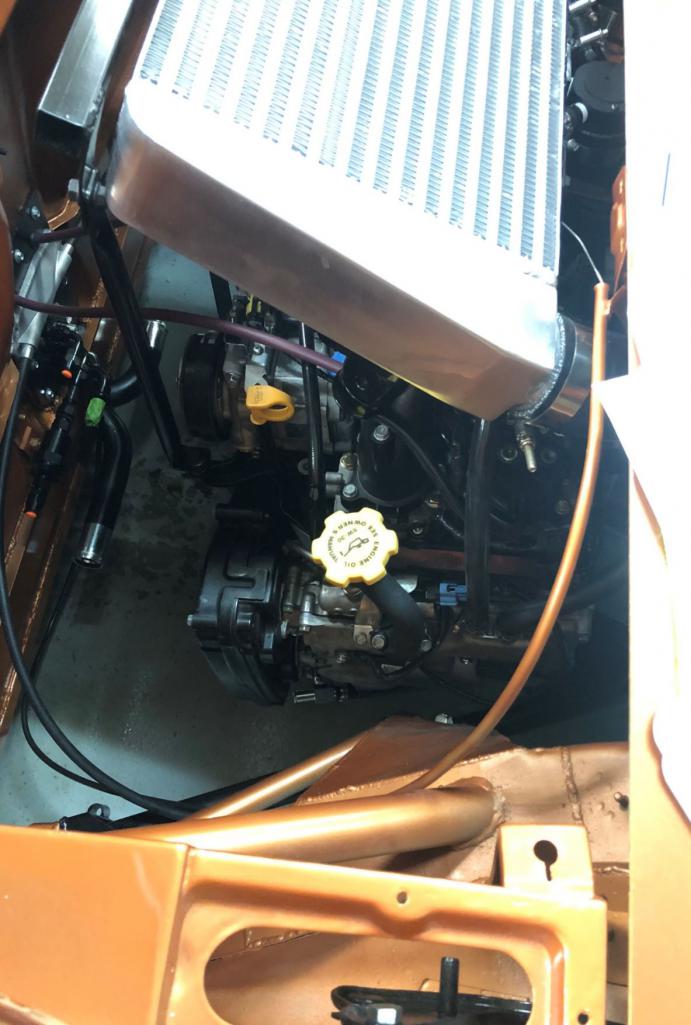 Attached thumbnail(s)  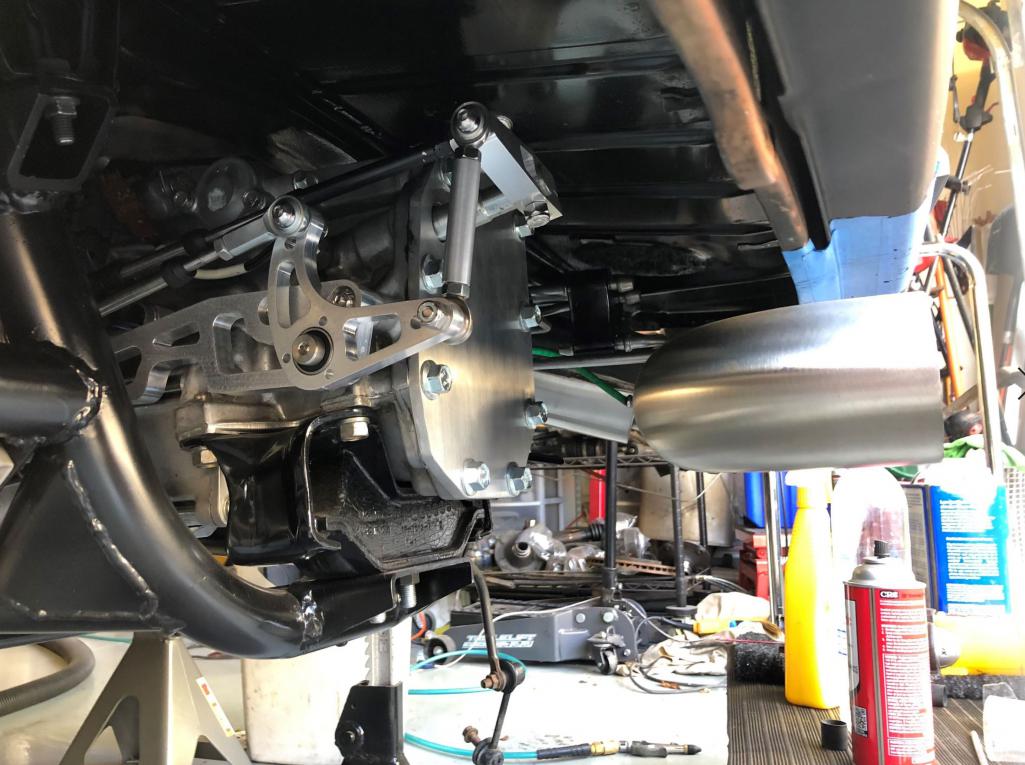
|
|
|
|
| waltonsm |
Jun 13 2020, 12:00 AM
Post
#3
|
|
Member Group: Members Posts: 93 Joined: 27-June 14 From: United States Member No.: 17,561 Region Association: Pacific Northwest |
some more:
   [attachmentid=748 [attachmentid=748237]  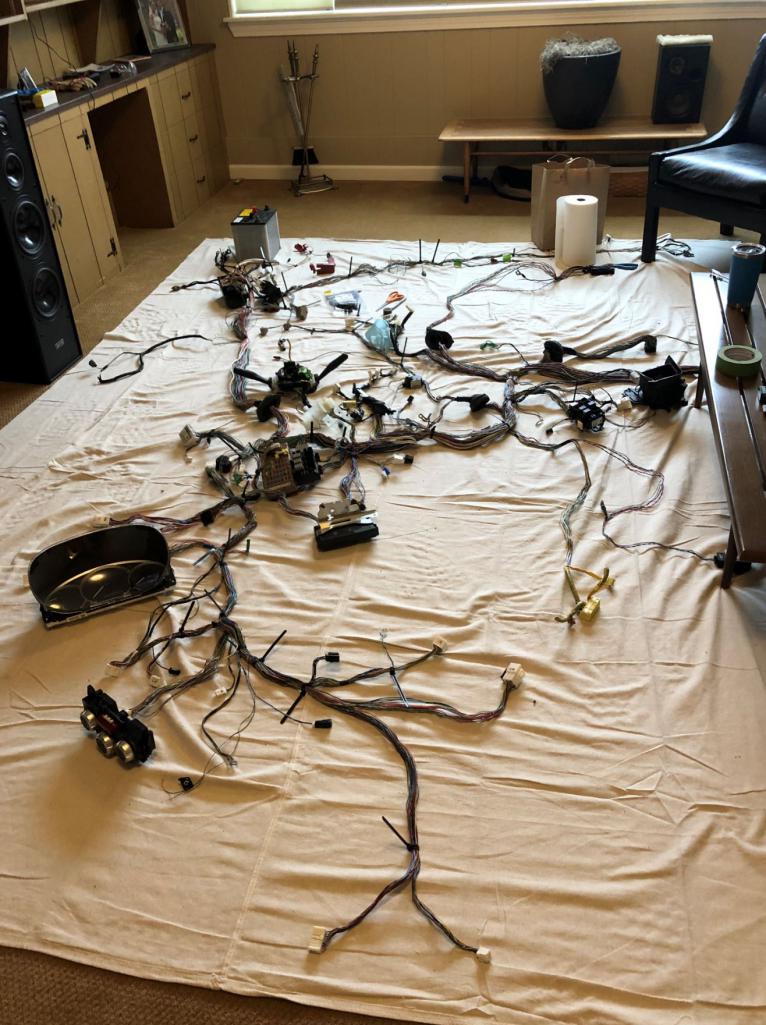 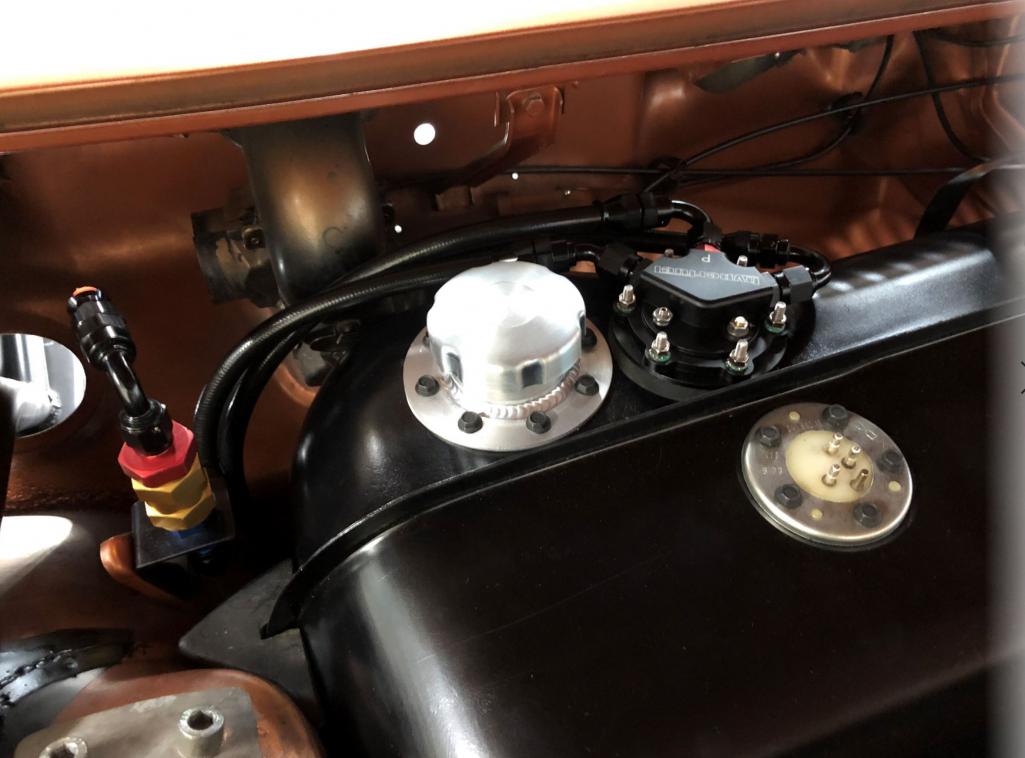 [attachmentid [attachmentid=748241] Attached thumbnail(s) 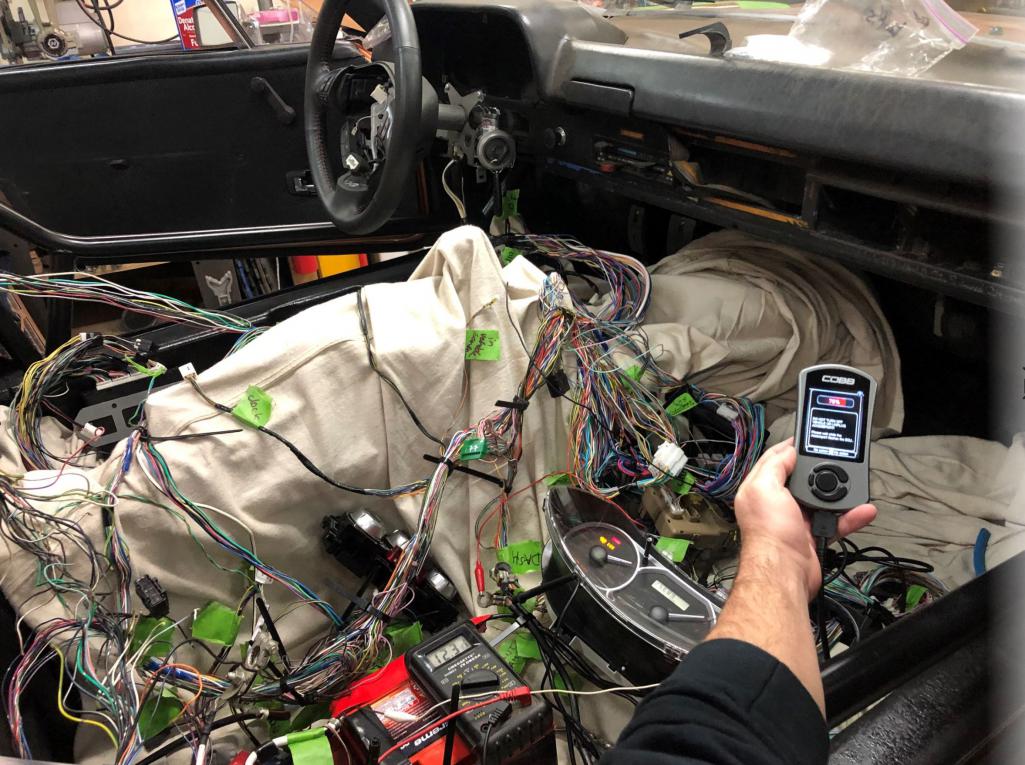 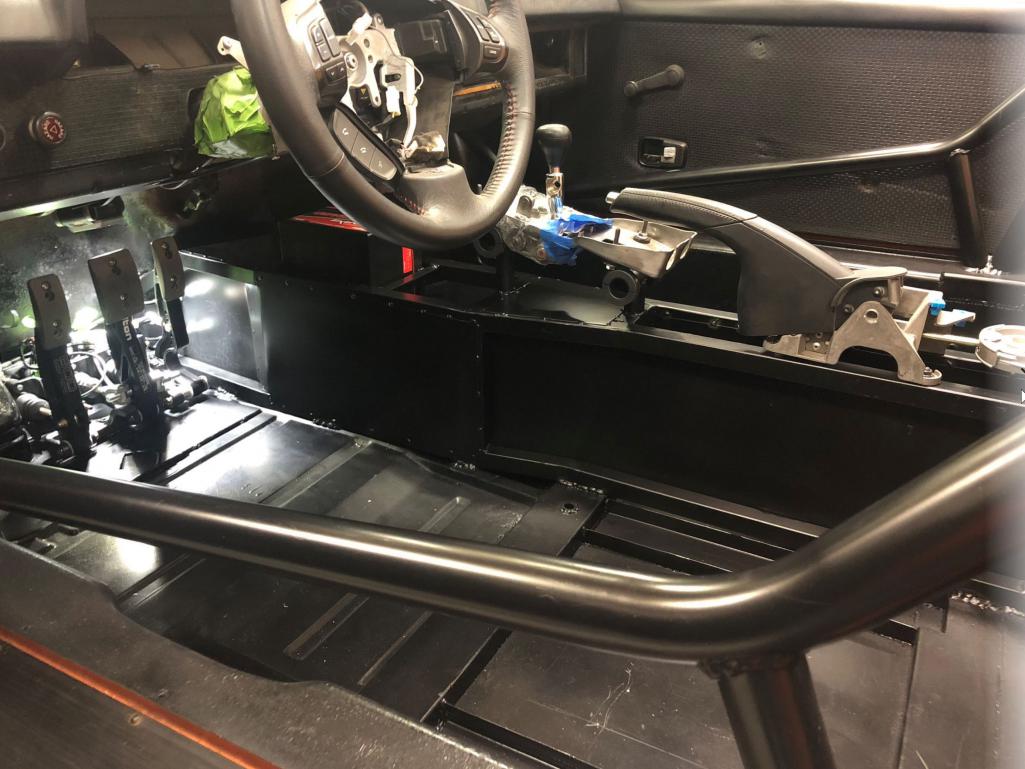
|
|
|
|
| waltonsm |
Jun 13 2020, 12:02 AM
Post
#4
|
|
Member Group: Members Posts: 93 Joined: 27-June 14 From: United States Member No.: 17,561 Region Association: Pacific Northwest |
some more:
   [attachmentid=748 [attachmentid=748245] 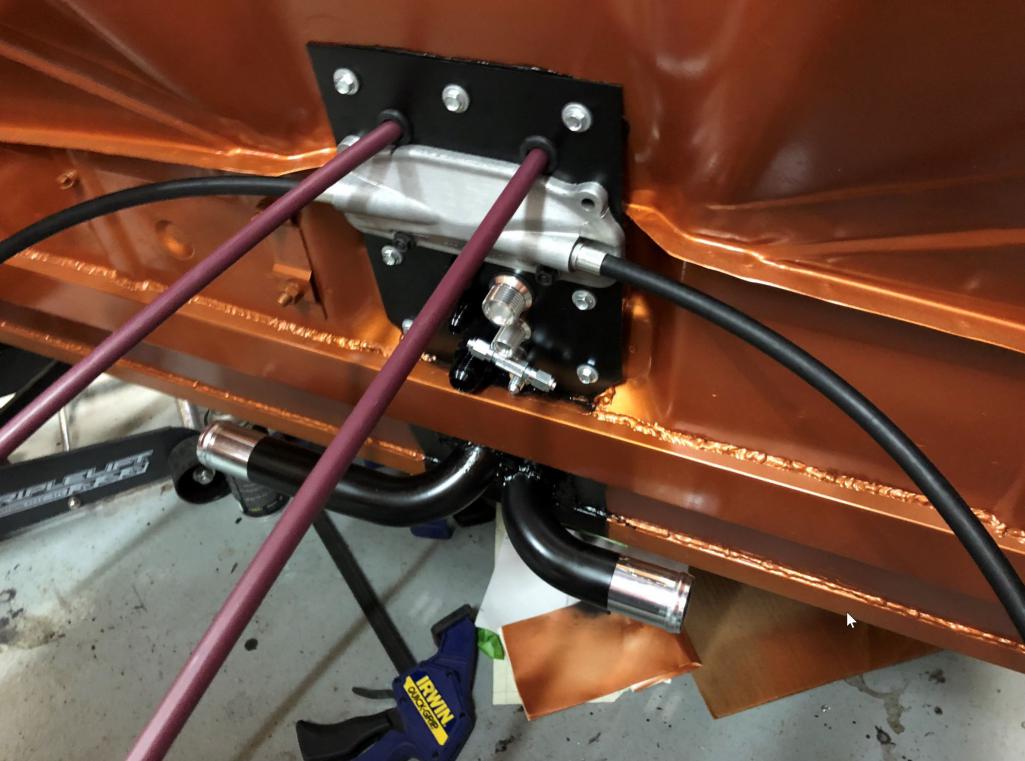  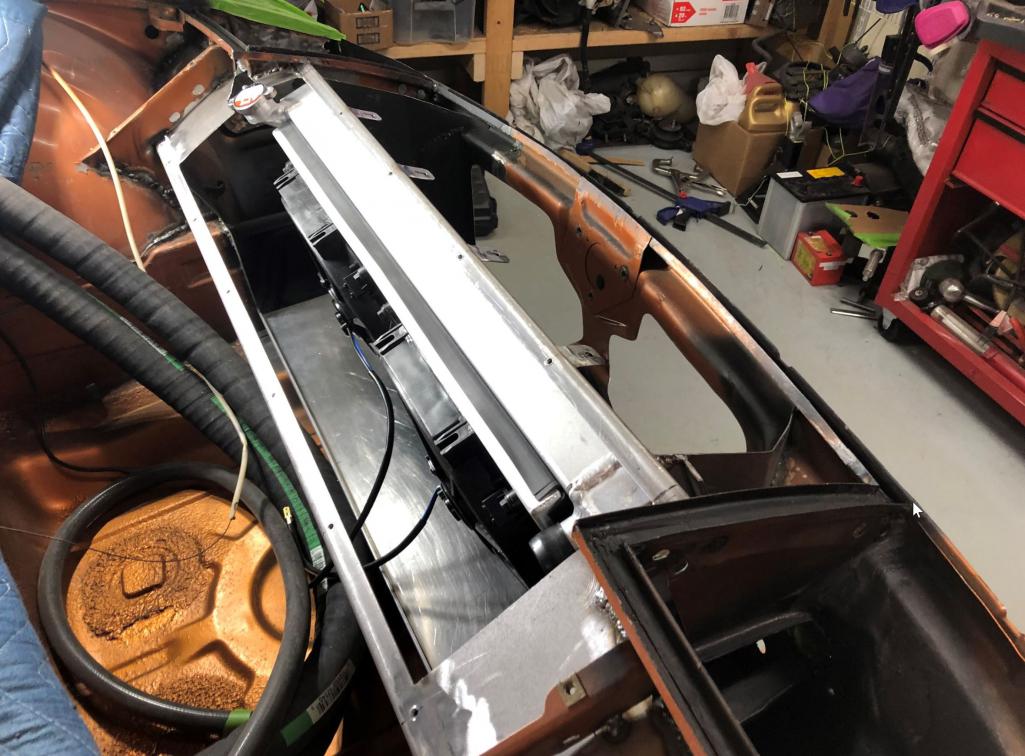 [attachmentid [attachmentid=748249] 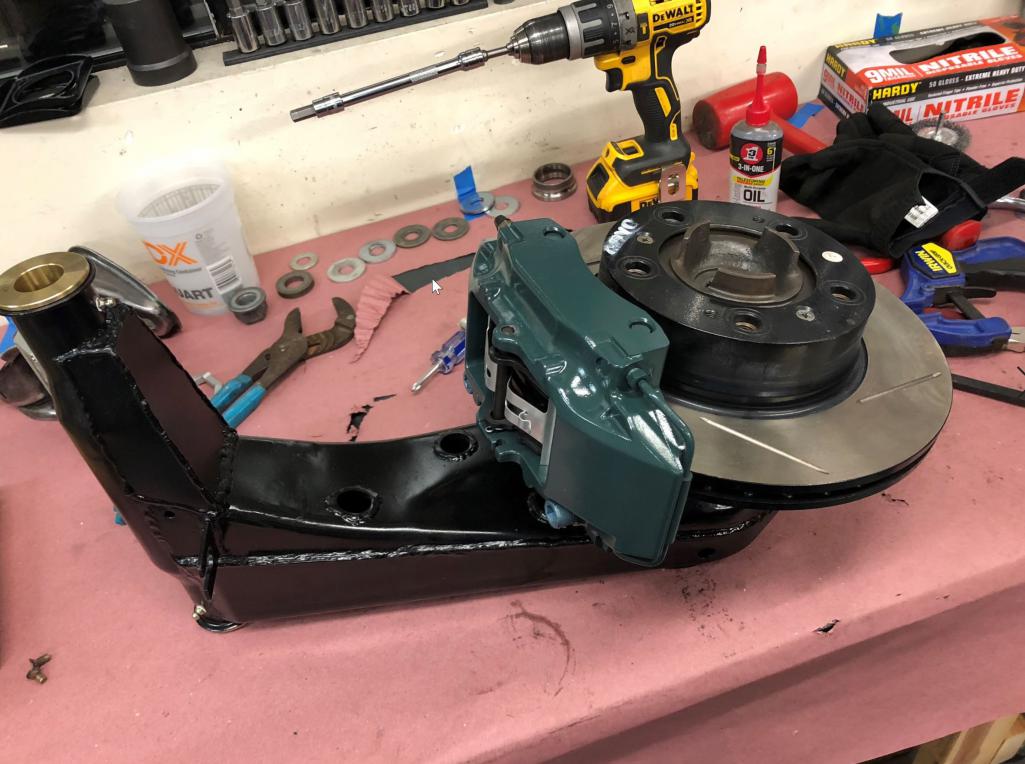 Attached thumbnail(s) 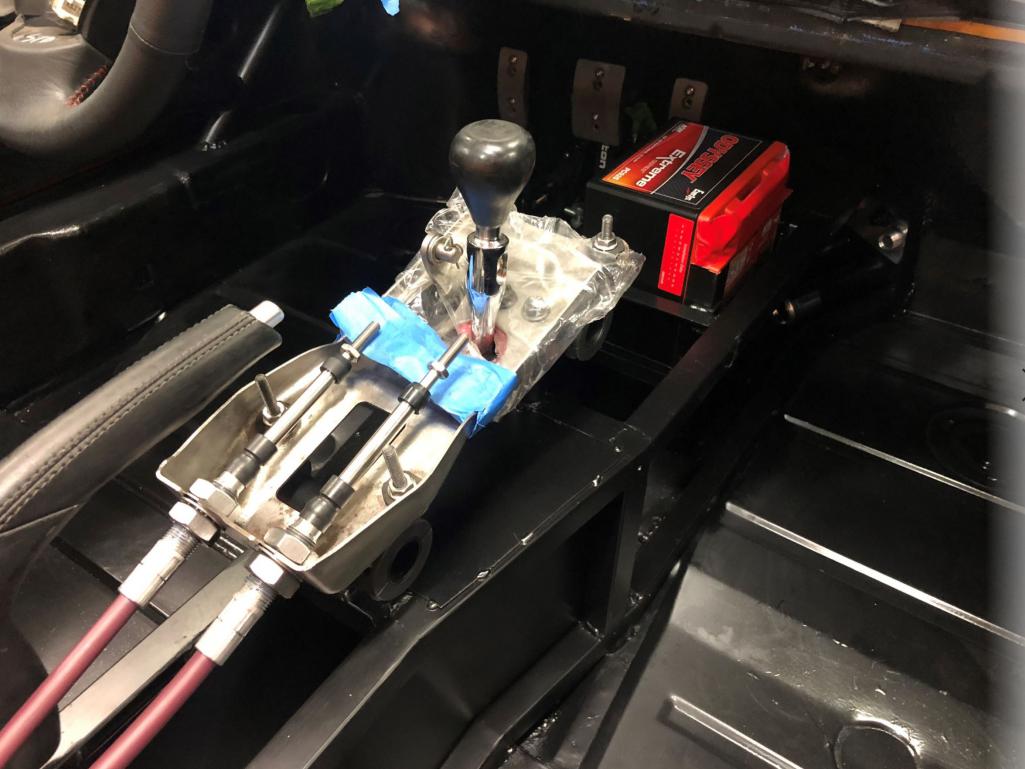 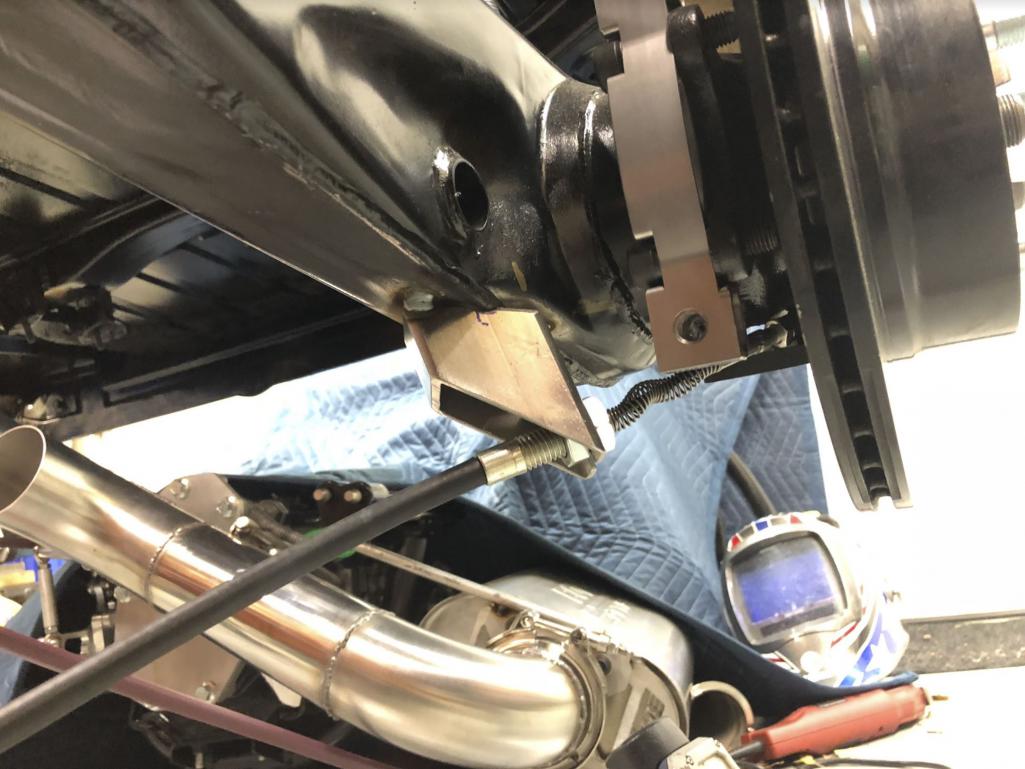
|
|
|
|
| Thunderchief |
Jun 13 2020, 12:18 AM
Post
#5
|
|
Member Group: Members Posts: 197 Joined: 12-August 19 From: Pasadena, CA. Member No.: 23,365 Region Association: Southern California |
Super cool! Very clean and professional looking. Good job.
|
|
|
|
| BIGKAT_83 |
Jun 13 2020, 05:51 AM
Post
#6
|
|
Senior Member Group: Members Posts: 1,800 Joined: 25-January 03 From: Way down south Bogart,GA Member No.: 194 Region Association: South East States |
Nice !!!
All your parts are top of the line stuff. Great work. (IMG:style_emoticons/default/popcorn[1].gif) |
|
|
|
| Cairo94507 |
Jun 13 2020, 06:20 AM
Post
#7
|
|
Michael Group: Members Posts: 10,686 Joined: 1-November 08 From: Auburn, CA Member No.: 9,712 Region Association: Northern California |
Nice work and skills set. Glad you are getting to enjoy driving your car. Keep us posted as the build moves along to completion- or as close as you can ever get to completion on a build. (IMG:style_emoticons/default/beerchug.gif)
|
|
|
|
| 76-914 |
Jun 13 2020, 08:54 AM
Post
#8
|
|
Repeat Offender & Resident Subaru Antagonist Group: Members Posts: 13,910 Joined: 23-January 09 From: Temecula, CA Member No.: 9,964 Region Association: Southern California |
QUOTE(Cairo94507 @ Jun 13 2020, 05:20 AM)  Nice work and skills set. Glad you are getting to enjoy driving your car. Keep us posted as the build moves along to completion- or as close as you can ever get to completion on a build. (IMG:style_emoticons/default/beerchug.gif) The best part is the reliability and knowing should you need a part it is most likely available at your friendly local FLAPS. (IMG:style_emoticons/default/beerchug.gif) |
|
|
|
| Retroracer |
Jun 13 2020, 02:19 PM
Post
#9
|
|
Senior Member Group: Members Posts: 663 Joined: 7-July 13 From: Bend OR Member No.: 16,100 Region Association: Pacific Northwest |
Very cool build - pls keep the posts & pics flowing! Some really nice details on this, love the vents on the headlight lids!
- Tony |
|
|
|
| PanelBilly |
Jun 13 2020, 09:44 PM
Post
#10
|
|
914 Guru Group: Members Posts: 5,992 Joined: 23-July 06 From: Kent, Wa Member No.: 6,488 Region Association: Pacific Northwest |
I want to go for a ride!
|
|
|
|
| waltonsm |
Jun 13 2020, 11:42 PM
Post
#11
|
|
Member Group: Members Posts: 93 Joined: 27-June 14 From: United States Member No.: 17,561 Region Association: Pacific Northwest |
QUOTE(PanelBilly @ Jun 13 2020, 08:44 PM) I want to go for a ride! I see you are in the area. I commuted to Kent for 11 years, until recently. Also, I was trying decide in what order to post pictures, but since I already got some questions, now I know. I am cross-posting some pictures from some questions I got: Question 1: Currently I have the Coldwater linkage setup and noticed you have the ZeroDecibel setup.....which I am thinking about buying if it will help the shifting. Have you any experience with the ZeroDecibel setup? BTW: This setup looks so clean and awesome. A: I vaguely remember looking at the coldwater linkage. As far as the zero decibel part goes.. I like it.There are a few items, well more than a few, on the car that I just spent money instead of doing all the fab myself. It mostly happened when I ended up being blocked in several directions and I just needed parts in hand to make a decision to free some other stuff up. The shift linkage was one of those things. I am quite happy with it now. But it took me a long time to get to satisfactory shifting. Replacing all bushings from the MR2 shifter, making sure everything in the assemblies stay tight, torqued, threadlocker, etc., There is a lot of opportunities for play and flex in the MANY bolted joints if not properly torqued. Also I spent a bunch of time changing the shift lever length, welding new eyelets for cables on the MR2 shifter, etc. (I have had three different shift lever lengths in this car, all trying to get the ratios all lined up, hand position, and centering the shifter spring neutral position with the transmission is a pain. But i can say it shifts like a pretty good subaru now. Not like and S2000, but definitiely not like a 901. I built this car around me. Just right (after new eyelets)  Question 2: It looks like you have installed an in-tank fuel pump. I did this on my brother-in-laws car but he does not have it running yet. I used an In Tanks and put it in the exact same place as you did, to take advantage of the fuel tank baffles. So, I don't know if it will be everything I hoped for. But, I am thinking about doing it on my car. What is the manufacturer of your fuel pump and have you had experience with this pump previously? The fuel pump is an Hyperfuel n tank assembly. i am using the OEM level sender, but put the pump inside the OEM baffle. I had to fully refurbish the tank, and it required a bunch of weld repair, and I also welded up the outlet and return on the bottom of the tank. Remember to be careful welding tanks. 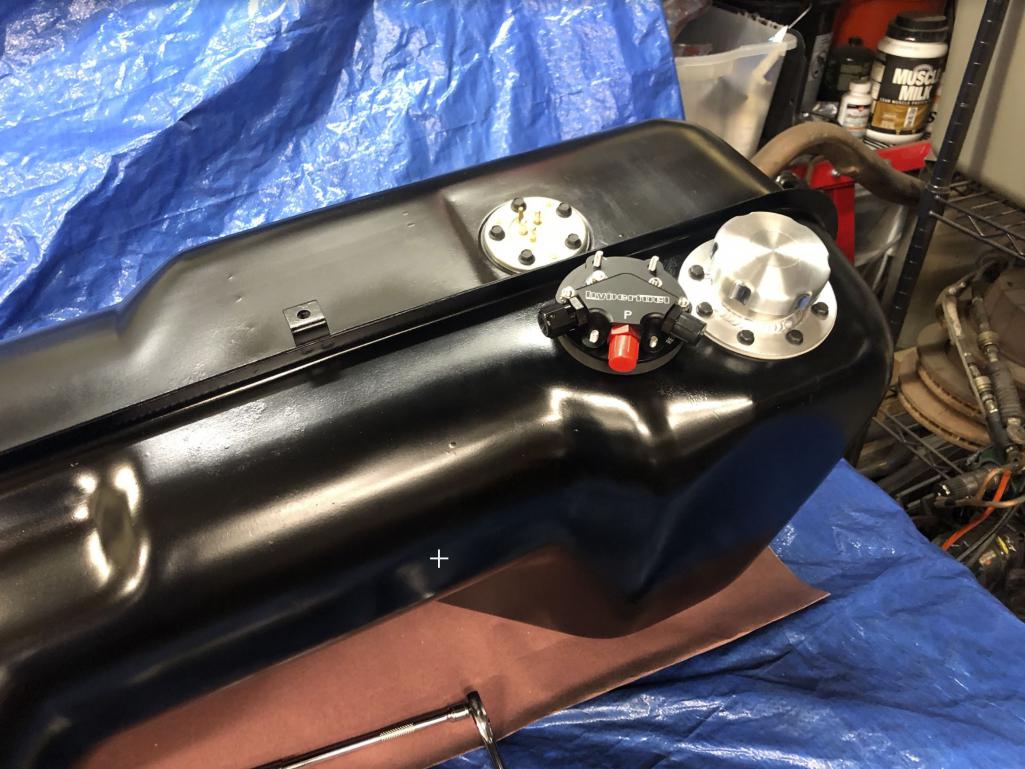 After all the care I took to make sure the vent/supply/return were routed properly, I still managed to get them messed up one time I took the tank out. This is not a good thing to do. The tank gets pressurized by the return, and you you force fuel out the vent.. There are others out there with better markings and different plumbing configs. but this one has worked great when properly installed.. On that note: when you relocate the pump to this location in the OEM baffle, you need to eliminate the expansion tank. Now you need a new vent solution that doesn't dump gas. I have iterated, and if you look close in the picture, you can see the vent line route from the pump assembly toward the driver side in front of the blower housing, as high as I can go underneath the cowl. This is routed against the liquid level during left hand lateral acceleration. This is then routed through a loop and then to a refillable charcoal canister. (Don't use ABS. I did) When I rebuild mine in new material, I will then be routing the fuel vent to the bottom of the car near the steering rack. I have zero gas smell in my closed garage (which is also my office these days). 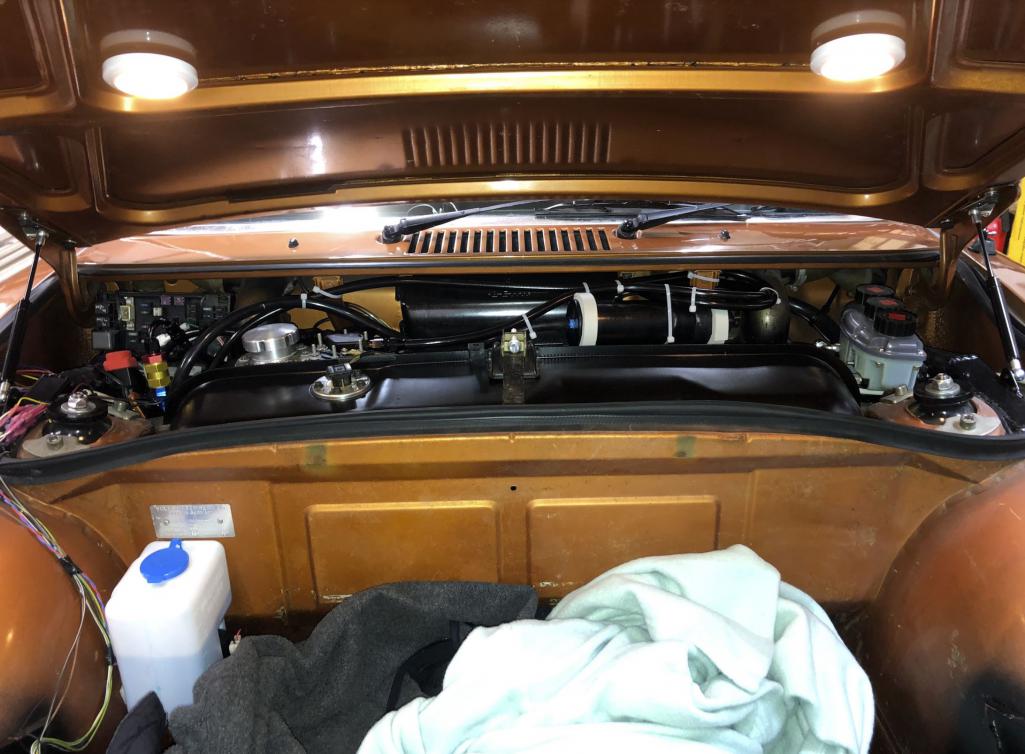 I didn't retain the fuel pump controller from the donor car. I would have had I known what I was doing with this, it would have been much simpler than I thought at the time, considering I am running the both the WRX ECU and Chassis computer. I do have an inertial switch for the fuel pump too. I often will disconnect this when I want to have the ignition on without the pump running. I have about 5000 miles on this car in the last year, with zero issues with the pump or switch. And I haven't had any fuel fumes with the current vent configuration. I have also had it on the track and run it to <1/8th tank with no issues with the baffles. THe only think i plan to do is put and RC filter on the sender to slow it down a bit to the gauge during cornering... |
|
|
|
| waltonsm |
Jun 14 2020, 12:09 AM
Post
#12
|
|
Member Group: Members Posts: 93 Joined: 27-June 14 From: United States Member No.: 17,561 Region Association: Pacific Northwest |
QUOTE(Retroracer @ Jun 13 2020, 01:19 PM) Very cool build - pls keep the posts & pics flowing! Some really nice details on this, love the vents on the headlight lids! - Tony Thanks Tony! This was one of the areas i struggled with a lot on the design side. My goals were to make all changes in the direction of improving the performance of the car, and also retain as much of that amazing road trip/race track storage capability as possible. I wanted to vent the air over the hood, but boxing out the entire headlight bucket area was a pain! 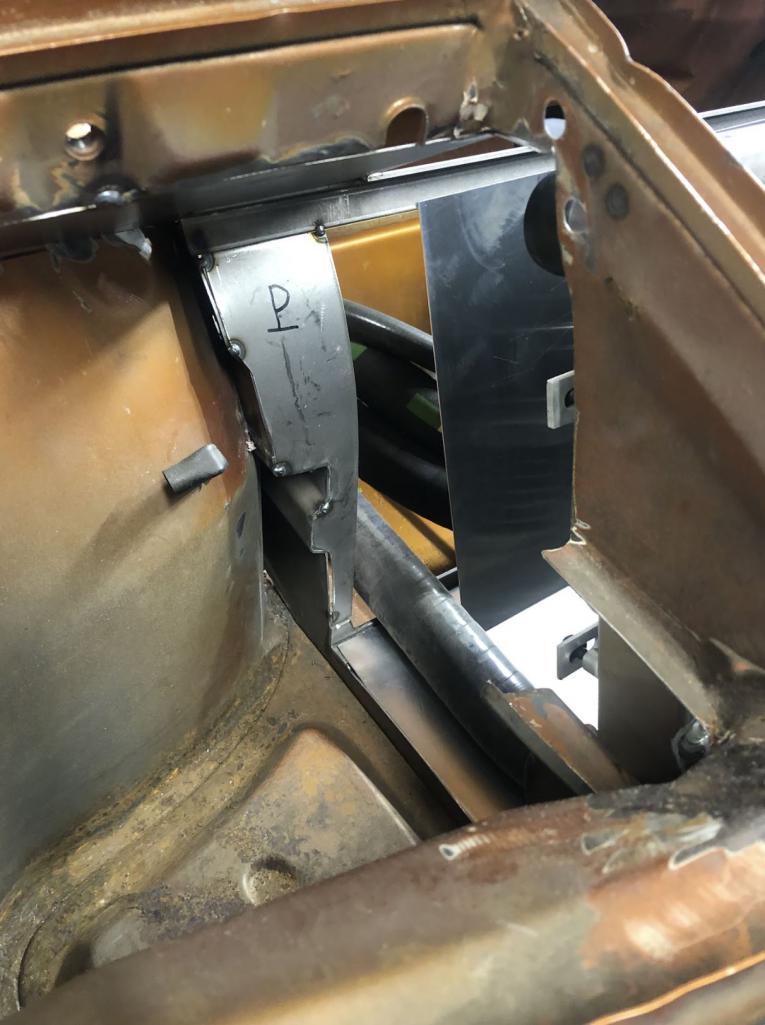 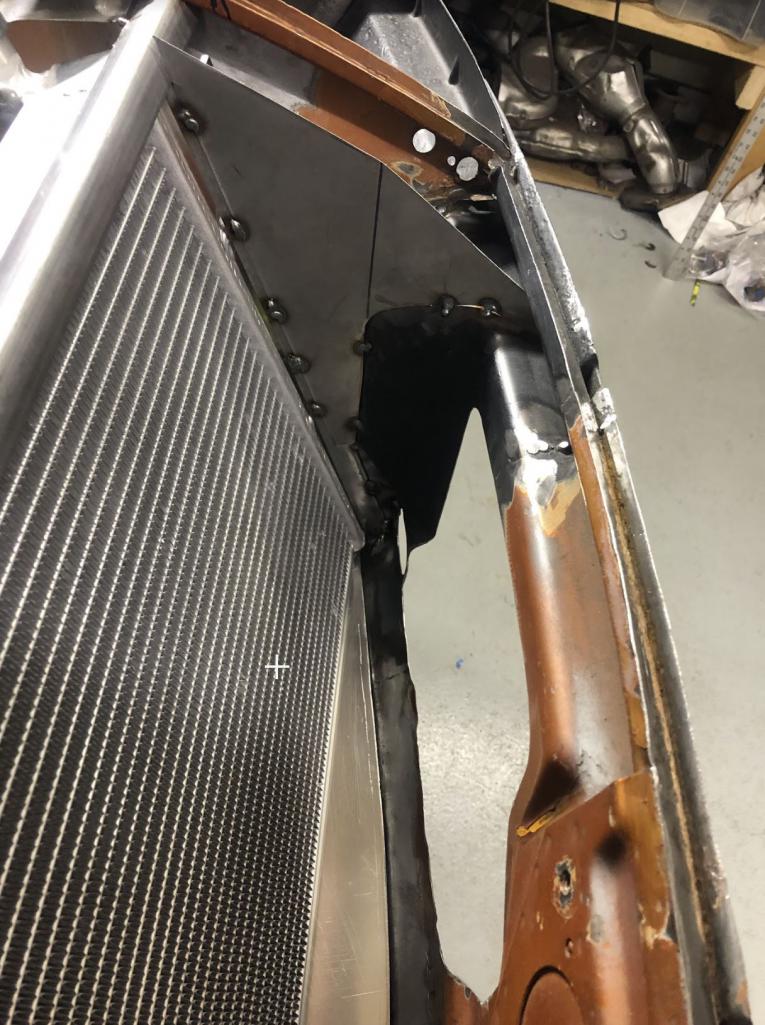 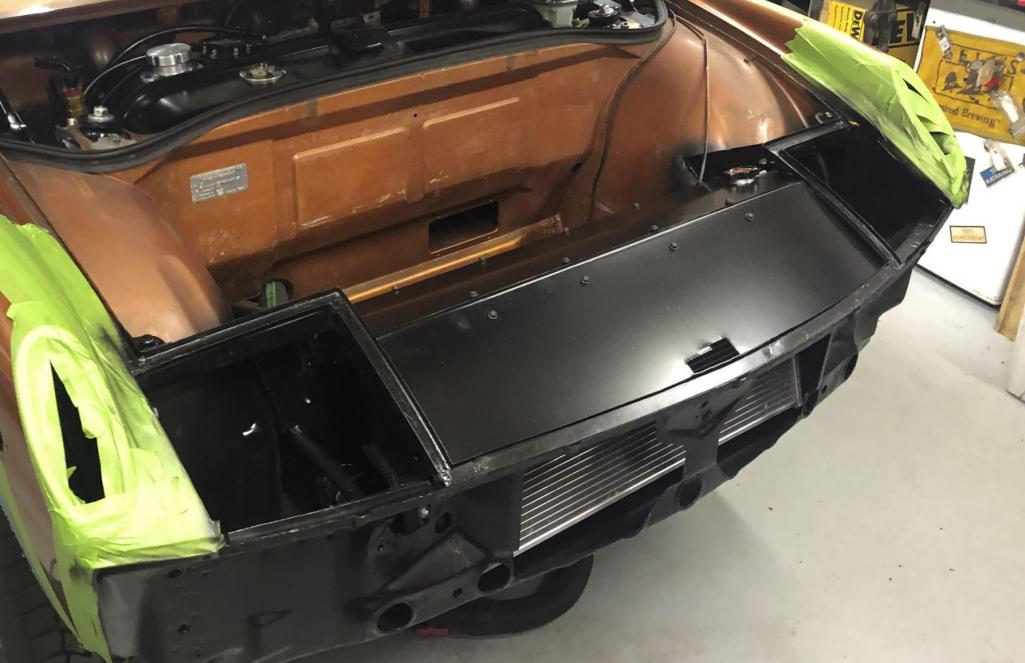 Very early i knew this was the plan, but it took until bout 3 months ago for me to finally execute the splitter and the headlight vents, and "fog lights". I have LED projectors in the turn signal housings (super cheap ones) and the foglights (expensive ones). the radiator vents started as scrap kayak building material the foglights as toiletbowl brushes (NEW) the splitter as a fiberglass LE spoiler 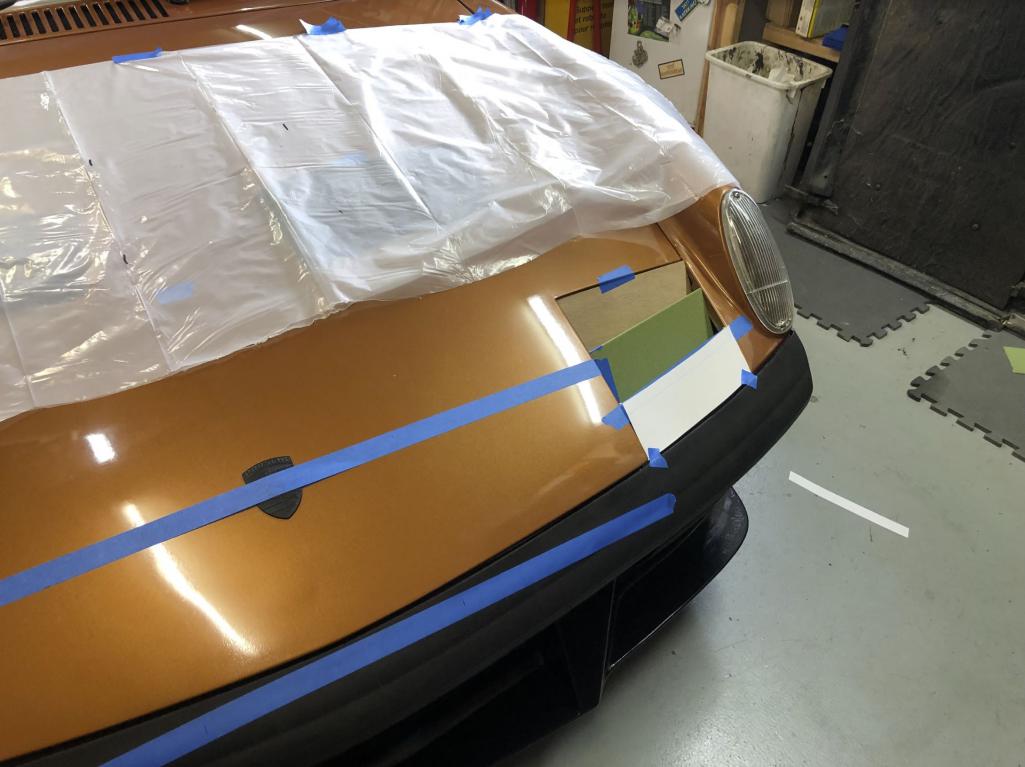 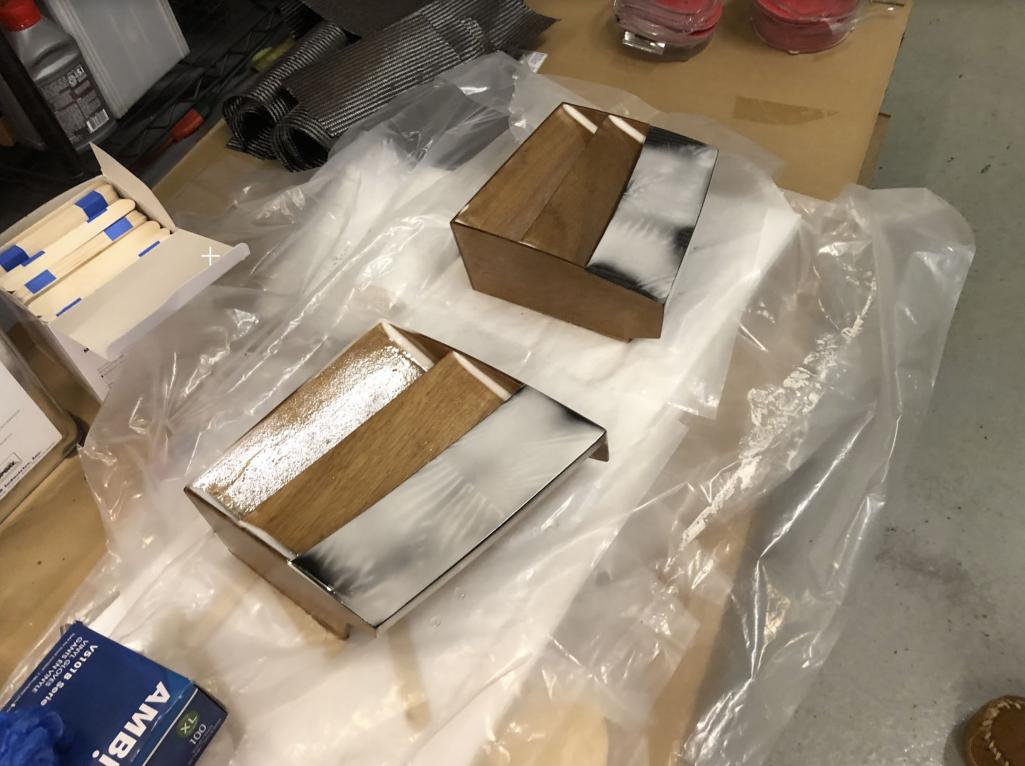 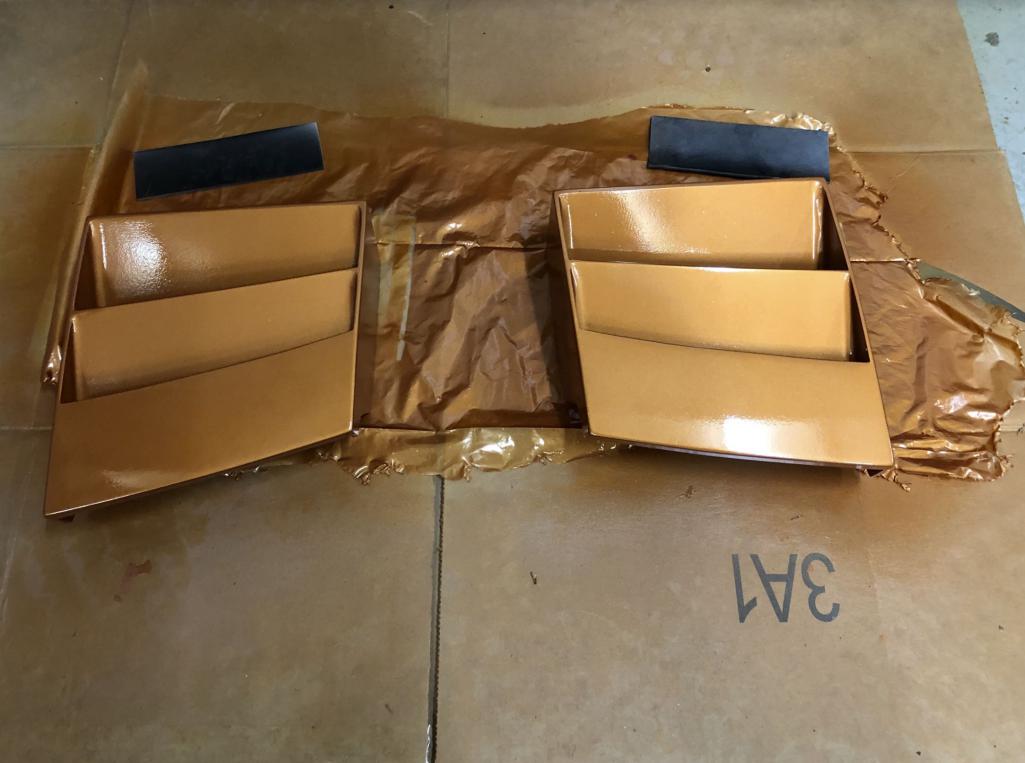 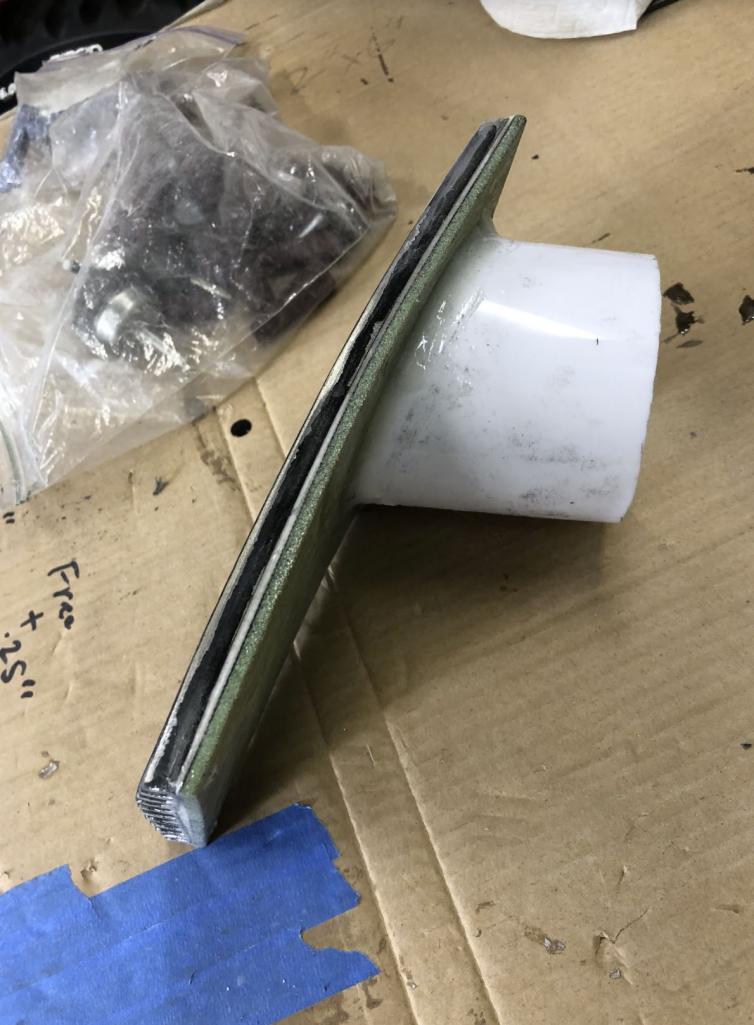 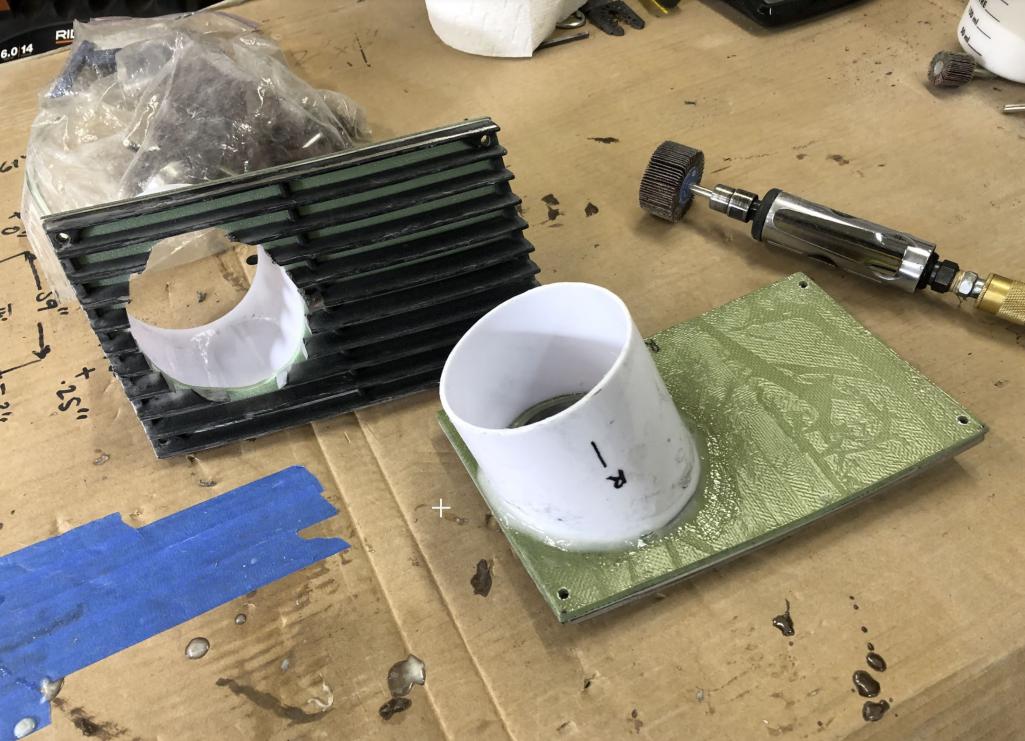 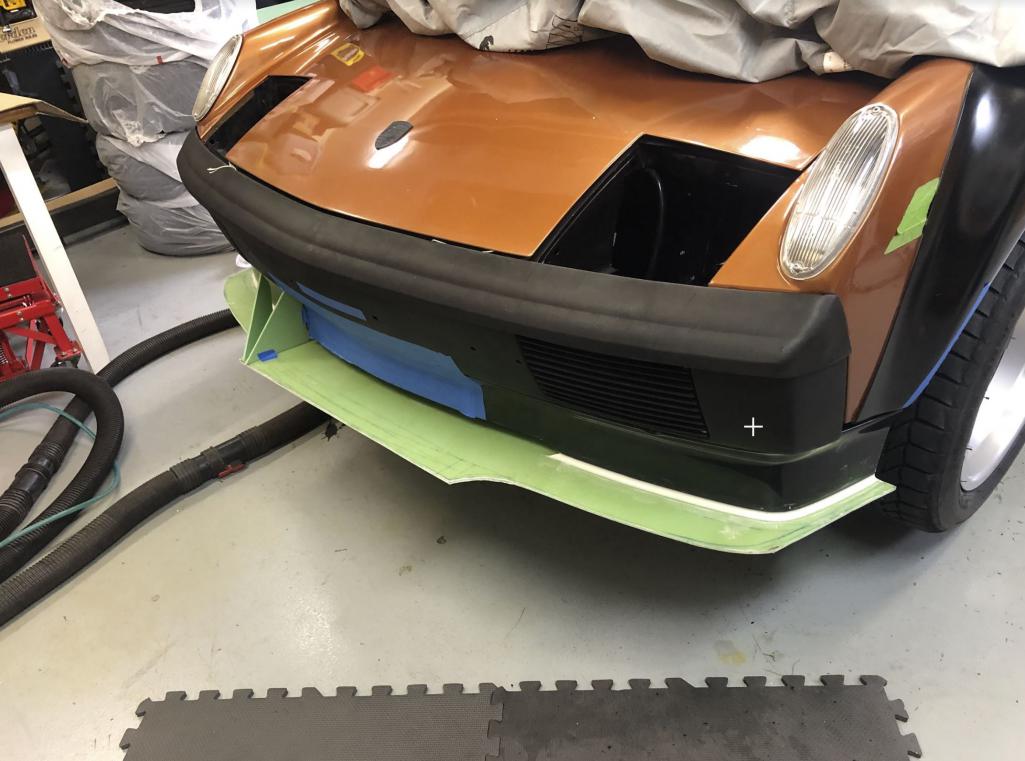 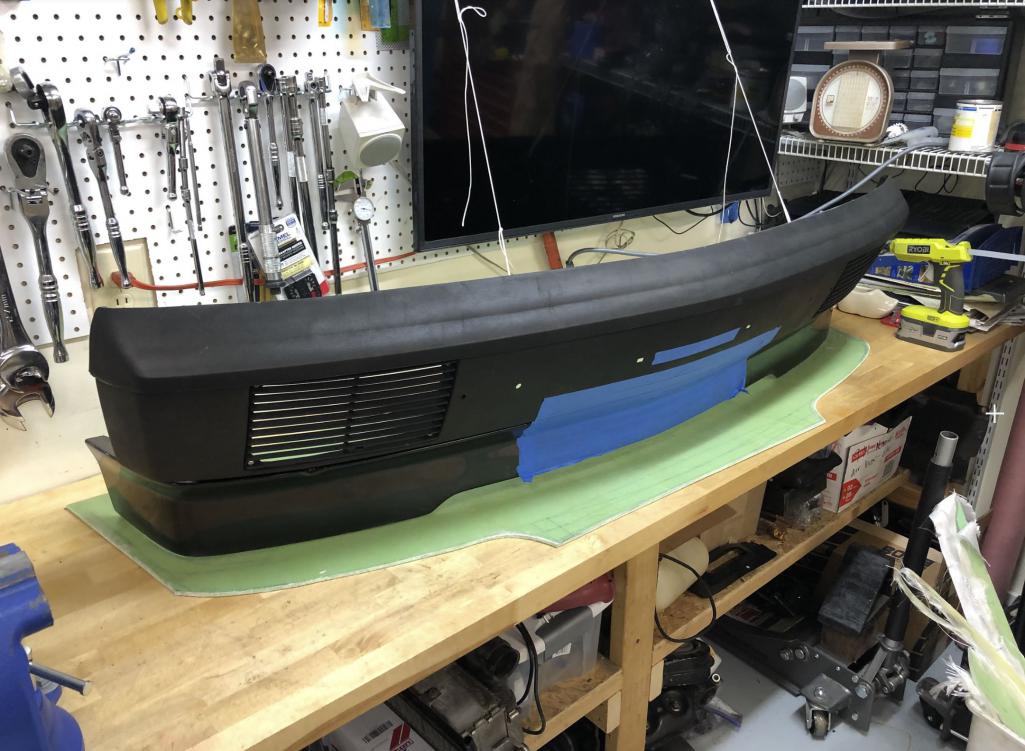 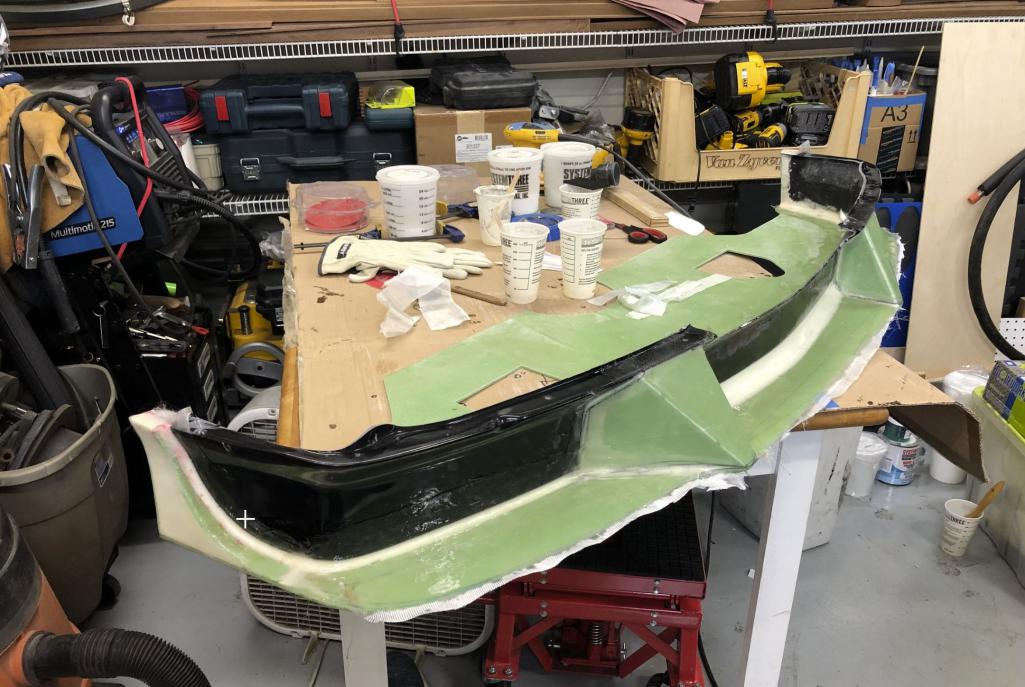 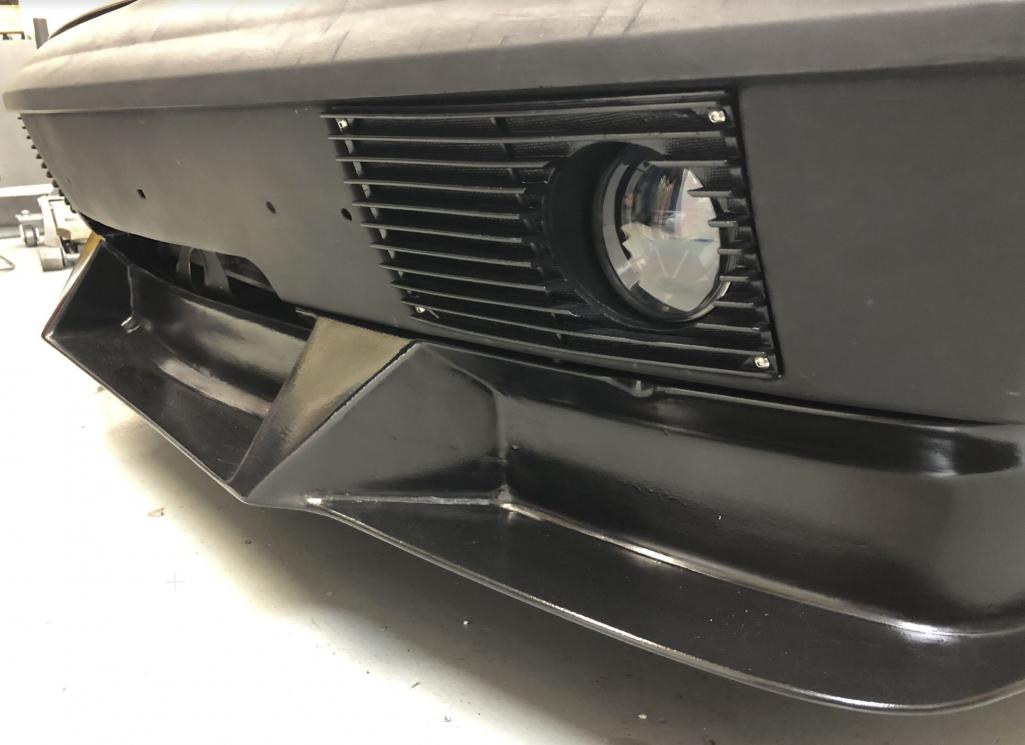 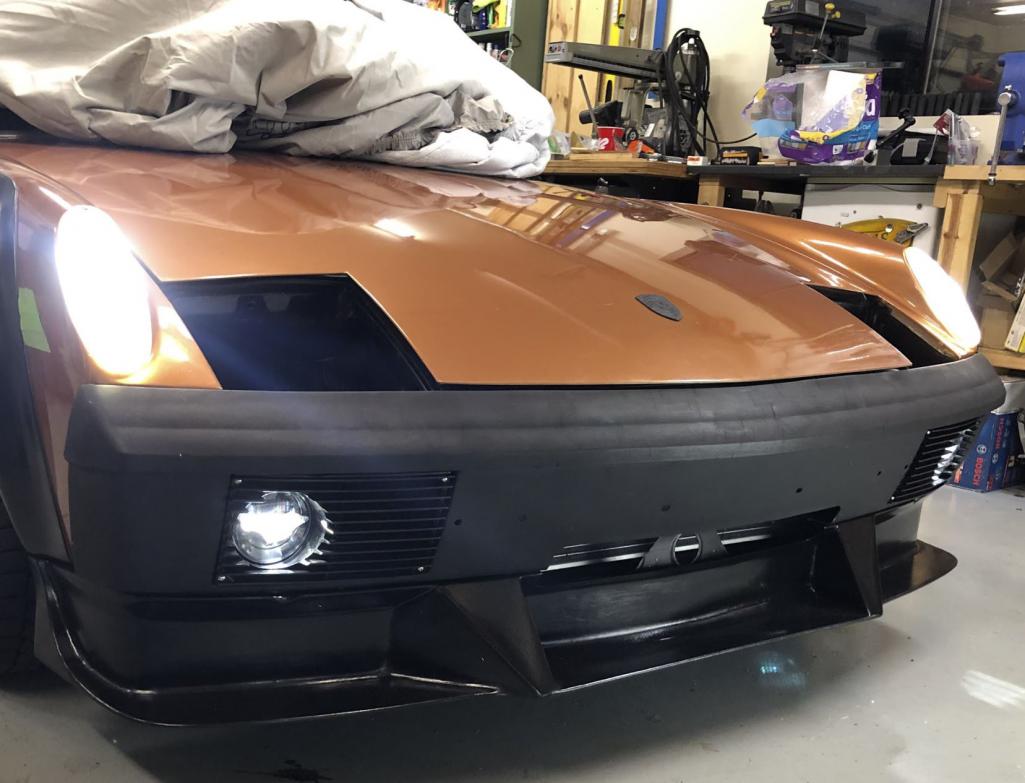 |
|
|
|
| kroelofsen |
Jun 14 2020, 02:42 AM
Post
#13
|
|
Member Group: Members Posts: 102 Joined: 27-June 19 From: The Netherlands Member No.: 23,255 Region Association: Europe |
Envy... (IMG:style_emoticons/default/aktion035.gif)
|
|
|
|
| waltonsm |
Jun 30 2020, 09:18 PM
Post
#14
|
|
Member Group: Members Posts: 93 Joined: 27-June 14 From: United States Member No.: 17,561 Region Association: Pacific Northwest |
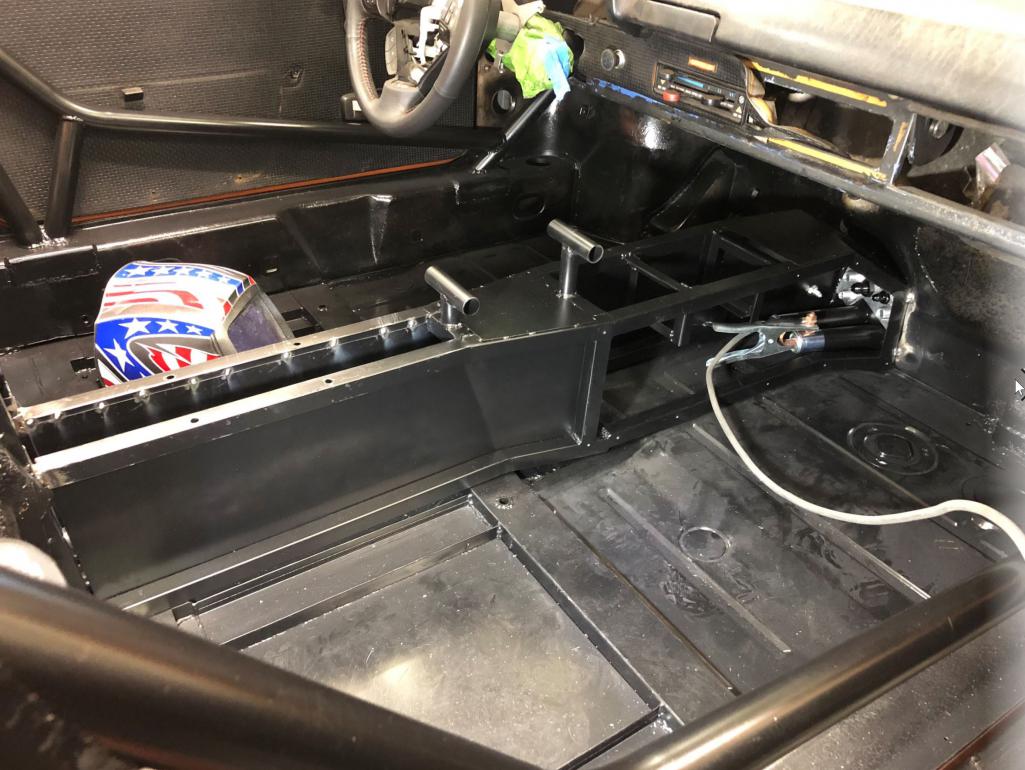
Time to add some more photos: Trying to capture mostly what was done (and since modified) for the rear subframe.
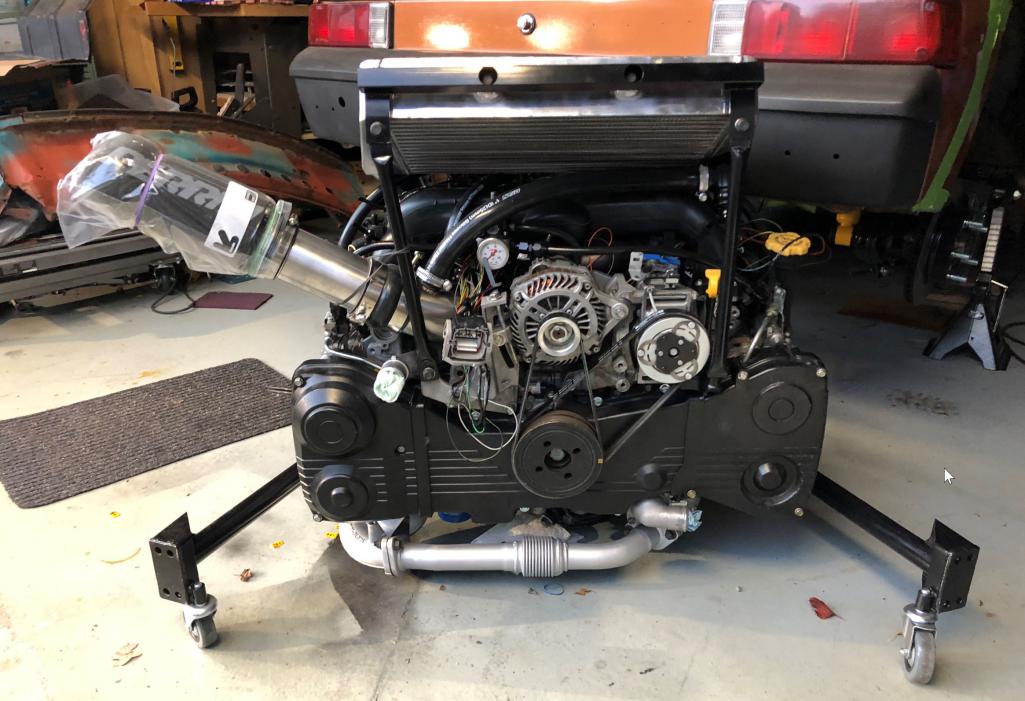
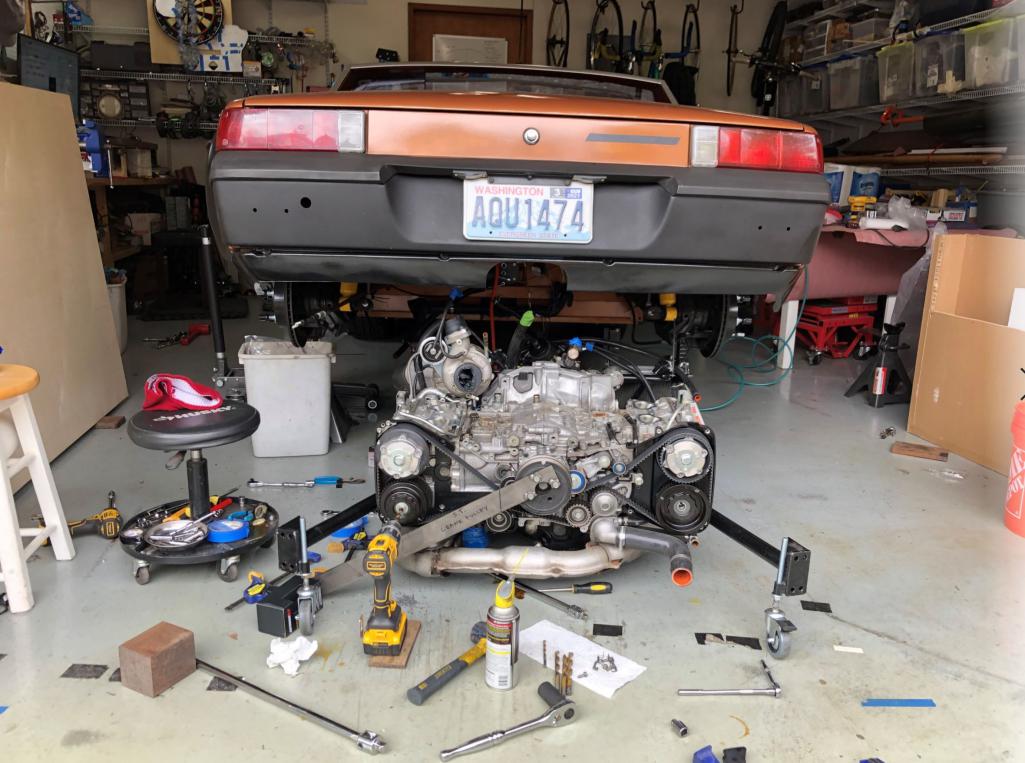
Objectives: -make the subframe a rolling cart with adjustable corners for simple motor drops for engine work (proven, unfortunately) -use it to box out the rear end of the car -hang as much off the subframe as possible -get the engine as high and forward as possible, ground clearance and cg In the end I mounted the intercooler, oil cooler, muffler, and rear sway bar on the subframe, of course in addition to the engine and trans. I used Subaru group N engine mounts, I later added the pitch stop off brackets at the rear of trans to manage axial motion to stiffen it a bit. I have enough degrees of freedom to adjust the up-pipe, turbo,downpipe,exhauts tip location. I did end up making a small cut in the rear trunk to fit the turbo, this was an early design error that I just ended up going with (to keep the turbo in stock location). 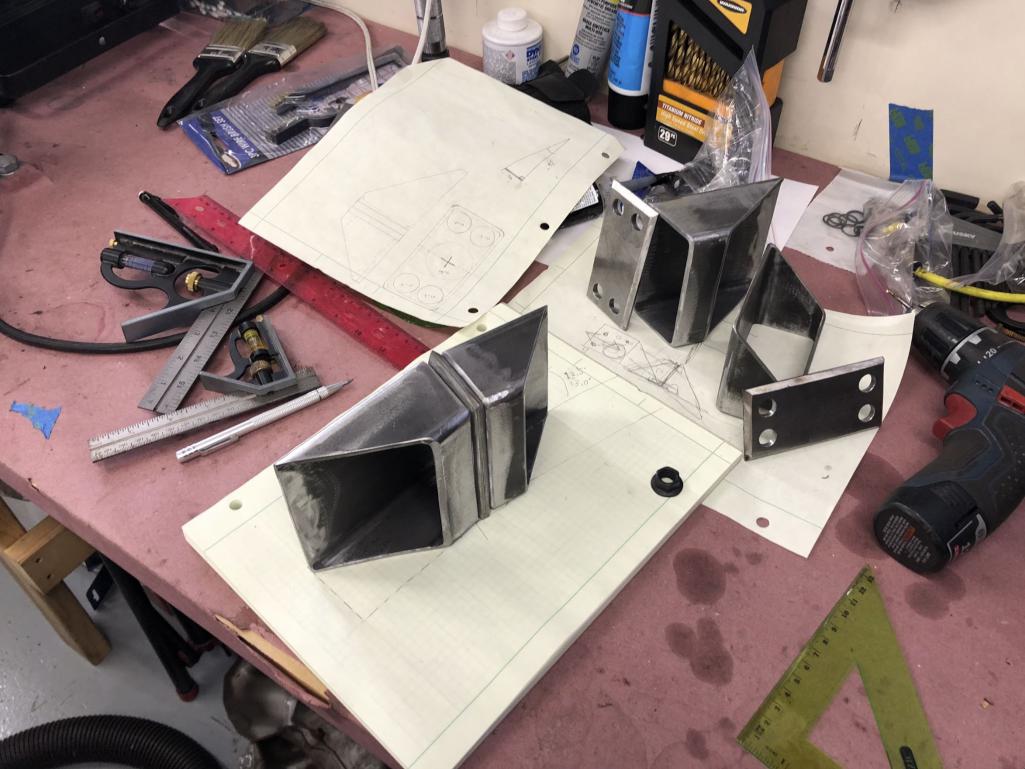 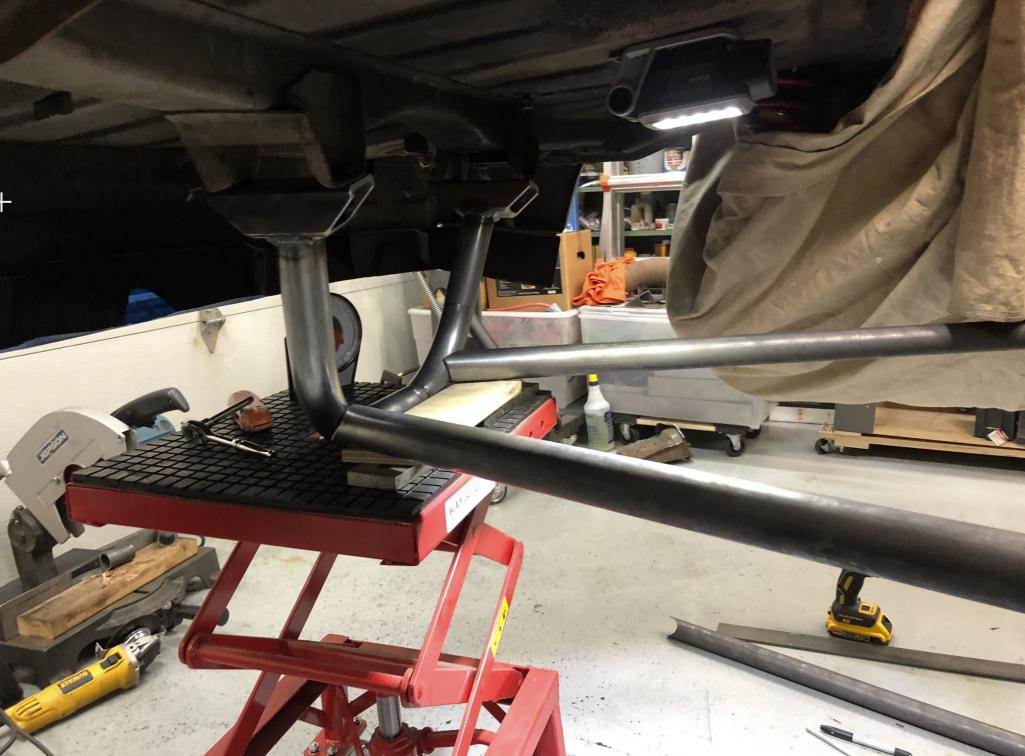 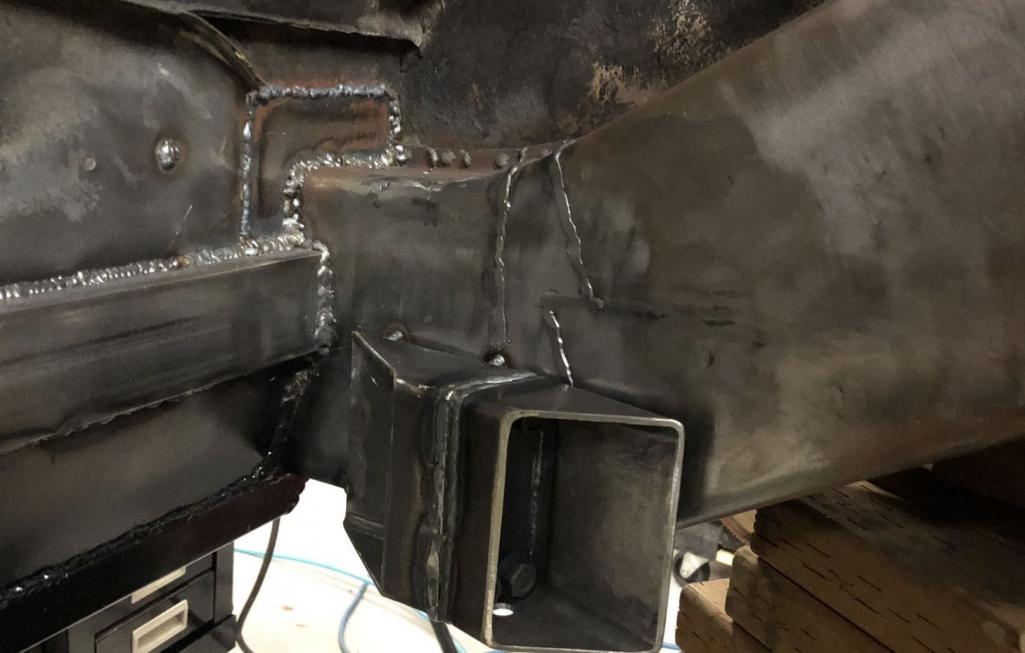 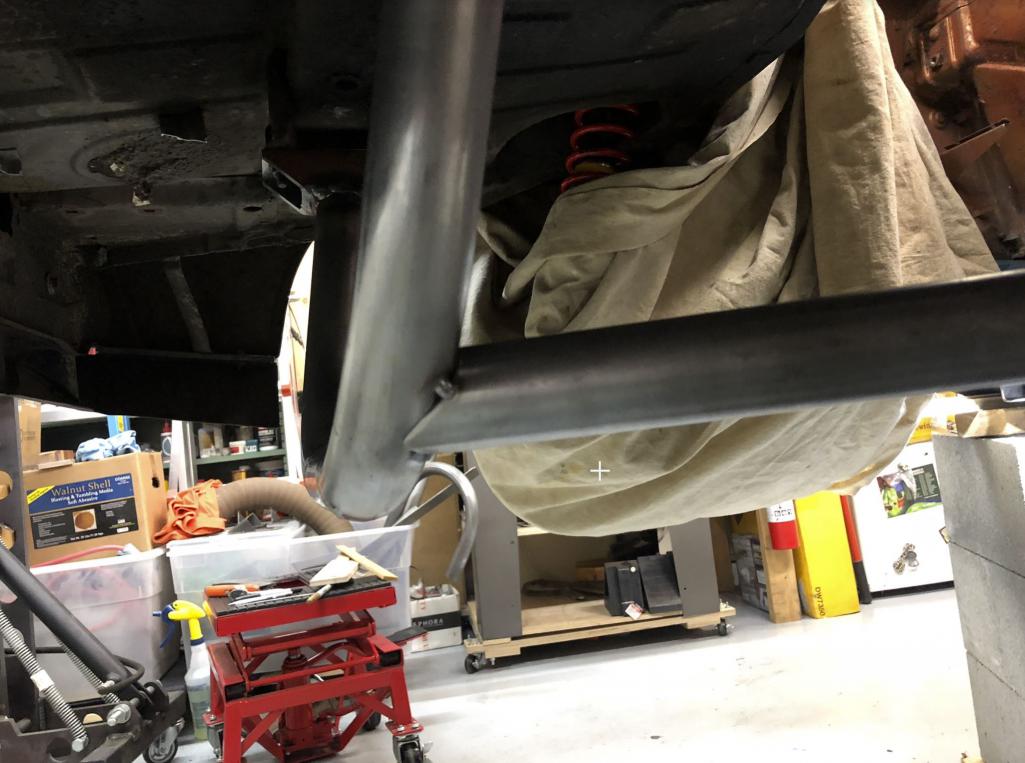 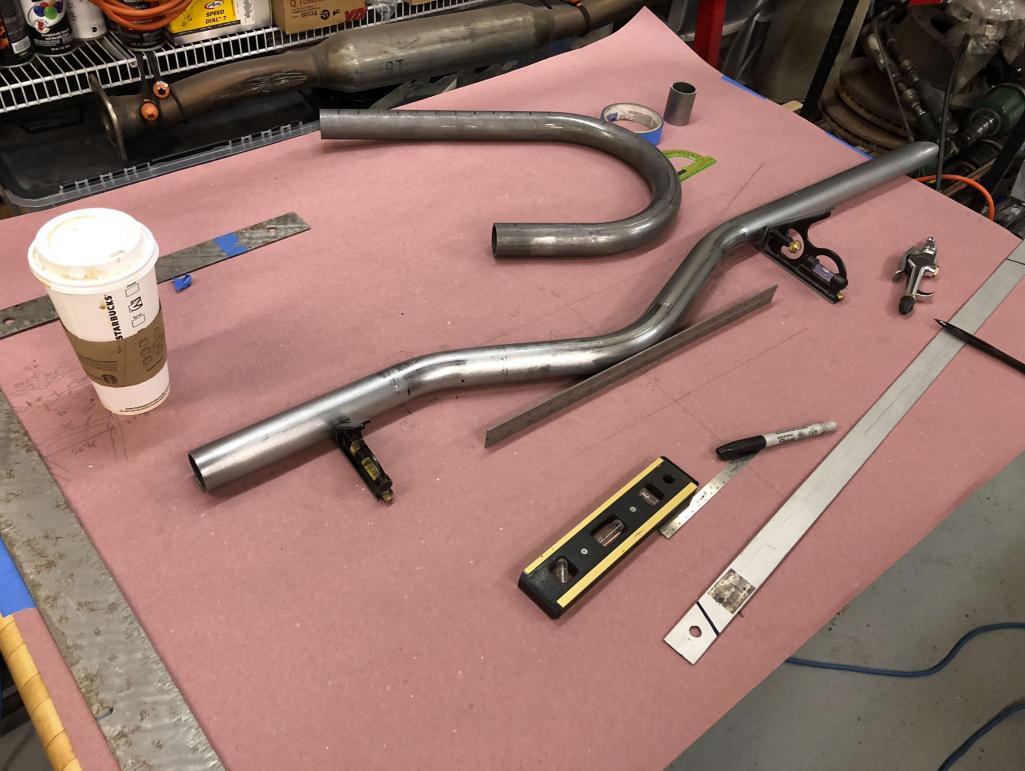 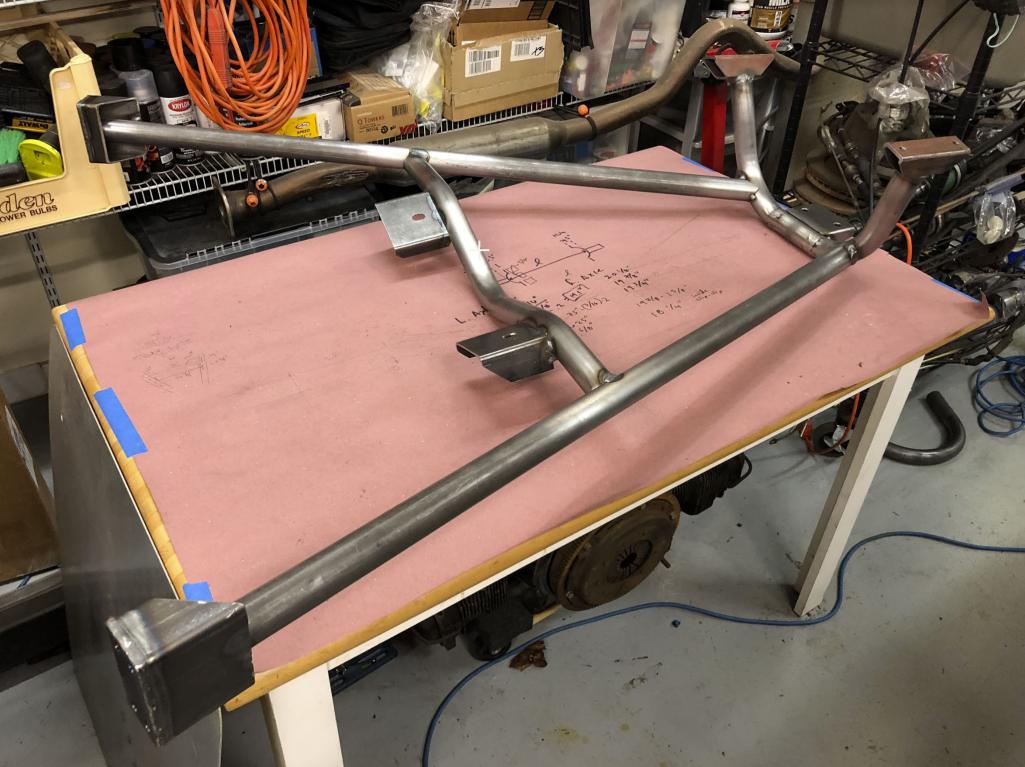 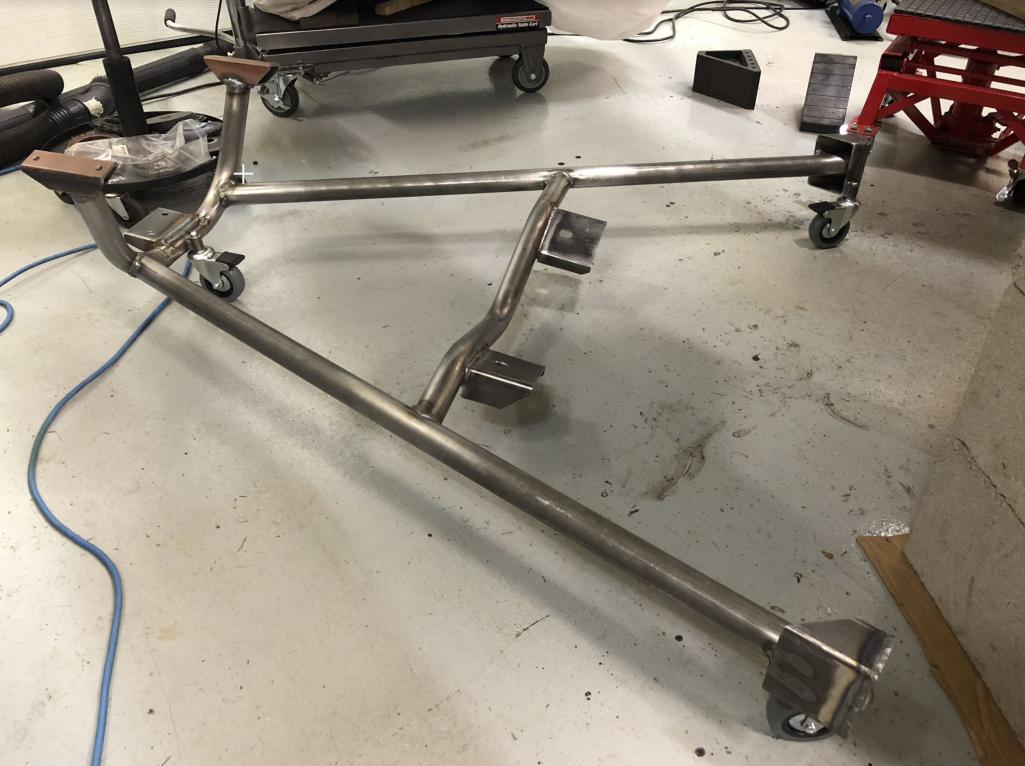 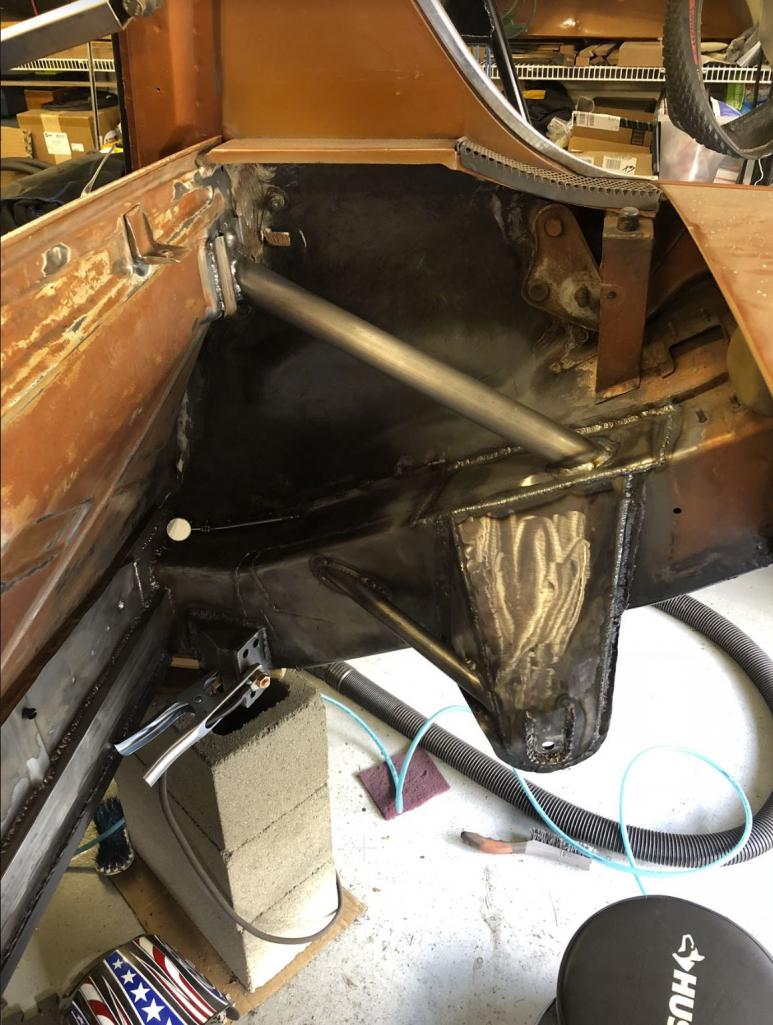 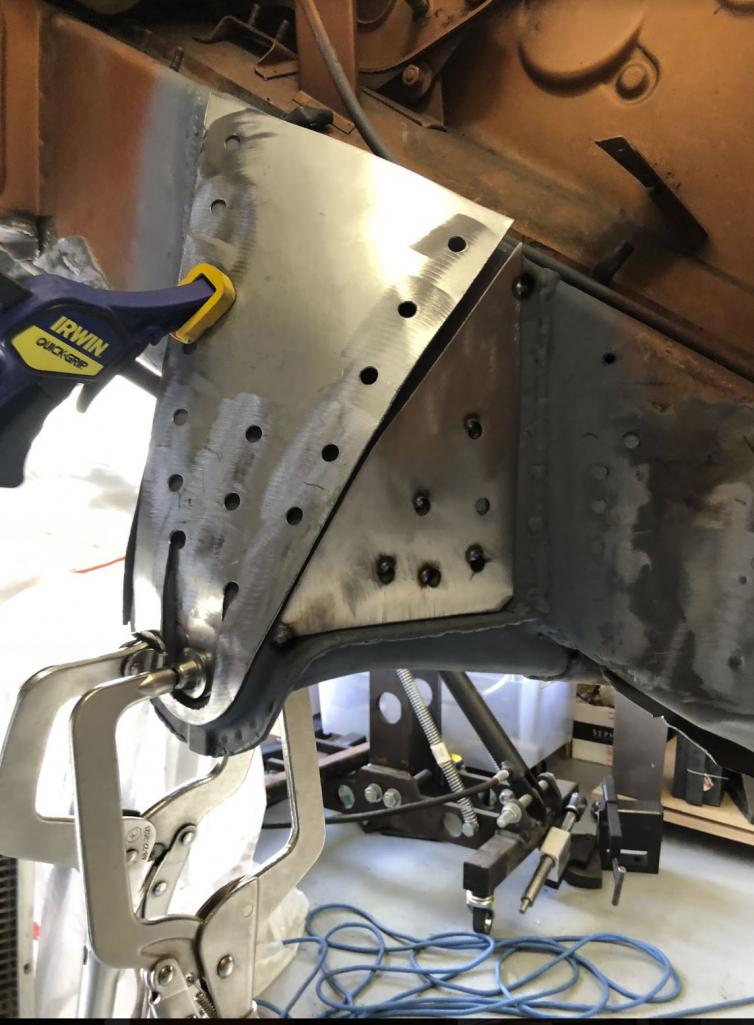 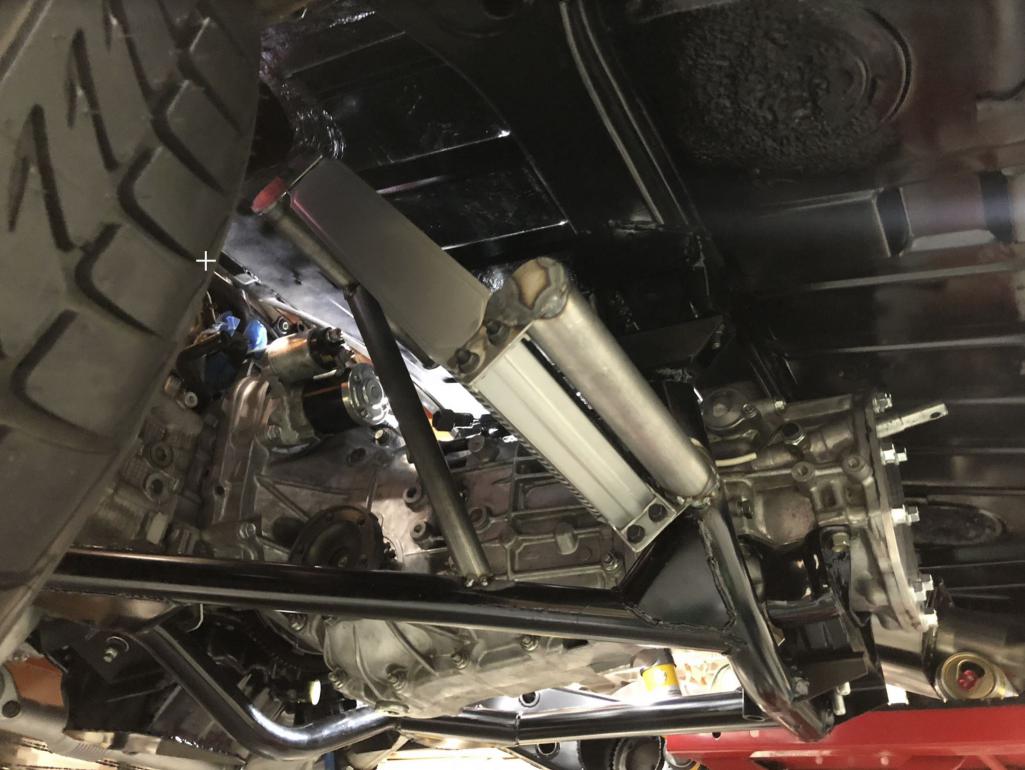 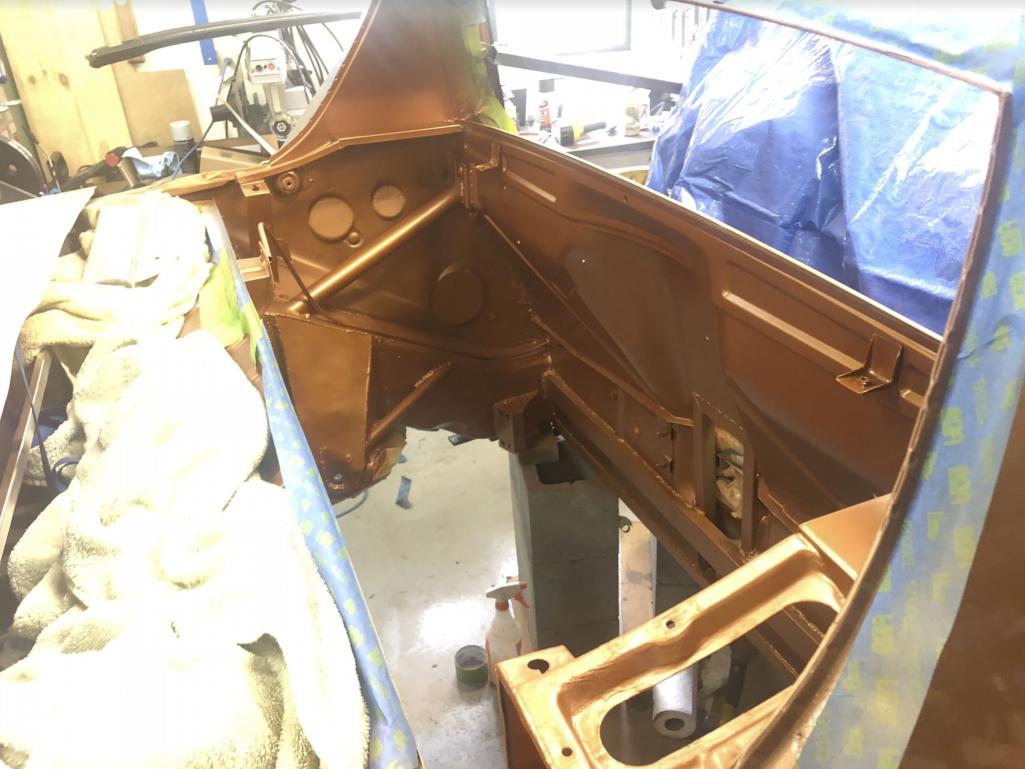 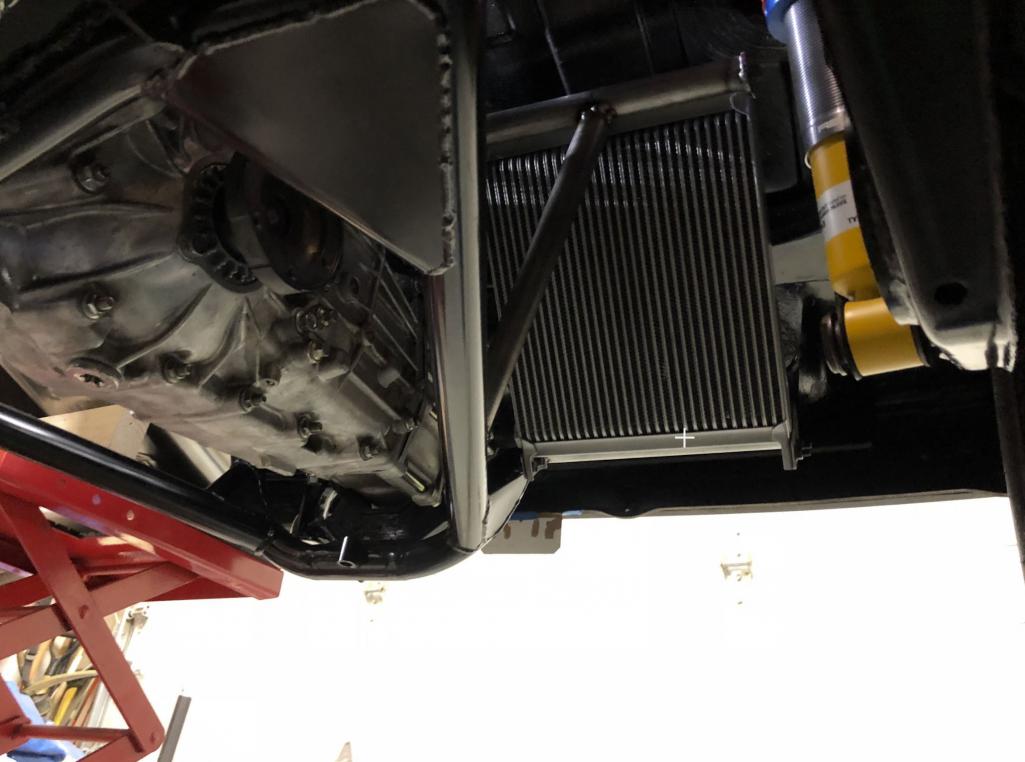 |
|
|
|
| waltonsm |
Jun 30 2020, 09:19 PM
Post
#15
|
|
Member Group: Members Posts: 93 Joined: 27-June 14 From: United States Member No.: 17,561 Region Association: Pacific Northwest |
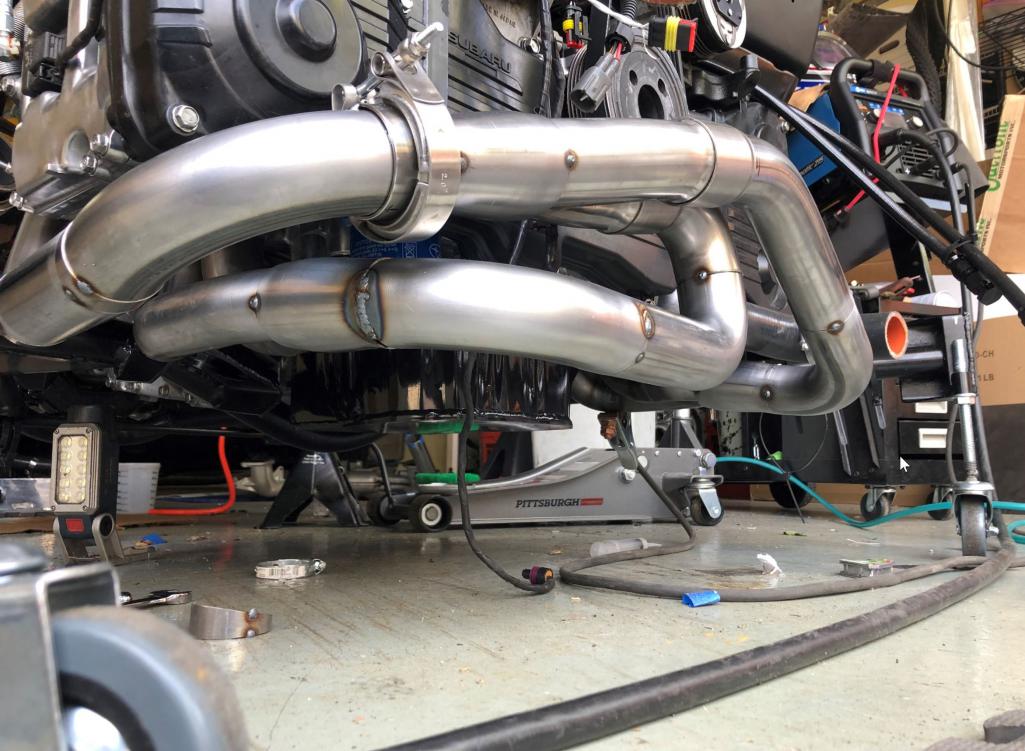
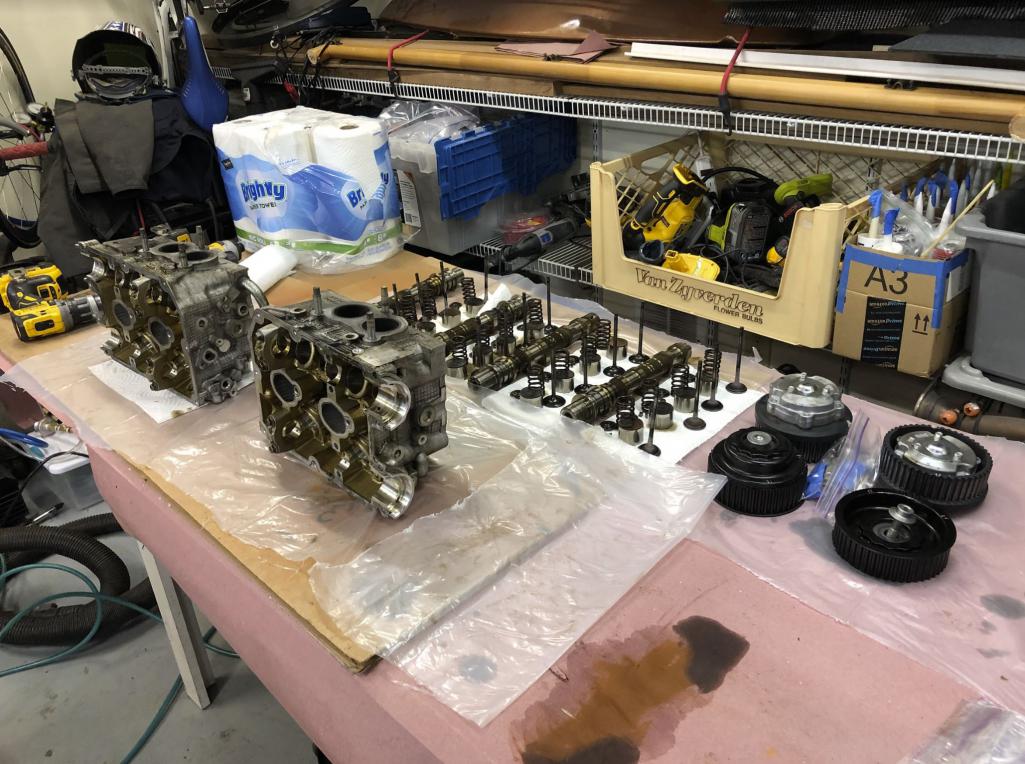
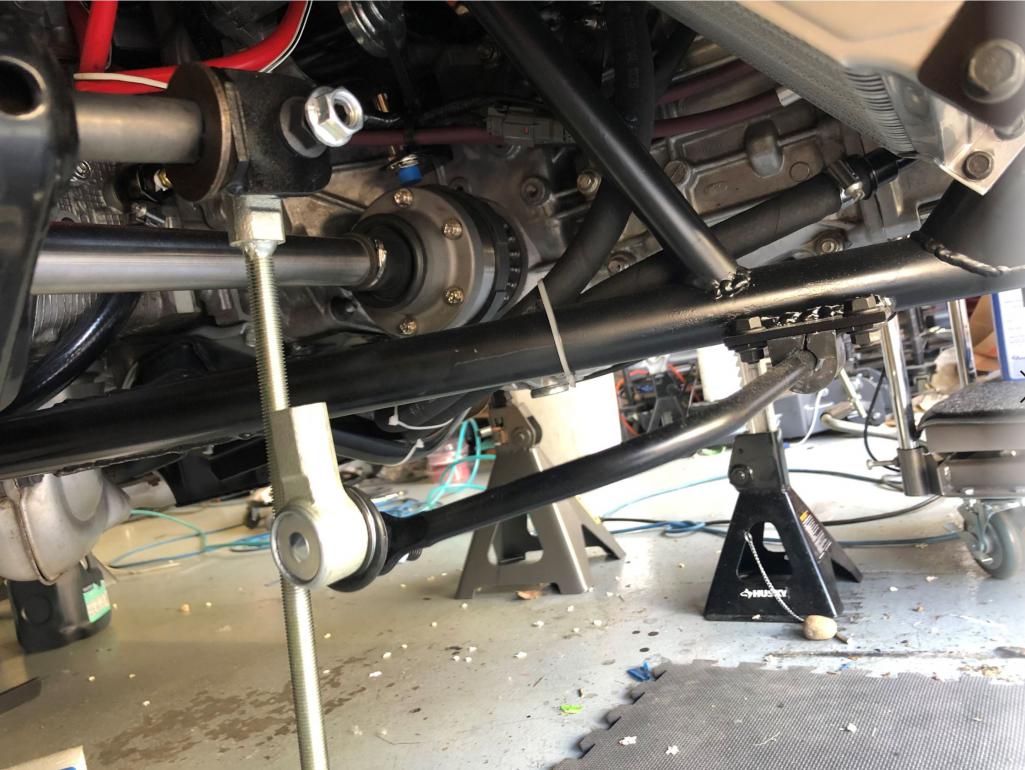
And some more subframe photos, including the mods I did during the engine rebuild, including building new ~equal length tri-y headers for more ground clearance, raising the forward motor mount a half inch, adding the axial mount, and installing new oil pan and baffles (root cause for motor build).
Most of this was planned work for when i rebuilt the motor. Just didn't plan to do it over the first 6 wks of covid. 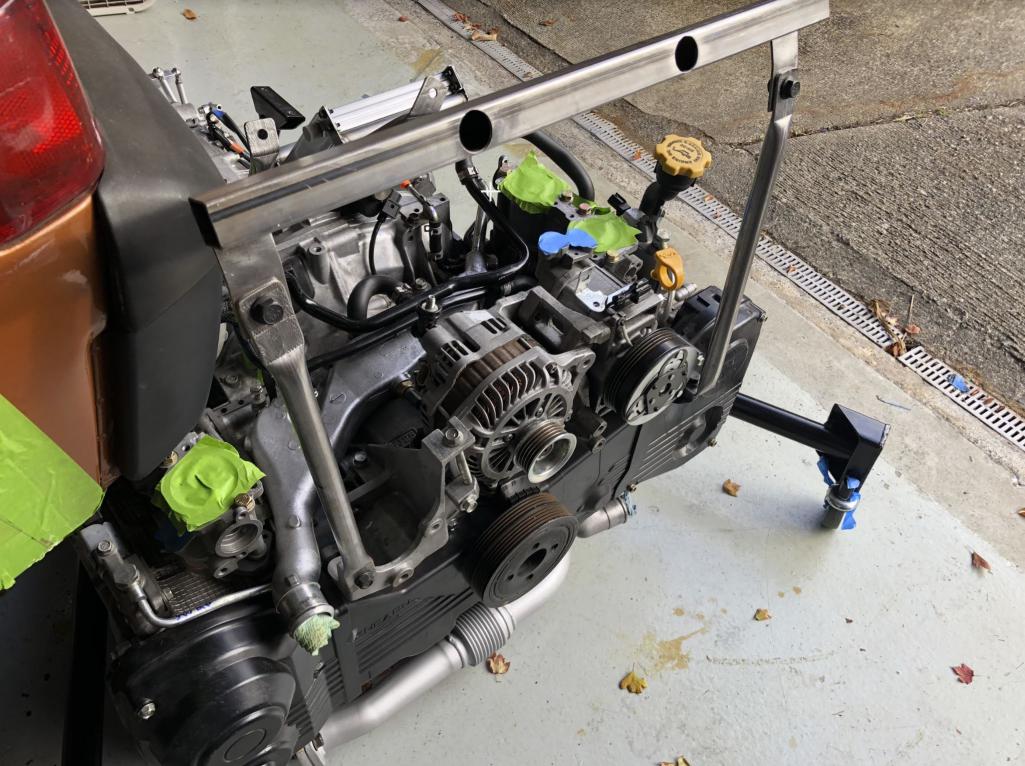 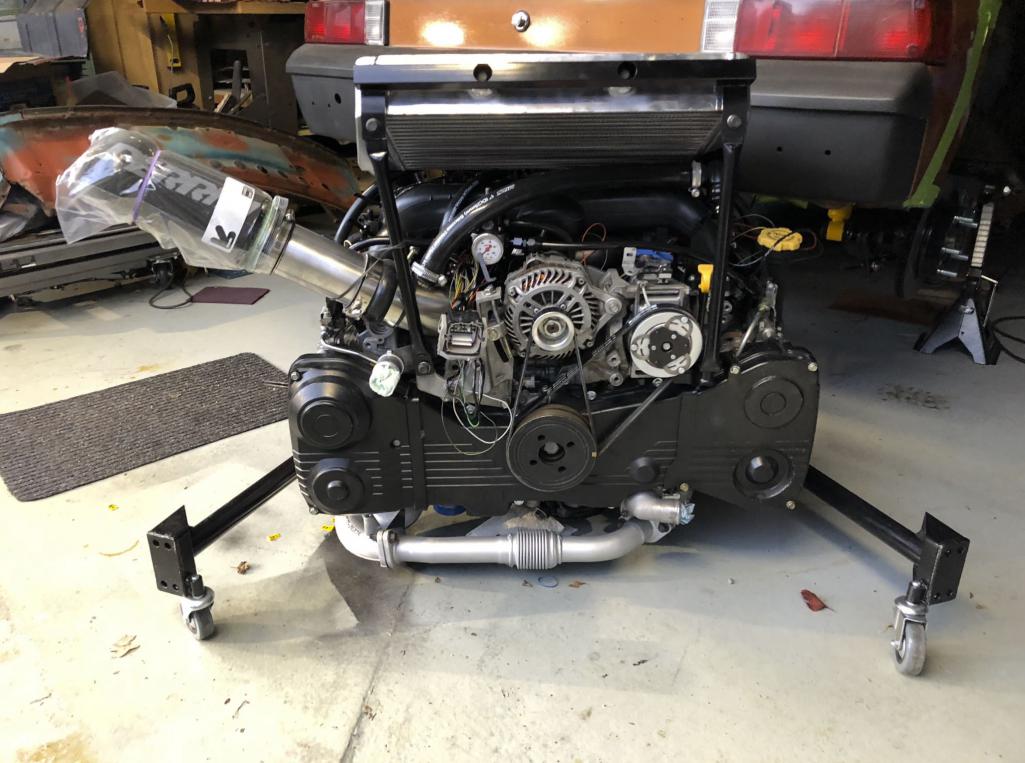 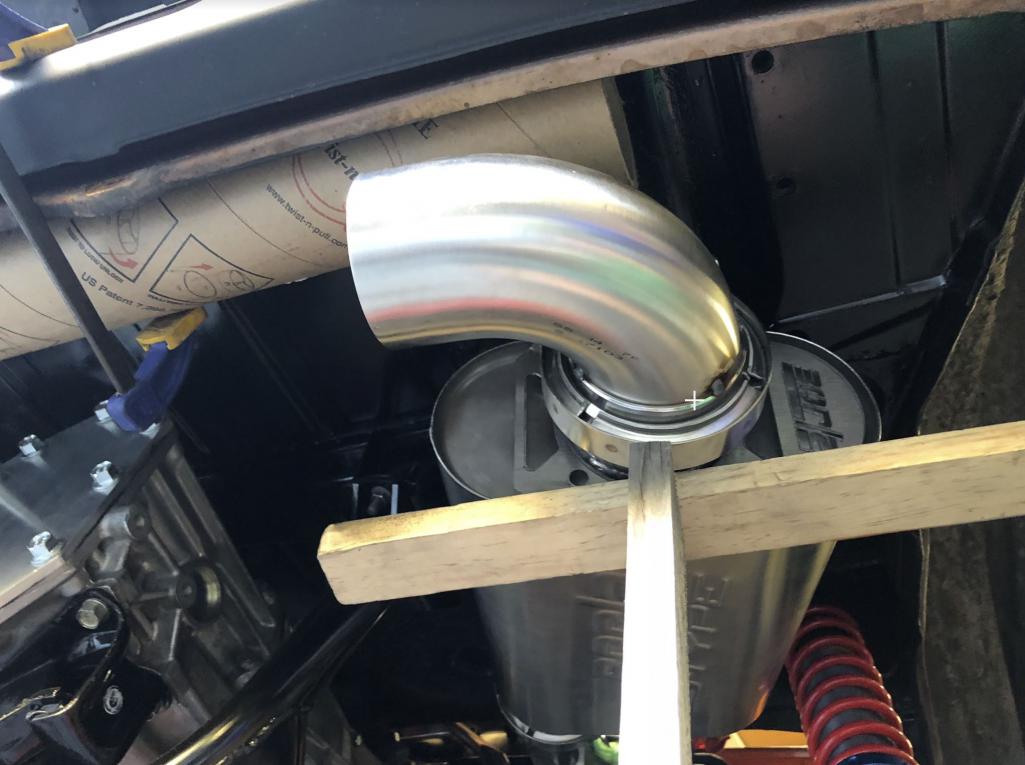 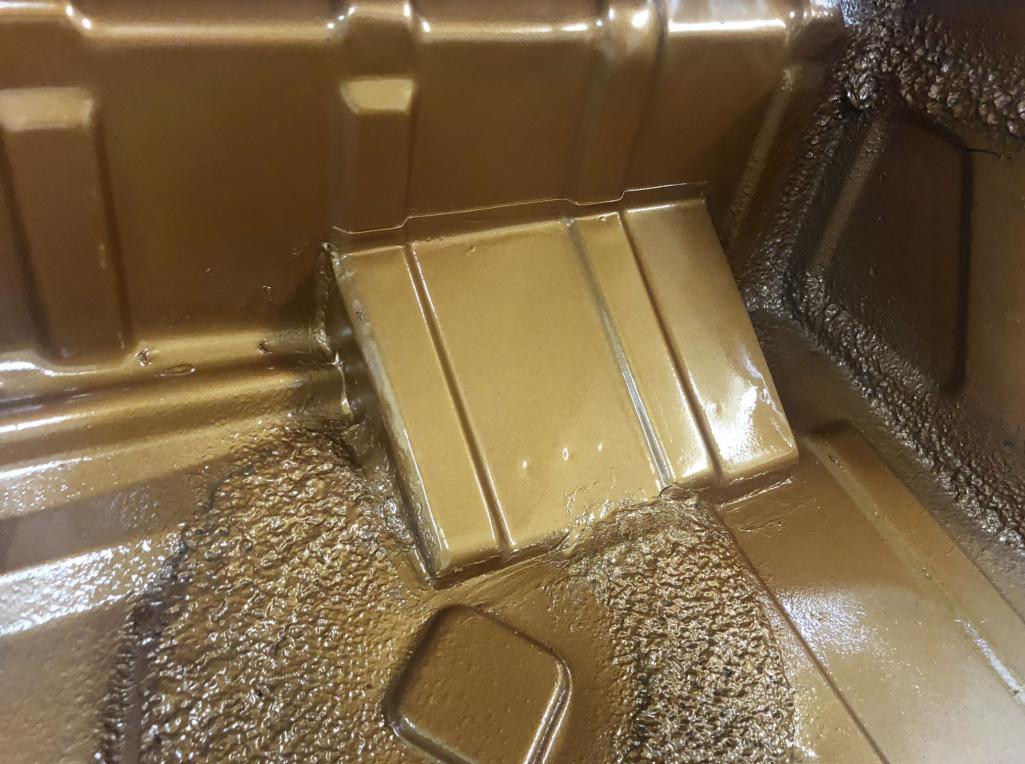  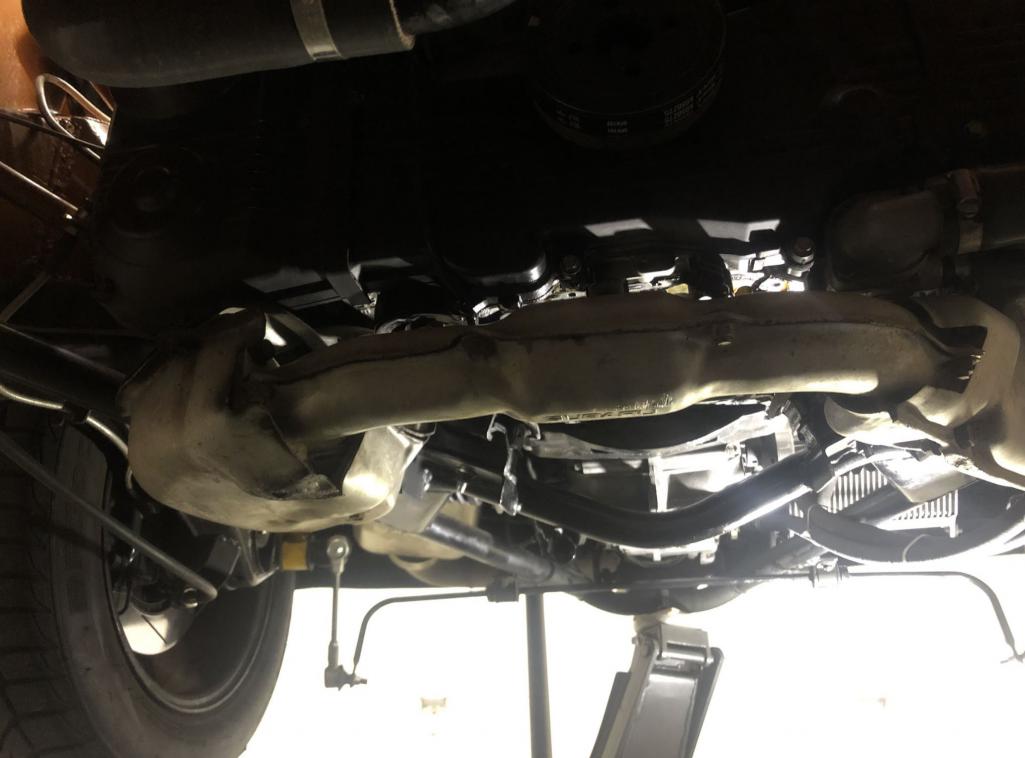 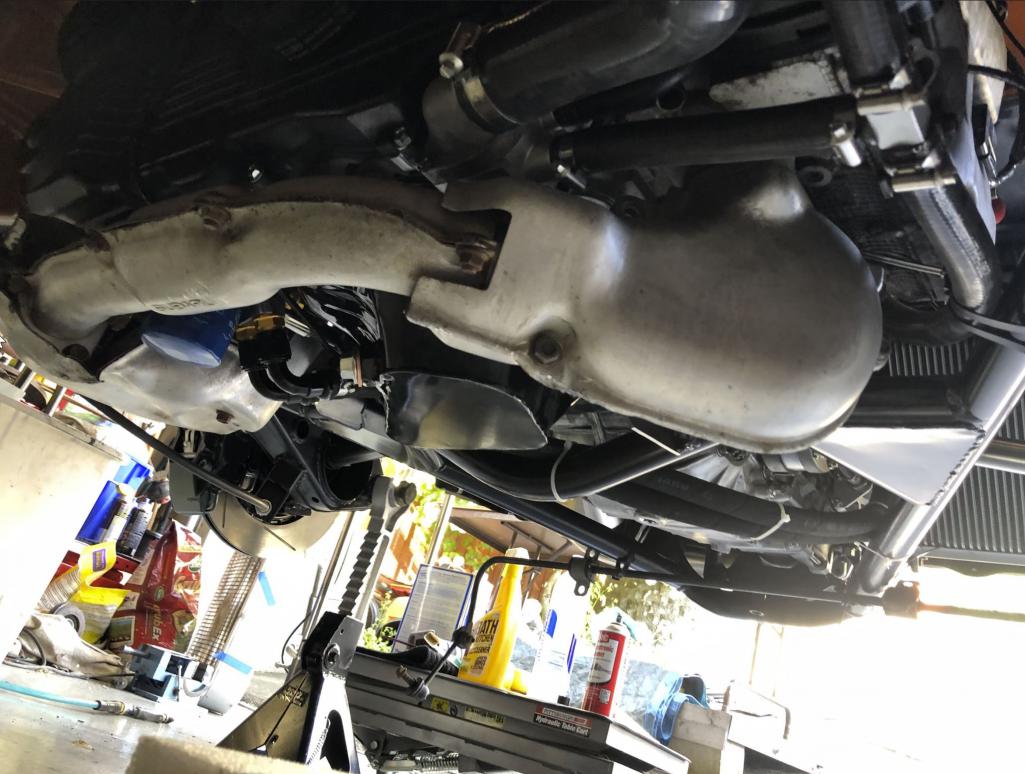 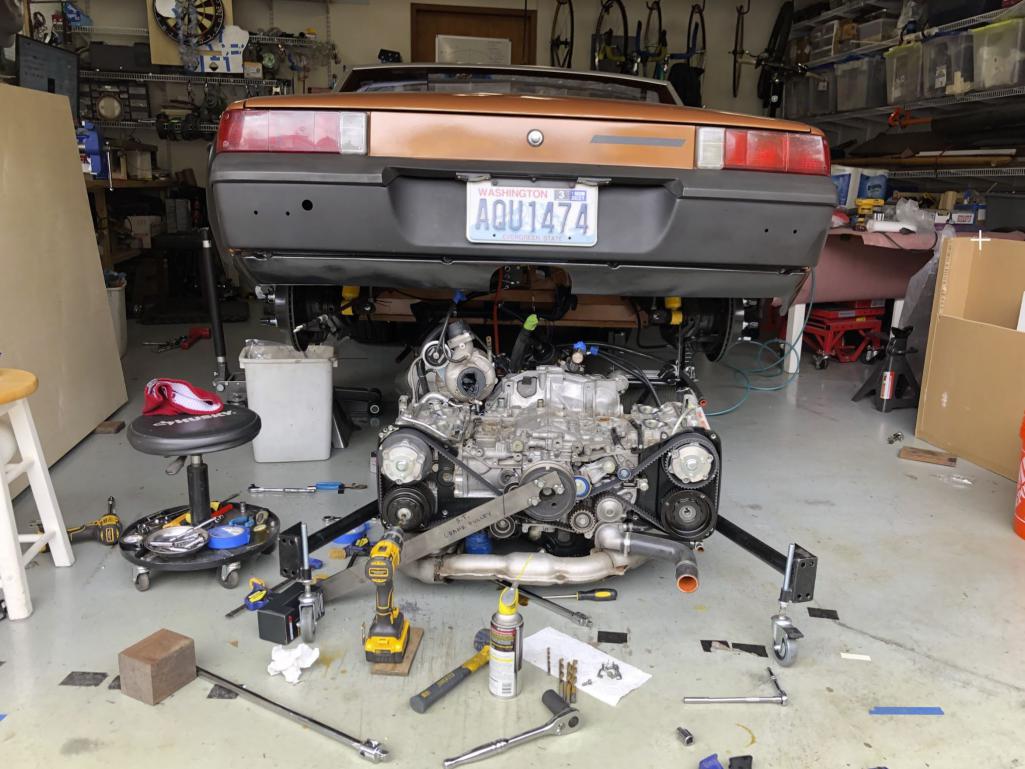  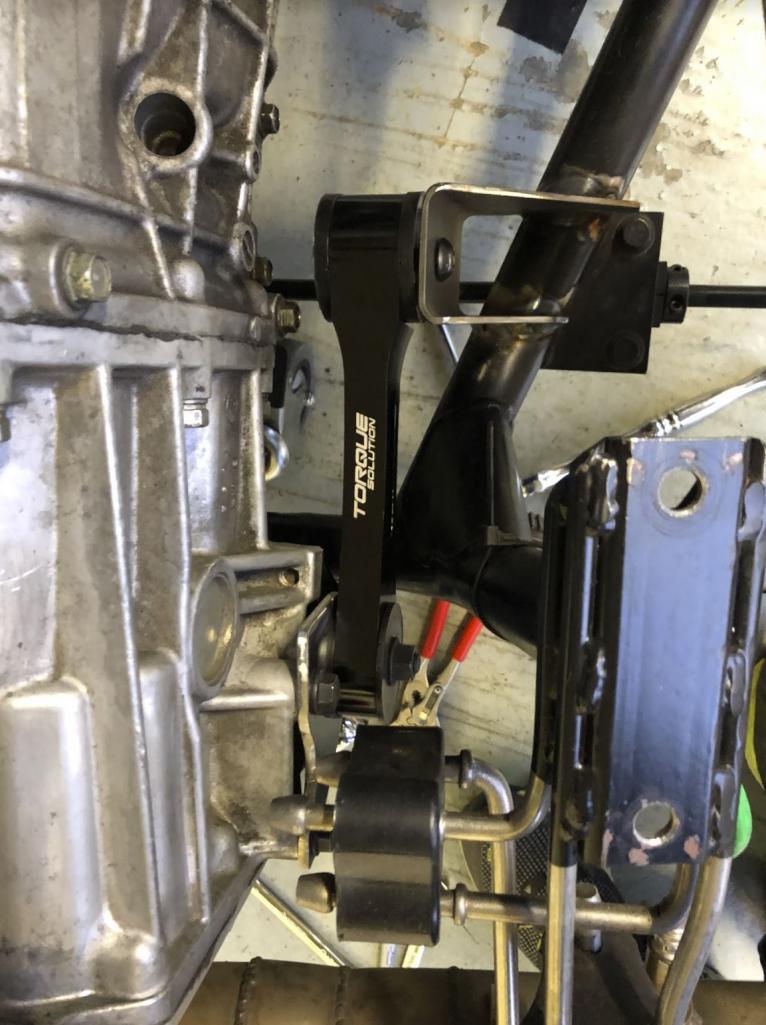 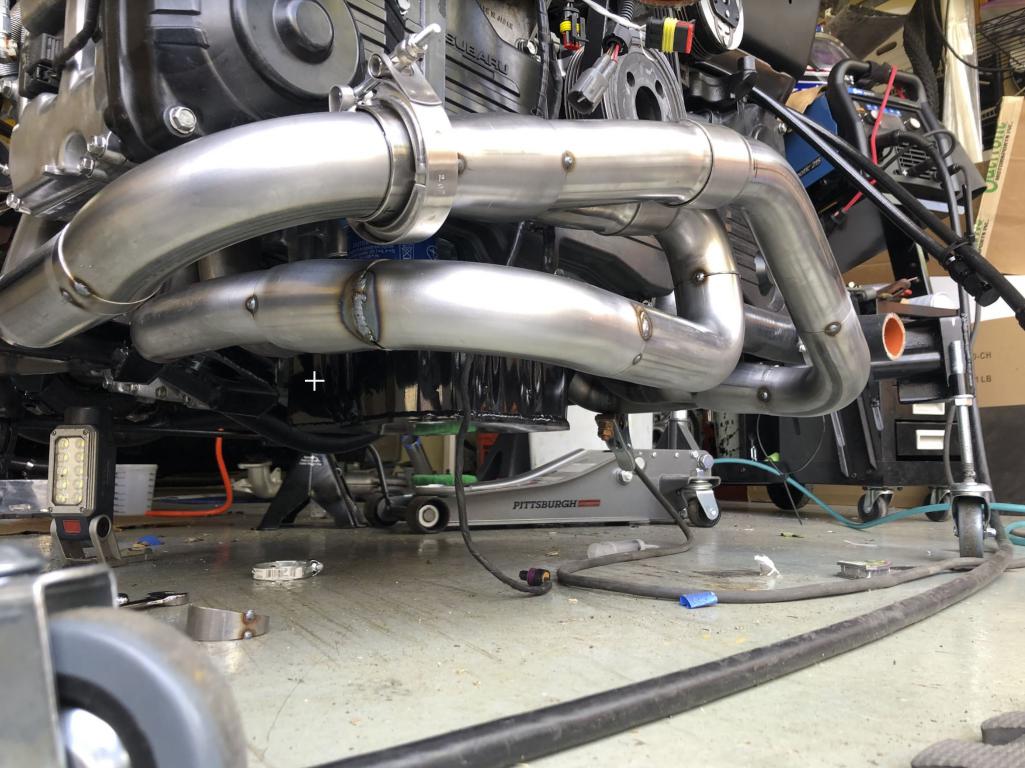 |
|
|
|
| Thunderchief |
Jul 1 2020, 12:57 AM
Post
#16
|
|
Member Group: Members Posts: 197 Joined: 12-August 19 From: Pasadena, CA. Member No.: 23,365 Region Association: Southern California |
What kind of heated seats are you running? Do they sit higher than stock?
|
|
|
|
| Dion |
Jul 1 2020, 05:05 AM
Post
#17
|
|
RN Group: Members Posts: 2,931 Joined: 16-September 04 From: Shepherdstown, WV Member No.: 2,766 Region Association: MidAtlantic Region |
Cool build. Looks pretty bad-ass. You’ve put some hard work into that.
Enjoy! |
|
|
|
| ClayPerrine |
Jul 1 2020, 06:27 AM
Post
#18
|
|
Life's been good to me so far..... Group: Admin Posts: 16,556 Joined: 11-September 03 From: Hurst, TX. Member No.: 1,143 Region Association: NineFourteenerVille |
This is an absolutely cool build. The workmanship is incredible. (IMG:style_emoticons/default/pray.gif)
Too bad you didn't get this license plate. 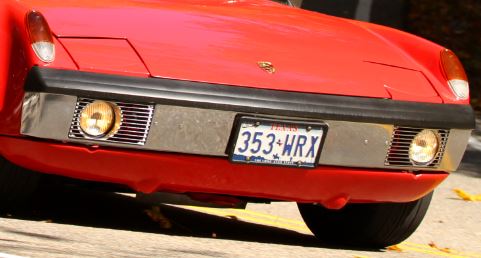 It would be even better if it was 914 WRX. In fact, if you want the old plate, I will send it to you. It has been replaced here, so it is just sitting in a pile of old license plates. Clay |
|
|
|
| Chris H. |
Jul 1 2020, 09:05 AM
Post
#19
|
|
Senior Member Group: Members Posts: 4,090 Joined: 2-January 03 From: Chicago 'burbs Member No.: 73 Region Association: Upper MidWest |
Wow REALLY cool build! Thanks for sharing it. Some great new ideas in there. Among many other things, I really like how you did the center tunnel. Might have to borrow that one.
Question...so your ONLY radiator air exit vents are in the former headlight buckets? Curious to hear how that works since no one has done it before. Any cooling issues at all so far? |
|
|
|
| DRPHIL914 |
Jul 1 2020, 09:31 AM
Post
#20
|
|
Dr. Phil Group: Members Posts: 5,950 Joined: 9-December 09 From: Kennesaw, GA Member No.: 11,106 Region Association: South East States |
QUOTE(Thunderchief @ Jun 13 2020, 02:18 AM) Super cool! Very clean and professional looking. Good job. first comment is : WOW!! nice job! of course I am partial to the color being a L99k owner myself. its not easy to get seats like that in a 914 those look super comfortable!, only thing I would pick at , not my taste is the fenders, but that's just because there is nothing else to pick on.. but really maybe some factory GT fenders at some point to really clean it up but, this may be my favorite suby build yet. Partly the color, but mostly because you really did everything yourself and at such a high level too, I cant imagine how much fun it is to drive a 350hp 914!!! well done sir! Phil |
|
|
|
|
1 User(s) are reading this topic (1 Guests and 0 Anonymous Users)
0 Members:

|
Lo-Fi Version | Time is now: 3rd July 2026 - 09:15 PM |
Invision Power Board
v9.1.4 © 2026 IPS, Inc.