|
|
|
Porsche, and the Porsche crest are registered trademarks of Dr. Ing. h.c. F. Porsche AG.
This site is not affiliated with Porsche in any way. Its only purpose is to provide an online forum for car enthusiasts. All other trademarks are property of their respective owners. |
|
|

  |

| waltonsm |
 Mar 26 2022, 01:44 AM Mar 26 2022, 01:44 AM
Post
#41
|
|
Member  Group: Members Posts: 93 Joined: 27-June 14 From: United States Member No.: 17,561 Region Association: Pacific Northwest |
After the transmission was well under way, I worked on the offroad package when I had spare cycles. I had inspiration from other 911 safari cars, like the keen project, and artwork form glen, but I have my own requirements of being able to go back and forth between road and offroad. Ideally in a day (a long day because corner balancing and alignment is needed too).
I started with a bunch of measurement, and started working on my target ride height, and planned suspension mods to ensure I can align it with basically oem adjustment methods in both configurations. It is threading the needle, and I don't think I quite made it yet, but I think I can get there with another minor change. I also might make some other changes to get simpler, easier adjustment too. This was near the very beginning of this project, as parts had started showing up. Apparently I got bored during COVID. 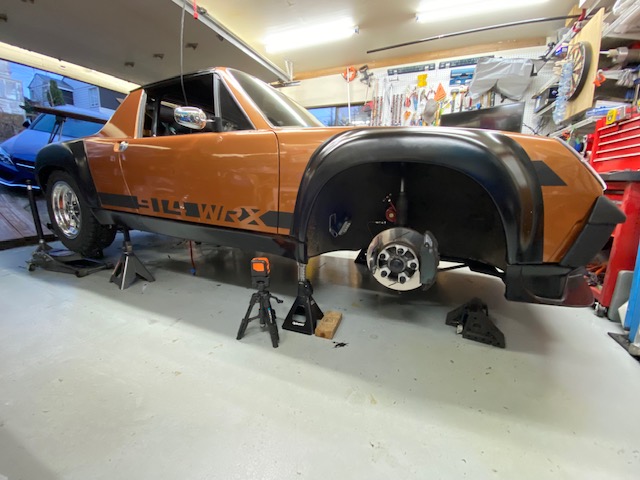 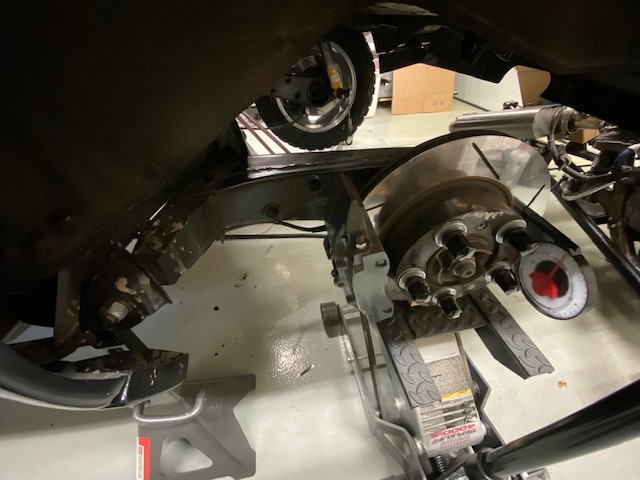 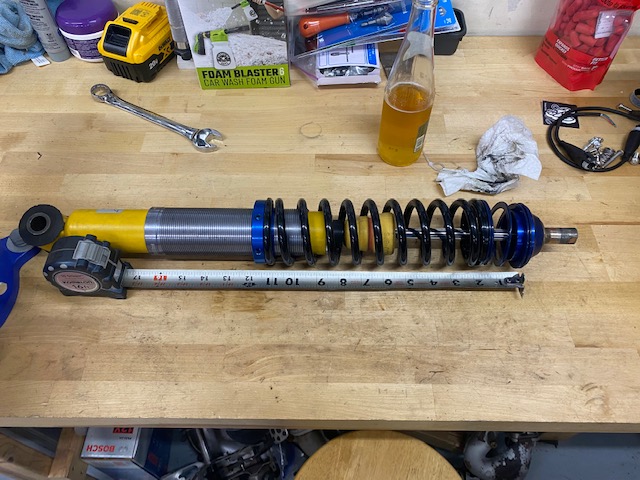 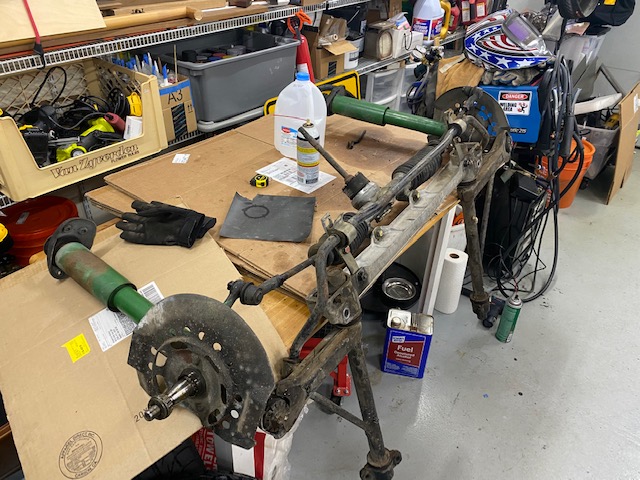 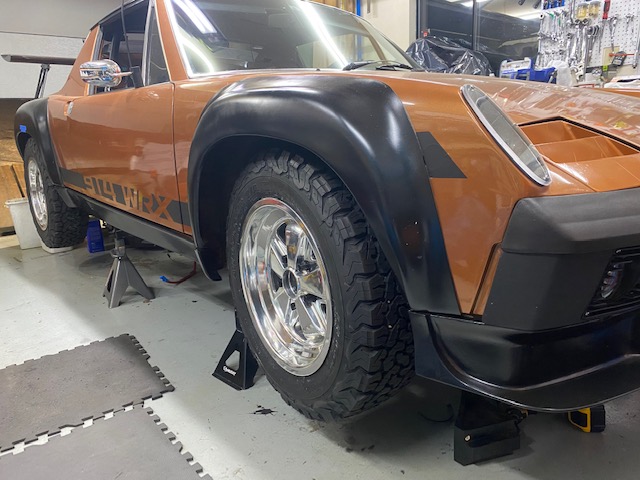 These photos for initial measurement/clearances/planning are shown at full droop for the road configuration, but with the offroad wheels and tires. A lot (of very minor stuff) changed to get the alignment correct and much more droop travel over the course of a few months. |
   |

 
|
| waltonsm |
Mar 26 2022, 05:14 PM
Post
#42
|
|
Member Group: Members Posts: 93 Joined: 27-June 14 From: United States Member No.: 17,561 Region Association: Pacific Northwest |
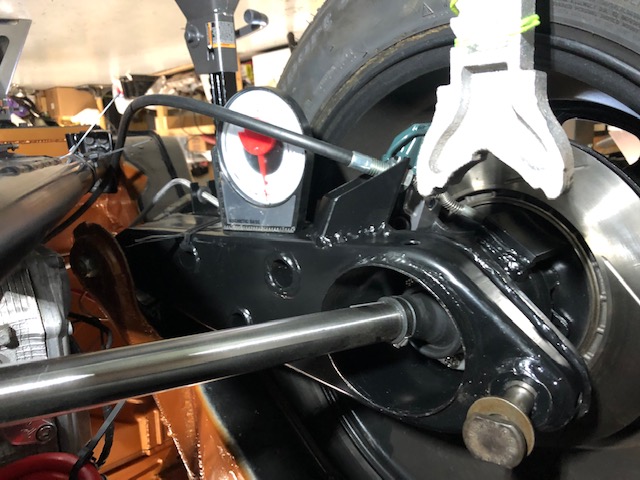
I decided to make a jig for adding 1.75 deg of camber to the rear swingarms. I had all the parts laying around to do it, and since I don't really plan on doing this many times, I figured I could take a lot of measurements along the way. Good tooling always makes the difference, it ended up being a low stress operation AFTER I made the cut.
I measured the swingarms, knew the car aligned well in the prior configuration, and that I had a reasonable amount of adjustment. So then decided to make the fixture around the existing arms. I calculated the rotation of the pivot end, and then welded the bearing end to the fixture after clamping up the hub. I made the cut, adjusted the pivot end up and down to effectively only add twist. Setting up the cut plane parallel to the pivot and normal to the wheel axis was the most tedious part, but was straightforward with the levels and laser level. I then trimmed the plate to be welded in flush to the arms, tacked. then relieved it down below the surface of the swingarm to improve the chances of a nice full penetration weld all around. The fixture is mirrored, so the top is one side of the car, and the bottom is the other side. If anyone in the Seattle area wants to borrow it, let me know. I don't think I will need very often :). 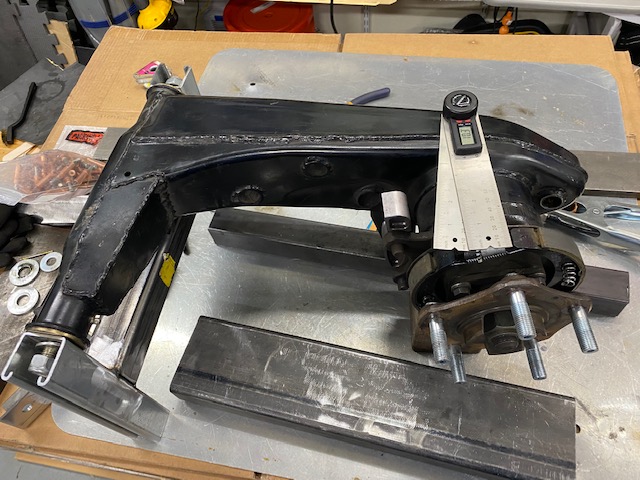 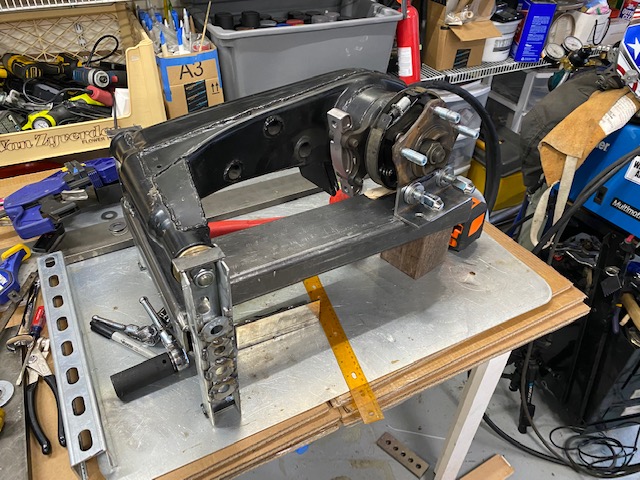 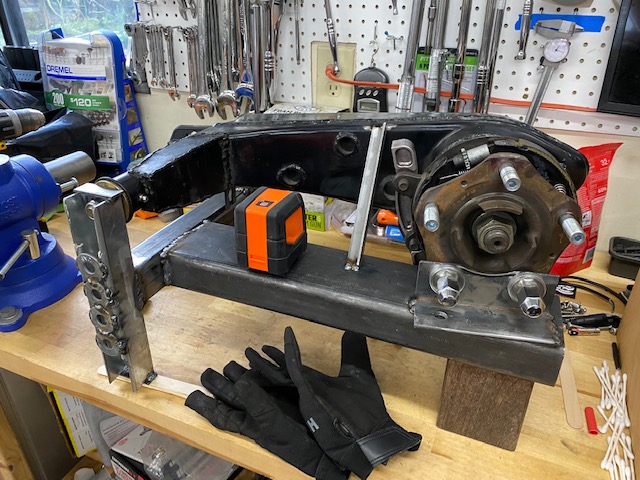 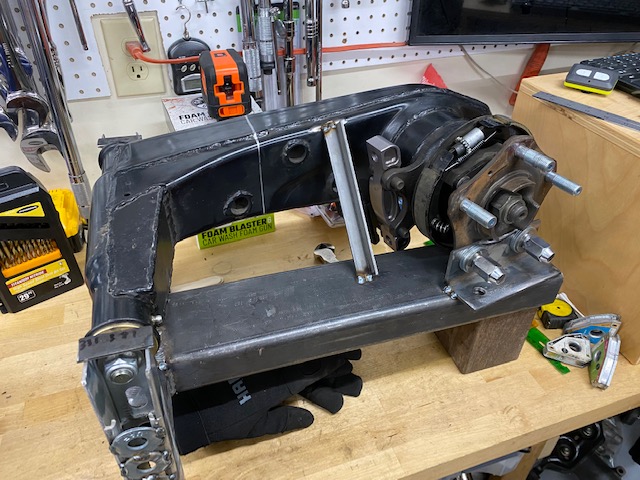 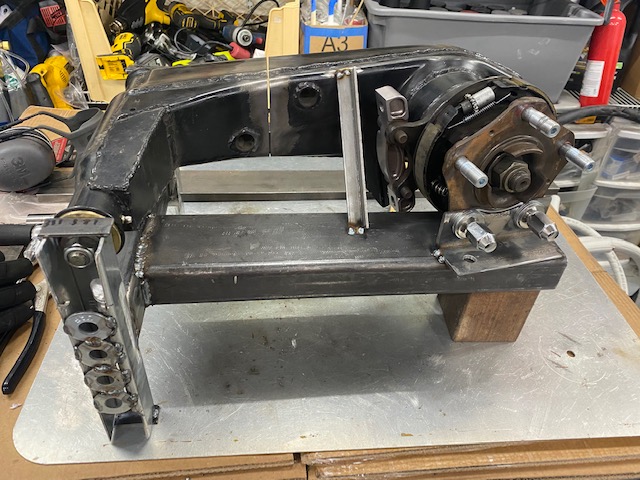 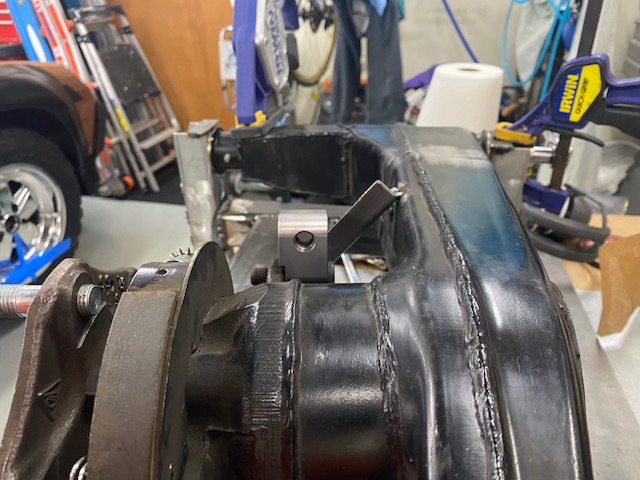 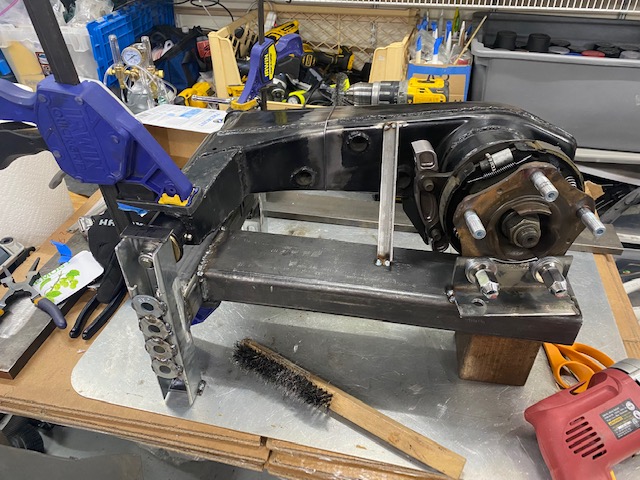 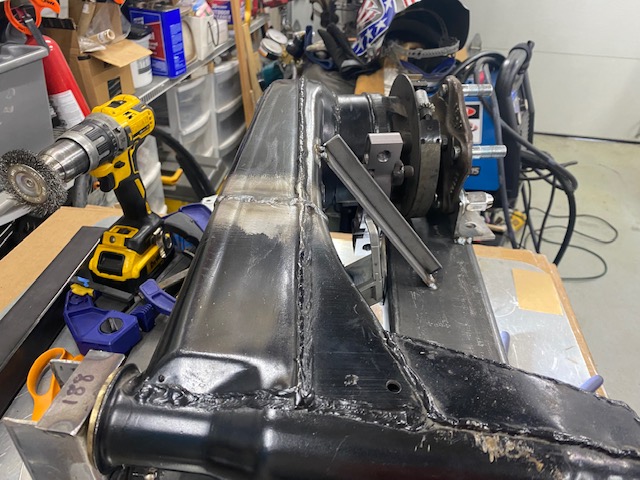 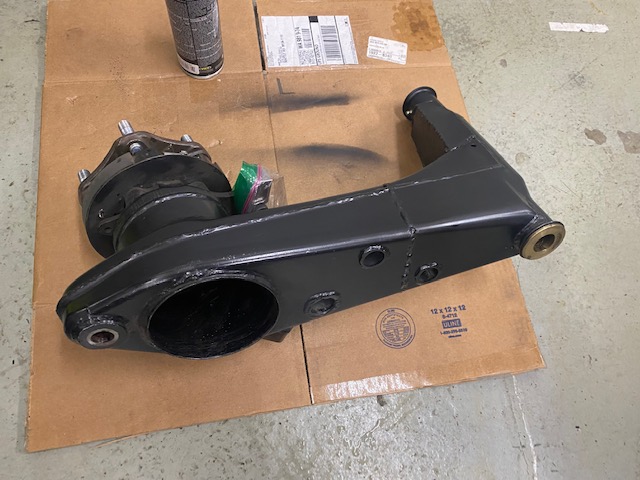 |
|
|
|
| waltonsm |
Mar 26 2022, 06:07 PM
Post
#43
|
|
Member Group: Members Posts: 93 Joined: 27-June 14 From: United States Member No.: 17,561 Region Association: Pacific Northwest |
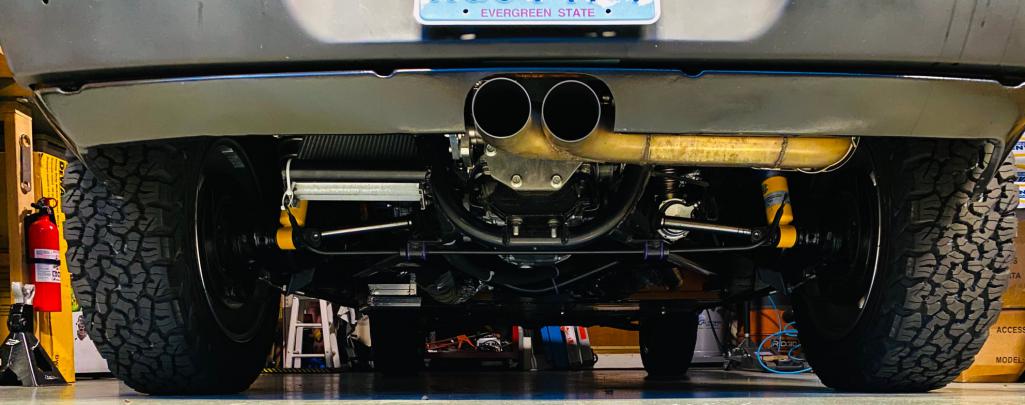
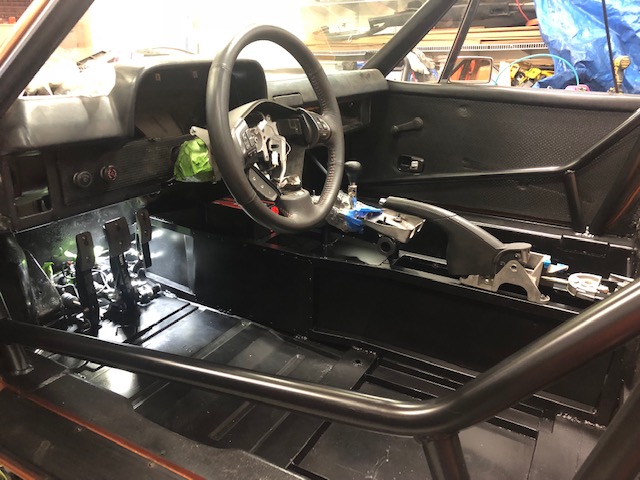
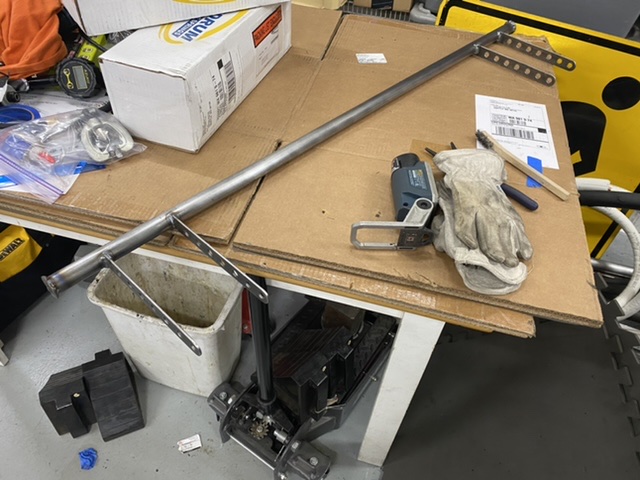
I also needed to raise the shock mounting points a bit, and also decided to soften my spring rates up slightly. I lowered the rear rates to 125 lbf/in from 140, and also went back to stock front torsion bars. I set the front sway bar to full soft for now, disconnected the rear miata sway bar, and added perches for limit straps to connect to the sway bar tabs if I choose to.
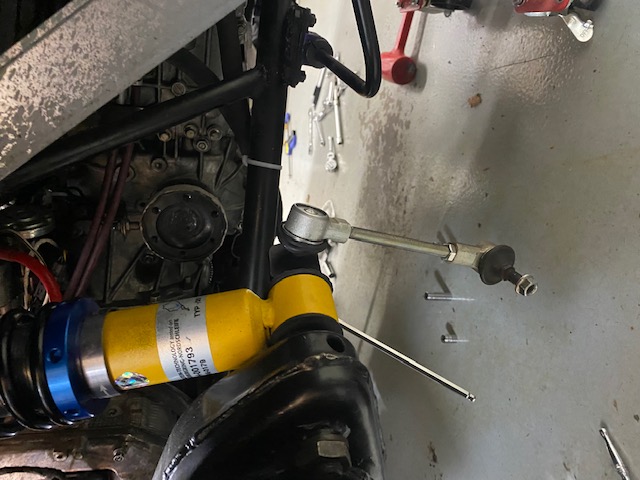  I bought some bar and turned a new upper shock bushing mount that ended up raising the shock to get 3" of droop travel (it is shown as 4" in the pic, but I took another inch off of it.  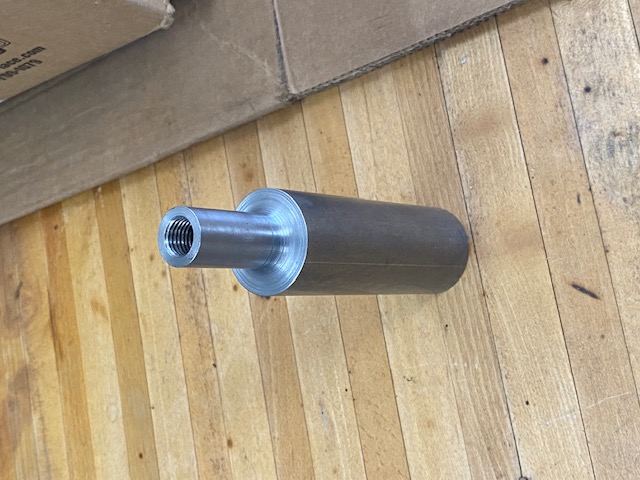 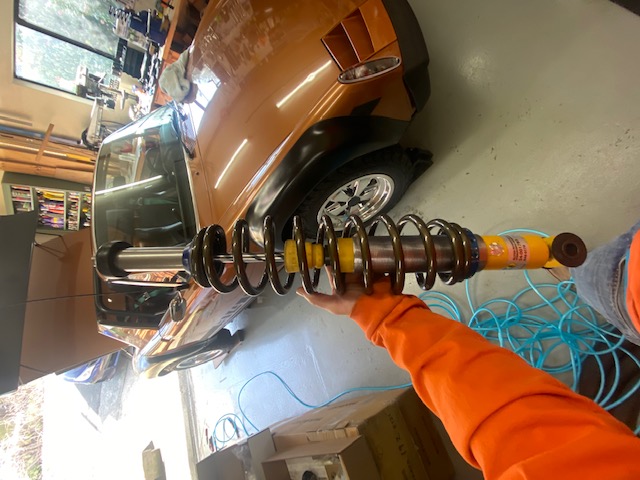 Along the way I came up with a kinda safe spring compressor configuration, he shock is zip tied to the jack, and I always keep the shock top threads fairly snug as I compress it. 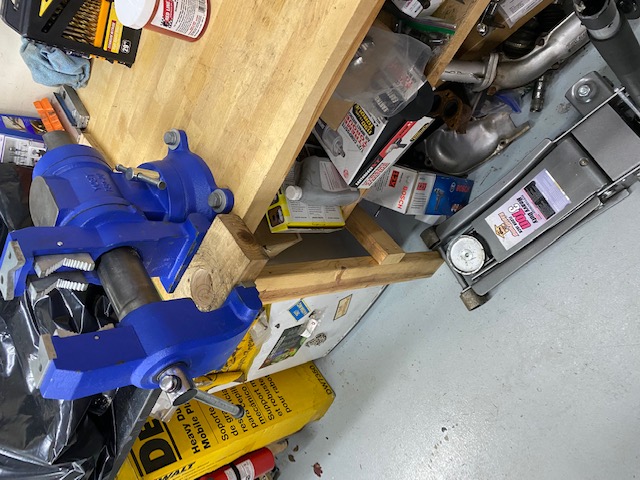  Attached image(s) 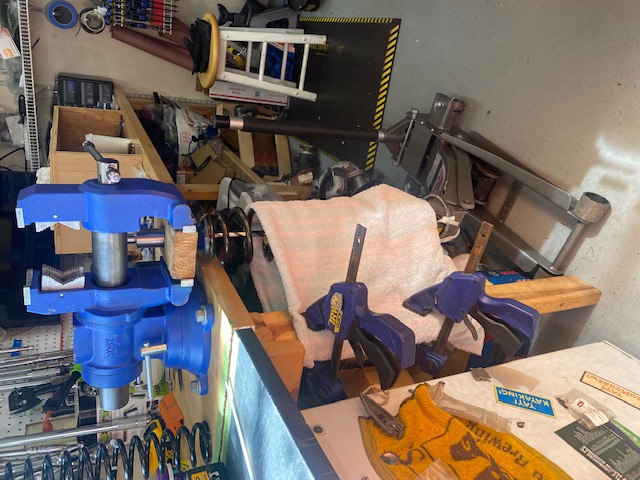
|
|
|
|
| waltonsm |
Mar 26 2022, 06:17 PM
Post
#44
|
|
Member Group: Members Posts: 93 Joined: 27-June 14 From: United States Member No.: 17,561 Region Association: Pacific Northwest |
I also ended up lowering the front spindles on the 930 front end I ended up with. I used the pretty well documented procedures of milling out the big rosette weld, pressing down the tube, and rewelding. I then fabbed up gussets and added another plate to put the new adjustable rod ends in double shear and added some paint. I replaced the upper strut seals with the bilstein part from the big box online stores and reassembled with my valves inserts.
The last pic is before adjusting for ride height, bump steer, and toe.  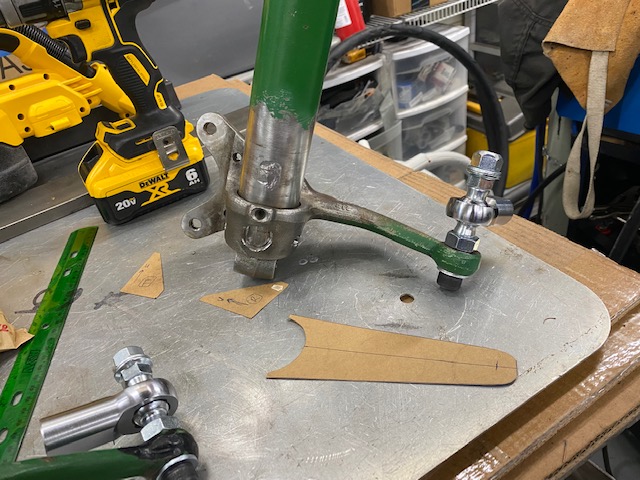 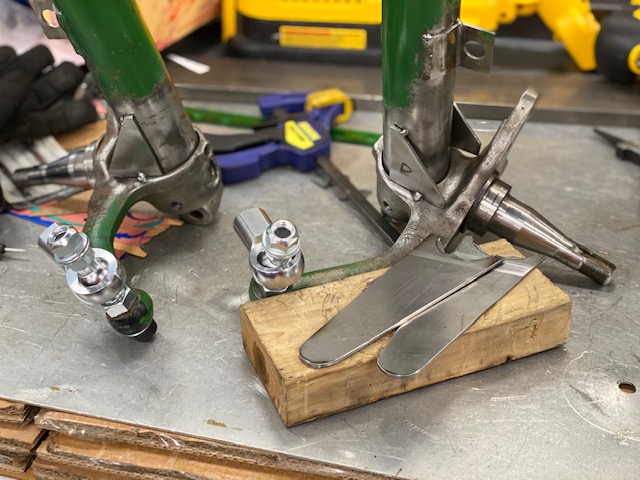 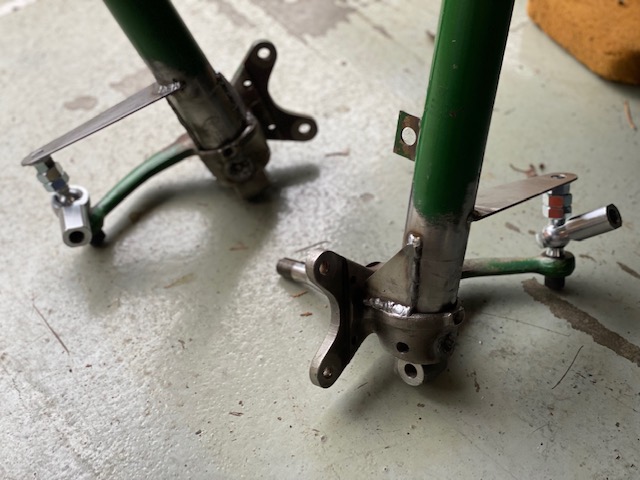 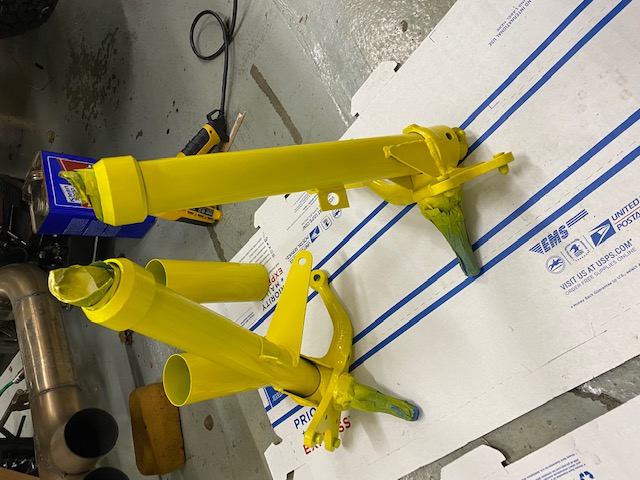 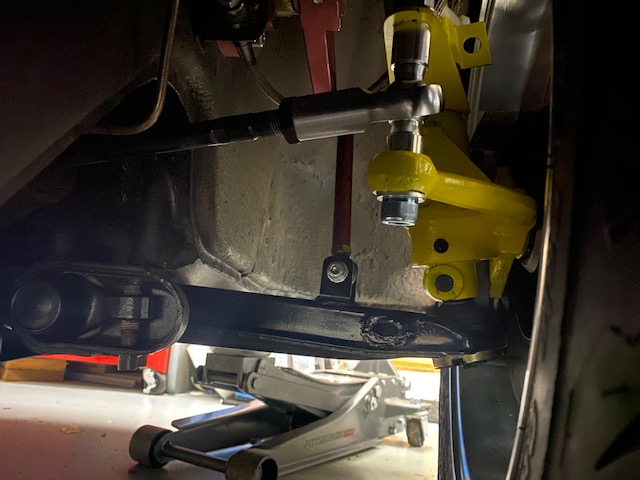 |
|
|
|
| tygaboy |
Mar 26 2022, 06:21 PM
Post
#45
|
|
914 Guru Group: Members Posts: 5,836 Joined: 6-October 15 From: Petaluma, CA Member No.: 19,241 Region Association: Northern California |
Absolutely love it. FABricationULOUS! (IMG:style_emoticons/default/wub.gif) (IMG:style_emoticons/default/pray.gif) (IMG:style_emoticons/default/smilie_pokal.gif)
|
|
|
|
| waltonsm |
Mar 26 2022, 06:23 PM
Post
#46
|
|
Member Group: Members Posts: 93 Joined: 27-June 14 From: United States Member No.: 17,561 Region Association: Pacific Northwest |
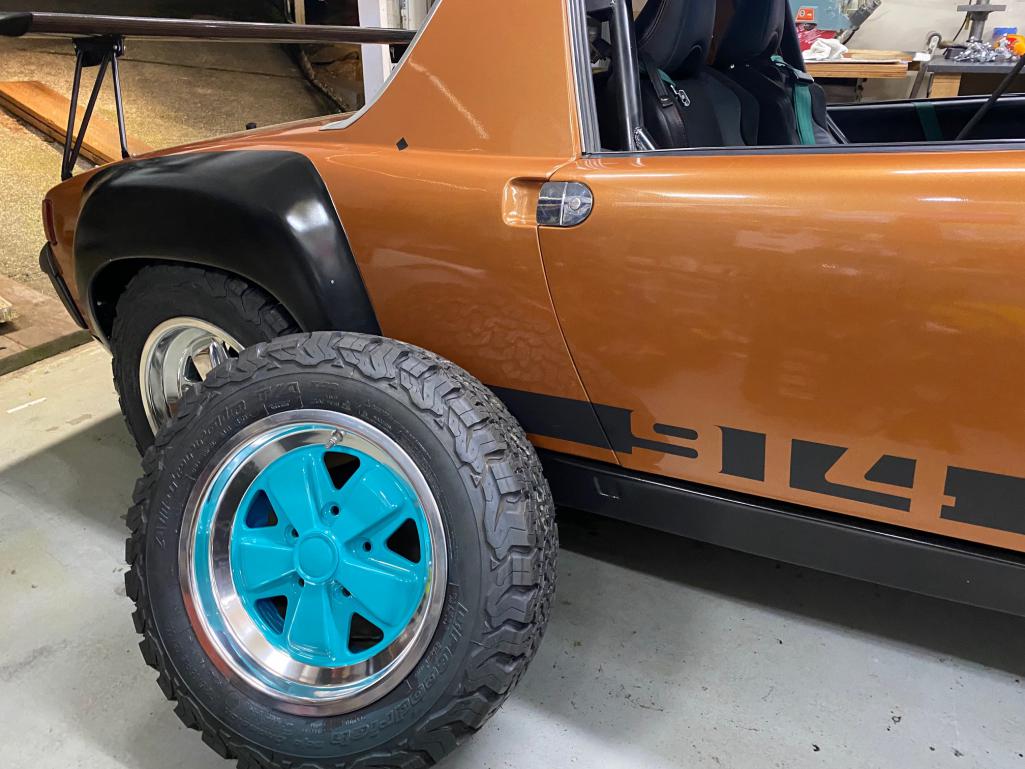
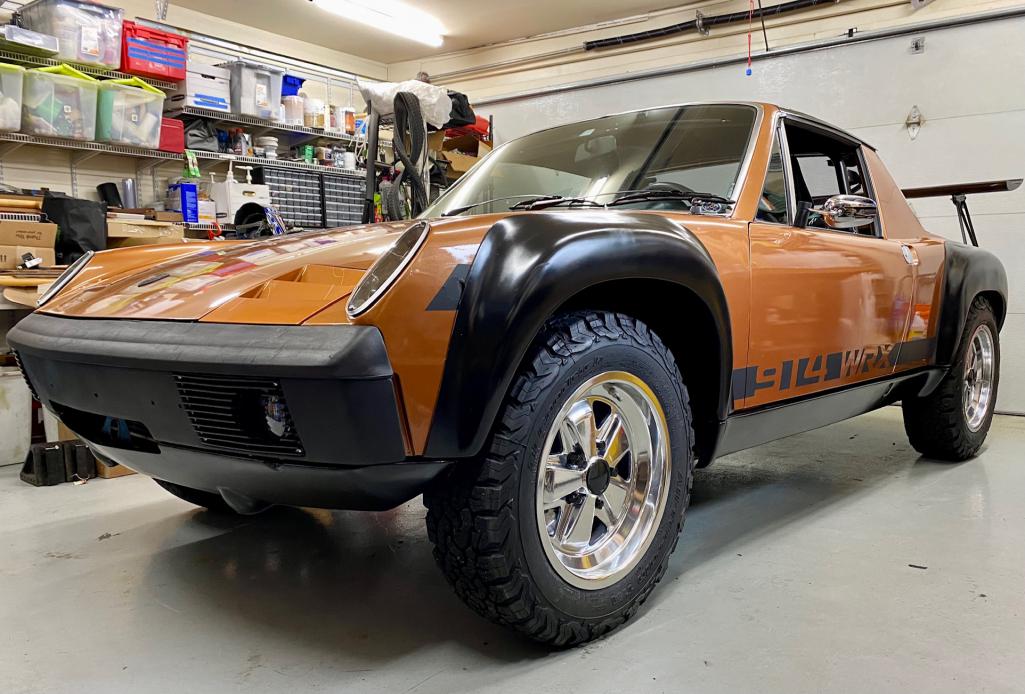
And this is where it is right now. I modified and went back to the original valence for approach clearance, of course. I also got the chrome wheels because I planned to vary the colors when I get bored. Here was a first try at the plastidip spray for one wheel that was pretty good, but I peeled off 5 min later to get the car on the road! I'm happy with how it drives right now one the worst pavement I can find :). Looking forward to getting it into the mountains this summer, although I don't have solid inspiration for the wheel color yet.
    |
|
|
|
| waltonsm |
Mar 26 2022, 06:43 PM
Post
#47
|
|
Member Group: Members Posts: 93 Joined: 27-June 14 From: United States Member No.: 17,561 Region Association: Pacific Northwest |
QUOTE(tygaboy @ Mar 26 2022, 05:21 PM)  Absolutely love it. FABricationULOUS! :wub: :worship: :trophy: Thank you! Fab is just about my favorite part. Not committed yet, but hoping to make to WCR this summer and meet some of this community in person :) |
|
|
|
| Mayne |
Mar 27 2022, 07:54 AM
Post
#48
|
|
Member Group: Members Posts: 254 Joined: 28-February 17 From: NM Member No.: 20,880 Region Association: None |
Amazing car and a fantastic build! Thanks for documenting all your creative work.
|
|
|
|
| Chris914n6 |
Apr 2 2022, 10:18 AM
Post
#49
|
|
Jackstands are my life. Group: Members Posts: 3,537 Joined: 14-March 03 From: Las Vegas, NV Member No.: 431 Region Association: Southwest Region |
Can you elaborate on the Boxster parts on the trailing arm. I was thinking of doing the same thing (IMG:style_emoticons/default/biggrin.gif)
|
|
|
|
| waltonsm |
Apr 9 2022, 02:12 PM
Post
#50
|
|
Member Group: Members Posts: 93 Joined: 27-June 14 From: United States Member No.: 17,561 Region Association: Pacific Northwest |
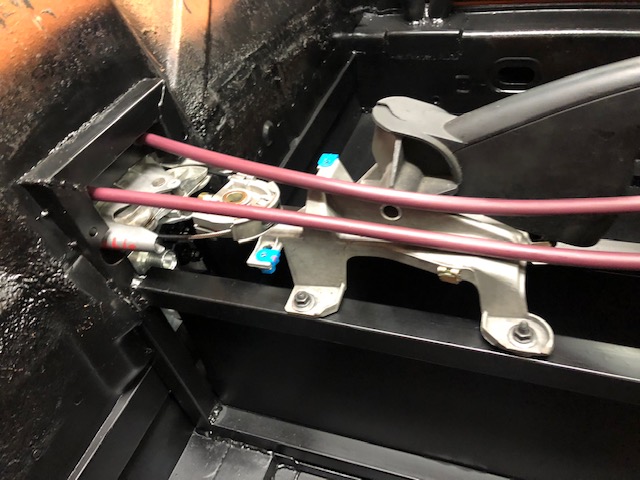
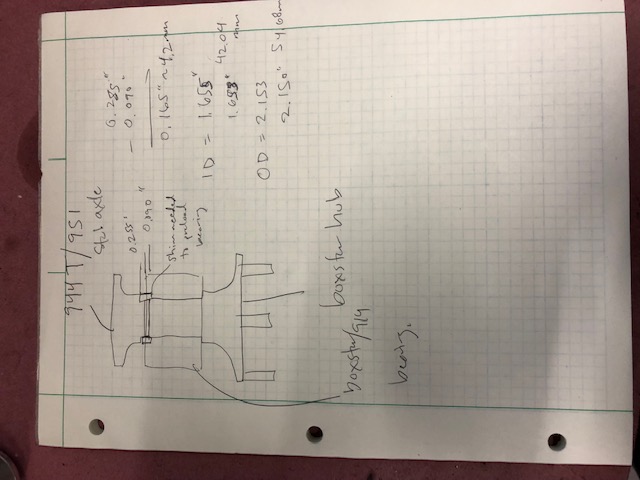
QUOTE(Chris914n6 @ Apr 2 2022, 09:18 AM) Can you elaborate on the Boxster parts on the trailing arm. I was thinking of doing the same thing :D I'm going to just dump a bunch of pictures here at the moment. Part summary on arm: 951 stub axles (spacer added to prevent bottoming out in hub), boxster hubs, modified boxster bearing retainer to clear the hubs. e brake hardware on arm: fabbed carrier with sheet and bar. made a bracket out of rectangular tube for the cable at the end. all boxster hardware pieces parts (springs, adjuster, cam, pads, etc. Both brake and shift cables from Custom control cables. I also used the turning/cam casting from the boxster so I could keep the cables close to the firewall with the center mounted e-brake handle, along with with a 986/996 ebrake handle. 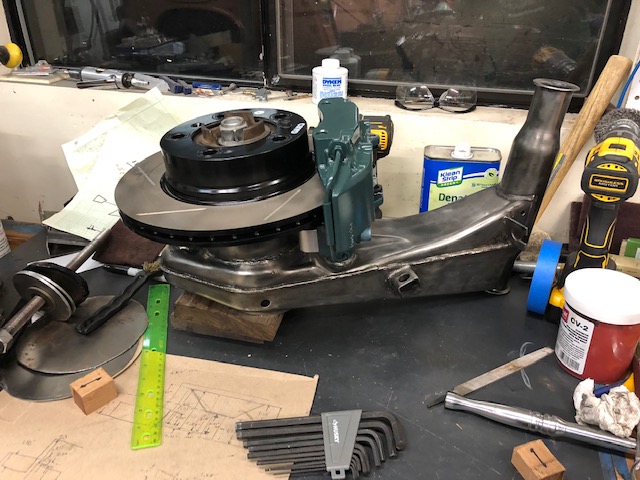 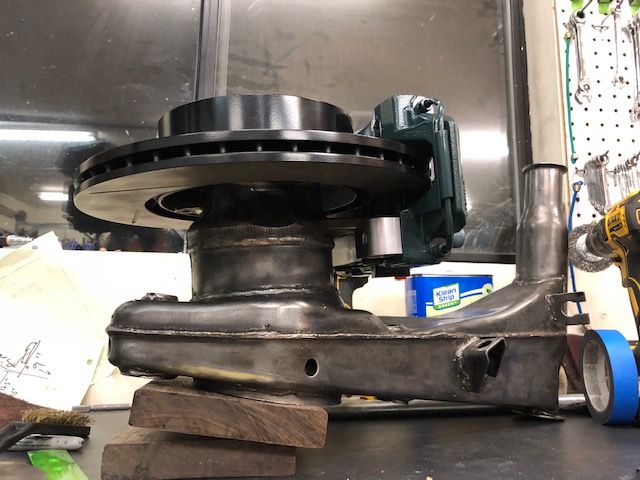 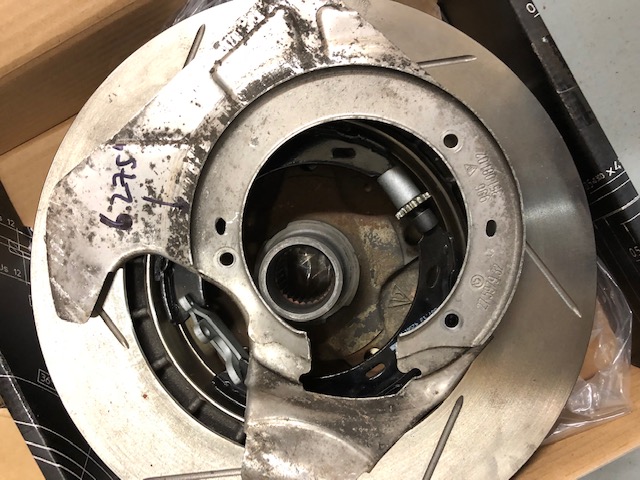 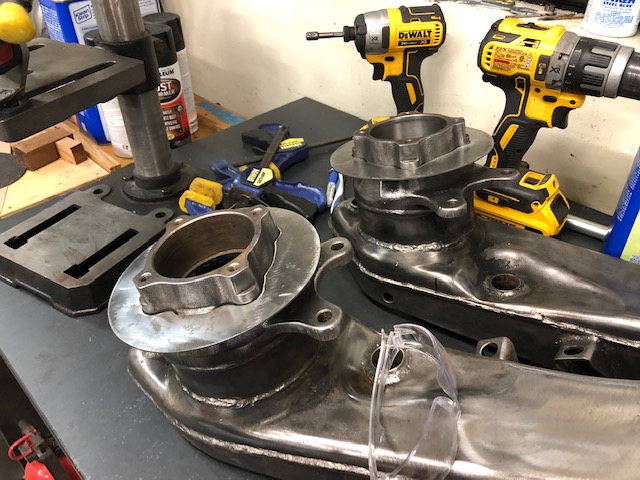 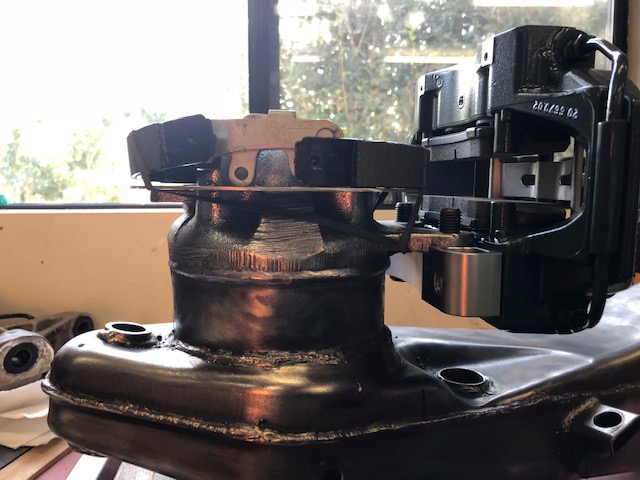 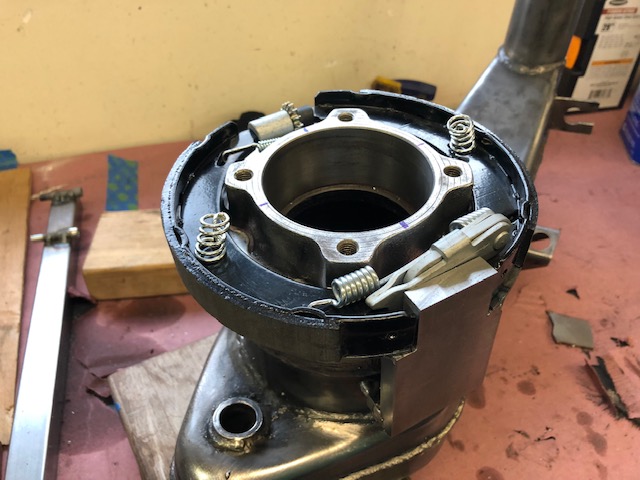 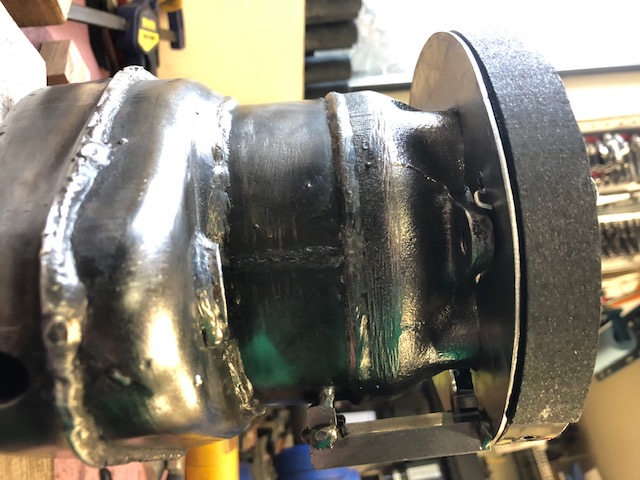 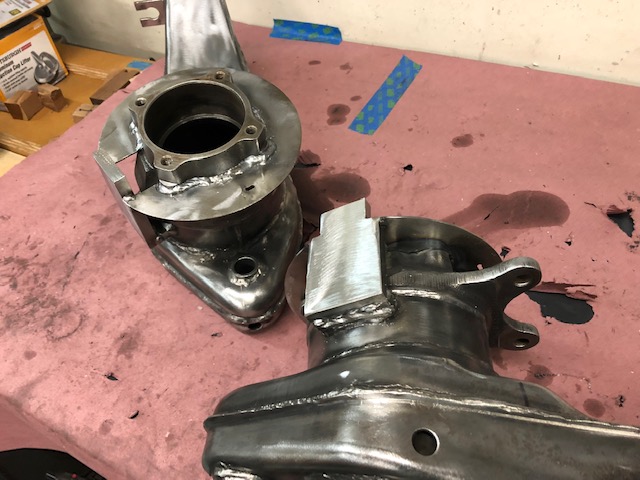 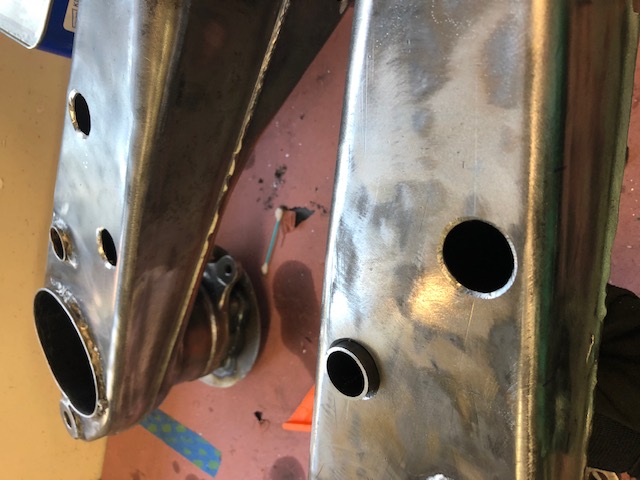 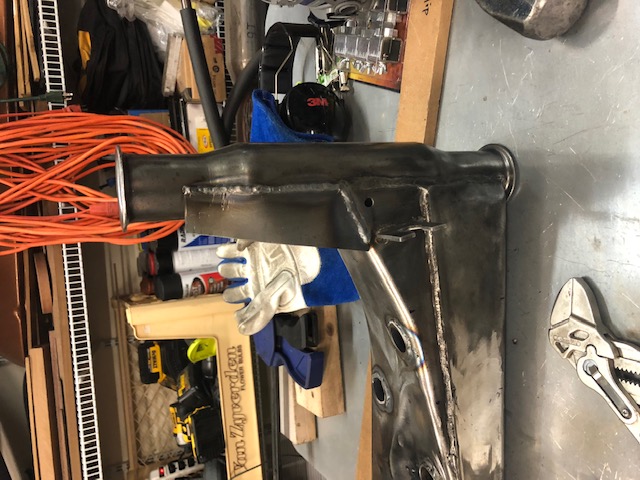 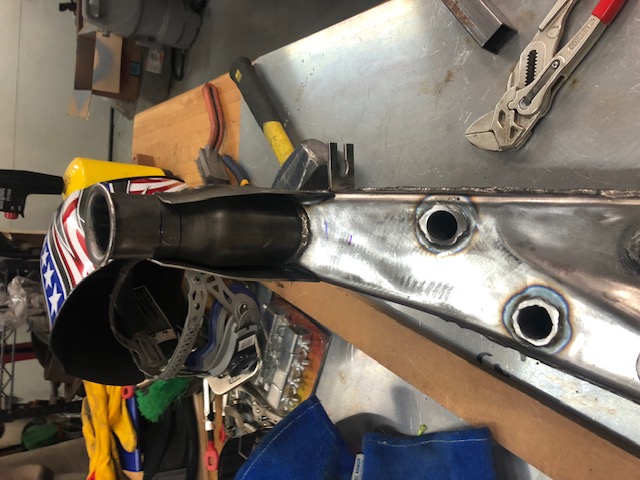 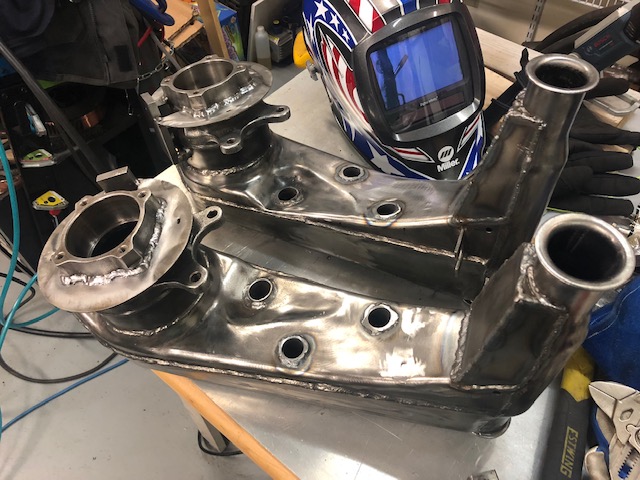 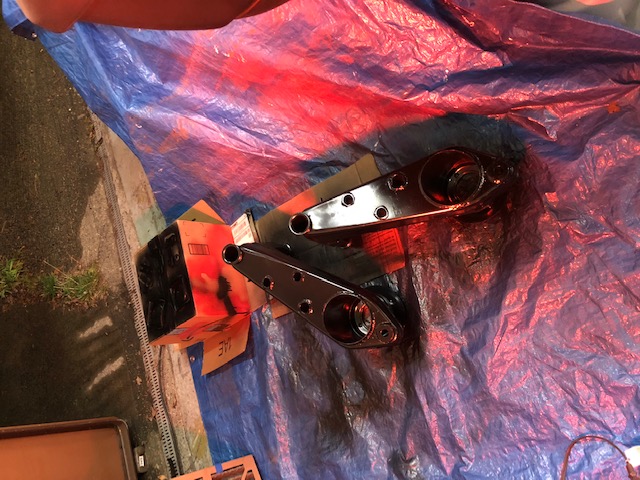 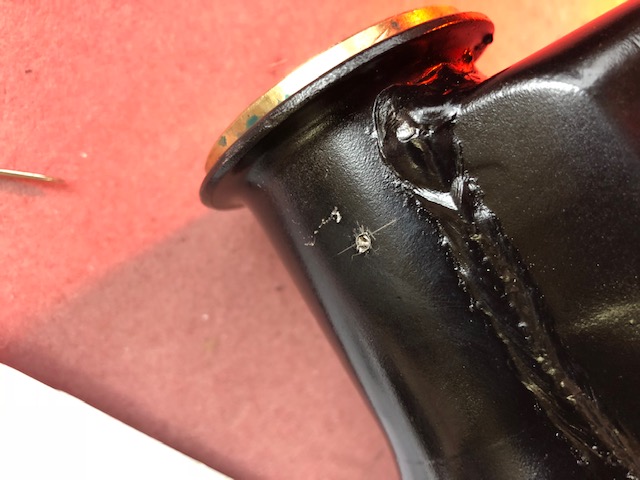 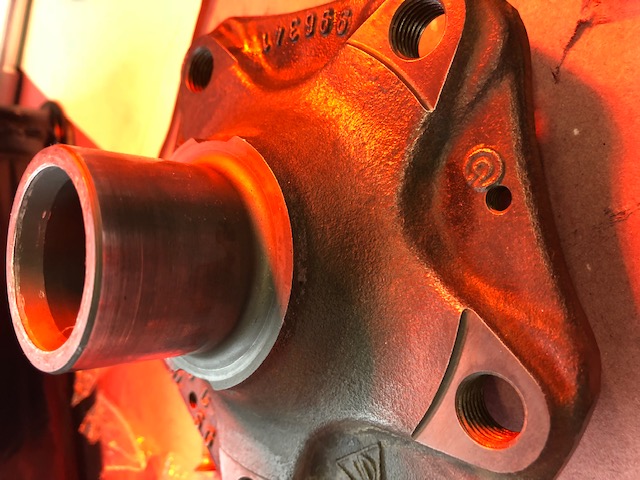 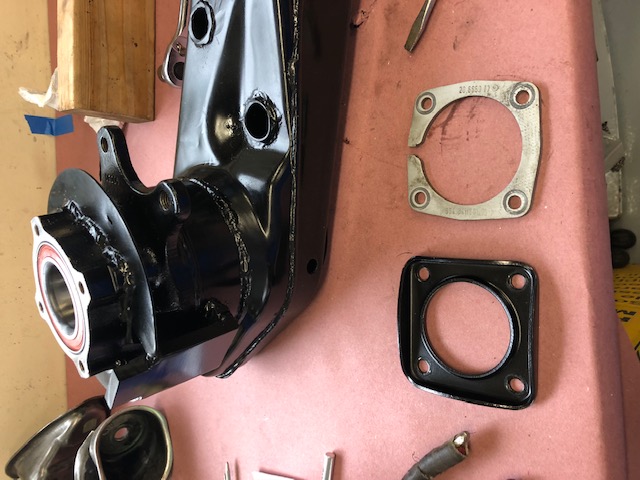 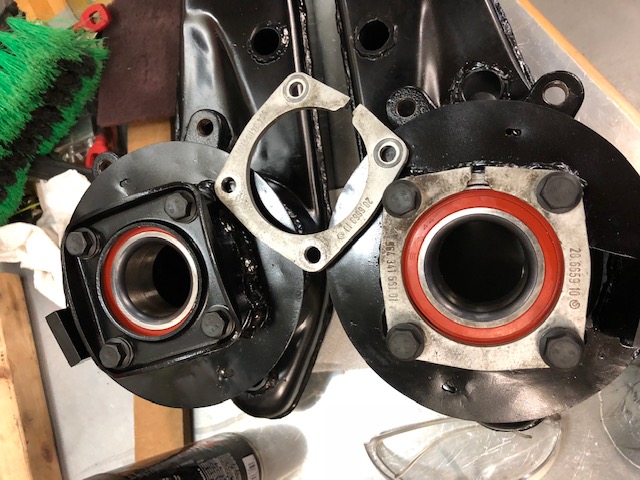 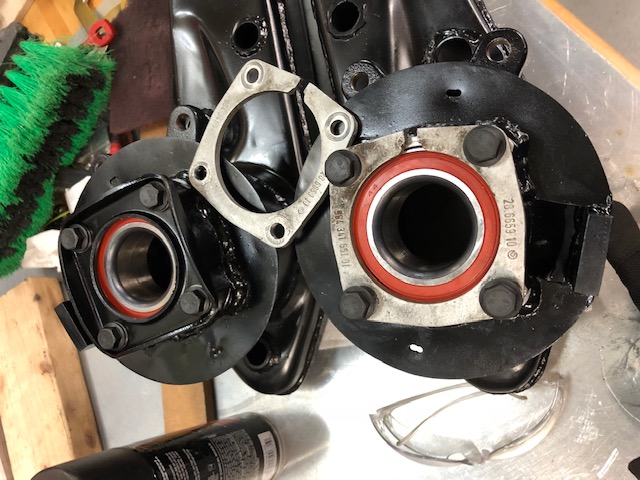  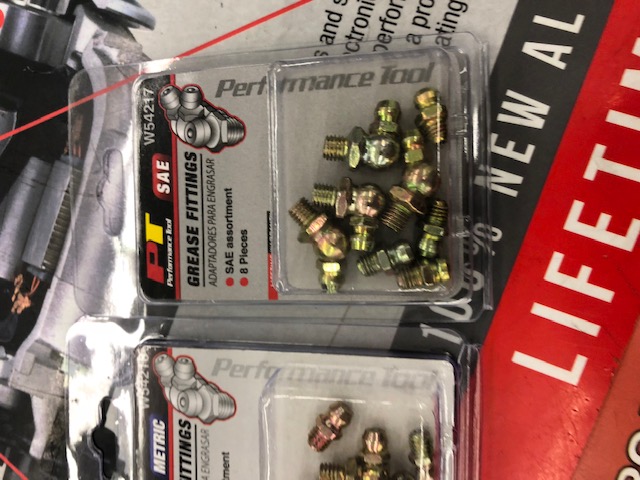 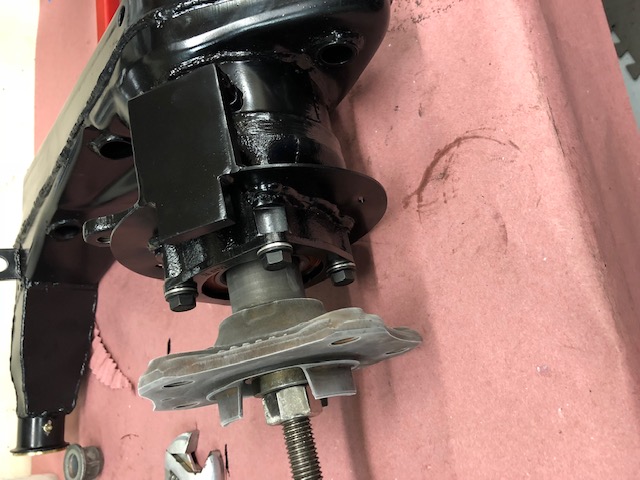 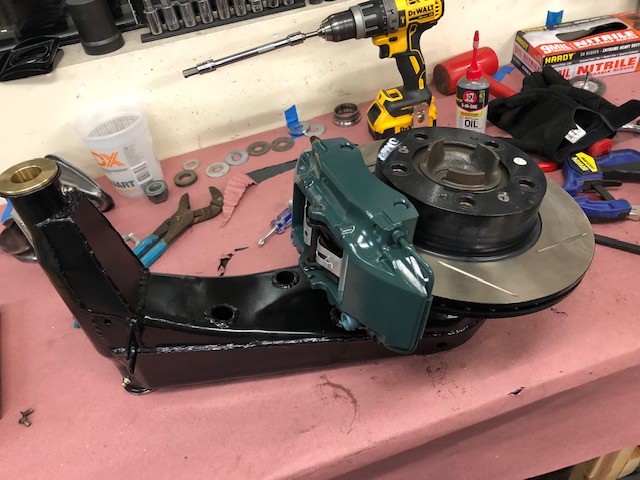 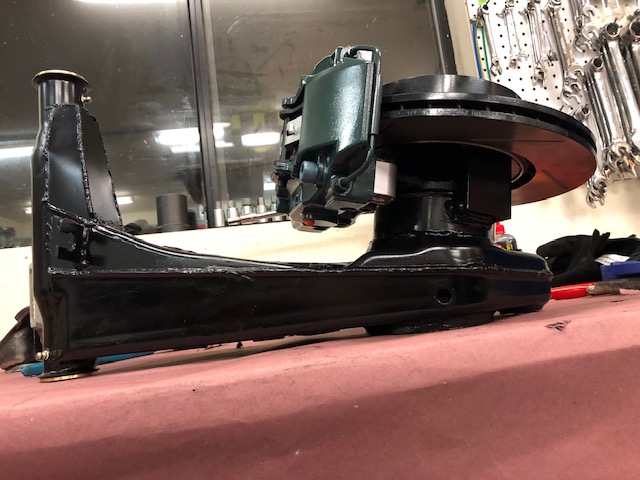 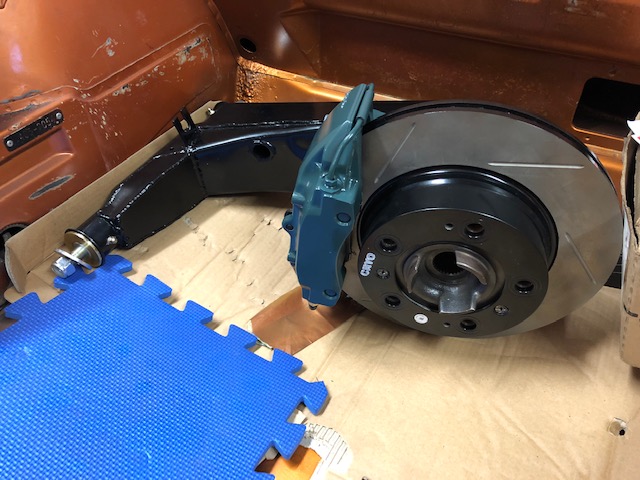  Attached image(s) 
|
|
|
|
| waltonsm |
Apr 9 2022, 02:15 PM
Post
#51
|
|
Member Group: Members Posts: 93 Joined: 27-June 14 From: United States Member No.: 17,561 Region Association: Pacific Northwest |
Here are the pics of the cable routing and and early sketch of the stub/hub:
     |
|
|
|
| waltonsm |
Apr 9 2022, 02:24 PM
Post
#52
|
|
Member Group: Members Posts: 93 Joined: 27-June 14 From: United States Member No.: 17,561 Region Association: Pacific Northwest |
I have gotten a few questions about the axles/CVs, so I am posting here:
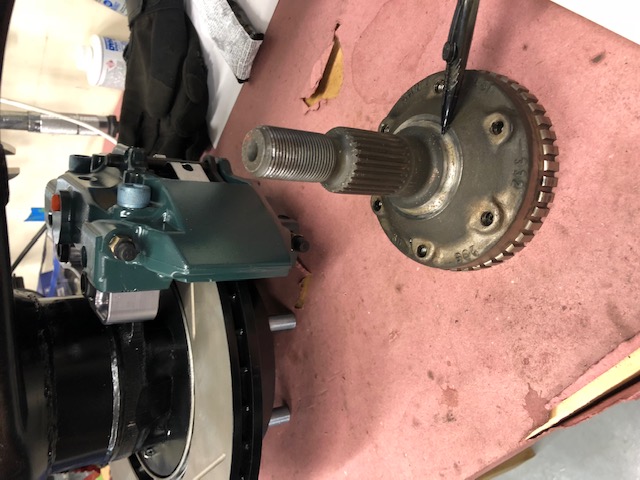
@willieg , @cali914 Parts I used: Subaru gears center diff lockout Quaife torsen transaxle diff Subaru gears diff stubs Subaru gears stub/100mm CV adapters Lindsey Racing 100mm Race CVs (custom center, balls, cage for higher torque in 100mm package, 911 splines) 300M, 911 axles in custom length from pacific customs I have been happy with all the above parts, but I can't recommend the low profile lindsey racing cv boots. They don't have enough plunge travel or articulation for this application. I now use OEM style 944 boots. |
|
|
|
| East coaster |
Apr 18 2022, 06:17 AM
Post
#53
|
|
Senior Member Group: Members Posts: 1,949 Joined: 28-March 03 From: Millville, NJ Member No.: 487 Region Association: None |
What size are the BFGs?
|
|
|
|
| waltonsm |
Apr 18 2022, 02:30 PM
Post
#54
|
|
Member Group: Members Posts: 93 Joined: 27-June 14 From: United States Member No.: 17,561 Region Association: Pacific Northwest |
QUOTE(East coaster @ Apr 18 2022, 05:17 AM) What size are the BFGs? Off-road, KO2 are Front and Rear 215 65 16  On-road, Comp 2 are Rear 255 50 16 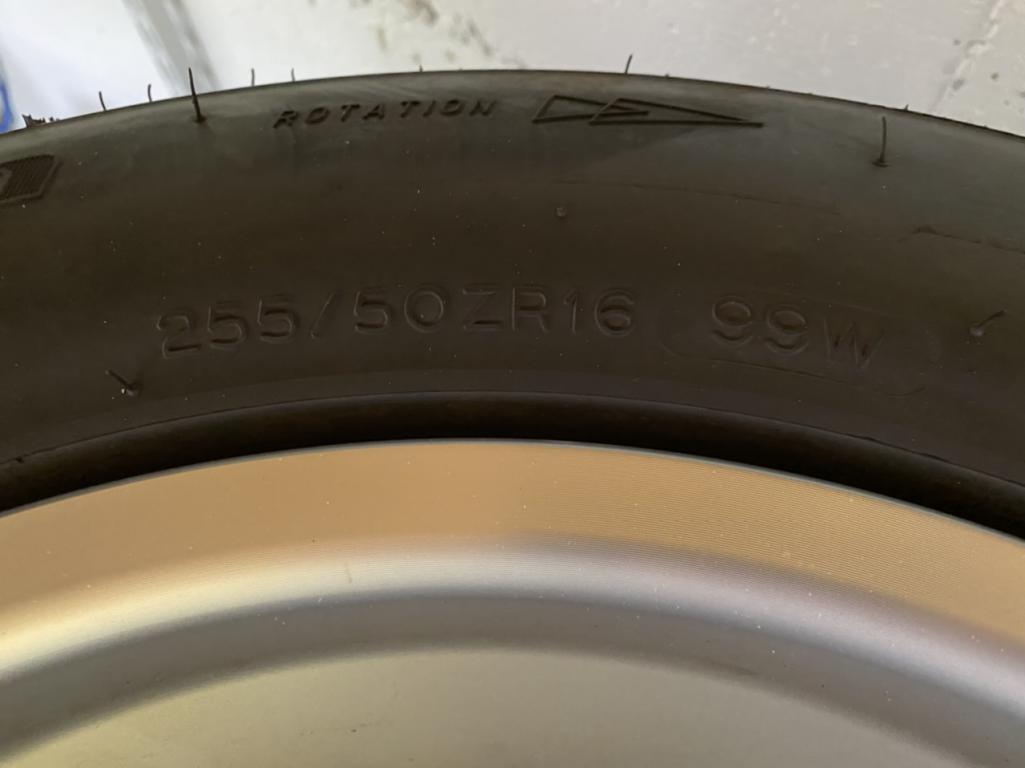 Front 225 50 16 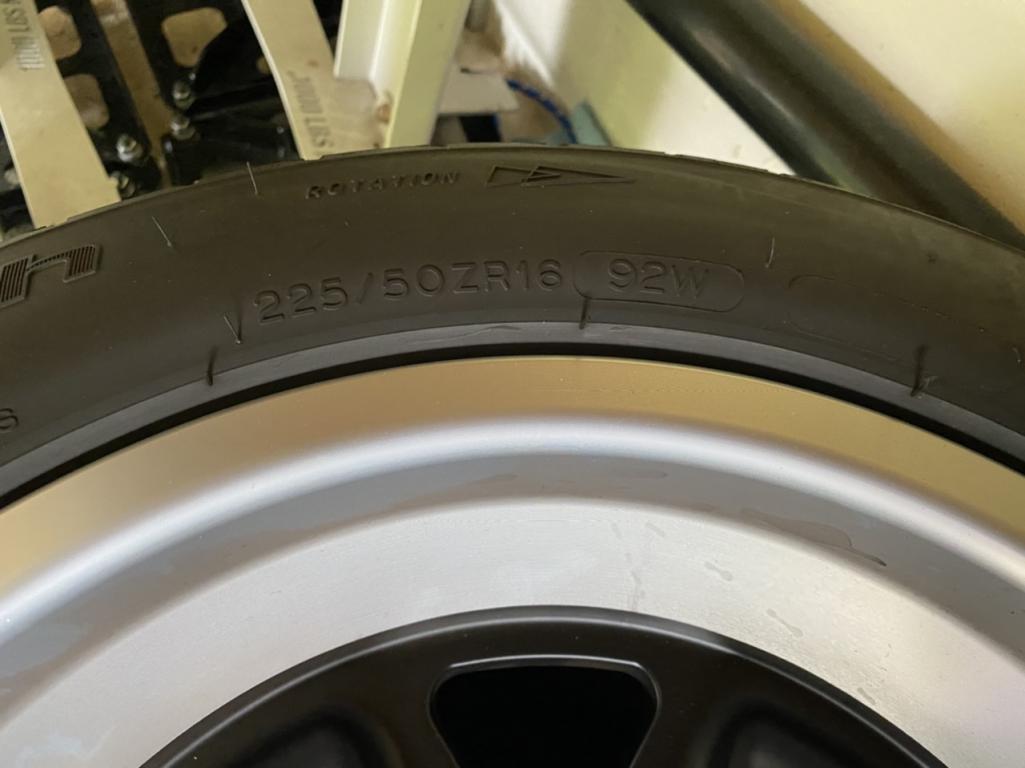 |
|
|
|
| Root_Werks |
Apr 18 2022, 04:48 PM
Post
#55
|
|
Village Idiot Group: Members Posts: 9,024 Joined: 25-May 04 From: About 15NM from Canada Member No.: 2,105 Region Association: Pacific Northwest |
What a cool build!
|
|
|
|
| waltonsm |
Apr 22 2022, 08:08 AM
Post
#56
|
|
Member Group: Members Posts: 93 Joined: 27-June 14 From: United States Member No.: 17,561 Region Association: Pacific Northwest |
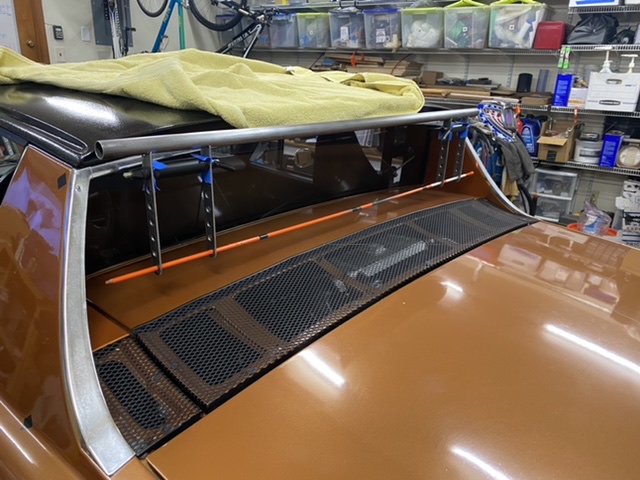
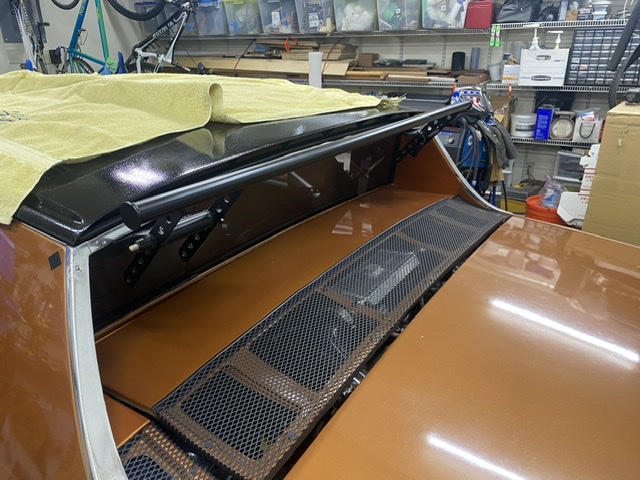
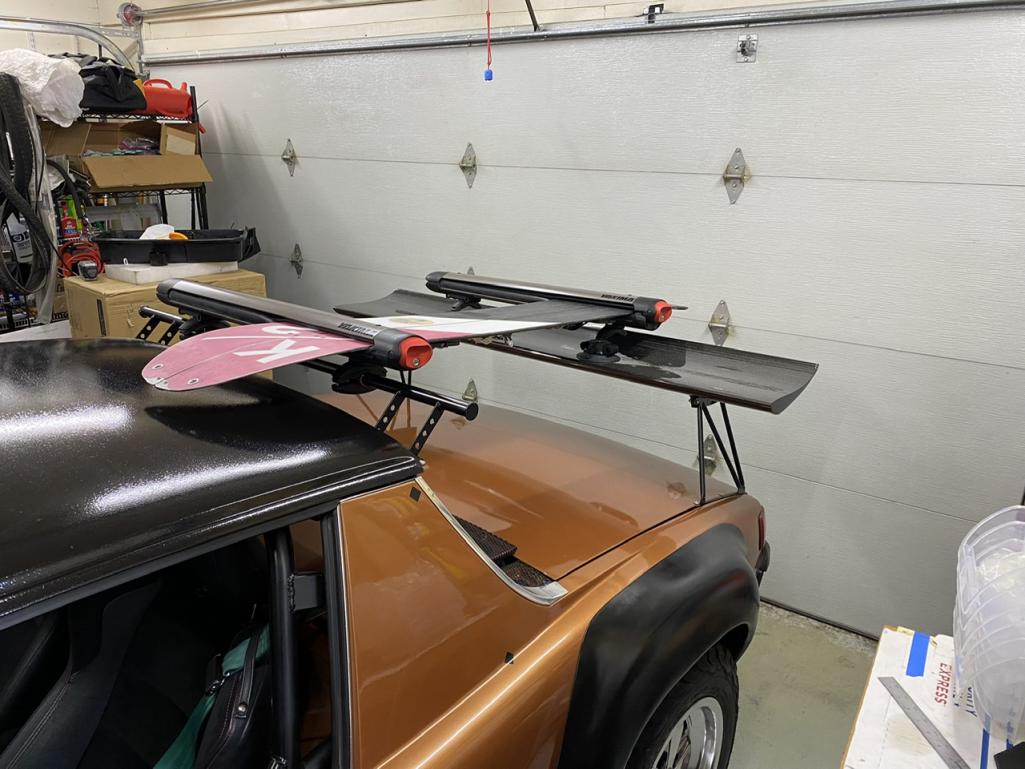
Thanks guys. While ruminating over the fact I will need to switch to a new tuning platform this week because of EPA mandated changes to the Cobb platform, I decided to finish a long planned project.
    |
|
|
|
| DRPHIL914 |
Apr 22 2022, 09:12 AM
Post
#57
|
|
Dr. Phil Group: Members Posts: 5,950 Joined: 9-December 09 From: Kennesaw, GA Member No.: 11,106 Region Association: South East States |
QUOTE(waltonsm @ Apr 22 2022, 10:08 AM) Thanks guys. While ruminating over the fact I will need to switch to a new tuning platform this week because of EPA mandated changes to the Cobb platform, I decided to finish a long planned project. good idea! stock ski racks are hard to find so this is a great way to go! |
|
|
|
| waltonsm |
May 4 2022, 12:00 AM
Post
#58
|
|
Member Group: Members Posts: 93 Joined: 27-June 14 From: United States Member No.: 17,561 Region Association: Pacific Northwest |
Made notable progress on my replacement tuning solution after Cobb locked me out. The open source Subaru community has made significant improvements over the last 5 years and I have more experience too. So I have committed to that now.
I spent a weekend converting my personally developed Cobb map to an Ecuflash map for the 2011 WRX ecu I am using. I set up ecu flash for tuning and romraider for data logging, along with my personal python scripts for data analysis all on a 250$ 10” windows 10 tablet. (Thanks glen for the gauge matching artwork) Turns out I am really excited about this integrated solution and am looking forward to continued map development because of it. Although I’m not sure if if I need much... I can probably spend some time further improving cruise fuel economy :) 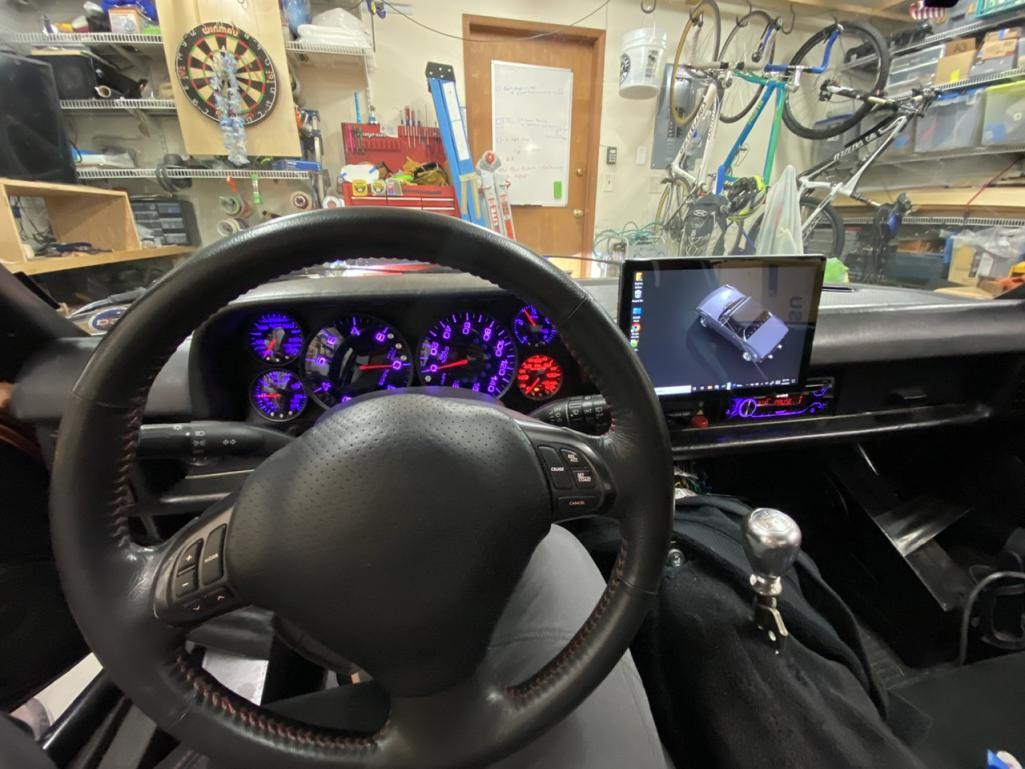 In parallel to that significant detour, i remounted the passenger seat to improve adjustability, and bought some new trail running shoes. These re-inspired me to finish my prior wheel plan, but with a waxed matte finish instead of gloss this time around. I will be joining the west coast rally unless I blow something up first! 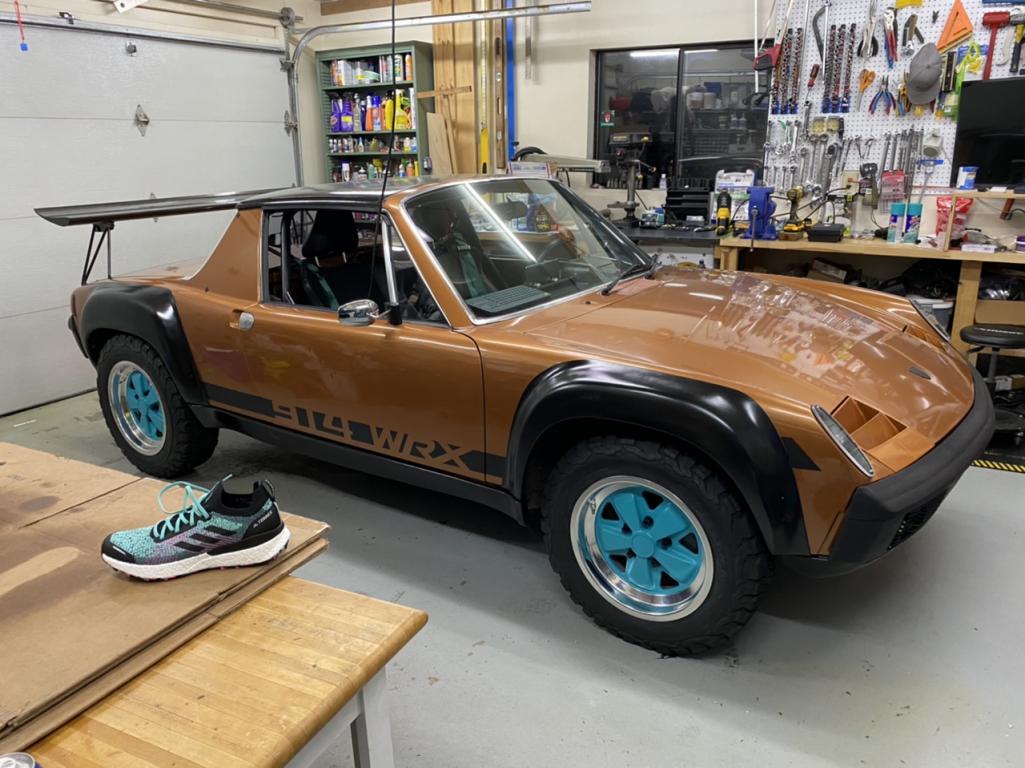 |
|
|
|
| autopro |
May 4 2022, 12:32 AM
Post
#59
|
|
Member Group: Members Posts: 306 Joined: 14-January 18 From: San Diego / Tijuana Member No.: 21,797 Region Association: Southern California |
Wow your car is coming out awesome, you really are very talented at fabrication.
|
|
|
|
| pbanders |
May 4 2022, 09:12 AM
Post
#60
|
|
Senior Member Group: Members Posts: 990 Joined: 11-June 03 From: Scottsdale, AZ Member No.: 805 Region Association: Southwest Region |
Very impressive, will have to take the time to go through this slowly and digest all the work you did.
|
|
|
|
|
1 User(s) are reading this topic (1 Guests and 0 Anonymous Users)
0 Members:

|
Lo-Fi Version | Time is now: 3rd July 2026 - 08:06 PM |
Invision Power Board
v9.1.4 © 2026 IPS, Inc.