|
|
|
Porsche, and the Porsche crest are registered trademarks of Dr. Ing. h.c. F. Porsche AG.
This site is not affiliated with Porsche in any way. Its only purpose is to provide an online forum for car enthusiasts. All other trademarks are property of their respective owners. |
|
|

  |

| mb911 |
 Dec 23 2024, 04:59 AM Dec 23 2024, 04:59 AM
Post
#201
|
|
914 Guru  Group: Members Posts: 7,785 Joined: 2-January 09 From: Burlington wi Member No.: 9,892 Region Association: Upper MidWest |
You mounted that further back then I do but looks great.
|
   |

 
|
| Geezer914 |
Dec 23 2024, 06:54 AM
Post
#202
|
|
Geezer914 Group: Members Posts: 2,315 Joined: 18-March 09 From: Salem, NJ Member No.: 10,179 Region Association: North East States |
Very nice work! You saved another one.
|
|
|
|
| BillC |
Dec 27 2024, 07:50 PM
Post
#203
|
|
Senior Member Group: Members Posts: 732 Joined: 24-April 15 From: Silver Spring, MD Member No.: 18,667 Region Association: MidAtlantic Region |
Some more parts arrived, so time to have a little fun installing! (IMG:style_emoticons/default/aktion035.gif)
I needed some hose to connect the aux heat fan to the top of the "J" tubes, so I ordered 8 feet of 2 1/4" neoprene ducting hose from Aircraft Spruce, since that was the only place I could find this size that could deliver this year. Turns out I could have gotten away with only 5 feet, since I have 3 feet left over.  Technically, the fan outlets and the "J" tubes are 55mm, and 2 1/4" is 57.2mm, but it fit just fine. There are sellers on ebay selling 55mm hose, but they are in China and who knows when it would arrive. I also found 2 sellers from the UK, but they were really proud of their stuff, and it still wouldn't arrive any time soon. BTW, at this time, the heater hose being sold by 914Rubber is the wrong size -- it is 2.5", which is just too big to fit or clamp down properly. However, when I called them and explained the problem, they immediately offered to send me a shipping label to return the hose and promised to get the size fixed. I also received my order from SuperBrightLeds, and now I have a functional back pad light. I got the 42mm bulb in "warm white", and it fit perfectly into the light fixture I got from 914Rubber.  |
|
|
|
| Artfrombama |
Dec 28 2024, 11:21 PM
Post
#204
|
|
Artfrombama Group: Members Posts: 458 Joined: 21-January 24 From: One of the chosen few Member No.: 27,870 Region Association: South East States |
QUOTE(BillC @ Dec 27 2024, 07:50 PM)  BTW, at this time, the heater hose being sold by 914Rubber is the wrong size -- it is 2.5", which is just too big to fit or clamp down properly. However, when I called them and explained the problem, they immediately offered to send me a shipping label to return the hose and promised to get the size fixed. I bought some of that unusable hose too, $42., $28. to return. No shipping label offered, told me it was returnable. Not cool 914 rubber! Used 60mm hose from McMaster Carr. |
|
|
|
| BillC |
Jan 22 2025, 05:17 PM
Post
#205
|
|
Senior Member Group: Members Posts: 732 Joined: 24-April 15 From: Silver Spring, MD Member No.: 18,667 Region Association: MidAtlantic Region |
Since the car is running okay, and since the weather has gotten really cold out, I've been working on the race car taking care of its maintenance needs. However, that doesn't mean I've completely ignored my 914.
Shortly after I got the car, I bought 5 new 195/65R15 BF Goodrich tires. Nice tires, but noticeably "fatter" than stock tires. Being fatter, the hold down screw for the spare no longer reached the thread at the bottom of the spare tire well using the stock hold down plate. My options were getting new tires before these wear out (not gonna happen), making an extension for the screw, making a longer screw or making a new hold down plate. I chose the latter option. I used a hole saw to cut a piece out of some 1/2" aluminum plate I had. I then turned it down in the lathe and finally cut a slot using the mill. 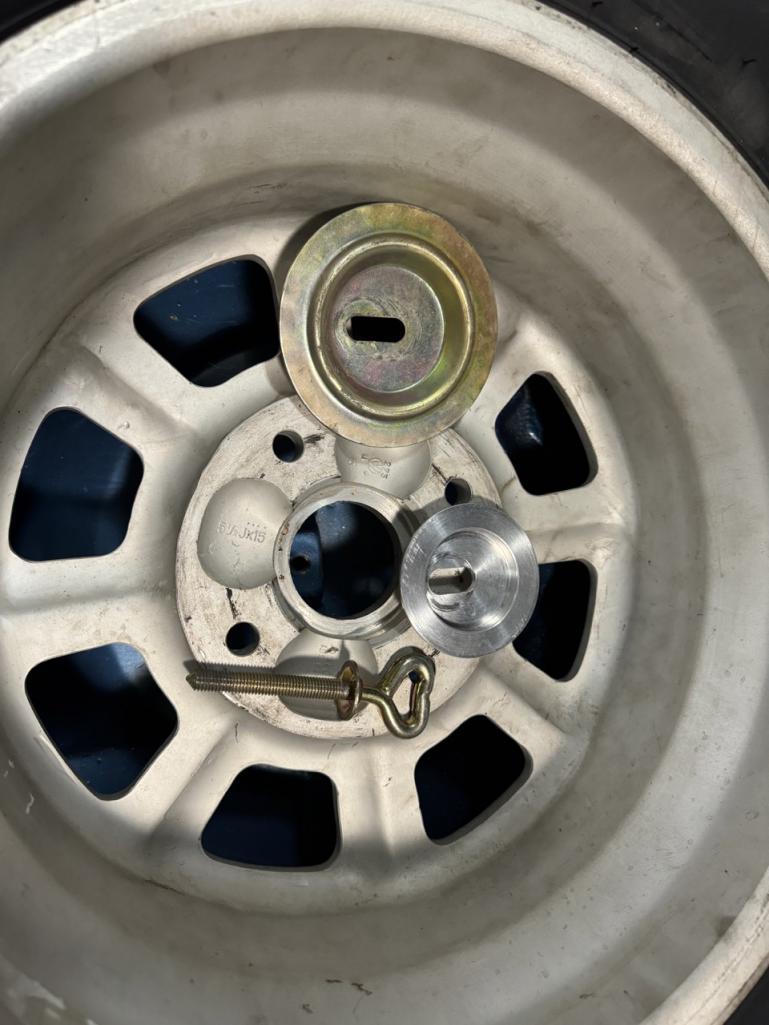 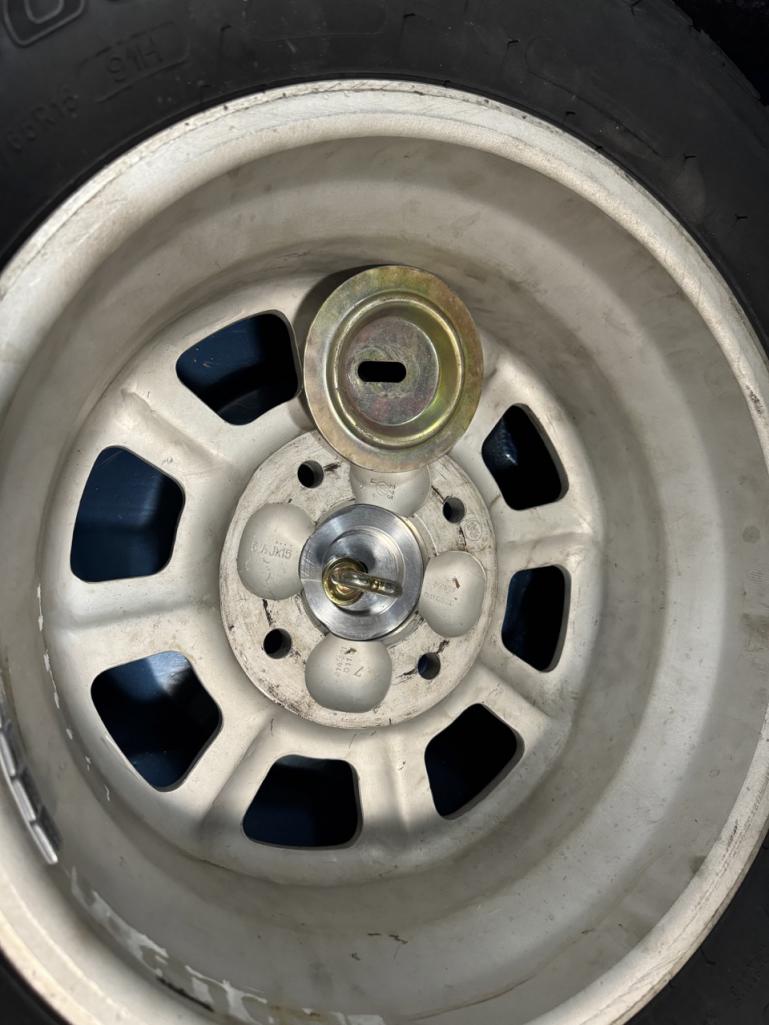 The new plate drops the flange surface about a half-inch lower, allowing the screw to reach and hold the tire down. |
|
|
|
| bkrantz |
Jan 22 2025, 11:50 PM
Post
#206
|
|
914 Guru Group: Members Posts: 8,716 Joined: 3-August 19 From: SW Colorado Member No.: 23,343 Region Association: Rocky Mountains |
When you want to replace at least one tire, consider getting an original size for the spare only, like 155R-15. This is close in diameter to 196/65-15 (24.8" vs 25.0"). And it fits in the frunk, not only the reach of the tie-down bolt but also the height of the floor board.
|
|
|
|
| BillC |
Mar 9 2025, 04:56 PM
Post
#207
|
|
Senior Member Group: Members Posts: 732 Joined: 24-April 15 From: Silver Spring, MD Member No.: 18,667 Region Association: MidAtlantic Region |
It's been a while since I was able to do any work on the 914, but finally had a chance today. This time, I replaced the outer window wiper seals on both doors.
 What a royal, flaming PITA! (IMG:style_emoticons/default/headbang.gif) (IMG:style_emoticons/default/hissyfit.gif) I watched @iankarr 's Bumblee video, and he made it look so simple and easy. The old seals were rock hard and slid out easily. The new ones did not want to go in at all. I ended up using some conduit wire lube on a q-tip on the round part of the seal, and then slowly working the seal into place -- what should have taken 20-30 minutes ended up taking 2.5 hours and my thumbs are still sore. |
|
|
|
| 930cabman |
Mar 9 2025, 05:36 PM
Post
#208
|
|
Advanced Member Group: Members Posts: 4,704 Joined: 12-November 20 From: Buffalo Member No.: 24,877 Region Association: North East States |
QUOTE(BillC @ Mar 9 2025, 04:56 PM) It's been a while since I was able to do any work on the 914, but finally had a chance today. This time, I replaced the outer window wiper seals on both doors. What a royal, flaming PITA! (IMG:style_emoticons/default/headbang.gif) (IMG:style_emoticons/default/hissyfit.gif) I watched @iankarr 's Bumblee video, and he made it look so simple and easy. The old seals were rock hard and slid out easily. The new ones did not want to go in at all. I ended up using some conduit wire lube on a q-tip on the round part of the seal, and then slowly working the seal into place -- what should have taken 20-30 minutes ended up taking 2.5 hours and my thumbs are still sore. I can't recall what product I used last year, but IIRC it was some sort of dishwashing soap in a pump bottle. just about fell in |
|
|
|
| iankarr |
Mar 10 2025, 12:05 AM
Post
#209
|
|
The wrencher formerly known as Cuddy_K Group: Members Posts: 2,601 Joined: 22-May 15 From: Heber City, UT Member No.: 18,749 Region Association: Intermountain Region |
What was the pita? Did the rounded nub not go into the track? I struggled with mine for a bit before I discovered that the seal needs to be nearly horizontal when installing. It’s the only way the nub faces down enough to be pressed into the track.
|
|
|
|
| BillC |
Mar 10 2025, 07:17 AM
Post
#210
|
|
Senior Member Group: Members Posts: 732 Joined: 24-April 15 From: Silver Spring, MD Member No.: 18,667 Region Association: MidAtlantic Region |
QUOTE(930cabman @ Mar 9 2025, 07:36 PM) I can't recall what product I used last year, but IIRC it was some sort of dishwashing soap in a pump bottle. just about fell in If you can find the name of the product, please post it up. These aren't the last seals I'm going to have to replace. QUOTE(iankarr @ Mar 10 2025, 02:05 AM) What was the pita? Did the rounded nub not go into the track? I struggled with mine for a bit before I discovered that the seal needs to be nearly horizontal when installing. It’s the only way the nub faces down enough to be pressed into the track. No, the rounded nub absolutely did not want to go into the track, and it did not matter how I oriented the seals. I re-watched that section of your video multiple times, and you made it look so easy. Mine fought me all the way to the end. From where did you get your seals? I got mine from AA, because they also had the replacement endcaps, which I couldn't find at 914Rubber. |
|
|
|
| 930cabman |
Mar 11 2025, 04:10 PM
Post
#211
|
|
Advanced Member Group: Members Posts: 4,704 Joined: 12-November 20 From: Buffalo Member No.: 24,877 Region Association: North East States |
QUOTE(BillC @ Mar 10 2025, 07:17 AM) QUOTE(930cabman @ Mar 9 2025, 07:36 PM) I can't recall what product I used last year, but IIRC it was some sort of dishwashing soap in a pump bottle. just about fell in If you can find the name of the product, please post it up. These aren't the last seals I'm going to have to replace. QUOTE(iankarr @ Mar 10 2025, 02:05 AM) What was the pita? Did the rounded nub not go into the track? I struggled with mine for a bit before I discovered that the seal needs to be nearly horizontal when installing. It’s the only way the nub faces down enough to be pressed into the track. No, the rounded nub absolutely did not want to go into the track, and it did not matter how I oriented the seals. I re-watched that section of your video multiple times, and you made it look so easy. Mine fought me all the way to the end. From where did you get your seals? I got mine from AA, because they also had the replacement endcaps, which I couldn't find at 914Rubber. Yes, next time I can get to the shop, I have been home with the flu for the past week. I was surprised at how easy the rubber slid in |
|
|
|
| 930cabman |
Mar 12 2025, 11:36 AM
Post
#212
|
|
Advanced Member Group: Members Posts: 4,704 Joined: 12-November 20 From: Buffalo Member No.: 24,877 Region Association: North East States |
QUOTE(930cabman @ Mar 11 2025, 04:10 PM) QUOTE(BillC @ Mar 10 2025, 07:17 AM) QUOTE(930cabman @ Mar 9 2025, 07:36 PM) I can't recall what product I used last year, but IIRC it was some sort of dishwashing soap in a pump bottle. just about fell in If you can find the name of the product, please post it up. These aren't the last seals I'm going to have to replace. QUOTE(iankarr @ Mar 10 2025, 02:05 AM) What was the pita? Did the rounded nub not go into the track? I struggled with mine for a bit before I discovered that the seal needs to be nearly horizontal when installing. It’s the only way the nub faces down enough to be pressed into the track. No, the rounded nub absolutely did not want to go into the track, and it did not matter how I oriented the seals. I re-watched that section of your video multiple times, and you made it look so easy. Mine fought me all the way to the end. From where did you get your seals? I got mine from AA, because they also had the replacement endcaps, which I couldn't find at 914Rubber. Yes, next time I can get to the shop, I have been home with the flu for the past week. I was surprised at how easy the rubber slid in "Softsoap" antibacterial in a squirt bottle. |
|
|
|
| BillC |
Mar 16 2025, 06:47 PM
Post
#213
|
|
Senior Member Group: Members Posts: 732 Joined: 24-April 15 From: Silver Spring, MD Member No.: 18,667 Region Association: MidAtlantic Region |
QUOTE(930cabman @ Mar 12 2025, 01:36 PM) "Softsoap" antibacterial in a squirt bottle. Thanks! -------------------------------- I took care of some maintenance today. I flushed the brake fluid, adjusted the rear brakes and also adjusted the front wheel bearings. No pics, since it's all pretty boring and has been posted about thousands of times already. The previous owner (well, a previous owner) gets an "Attaboy" for installing rebuilt rear calipers -- they're nicely clean and replated, so possibly done by PMB. They even have both adjuster gears. Unfortunately, he loses it because the clamp bolt in the passenger-side front bearing nut was completely loose. All fixed now. |
|
|
|
| GregAmy |
Mar 17 2025, 06:05 AM
Post
#214
|
|
Advanced Member Group: Members Posts: 2,677 Joined: 22-February 13 From: Middletown CT Member No.: 15,565 Region Association: North East States |
QUOTE(930cabman @ Mar 12 2025, 12:36 PM) "Softsoap" antibacterial in a squirt bottle. I prefer "water-based personal lubricants" since it evaporates and does not attack rubber. Yes, "that", from the pharmacy section of your fav store. |
|
|
|
| mb911 |
Mar 17 2025, 06:30 AM
Post
#215
|
|
914 Guru Group: Members Posts: 7,785 Joined: 2-January 09 From: Burlington wi Member No.: 9,892 Region Association: Upper MidWest |
QUOTE(930cabman @ Mar 9 2025, 03:36 PM) QUOTE(BillC @ Mar 9 2025, 04:56 PM) It's been a while since I was able to do any work on the 914, but finally had a chance today. This time, I replaced the outer window wiper seals on both doors. What a royal, flaming PITA! (IMG:style_emoticons/default/headbang.gif) (IMG:style_emoticons/default/hissyfit.gif) I watched @iankarr 's Bumblee video, and he made it look so simple and easy. The old seals were rock hard and slid out easily. The new ones did not want to go in at all. I ended up using some conduit wire lube on a q-tip on the round part of the seal, and then slowly working the seal into place -- what should have taken 20-30 minutes ended up taking 2.5 hours and my thumbs are still sore. I can't recall what product I used last year, but IIRC it was some sort of dishwashing soap in a pump bottle. just about fell in So a little experience with this as well. I bought a set with a seal kit form a vendor when doing my car. I cut that seal short but it was a monster PIA to get in. Then decided last year to order another one to get it the right length. Ordered from AA as I was getting a few items from them anyway. The seal from them slides right in and the whole project was about 5 minutes |
|
|
|
| BillC |
Mar 17 2025, 07:10 AM
Post
#216
|
|
Senior Member Group: Members Posts: 732 Joined: 24-April 15 From: Silver Spring, MD Member No.: 18,667 Region Association: MidAtlantic Region |
QUOTE(GregAmy @ Mar 17 2025, 08:05 AM) QUOTE(930cabman @ Mar 12 2025, 12:36 PM) "Softsoap" antibacterial in a squirt bottle. I prefer "water-based personal lubricants" since it evaporates and does not attack rubber. Yes, "that", from the pharmacy section of your fav store. That's the same reason I used the conduit wire-pull lube -- water-based and doesn't affect plastic or rubber. I had used it previously on other seals, and it worked okay on those. Just not so well this time. QUOTE(mb911 @ Mar 17 2025, 08:30 AM) So a little experience with this as well. I bought a set with a seal kit form a vendor when doing my car. I cut that seal short but it was a monster PIA to get in. Then decided last year to order another one to get it the right length. Ordered from AA as I was getting a few items from them anyway. The seal from them slides right in and the whole project was about 5 minutes I tried sliding the new seals in first, since the old seals slid right out. Unfortunately, sliding the new seals just didn't work -- even with a ton of lube, I could only force them in about 4" before they stuck and wouldn't move any more, even when pulling with pliers. I'm wondering if maybe the seals I received were just not quite right, and the "bulb" section that fits inside the aluminum track was slightly oversize. It would explain why others didn't have the same level of "fun" as I had. |
|
|
|
| BillC |
Apr 6 2025, 06:49 PM
Post
#217
|
|
Senior Member Group: Members Posts: 732 Joined: 24-April 15 From: Silver Spring, MD Member No.: 18,667 Region Association: MidAtlantic Region |
I set aside some time this weekend to work on the 914, swapping the rebuilt trans into the 914. I did it by myself, and let me tell you, next time I have to do this job, I will definitely make sure to have at least one helper. There were a few times where having two people would have made the job much easier, like working the jack to get the trans in place or installing the upper bell housing bolts (that task required some creative clamp work to hold the bolts in place while installing the nuts on the other side).
Since I was working alone, I only got one pic, of the old trans next to the "new" one: 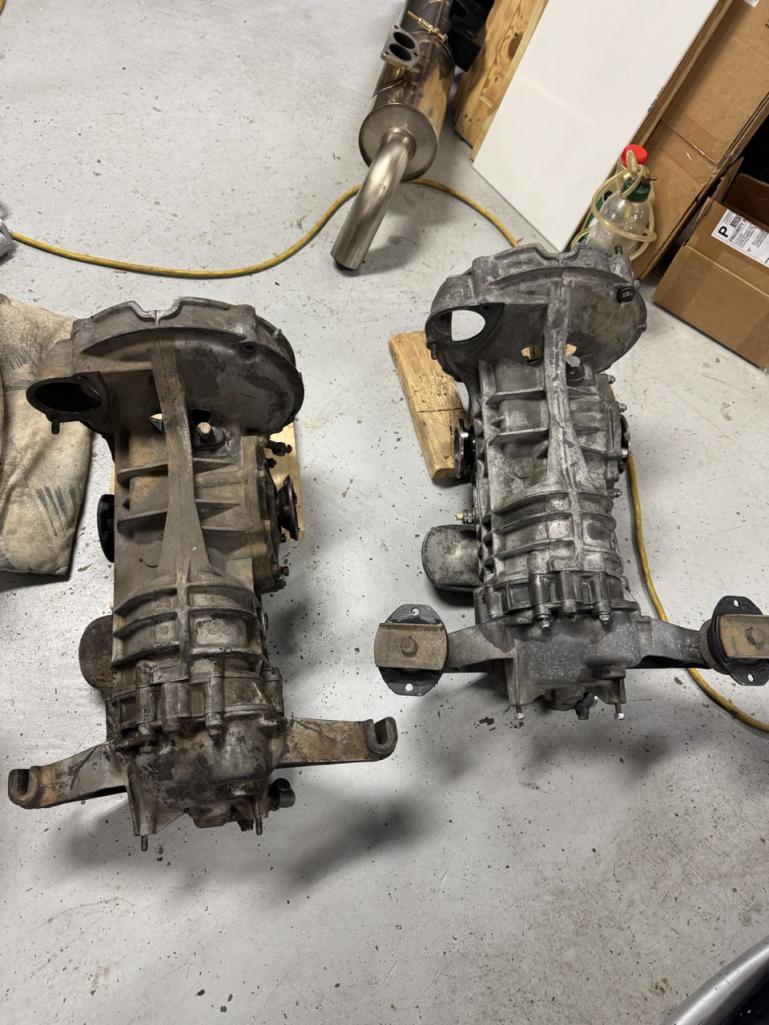 The new one is the one on the right, with the rear mounts already moved over. I'm about 90% done installing the new trans -- just need to hook up the shift linkage and reattach the muffler. |
|
|
|
| BillC |
Apr 18 2025, 04:42 PM
Post
#218
|
|
Senior Member Group: Members Posts: 732 Joined: 24-April 15 From: Silver Spring, MD Member No.: 18,667 Region Association: MidAtlantic Region |
Just a quick update -- finally finished reassembling the underside of the drivetrain and just took it for a test drive. And, the rebuilt trans works very well! (IMG:style_emoticons/default/piratenanner.gif)
I did have to come back home to readjust the shifter -- the lever needed to be moved just a scosche (technical term) to the left, so it would go into 2nd instead of nicking reverse. Only issue remaining with the trans is occasionally it doesn't want to go into 1st gear while sitting still (like at a light). I think that's just the new synchro and it should work in with a few more miles on the car. |
|
|
|
| 930cabman |
Apr 18 2025, 04:47 PM
Post
#219
|
|
Advanced Member Group: Members Posts: 4,704 Joined: 12-November 20 From: Buffalo Member No.: 24,877 Region Association: North East States |
QUOTE(BillC @ Apr 18 2025, 04:42 PM) Just a quick update -- finally finished reassembling the underside of the drivetrain and just took it for a test drive. And, the rebuilt trans works very well! (IMG:style_emoticons/default/piratenanner.gif) I did have to come back home to readjust the shifter -- the lever needed to be moved just a scosche (technical term) to the left, so it would go into 2nd instead of nicking reverse. Only issue remaining with the trans is occasionally it doesn't want to go into 1st gear while sitting still (like at a light). I think that's just the new synchro and it should work in with a few more miles on the car. How does she engage getting into reverse from a standing position? Is your clutch adjusted properly |
|
|
|
| BillC |
Apr 18 2025, 05:15 PM
Post
#220
|
|
Senior Member Group: Members Posts: 732 Joined: 24-April 15 From: Silver Spring, MD Member No.: 18,667 Region Association: MidAtlantic Region |
QUOTE(930cabman @ Apr 18 2025, 06:47 PM) How does she engage getting into reverse from a standing position? Is your clutch adjusted properly Goes into reverse very nicely. No clutch drag or grinding noise. In fact, I may loosen the clutch cable a 1/2-turn, just because the clutch engagement seems a bit high. Sometimes, the car slips right into 1st. Sometimes, it takes a firm pull before it will go into 1st. And sometimes, it just doesn't want to go into 1st at all and I have to come back to neutral and let off the clutch before re-trying multiple times before it finally, begrudgingly goes into 1st. |
|
|
|
|
1 User(s) are reading this topic (1 Guests and 0 Anonymous Users)
0 Members:

|
Lo-Fi Version | Time is now: 14th June 2026 - 11:37 PM |
Invision Power Board
v9.1.4 © 2026 IPS, Inc.