|
|
|
Porsche, and the Porsche crest are registered trademarks of Dr. Ing. h.c. F. Porsche AG.
This site is not affiliated with Porsche in any way. Its only purpose is to provide an online forum for car enthusiasts. All other trademarks are property of their respective owners. |
|
|


| BillC |
 Jun 27 2020, 11:30 AM Jun 27 2020, 11:30 AM
Post
#221
|
|
Senior Member  Group: Members Posts: 732 Joined: 24-April 15 From: Silver Spring, MD Member No.: 18,667 Region Association: MidAtlantic Region |
So, I bought a "new" 914 a few weeks ago (a '73 2.0). When I received it from the shipper, I noticed was the seller was quite artful about his pictures, with what was and what wasn't shown. And, now that I've had a chance to start taking things apart, I have uncovered quite a bit of DAPO-done-damage, and I'm sure there's more hiding somewhere (oh boy! something to look forward too....). Some of the damage appears to have been there for a loooong time.
I've already received a piece from a scrap car to fix this hole: 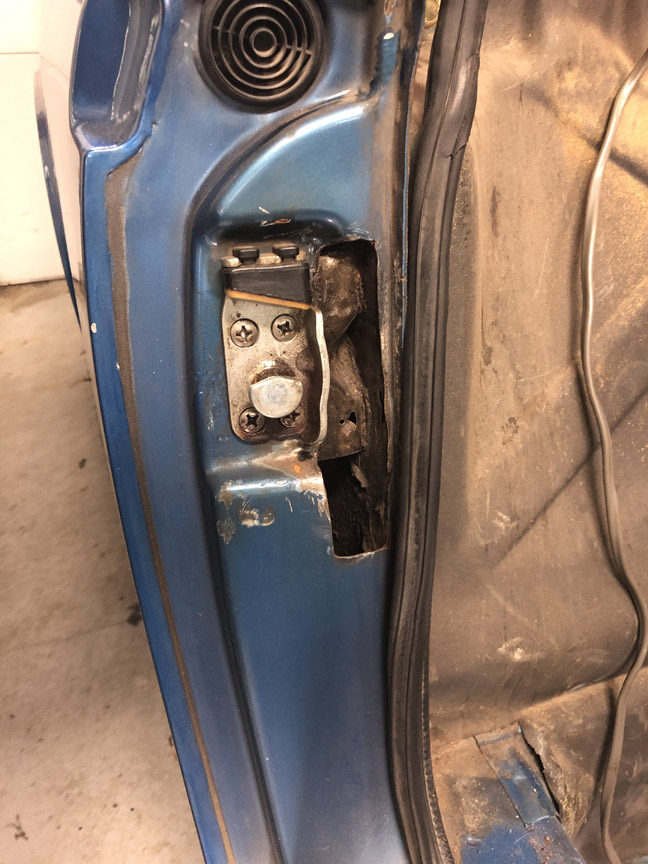 Once I took the rockers off, I discovered this: 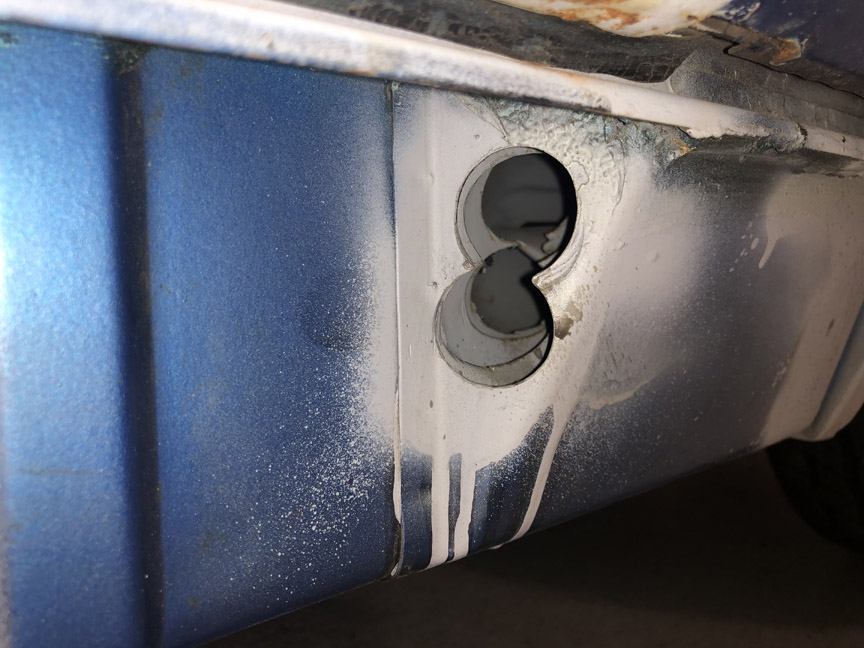 Yes, they hole-sawed through FOUR layers of sheet metal, including the heat duct. Not sure what they were thinking, but there it is. In the trunk, I found three hole-sawed holes. I think they might have been thinking about mounting the fuel pump in a 75/76 blister, but they never finished the work (and also picked the wrong location). 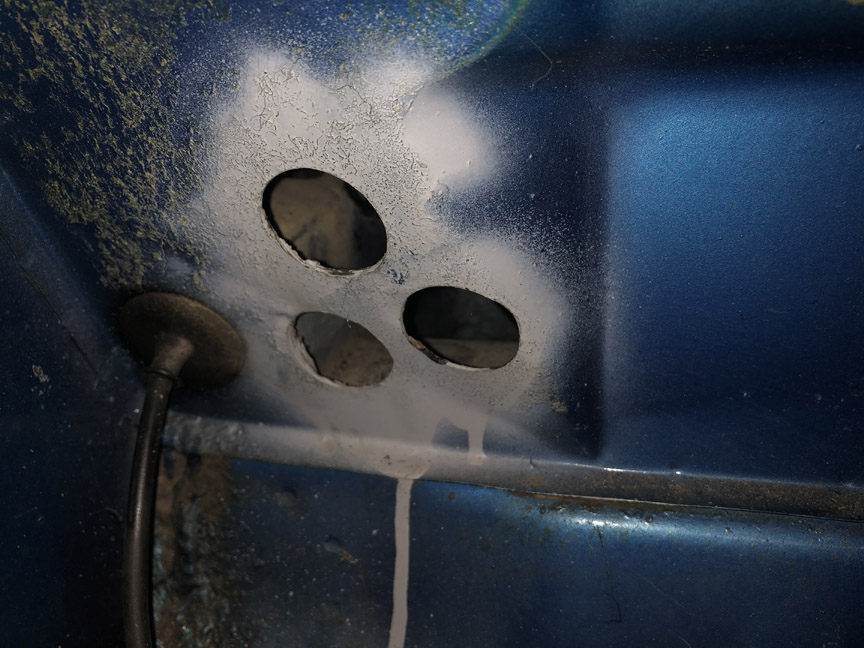 |
   |

 
|
Posts in this topic
 BillC Time to un-DAPO the "new" car Jun 27 2020, 11:30 AM
 Montreal914 Front mounted oil cooler or AC? :confused:
Look f... Jun 27 2020, 11:32 AM
Montreal914 Front mounted oil cooler or AC? :confused:
Look f... Jun 27 2020, 11:32 AM SirAndy
Front mounted oil cooler or AC? :confused:
Look ... Jun 27 2020, 11:43 AM
SirAndy
Front mounted oil cooler or AC? :confused:
Look ... Jun 27 2020, 11:43 AM BillC
Front mounted oil cooler or AC? :confused:
Look ... Jun 27 2020, 12:06 PM BillC But, so far, the "best" has to be the ho... Jun 27 2020, 12:16 PM SirAndy I cut it off with a pair of snips. I'll take ... Jun 27 2020, 03:01 PM BillC
[quote name='BillC' post='2828616' date='Jun 27 2... Jun 27 2020, 05:22 PM BillC And, in the archaeology department, here's a c... Jun 27 2020, 12:23 PM BillC It turns out that the car may have it's origin... Jun 27 2020, 12:27 PM preach
It turns out that the car may have it's origi... Jun 27 2020, 05:49 PM Chris914n6 The foam is factory correct for an early car. It... Jun 27 2020, 12:30 PM BillC
The foam is factory correct for an early car. It... Jun 27 2020, 12:44 PM mepstein
The foam is factory correct for an early car. It... Jun 27 2020, 04:11 PM ClayPerrine
[quote name='BillC' post='2828626' date='Jun 27 2... Jun 27 2020, 04:46 PM ClayPerrine Trying to "Un-DAPO" the car.
I am sti... Jun 27 2020, 03:17 PM Cairo94507 I hope they disclosed all of those issues prior to... Jun 27 2020, 05:42 PM BillC
I hope they disclosed all of those issues prior t... Jun 27 2020, 06:06 PM BillC So, continuing down the list of discoveries:
Ther... Jun 27 2020, 06:23 PM barefoot
The 1.7/1.8 SS heat exchangers have the same tub... Jun 28 2020, 01:35 PM BillC
The 1.7/1.8 SS heat exchangers have the same tu... Jun 28 2020, 05:48 PM BillC So, we got the engine and fuel tank out yesterday.... Jun 29 2020, 10:56 AM SirAndy For what it's worth, i really like the color... Jun 29 2020, 12:25 PM BillC
For what it's worth, i really like the color... Jul 1 2020, 04:12 PM Craigers17 This situation seems particularly frustrating....e... Jul 1 2020, 04:43 PM Superhawk996
This situation seems particularly frustrating....... Jul 1 2020, 05:02 PM BillC
This situation seems particularly frustrating....... Jul 1 2020, 05:22 PM 2mAn :WTF:
:chair: Jul 1 2020, 04:56 PM Wyvern When I started reading this I did not know what a ... Jul 1 2020, 05:03 PM BillC Made more progress today.
Removed the rear window... Jul 2 2020, 05:19 PM Montreal914 Not sure what your front sway bar setup is but I d... Jul 2 2020, 05:50 PM BillC
Not sure what your front sway bar setup is but I ... Jul 2 2020, 05:53 PM BillC It doesn't seem like I accomplished much today... Jul 3 2020, 04:44 PM BillC Well, I didn't make as much progress as hoped ... Jul 6 2020, 04:26 PM Cairo94507 Very nice. You are making great progress and tack... Jul 6 2020, 05:54 PM Front yard mechanic If you ever sell the car think what the next owner... Jul 6 2020, 08:07 PM BillC
If you ever sell the car think what the next owne... Jul 7 2020, 06:36 AM Superhawk996
If you ever sell the car think what the next own... Jul 8 2020, 06:40 AM get off my lawn
If you ever sell the car think what the next owne... Jul 7 2020, 03:20 PM IronHillRestorations Sad to see the misfortune of some cars. I hope my... Jul 7 2020, 03:16 PM BillC The order with the rubber isolator finally came, s... Jul 9 2020, 07:08 PM BillC Today I worked on reinstalling the fresh air box. ... Jul 11 2020, 04:19 PM BillC Time to tackle the hacked-in hole by the foot peda... Jul 12 2020, 02:39 PM 914werke Good idea on the Wire support. Jul 12 2020, 03:00 PM Superhawk996 Like the wire support execution.
My donor tunne... Jul 12 2020, 03:58 PM BillC
Like the wire support execution.
Thanks, but it... Jul 12 2020, 07:17 PM ClayPerrine
Like the wire support execution.
Thanks, but i... Jul 12 2020, 09:50 PM BillC And now, let's go after this lovely bunch of h... Jul 13 2020, 07:17 PM BillC The lovely bunch of holes, continued:
Here's ... Jul 13 2020, 07:29 PM Superhawk996 :trophy:
Like the screw as a handle. Still had ... Jul 14 2020, 07:50 AM BillC Like the screw as a handle. Still had to have bee... Jul 14 2020, 12:35 PM kroelofsen :Qarl: Nice work...! Jul 14 2020, 11:53 AM bkrantz Be fair! I am sure most 914s were free of rus... Jul 14 2020, 08:29 PM BillC
Be fair! I am sure most 914s were free of ru... Jul 15 2020, 04:34 PM BillC Time to do more work on the fuel system.
First, n... Jul 17 2020, 04:52 PM barefoot Next, is to mount the fuel pump and fuel filter. ... Jul 18 2020, 02:13 PM Superhawk996 :cheer: Jul 18 2020, 08:43 AM Cupomeat Love this thread! Thankfully I've had my 9... Jul 18 2020, 09:05 AM BillC
Love this thread!
Thanks! Sometimes I w... Jul 18 2020, 06:27 PM bkrantz
Love this thread!
Thanks! Sometimes I ... Jul 18 2020, 08:33 PM BillC
Did you consider mounting the pump on the undersi... Jul 19 2020, 05:51 AM BillC Anyway, finally got the pump, filter and hoses ins... Jul 18 2020, 06:27 PM BillC So, the parts I've been waiting for finally ar... Jul 23 2020, 02:11 PM Superhawk996
Here are the pliers reassembled and holding a r... Jul 23 2020, 02:33 PM BillC Last night, I glued the perlon back on the front b... Jul 24 2020, 03:27 PM BillC This is what the battery tray looked like:
This i... Jul 26 2020, 10:38 AM Frankvw good trick with adjusting these pliers !
Ques... Jul 27 2020, 01:05 AM BillC
good trick with adjusting these pliers !
Que... Jul 27 2020, 02:20 PM Frankvw "If you want, I'll take more pictures of ... Jul 27 2020, 02:25 PM BillC Well, it's been too long, but I finally had a ... Aug 9 2020, 06:32 PM porschetub you have great metal fab skills,well done but expe... Aug 9 2020, 09:14 PM BillC Didn't plan on it taking so long for this next... Aug 23 2020, 06:02 PM BillC Well, it's been waaaay too long since I made a... Oct 12 2020, 04:01 PM Tdskip Nice going, and thanks for the updates! Oct 13 2020, 09:02 AM BillC It's finally time to take on the last "DA... Oct 22 2020, 02:22 PM BillC I was able to spend some time with the car this we... Nov 2 2020, 03:32 PM Cairo94507 Very very nice work. :trophy: Nov 2 2020, 04:42 PM StarBear
Very very nice work. :trophy:
:agree: Nov 28 2020, 10:45 AM BillC I took advantage of the federal holiday to spend a... Nov 11 2020, 04:17 PM Morph914 Your thread makes me realize how fortunate I was t... Nov 11 2020, 08:10 PM bkrantz
Your thread makes me realize how fortunate I was ... Nov 28 2020, 08:58 PM BillC I had some time yesterday to work on the car, so I... Nov 28 2020, 10:07 AM Superhawk996
Then, after I was finished with the mirror holes... Nov 29 2020, 10:25 AM BillC Now it's time to tackle a common 914 problem (... Nov 29 2020, 04:21 PM Cairo94507 Chasing the rust is a very very slippery slope. I... Nov 29 2020, 04:43 PM BillC So, the new sander belts came in and I got back to... Dec 5 2020, 05:07 PM BillC And . . . done!
It even works!
I need ... Dec 6 2020, 12:13 PM Superhawk996
And . . . done!
No getting off that easy.... Dec 21 2020, 09:01 AM BillC
And I agree: grad school sons are sometimes helpf... Dec 21 2020, 09:32 AM barefoot
And . . . done!
No getting off that easy... Dec 22 2020, 12:31 PM BillC And, now for the moment you've all have been w... Dec 20 2020, 05:00 PM AZBanks Great work. Looks really good. Dec 20 2020, 07:01 PM bkrantz Looks great.
And I agree: grad school sons are so... Dec 20 2020, 09:16 PM PanelBilly Reading this makes me want to build another car. F... Dec 21 2020, 12:01 AM Cairo94507 Bill, @BillC , great job. So nice to see that do... Dec 21 2020, 10:12 AM bbrock Just getting caught up on your thread. Fantastic ... Dec 22 2020, 02:29 PM BillC It may look like not much has happened since the l... Jan 10 2021, 11:43 AM pete000 Just remember that is wasn't all that long ago... Jan 10 2021, 03:25 PM BillC Time to take on the last rusty area I've found... Jan 17 2021, 02:16 PM BillC I was able to spend more time today on the car, st... Jan 18 2021, 07:27 PM jaredmcginness Nice work! I used 16g for that section on my c... Jan 19 2021, 05:38 AM
BillC
Front mounted oil cooler or AC? :confused:
Look ... Jun 27 2020, 12:06 PM BillC But, so far, the "best" has to be the ho... Jun 27 2020, 12:16 PM SirAndy I cut it off with a pair of snips. I'll take ... Jun 27 2020, 03:01 PM BillC
[quote name='BillC' post='2828616' date='Jun 27 2... Jun 27 2020, 05:22 PM BillC And, in the archaeology department, here's a c... Jun 27 2020, 12:23 PM BillC It turns out that the car may have it's origin... Jun 27 2020, 12:27 PM preach
It turns out that the car may have it's origi... Jun 27 2020, 05:49 PM Chris914n6 The foam is factory correct for an early car. It... Jun 27 2020, 12:30 PM BillC
The foam is factory correct for an early car. It... Jun 27 2020, 12:44 PM mepstein
The foam is factory correct for an early car. It... Jun 27 2020, 04:11 PM ClayPerrine
[quote name='BillC' post='2828626' date='Jun 27 2... Jun 27 2020, 04:46 PM ClayPerrine Trying to "Un-DAPO" the car.
I am sti... Jun 27 2020, 03:17 PM Cairo94507 I hope they disclosed all of those issues prior to... Jun 27 2020, 05:42 PM BillC
I hope they disclosed all of those issues prior t... Jun 27 2020, 06:06 PM BillC So, continuing down the list of discoveries:
Ther... Jun 27 2020, 06:23 PM barefoot
The 1.7/1.8 SS heat exchangers have the same tub... Jun 28 2020, 01:35 PM BillC
The 1.7/1.8 SS heat exchangers have the same tu... Jun 28 2020, 05:48 PM BillC So, we got the engine and fuel tank out yesterday.... Jun 29 2020, 10:56 AM SirAndy For what it's worth, i really like the color... Jun 29 2020, 12:25 PM BillC
For what it's worth, i really like the color... Jul 1 2020, 04:12 PM Craigers17 This situation seems particularly frustrating....e... Jul 1 2020, 04:43 PM Superhawk996
This situation seems particularly frustrating....... Jul 1 2020, 05:02 PM BillC
This situation seems particularly frustrating....... Jul 1 2020, 05:22 PM 2mAn :WTF:
:chair: Jul 1 2020, 04:56 PM Wyvern When I started reading this I did not know what a ... Jul 1 2020, 05:03 PM BillC Made more progress today.
Removed the rear window... Jul 2 2020, 05:19 PM Montreal914 Not sure what your front sway bar setup is but I d... Jul 2 2020, 05:50 PM BillC
Not sure what your front sway bar setup is but I ... Jul 2 2020, 05:53 PM BillC It doesn't seem like I accomplished much today... Jul 3 2020, 04:44 PM BillC Well, I didn't make as much progress as hoped ... Jul 6 2020, 04:26 PM Cairo94507 Very nice. You are making great progress and tack... Jul 6 2020, 05:54 PM Front yard mechanic If you ever sell the car think what the next owner... Jul 6 2020, 08:07 PM BillC
If you ever sell the car think what the next owne... Jul 7 2020, 06:36 AM Superhawk996
If you ever sell the car think what the next own... Jul 8 2020, 06:40 AM get off my lawn
If you ever sell the car think what the next owne... Jul 7 2020, 03:20 PM IronHillRestorations Sad to see the misfortune of some cars. I hope my... Jul 7 2020, 03:16 PM BillC The order with the rubber isolator finally came, s... Jul 9 2020, 07:08 PM BillC Today I worked on reinstalling the fresh air box. ... Jul 11 2020, 04:19 PM BillC Time to tackle the hacked-in hole by the foot peda... Jul 12 2020, 02:39 PM 914werke Good idea on the Wire support. Jul 12 2020, 03:00 PM Superhawk996 Like the wire support execution.
My donor tunne... Jul 12 2020, 03:58 PM BillC
Like the wire support execution.
Thanks, but it... Jul 12 2020, 07:17 PM ClayPerrine
Like the wire support execution.
Thanks, but i... Jul 12 2020, 09:50 PM BillC And now, let's go after this lovely bunch of h... Jul 13 2020, 07:17 PM BillC The lovely bunch of holes, continued:
Here's ... Jul 13 2020, 07:29 PM Superhawk996 :trophy:
Like the screw as a handle. Still had ... Jul 14 2020, 07:50 AM BillC Like the screw as a handle. Still had to have bee... Jul 14 2020, 12:35 PM kroelofsen :Qarl: Nice work...! Jul 14 2020, 11:53 AM bkrantz Be fair! I am sure most 914s were free of rus... Jul 14 2020, 08:29 PM BillC
Be fair! I am sure most 914s were free of ru... Jul 15 2020, 04:34 PM BillC Time to do more work on the fuel system.
First, n... Jul 17 2020, 04:52 PM barefoot Next, is to mount the fuel pump and fuel filter. ... Jul 18 2020, 02:13 PM Superhawk996 :cheer: Jul 18 2020, 08:43 AM Cupomeat Love this thread! Thankfully I've had my 9... Jul 18 2020, 09:05 AM BillC
Love this thread!
Thanks! Sometimes I w... Jul 18 2020, 06:27 PM bkrantz
Love this thread!
Thanks! Sometimes I ... Jul 18 2020, 08:33 PM BillC
Did you consider mounting the pump on the undersi... Jul 19 2020, 05:51 AM BillC Anyway, finally got the pump, filter and hoses ins... Jul 18 2020, 06:27 PM BillC So, the parts I've been waiting for finally ar... Jul 23 2020, 02:11 PM Superhawk996
Here are the pliers reassembled and holding a r... Jul 23 2020, 02:33 PM BillC Last night, I glued the perlon back on the front b... Jul 24 2020, 03:27 PM BillC This is what the battery tray looked like:
This i... Jul 26 2020, 10:38 AM Frankvw good trick with adjusting these pliers !
Ques... Jul 27 2020, 01:05 AM BillC
good trick with adjusting these pliers !
Que... Jul 27 2020, 02:20 PM Frankvw "If you want, I'll take more pictures of ... Jul 27 2020, 02:25 PM BillC Well, it's been too long, but I finally had a ... Aug 9 2020, 06:32 PM porschetub you have great metal fab skills,well done but expe... Aug 9 2020, 09:14 PM BillC Didn't plan on it taking so long for this next... Aug 23 2020, 06:02 PM BillC Well, it's been waaaay too long since I made a... Oct 12 2020, 04:01 PM Tdskip Nice going, and thanks for the updates! Oct 13 2020, 09:02 AM BillC It's finally time to take on the last "DA... Oct 22 2020, 02:22 PM BillC I was able to spend some time with the car this we... Nov 2 2020, 03:32 PM Cairo94507 Very very nice work. :trophy: Nov 2 2020, 04:42 PM StarBear
Very very nice work. :trophy:
:agree: Nov 28 2020, 10:45 AM BillC I took advantage of the federal holiday to spend a... Nov 11 2020, 04:17 PM Morph914 Your thread makes me realize how fortunate I was t... Nov 11 2020, 08:10 PM bkrantz
Your thread makes me realize how fortunate I was ... Nov 28 2020, 08:58 PM BillC I had some time yesterday to work on the car, so I... Nov 28 2020, 10:07 AM Superhawk996
Then, after I was finished with the mirror holes... Nov 29 2020, 10:25 AM BillC Now it's time to tackle a common 914 problem (... Nov 29 2020, 04:21 PM Cairo94507 Chasing the rust is a very very slippery slope. I... Nov 29 2020, 04:43 PM BillC So, the new sander belts came in and I got back to... Dec 5 2020, 05:07 PM BillC And . . . done!
It even works!
I need ... Dec 6 2020, 12:13 PM Superhawk996
And . . . done!
No getting off that easy.... Dec 21 2020, 09:01 AM BillC
And I agree: grad school sons are sometimes helpf... Dec 21 2020, 09:32 AM barefoot
And . . . done!
No getting off that easy... Dec 22 2020, 12:31 PM BillC And, now for the moment you've all have been w... Dec 20 2020, 05:00 PM AZBanks Great work. Looks really good. Dec 20 2020, 07:01 PM bkrantz Looks great.
And I agree: grad school sons are so... Dec 20 2020, 09:16 PM PanelBilly Reading this makes me want to build another car. F... Dec 21 2020, 12:01 AM Cairo94507 Bill, @BillC , great job. So nice to see that do... Dec 21 2020, 10:12 AM bbrock Just getting caught up on your thread. Fantastic ... Dec 22 2020, 02:29 PM BillC It may look like not much has happened since the l... Jan 10 2021, 11:43 AM pete000 Just remember that is wasn't all that long ago... Jan 10 2021, 03:25 PM BillC Time to take on the last rusty area I've found... Jan 17 2021, 02:16 PM BillC I was able to spend more time today on the car, st... Jan 18 2021, 07:27 PM jaredmcginness Nice work! I used 16g for that section on my c... Jan 19 2021, 05:38 AM  |
1 User(s) are reading this topic (1 Guests and 0 Anonymous Users)
0 Members:

|
Lo-Fi Version | Time is now: 14th June 2026 - 11:38 PM |
Invision Power Board
v9.1.4 © 2026 IPS, Inc.