|
|
|
Porsche, and the Porsche crest are registered trademarks of Dr. Ing. h.c. F. Porsche AG.
This site is not affiliated with Porsche in any way. Its only purpose is to provide an online forum for car enthusiasts. All other trademarks are property of their respective owners. |
|
|

  |

| bkrantz |
 Nov 28 2020, 08:58 PM Nov 28 2020, 08:58 PM
Post
#81
|
|
914 Guru  Group: Members Posts: 8,716 Joined: 3-August 19 From: SW Colorado Member No.: 23,343 Region Association: Rocky Mountains |
QUOTE(Morph914 @ Nov 11 2020, 07:10 PM)  Your thread makes me realize how fortunate I was to obtain a clean dry car with no dapo issues to deal with. Thank you for posting your progress, keep up the good work! Cheers, John What fun would that be? (IMG:style_emoticons/default/biggrin.gif) |
   |

 
|
| Superhawk996 |
Nov 29 2020, 10:25 AM
Post
#82
|
|
914 Guru Group: Members Posts: 7,886 Joined: 25-August 18 From: Woods of N. Idaho Member No.: 22,428 Region Association: Galt's Gulch |
QUOTE(BillC @ Nov 28 2020, 11:07 AM) Then, after I was finished with the mirror holes, I went back and painted all the rusty areas inside the door with rust-converter. It's not ideal, but it should stop the door from rusting inside-out before the car can get a full restoration. (IMG:style_emoticons/default/happy11.gif) Good job. Love these sorts of pictures to reinforce there is no such animal as a rust free 914 regardless of how it looks on the outside! Keep going - your car is coming along nicely. (IMG:style_emoticons/default/aktion035.gif) |
|
|
|
| BillC |
Nov 29 2020, 04:21 PM
Post
#83
|
|
Senior Member Group: Members Posts: 732 Joined: 24-April 15 From: Silver Spring, MD Member No.: 18,667 Region Association: MidAtlantic Region |
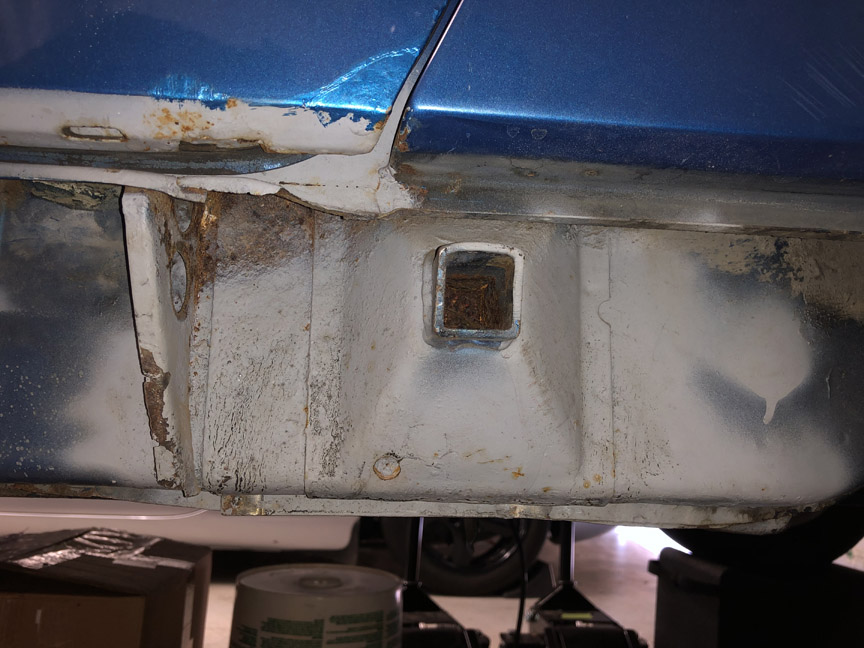
Now it's time to tackle a common 914 problem (woohoo! . . . err, I think . . .) -- the jack points. Mine actually looked pretty good externally, but I discovered that both were packed full of sand and rust. Here's what the driver's side looked like after getting the sand out. Those little "lines" next to the vent hole are actually rust perforations, not scratches.
 The passenger side was actually in worse shape than the driver's side, so that's where I started. Here's what the passenger side looked like after I took some tin snips to it: 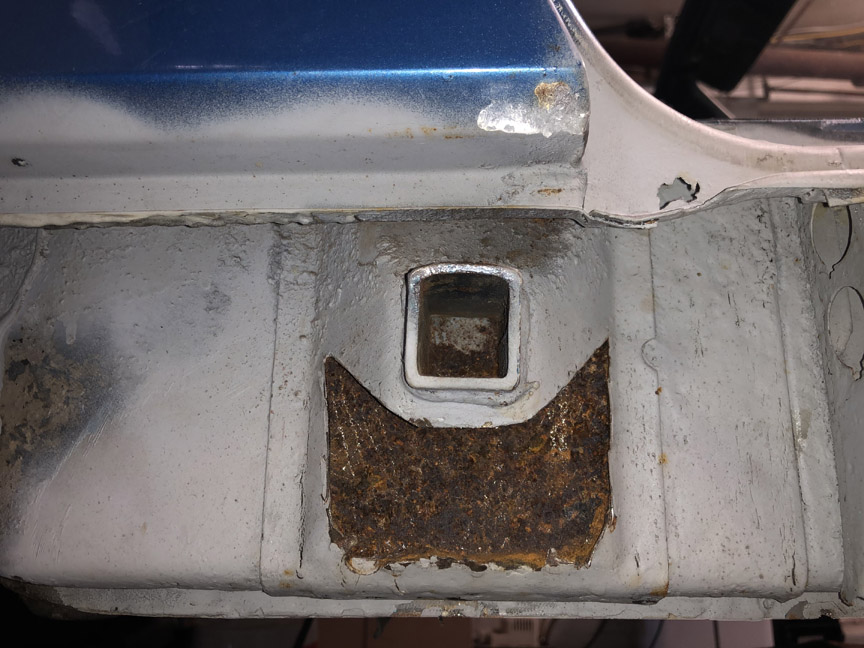 Pretty nasty inside. At this point, there really isn't much choice except to replace (at a minimum) the jackpoint reinforcements. When I've read other people's projects, they usually chop off a good-sized chunk of the quarter panel behind the door opening. While this makes access to the top of the reinforcement much easier, it requires a lot of work to fix the quarter afterward. I decided to try a different approach. I bought one of those little belt sanders you see on various car restoration shows.  This thing works great! I'm astounded, I wish I had bought one many years ago. The 36 grit belt just zipped through the sheet metal, making it very easy to remove the spot welds on the bottom and the sides. The plan is to reach down from above (inside the quarter panel) to remove the top of the reinforcement. I got about 80% through the removal process today -- the bottom and both sides are gone. The top part will have to wait for later, since I'm out of belts. The sander only came with one 36 grit belt, which lasted through taking off about half the reinforcement. The other belts that came with the kit didn't last very long, since they were finer grit. So, now I have to wait for a new order of belts to come; they should be here in time for next weekend. This is what the piece looks like now: 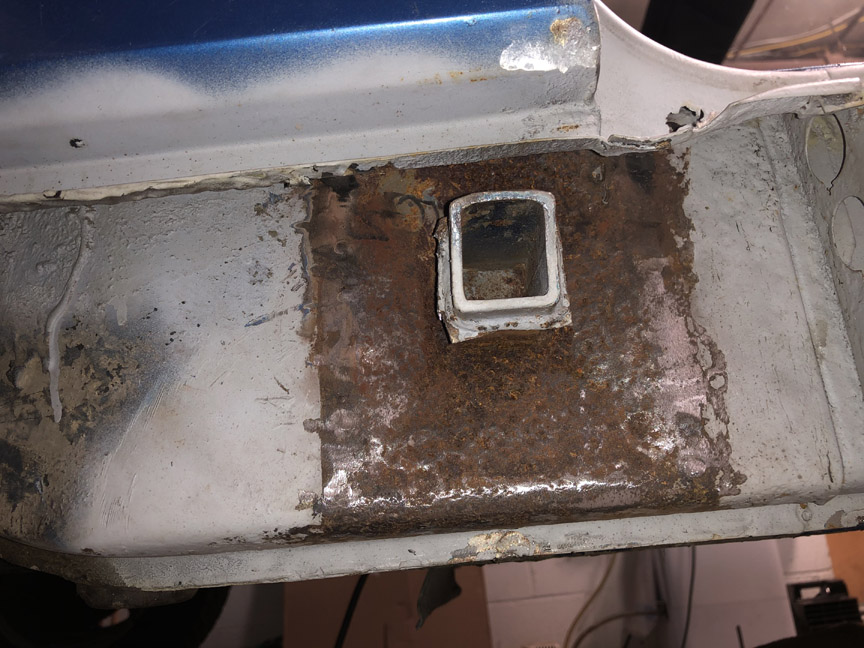 Haven't quite decided what to do about the inner sheet metal. There are no penetrations and the jack post is solid, but the sheet metal is rather thin in spots. I'd like to replace the sheet metal, but replacement stampings are rather pricey, especially for the small pieces I'd need from it. On the other hand, McMaster sells galvanneal sheet -- I can get a 2'x2' panel for less than half of one of the pre-formed parts, and have plenty left over. I guess we'll see once I get the rest of the old reinforcement out. |
|
|
|
| Cairo94507 |
Nov 29 2020, 04:43 PM
Post
#84
|
|
Michael Group: Members Posts: 10,670 Joined: 1-November 08 From: Auburn, CA Member No.: 9,712 Region Association: Northern California |
Chasing the rust is a very very slippery slope. I began drinking when we were cutting out rust and replacing panels. I did not think I was going to survive that seemingly never-ending trauma.
In reality, looking back, dealing with the rust really was not that bad on my car. It mostly had bad body repair work from when these cars were a dime a dozen (and in VA) when no one took the time to do it correctly. Fortunately, I had Kent Simmons (Auto Art Customs,Torrance, CA) on the job and he was 1000% up to the task. I have never regretted meeting and getting to know Kent. All I can say is if you have rust, not even bad rust, find someone who knows what they are doing so that rust issue, even after rust repairs, doesn't keep haunting you in all sorts of different ways. (IMG:style_emoticons/default/beerchug.gif) |
 |
|
| BillC |
Dec 5 2020, 05:07 PM
Post
#85
|
|
Senior Member Group: Members Posts: 732 Joined: 24-April 15 From: Silver Spring, MD Member No.: 18,667 Region Association: MidAtlantic Region |
So, the new sander belts came in and I got back to work on the car this morning.
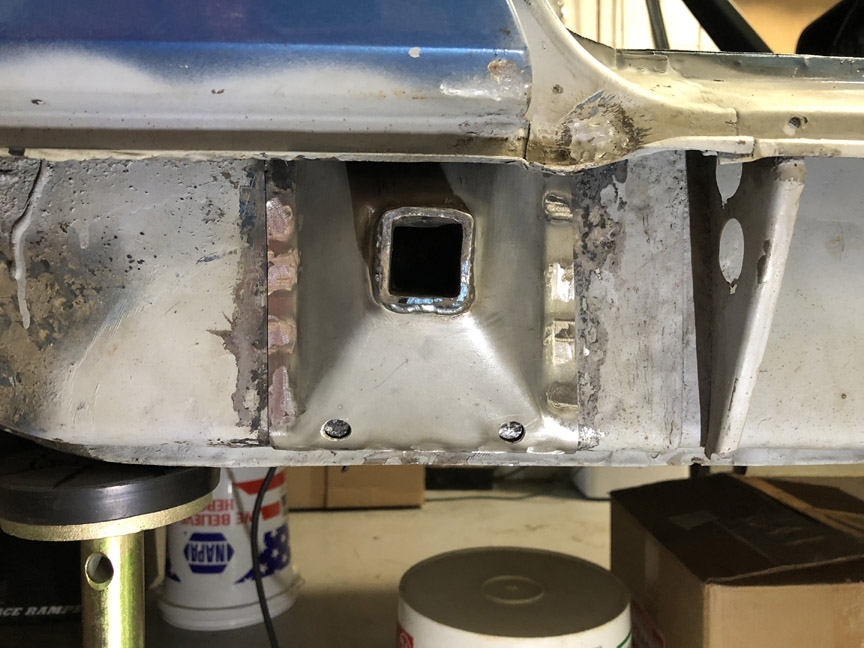
Here's what the remains of the jackpoint reinforcement looked like from inside the quarter panel: 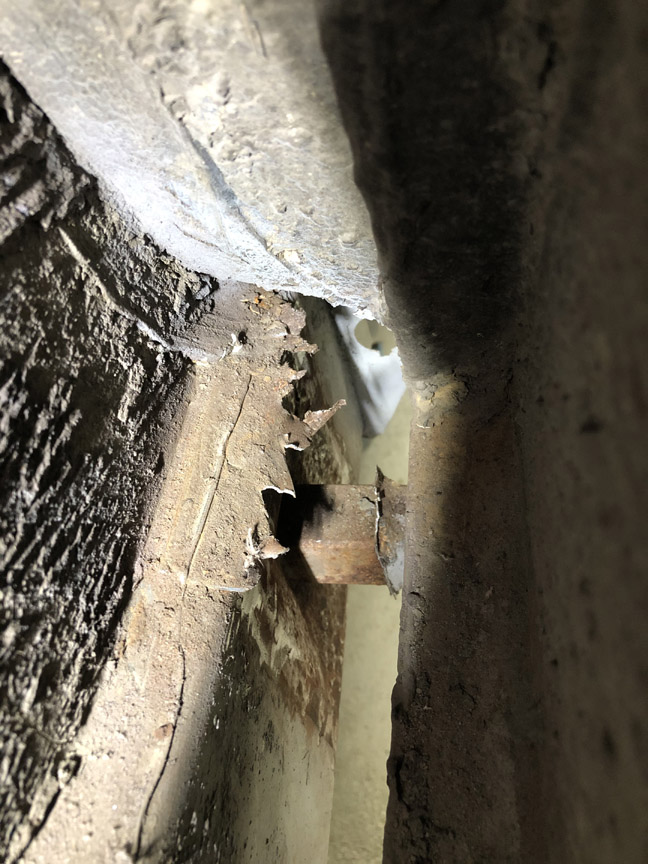 About a half-hour later, this is what that space looked like: 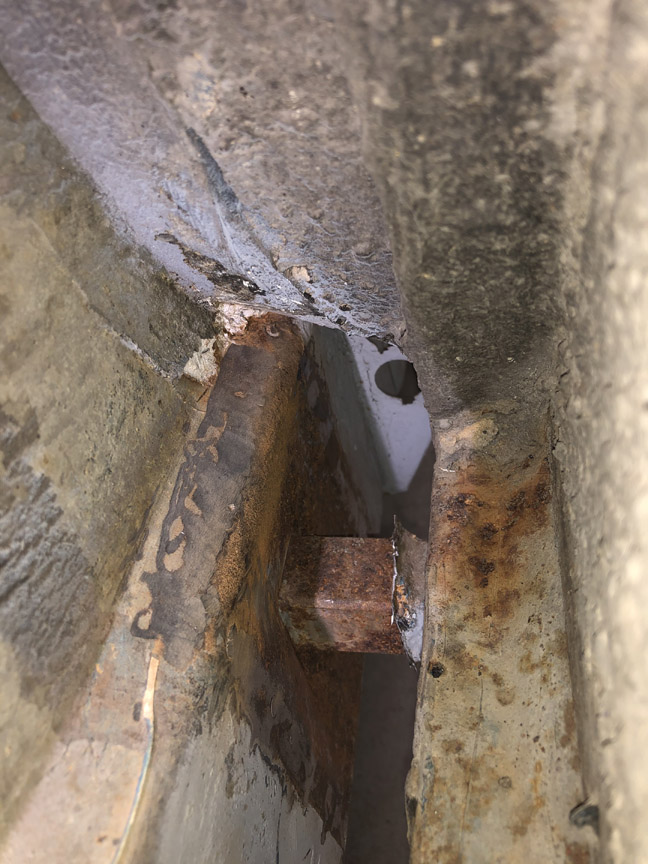 I am really liking this little belt sander. However, the generic 36-grit belts were disappointing -- the grit was caked on so thick, most of it cracked off pretty quickly. Fortunately, I also ordered some 3m cubitron 60+ grit belts that did a great job on the old sheet metal and rust. Once I got the rest of the old reinforcement out, including cleaning the remnants off the jack post, I tried dry-fitting the new piece. I was pleasantly surprised to find that I can get the panel in place with just some wiggling; I was afraid I'd have to cut it in half, but no need. 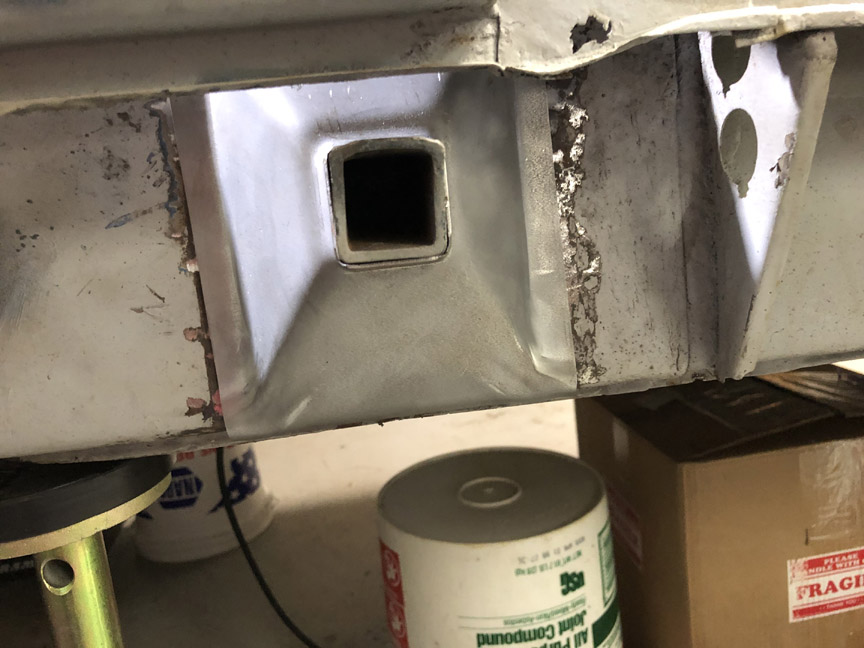 After that, I soaked the whole area down with Ospho. The plan is to use some Eastwood internal-chassis paint inside that area once everything is welded back in place. Also, since I had the welder out, I decided to weld up the hole in the sheet metal under the door opening. You can see the hole in the above pics. 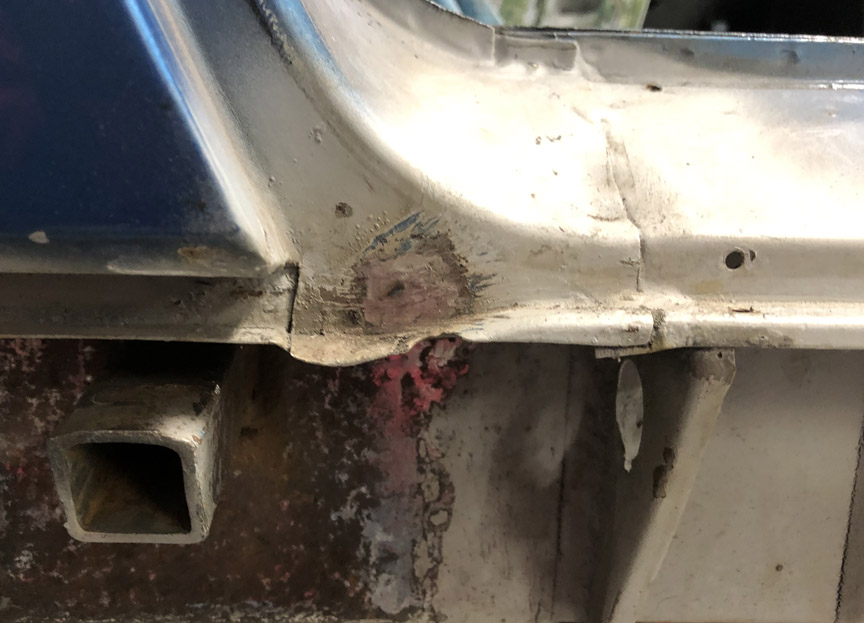 With any luck, I'll be be able to weld the reinforcement in place tomorrow. |
|
|
|
| BillC |
Dec 6 2020, 12:13 PM
Post
#86
|
|
Senior Member Group: Members Posts: 732 Joined: 24-April 15 From: Silver Spring, MD Member No.: 18,667 Region Association: MidAtlantic Region |
And . . . done!
 It even works! 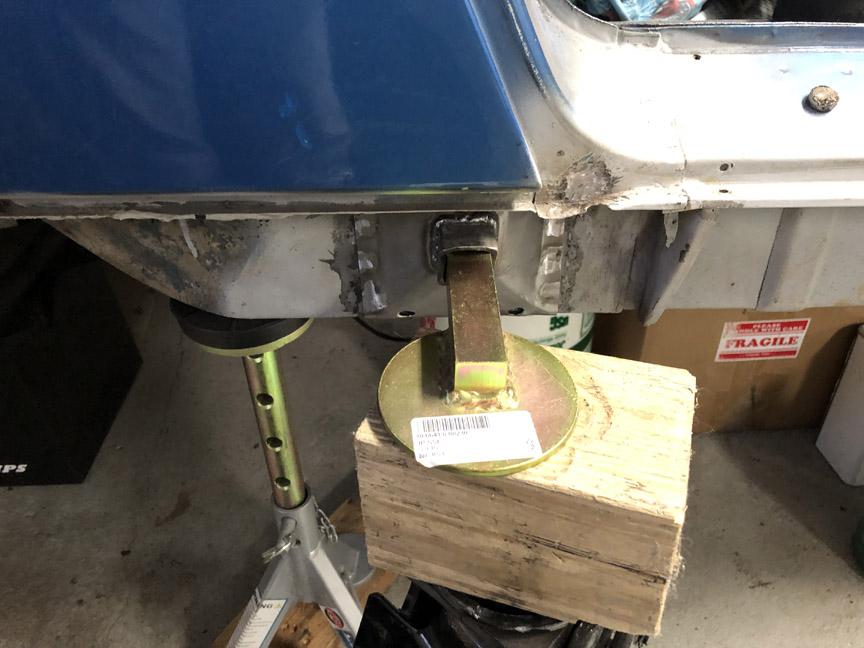 I need to finish cleaning up and painting this side, then it's on to the other side (joy. (IMG:style_emoticons/default/headbang.gif) ) |
|
|
|
| BillC |
Dec 20 2020, 05:00 PM
Post
#87
|
|
Senior Member Group: Members Posts: 732 Joined: 24-April 15 From: Silver Spring, MD Member No.: 18,667 Region Association: MidAtlantic Region |
And, now for the moment you've all have been waiting for!
Okay, well, maybe not all of you. Errr, well, maybe not any of you.... But it's the moment I've been waiting for, for far too long -- time to reinstall the passenger door! It took a while to clean up the rust and old primer on the sill. It was all sanded down, treated with Ospho, re-primed and repainted. Here's what it looked like, just waiting for the door: 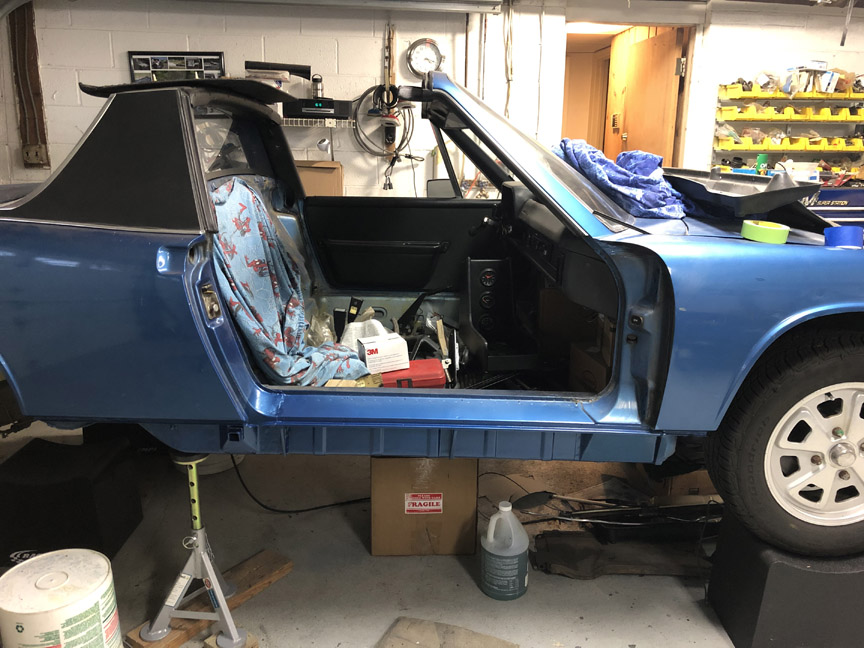 One little trick I figured out a long time ago, on a project far far away, is using studs to help with bolting on the hinges. Put one stud in the body plate for each hinge (one top and one bottom). This makes it much easier to line up and install the first two bolts. Once they're in, unscrew the stud and install the last bolt. Here's the idea: 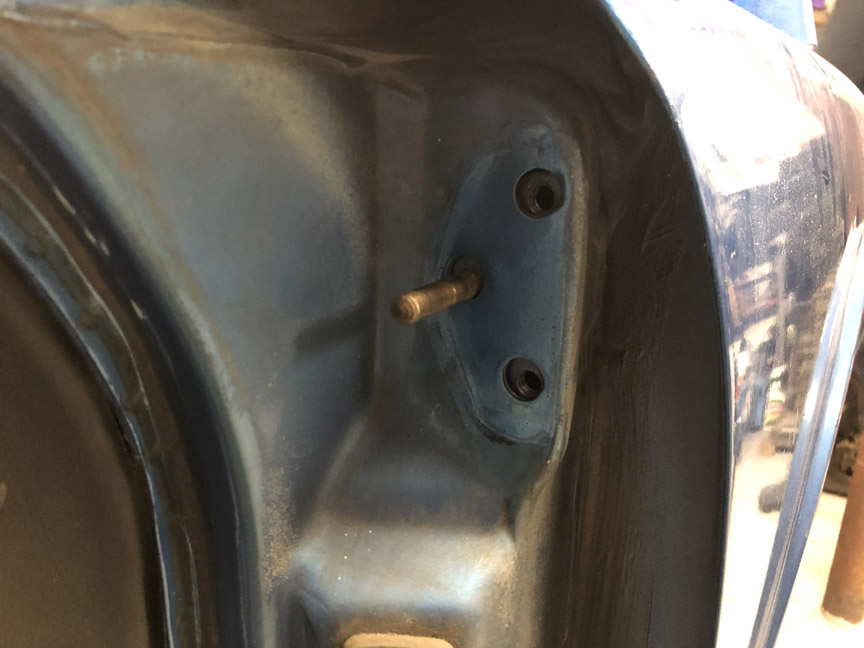 The doors mount with 8-1.25mm bolts, which are the same size as the exhaust studs. So, most of you probably already have a few lying around somewhere. And, now the moment .... yeah, you know what's coming. The door installed! 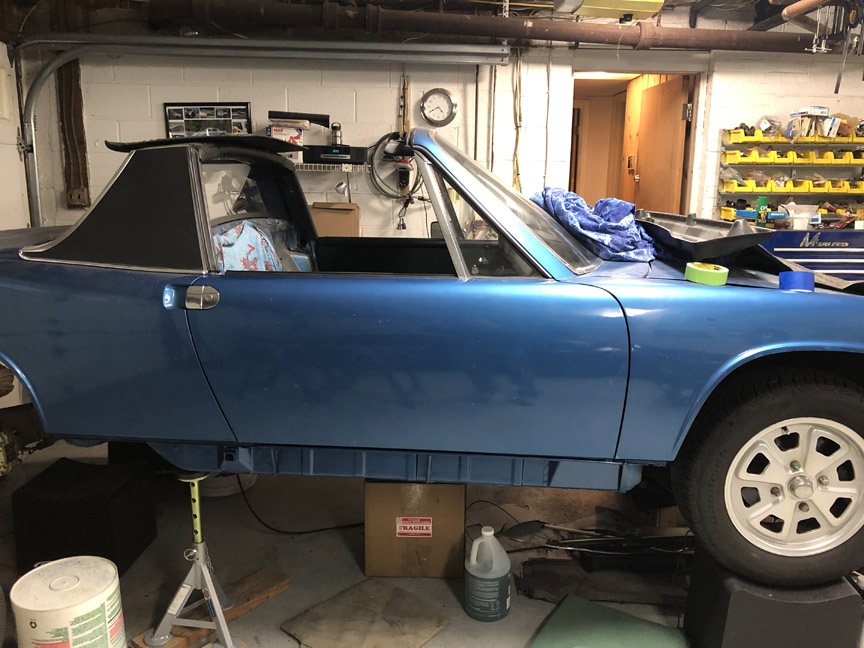 This was a two-person job. I held the door in place, while my oldest son (who's home from grad school) installed the bolts. Then, he helped me adjust the door. It's lined up much better than when it arrived. While I was at it, I also installed the passenger-side mirror. It's just a normal driver-side mirror, flipped over. Someday I may get a piece of convex mirror glass for it, but for now it'll work, and it just looks so much better than those aftermarket mirrors that were on my previous 914. 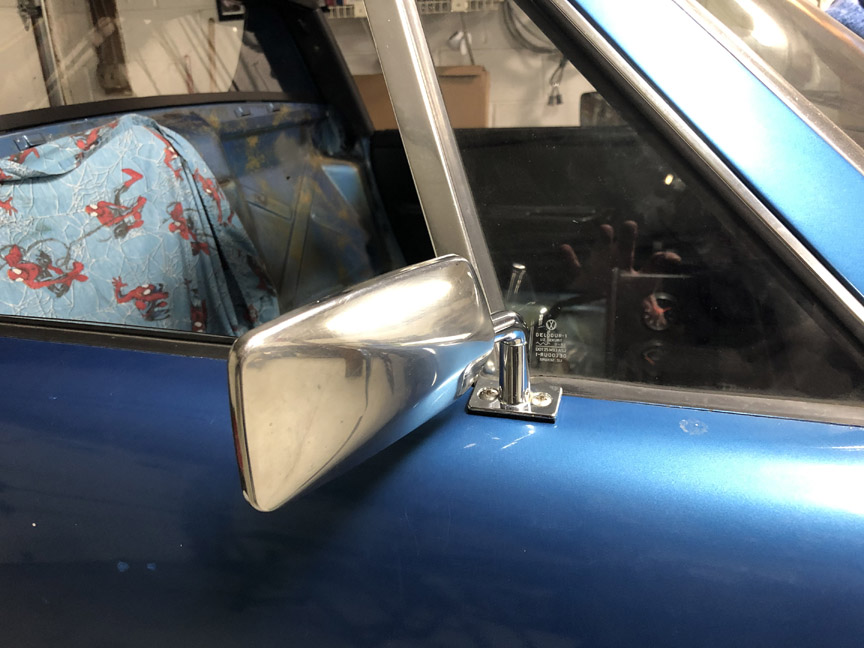 |
|
|
|
| AZBanks |
Dec 20 2020, 07:01 PM
Post
#88
|
|
Senior Member Group: Members Posts: 1,079 Joined: 7-December 05 From: New River, AZ Member No.: 5,245 Region Association: Southwest Region |
Great work. Looks really good.
|
|
|
|
| bkrantz |
Dec 20 2020, 09:16 PM
Post
#89
|
|
914 Guru Group: Members Posts: 8,716 Joined: 3-August 19 From: SW Colorado Member No.: 23,343 Region Association: Rocky Mountains |
Looks great.
And I agree: grad school sons are sometimes helpful. |
|
|
|
| PanelBilly |
Dec 21 2020, 12:01 AM
Post
#90
|
|
914 Guru Group: Members Posts: 5,969 Joined: 23-July 06 From: Kent, Wa Member No.: 6,488 Region Association: Pacific Northwest |
Reading this makes me want to build another car. For now, I'll just watch from afar and admire your workmanship
|
|
|
|
| Superhawk996 |
Dec 21 2020, 09:01 AM
Post
#91
|
|
914 Guru Group: Members Posts: 7,886 Joined: 25-August 18 From: Woods of N. Idaho Member No.: 22,428 Region Association: Galt's Gulch |
QUOTE(BillC @ Dec 6 2020, 01:13 PM) And . . . done! No getting off that easy. (IMG:style_emoticons/default/happy11.gif) Do tell . . . . How did you weld the top? I'm assuming MIG with blind point & shoot approach? I've got a similar situation but will need to TIG. I'm really debating about removing the top 1/2 of the pyramid. I want full fresh metal in there but I think it's going to be almost impossible to weld the top. Having said that the welds along bottom and side would be more than enough to provide a functional support. Maybe just seam seal the top and be done with it. (IMG:style_emoticons/default/idea.gif) |
|
|
|
| BillC |
Dec 21 2020, 09:32 AM
Post
#92
|
|
Senior Member Group: Members Posts: 732 Joined: 24-April 15 From: Silver Spring, MD Member No.: 18,667 Region Association: MidAtlantic Region |
QUOTE(bkrantz @ Dec 20 2020, 10:16 PM) And I agree: grad school sons are sometimes helpful. Yup, especially when they figure out how to pay for grad school on their own! In this case, he has a research assistant position that includes tuition and pays a stipend that covers room and board. QUOTE(Superhawk996 @ Dec 21 2020, 10:01 AM) QUOTE(BillC @ Dec 6 2020, 01:13 PM) And . . . done! No getting off that easy. (IMG:style_emoticons/default/happy11.gif) Do tell . . . . How did you weld the top? I'm assuming MIG with blind point & shoot approach? I've got a similar situation but will need to TIG. I'm really debating about removing the top 1/2 of the pyramid. I want full fresh metal in there but I think it's going to be almost impossible to weld the top. Having said that the welds along bottom and side would be more than enough to provide a functional support. Maybe just seam seal the top and be done with it. (IMG:style_emoticons/default/idea.gif) As you guessed, I used a MIG welder. I pre-drilled all the rosette holes, then one-at-a-time, positioned the MIG gun over each hole and filled in the spot. I used the goggles from my acetylene torch, since I couldn't get my head in position to see while wearing the welding helmet -- it was a little bright, but much better than no protection at all. I did the top after doing the sides and bottom, so I didn't have to worry about the piece moving while welding. Rather than just seam-sealing the top of your pyramid, maybe you can TIG the sides and bottom and then MIG weld the top like I did. Ugly welds hidden where no one can see should be better than no welds at all. |
|
|
|
| Cairo94507 |
Dec 21 2020, 10:12 AM
Post
#93
|
|
Michael Group: Members Posts: 10,670 Joined: 1-November 08 From: Auburn, CA Member No.: 9,712 Region Association: Northern California |
Bill, @BillC , great job. So nice to see that door fitting properly and you are 100% right about the stock mirrors- they fit the car perfectly. I too wish I had a convex mirror on my passenger side mirror. Great Job. (IMG:style_emoticons/default/beerchug.gif)
|
|
|
|
| barefoot |
Dec 22 2020, 12:31 PM
Post
#94
|
|
Senior Member Group: Members Posts: 1,517 Joined: 19-March 13 From: Charleston SC Member No.: 15,673 Region Association: South East States |
QUOTE(Superhawk996 @ Dec 21 2020, 10:01 AM) QUOTE(BillC @ Dec 6 2020, 01:13 PM) And . . . done! No getting off that easy. (IMG:style_emoticons/default/happy11.gif) Do tell . . . . How did you weld the top? I'm assuming MIG with blind point & shoot approach? I've got a similar situation but will need to TIG. I'm really debating about removing the top 1/2 of the pyramid. I want full fresh metal in there but I think it's going to be almost impossible to weld the top. Having said that the welds along bottom and side would be more than enough to provide a functional support. Maybe just seam seal the top and be done with it. (IMG:style_emoticons/default/idea.gif) Don't need the top welds, for shear, all other welds have enough to handle this and in bending, all the bending loads on the top half are trying to push the gasset into the longs anyway, no tensile loads on those welds. (IMG:style_emoticons/default/smile.gif) |
|
|
|
| bbrock |
Dec 22 2020, 02:29 PM
Post
#95
|
|
914 Guru Group: Members Posts: 5,269 Joined: 17-February 17 From: Montana Member No.: 20,845 Region Association: Rocky Mountains |
Just getting caught up on your thread. Fantastic work. (IMG:style_emoticons/default/smilie_pokal.gif) The stud for hanging doors is a great tip!!! I lost count of the number of times I mounted my doors solo and could have really benefited from that bit of wisdom (IMG:style_emoticons/default/beerchug.gif)
|
|
|
|
| BillC |
Jan 10 2021, 11:43 AM
Post
#96
|
|
Senior Member Group: Members Posts: 732 Joined: 24-April 15 From: Silver Spring, MD Member No.: 18,667 Region Association: MidAtlantic Region |
It may look like not much has happened since the last update, but most of that time was waiting for two little rubber bumpers. First place was back-ordered, but didn't bother to tell me before they shipped the rest of the order, which ended up taking nearly three weeks to be delivered (thanks again, usps. (IMG:style_emoticons/default/headbang.gif) ). I then asked if anyone on this forum had a pair and finally found a pair , but now that shipment is lost in usps hell. So, ended up getting a pair from Stoddard, which was the same price as the original vendor.
So, this is what the decklid looked like when I removed it from the car. The PO had primed a lot of area, trying to minimize the spread of rust, but didn't actually do any rust removal. 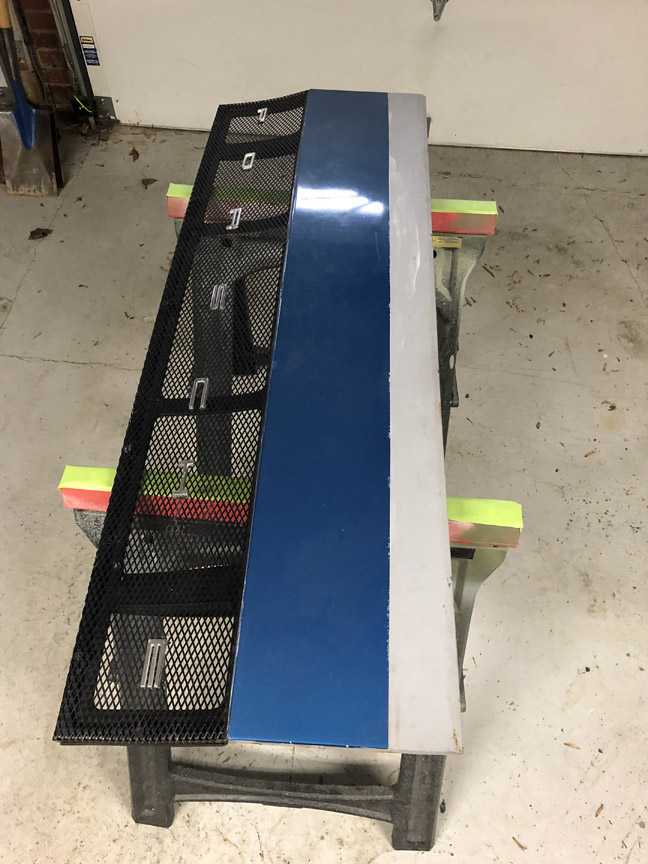 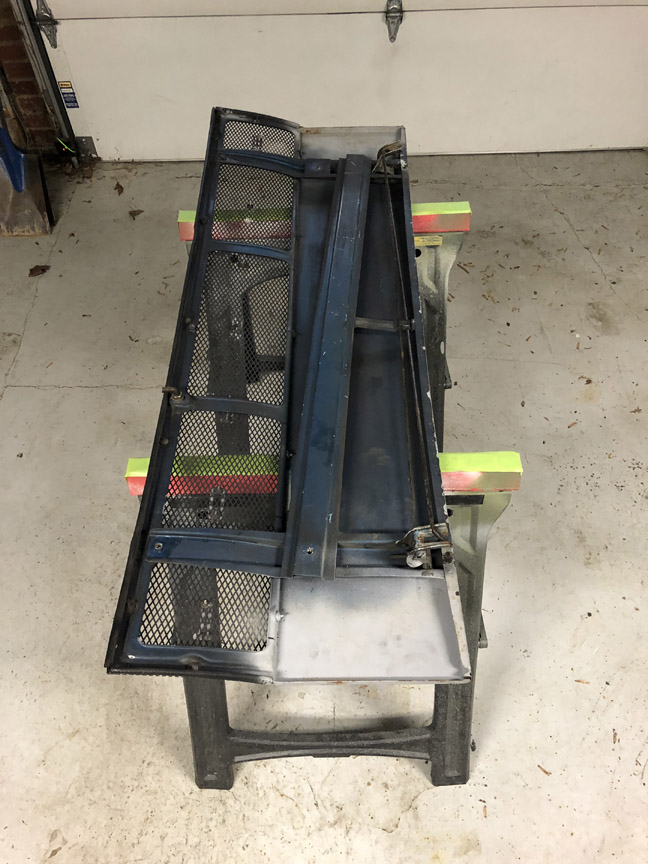 I took the grill and springs off, removed the extra primer, cleaned up the drip tray and repainted the decklid. Here's what it looks like back on the car: 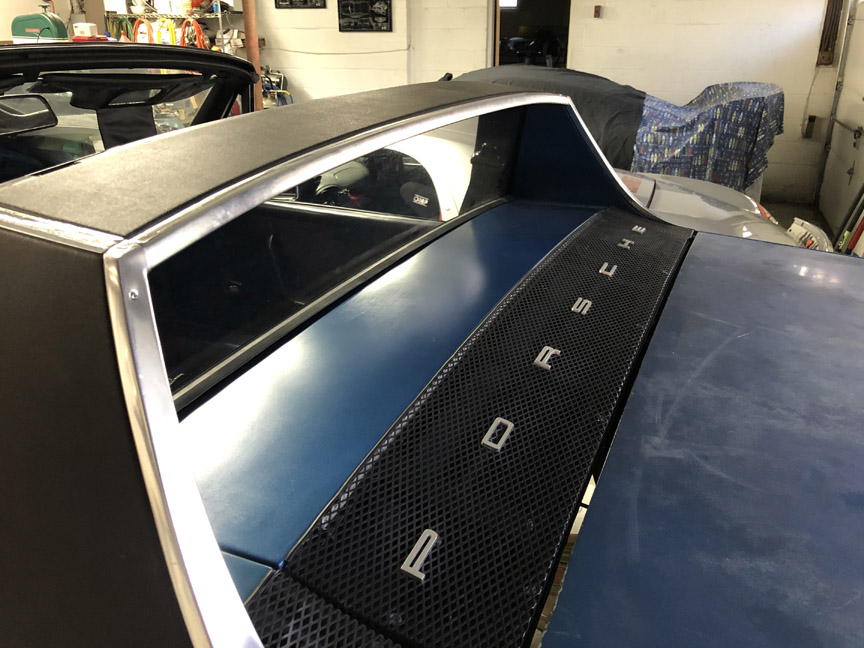 I thought I had taken a few pics after it was all painted and reassembled, but I guess I didn't (sorry). While it was apart, I decided to add a third brake light. Someone on a local forum sent me a string of LED lights. Thanks, Matt! Here's what the new light looks like: 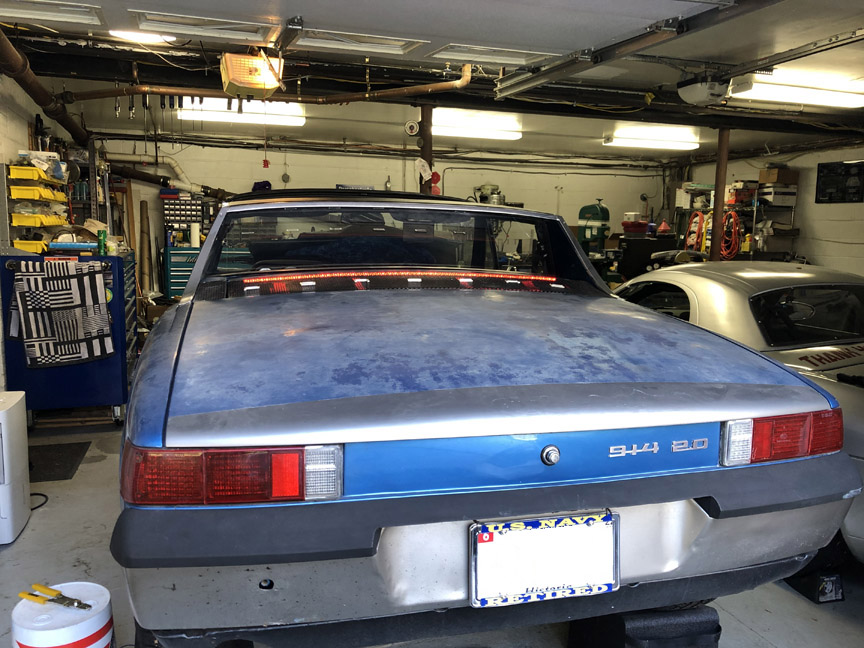 I will end up wiring it to the brake circuit, so it will light with the regular brake lights (already replaced with a set of Spokewerks LED tail lights). And, in case anyone was wondering, here's what one of those long-delayed bumpers looks like installed: 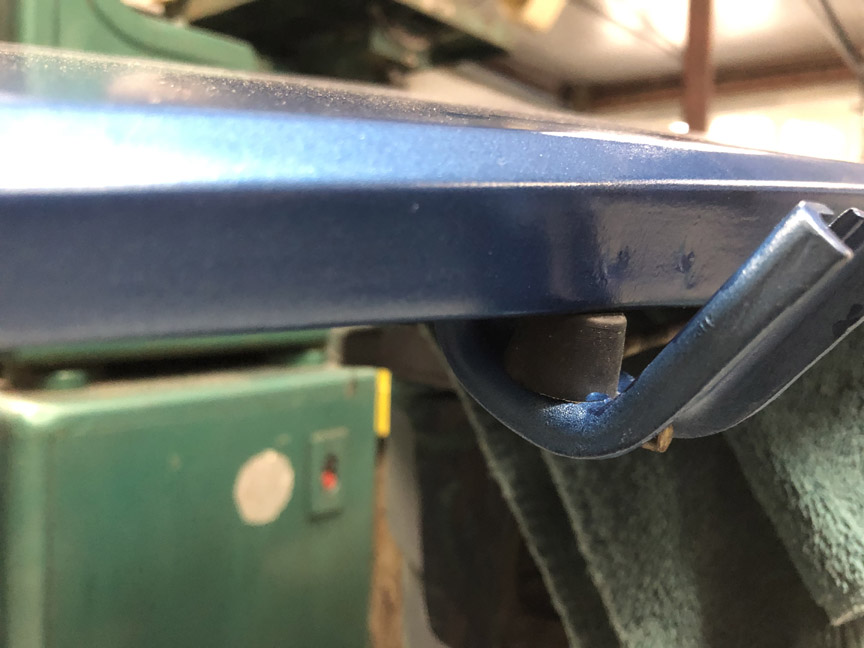 |
|
|
|
| pete000 |
Jan 10 2021, 03:25 PM
Post
#97
|
|
Senior Member Group: Members Posts: 1,887 Joined: 23-August 10 From: Bradenton Florida Member No.: 12,094 Region Association: South East States |
Just remember that is wasn't all that long ago these cars were considered cheap junk and people butchered them up on a regular basis...
|
|
|
|
| BillC |
Jan 17 2021, 02:16 PM
Post
#98
|
|
Senior Member Group: Members Posts: 732 Joined: 24-April 15 From: Silver Spring, MD Member No.: 18,667 Region Association: MidAtlantic Region |
Time to take on the last rusty area I've found -- the driver's side latch post and jack point.
Here's what it looks like to start: 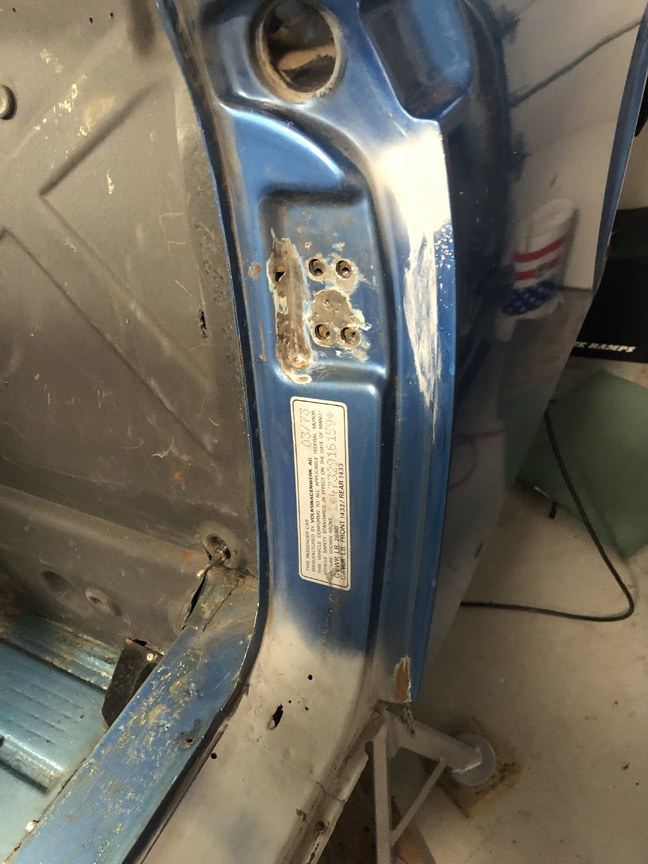 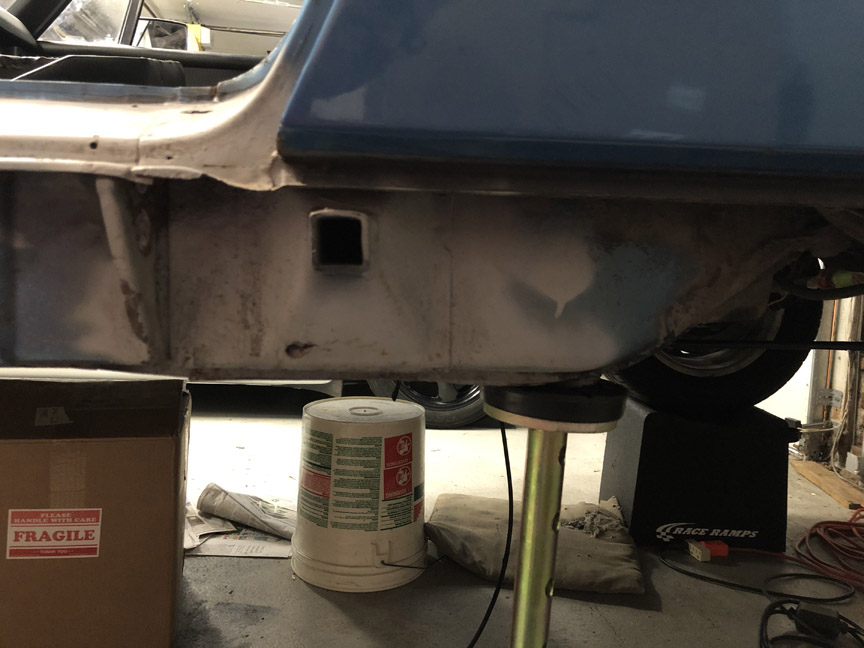 This side doesn't look much worse than the passenger side. However, I'm going to have to replace the jackpoint tube, since I poked through the metal at the bottom when cleaning out rust. Also, when I unscrewed the latch post, the screw plate underneath wouldn't move. Turns out, that area was packed full of this god-awful light-brown sand. The only heavily-rusted places I've found on this car are places where the sand was packed in -- both jackpoints, the lower driver's latch panel where the vent tubes run and (of course) the pocket for the latch post screw plate. Some DAPO must have driven this car on the beach multiple times (or just one time very enthusiastically). With some poking and prodding, I finally freed up the screw plate. I also knocked a surprising amount of sand on the floor -- could the inside of that pocket be like a tardis (bigger on the inside)? Unfortunately, it turned out that the backside of the pocket is rusted out, so I'll need to purchase or make a replacement. 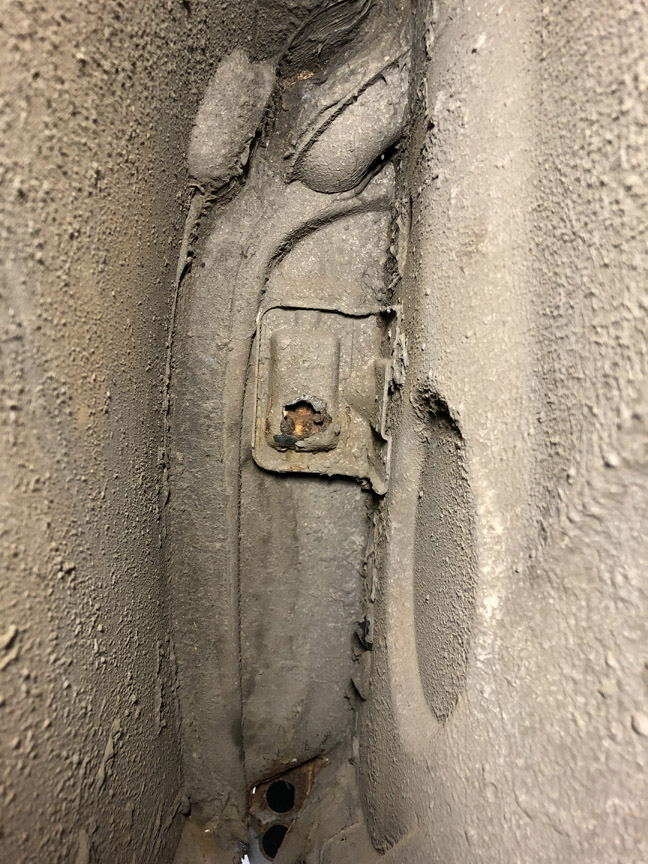 I already have a replacement latch panel, latch reinforcement and screw plate, but can't find a replacement pocket cap (or whatever it would be called). I'll make one if I have to, but would like to see if a new one is commercially available. Does anyone know if a replacement for that pocket/cap is available? I've already checked Restoration Design and AutoAtlanta, but can't find the part on either site. Any leads are appreciated -- looking for the sheet metal piece circled in red. 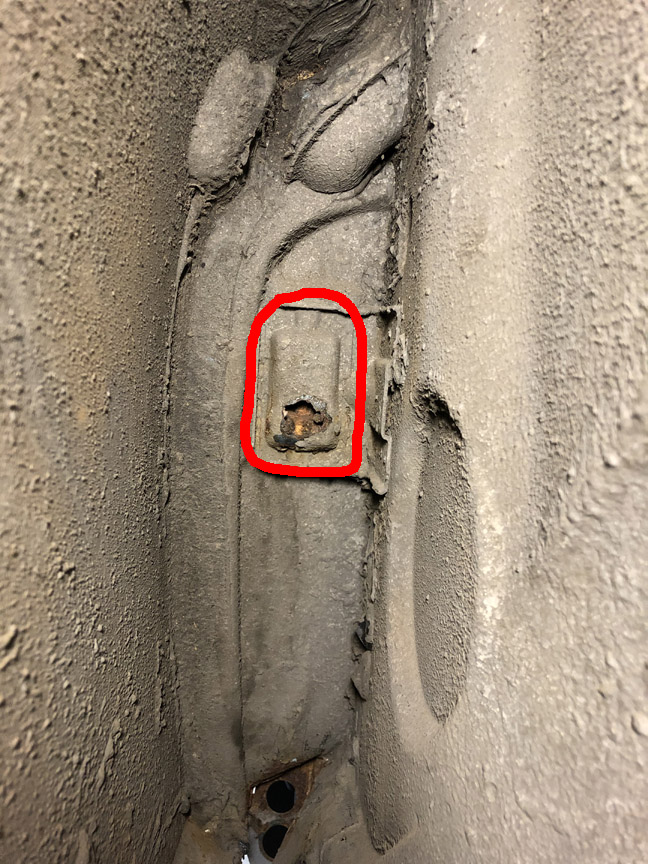 |
|
|
|
| BillC |
Jan 18 2021, 07:27 PM
Post
#99
|
|
Senior Member Group: Members Posts: 732 Joined: 24-April 15 From: Silver Spring, MD Member No.: 18,667 Region Association: MidAtlantic Region |
I was able to spend more time today on the car, stripping off rusty metal. I got the jackpoint pyramid and tube off. And cut out most of the rust at the bottom of the latch panel; not sure how much more I'll be taking off, but at least a little more.
I also cut out the section where the door latch mounts. I was really hoping to leave that section of the latch panel intact and just fill the little rust holes. Unfortunately, I couldn't get the support piece behind it out without better access; so, out it all came.... Here's what it looks like now: 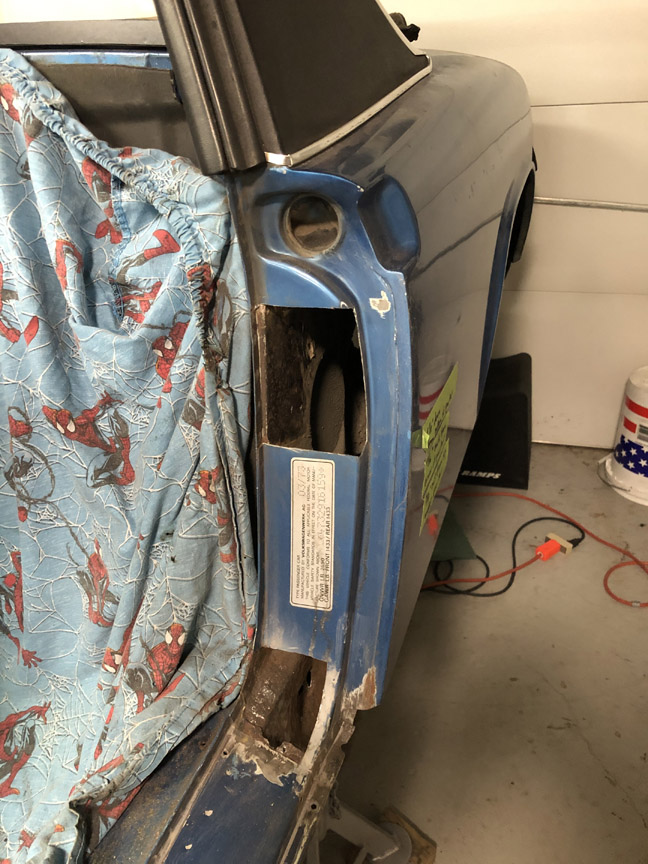 Also, here's what the recessed pyramid area inside the jackpoint looks like: 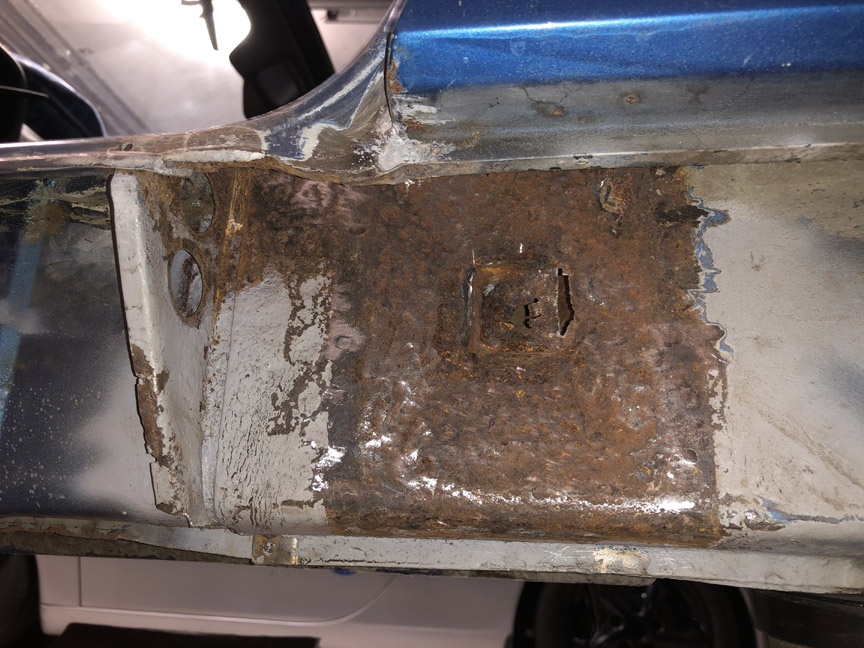 This side is definitely worse than the other side. So, I'm going to make a replacement piece out of some 16ga galvaneal I already have and weld it in. I've left the part in place for now, so I can make a pattern off of it (more masking tape...). It's fairly complex, with four triangular panels and a recessed pocket at the bottom for the jack tube, so it'll end up being two pieces welded together. |
|
|
|
| jaredmcginness |
Jan 19 2021, 05:38 AM
Post
#100
|
|
... Group: Members Posts: 510 Joined: 12-June 19 From: Baltimore Member No.: 23,209 Region Association: MidAtlantic Region |
Nice work! I used 16g for that section on my car and it came out rather nicely. Really sturdy. Should last another 40 years.
Keep it up! |
|
|
|
|
2 User(s) are reading this topic (2 Guests and 0 Anonymous Users)
0 Members:

|
Lo-Fi Version | Time is now: 14th June 2026 - 06:00 PM |
Invision Power Board
v9.1.4 © 2026 IPS, Inc.