|
|
|
Porsche, and the Porsche crest are registered trademarks of Dr. Ing. h.c. F. Porsche AG.
This site is not affiliated with Porsche in any way. Its only purpose is to provide an online forum for car enthusiasts. All other trademarks are property of their respective owners. |
|
|

  |

| 76-914 |
 Jun 28 2020, 08:36 PM Jun 28 2020, 08:36 PM
Post
#1
|
|
Repeat Offender & Resident Subaru Antagonist  Group: Members Posts: 13,920 Joined: 23-January 09 From: Temecula, CA Member No.: 9,964 Region Association: Southern California |
The engine is sold. I'll soon have a very fresh 901 w/ an "H" gear for sale as well as some other goodies soon for those planning an SBC conversion. I couldn't do much with this sitting in my garage as it already is stuffed to the max. Therefor I felt it somewhat necessary to sell this before commencing with the re-conversion. I've been silently (yeh, I know; me silent) working in the background for a few months fabricating some items that will be needed. I'll do my best to document things a bit more accurately than the previous conversion. Once again I'll be using the Subaru 6 and Subaru transmission. I've had tremendous success with this platform so I might as well repeat myself. So sit back, bear with me and watch as I stumble along and occasionally embarrass myself. Mistakes are an integral part of my journey. (IMG:style_emoticons/default/beerchug.gif)
Attached image(s) 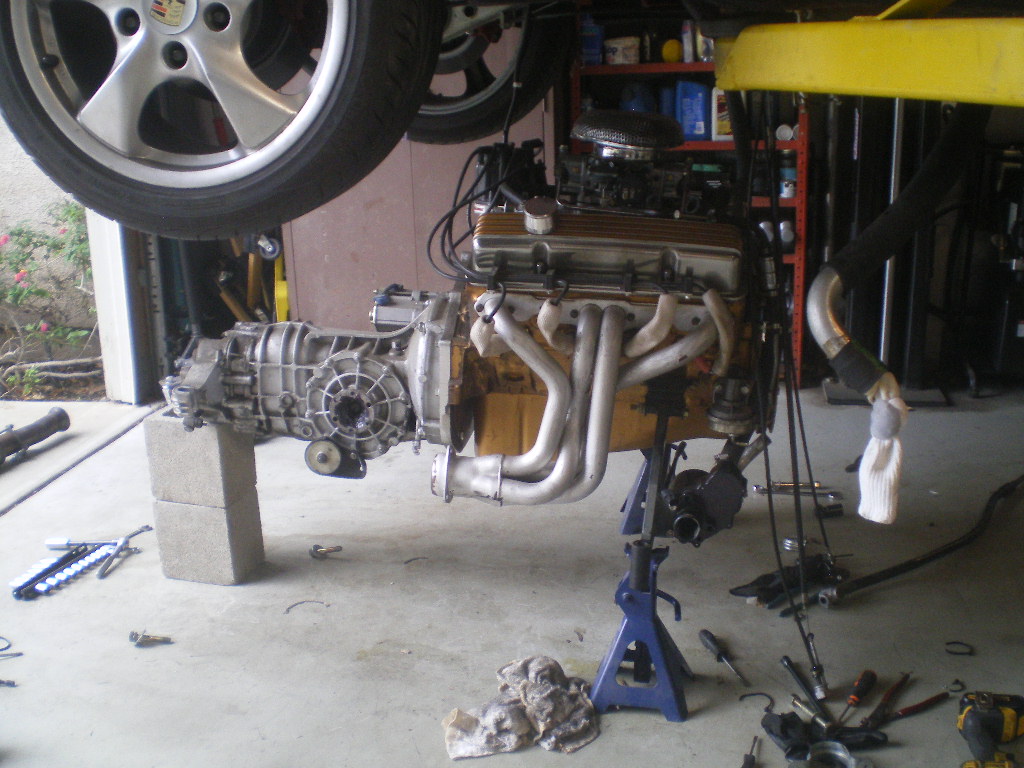
|
   |

 
|
| tygaboy |
Jun 28 2020, 09:31 PM
Post
#2
|
|
914 Guru Group: Members Posts: 5,844 Joined: 6-October 15 From: Petaluma, CA Member No.: 19,241 Region Association: Northern California |
Yaaaa! Can't wait to see this one come (back) together!
Let me know if there's anything I can do to help. I'd love to contribute to one of your builds. |
|
|
|
| EdwardBlume |
Jun 28 2020, 09:35 PM
Post
#3
|
|
914 Wizard Group: Members Posts: 12,340 Joined: 2-January 03 From: SLO Member No.: 81 Region Association: Central California |
Love those Boxster rims. 70 was a good year. I know a guy with a 0mi 3.0 if you're into that kind of thing...
Have fun! |
|
|
|
| 76-914 |
Jun 30 2020, 04:52 PM
Post
#4
|
|
Repeat Offender & Resident Subaru Antagonist Group: Members Posts: 13,920 Joined: 23-January 09 From: Temecula, CA Member No.: 9,964 Region Association: Southern California |
QUOTE(tygaboy @ Jun 28 2020, 08:31 PM)  Yaaaa! Can't wait to see this one come (back) together! Let me know if there's anything I can do to help. I'd love to contribute to one of your builds. Thx Chris but your work is too nice for my "hack" builds. (IMG:style_emoticons/default/lol-2.gif) I might; I'll let you know if so. Thx. (IMG:style_emoticons/default/beerchug.gif) |
|
|
|
| 76-914 |
Jun 30 2020, 04:53 PM
Post
#5
|
|
Repeat Offender & Resident Subaru Antagonist Group: Members Posts: 13,920 Joined: 23-January 09 From: Temecula, CA Member No.: 9,964 Region Association: Southern California |
QUOTE(EdwardBlume @ Jun 28 2020, 08:35 PM) Love those Boxster rims. 70 was a good year. I know a guy with a 0mi 3.0 if you're into that kind of thing... Have fun! That's exactly what I'm installing. A 3.0. (IMG:style_emoticons/default/beerchug.gif) |
|
|
|
| 76-914 |
Jun 30 2020, 05:44 PM
Post
#6
|
|
Repeat Offender & Resident Subaru Antagonist Group: Members Posts: 13,920 Joined: 23-January 09 From: Temecula, CA Member No.: 9,964 Region Association: Southern California |
I've seen several requests for cradles in the past few years and that's not including the Facebook group. So I thought this time I would take it step by step to show that even a novice can build one. The process is simple so don't be intimidated. Minimal skills are required.If you can't weld, no sweat. You can pay a mobile welder to weld it up and you can do everything else yourself. You will need a drill press, a metal cutting bandsaw or chop saw, a $99 Harbor Freight tube bender and tubing notcher, assortment of drill bits and a couple of hole saws. Granted the tube bender and tubing notcher aren't tools you'd use again but you can sell them quickly to another member who wants to build one. I built my last one out of desperation. I'd waited 3 months for Ian of ColdWater to make another run and decided I'd give it a shot and if that didn't workout I'd wait till he finally got around to it. That was over 6 years ago and no ones brought any to market yet. I'll re-use many of the bolts from the OEM motor mounts, some scrap and some new metal. I'll quit yaking now and start hacking.
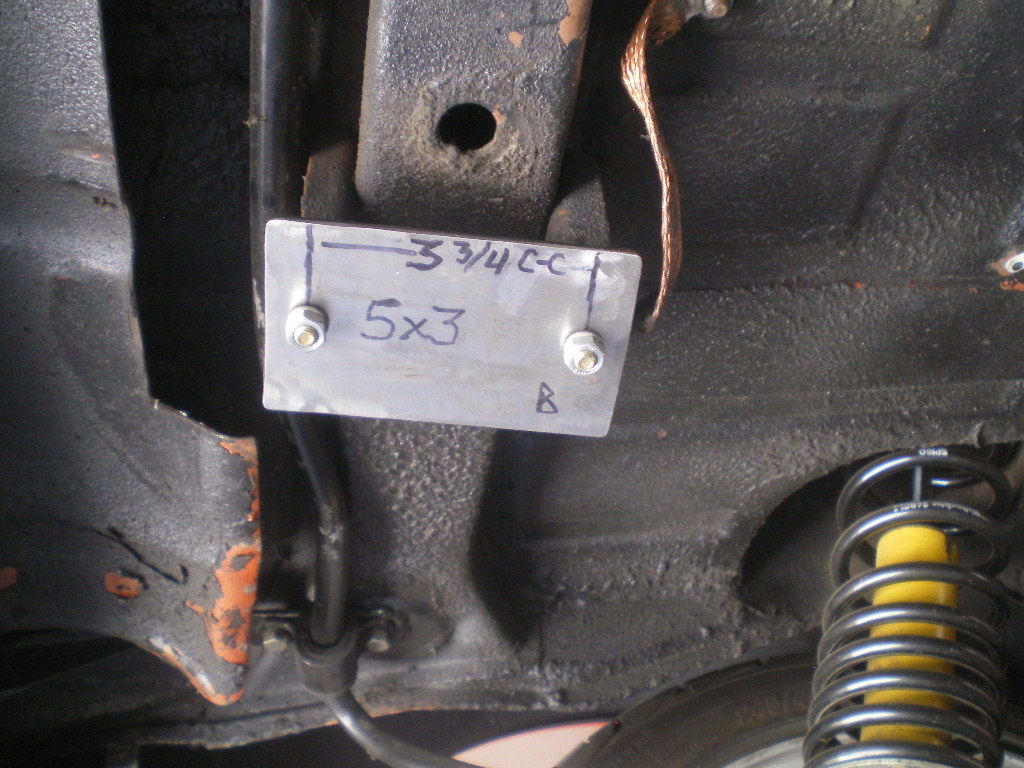
First your going to make some plates that will attach to the original mounting points on your 914. 2ea- 3"x5"x 3/16" plates and 2ea- 2"x 1.5""x 1/4" angle iron 5" long. There are a few pic's of the angle in order to show all the dimensions. If I forgot a dimension, LMK. NOTE: I just noticed in the 4th pic I listed two dimensions for the center of the 1/2" hole; 2 1/2" is correct. The 1 7/8" is a brain fart. (IMG:style_emoticons/default/headbang.gif) 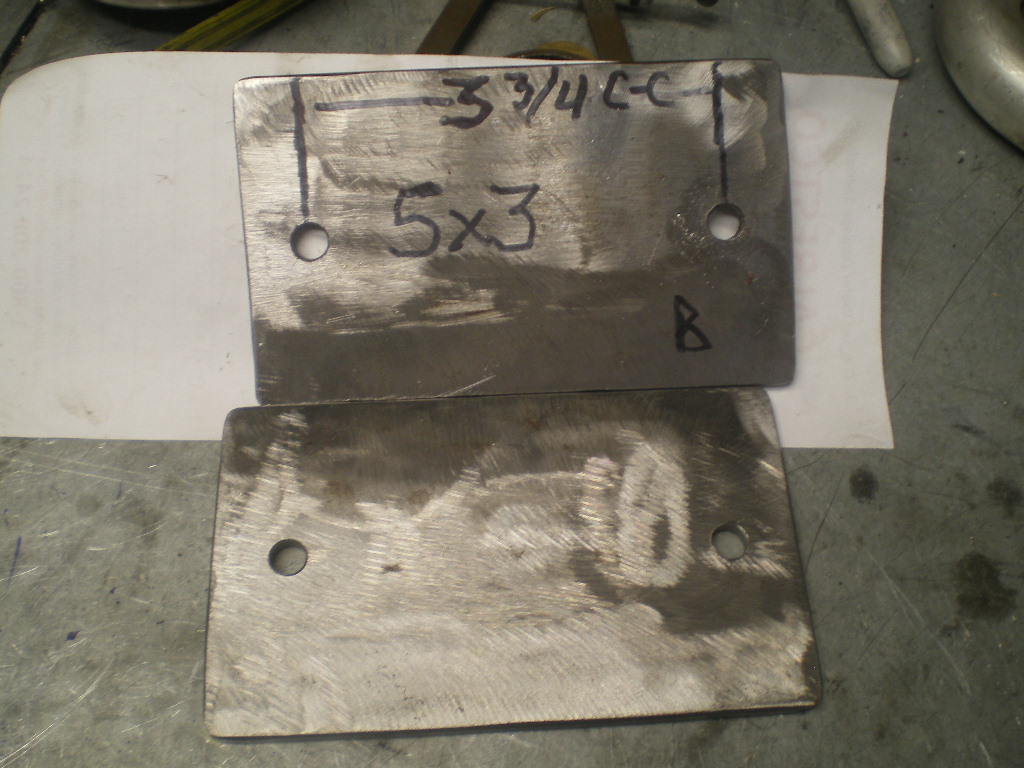 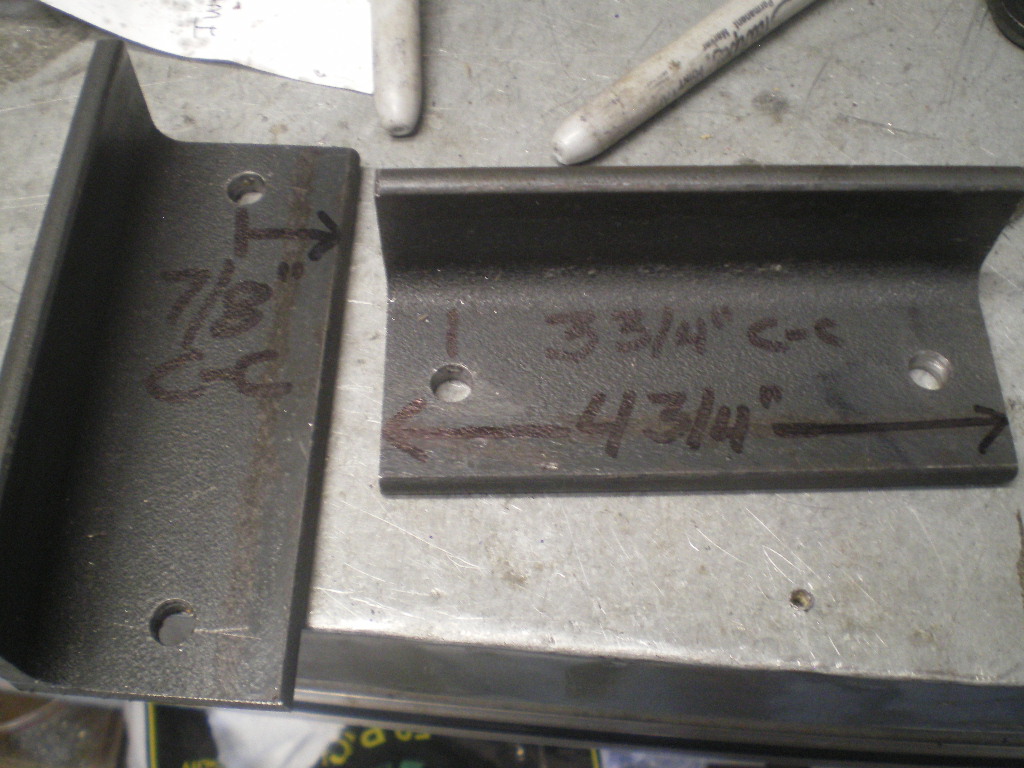 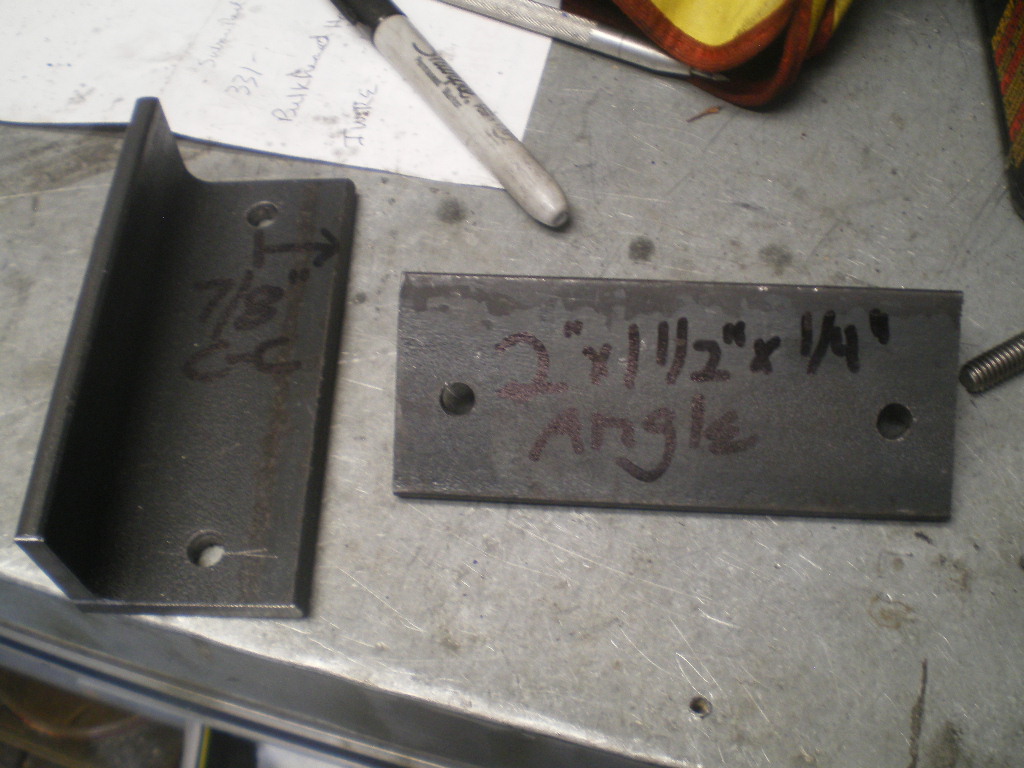 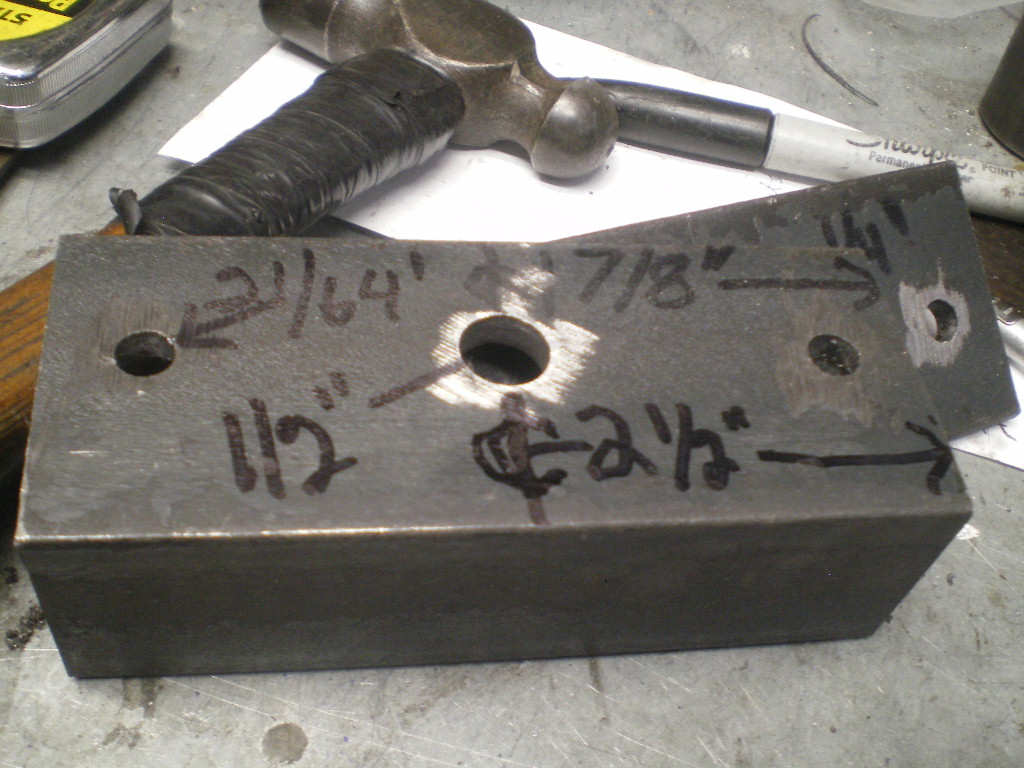 After you've completed these pieces pieces mount them in place as shown below. I'm re-using the existing nuts, bolts and washers.  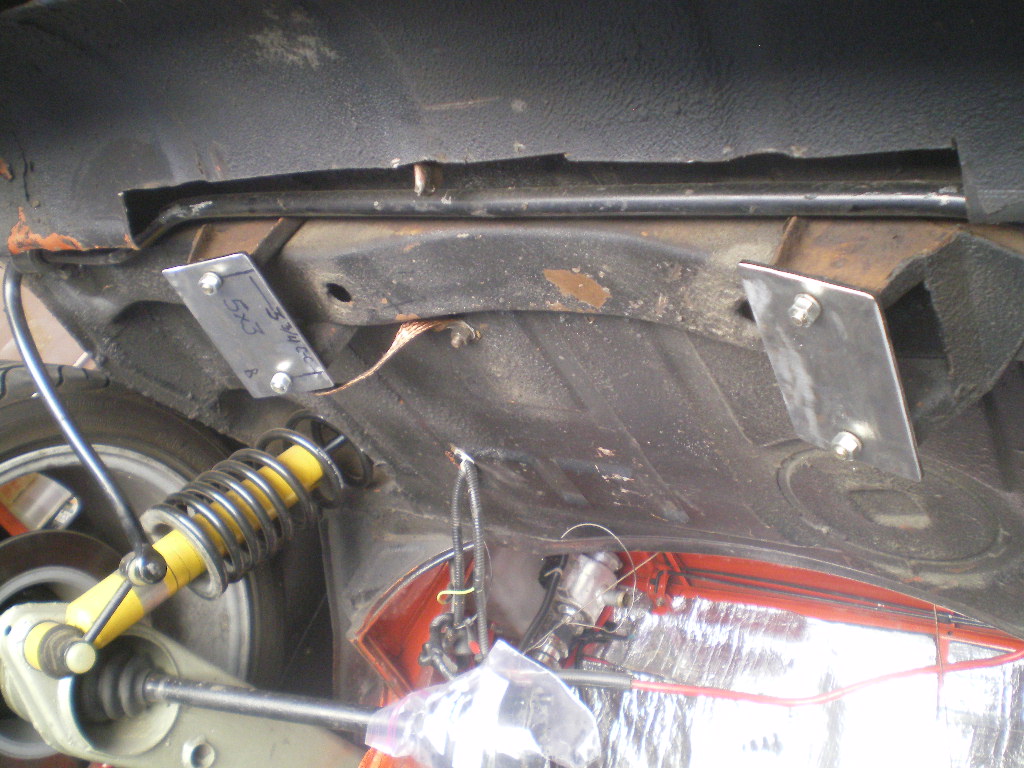   To be continued............ |
|
|
|
| flmont |
Jun 30 2020, 07:02 PM
Post
#7
|
|
Senior Member Group: Members Posts: 881 Joined: 21-October 08 From: Tucson,Az Member No.: 9,676 Region Association: Southwest Region |
What are u thinking price wise on that 901 , Thanks Frank
|
|
|
|
| 76-914 |
Jun 30 2020, 07:25 PM
Post
#8
|
|
Repeat Offender & Resident Subaru Antagonist Group: Members Posts: 13,920 Joined: 23-January 09 From: Temecula, CA Member No.: 9,964 Region Association: Southern California |
QUOTE(flmont @ Jun 30 2020, 06:02 PM) What are u thinking price wise on that 901 , Thanks Frank For you, Frank $600. If I list it $900 for putting up with the "Tire Kickers and Low Ballers". It shifts like a dream. No leaks or squeaks.No whines or grinds. No popping out of gear either. How's that conversion coming along. I'd like to see some pic's of what your doing. (IMG:style_emoticons/default/beerchug.gif) |
|
|
|
| flmont |
Jun 30 2020, 07:36 PM
Post
#9
|
|
Senior Member Group: Members Posts: 881 Joined: 21-October 08 From: Tucson,Az Member No.: 9,676 Region Association: Southwest Region |
Sold..! TY
|
|
|
|
| flmont |
Jun 30 2020, 07:40 PM
Post
#10
|
|
Senior Member Group: Members Posts: 881 Joined: 21-October 08 From: Tucson,Az Member No.: 9,676 Region Association: Southwest Region |
its still the same I did buy 914forme's cradle / bracket,So I'am hoping to fit it over 4 th of july weekend,..I'am SO ready to install everything and fire it up I'am just so busy, but things are slowing down so I can have my weekends back very soon !
|
|
|
|
| flmont |
Jun 30 2020, 07:44 PM
Post
#11
|
|
Senior Member Group: Members Posts: 881 Joined: 21-October 08 From: Tucson,Az Member No.: 9,676 Region Association: Southwest Region |
I do need to read ChrisH,..posting on the heater core upgrade he did with a mustang box I think,.then I can install fuel tank ,then wiring !! its all ready just need time to assemble !
|
|
|
|
| 76-914 |
Jun 30 2020, 08:05 PM
Post
#12
|
|
Repeat Offender & Resident Subaru Antagonist Group: Members Posts: 13,920 Joined: 23-January 09 From: Temecula, CA Member No.: 9,964 Region Association: Southern California |
QUOTE(flmont @ Jun 30 2020, 06:36 PM) Sold..! TY PM sent |
|
|
|
| 76-914 |
Jul 3 2020, 06:11 PM
Post
#13
|
|
Repeat Offender & Resident Subaru Antagonist Group: Members Posts: 13,920 Joined: 23-January 09 From: Temecula, CA Member No.: 9,964 Region Association: Southern California |
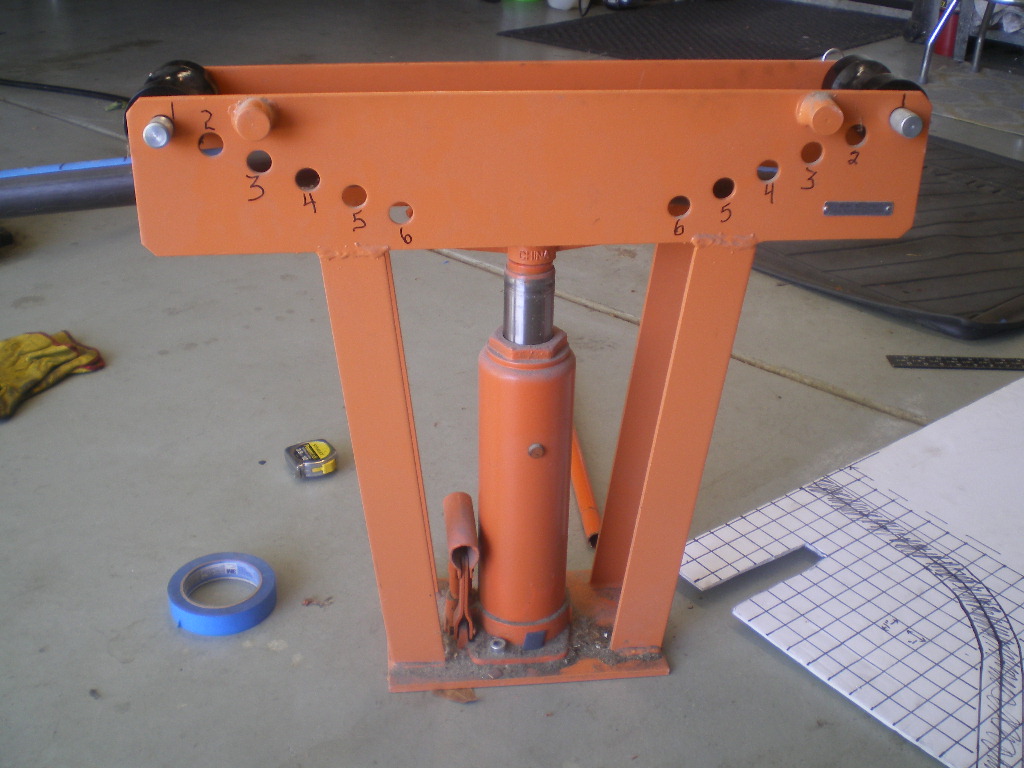
OK, back on track. If you plan to use 4130 chromoly it is sold in 12ft lengths. My 1st cradle I purchased 10ft and had about 4" left over. Thats cutting it too close so this time I sprung for the complete length. 1.5"x 12' .095 tube. Here is a pic of the cheap HF bender I use. $99 on sale.
 Cut one piece 90" long then cut that in half giving you 2 - 45" pieces. Put the left over piece to the side for now. From one end of each pipe place a mark 22" down. This is your 1st bend point. Place the mark in the center of the bender with the rollers in the #1 pegs and give it several pumps until you see it begin to bend. It has a lot of bend back but after a few bends you'll know how many strokes to bend it. Look at the pics below and you will see how little deflection there is after the first few bends. Slowly work this area then move the pegs to the #2 position and repeat this process until you get the desired arc. Be sure to check your bend often against the graph shown. Those are 1" squares so you can duplicate it easily. 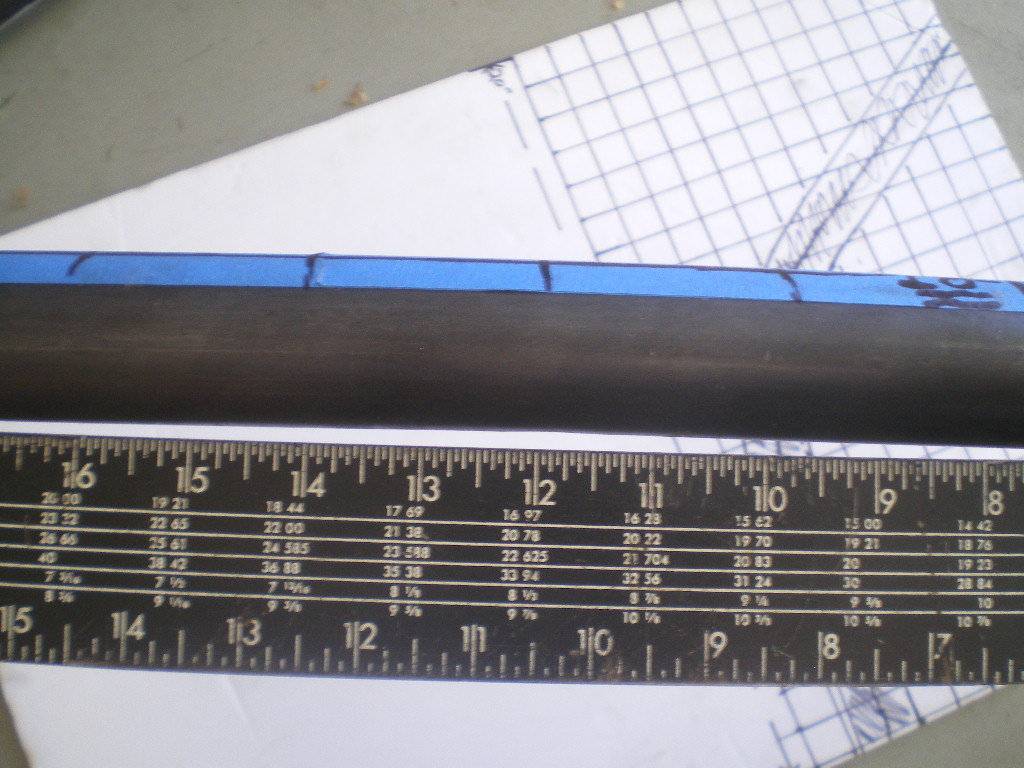 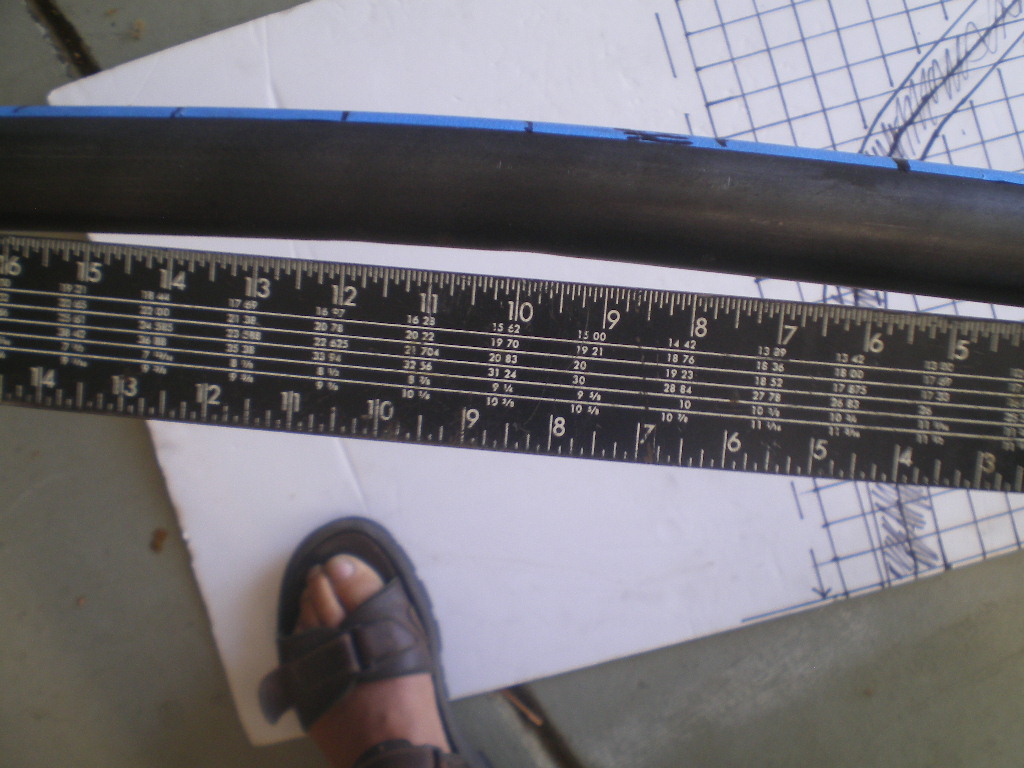 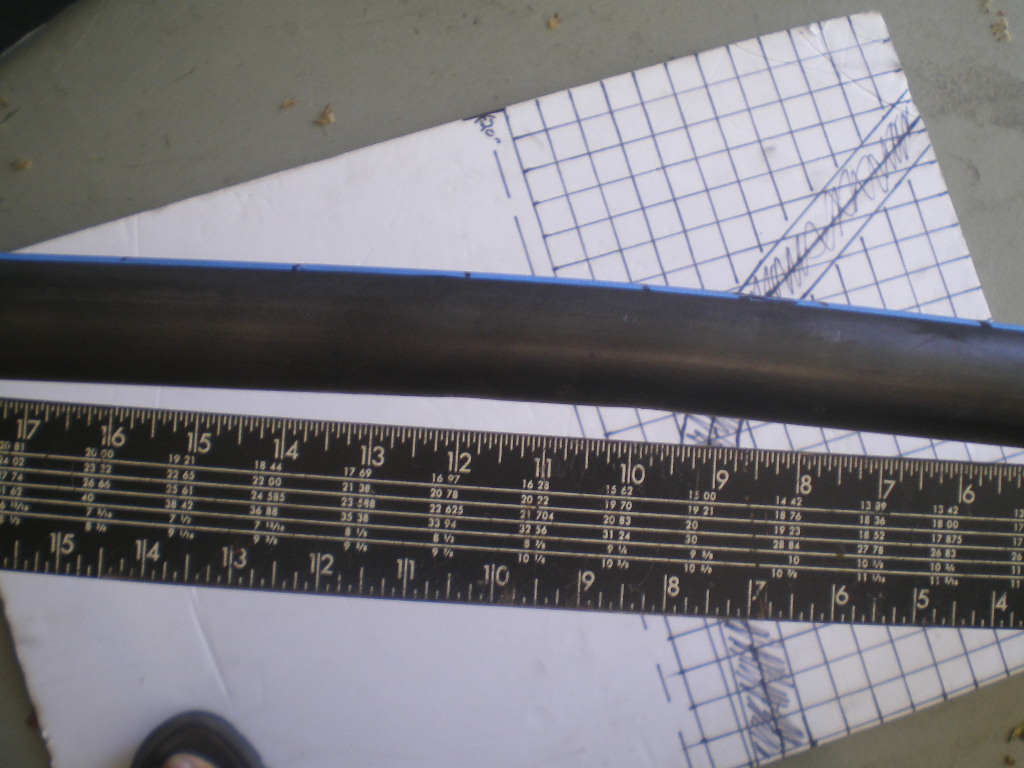 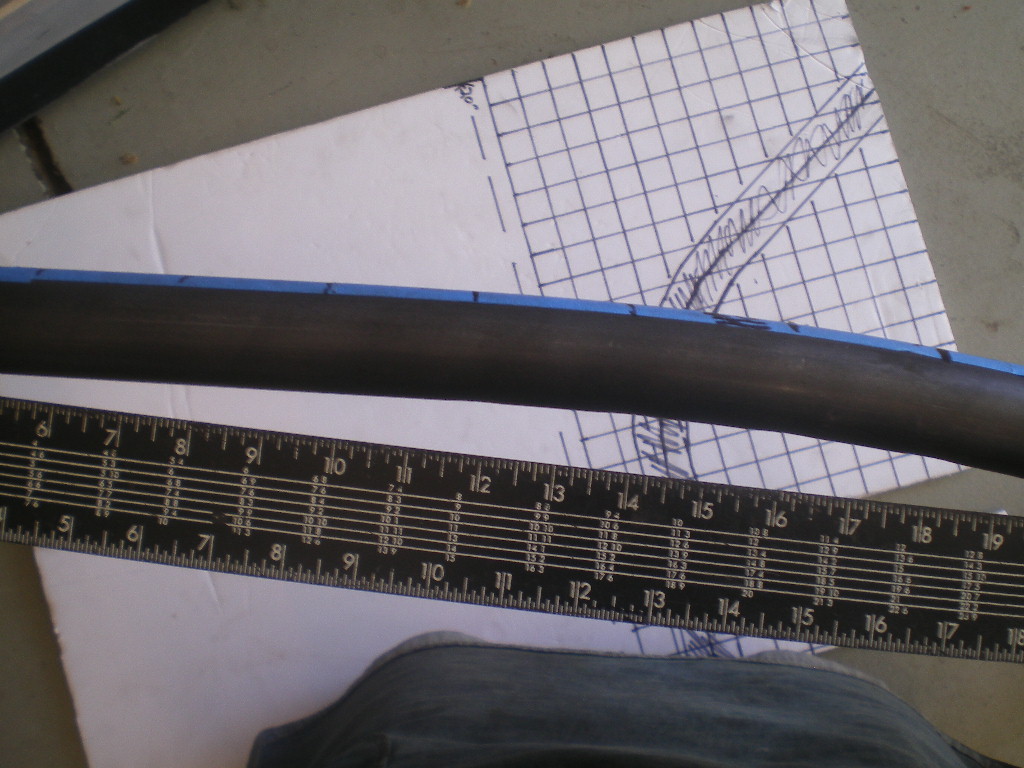 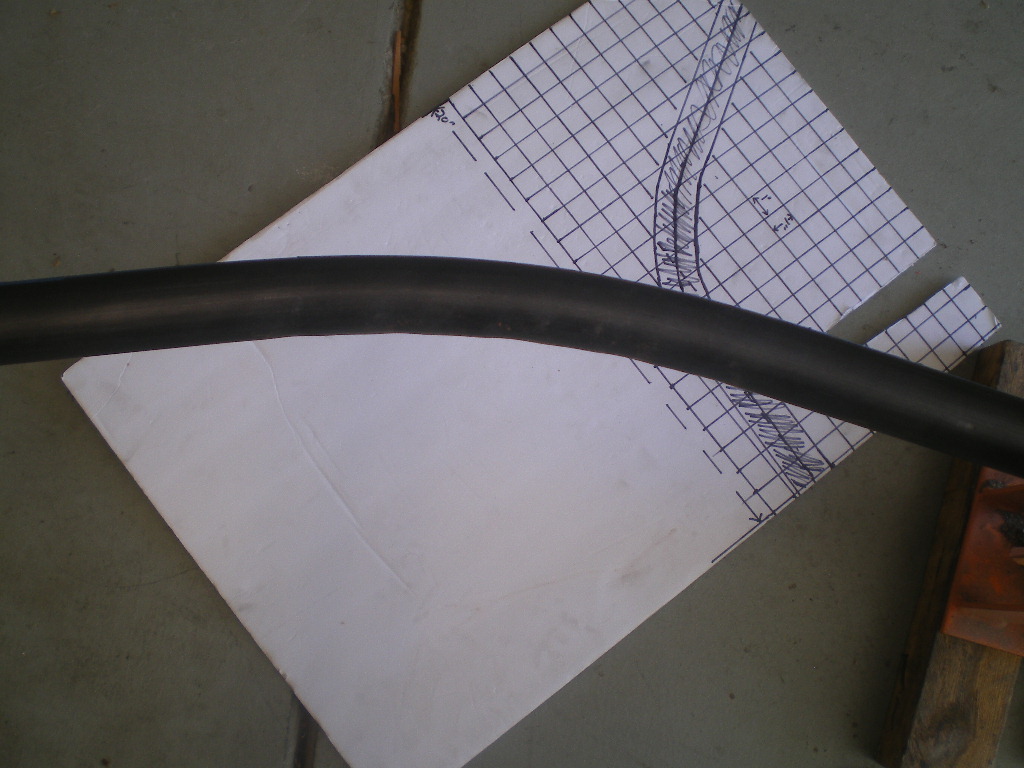  You want to leave the last 12" of the tube straight. So your only working/bending about a 12"-14" span of the tube. You will be trimming a few inches off each end for the final fit so you only need to establish the arc close to what is shown. After the bend is complete we want to end up with a distance of 40" or greater between the ends. See below. 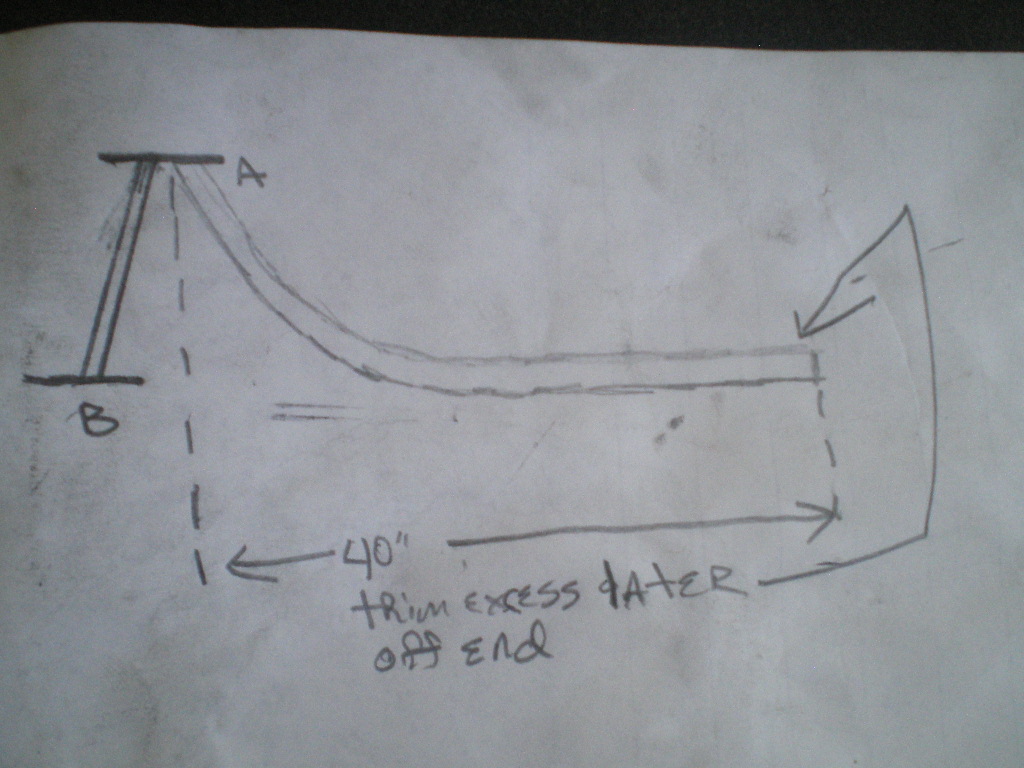 Once you've got these 2 pieces done you can move on to fitting them to the hangers. |
|
|
|
| tygaboy |
Jul 3 2020, 06:53 PM
Post
#14
|
|
914 Guru Group: Members Posts: 5,844 Joined: 6-October 15 From: Petaluma, CA Member No.: 19,241 Region Association: Northern California |
METAL!!!! (IMG:style_emoticons/default/aktion035.gif)
So cool that you're documenting things that others will find useful. (Unlike some of us! (IMG:style_emoticons/default/biggrin.gif) ) Great stuff! Thanks Kent. |
|
|
|
| 76-914 |
Jul 3 2020, 07:24 PM
Post
#15
|
|
Repeat Offender & Resident Subaru Antagonist Group: Members Posts: 13,920 Joined: 23-January 09 From: Temecula, CA Member No.: 9,964 Region Association: Southern California |
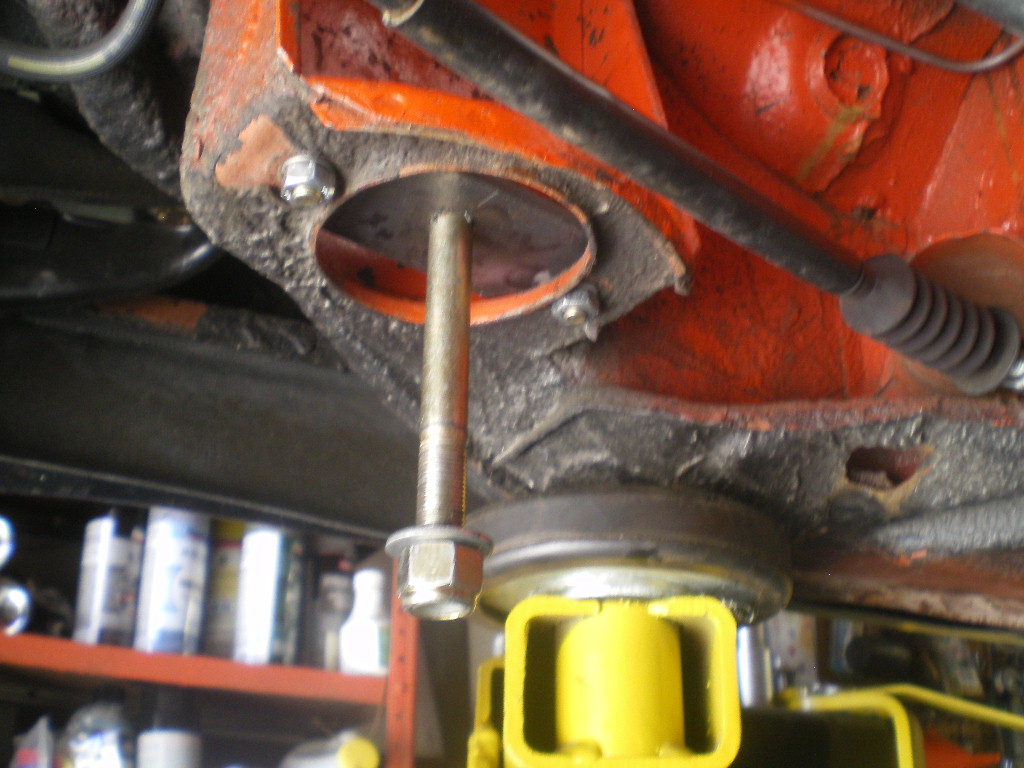
Go ahead and remove your old hardware from the front and rear attach points. Save the 5/16" & 1/2" nuts and bolts. Attach the 2- 3"x5" pieces to the former transmission mounts and the 2- 2"x1.5" angle pieces to the former engine mounts.
   If you work by yourself you'll need to hang the runners in place. This can be trying to say the least. Several times my wife came out to the garage to see who I was yelling at. If you have a helper then this will be simple. The car will need to be level front to rear and left to right. I got lucky here because my lift is square to the floor. In the pic below you can get an idea of how I hung the runners with bailing wire. However you hang it is good. The objective is to center up length wise with the bolt hole of the front hanger and the center of the 3"x5" rear plate. 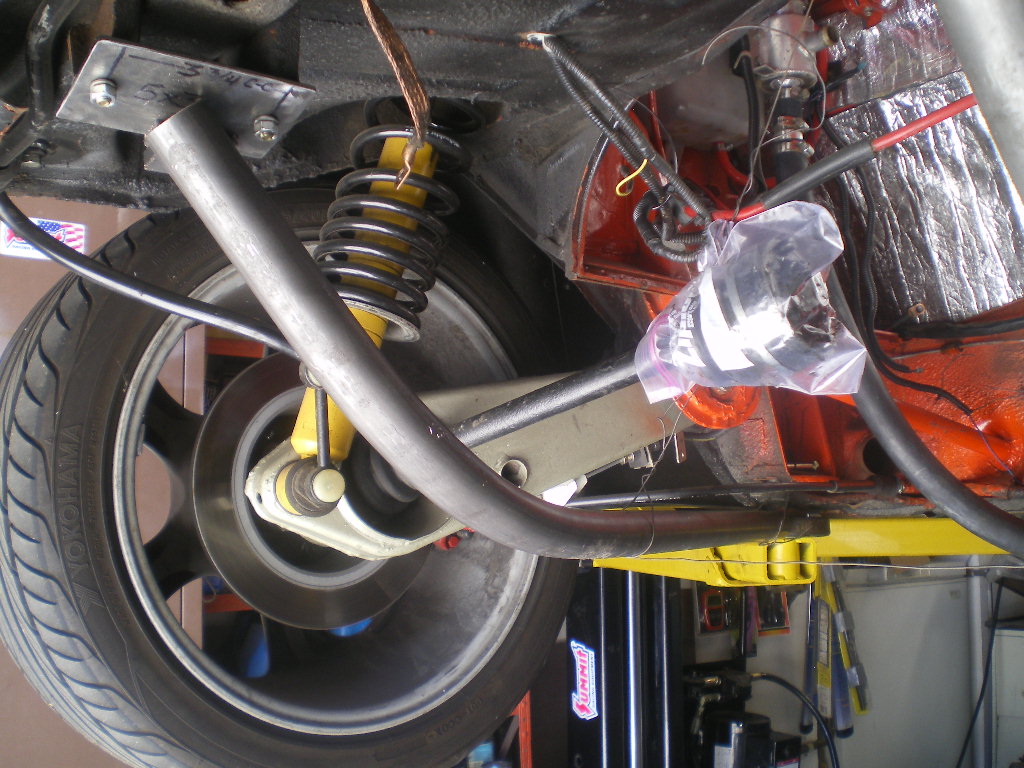 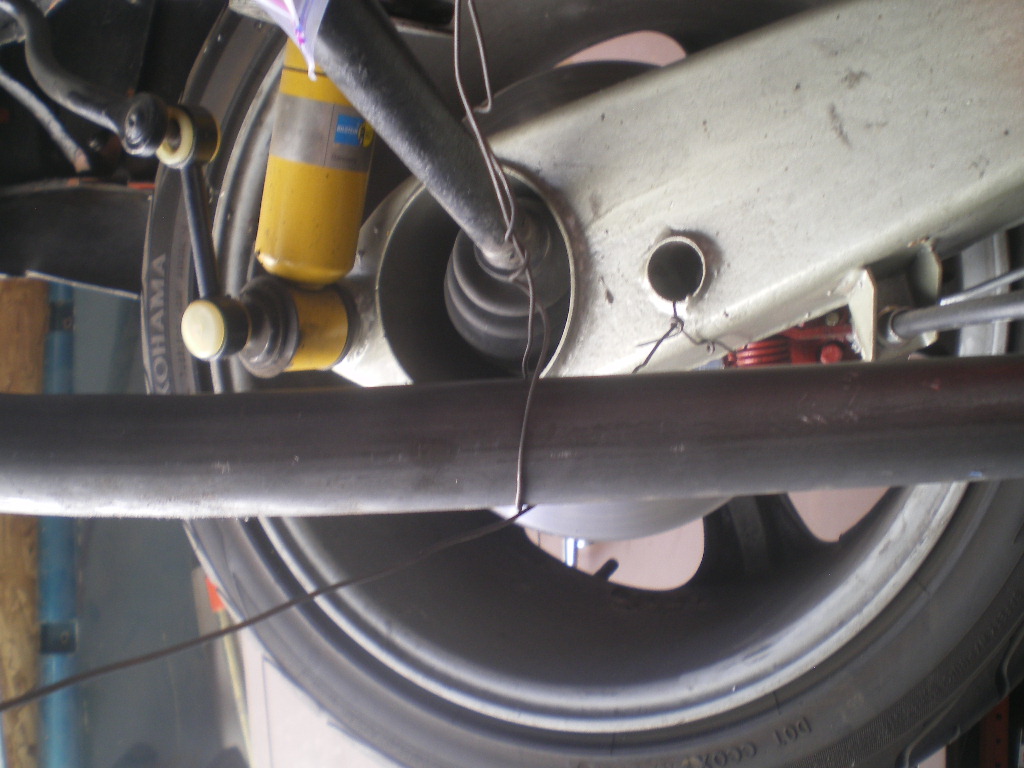 Once it's is secure be sure the section past or to the rear of the arc is perpendicular or 90 deg to the floor and that the long end is level or parallel to the floor. Ultimately the top of the tube should be 1" below the bottom of the angle iron bracket or 1.5" to the center of the tube. This is somewhat important. You may find you need to cut that angle piece twice in order to raise the back end enough to get it level while maintaining the 1" gap mentioned above and keeping the length level. Now is the time to mark the compound angle that will be trimmed off the top end. The 1st cradle I used a marks-a-lot but found the hacksaw blade to be much more accurate in transferring the mark because the blade could be held flush against both sides of the tape roll. Hold the roll flush against the plate. I needed to stretch the roll into an oval to work around the protruding bolts. 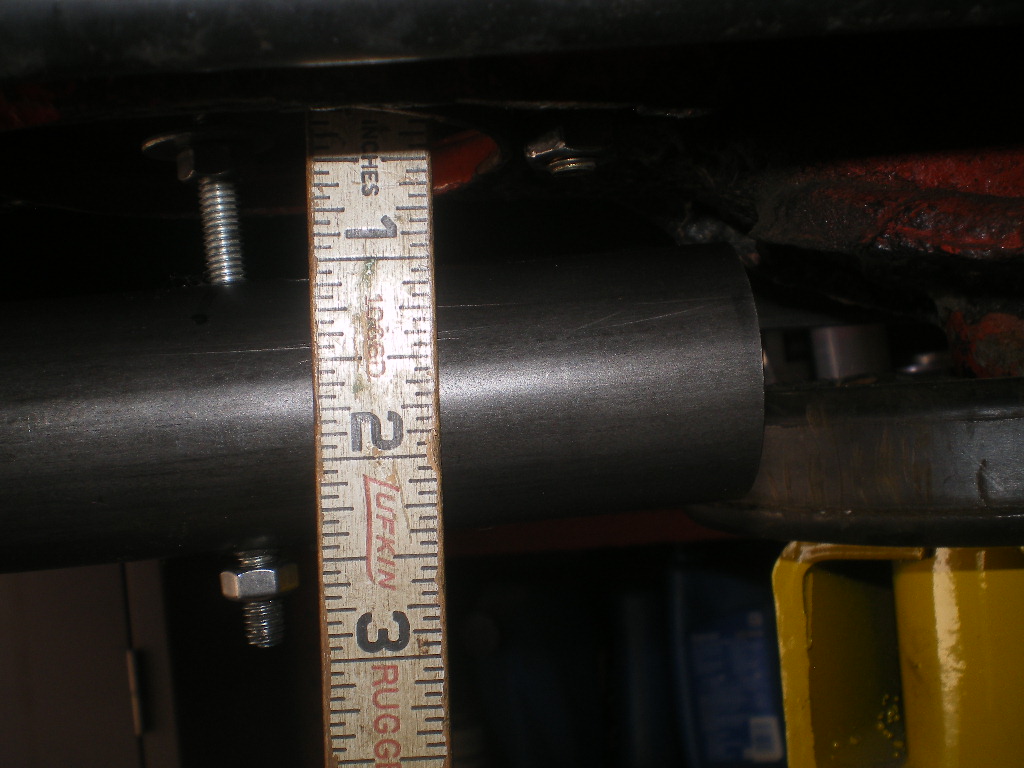 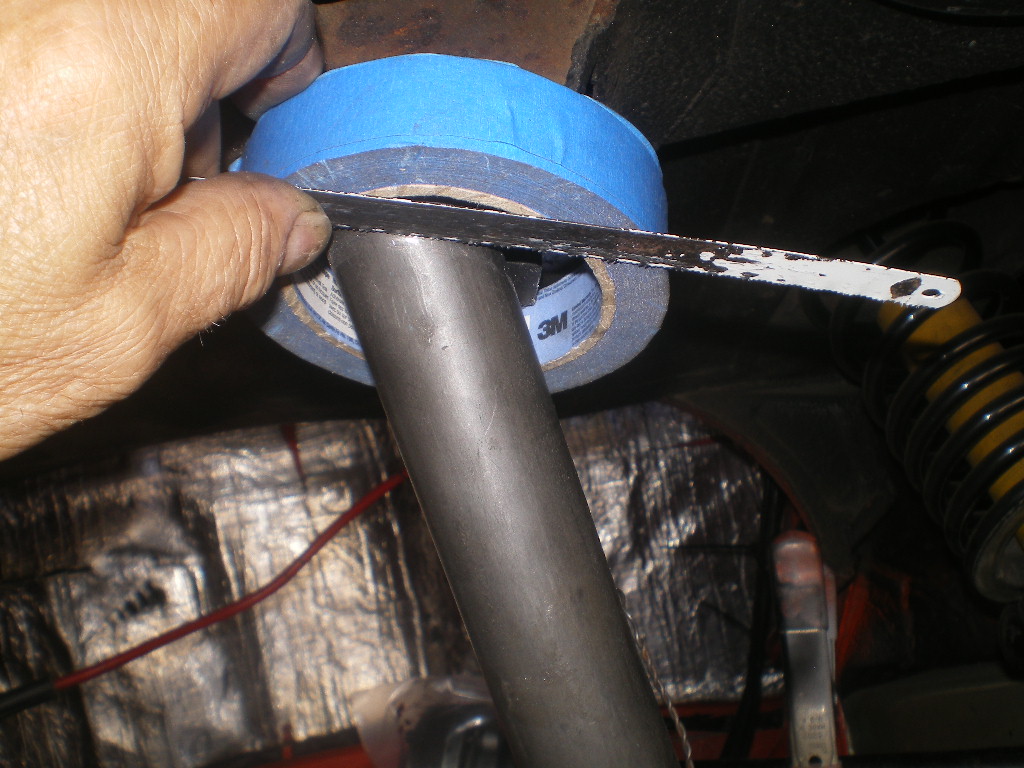 Once you've got a good mark it's time to cut it. I used an angle grinder with a thin blade to cut. I tried with my bandsaw but alas I couldn't hold it square with the compound angle. You will end up with a cutoff piece that looks something like this. I dressed the ends with a 12" sanding wheel but a file will work too. 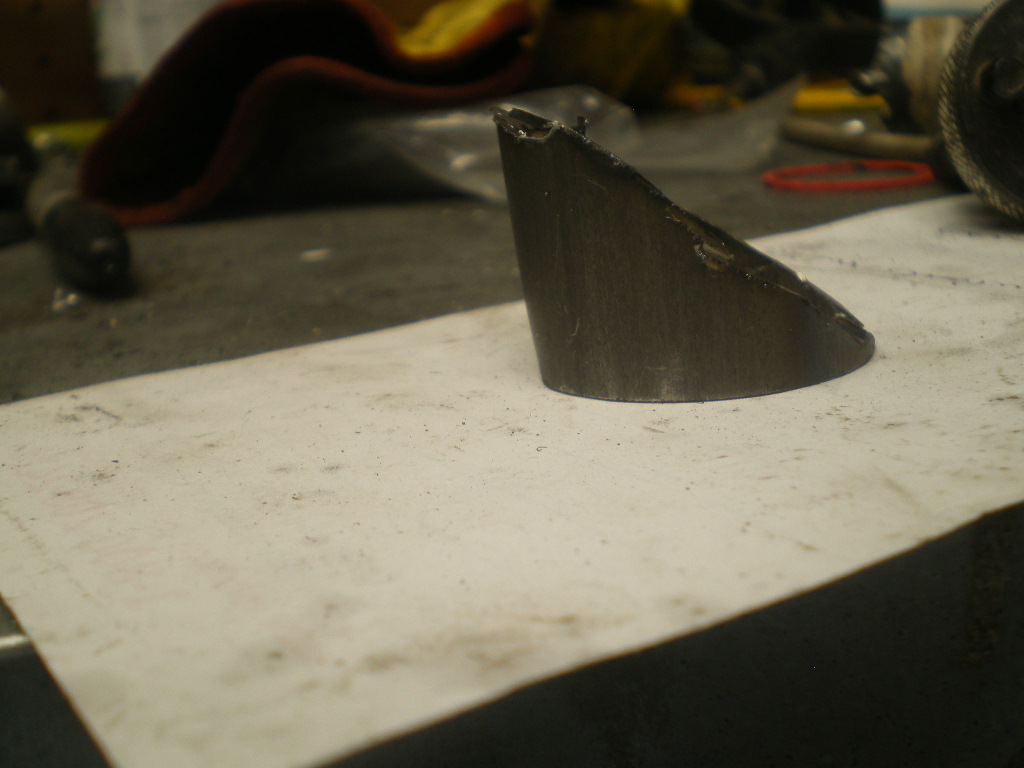 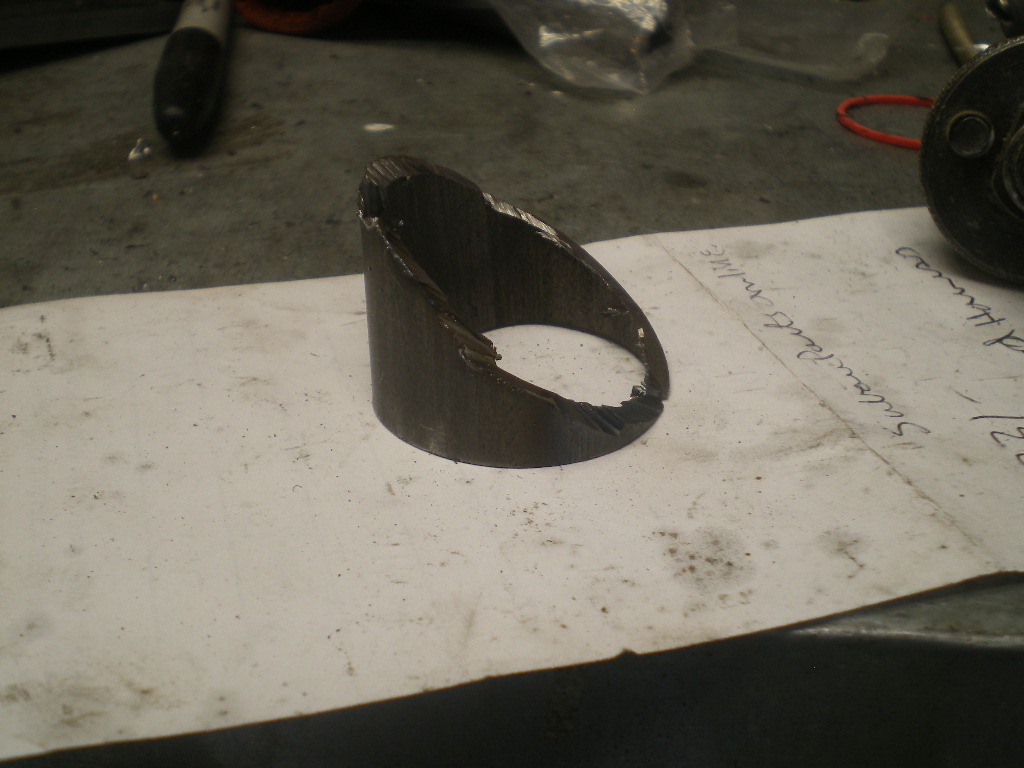 Edit: Don't know how this pic ended up here. I noticed this on my last build. Somehow the file gets corrupted when loading them. I've even gone back and deleted all of the pics yet one remained in the post although it doesn't show up as an attachment on the list of pics selected. Oh well. just ignore that one. (IMG:style_emoticons/default/headbang.gif) Attached image(s) 
|
|
|
|
| 76-914 |
Jul 3 2020, 08:08 PM
Post
#16
|
|
Repeat Offender & Resident Subaru Antagonist Group: Members Posts: 13,920 Joined: 23-January 09 From: Temecula, CA Member No.: 9,964 Region Association: Southern California |
Now return the piece in place and hold the newly cut end very close to the front nut. This will give us room at the back of the plate for the transmission hanger later on. Allow just enough room for the washer to clear the weld bead.
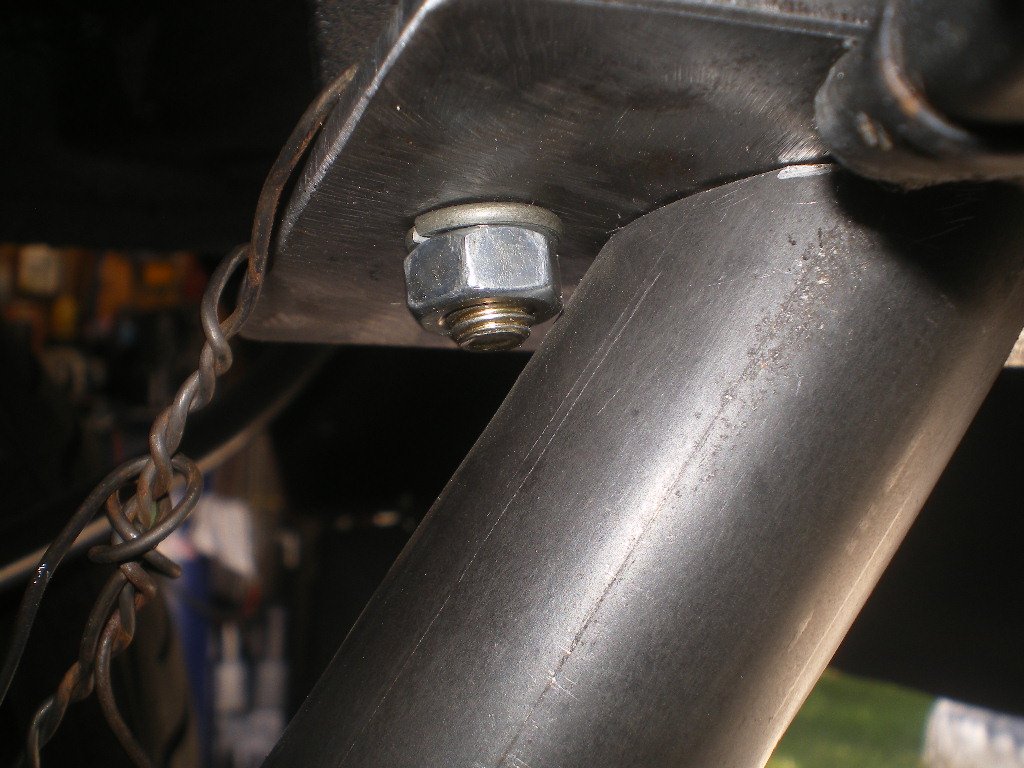 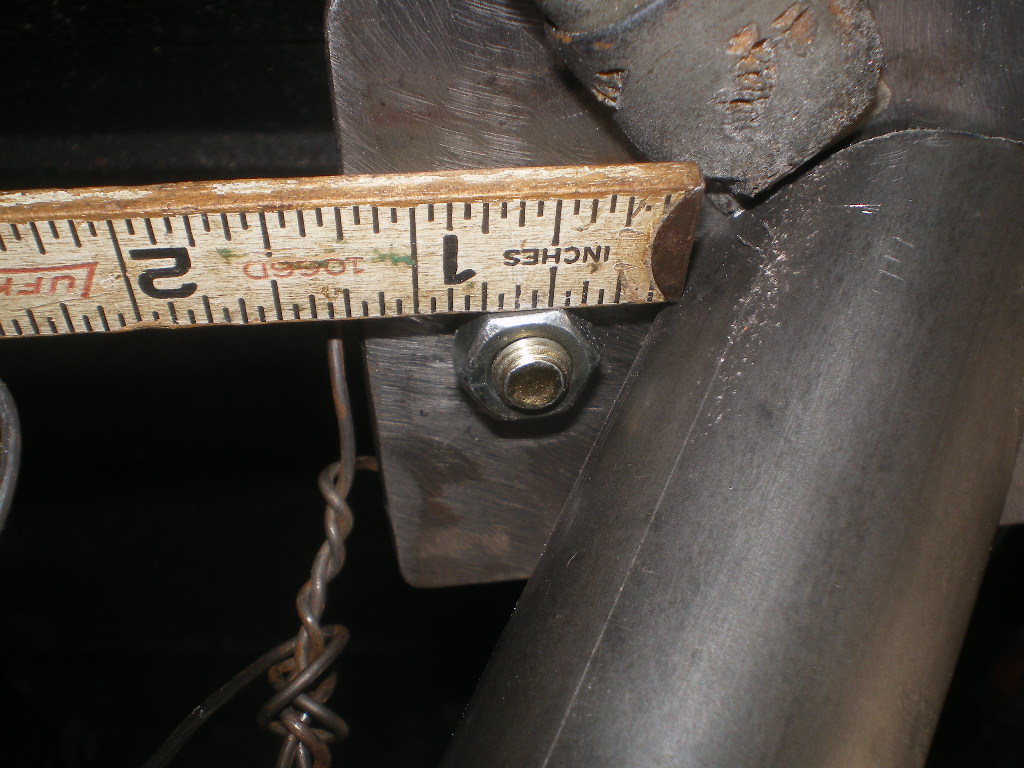 Now go to the front mount and carefully drop a marker thru the 1/2" hole making a mark on the tube. Try your best to be accurate but if not I've got a work around. Now your ready to take the piece to the drill press and drill it's first hole. The first hole will be 1/8". Why? Because odds are you've missed the mark a tiny bit and if so it is easy to correct. The rear attach plate is set at ~15 deg so we need to clamp the piece so that the cut end is at 15 deg. Once that is established we need to check to see if our drill bit is lined up with our mark. If it is then carefully drill the 1/8" hole. If that looks good then increase it to 1/4' or 6mm. Now return the piece to the car and using a long 6mm/1/4" bolt or threaded rod as I did, hang that end from the hanger and set it 1" below the angle iron. now check to see how your cut end mates up with the 3x5 plate. If the tube is for or aft of the desired location drill another small hole to place it in the correct location. Ideally the arc is still 90 deg to the floor but if it is slightly off 1-2 deg it won't matter. This is when you may need to remove a bit more off the cut end if the length is not parallel to the floor while maintaining that 1" gap. When complete with this task both tubes should be parallel to one another because we don't want the cross brace to be higher on one side than the other.   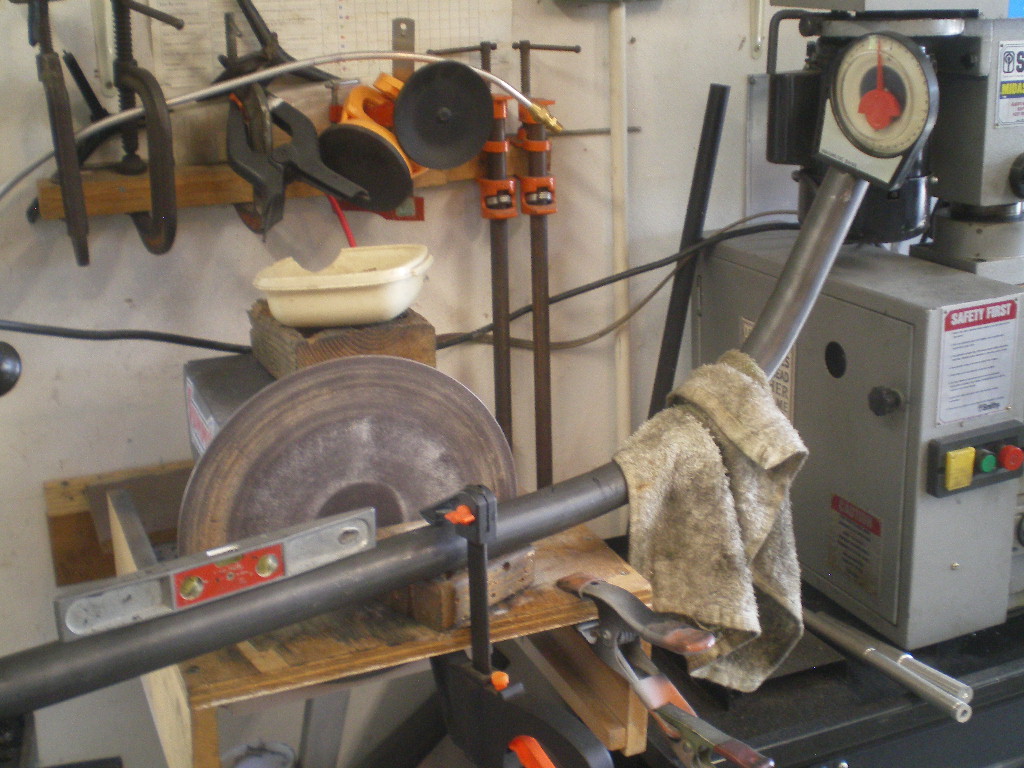 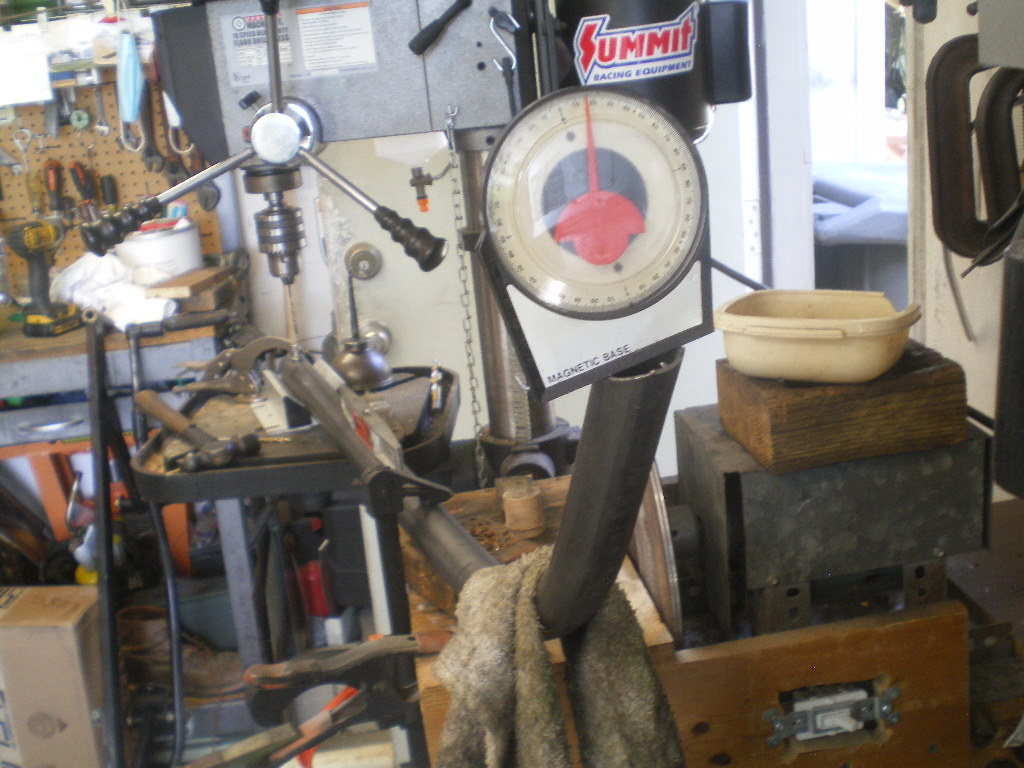 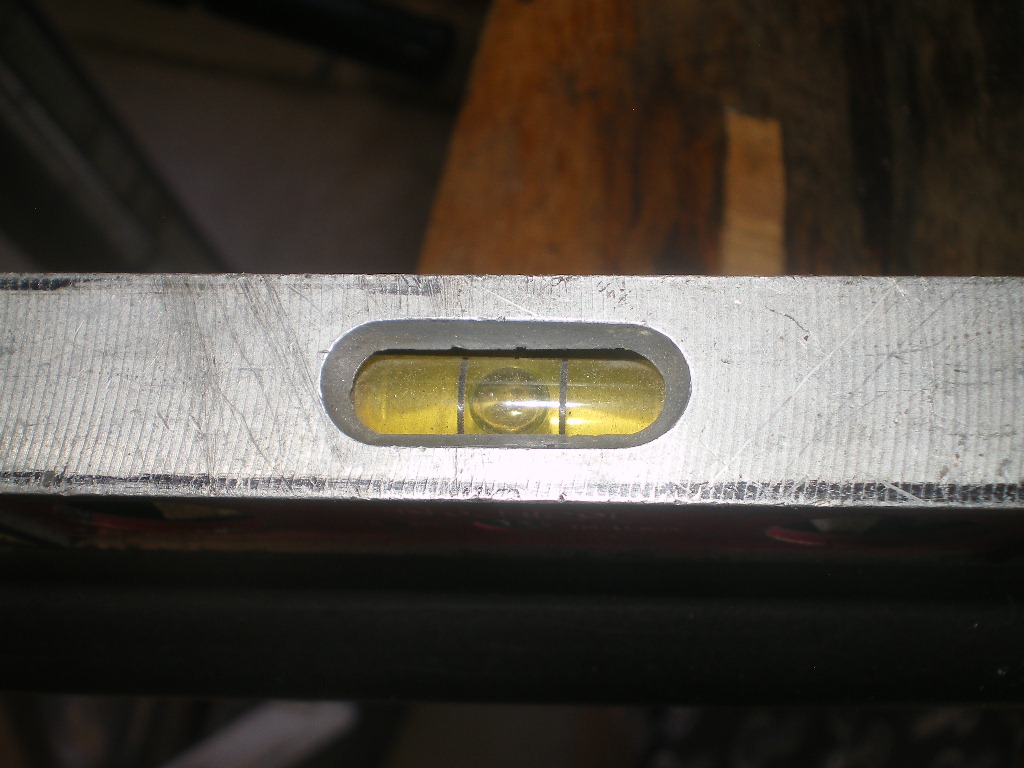 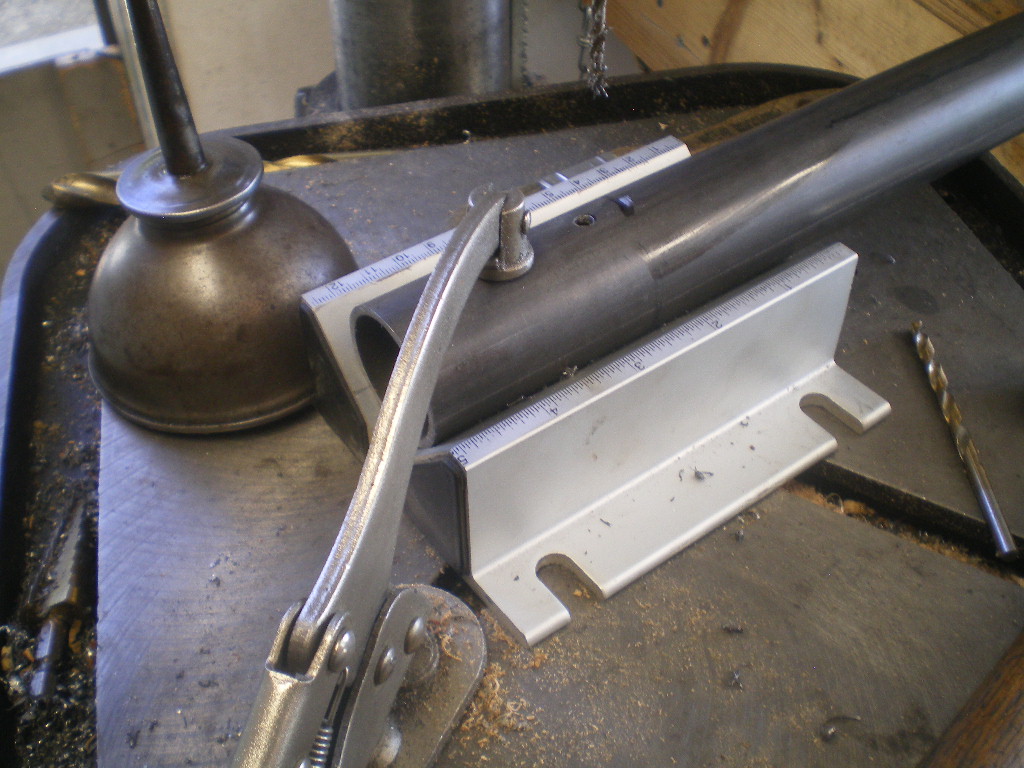  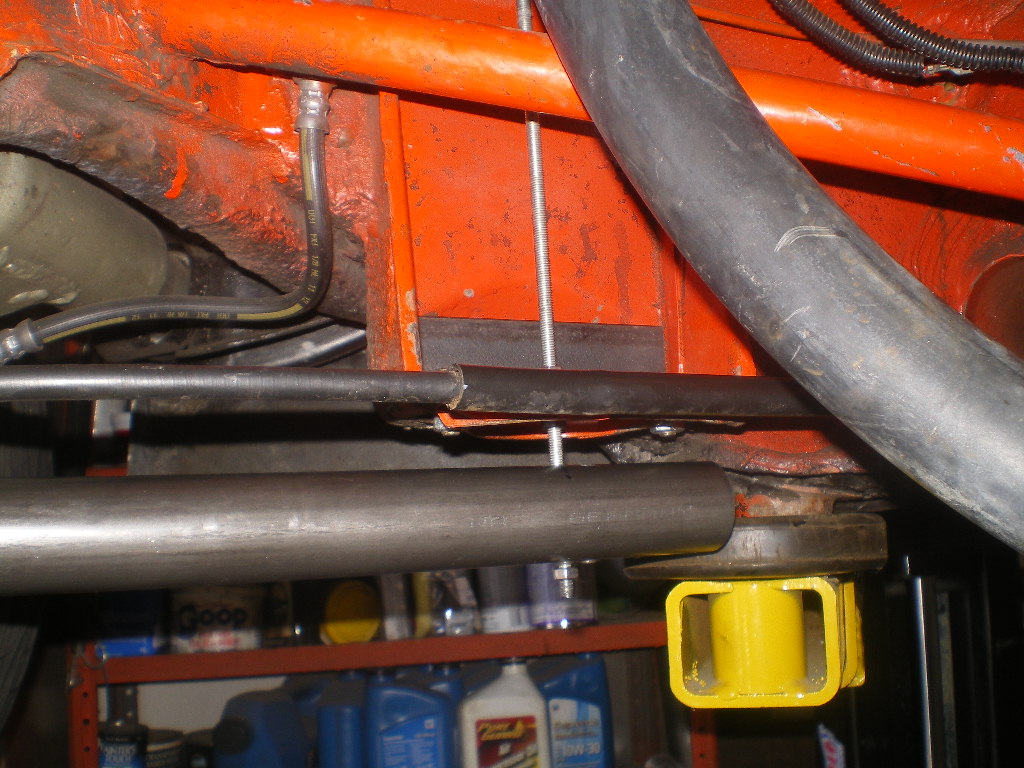 It should end up looking something like this but not to worry. This end will be welded and no one will see an imperfect cut anyway. 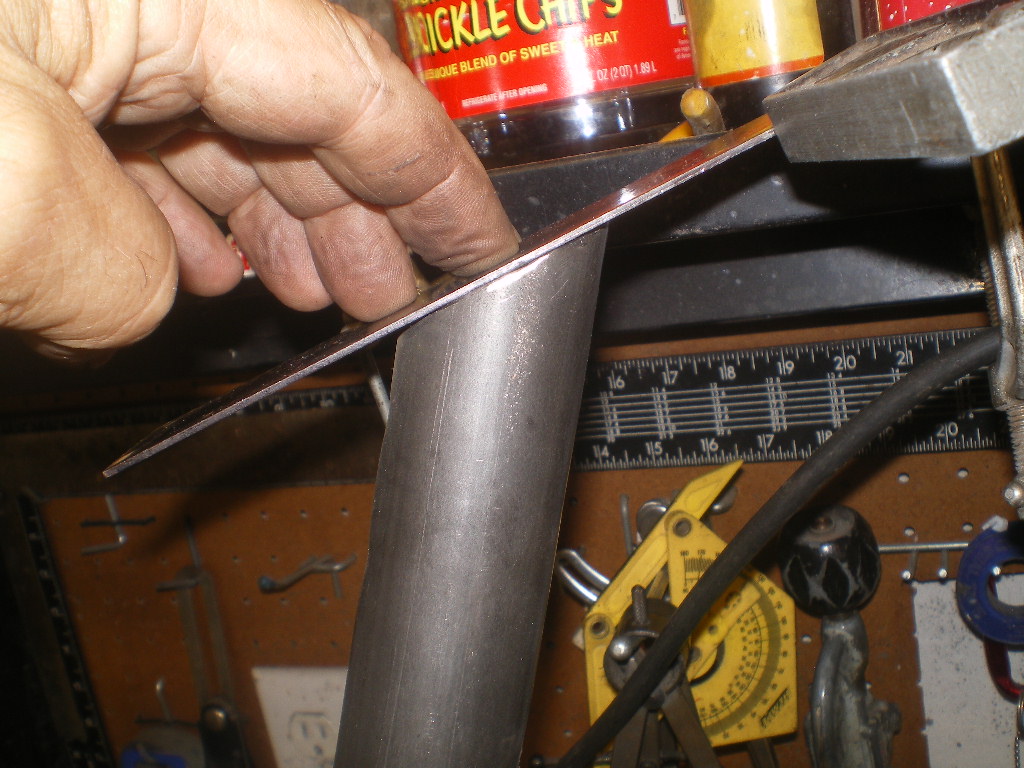 To be continued................ |
|
|
|
| 808 WRX |
Jul 6 2020, 01:39 PM
Post
#17
|
|
Member Group: Members Posts: 61 Joined: 4-June 20 From: San Jose, CA Member No.: 24,349 Region Association: Northern California |
QUOTE(76-914 @ Jul 3 2020, 05:24 PM) Once it's is secure be sure the section past or to the rear of the arc is perpendicular or 90 deg to the floor and that the long end is level or parallel to the floor. Ultimately the top of the tube should be 1" below the bottom of the angle iron bracket. This IS important. You may find you need to cut that angle piece twice in order to raise the back end enough to get it level while maintaining the 1" gap mentioned above and keeping the length level. Now is the time to mark the compound angle that will be trimmed off the top end. The 1st cradle I used a marks-a-lot but found the hacksaw blade to be much more accurate in transferring the mark because the blade could be held flush against both sides of the tape roll. Hold the roll flush against the plate. I needed to stretch the roll into an over same to work around the protruding bolts. I am probably a month or two from building myself a cradle. So your timing is perfect and I am looking forward to this thread! Quick question, why is the 1" gap important? |
|
|
|
| Andyrew |
Jul 6 2020, 01:45 PM
Post
#18
|
|
Spooling.... Please wait Group: Members Posts: 13,381 Joined: 20-January 03 From: Riverbank, Ca Member No.: 172 Region Association: Northern California |
(IMG:style_emoticons/default/smilie_pokal.gif) (IMG:style_emoticons/default/popcorn[1].gif) (IMG:style_emoticons/default/welder.gif)
Awesome!!! |
|
|
|
| tygaboy |
Jul 6 2020, 02:24 PM
Post
#19
|
|
914 Guru Group: Members Posts: 5,844 Joined: 6-October 15 From: Petaluma, CA Member No.: 19,241 Region Association: Northern California |
QUOTE(Andyrew @ Jul 6 2020, 12:45 PM) (IMG:style_emoticons/default/smilie_pokal.gif) (IMG:style_emoticons/default/popcorn[1].gif) (IMG:style_emoticons/default/welder.gif) Awesome!!! (IMG:style_emoticons/default/agree.gif) (IMG:style_emoticons/default/agree.gif) (IMG:style_emoticons/default/agree.gif) (IMG:style_emoticons/default/smilie_pokal.gif) |
|
|
|
| 914forme |
Jul 6 2020, 02:32 PM
Post
#20
|
|
Times a wastin', get wrenchin'! Group: Members Posts: 3,899 Joined: 24-July 04 From: Dayton, Ohio Member No.: 2,388 Region Association: None |
Love the low tech cradle build.
The roll of tape and hack saw blade trick genius. I would have used machinist dye, but that is me getting all fancy. (IMG:style_emoticons/default/whip[1].gif) back to the day job for me |
|
|
|
|
1 User(s) are reading this topic (1 Guests and 0 Anonymous Users)
0 Members:

|
Lo-Fi Version | Time is now: 25th July 2026 - 12:23 AM |
Invision Power Board
v9.1.4 © 2026 IPS, Inc.