|
|
|
Porsche, and the Porsche crest are registered trademarks of Dr. Ing. h.c. F. Porsche AG.
This site is not affiliated with Porsche in any way. Its only purpose is to provide an online forum for car enthusiasts. All other trademarks are property of their respective owners. |
|
|

  |

| sdoolin |
 Jul 22 2020, 06:57 PM Jul 22 2020, 06:57 PM
Post
#1
|
|
Member  Group: Members Posts: 359 Joined: 1-May 14 From: LouKY Member No.: 17,299 Region Association: None |
I need to install a firewall shift rod bushing. 1973 2.0 litre side shifter if it matters. Under engine shift rod easily removed with cone screws. From reading many posts about this, (and reconnoitering) it is obvious I need to install this bushing with the tunnel shift rod unbolted from the shifter and out of the way. I don't have experience with the tunnel shift rod.
My reconnoitering in the car tells me that this tunnel shift rod is finely splined to the coupler that connects it to the shifter. I need to disconnect this, slide the tunnel shift rod forward (out of the way of the bushing), install the firewall bushing, then reconnect all of that stuff. This all sounds straightforward, except there is little room in the space behind the shifter to be able to move around in order to do this reinstall. Can I do this with the shifter and carpet still in place? It seems like the tunnel shift rod will fall to the floor of the car when disconnected, and then retrieving it and re-installing it to the coupler, in the exact same orientation, is nearly impossible with shifter and carpet still in place. Or, at the very least, a long exercise in the creative application of adult language towards the result of increased shifting accuracy. Any words of wisdom? I did search (a lot). |
   |

 
|
| Montreal914 |
Jul 22 2020, 07:34 PM
Post
#2
|
|
Senior Member Group: Members Posts: 1,562 Joined: 8-August 10 From: Claremont, CA Member No.: 12,023 Region Association: Southern California |
I have played there a few times and I like to have space and keep the language civilized (IMG:style_emoticons/default/biggrin.gif) . I have removed the passenger seat and the carpet in the past. The seat may not be needed but since it takes all of 2 minutes, why not.
But your steps are correct. There is an access panel on the back of the tunnel for you to maneuver the rod back in. As for the front of the rod, yes you will need to re-engage it in the shifter. I have a magnet that I use to pick it up from the floor. The splines are there for the shifter connector to grab on the rod. You will need to readjust your shifter after that operation. The procedure is documented if you do a search. As for the shifter bushing, there are a few options that you might want to look into. Chris Foley has a nice improved one and there are others too I think. The side shifting can be made to work very well if all the bushings are in good condition. The poroblem is that the plastic ones don't last long. The bushing at the shifter console on the gearbox can also be replaced by a bronze version. There are also other improvement options available of you can make your own too (IMG:style_emoticons/default/driving.gif) Good luck! (IMG:style_emoticons/default/beerchug.gif) |
|
|
|
| 76-914 |
Jul 22 2020, 07:35 PM
Post
#3
|
|
Repeat Offender & Resident Subaru Antagonist Group: Members Posts: 13,504 Joined: 23-January 09 From: Temecula, CA Member No.: 9,964 Region Association: Southern California |
Unbolt the shifter from the floor then turn the base 90 degrees to gain access to the splined connection. Mark the 2 pieces before disassembly. Be very accurate. As you said they are small splines. I put a hose clamp with an 1/8" wide piece of steel bent at a 90 in between the clamp and rod at the 12 o'clock position so I could reference it upon reassembly. (IMG:style_emoticons/default/beerchug.gif)
|
|
|
|
| 914rat |
Jul 22 2020, 08:29 PM
Post
#4
|
|
Member Group: Members Posts: 279 Joined: 3-July 06 From: Maryland Member No.: 6,362 |
I just replaced all of the shifter bushings. Even the 1 in the shifter itself. Maybe I got lucky. I never made any adjustments to the tunnel rod mating with the shifter. It may be off slightly. I'm not sure because it shifts so much better than it did with 46 year old bushings. I was perfectly content with it's performance until I read this thread. Now I won't be able to sleep. Thanks (IMG:style_emoticons/default/icon8.gif)
|
|
|
|
| Frankvw |
Jul 23 2020, 01:26 AM
Post
#5
|
|
working on my first 914 ! Group: Members Posts: 651 Joined: 13-April 16 From: Holland, the Netherlands Member No.: 19,896 Region Association: Europe |
Hi, I posted a short while ago what I did (also a 73 sideshifter firewall bushing)
http://www.914world.com/bbs2/index.php?showtopic=345742 maybe that helps ? |
|
|
|
| Olympic 914 |
Jul 23 2020, 07:11 AM
Post
#6
|
|
Group: Members Posts: 1,671 Joined: 7-July 11 From: Pittsburgh PA Member No.: 13,287 Region Association: North East States |
I like to paint the coupling at the shifter/rod with white-out then mark with a fine tip sharpie.
1 line along the joint to reference the forward / back adjustment and 1 line to mark the rotation. makes it easy to return to original setting. when you reach the final setting scrub off the white-out and reapply with the new marks for reference. This lets you know if something moves later on. If that makes any sense. |
|
|
|
| yellowporky |
Jul 23 2020, 08:53 AM
Post
#7
|
|
Member Group: Members Posts: 427 Joined: 18-October 09 From: Martinez, Ca. Member No.: 10,948 Region Association: Northern California |
FYI- I just did my firewall bushing without removing the shift rod from the shifter although i did reinstall the Tangerine Racings firewall bushing. If you are going with the stock bushing that is sloppy from day one you will have to do the extra work.
I believe the Tangerine bushing is like $65 and worth every penny. |
|
|
|
| sdoolin |
Jul 23 2020, 10:28 AM
Post
#8
|
|
Member Group: Members Posts: 359 Joined: 1-May 14 From: LouKY Member No.: 17,299 Region Association: None |
Thanks for all of the tips. I have the inspection cover between the seats removed. I will make a reference mark on the tunnel rod and shift coupler with white paint and a fine line sharpie as suggested (white paint is drying now) in hopes of re-engaging in the same position. The car shifted fairly well. Also going to use a loop of safety wire on the tunnel rod up by the shifter so that it doesn't fall out of reach.
I do have the CFR firewall bushing, but cannot get a drill in between the fan housing and the firewall to drill the holes to locate it. So that will have to wait until I drop the engine again (likely this winter because the freaking push rod tube seals are leaking). So for now I will be installing a fresh OE firewall bushing, will use the boiling water method on that. |
|
|
|
| Frankvw |
Jul 23 2020, 10:54 AM
Post
#9
|
|
working on my first 914 ! Group: Members Posts: 651 Joined: 13-April 16 From: Holland, the Netherlands Member No.: 19,896 Region Association: Europe |
when you mention :
"I will make a reference mark on the tunnel rod and shift coupler with white paint and a fine line sharpie as suggested (white paint is drying now) in hopes of re-engaging in the same position" I think the rod will only go back one way in the coupler, since there is a specific conescrew that locates it in a location where the dimple in the rod is. So, your marking will be a reference only. The shifter is the point of adjustment afterwards, not the rod I think. |
|
|
|
| iankarr |
Jul 23 2020, 11:18 AM
Post
#10
|
|
The wrencher formerly known as Cuddy_K Group: Members Posts: 2,474 Joined: 22-May 15 From: Heber City, UT Member No.: 18,749 Region Association: Intermountain Region |
QUOTE(sdoolin @ Jul 23 2020, 12:28 PM)  Thanks for all of the tips. I have the inspection cover between the seats removed. I will make a reference mark on the tunnel rod and shift coupler with white paint and a fine line sharpie as suggested (white paint is drying now) in hopes of re-engaging in the same position. The car shifted fairly well. Also going to use a loop of safety wire on the tunnel rod up by the shifter so that it doesn't fall out of reach. I do have the CFR firewall bushing, but cannot get a drill in between the fan housing and the firewall to drill the holes to locate it. So that will have to wait until I drop the engine again (likely this winter because the freaking push rod tube seals are leaking). So for now I will be installing a fresh OE firewall bushing, will use the boiling water method on that. A drill bit on a flexible dremel may allow you to get the holes done with the engine in... |
|
|
|
| sdoolin |
Jul 23 2020, 12:00 PM
Post
#11
|
|
Member Group: Members Posts: 359 Joined: 1-May 14 From: LouKY Member No.: 17,299 Region Association: None |
QUOTE(Frankvw @ Jul 23 2020, 12:54 PM) when you mention : "I will make a reference mark on the tunnel rod and shift coupler with white paint and a fine line sharpie as suggested (white paint is drying now) in hopes of re-engaging in the same position" I think the rod will only go back one way in the coupler, since there is a specific conescrew that locates it in a location where the dimple in the rod is. So, your marking will be a reference only. The shifter is the point of adjustment afterwards, not the rod I think. Since the rod is finely splined, I'd think it would be easy to rotate the thing slightly from its original orientation when re-engaging it. The reference mark I am planning on will help me re-align the splines with the coupler in the original orientation. There is no conescrew (to my knowledge) on the tunnel rod? |
|
|
|
| sdoolin |
Jul 23 2020, 12:04 PM
Post
#12
|
|
Member Group: Members Posts: 359 Joined: 1-May 14 From: LouKY Member No.: 17,299 Region Association: None |
QUOTE(cuddy_k @ Jul 23 2020, 01:18 PM) QUOTE(sdoolin @ Jul 23 2020, 12:28 PM) Thanks for all of the tips. I have the inspection cover between the seats removed. I will make a reference mark on the tunnel rod and shift coupler with white paint and a fine line sharpie as suggested (white paint is drying now) in hopes of re-engaging in the same position. The car shifted fairly well. Also going to use a loop of safety wire on the tunnel rod up by the shifter so that it doesn't fall out of reach. I do have the CFR firewall bushing, but cannot get a drill in between the fan housing and the firewall to drill the holes to locate it. So that will have to wait until I drop the engine again (likely this winter because the freaking push rod tube seals are leaking). So for now I will be installing a fresh OE firewall bushing, will use the boiling water method on that. A drill bit on a flexible dremel may allow you to get the holes done with the engine in... Good suggestion, but I am in the process of manufacturing reasons to drop the engine. So far I have: it is dirty, it has various small oil leaks, need to install CFR firewall bushing, need to check valve adjustment, check plugs/points, I could go on and on... |
|
|
|
| Frankvw |
Jul 23 2020, 12:14 PM
Post
#13
|
|
working on my first 914 ! Group: Members Posts: 651 Joined: 13-April 16 From: Holland, the Netherlands Member No.: 19,896 Region Association: Europe |
ok, maybe we talk about two different parts.
The bushing in the firewall is at the end of 30. End of 30 is attached to the coupler (25) with a conescrew, no splined stuff there, only a dimple in the rod and the conescrew locking it in position. I thought that is what you wanted to mark...... 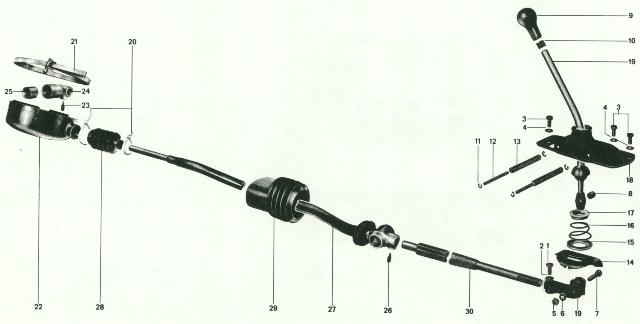 |
|
|
|
| Olympic 914 |
Jul 23 2020, 01:04 PM
Post
#14
|
|
Group: Members Posts: 1,671 Joined: 7-July 11 From: Pittsburgh PA Member No.: 13,287 Region Association: North East States |
The place to mark is where rod #30 goes into shift coupler #19 (maybe what I am calling it caused confusion)
The splines on this end of #30 do not have corresponding splines inside #19. So you can twist it a little to get your adjustment. you can clamp vice grips on the other end of rod #30 accessed through the small door near the back of the tunnel. this helps to hold it in place or make small adjustments. |
|
|
|
| sdoolin |
Jul 23 2020, 01:12 PM
Post
#15
|
|
Member Group: Members Posts: 359 Joined: 1-May 14 From: LouKY Member No.: 17,299 Region Association: None |
QUOTE(Olympic 914 @ Jul 23 2020, 03:04 PM) The place to mark is where rod #30 goes into shift coupler #19 (maybe what I am calling it caused confusion) The splines on this end of #30 do not have corresponding splines inside #19. So you can twist it a little to get your adjustment. you can clamp vice grips on the other end of rod #30 accessed through the small door near the back of the tunnel. this helps to hold it in place or make small adjustments. This is what I am doing. Marking both #30 & #19 so that when I go to re-insert #30 into #19 (now I feel like a number) it is hopefully close to where it was when I took it apart. I can follow the shifter adjustment procedure if needed, but it shifted well enough that I feel like if I get it back together just like it came apart, with the addition of the replacement bushing, it will shift even better. If not, I will follow the shifter adjustment procedure. |
|
|
|
| Frankvw |
Jul 23 2020, 02:18 PM
Post
#16
|
|
working on my first 914 ! Group: Members Posts: 651 Joined: 13-April 16 From: Holland, the Netherlands Member No.: 19,896 Region Association: Europe |
Ok clear (IMG:style_emoticons/default/smile.gif)
but....if you want to keep the same position, you do not need to take it apart on the shifterside. Just undo the bolts that hold the shifter to the tunnel, rotate the shifter after it is loose and you create some space and the rod can drop in the tunnel without being disconnected from nr19. But marking it is also a good idea. More ways lead to Rome. |
|
|
|
| sdoolin |
Jul 24 2020, 09:09 AM
Post
#17
|
|
Member Group: Members Posts: 359 Joined: 1-May 14 From: LouKY Member No.: 17,299 Region Association: None |
So this went well. Managed to get the tunnel rod re-engaged with the shift coupler, my reference mark was helpful. So, all good inside the car. Firewall bushing was pain-free after a short boil.
Rear shift rod re-installed with conescrews, console cover and new rear bellows (from 914Rubber) installed. All went well. Then, I attempted the notorious firewall bellows. I strung together some very unusual combinations of profanity and adult language before I waked away in disgust. As the younger crowd would say - Epic Fail. I will try again after consumption of the right amount of liquid encouragement (bourbon helps everything). |
|
|
|
| Olympic 914 |
Jul 24 2020, 09:18 AM
Post
#18
|
|
Group: Members Posts: 1,671 Joined: 7-July 11 From: Pittsburgh PA Member No.: 13,287 Region Association: North East States |
QUOTE(sdoolin @ Jul 24 2020, 11:09 AM) Then, I attempted the notorious firewall bellows. I strung together some very unusual combinations of profanity and adult language before I waked away in disgust. As the younger crowd would say - Epic Fail. I will try again after consumption of the right amount of liquid encouragement (bourbon helps everything). There is a thread on this.. http://www.914world.com/bbs2/index.php?sho...=344106&hl= |
|
|
|
| Frankvw |
Jul 24 2020, 09:36 AM
Post
#19
|
|
working on my first 914 ! Group: Members Posts: 651 Joined: 13-April 16 From: Holland, the Netherlands Member No.: 19,896 Region Association: Europe |
yes, I understand your frustration with that firewallboot thing.
From my post: "To re-install that rubberboot I was fiddling for a long time. Then I started by hand on top and side and used a pick on lowest part and took me 10 secs." And that really is true ! |
|
|
|
| sdoolin |
Jul 24 2020, 04:46 PM
Post
#20
|
|
Member Group: Members Posts: 359 Joined: 1-May 14 From: LouKY Member No.: 17,299 Region Association: None |
My firewall shift rod boot/bellows thingy install procedure.
Mix one Old Fashioned (2 Oz Makers Mark, 1/2 Oz simple syrup, Angostura bitters to taste, small slice of orange zest (do NOT muddle fruit in this drink, it offends the bourbon)), one large rock/cube. Sip Old Fashioned while raising car on lift. Sip Old Fashioned while reconnoitering boot/bellows thingy and working up courage. Make sure boot/bellows thingy is loose on the shift rod, both ends are free. On the firewall end of the boot/bellows thingy, flip the boot/bellows thingy back on itself. Press up against the firewall. Starting at the top, "unflip" the boot/bellows thingy around its lip on the firewall working top to bottom. Now secure boot/bellows thingy to shift rod. Done. Finish Old Fashioned in celebratory nature. Two minutes from start to finish. Ten minutes if you factor in the time for mixing the Old Fashioned. Like a said earlier. Bourbon helps everything. Car runs fantastic, and shifting is smooth and precise. Well, "more" precise. |
|
|
|
|
1 User(s) are reading this topic (1 Guests and 0 Anonymous Users)
0 Members:

|
Lo-Fi Version | Time is now: 20th May 2024 - 11:10 PM |
Invision Power Board
v9.1.4 © 2024 IPS, Inc.