|
|
|
Porsche, and the Porsche crest are registered trademarks of Dr. Ing. h.c. F. Porsche AG.
This site is not affiliated with Porsche in any way. Its only purpose is to provide an online forum for car enthusiasts. All other trademarks are property of their respective owners. |
|
|


| andrewck |
 Jul 26 2020, 11:30 AM Jul 26 2020, 11:30 AM
Post
#1
|
|
Newbie  Group: Members Posts: 48 Joined: 5-July 20 From: Denver Member No.: 24,461 Region Association: Rocky Mountains |
Greeting from Denver. I was at a 996 meetup a few weeks ago and started talking to a guy selling his 914 project car. A week later, I am said owner of a 1975 Laguna Blue 914 with two 2.0L motors, a couple of transmissions, and lots of parts to put it together. To top it all off, I made a new friend in the PO and have had a warm welcome into the 914 world.
PO spent a lot of money and effort to addressing rust so I'm starting off with a fantastic chassis. I'm spoiled as I come from the 996 world where I don't have to worry about many of the issues that come with 45+ year old cars. I'm decent with a wrench, though I have no fabricating skills and have never rebuilt a motor, so this is all a learning experience. The plan is to clean the "complete" motor and redo seals, belts, gaskets, other basic things to get it running and just drive it. Meanwhile I'll explore options on the second block, and am already looking into a 2056 build. Step one of getting the car back on the road looks relatively straightforward, but the catch is I don't have a garage/shop to work on the car, so much of it will be done in my livingroom and parking spot. Already appreciate all the knowledge posted here and I'm finding inspiration in a lot of your builds. The search function has been my friend, but I'm sure I'll be asking questions going forward. -Andrew 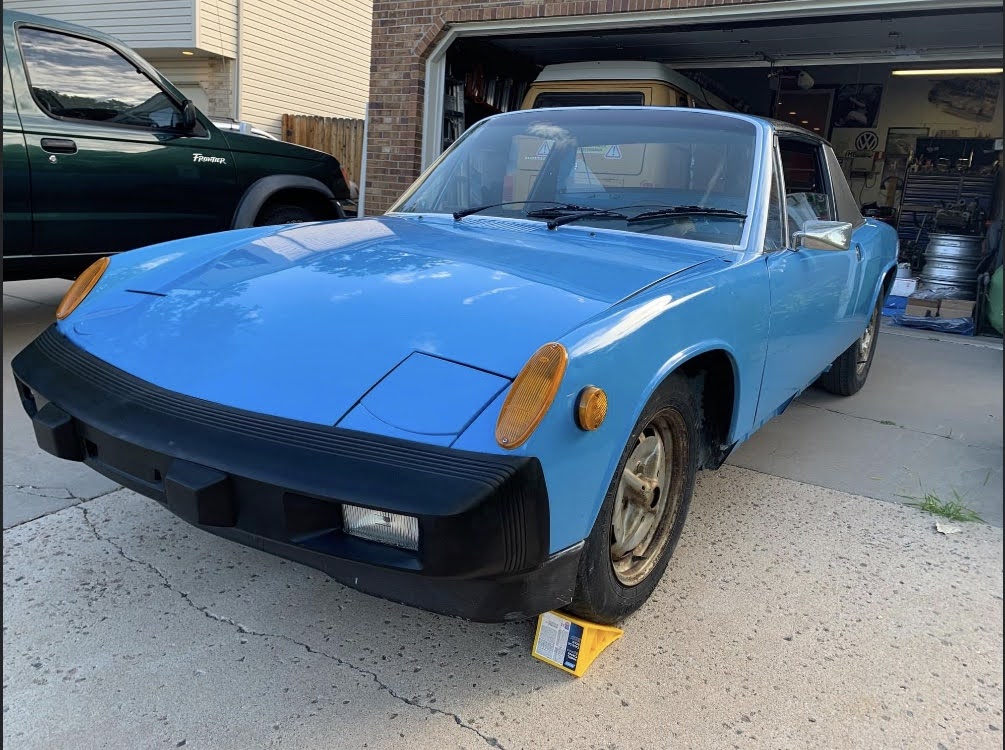 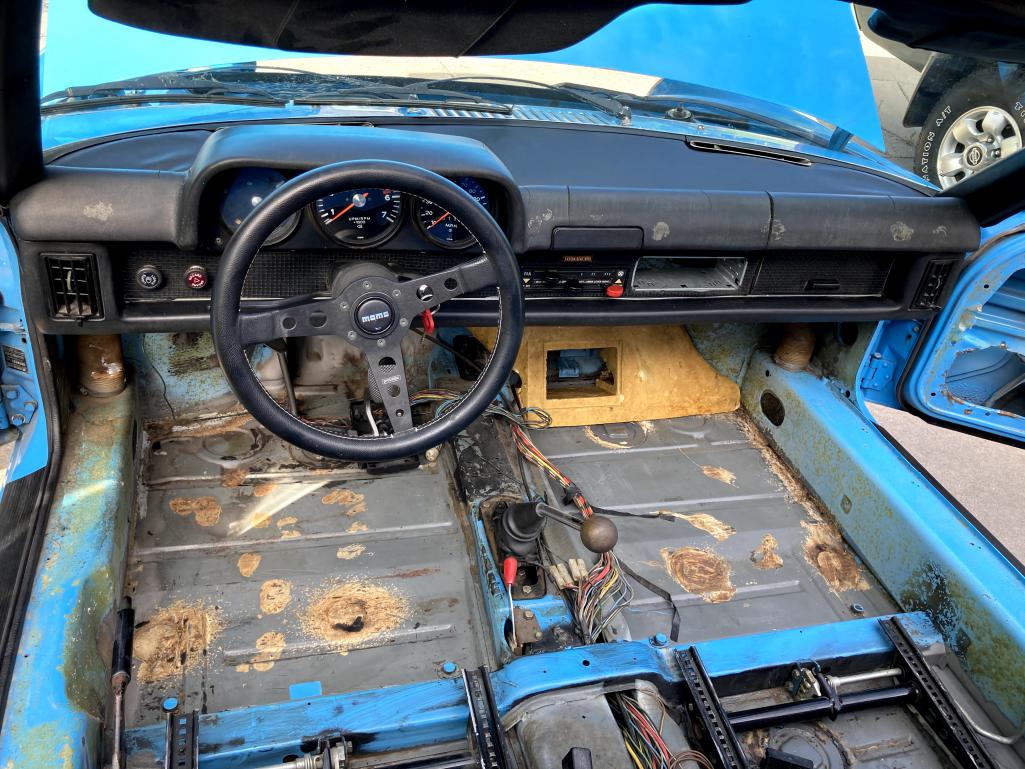  |
   |

 
|
  |
Replies
| andrewck |
Sep 6 2020, 09:59 PM
Post
#2
|
|
Newbie Group: Members Posts: 48 Joined: 5-July 20 From: Denver Member No.: 24,461 Region Association: Rocky Mountains |
My car came with a cracked dash, as well as 2 spares (one in worse condition, and another in ehh shape, but better than the installed one). I'm having a drink now, but I sure should have had 3 before taking on this project.
I was able to get the lower dash (knee pad) off easily, but with it can clouds of dust and dirt. I took my hand and banged on the metal bar that the knee pad attaches to and with each thump saw waterfalls of debris coming out from the dash. I did this for 5 minutes until there was nothing left to rain down. I don't know how so much crap got lodged up there, but I filled up a vacuum canister from what came down. Now on to the upper dash. This took way too much trial and error even with forum instructions. Maybe I'm bad at following directions and have too large of hands, but please see below for what worked for me to access the hidden nuts. I worked my way from left to right, ripping off disentegrated dash as I moved on. FYI all nuts are 13mm 1. Used a crow foot wrench inside the vent to loosten, then removed by hand 2 used a 1/4" 13mm deep socked and extension. Started from the hood release and worked back up towards the dash to access the nut 3 I did not remove the instrument cluster or steering wheel. I removed oil temp gauge and used a 13mm wrench to slowly access the nut hidden way back under the sheet metal. This was the most difficult one to access and because I don't have thin/narrow wrenches, it was a drawn out process of 1/3 turns and resetting the wrench 4 same as #3, but removed the speedo to access 5 red arrow should be pointing straight up as I used the same methodology as with nut #2. A long extension and deep socket should allow you to loosten and remove while looking up from underneath the dash. To reinstall, keep the speedo out and use a crow foot wrench and your fingers to tighten the nut just to the right of the opening. 6 make sure your radio is out to get access. again get under the dash and look up. you should be able to use a nut driver or crow foot to loosten the nuts and then pull them out by hand 7 see #6, you should be able to access both nuts at the same time 8 remove the glove bot metal strap. it is next to nut #7 and held on by a 4mm?? nut, . you don't need to pull out the entire glovebox, just loosten the strap. at that point you can get back on the floor and use same method as #2 and #5. Long extension to loosten, pull out by hand 9 crow foot wrench going through the vent up and to the right. probably 5 small turns to loosten it and then unscrew by hand By now, your back is sore, your fingers are dirty/bloody, and your neighbors have learned a couple of new curse words. Congratulations! You should have 9 plastic nuts and metal washers. The dash should pull up and out. installation is the reverse. you now deserve another drink. 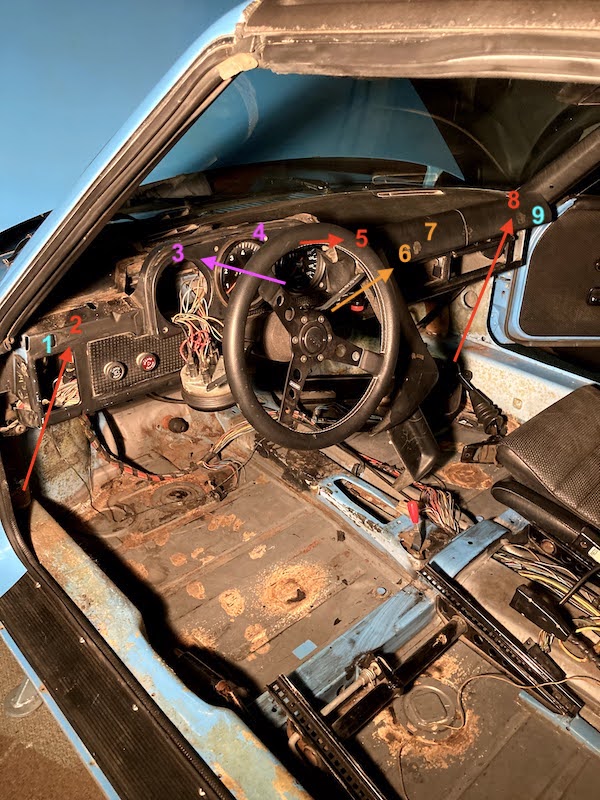 Anyways, I hope this helps at least one person out there that is frustruated with removing the dash and is wondering why no combination of socket set is getting the job done. |
|
|
|
| Gint |
Sep 9 2020, 12:15 PM
Post
#3
|
|
Mike Ginter Group: Admin Posts: 16,066 Joined: 26-December 02 From: Denver CO. Member No.: 20 Region Association: Rocky Mountains |
QUOTE(andrewck @ Sep 6 2020, 08:59 PM)  By now, your back is sore, your fingers are dirty/bloody, and your neighbors have learned a couple of new curse words. Congratulations! You should have 9 plastic nuts and metal washers. The dash should pull up and out. installation is the reverse. you now deserve another drink. The installation is really a PITA. But at least at that point you know where the attachment points are. And your vocabulary is up to speed. The local crew got together and did one of these a while ago. I think that was Pete's old car. Did Doug give you the details on prior ownership? |
|
|
|
| andrewck |
Sep 9 2020, 10:00 PM
Post
#4
|
|
Newbie Group: Members Posts: 48 Joined: 5-July 20 From: Denver Member No.: 24,461 Region Association: Rocky Mountains |
QUOTE(Gint @ Sep 9 2020, 12:15 PM) QUOTE(andrewck @ Sep 6 2020, 08:59 PM) By now, your back is sore, your fingers are dirty/bloody, and your neighbors have learned a couple of new curse words. Congratulations! You should have 9 plastic nuts and metal washers. The dash should pull up and out. installation is the reverse. you now deserve another drink. The installation is really a PITA. But at least at that point you know where the attachment points are. And your vocabulary is up to speed. The local crew got together and did one of these a while ago. I think that was Pete's old car. Did Doug give you the details on prior ownership? There are some receipts from Peter from the mid-90s. Looks like it had a few owners since then, but if there are some fun stories/details you might know, I'm all ears! |
|
|
|
Posts in this topic
 andrewck Laguna Blue '75 build Jul 26 2020, 11:30 AM
 andrewck Yes, I do mean it when I said I'm tearing down... Jul 26 2020, 11:37 AM Nojoah :wttc: Looks like you have a great car to start wi... Jul 26 2020, 11:44 AM Cairo94507 What a terrific color and nice chassis. I don... Jul 26 2020, 01:45 PM
 andrewck
What a terrific color and nice chassis. I don... Jul 31 2020, 02:27 PM Jamie
[quote name='Cairo94507' post='2837327' date='Jul... Jul 31 2020, 07:54 PM Root_Werks Looks like a solid starting point (little to almos... Jul 31 2020, 04:46 PM andrewck Opened the sump plate and it’s metal city! L... Jul 31 2020, 05:18 PM bkrantz Congrats, welcome, ,and good luck. Tearing down a... Jul 31 2020, 08:05 PM andrewck
Congrats, welcome, ,and good luck. Tearing down ... Aug 1 2020, 07:33 AM Tdskip Shoptalk has a good Type4 community too, worth tak... Aug 1 2020, 07:48 AM andrewck I'm well on my way towards splitting the case ... Aug 2 2020, 09:54 PM cuddy_k Wow...engine work INSIDE the house? I salute you... Aug 3 2020, 10:52 AM ctc911ctc GIRLFRIEND?
Marry that girl! Aug 3 2020, 12:23 PM andrewck If I were a betting man, I’d say this could be t... Aug 3 2020, 04:33 PM IronHillRestorations Friction from worn rings, or a bad rebuild Aug 3 2020, 08:11 PM andrewck The car made its way home with me today and is rea... Aug 15 2020, 09:17 PM djway
The car made its way home with me today and is re... Aug 16 2020, 01:12 AM Rleog You definitely have a “keeper” in your girlfri... Aug 16 2020, 04:05 AM andrewck
You definitely have a “keeper” in your girlfr... Aug 16 2020, 09:53 AM andrewck I’ll actually take a step further back and do a ... Aug 16 2020, 10:23 AM andrewck Nothing is ever easy.
Just got back from Woody... Aug 31 2020, 03:51 PM DRPHIL914 :wttc:
the airbnb garage idea is really cool, th... Sep 1 2020, 06:54 AM andrewck
:wttc:
the airbnb garage idea is really cool, t... Sep 6 2020, 09:03 PM andrewck So I started the weekend off with an easy project ... Sep 6 2020, 09:18 PM andrewck Thanks to @fiacra and [b]@[url=http://www.914wo... Sep 6 2020, 09:22 PM andrewck Thermostat bellows were blown, so a quick search p... Sep 6 2020, 09:26 PM Gint [quote name='Gint' post='2849775' date='Sep 9 2020... Sep 15 2020, 08:45 AM andrewck
[quote name='Gint' post='2849775' date='Sep 9 202... Sep 15 2020, 09:40 AM Greycarrera There is a pretty good video of 914 dash removal o... Sep 7 2020, 08:49 AM andrewck
There is a pretty good video of 914 dash removal ... Sep 9 2020, 09:50 PM Tdskip Thanks for the updates and write up. Good stuff.
... Sep 10 2020, 08:24 AM Frankvw I like the updates and build, good luck with the r... Sep 15 2020, 10:47 AM andrewck
I like the updates and build, good luck with the ... Sep 18 2020, 12:51 PM andrewck I am tackling the 5 lug hub conversion this weeken... Sep 18 2020, 12:58 PM Tdskip
It appears that Swepco 101 is the hub/bearing gr... Sep 18 2020, 03:40 PM andrewck
[quote name='andrewck' post='2852322' date='Sep 1... Sep 19 2020, 07:24 PM andrewck Old bearing out, new bearing....stuck. Had these i... Sep 20 2020, 03:01 PM iankarr Tough to tell for sure, but from the picture it lo... Sep 20 2020, 04:31 PM andrewck
Tough to tell for sure, but from the picture it l... Sep 20 2020, 10:08 PM andrewck
[quote name='iankarr' post='2852824' date='Sep 20... Oct 7 2020, 07:24 PM andrewck Got around to working on the replacement motor tod... Oct 25 2020, 03:44 PM andrewck It's been a while since I've posted progre... May 11 2021, 05:59 PM
andrewck
What a terrific color and nice chassis. I don... Jul 31 2020, 02:27 PM Jamie
[quote name='Cairo94507' post='2837327' date='Jul... Jul 31 2020, 07:54 PM Root_Werks Looks like a solid starting point (little to almos... Jul 31 2020, 04:46 PM andrewck Opened the sump plate and it’s metal city! L... Jul 31 2020, 05:18 PM bkrantz Congrats, welcome, ,and good luck. Tearing down a... Jul 31 2020, 08:05 PM andrewck
Congrats, welcome, ,and good luck. Tearing down ... Aug 1 2020, 07:33 AM Tdskip Shoptalk has a good Type4 community too, worth tak... Aug 1 2020, 07:48 AM andrewck I'm well on my way towards splitting the case ... Aug 2 2020, 09:54 PM cuddy_k Wow...engine work INSIDE the house? I salute you... Aug 3 2020, 10:52 AM ctc911ctc GIRLFRIEND?
Marry that girl! Aug 3 2020, 12:23 PM andrewck If I were a betting man, I’d say this could be t... Aug 3 2020, 04:33 PM IronHillRestorations Friction from worn rings, or a bad rebuild Aug 3 2020, 08:11 PM andrewck The car made its way home with me today and is rea... Aug 15 2020, 09:17 PM djway
The car made its way home with me today and is re... Aug 16 2020, 01:12 AM Rleog You definitely have a “keeper” in your girlfri... Aug 16 2020, 04:05 AM andrewck
You definitely have a “keeper” in your girlfr... Aug 16 2020, 09:53 AM andrewck I’ll actually take a step further back and do a ... Aug 16 2020, 10:23 AM andrewck Nothing is ever easy.
Just got back from Woody... Aug 31 2020, 03:51 PM DRPHIL914 :wttc:
the airbnb garage idea is really cool, th... Sep 1 2020, 06:54 AM andrewck
:wttc:
the airbnb garage idea is really cool, t... Sep 6 2020, 09:03 PM andrewck So I started the weekend off with an easy project ... Sep 6 2020, 09:18 PM andrewck Thanks to @fiacra and [b]@[url=http://www.914wo... Sep 6 2020, 09:22 PM andrewck Thermostat bellows were blown, so a quick search p... Sep 6 2020, 09:26 PM Gint [quote name='Gint' post='2849775' date='Sep 9 2020... Sep 15 2020, 08:45 AM andrewck
[quote name='Gint' post='2849775' date='Sep 9 202... Sep 15 2020, 09:40 AM Greycarrera There is a pretty good video of 914 dash removal o... Sep 7 2020, 08:49 AM andrewck
There is a pretty good video of 914 dash removal ... Sep 9 2020, 09:50 PM Tdskip Thanks for the updates and write up. Good stuff.
... Sep 10 2020, 08:24 AM Frankvw I like the updates and build, good luck with the r... Sep 15 2020, 10:47 AM andrewck
I like the updates and build, good luck with the ... Sep 18 2020, 12:51 PM andrewck I am tackling the 5 lug hub conversion this weeken... Sep 18 2020, 12:58 PM Tdskip
It appears that Swepco 101 is the hub/bearing gr... Sep 18 2020, 03:40 PM andrewck
[quote name='andrewck' post='2852322' date='Sep 1... Sep 19 2020, 07:24 PM andrewck Old bearing out, new bearing....stuck. Had these i... Sep 20 2020, 03:01 PM iankarr Tough to tell for sure, but from the picture it lo... Sep 20 2020, 04:31 PM andrewck
Tough to tell for sure, but from the picture it l... Sep 20 2020, 10:08 PM andrewck
[quote name='iankarr' post='2852824' date='Sep 20... Oct 7 2020, 07:24 PM andrewck Got around to working on the replacement motor tod... Oct 25 2020, 03:44 PM andrewck It's been a while since I've posted progre... May 11 2021, 05:59 PM |
2 User(s) are reading this topic (2 Guests and 0 Anonymous Users)
0 Members:

|
Lo-Fi Version | Time is now: 1st May 2024 - 04:33 PM |
Invision Power Board
v9.1.4 © 2024 IPS, Inc.