|
|
|
Porsche, and the Porsche crest are registered trademarks of Dr. Ing. h.c. F. Porsche AG.
This site is not affiliated with Porsche in any way. Its only purpose is to provide an online forum for car enthusiasts. All other trademarks are property of their respective owners. |
|
|

  |

| FlacaProductions |
 Jul 30 2020, 10:56 AM Jul 30 2020, 10:56 AM
Post
#1
|
|
Senior Member  Group: Members Posts: 1,591 Joined: 24-November 17 From: LA Member No.: 21,628 Region Association: Southern California |
I have a combo gauge with integrated temp gauge (914 641 101 50) and I'd like to use the blank indicator lens position. Has anyone done or had this done?
My "additional/unused" indicator position already has a red lens in it which is held there by a piece of solid black tape. It appears OEM and I have seen others that look the same. At first glance, you could just remove the reflector, (snip it out or bend it out of the way?), remove the tape and glue the lens in, fit a boot, insert an applicable lamp/lamp holder in the existing hole and be done...but that would then eliminate the gauge overall illumination. That's no good. My next thought is to get an additional "boot" like the other indicators, cut it down so that it fits under the reflector, insert a small LED (secure it with silicone?) and route the wires through an existing screw hole (leave that screw out and fill it with silicone, etc) or drill an additional small hole. This would illuminate the lens (which is already red in my unit) but retain overall gauge illumination. Thoughts? Where can I get a couple of the rubber "boots"? It would involve some trial and error knowing me.... 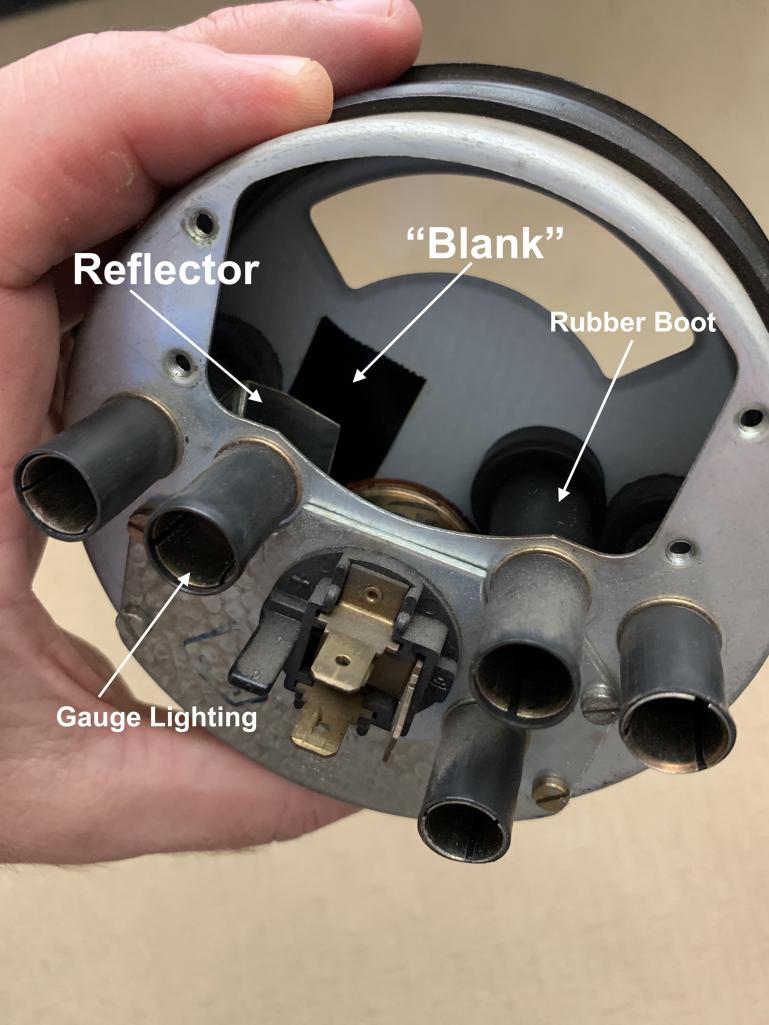 |
   |

 
|
| johnlush |
Jul 30 2020, 11:52 AM
Post
#2
|
|
What's all this then? Group: Members Posts: 371 Joined: 26-May 04 From: Cheyenne, WY Member No.: 2,108 Region Association: Rocky Mountains |
I think your second idea would be easier and less invasive.
Many moons ago I built a couple of triple gauges from kits I picked up from Stephen Jacobs. Being a packrat, I have a bag with all of the leftover parts from that project including at least one of the rubber "tubes" which I'd be glad to share with you. What is the function of your new indicator light? |
|
|
|
| FlacaProductions |
Jul 30 2020, 12:06 PM
Post
#3
|
|
Senior Member Group: Members Posts: 1,591 Joined: 24-November 17 From: LA Member No.: 21,628 Region Association: Southern California |
Hi John - thanks for the backstop and the offer. I'll send you a PM.
The new indicator would be related to kill switch status. I just like the idea of it being in a stock location. When lit (activated) it wouldn't look out of place. |
|
|
|
| 914forme |
Jul 30 2020, 03:09 PM
Post
#4
|
|
Times a wastin', get wrenchin'! Group: Members Posts: 3,896 Joined: 24-July 04 From: Dayton, Ohio Member No.: 2,388 Region Association: None |
Interior Boot option is a good way to go. Lighting of the can, a bit of LED action, and you have interior lights.
If John does not have the parts, I must likely well. PM if you need them. Piece inside that snaps to the light tube, then you add the rubber bellows, which also holds the lens. Other words. Small metal ring with two ends. Rubber Tube Lens Gauge Face Call kind of compressed together |
|
|
|
| Chris914n6 |
Jul 30 2020, 03:33 PM
Post
#5
|
|
Jackstands are my life. Group: Members Posts: 3,321 Joined: 14-March 03 From: Las Vegas, NV Member No.: 431 Region Association: Southwest Region |
LED taped to the back of the blank lens would be the easiest.
Unless you want to do full LED lighting ala Spoke's system. |
|
|
|
| FlacaProductions |
Jul 30 2020, 04:14 PM
Post
#6
|
|
Senior Member Group: Members Posts: 1,591 Joined: 24-November 17 From: LA Member No.: 21,628 Region Association: Southern California |
QUOTE(Chris914n6 @ Jul 30 2020, 02:33 PM)  LED taped to the back of the blank lens would be the easiest. Unless you want to do full LED lighting ala Spoke's system. Thought about this - i can't seem to find a flat LED - or one that would be easy to tape back there - and then cover with black to keep it from illuminating the inside of the entire gauge when it lights up. |
|
|
|
| FlacaProductions |
Jul 30 2020, 04:16 PM
Post
#7
|
|
Senior Member Group: Members Posts: 1,591 Joined: 24-November 17 From: LA Member No.: 21,628 Region Association: Southern California |
QUOTE(914forme @ Jul 30 2020, 02:09 PM) Small metal ring with two ends. Rubber Tube Lens Gauge Face Call kind of compressed together Yep - that's how I have it in my head....which is a dangerous place to be. |
|
|
|
| 914forme |
Jul 30 2020, 07:47 PM
Post
#8
|
|
Times a wastin', get wrenchin'! Group: Members Posts: 3,896 Joined: 24-July 04 From: Dayton, Ohio Member No.: 2,388 Region Association: None |
LED 12v bulb and holder, and the lens then build it all in an assembly 3d print the surround. Glue it in place, run the leads out in a grommet.
easy peasy example of the LED |
|
|
|
| 914forme |
Jul 30 2020, 07:49 PM
Post
#9
|
|
Times a wastin', get wrenchin'! Group: Members Posts: 3,896 Joined: 24-July 04 From: Dayton, Ohio Member No.: 2,388 Region Association: None |
:hiJack: Wait Spoke has LED gauge lighting now (IMG:style_emoticons/default/headbang.gif) Jerry!!!!!!
Good did not find them on his site. a few $$$ saved |
|
|
|
| FlacaProductions |
Jul 30 2020, 08:06 PM
Post
#10
|
|
Senior Member Group: Members Posts: 1,591 Joined: 24-November 17 From: LA Member No.: 21,628 Region Association: Southern California |
Ah - good find on the LEDs. Perfect!
Right now, I'll probably use the rubber boot and put the LED in it secured with RTV - under the reflector. I'll use an LED in the standard illumination hole - I've got LEDs in my other gauges already. |
|
|
|
|
1 User(s) are reading this topic (1 Guests and 0 Anonymous Users)
0 Members:

|
Lo-Fi Version | Time is now: 20th May 2024 - 11:07 PM |
Invision Power Board
v9.1.4 © 2024 IPS, Inc.