|
|
|
Porsche, and the Porsche crest are registered trademarks of Dr. Ing. h.c. F. Porsche AG.
This site is not affiliated with Porsche in any way. Its only purpose is to provide an online forum for car enthusiasts. All other trademarks are property of their respective owners. |
|
|

  |

| rick 918-S |
 Mar 10 2023, 05:31 AM Mar 10 2023, 05:31 AM
Post
#101
|
|
Hey nice rack! -Celette  Group: Members Posts: 21,239 Joined: 30-December 02 From: Now in Superior WI Member No.: 43 Region Association: Northstar Region |
Got your text. I think I read at one time Chris Foley has a fixture for locating the suspension console if you end up having to remove it. Short of that I would spend the time and build something you could use to locate it before going too far. The car is progressing nicely.
|
   |

 
|
| 930cabman |
Mar 10 2023, 10:57 AM
Post
#102
|
|
Advanced Member Group: Members Posts: 4,576 Joined: 12-November 20 From: Buffalo Member No.: 24,877 Region Association: North East States |
Great looking workmanship, keep it going.
the things we do for our 50 y/o machines!! |
|
|
|
| Superhawk996 |
Mar 10 2023, 11:36 AM
Post
#103
|
|
914 Guru Group: Members Posts: 7,771 Joined: 25-August 18 From: Woods of N. Idaho Member No.: 22,428 Region Association: Galt's Gulch |
Lots of good work going on here. (IMG:style_emoticons/default/smilie_pokal.gif)
|
|
|
|
| bkrantz |
Mar 10 2023, 08:21 PM
Post
#104
|
|
914 Guru Group: Members Posts: 8,650 Joined: 3-August 19 From: SW Colorado Member No.: 23,343 Region Association: Rocky Mountains |
Your panel fit and alignment looks at least as good as factory. (IMG:style_emoticons/default/smash.gif)
|
|
|
|
| Montreal914 |
Mar 11 2023, 11:06 AM
Post
#105
|
|
Advanced Member Group: Members Posts: 2,075 Joined: 8-August 10 From: Claremont, CA Member No.: 12,023 Region Association: Southern California |
All, thank you for the compliment! (IMG:style_emoticons/default/pray.gif)
All of your build threads have been inspirational and an extremely valuable source of information. (IMG:style_emoticons/default/smilie_pokal.gif) I will be moving on a new dreaded phase of the project, the longs... (IMG:style_emoticons/default/unsure.gif) Hopefully, the level of repair needed will not be as extreme as what you guys had to deal with. I bought the car 13 years ago when I moved to California from Canada and this was my only means of transportation for many years! (IMG:style_emoticons/default/driving.gif) A few months after purchasing it and joining the forum, I discovered heavy rust in the jack point area. I did a temporary fix over a couple of weekends with a Brad Mayer repair kit that allowed me to drive and enjoy my car for many years. I think this was the right decision. Now the time has come to remove the Brad Mayer parts, investigate and properly address the rusted areas. I am hoping I can achieve the passenger side without removing the rear fender, and using methods shared by Rick and Superhawk. Fingers crossed. Stay tuned, more to come! (IMG:style_emoticons/default/smile.gif) |
|
|
|
| Montreal914 |
Apr 8 2023, 06:40 PM
Post
#106
|
|
Advanced Member Group: Members Posts: 2,075 Joined: 8-August 10 From: Claremont, CA Member No.: 12,023 Region Association: Southern California |
Before I continue I need to take a few step back and investigate a repair the DACO (Dumb Ass Current Owner) did about 13 years ago... (IMG:style_emoticons/default/laugh.gif)
At the time, I had just moved to California from Canada and the 914 was my only mode or transportation (excluding my bicycle)! (IMG:style_emoticons/default/smile.gif) (IMG:style_emoticons/default/driving.gif) Therefore I needed a quick fix for both driver and passenger side jack point pyramids that were rusted and had impacted the longs. I bought a used 120V welder on Craigslist and proceeded to make this repair in my driveway (no garage on the rental). I had access to a few very basic tools too. Anyhow, the Brad Mayer repair panels did the trick and allowed me to enjoy my 914 for about 10 years before I started this now rebuild project. (IMG:style_emoticons/default/smash.gif) For the past while I debated weather I should go back and revisit this repair or simply continue as is. That was until I decided to remove the back portion of the Brad Mayer panel on the right side and discovered this! (IMG:style_emoticons/default/unsure.gif) 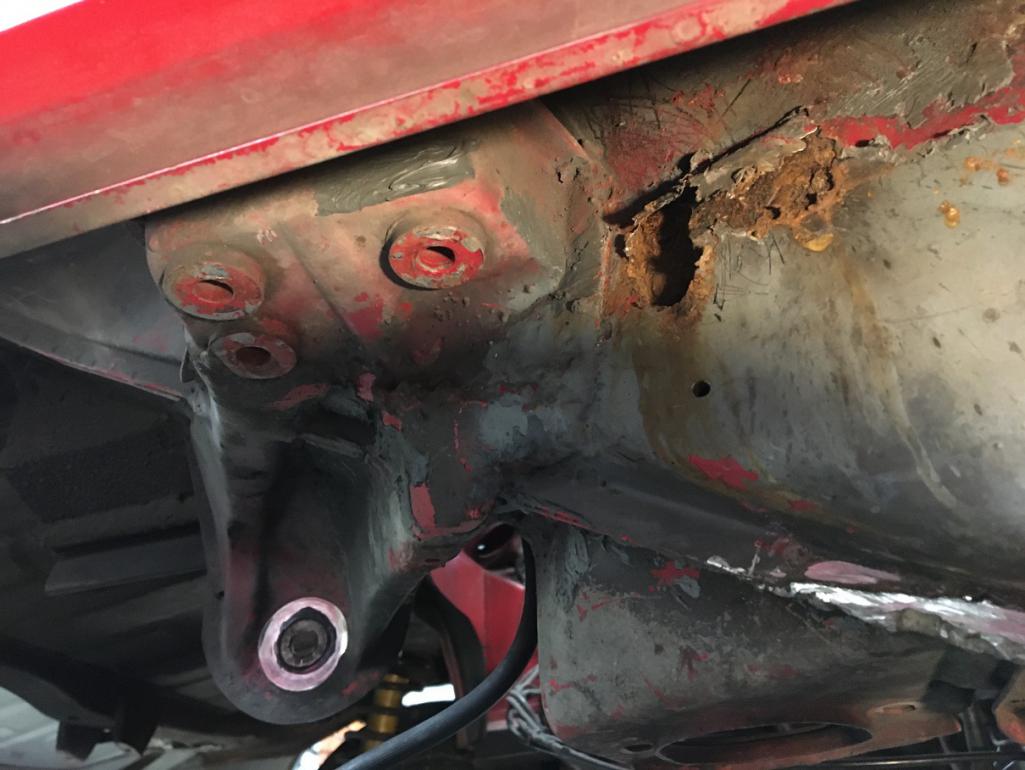 So clearly this will require a thorough investigation that will get pretty deep. (IMG:style_emoticons/default/icon8.gif) So, although the repair panels were a success as they did what was needed, it is time to go through all of this and fix it the right way. (IMG:style_emoticons/default/smash.gif) Step #1, getting the proper dolly for the car. I have no clue how far this will go, and I need something to move this shell around anyway so... After reading many of the rebuild threads here, I decided to make myself a similar copy of the Jigster engineered by @Jeff Hail (IMG:style_emoticons/default/pray.gif) With today's steel prices, the 4" x 2" x 1/8 20ft. that Jeff used are about $150 ea. and 2 are needed for this build. Instead, I went the frugal way and got some used racking beams and used heavy duty casters. (IMG:style_emoticons/default/smile.gif) Total investment, a whopping $72! (IMG:style_emoticons/default/sunglasses.gif) Here are the beams purchased: 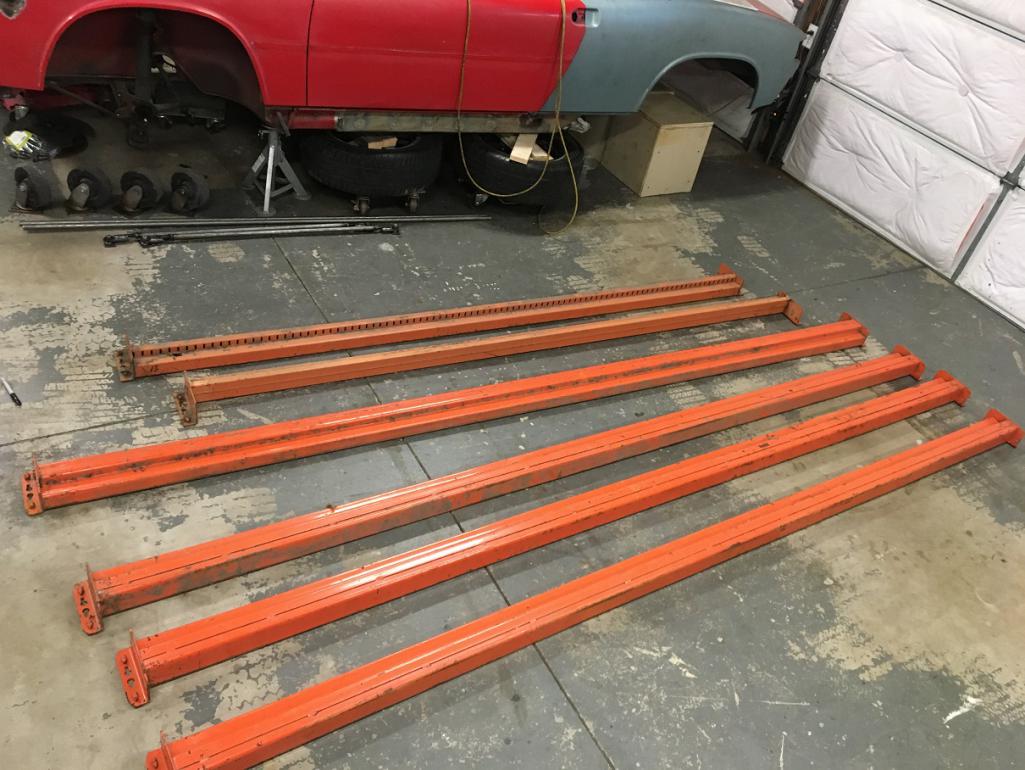 Now to cut these square requires the correct tool that I obviously don't have as I am not a metal fabrication shop... (IMG:style_emoticons/default/rolleyes.gif) This is where reading can give you tricks! (IMG:style_emoticons/default/smile.gif) I got myself a 10" thin abrasive disk with a 5/8" arbor and set it on my wood miter saw. Make sure your disk is rated for the speed of your saw! Time to do some cutting! 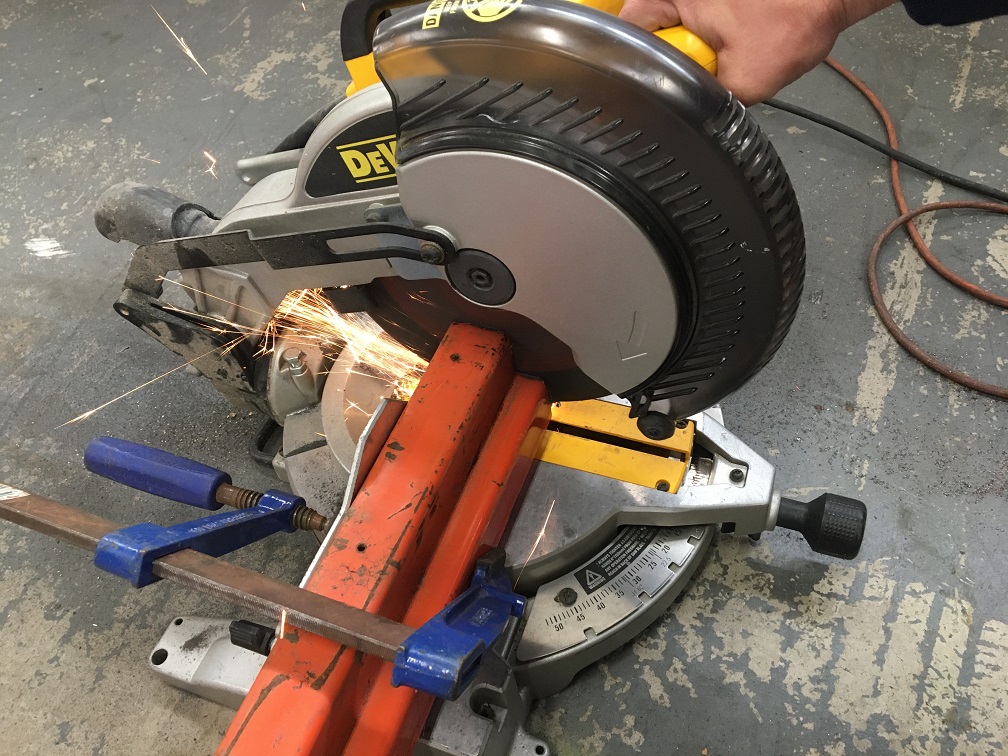 And here are all the parts cut to length within less that a 1/16" off. (IMG:style_emoticons/default/smile.gif) 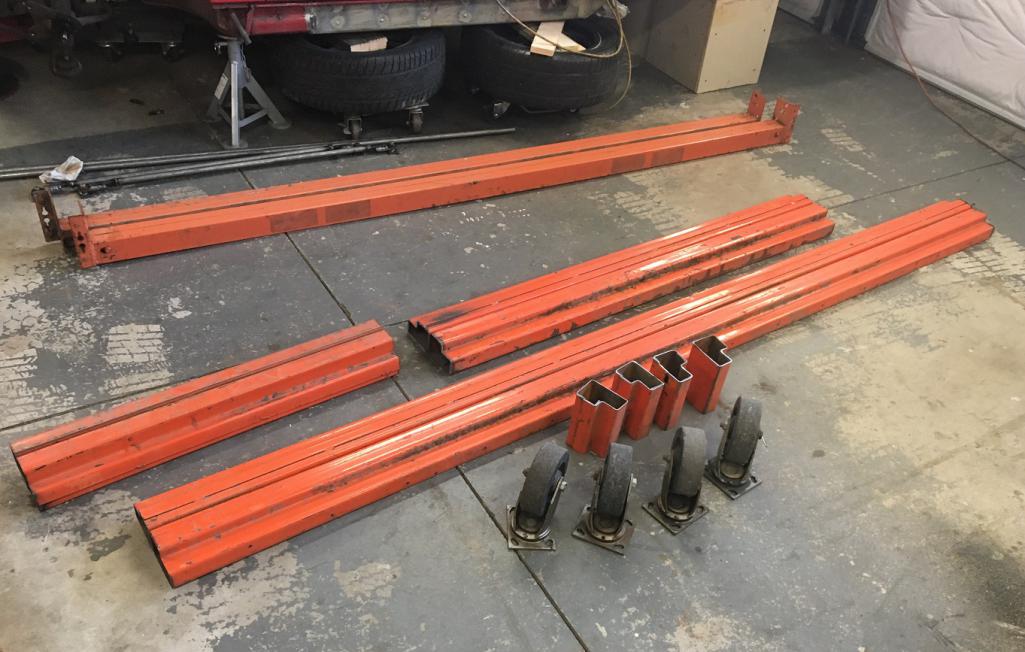 Time to burn metal (IMG:style_emoticons/default/welder.gif) Using a laser I set the beams leveled and tacked the 4 parts of the frame. After measuring the diagonals, I was within less than 1/16" and nicely leveled. Time to fully weld this thing! 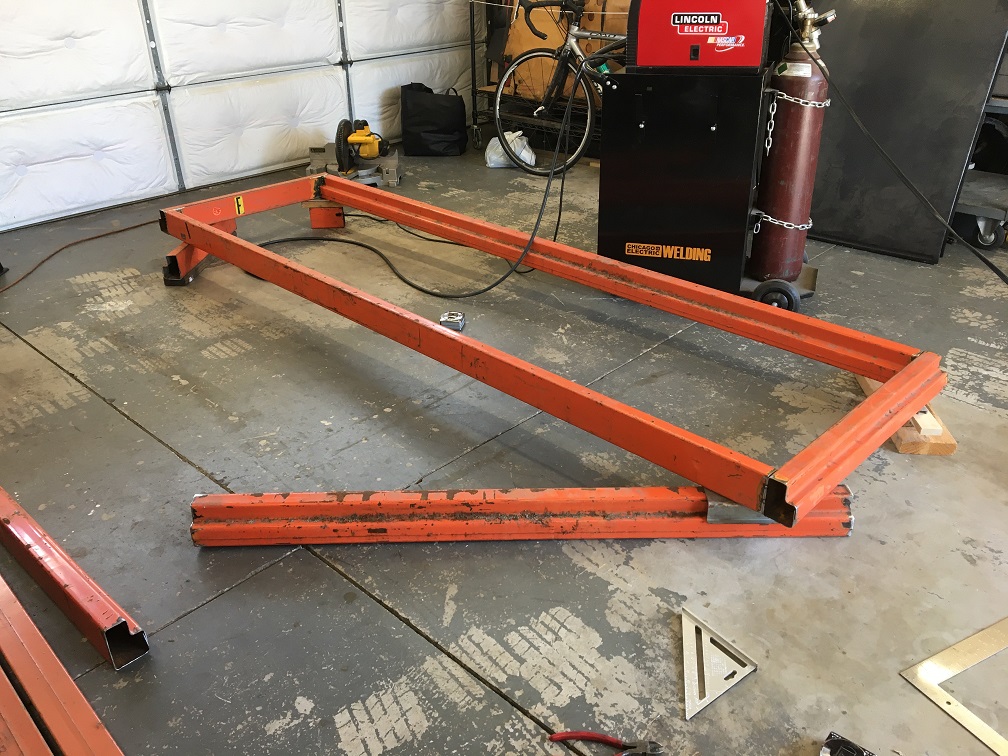 Flipped upside down to do the legs and casters. 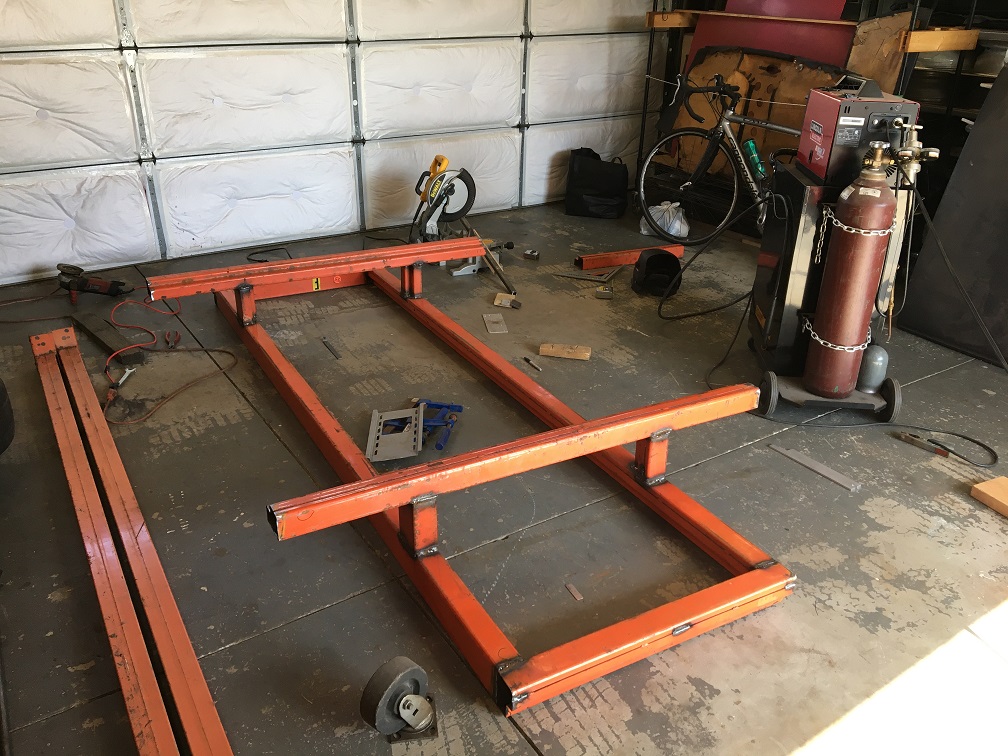 For the casters I got lucky as a piece of 1" x 1" tube I had made the perfect spacer for the caster plate. The correct way would have been to have a plate and bolt the casters, but I went the easy way and just welded them on. I doubt I will ever have to replace them anyway... 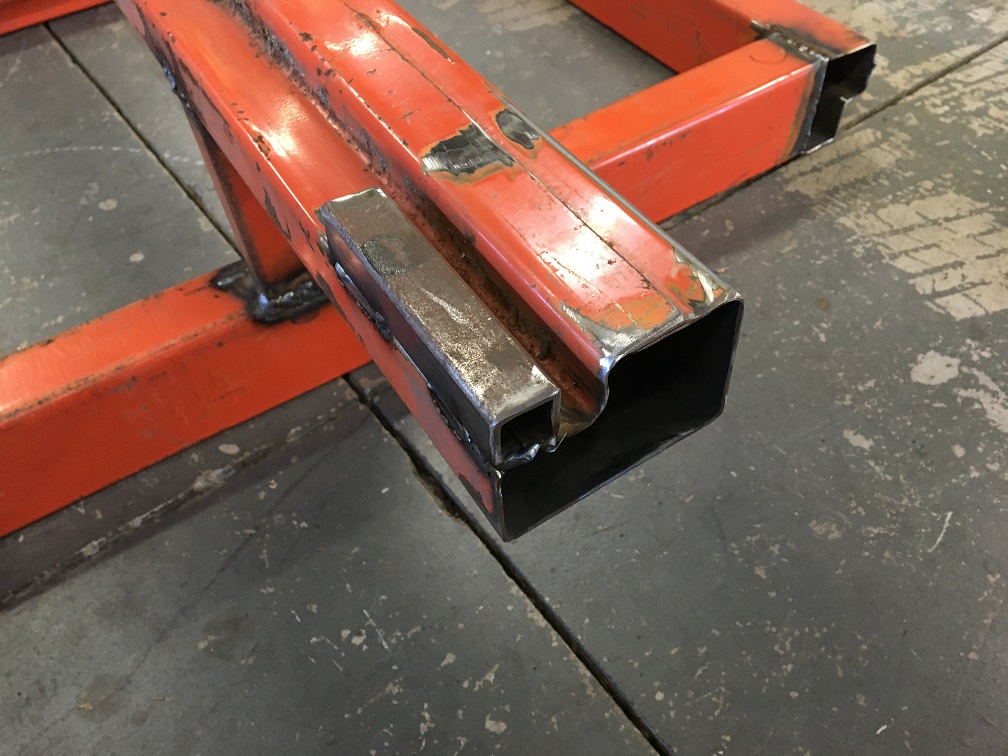 Once done I sprayed some left over rattle can paint over the welds after wire brushing the areas. I am very pleased with the result and can now plan on setting the shell on it and begin the long repair how ever deep I need to go. I know I will be able to make which ever brace will be needed for key reference points such as suspension console. It was a long day but well worth it! (IMG:style_emoticons/default/smile.gif) 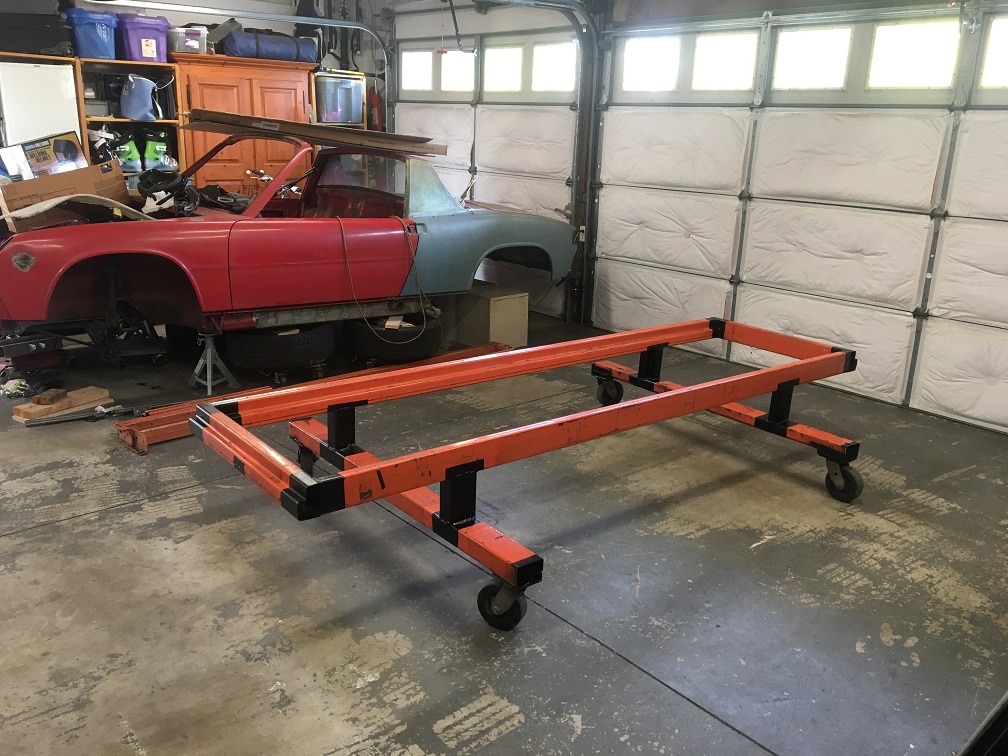 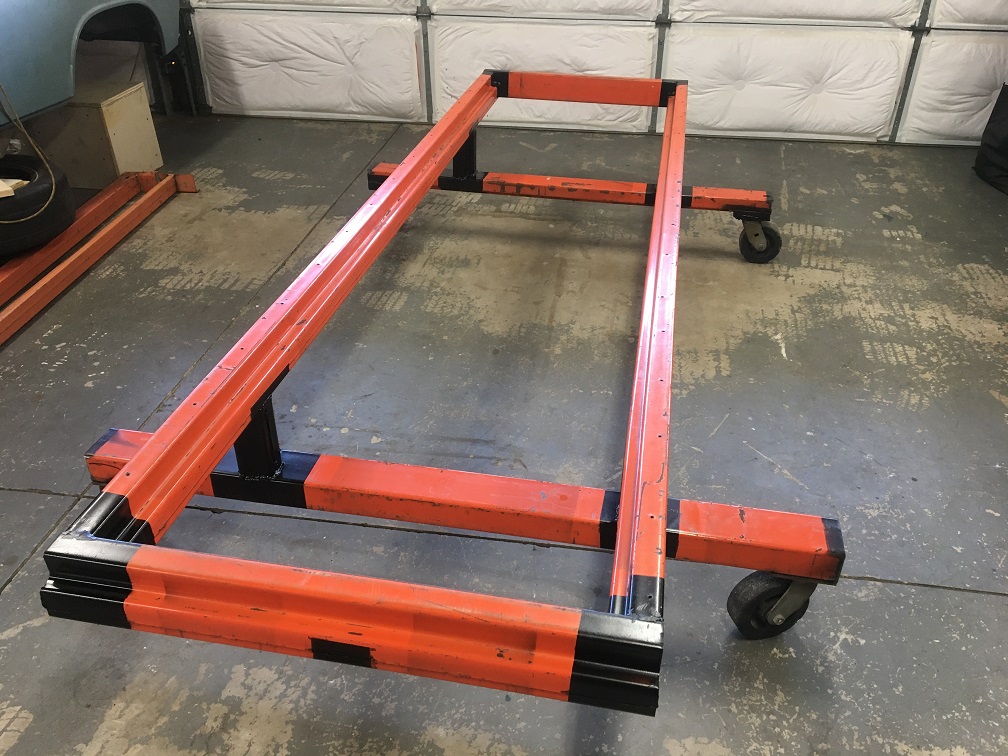 |
|
|
|
| rick 918-S |
Apr 8 2023, 08:32 PM
Post
#107
|
|
Hey nice rack! -Celette Group: Members Posts: 21,239 Joined: 30-December 02 From: Now in Superior WI Member No.: 43 Region Association: Northstar Region |
That should work nicely (IMG:style_emoticons/default/welder.gif)
|
|
|
|
| nivekdodge |
Apr 8 2023, 10:19 PM
Post
#108
|
|
Member Group: Members Posts: 332 Joined: 28-August 21 From: Pittsburgh Pa Member No.: 25,860 Region Association: MidAtlantic Region |
QUOTE(Montreal914 @ Feb 24 2023, 10:03 PM)  OK, so let's continue with this problematic lower dented corner. After trying to hammer it back to match the shape of the fender, I realiazed I had cut to much material off of it and was left with too large of a gap. (IMG:style_emoticons/default/rolleyes.gif) (IMG:style_emoticons/default/headbang.gif) So, luckily among my various sheet metal parts, I had one from the yellow fender piece. So here it is now attached to the car and nicely matching the new fender. And now with the fender nicely matching ready for the butt weld. After many subtle little adjustments and on and off, I want to think the fit is pretty much ready for welding! (IMG:style_emoticons/default/smile.gif) The door gap is pretty uniform at 5.27mm near the top and 5.08 at the bottom held by a few vise grips. Let's hope it stays during welding... More pictures of it simply held by a few clamps. Next, prepping the surfaces and weld! (IMG:style_emoticons/default/smile.gif) (IMG:style_emoticons/default/beer3.gif) Nail That Eric , looks excellent |
|
|
|
| ChrisFoley |
Apr 9 2023, 03:52 AM
Post
#109
|
|
I am Tangerine Racing Group: Members Posts: 8,019 Joined: 29-January 03 From: Bolton, CT Member No.: 209 Region Association: None |
I like that!
|
|
|
|
| Montreal914 |
Apr 21 2023, 07:13 PM
Post
#110
|
|
Advanced Member Group: Members Posts: 2,075 Joined: 8-August 10 From: Claremont, CA Member No.: 12,023 Region Association: Southern California |
Time to put the tub on the Jigster (Jeff Hail's TM (IMG:style_emoticons/default/smile.gif) ).
Working alone as usual, so one step at a time. Need to bring the car 25" up (from long lower edge). Using a small 2 ton jack and all sorts of methods... (IMG:style_emoticons/default/unsure.gif) , I slowly raised the car in steps constantly checking how stable it was... 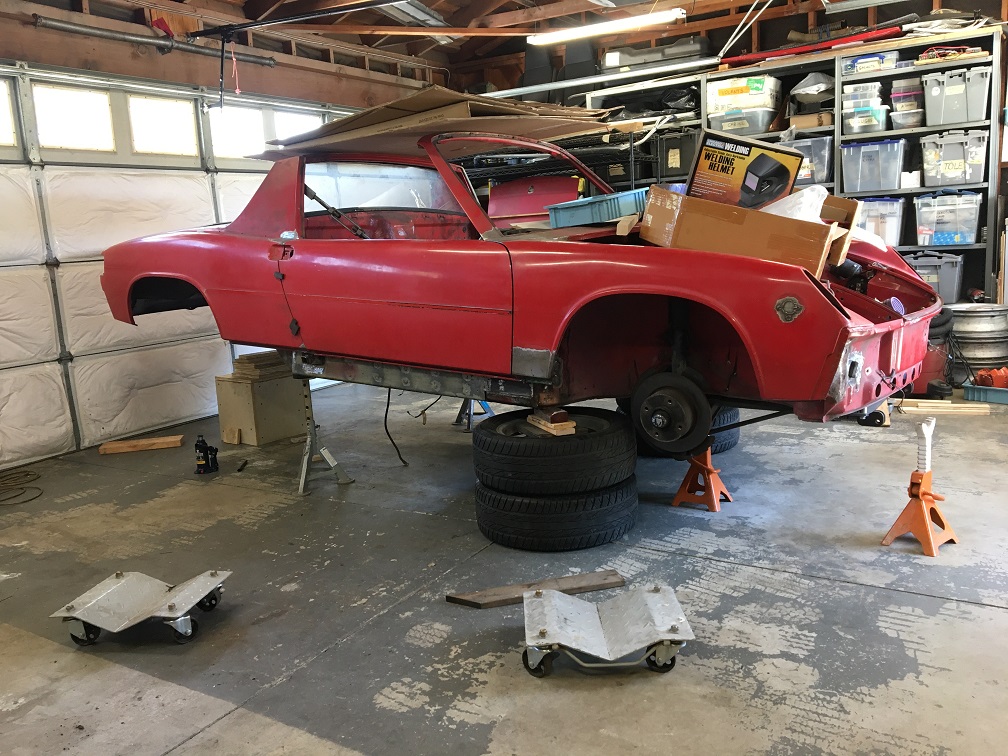 Once there, I wheeled the dolly delicately going around the jack stands. 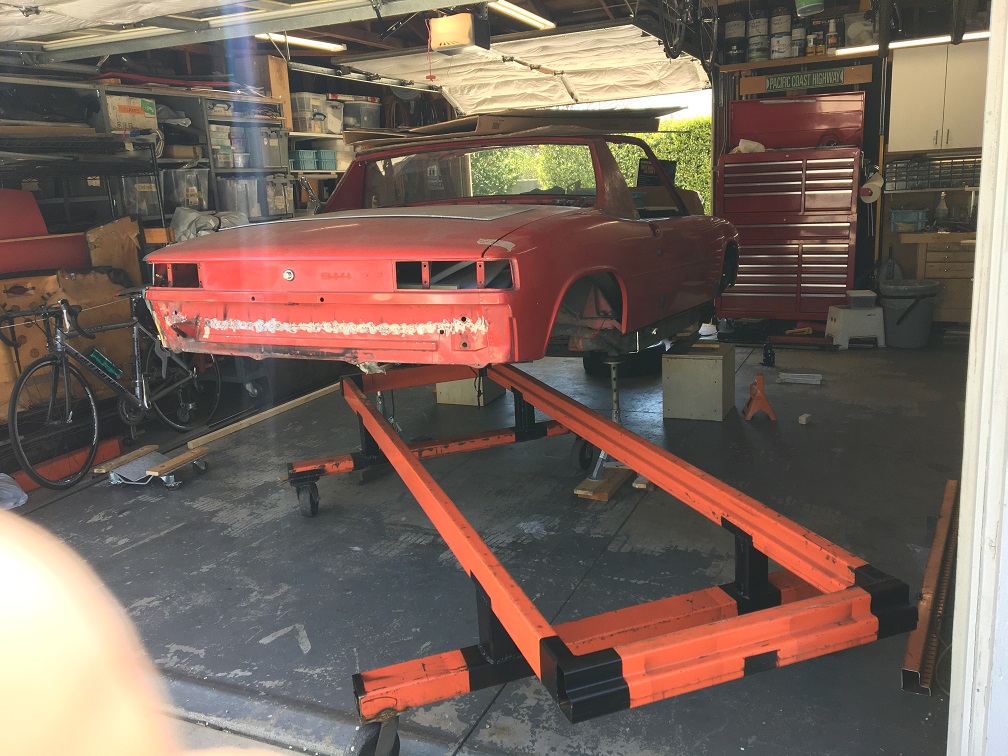 Sometimes you get lucky... The caster went by the rear driver side jack with about 1/16" clearance. (IMG:style_emoticons/default/sunglasses.gif) 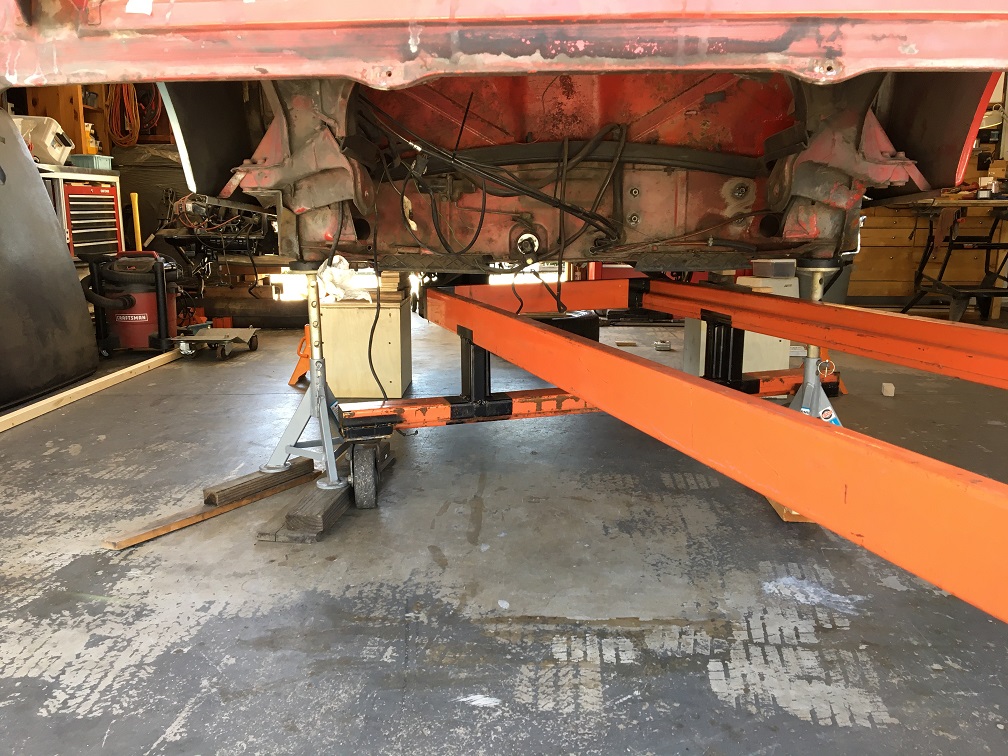 Almost there, just need a little more height in the front. (IMG:style_emoticons/default/smile.gif) 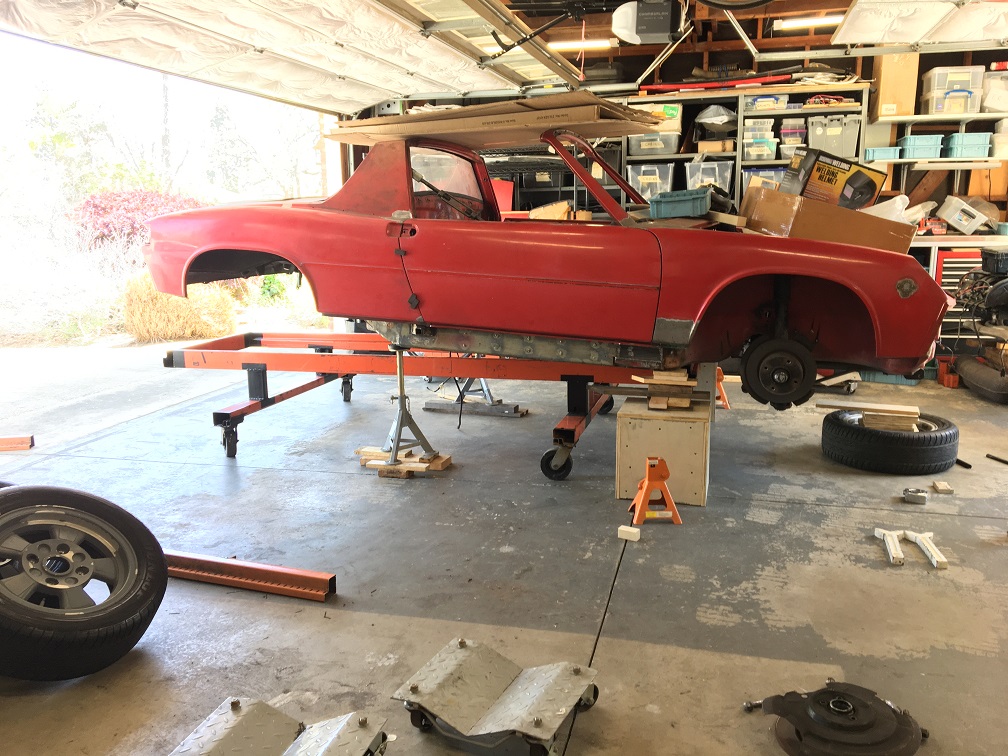 And finally, the tub is now resting on the Jigster and can almost too easily get moved around. 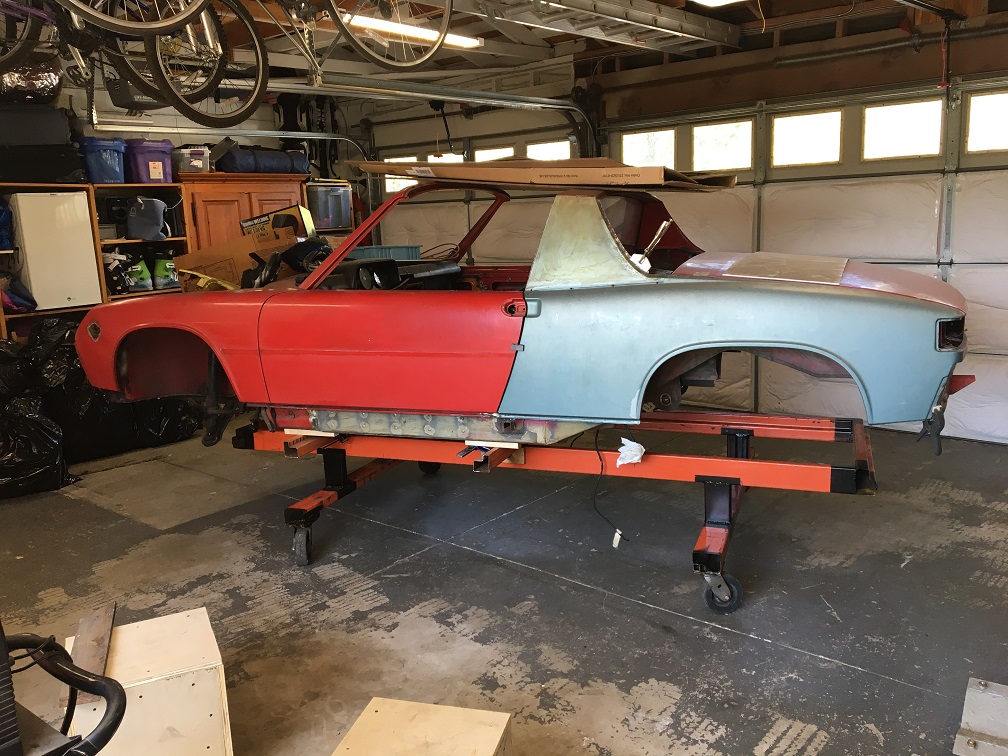 And at the end of the work day, it can be tucked in its corner, leaving the garage for the daily car. (IMG:style_emoticons/default/smile.gif) 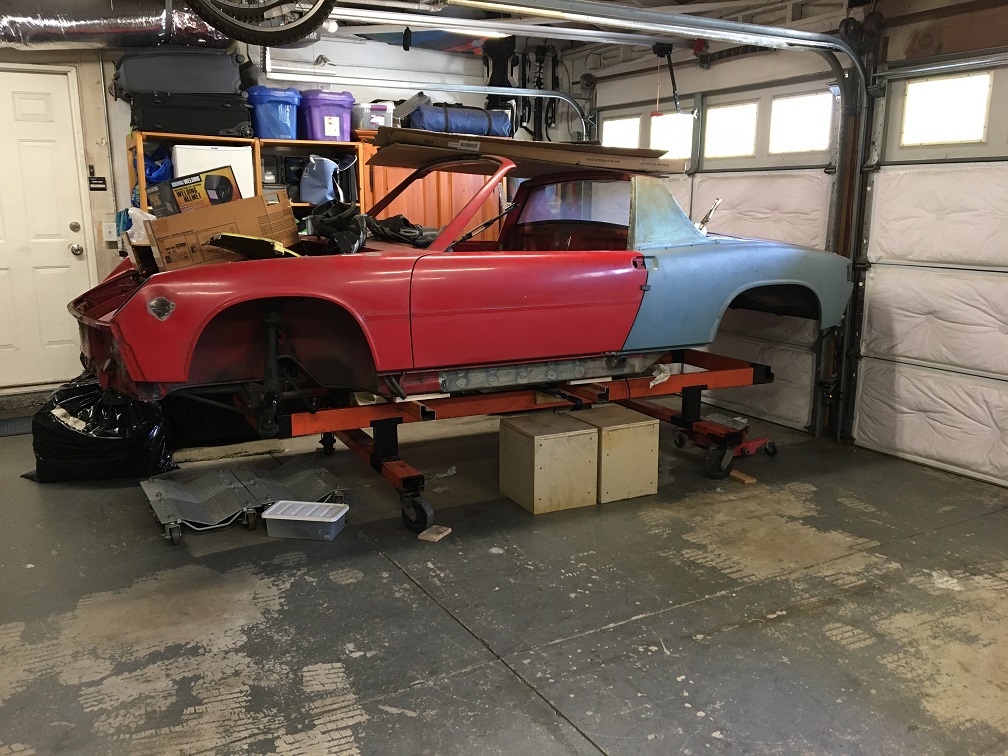 |
|
|
|
| Montreal914 |
Apr 21 2023, 07:23 PM
Post
#111
|
|
Advanced Member Group: Members Posts: 2,075 Joined: 8-August 10 From: Claremont, CA Member No.: 12,023 Region Association: Southern California |
So, as mentioned earlier, the car is currently set with Brad Mayer repair panels. I installed those 13 years ago to enjoy my car daily. (IMG:style_emoticons/default/driving.gif)
This was a nice patch and it definitely served its purpose, but it is now time to revisit the area and properly fix the problem. (IMG:style_emoticons/default/smash.gif) I made some braces with 1" square tube and large turnbuckles to minimize the car's movement. I plan on anchoring the tub accordingly on the dolly, but the first part is to assess the situation. I will begin with the driver side as I am hoping it is in better shape than the passenger's. This way I can somewhat get used to the longitudinal repair work. (IMG:style_emoticons/default/icon8.gif) Step one, removing the door sill so I can have access to the weld that are on the top. 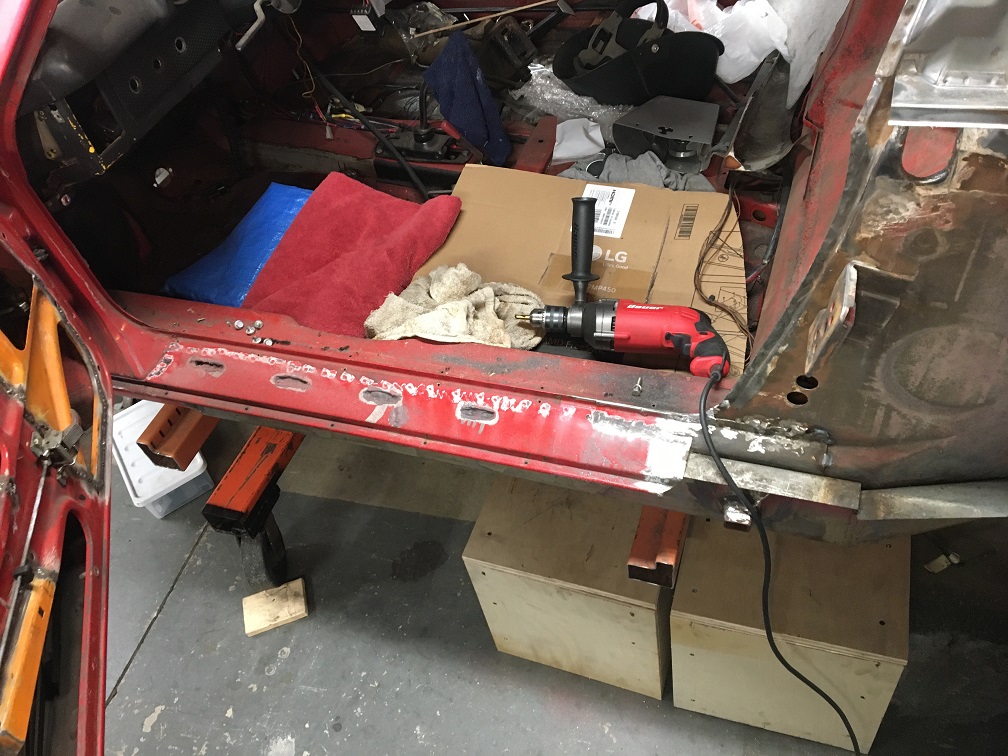 I used a 3/4" hole saw and cut around the 10 plug welds on the vertical part of the panel. 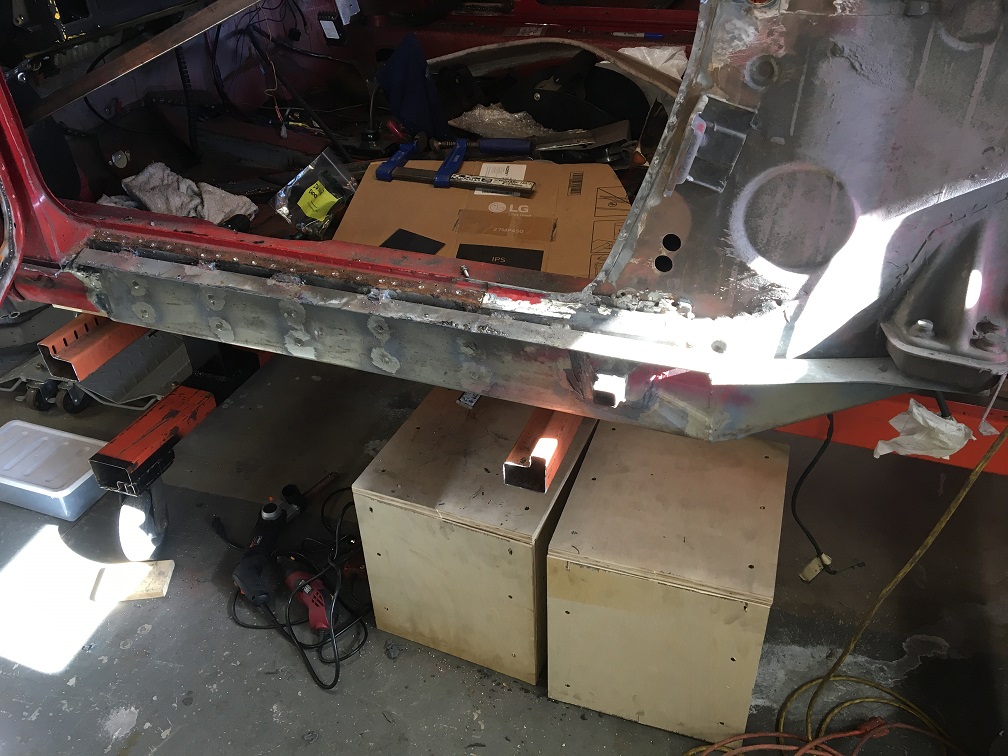  Then the pain of grinding all the various welds around the panel without damaging the original sheet metal... (IMG:style_emoticons/default/rolleyes.gif) ...Finally, it is off! 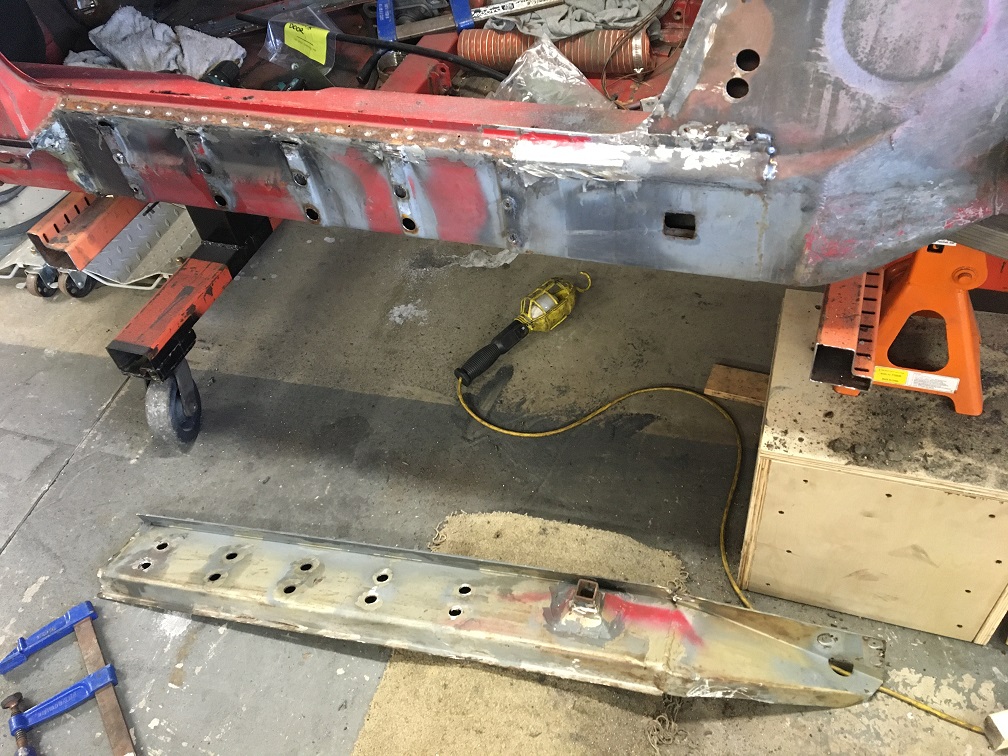 Now, the good eye will notice the jack point area to be somewhat different. (IMG:style_emoticons/default/idea.gif) At the time, to reinforce that rusted area, I made a patch with the very limited means I had...  Well, 13 years later, nothing improved behind it... (IMG:style_emoticons/default/rolleyes.gif) ...but nothing isn't really worse either... 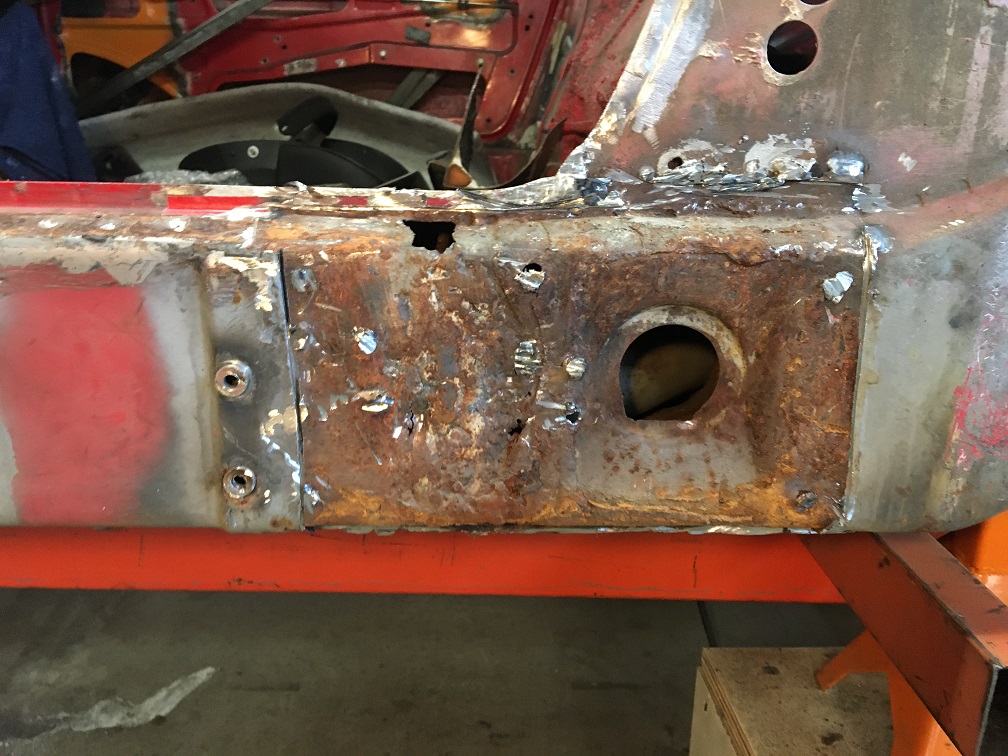 Clearly, I will be in need of new metal there, that being said, there are no reproduction of this piece... (IMG:style_emoticons/default/headbang.gif) I cut out a window allowing me to take some pictures inside.  Looking towards the front, things don't look too bad. We can see the indent for the emergency brake lever (arrow).  Now looking towards the rear, I am concerned by the circled area. The rust on the panels seems to be more than just surface... (IMG:style_emoticons/default/sad.gif) 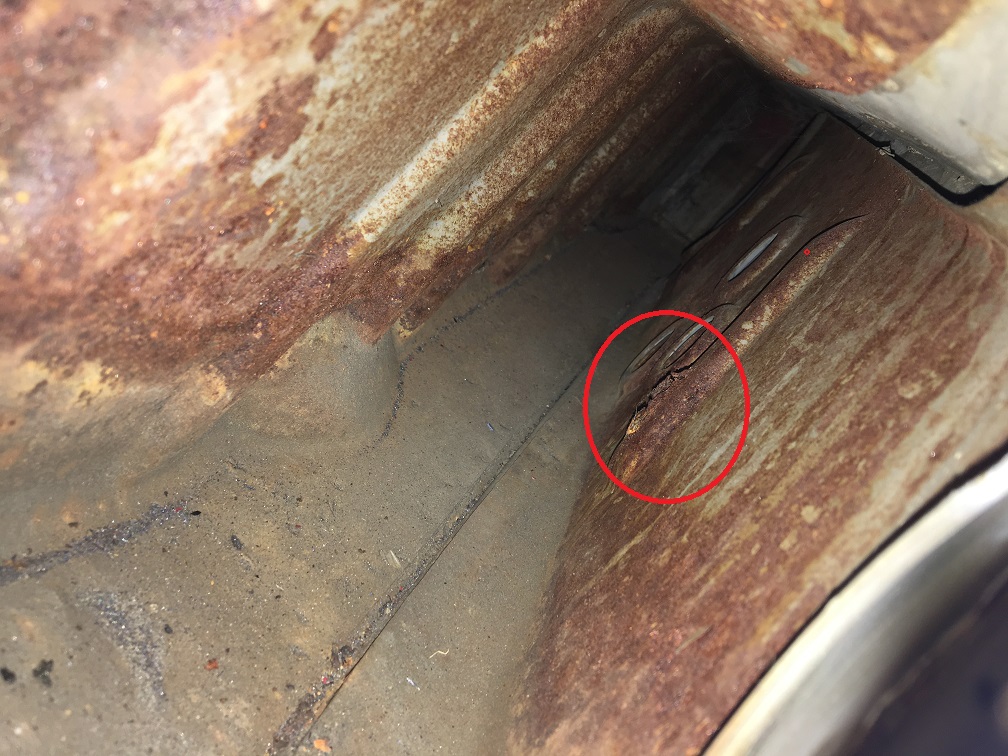 So I decided to cut out a little window on the outside surface and discovered this... (IMG:style_emoticons/default/headbang.gif) 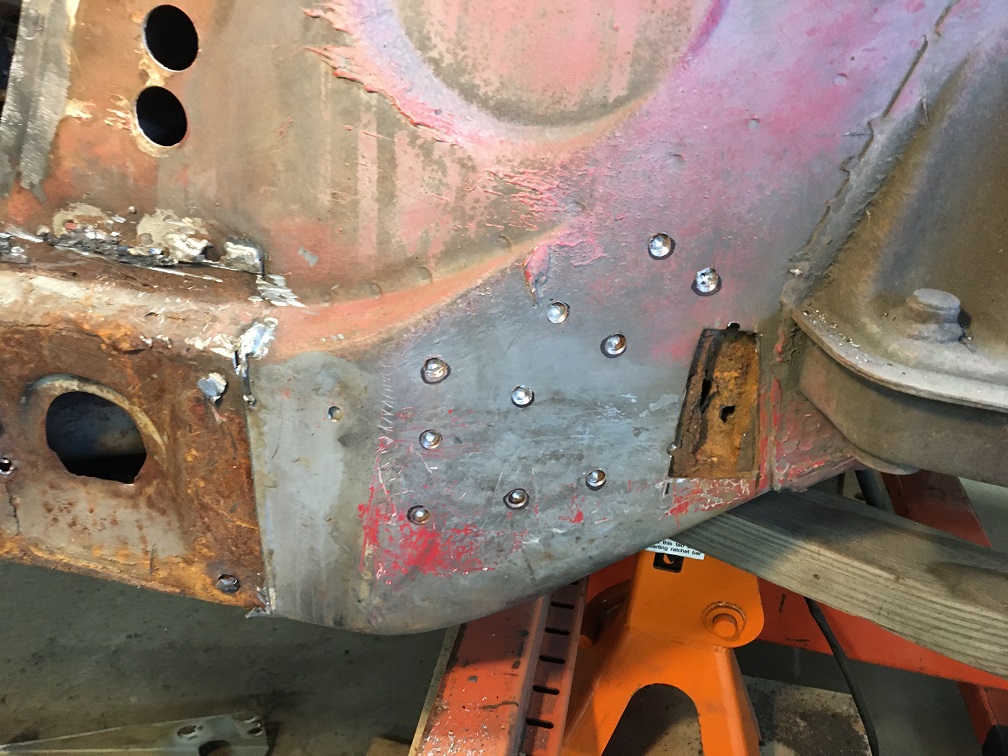 So, I made a larger window... 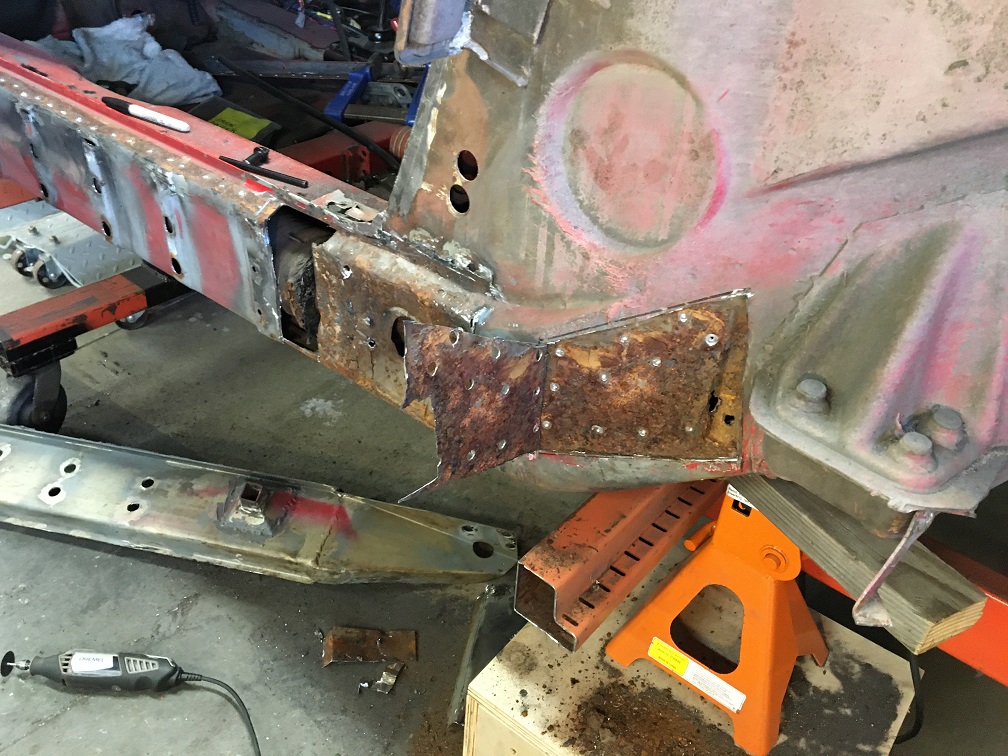 This is definitely more than surface rust which means this whole section will need to be replace, inner and outer layer... (IMG:style_emoticons/default/dry.gif) Now, when looking at he picture again, the inner side of the long doesn't really seem to be in better shape rust wise. I fear the rust between the corrugated inside inner and the inside outer layer will be the same as what we see in the last picture. This would mean rebuilding the whole long including dealing with the removal of the suspension consoles, and engine mount... (IMG:style_emoticons/default/headbang.gif) And this is the driver side... clearly the passenger will probably not be better... Not sure how to proceed here... (IMG:style_emoticons/default/dry.gif) Looking at the suspension console area and the rest of the engine compartment, it would be difficult to even think the level of rust that is inside. This tells me that probably most of the 914s even in decent conditions have a generous amount of rust in those layered area. |
|
|
|
| 930cabman |
Apr 22 2023, 06:43 AM
Post
#112
|
|
Advanced Member Group: Members Posts: 4,576 Joined: 12-November 20 From: Buffalo Member No.: 24,877 Region Association: North East States |
The lengths we go to save our 1/2 century entry level sporting machines. Very thorough and keep the energy moving ahead.
(IMG:style_emoticons/default/beerchug.gif) |
|
|
|
| Montreal914 |
Apr 22 2023, 10:15 AM
Post
#113
|
|
Advanced Member Group: Members Posts: 2,075 Joined: 8-August 10 From: Claremont, CA Member No.: 12,023 Region Association: Southern California |
Yeah... Spent the night thinking about a strategy to tackle this... I have to say, I did really consider abandoning here and find myself another 914, but I fear a lot of them have this in-between layer rust issues. (IMG:style_emoticons/default/confused24.gif) Anyhow, I am in too deep to stop, and I know I can find the right support here (IMG:style_emoticons/default/smilie_pokal.gif) so I will fix this. (IMG:style_emoticons/default/wacko.gif)
Does anyone know if both inner and outer suspension consoles and engine mounts are spot welded to the outer layers of the long or through the outer and inner layers (which would make more sense strength wise)? @nathanxnathan , @bbrock , @bkrantz , @Superhawk996 , @rick 918-s , to name a few of my build threads resources (IMG:style_emoticons/default/pray.gif) At this point, I will borrow @nathanxnathan 's (IMG:style_emoticons/default/beerchug.gif) nice cross section and lexicon to make sure everyone can follow. 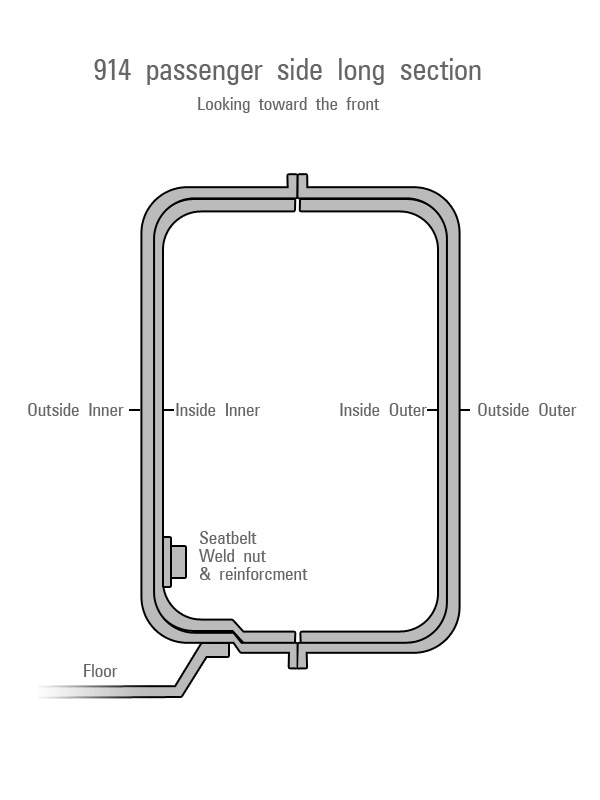 Just wondering how some of these components could be removed/installed individually or a few at a time. The more I look at it, it seems this large portion of the inner fender (Outside Outer and Inside Outer) will come out, maybe with the outer suspension console attached (?).  This will expose the Inside Inner corrugated part. Then making a window in the corrugated part, I could investigate the level of rust in between the Inner long two layers (Inside Inner and Outside Inner). This might save me from removing the inside suspension console and the engine mount. All of these components look very good with original paint still on BTW. Which adds to my concern of the rust going from inside out... A couple of pictures I quickly took last night. This not a restored car, but far from being a complete rust bucket, yet, it sort of is... (IMG:style_emoticons/default/sad.gif)  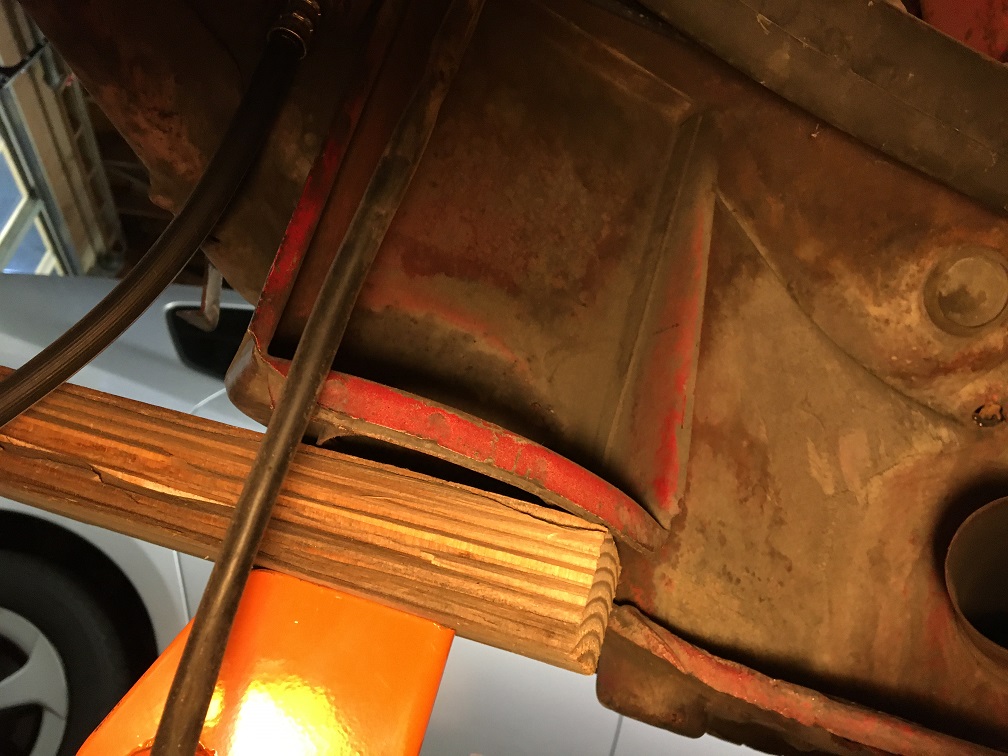 |
|
|
|
| Superhawk996 |
Apr 22 2023, 11:10 AM
Post
#114
|
|
914 Guru Group: Members Posts: 7,771 Joined: 25-August 18 From: Woods of N. Idaho Member No.: 22,428 Region Association: Galt's Gulch |
1st let’s answer your question.
Suspension console is spot welded through 1 layer of steel on the outer long. Here is the picture of mine: 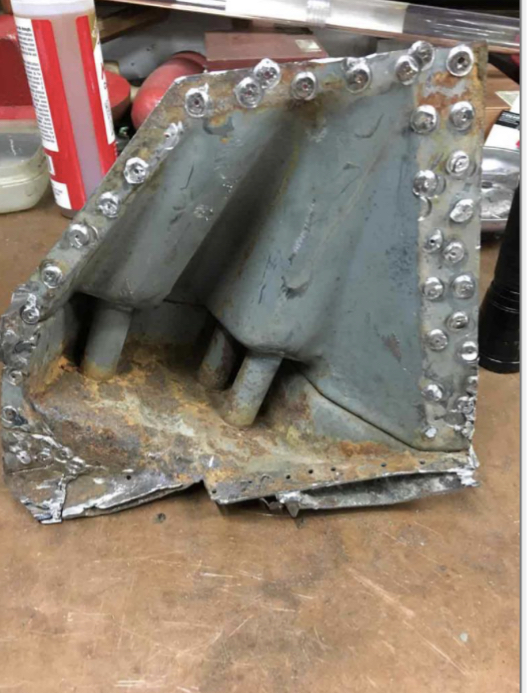 So what to do with yours? That is a really a tough call. Cutting out the entire long is feasible - that is what I did on the passenger side. Mine was simply roached completely. See the 1st couple pages of my thread in signature. The problem is in the driver side, the complete panels aren’t available from AA or RD like they are for the passenger side. So it would be a TON of fab work to make what can’t be purchased. In your case, it doesn’t look quite that bad from the photos you’ve posted. If you can avoid removing the whole long and just patch where necessary, I would. Sure there will be rust between the corrugated inner and the outer but unless it’s completely compromised, I wouldn’t cut it out. Maybe cut some access windows. Spray in Ospho? Maybe other rust converting / encapsulating paint like Eastwood frame spray or any other converting paint? Treat it as completely as you can with access holes, then weld up the access holes? |
|
|
|
| Superhawk996 |
Apr 22 2023, 11:18 AM
Post
#115
|
|
914 Guru Group: Members Posts: 7,771 Joined: 25-August 18 From: Woods of N. Idaho Member No.: 22,428 Region Association: Galt's Gulch |
What you have is worth saving. Don’t give up. You’re doing a great job! (IMG:style_emoticons/default/aktion035.gif)
You are at the phase of OMG - what have I done (IMG:style_emoticons/default/new_shocked.gif) Once you wrap your mind around it and start moving forward, you will feel much better. I applaud you for pulling the Brad Mayer panels. They serve the purpose they were meant - keeping cars on the road. But they are heavy and will be unnecessary when you make the repairs you’re doing. These cars were mean to be Lightweight - no need to be carrying around extra steel plate when you’re done! Also take a look up in the engine compartment at the top of the longs - you will find access holes there that lead into the top of the long. This is a great access point for Ospho and rust converting paint. |
|
|
|
| Montreal914 |
Apr 22 2023, 12:11 PM
Post
#116
|
|
Advanced Member Group: Members Posts: 2,075 Joined: 8-August 10 From: Claremont, CA Member No.: 12,023 Region Association: Southern California |
Thank you Superhawk for the pointers. I am going to see Vince now (1 hour away) to see what panels he has in his yard. I know the driver's side isn't available from RD, AA. I have already gotten the inner fender well for the passenger as the rust is poking out fore of the outer suspension point. As for the hell hole, there was a repair done prior to my ownership. I plan on opening it up to see how that looks. I did locate the hole at the top of the long and may get one of those cheap borescope.
Good to know the grafted elements (suspension consoles, engine mount (hopefully)) are only attached to the outer layer. This may come handy to separate parts. Yeah, I feel like my car is pretty solid (no signs yet of floor rust), but it is clearly affected by rust in the key structural area. (IMG:style_emoticons/default/dry.gif) The Brad Mayer will not go back on, for sure. But I will reinforce some areas. Inner kit, outer clamshell, GT kit are all options on the table, maybe partial components. |
|
|
|
| Superhawk996 |
Apr 22 2023, 12:27 PM
Post
#117
|
|
914 Guru Group: Members Posts: 7,771 Joined: 25-August 18 From: Woods of N. Idaho Member No.: 22,428 Region Association: Galt's Gulch |
Give my regards to Vince. He provided front bulkhead sheet metal and a tunnel for my project. Would have been hell without his donor metal!
You’re lucky to have him so close! |
|
|
|
| rick 918-S |
Apr 22 2023, 12:28 PM
Post
#118
|
|
Hey nice rack! -Celette Group: Members Posts: 21,239 Joined: 30-December 02 From: Now in Superior WI Member No.: 43 Region Association: Northstar Region |
It is always hard to know when to stop. I mean you could really dissemble the whole car and never find all the rust. I am not upposed to drilling access holes just large enough to slide in the long tube you get with the Eastwood encapsulator and flood the spaces. Some two part epoxy injected in the holes will seal them without welding and burning off the encapsulator. Just a suggestion.
|
|
|
|
| altitude411 |
Apr 22 2023, 12:55 PM
Post
#119
|
|
I drove my 6 into a tree Group: Members Posts: 1,306 Joined: 21-September 14 From: montana Member No.: 17,932 Region Association: Rocky Mountains |
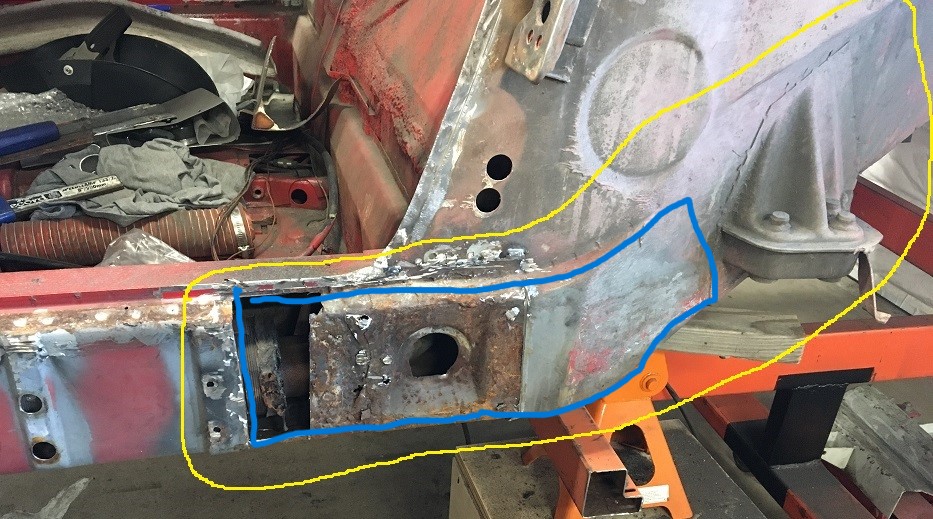
Am I mistaken or is this area in blue the only place the outside long is double walled? (IMG:style_emoticons/default/confused24.gif) I thought it was only double walled in the area of the overlap where the inner fender and the outer long piece butted together? (sleeved)
 * Edit, just found these photos courtesy of Luke M Maybe of some help to you for reference 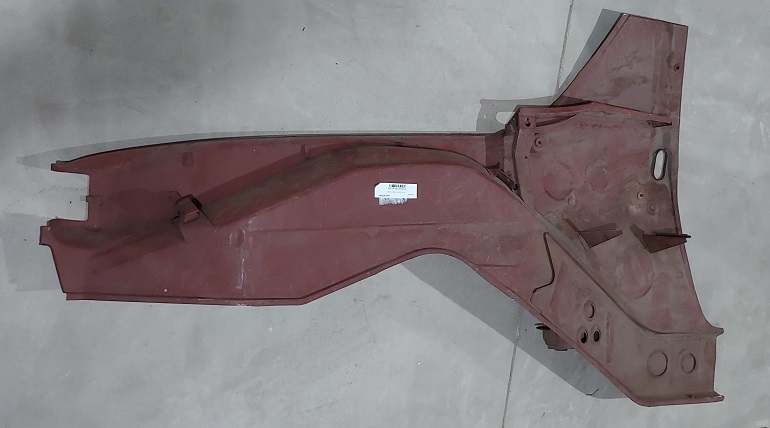 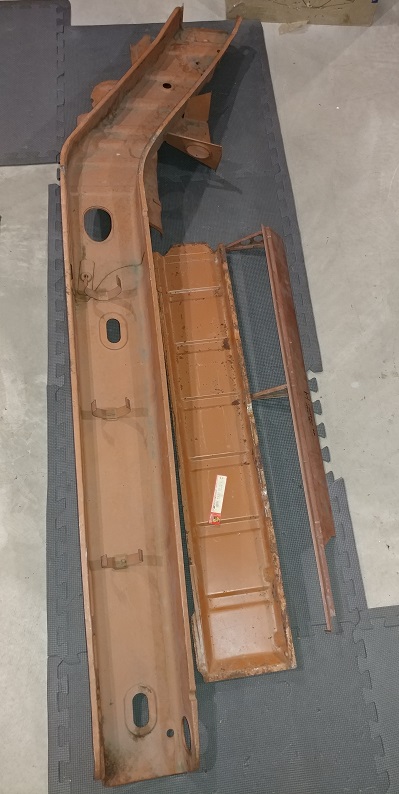 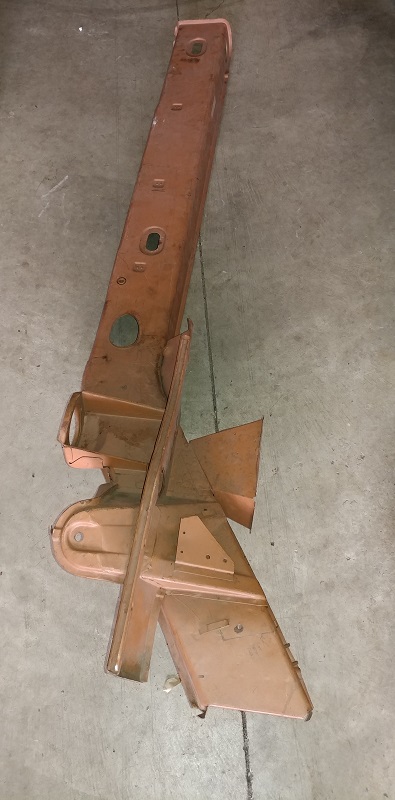 |
|
|
|
| Montreal914 |
Apr 22 2023, 05:38 PM
Post
#120
|
|
Advanced Member Group: Members Posts: 2,075 Joined: 8-August 10 From: Claremont, CA Member No.: 12,023 Region Association: Southern California |
Well, it was worth the trip to Vince's. (IMG:style_emoticons/default/smilie_pokal.gif) I did pass on the hello on your behalf and all of the World. He mentioned not remembering everyone as he regularly ships parts all over. And yes, it is quite a blessing to have him close by for such projects. Parts are getting a lot harder to find for him due to rarity of the abandoned cars. Also, cars that he might have cut in the past now are kept whole for potential buyers.
Altitude: Those are some very good looking sheet metal components! (IMG:style_emoticons/default/smile.gif) That being said, I think I found some good parts for my repair. I was hoping to find a whole piece to replace the outer portion basically including the jack point all the way rear of the suspension console. Instead I got that in two parts and a whole lot more (IMG:style_emoticons/default/smile.gif) . Here is today's lot brought home: 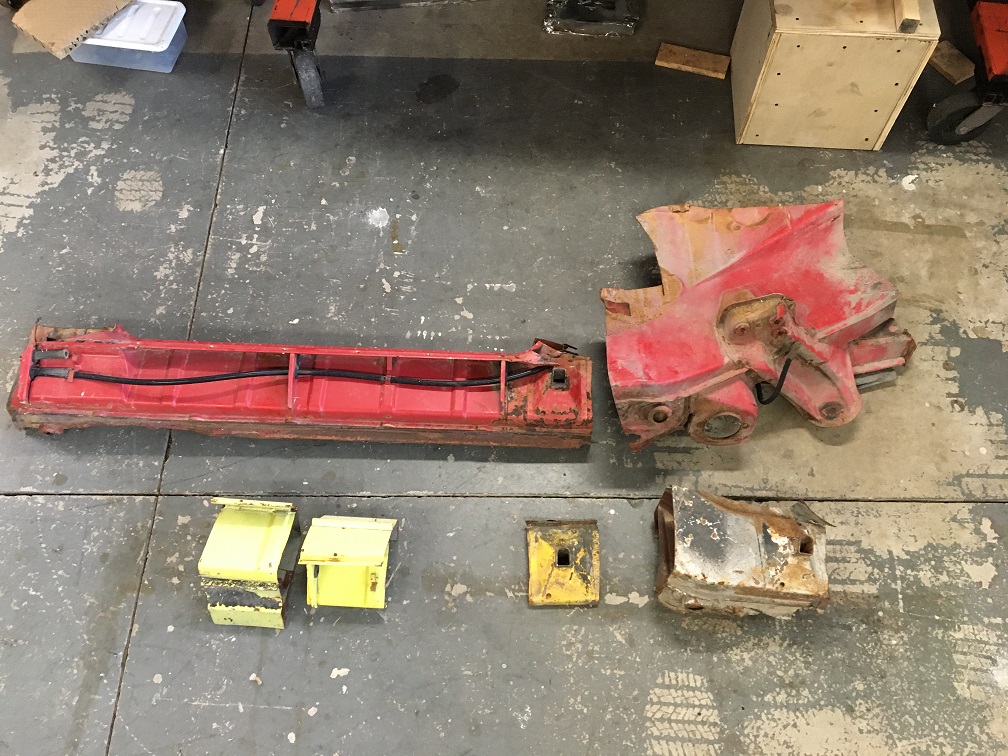 The red parts are actually from the same car but unfortunately was cut in two. The cut matches though so other than it, it is complete. The jack point on it isn't the greatest but that is OK as I got two other ones too. (IMG:style_emoticons/default/sunglasses.gif) Now looking inside the rear part, it is pretty much gray, not rust. This is very encouraging! 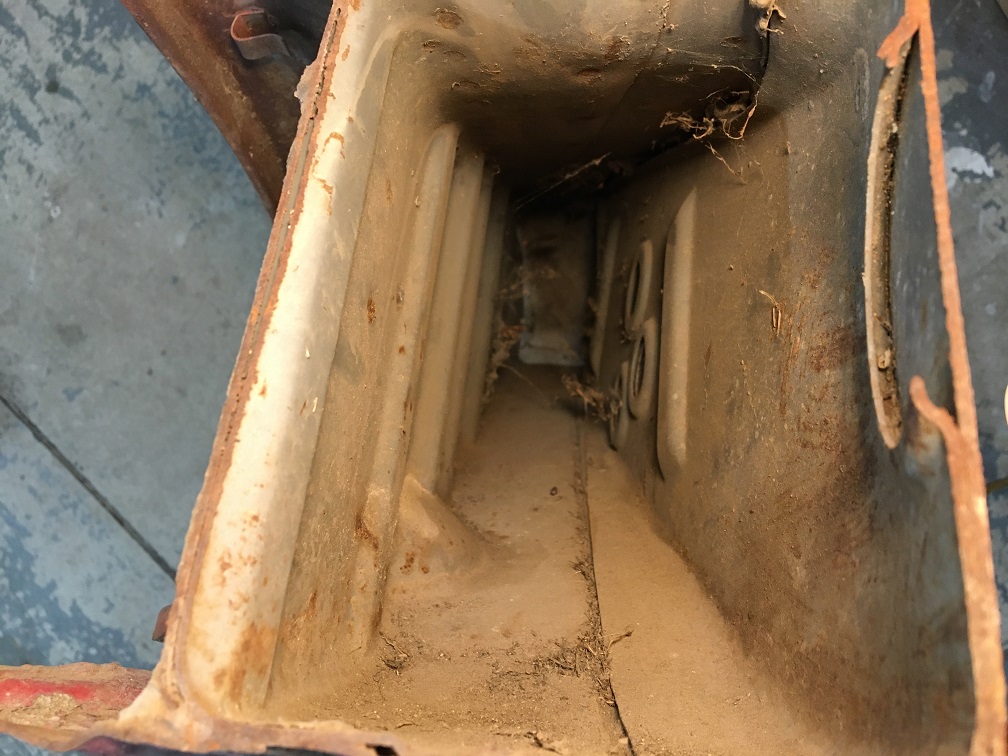 Not sure yet how I will tackle this but I might simply replace the outer with the "new" part as-is, meaning the whole outer two layers and suspension point in one transfer. With all of the outer removed, it would give me access to the Inside Inner (corrugated). Now that it was established that the spot welds of the inner suspension console isn't through the inner (corrugated) panel, I could remove it by drilling the spot weld and investigate the rust between those layers while leaving all of the engine side as-is. Once the corrugated removed, I could replace it with the "new" one. This would basically replace 3 of the 4 layers from outside without drilling any of the suspension consoles spot welds. (IMG:style_emoticons/default/idea.gif) The plan is starting to take shape. (IMG:style_emoticons/default/smash.gif) One of the question is; where to cut the Outside Outer on the car? Maybe about 3/4" above the upper line of spot welds, sort of like the RD part that is available for the passenger side? |
|
|
|
|
3 User(s) are reading this topic (3 Guests and 0 Anonymous Users)
0 Members:

|
Lo-Fi Version | Time is now: 7th April 2026 - 03:16 AM |
Invision Power Board
v9.1.4 © 2026 IPS, Inc.