|
|
|
Porsche, and the Porsche crest are registered trademarks of Dr. Ing. h.c. F. Porsche AG.
This site is not affiliated with Porsche in any way. Its only purpose is to provide an online forum for car enthusiasts. All other trademarks are property of their respective owners. |
|
|


| Montreal914 |
 Oct 24 2020, 05:59 PM Oct 24 2020, 05:59 PM
Post
#201
|
|
Advanced Member  Group: Members Posts: 2,118 Joined: 8-August 10 From: Claremont, CA Member No.: 12,023 Region Association: Southern California |
Edit: I might as well make this my rebuild thread...
Original post; I got side tracked on my Microsquirt build as I have decided, after 11 years of ownership, to finally get my car painted to get her ready for her upcoming 50th birthday. (IMG:style_emoticons/default/smile.gif) Knowing these endeavors can take a lot more time than initially planned, I hope to make it in time... (IMG:style_emoticons/default/wacko.gif) Well that date has long past now... (IMG:style_emoticons/default/rolleyes.gif) Originally bahia red 73 1.7. The goal is a narrow body Front: 914-4 A arms with Rear: Drilled hubs, But before I get the pleasure of installing all of these beautiful fresh goodies, I need to tackle the not so fun stuff... (IMG:style_emoticons/default/headbang.gif) I have already started fixing some of the rust issues and will share that progress in the near future but right now, I wanted to post some of the issues i have on the passenger side front fender. (IMG:style_emoticons/default/sad.gif) I have searched and read many of the builds here but I would like some inputs from the people who have gone through this mess. I am trying to understand the construction of the rear part of the fender, more precisely the area joining the front cowling. Below is a sketch of how I think it is made but i would like someone to confirm... 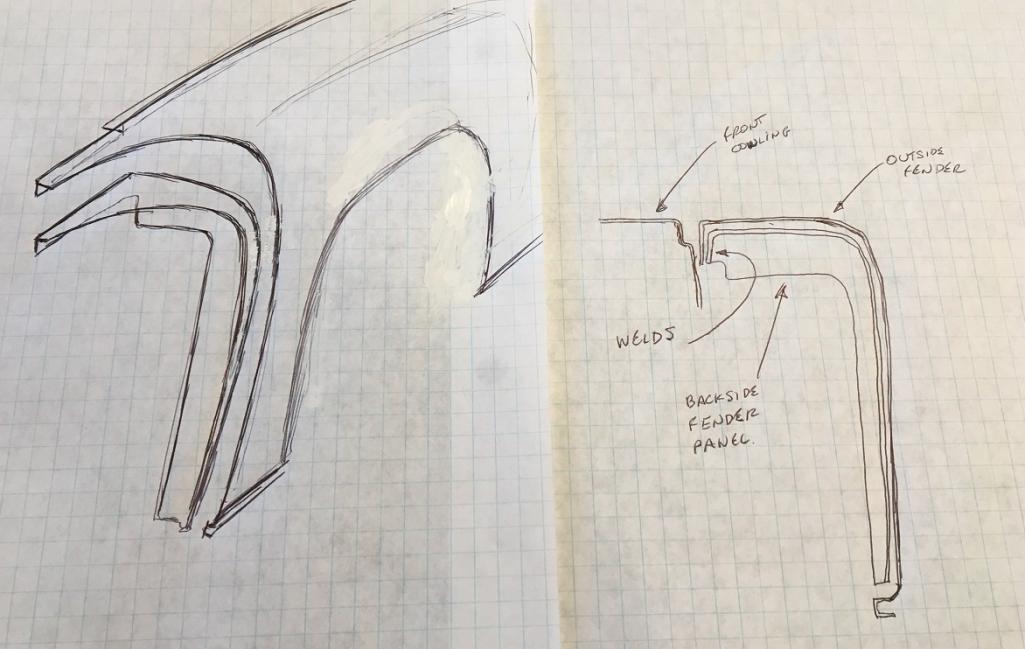 Having removed the seam sealer in the upper rear area, I have discovered "this" (IMG:style_emoticons/default/dry.gif) which is not really unusual, but clearly a pain to fix. I am not sure though what I am looking at. If my sketch is correct, I guess the inner rusted layer is from the fender rear bulkhead that actually becomes an inner layer on the rear upper point of the fender by the door and cowling junction. 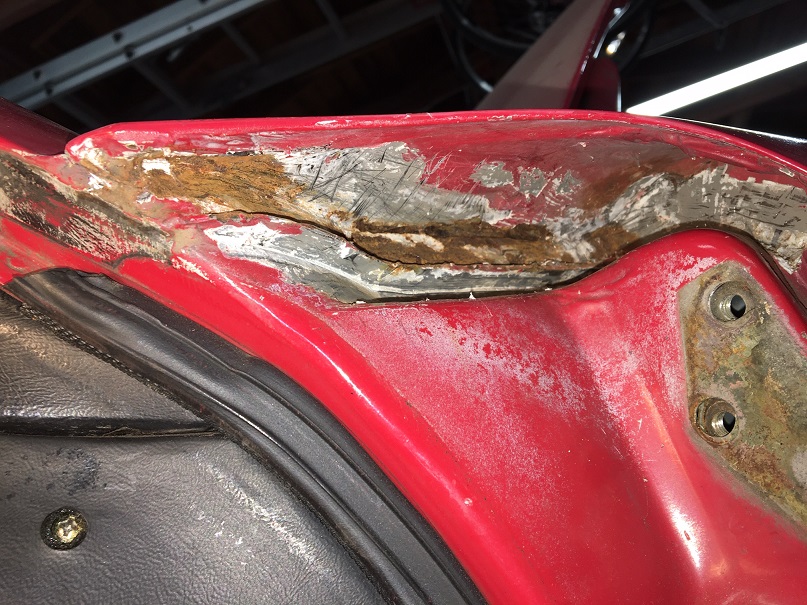 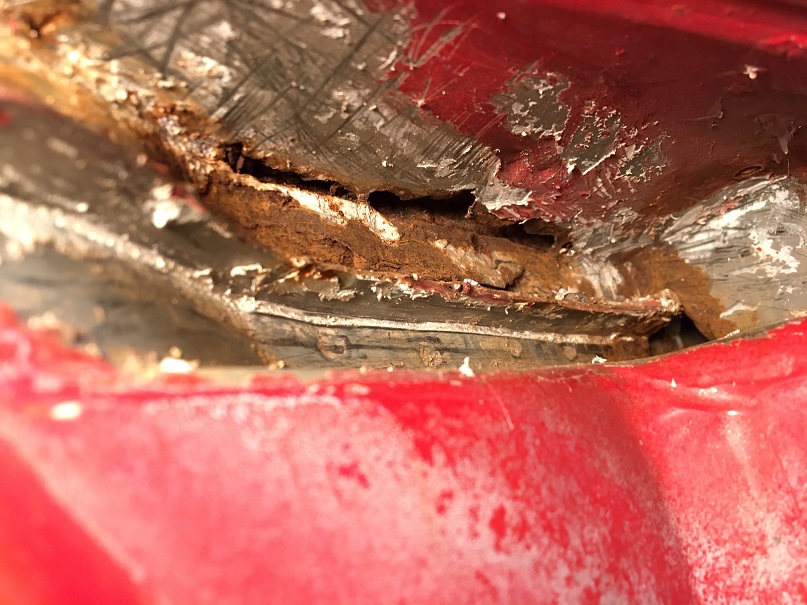 I might be able to cut this from the underside preventing me from cutting the outer surface of the fender. But I would like to better understand what is happening at the junction to the body. How many layers are there from the fender, one or two? Is the metal peeling off at the joint to the body the metal from the bulkhead/inner layer, or is it the outer fender layer? As a reference, this if the situation of the channel, surface rust, but how bad? Is there a way to better know without destroying? Maybe poke with a screwdriver? (IMG:style_emoticons/default/confused24.gif) 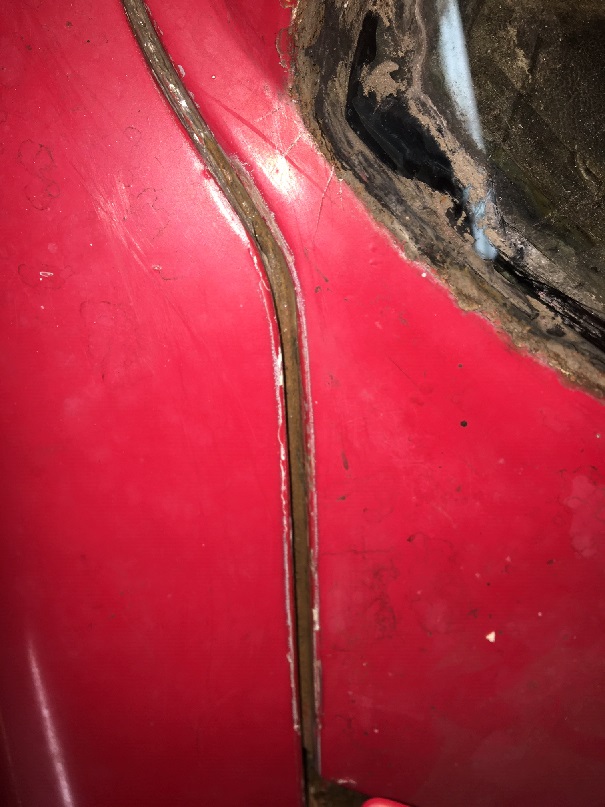 Comments appreciated (IMG:style_emoticons/default/smile.gif) |
   |

 
|
Posts in this topic
 Montreal914 Rust repair before paint Oct 24 2020, 05:59 PM
 cary You got it.
http://www.914world.com/bbs2/index.ph... Oct 24 2020, 06:32 PM horizontally-opposed All I can say is…go the distance in that area.
... Oct 24 2020, 06:33 PM Montreal914 @[url=http://www.914world.com/bbs2/index.php?showu... Oct 24 2020, 07:37 PM cary I'm going to ask George (AA) and Alex and Pete... Oct 25 2020, 09:48 AM Montreal914 Today's update. After carefully studying Cary... Oct 25 2020, 03:37 PM cary Looks good. Full speed ahead.
I didn't know Ge... Oct 25 2020, 04:28 PM Montreal914 On AA website:
Part number: 91450303211A and 914... Oct 25 2020, 04:34 PM cary Only cut out what you need too on either piece ...... Oct 25 2020, 05:17 PM Montreal914 Yes, it's all about the gap and its evenness t... Oct 25 2020, 06:10 PM Montreal914 I worked a couple of hours last night and began to... Oct 27 2020, 07:32 PM Montreal914 A little more cleaning up tonight. Looking at the ... Oct 27 2020, 10:33 PM Arno914 Hi,
here are pics of a NOS Fender I aquired a lon... Oct 28 2020, 03:03 AM
cary You got it.
http://www.914world.com/bbs2/index.ph... Oct 24 2020, 06:32 PM horizontally-opposed All I can say is…go the distance in that area.
... Oct 24 2020, 06:33 PM Montreal914 @[url=http://www.914world.com/bbs2/index.php?showu... Oct 24 2020, 07:37 PM cary I'm going to ask George (AA) and Alex and Pete... Oct 25 2020, 09:48 AM Montreal914 Today's update. After carefully studying Cary... Oct 25 2020, 03:37 PM cary Looks good. Full speed ahead.
I didn't know Ge... Oct 25 2020, 04:28 PM Montreal914 On AA website:
Part number: 91450303211A and 914... Oct 25 2020, 04:34 PM cary Only cut out what you need too on either piece ...... Oct 25 2020, 05:17 PM Montreal914 Yes, it's all about the gap and its evenness t... Oct 25 2020, 06:10 PM Montreal914 I worked a couple of hours last night and began to... Oct 27 2020, 07:32 PM Montreal914 A little more cleaning up tonight. Looking at the ... Oct 27 2020, 10:33 PM Arno914 Hi,
here are pics of a NOS Fender I aquired a lon... Oct 28 2020, 03:03 AM
 horizontally-opposed
Hi,
here are pics of a NOS Fender I aquired a lo... Nov 6 2020, 12:16 PM cary I'd wait till you have the new patch panel in ... Oct 28 2020, 08:26 AM Arno914 Thanks to the detailed pics from Montreal914 I not... Oct 28 2020, 08:47 AM Montreal914 @cary ; Thank you for the input, that second cut ... Oct 28 2020, 09:29 AM Montreal914 Did a little work this WE. I removed some metal in... Nov 1 2020, 08:04 PM Montreal914 Yesterday I received my sheet metal repair pieces,... Nov 6 2020, 12:50 AM cary Your now into what we/I call the art of massaging ... Nov 6 2020, 12:08 PM Montreal914 @Cary
Here are a few pictures of the fender patc... Nov 6 2020, 03:23 PM cary I'd say do the cowl section first.
Then tune t... Nov 6 2020, 03:49 PM Montreal914
I'd say do the cowl section first.
Then tune ... Nov 6 2020, 04:08 PM cary Go big. You wouldn't be happy welding that sho... Nov 6 2020, 04:24 PM Montreal914
Go big. You wouldn't be happy welding that sh... Nov 6 2020, 04:33 PM Eric_Shea If you leaf through this album, there's a ton ... Nov 7 2020, 08:05 AM Montreal914 @Eric_Shea Thank you for the link. Very nice pict... Nov 15 2020, 11:33 AM Montreal914 It has been over two months since I posted some pr... Jan 24 2021, 05:42 PM mb911 Looks great. That is a spot on my car I repaired a... Jan 24 2021, 06:01 PM Montreal914
Looks great. That is a spot on my car I repaired ... Jan 24 2021, 06:10 PM mb911
Looks great. That is a spot on my car I repaired... Jan 24 2021, 06:15 PM Montreal914 Moving on to the other problem area of this fender... Jan 24 2021, 06:04 PM Montreal914 Time to switch to the rear fender of that same sid... Jan 24 2021, 06:24 PM bkrantz Nice work--keep it up! Jan 24 2021, 08:49 PM Montreal914 This weeks update:
The door latch bracket deep in... Jan 30 2021, 09:07 PM Cairo94507 Very nicely done and great attention to detail. ... Jan 31 2021, 10:18 AM pencap914 Nice work Eric! Looks like my 914 will need a ... Feb 17 2021, 06:22 PM Montreal914 Fresh update :)
Spent some time finishing the r... Apr 23 2021, 08:12 PM Montreal914 Battery tray! :cheer:
Some like to weld it ... Apr 23 2021, 08:47 PM Root_Werks Really like this thread! You've got some ... Apr 26 2021, 03:24 PM Montreal914
Really like this thread! You've got some... May 1 2021, 03:55 PM Montreal914 Now back to the main program...
Removing the carp... May 1 2021, 04:00 PM bbrock I just got caught up. Fantastic work. I'm en... May 1 2021, 06:02 PM Montreal914
I just got caught up. Fantastic work. I'm e... May 1 2021, 09:25 PM bbrock Thanks for the update on the boat(s). Fantastic.
... May 1 2021, 10:18 PM Montreal914
Thanks for the update on the boat(s). Fantastic.... May 1 2021, 11:47 PM Montreal914 Wow, already about 3 1/2 months since my last post... Aug 13 2021, 11:35 AM Montreal914 Time to move on to the engine lid, which also need... Aug 13 2021, 12:04 PM Montreal914 Wow it has been many months since I have updated t... Dec 12 2021, 01:56 PM Montreal914 Between the filter/thermostat assembly and the fro... Dec 12 2021, 06:18 PM Montreal914 Although I could have elected to use steel braded ... Dec 12 2021, 07:19 PM Montreal914 Now, that the rigid part has been completed, it is... Dec 12 2021, 07:45 PM bkrantz Nice work--looks great! Dec 12 2021, 08:05 PM Montreal914 I am using a Mercedes Diesel oil cooler I got from... Dec 12 2021, 08:08 PM pete-stevers Inspiring thread! that is a job well done... Dec 12 2021, 10:09 PM Montreal914
Inspiring thread! that is a job well done... Dec 12 2021, 11:33 PM Cairo94507 Very nicely done. That should keep your engine ni... Dec 13 2021, 08:14 AM Montreal914 Here I will need the input from the experienced pe... Dec 15 2021, 11:36 AM Luke M I've done both of these type of repairs. My br... Dec 15 2021, 02:34 PM Montreal914 Thank you for the advice and pictures Luke. :)
... Dec 15 2021, 03:27 PM Luke M
Thank you for the advice and pictures Luke. :)
... Dec 15 2021, 06:12 PM Montreal914 So am I understanding that you keep the tube on th... Dec 15 2021, 08:14 PM Luke M Correct. Keep the tube on the donor q-panel. Remov... Dec 16 2021, 11:07 AM Montreal914 After removing the blower box and the wiper assemb... Dec 17 2021, 06:30 PM Luke M
After removing the blower box and the wiper assem... Dec 18 2021, 09:37 AM Montreal914 @Luke M Antenna, humm seems like a good explanati... Dec 18 2021, 02:45 PM Montreal914 A little progress this weekend. I delicately remov... Dec 20 2021, 09:14 PM Montreal914 Today I removed the master cylinder and pedal asse... Dec 23 2021, 05:16 PM Montreal914 Happy New Year!
Being stuck at home for the ... Jan 1 2022, 08:06 PM bkrantz Very nice work! Jan 1 2022, 09:32 PM nivekdodge Looks good Eric, let me know if I can help Jan 20 2022, 09:57 PM Montreal914 Time to add some of the progress... :smash:
Beli... Apr 8 2022, 07:14 PM nivekdodge How are you coming along? Sep 24 2022, 06:53 PM Montreal914 Thank you for asking! Clearly not as much prog... Sep 25 2022, 01:01 AM nivekdodge I think I'm still leaning to the whole fender ... Sep 25 2022, 07:57 PM Cairo94507 Really nice work Eric. I agree with replacing the... Sep 26 2022, 07:36 AM 930cabman
Really nice work Eric. I agree with replacing th... Sep 27 2022, 11:59 AM Montreal914 @nivekdodge : By double flange you mean this class... Sep 26 2022, 08:14 AM nathanxnathan You know my original advice was to splice in just ... Sep 26 2022, 10:45 AM Montreal914
You know my original advice was to splice in just... Sep 26 2022, 11:20 PM nathanxnathan
Nathan, yes I still have all the pictures you sen... Sep 27 2022, 11:39 AM Montreal914 All good inputs!! :trophy:
@nathanxnat... Sep 27 2022, 08:03 PM nathanxnathan
All good inputs!! :trophy:
[b]@[url=h... Sep 28 2022, 11:31 PM nivekdodge Eric
I meant in the gap beside the trunk lid. I... Sep 27 2022, 08:18 PM Montreal914 I would probably attach the fender using a few sel... Sep 29 2022, 06:53 PM nivekdodge I removed the tubes and almost welded the holes up... Nov 8 2022, 08:16 PM Montreal914 OK, time for some update. The current work is focu... Dec 4 2022, 12:45 PM Cairo94507 Very nicely done. :beer2: Dec 4 2022, 03:48 PM nathanxnathan Lookin' good :welder: @Montreal914 Dec 4 2022, 07:35 PM nivekdodge Yes it does, it looks great! make sure to clea... Dec 4 2022, 09:04 PM Montreal914 I was able to continue the slow process of making ... Dec 17 2022, 05:43 PM nathanxnathan Coming along nicely. :)
I'll have to take a... Dec 18 2022, 02:39 AM Montreal914 @[url=http://www.914world.com/bbs2/index.php?showu... Dec 18 2022, 02:41 PM nivekdodge https://www.semproducts.com/product/rust-sh.../281... Dec 18 2022, 08:21 PM Montreal914
https://www.semproducts.com/product/rust-sh.../28... Feb 24 2023, 06:21 PM Montreal914 Another overdue update...
As mentioned in the pre... Feb 24 2023, 07:04 PM Montreal914 Next, time to fix some of the scars created during... Feb 24 2023, 07:37 PM Montreal914 OK, so let's continue with this problematic lo... Feb 24 2023, 08:03 PM bob164 Great progress Eric, thanks for the detailed photo... Feb 24 2023, 08:05 PM Cairo94507 Great work Eric; a thing of beauty when the new qu... Feb 25 2023, 08:57 AM
horizontally-opposed
Hi,
here are pics of a NOS Fender I aquired a lo... Nov 6 2020, 12:16 PM cary I'd wait till you have the new patch panel in ... Oct 28 2020, 08:26 AM Arno914 Thanks to the detailed pics from Montreal914 I not... Oct 28 2020, 08:47 AM Montreal914 @cary ; Thank you for the input, that second cut ... Oct 28 2020, 09:29 AM Montreal914 Did a little work this WE. I removed some metal in... Nov 1 2020, 08:04 PM Montreal914 Yesterday I received my sheet metal repair pieces,... Nov 6 2020, 12:50 AM cary Your now into what we/I call the art of massaging ... Nov 6 2020, 12:08 PM Montreal914 @Cary
Here are a few pictures of the fender patc... Nov 6 2020, 03:23 PM cary I'd say do the cowl section first.
Then tune t... Nov 6 2020, 03:49 PM Montreal914
I'd say do the cowl section first.
Then tune ... Nov 6 2020, 04:08 PM cary Go big. You wouldn't be happy welding that sho... Nov 6 2020, 04:24 PM Montreal914
Go big. You wouldn't be happy welding that sh... Nov 6 2020, 04:33 PM Eric_Shea If you leaf through this album, there's a ton ... Nov 7 2020, 08:05 AM Montreal914 @Eric_Shea Thank you for the link. Very nice pict... Nov 15 2020, 11:33 AM Montreal914 It has been over two months since I posted some pr... Jan 24 2021, 05:42 PM mb911 Looks great. That is a spot on my car I repaired a... Jan 24 2021, 06:01 PM Montreal914
Looks great. That is a spot on my car I repaired ... Jan 24 2021, 06:10 PM mb911
Looks great. That is a spot on my car I repaired... Jan 24 2021, 06:15 PM Montreal914 Moving on to the other problem area of this fender... Jan 24 2021, 06:04 PM Montreal914 Time to switch to the rear fender of that same sid... Jan 24 2021, 06:24 PM bkrantz Nice work--keep it up! Jan 24 2021, 08:49 PM Montreal914 This weeks update:
The door latch bracket deep in... Jan 30 2021, 09:07 PM Cairo94507 Very nicely done and great attention to detail. ... Jan 31 2021, 10:18 AM pencap914 Nice work Eric! Looks like my 914 will need a ... Feb 17 2021, 06:22 PM Montreal914 Fresh update :)
Spent some time finishing the r... Apr 23 2021, 08:12 PM Montreal914 Battery tray! :cheer:
Some like to weld it ... Apr 23 2021, 08:47 PM Root_Werks Really like this thread! You've got some ... Apr 26 2021, 03:24 PM Montreal914
Really like this thread! You've got some... May 1 2021, 03:55 PM Montreal914 Now back to the main program...
Removing the carp... May 1 2021, 04:00 PM bbrock I just got caught up. Fantastic work. I'm en... May 1 2021, 06:02 PM Montreal914
I just got caught up. Fantastic work. I'm e... May 1 2021, 09:25 PM bbrock Thanks for the update on the boat(s). Fantastic.
... May 1 2021, 10:18 PM Montreal914
Thanks for the update on the boat(s). Fantastic.... May 1 2021, 11:47 PM Montreal914 Wow, already about 3 1/2 months since my last post... Aug 13 2021, 11:35 AM Montreal914 Time to move on to the engine lid, which also need... Aug 13 2021, 12:04 PM Montreal914 Wow it has been many months since I have updated t... Dec 12 2021, 01:56 PM Montreal914 Between the filter/thermostat assembly and the fro... Dec 12 2021, 06:18 PM Montreal914 Although I could have elected to use steel braded ... Dec 12 2021, 07:19 PM Montreal914 Now, that the rigid part has been completed, it is... Dec 12 2021, 07:45 PM bkrantz Nice work--looks great! Dec 12 2021, 08:05 PM Montreal914 I am using a Mercedes Diesel oil cooler I got from... Dec 12 2021, 08:08 PM pete-stevers Inspiring thread! that is a job well done... Dec 12 2021, 10:09 PM Montreal914
Inspiring thread! that is a job well done... Dec 12 2021, 11:33 PM Cairo94507 Very nicely done. That should keep your engine ni... Dec 13 2021, 08:14 AM Montreal914 Here I will need the input from the experienced pe... Dec 15 2021, 11:36 AM Luke M I've done both of these type of repairs. My br... Dec 15 2021, 02:34 PM Montreal914 Thank you for the advice and pictures Luke. :)
... Dec 15 2021, 03:27 PM Luke M
Thank you for the advice and pictures Luke. :)
... Dec 15 2021, 06:12 PM Montreal914 So am I understanding that you keep the tube on th... Dec 15 2021, 08:14 PM Luke M Correct. Keep the tube on the donor q-panel. Remov... Dec 16 2021, 11:07 AM Montreal914 After removing the blower box and the wiper assemb... Dec 17 2021, 06:30 PM Luke M
After removing the blower box and the wiper assem... Dec 18 2021, 09:37 AM Montreal914 @Luke M Antenna, humm seems like a good explanati... Dec 18 2021, 02:45 PM Montreal914 A little progress this weekend. I delicately remov... Dec 20 2021, 09:14 PM Montreal914 Today I removed the master cylinder and pedal asse... Dec 23 2021, 05:16 PM Montreal914 Happy New Year!
Being stuck at home for the ... Jan 1 2022, 08:06 PM bkrantz Very nice work! Jan 1 2022, 09:32 PM nivekdodge Looks good Eric, let me know if I can help Jan 20 2022, 09:57 PM Montreal914 Time to add some of the progress... :smash:
Beli... Apr 8 2022, 07:14 PM nivekdodge How are you coming along? Sep 24 2022, 06:53 PM Montreal914 Thank you for asking! Clearly not as much prog... Sep 25 2022, 01:01 AM nivekdodge I think I'm still leaning to the whole fender ... Sep 25 2022, 07:57 PM Cairo94507 Really nice work Eric. I agree with replacing the... Sep 26 2022, 07:36 AM 930cabman
Really nice work Eric. I agree with replacing th... Sep 27 2022, 11:59 AM Montreal914 @nivekdodge : By double flange you mean this class... Sep 26 2022, 08:14 AM nathanxnathan You know my original advice was to splice in just ... Sep 26 2022, 10:45 AM Montreal914
You know my original advice was to splice in just... Sep 26 2022, 11:20 PM nathanxnathan
Nathan, yes I still have all the pictures you sen... Sep 27 2022, 11:39 AM Montreal914 All good inputs!! :trophy:
@nathanxnat... Sep 27 2022, 08:03 PM nathanxnathan
All good inputs!! :trophy:
[b]@[url=h... Sep 28 2022, 11:31 PM nivekdodge Eric
I meant in the gap beside the trunk lid. I... Sep 27 2022, 08:18 PM Montreal914 I would probably attach the fender using a few sel... Sep 29 2022, 06:53 PM nivekdodge I removed the tubes and almost welded the holes up... Nov 8 2022, 08:16 PM Montreal914 OK, time for some update. The current work is focu... Dec 4 2022, 12:45 PM Cairo94507 Very nicely done. :beer2: Dec 4 2022, 03:48 PM nathanxnathan Lookin' good :welder: @Montreal914 Dec 4 2022, 07:35 PM nivekdodge Yes it does, it looks great! make sure to clea... Dec 4 2022, 09:04 PM Montreal914 I was able to continue the slow process of making ... Dec 17 2022, 05:43 PM nathanxnathan Coming along nicely. :)
I'll have to take a... Dec 18 2022, 02:39 AM Montreal914 @[url=http://www.914world.com/bbs2/index.php?showu... Dec 18 2022, 02:41 PM nivekdodge https://www.semproducts.com/product/rust-sh.../281... Dec 18 2022, 08:21 PM Montreal914
https://www.semproducts.com/product/rust-sh.../28... Feb 24 2023, 06:21 PM Montreal914 Another overdue update...
As mentioned in the pre... Feb 24 2023, 07:04 PM Montreal914 Next, time to fix some of the scars created during... Feb 24 2023, 07:37 PM Montreal914 OK, so let's continue with this problematic lo... Feb 24 2023, 08:03 PM bob164 Great progress Eric, thanks for the detailed photo... Feb 24 2023, 08:05 PM Cairo94507 Great work Eric; a thing of beauty when the new qu... Feb 25 2023, 08:57 AM  |
1 User(s) are reading this topic (1 Guests and 0 Anonymous Users)
0 Members:

|
Lo-Fi Version | Time is now: 1st June 2026 - 03:11 AM |
Invision Power Board
v9.1.4 © 2026 IPS, Inc.