|
|
|
Porsche, and the Porsche crest are registered trademarks of Dr. Ing. h.c. F. Porsche AG.
This site is not affiliated with Porsche in any way. Its only purpose is to provide an online forum for car enthusiasts. All other trademarks are property of their respective owners. |
|
|

  |

| porschetub |
 Mar 29 2026, 10:51 PM Mar 29 2026, 10:51 PM
Post
#221
|
|
914 Guru  Group: Members Posts: 5,106 Joined: 25-July 15 From: New Zealand Member No.: 18,995 Region Association: None |
QUOTE(Montreal914 @ Mar 30 2026, 03:54 PM)  Time for some overdue update. Although I did work on many areas, mostly trying to salvage rusted donor parts which takes a lot of time (IMG:style_emoticons/default/screwy.gif) (IMG:style_emoticons/default/smash.gif), I will focus on one area for this post. Last time, I was showing a couple of longitudinal sections that I had began looking into. After a lot of evaluation for the usage, I elected to begin with the small piece. This one: This part has been de-rusted in citric acid for a couple of days. First step, dissociating the inside layer from the outside one. My hope is to use the outside one on my car to repair this section. After many spot welds drilling, the two were finally separated. After roughly cutting the lower half which I plan on using, the first step was to take care of this nasty cut. (IMG:style_emoticons/default/confused24.gif) After the repair, no more cut! (IMG:style_emoticons/default/welder.gif) (IMG:style_emoticons/default/sunglasses.gif) Next, let's see how this fit on the car. Here it is simply overlapped on the current opening ("new" piece contoured in red). Clearly, I am missing some metal on the rear end of the piece. In my hand the extension made from 18ga. stock. Since the end of the piece already looks like Swiss cheese, I took this opportunity to remove this section. And now the extension. (IMG:style_emoticons/default/welder.gif) Here the extension is fully welded and you can see the next area to be repaired. Here the piece is trial fitted on the car. (IMG:style_emoticons/default/smile.gif) But, as we can see, there need to be an extension in the front too! Searching through my pile of metal, I found this small section that was actually from the driver's side. It is missing the lower fold/flange, but it does have that shallow step where the floor attaches to. Not great, but I can make it work. After trimming and fitting, time to extend the part towards the front. Welding setup with copper backing. Wrapping up this post with the trial fit of the whole piece on the car. There is still some fitting/trimming to be done but this is looking good! (IMG:style_emoticons/default/beer3.gif) Wow impressive metalworking and welding skills there (IMG:style_emoticons/default/smash.gif) (IMG:style_emoticons/default/smilie_pokal.gif) . |
   |

 
|
| Montreal914 |
Apr 29 2026, 09:40 PM
Post
#222
|
|
Advanced Member Group: Members Posts: 2,107 Joined: 8-August 10 From: Claremont, CA Member No.: 12,023 Region Association: Southern California |
Some progress...
Before installing any repair piece, I cleaned up the upper part of the long to make sure everything was solid. First, I setup my spray system and flushed citric acid using my cheap amazon submersible pump in a tote. Once the process done ~1-2 days, I flushed again with a mixture of water and baking soda to neutralize. We are currently looking upward in the remaining section of the rear upper long. The end of the hose was simply spaying on the end of the long and flowing back down on the various surfaces. The arrow points to the hose and you can see the flow pooring down. (IMG:style_emoticons/default/smile.gif) 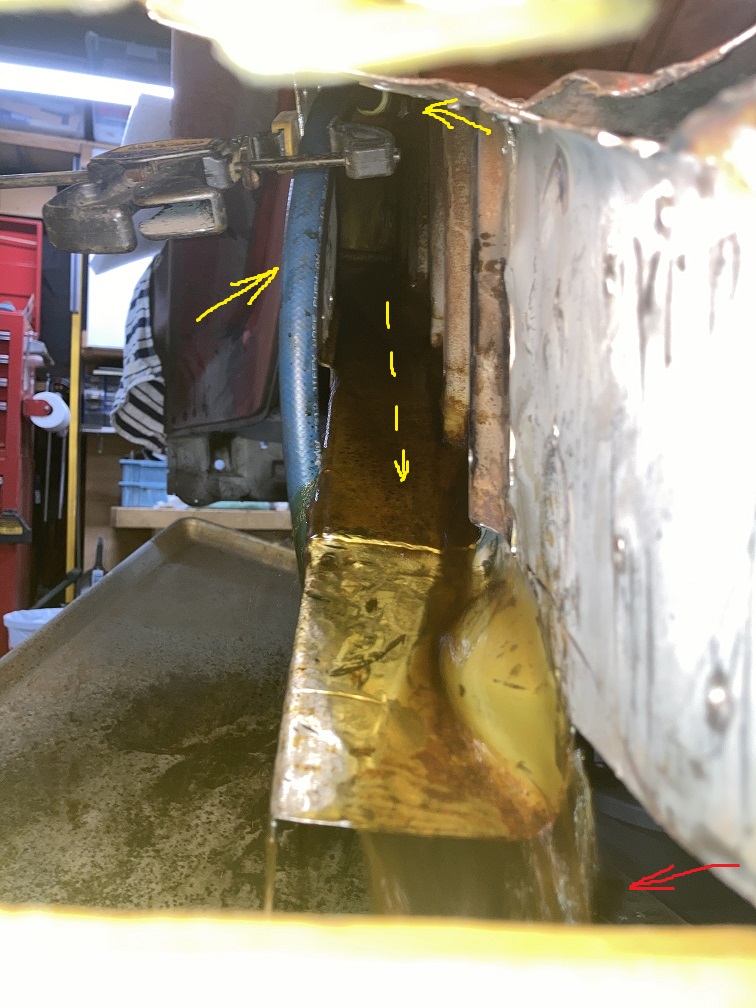 And after the treatment I applied Ospho all over to protect the metal. This looks like healthy metal. (IMG:style_emoticons/default/smile.gif) 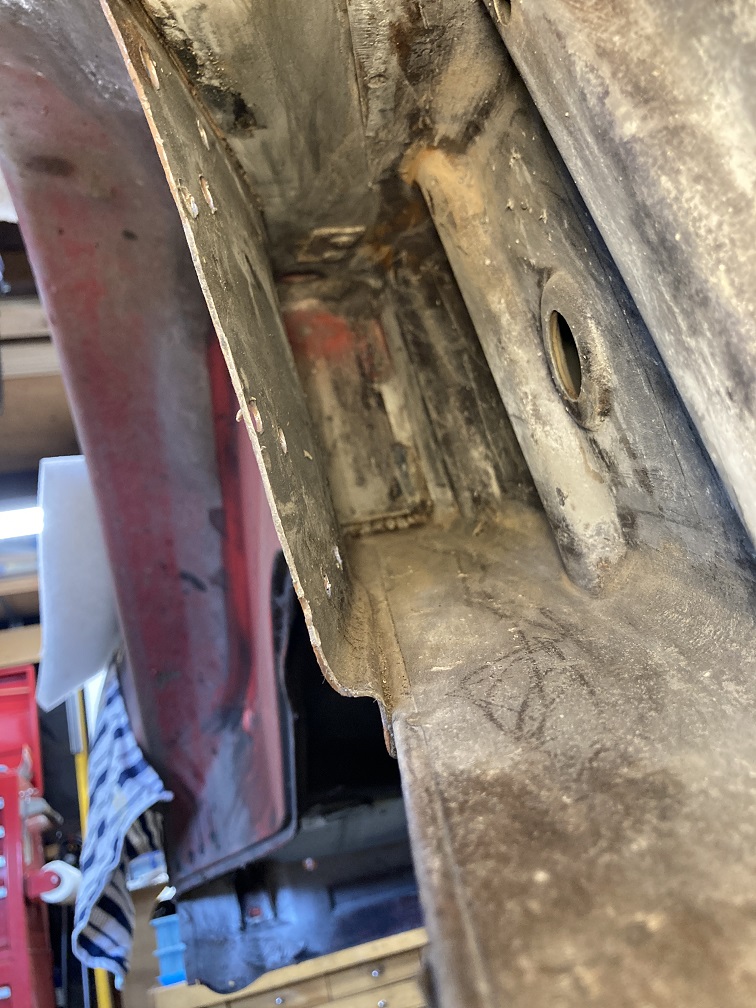 Back to parts reparation. Just to quickly recap, I left off last time working on the lower elbow section of the passenger side longitudinal. This below, which is the tacked combination of three sections, two donor and one fab: 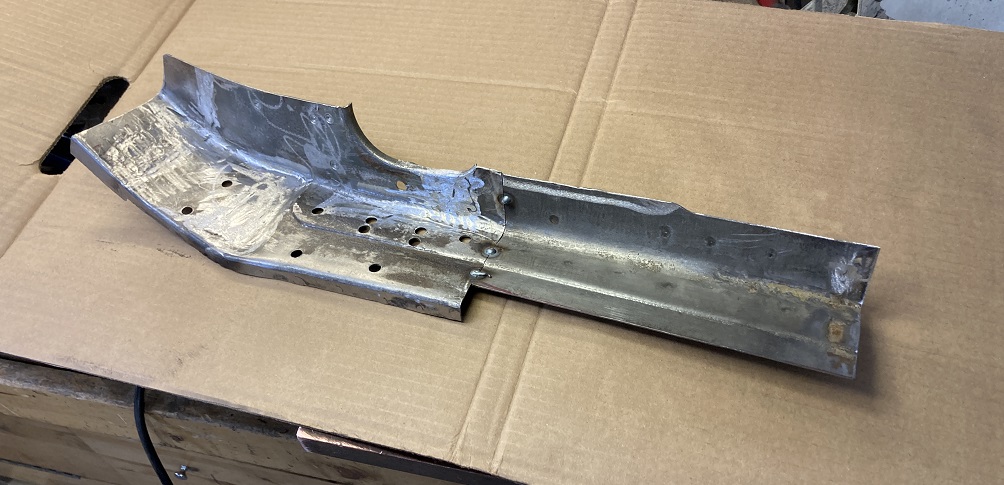 Moving on with restoring some of the numerous spot weld drilled holes. Plugging them one by one using a small coin of 18ga steel in each hole and welding around. Note the copper backing bar. 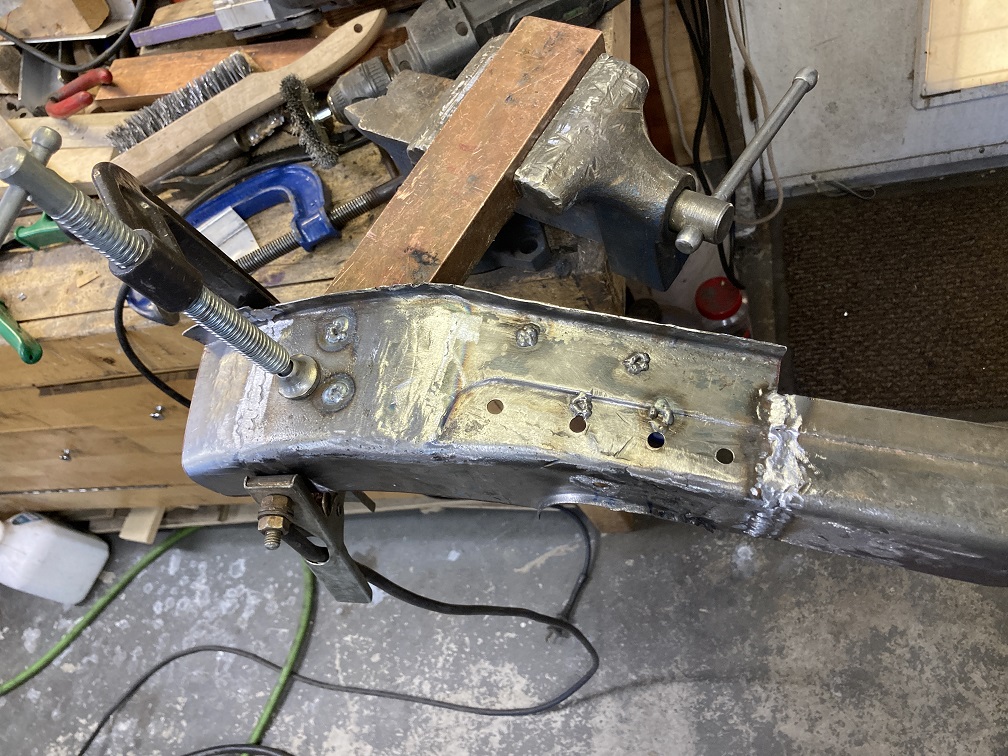 Many fitting iterations... (IMG:style_emoticons/default/rolleyes.gif) This process seems to never end right up to the point where one realizes there is nothing left to adjust, this part simply needs to go on! (IMG:style_emoticons/default/screwy.gif) 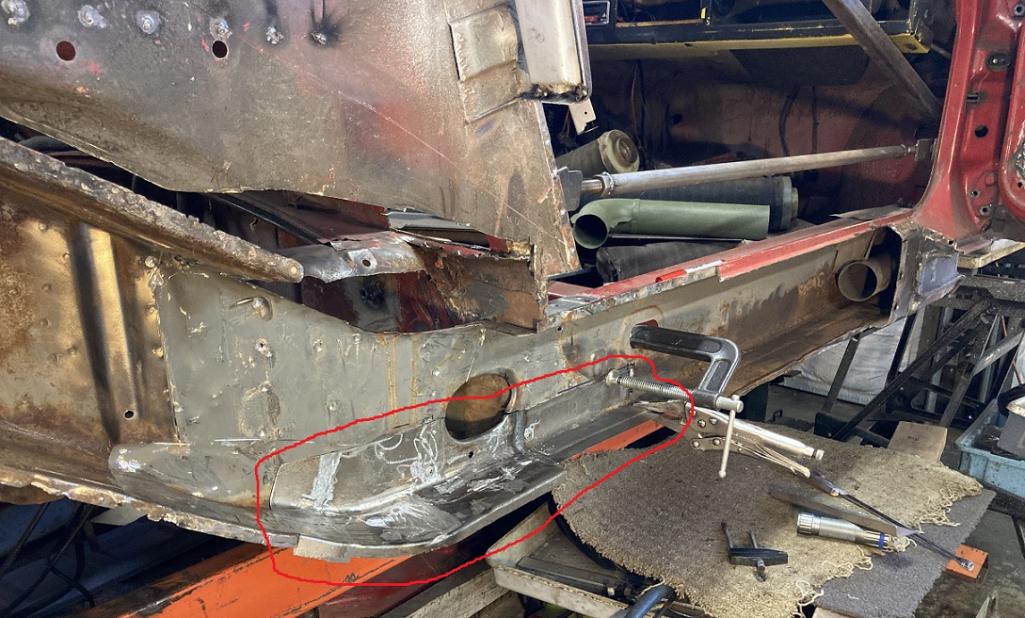 Well, yes and no. (IMG:style_emoticons/default/laugh.gif) Many new holes need to be drilled in the proper location so it can be plug welded. In this case it would be to the floor and to the firewall inner and outer panels. Also, I spayed some primer in the firewall cavity. This area will get more protection with Eastwood frame encapsulation paint once all the welding is completed on the lower fire wall (including the Maddog inner reinforcement kit and the bulkhead engine mount in the engine bay). Here, now the part is ready. I did spay some weld through primer at the floor joint area. 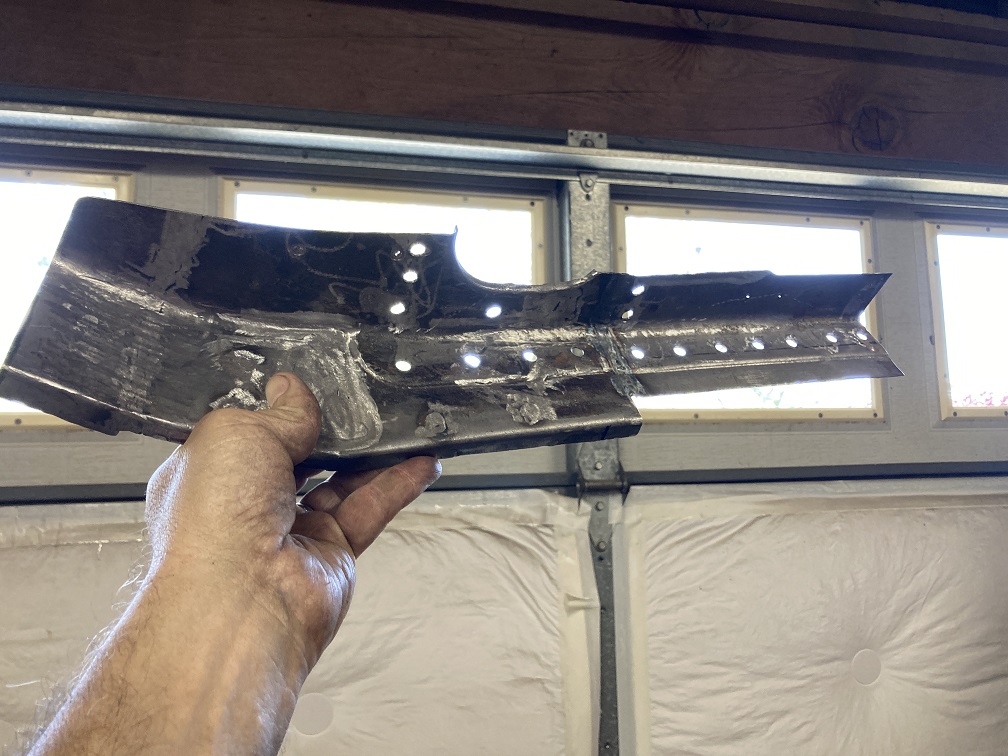 Installation on the car. (IMG:style_emoticons/default/welder.gif) 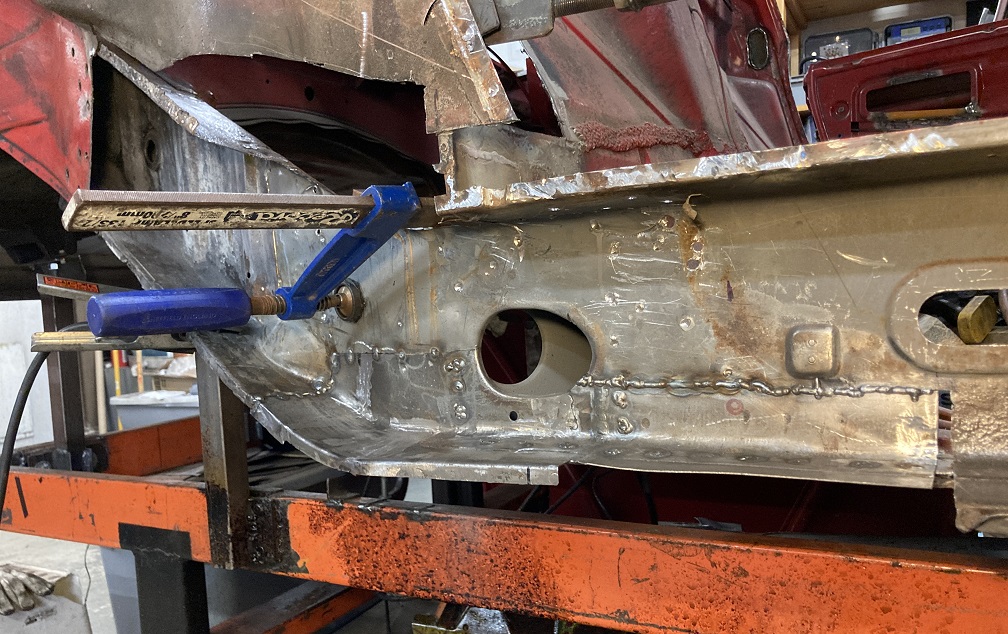 Looking into the firewall cavity through the port where the heater tube normally lives. 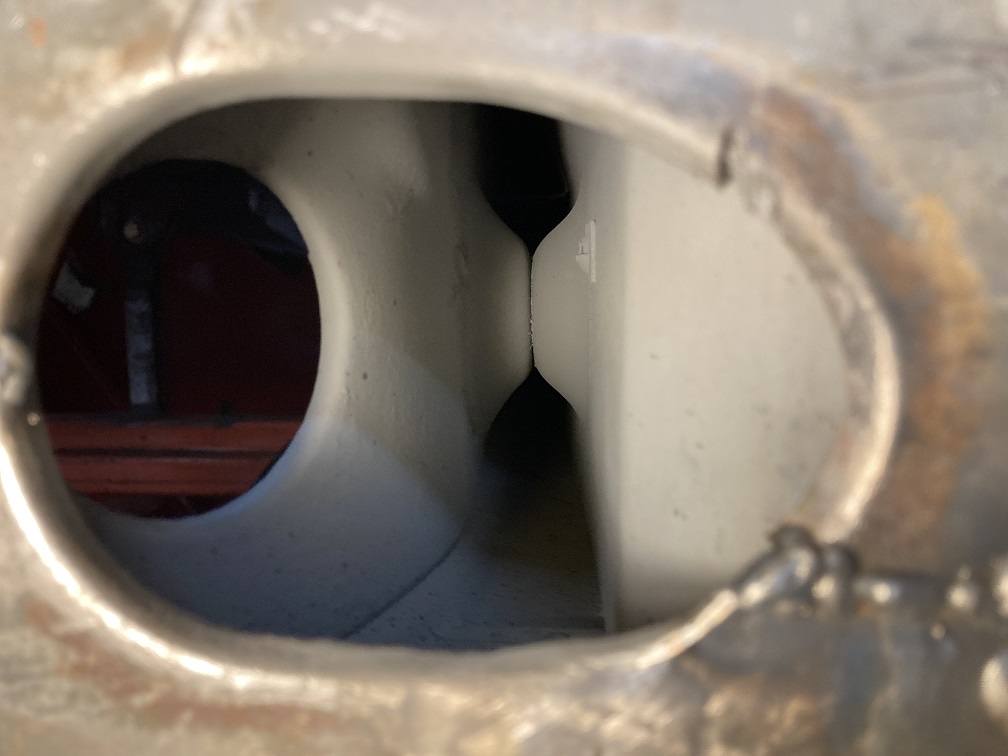 To make sure the butt joint is solid, I welded the back side too. Here is the view from inside the cabin. 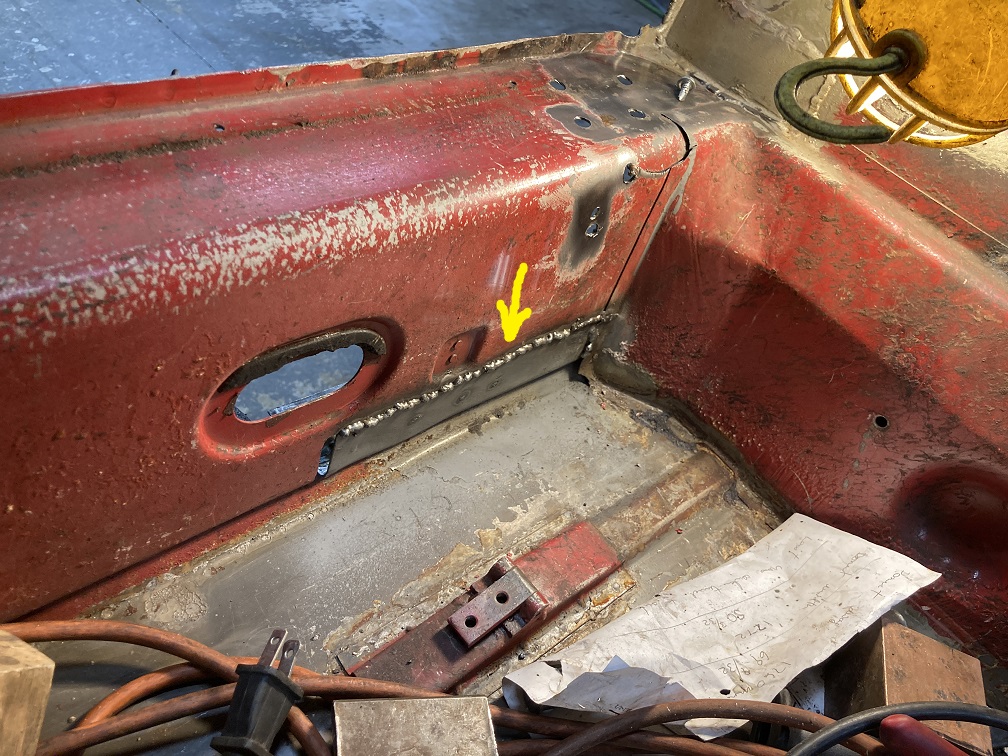 Last forgotten hole to plug. 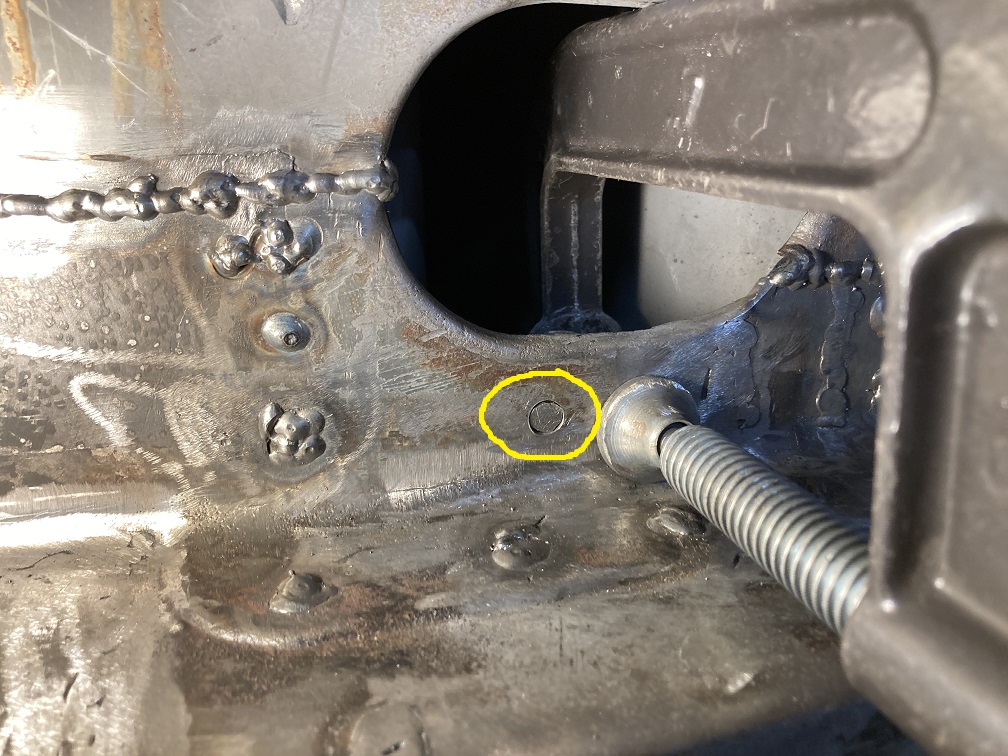 Now plugged. (IMG:style_emoticons/default/biggrin.gif) 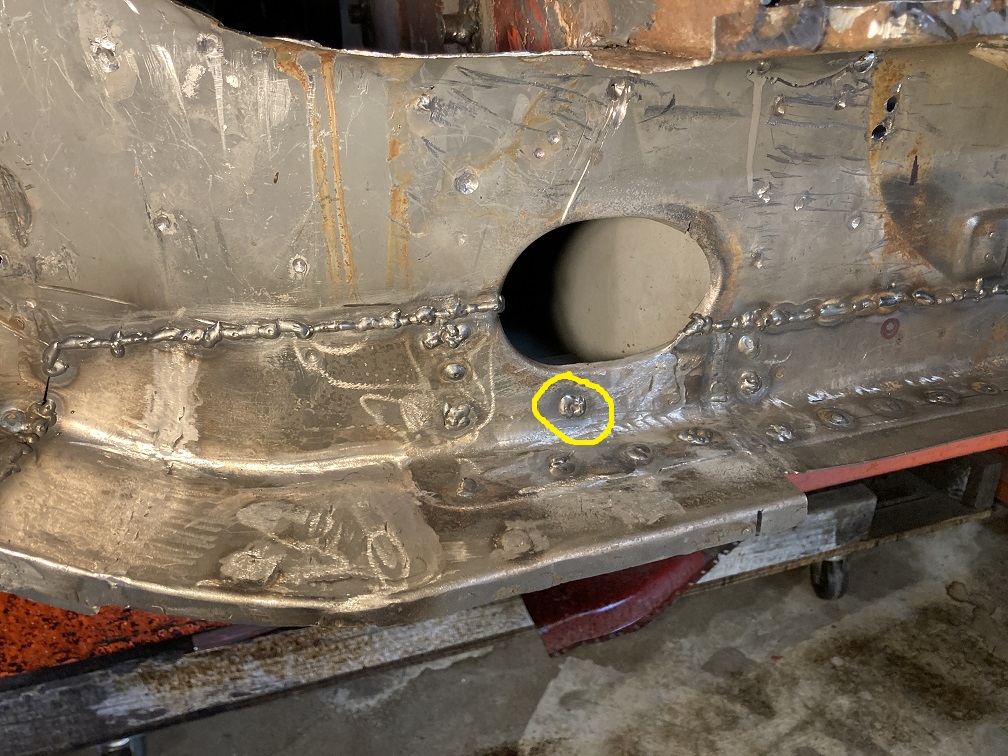 And because this surface will be doubled with the inner layer, I ground flush the welds so the inner layer fits nicely. 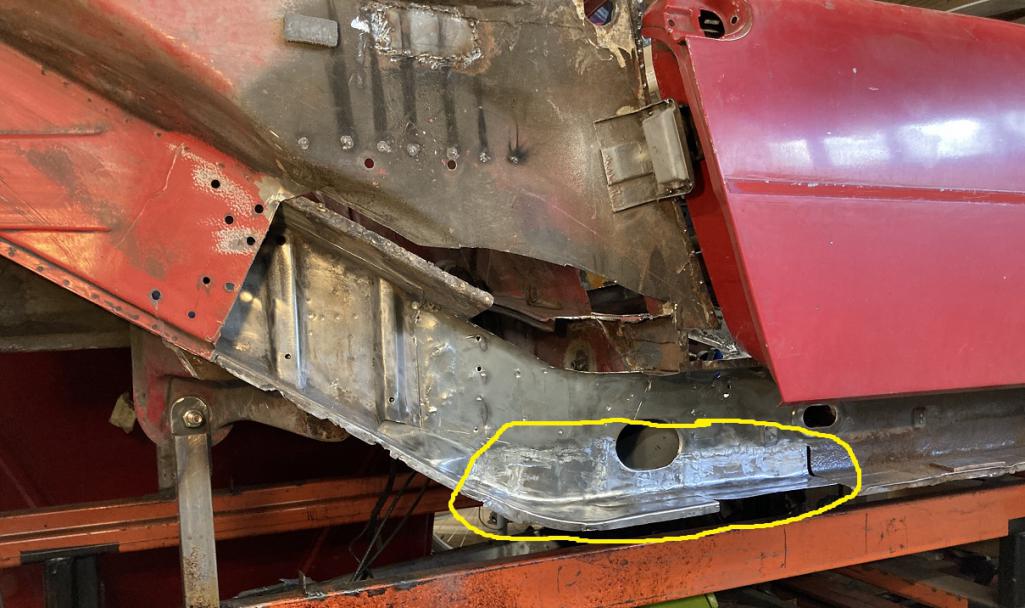 That is the current update. Stay tune for more... (IMG:style_emoticons/default/smile.gif) |
|
|
|
| friethmiller |
Apr 30 2026, 05:48 AM
Post
#223
|
|
Senior Member Group: Members Posts: 1,266 Joined: 10-February 19 From: Austin, TX Member No.: 22,863 Region Association: Southwest Region |
Great job! Enjoying the pics and reminiscing (IMG:style_emoticons/default/popcorn[1].gif)
|
 |
|
| Root_Werks |
Apr 30 2026, 08:59 AM
Post
#224
|
|
Village Idiot Group: Members Posts: 8,981 Joined: 25-May 04 From: About 15NM from Canada Member No.: 2,105 Region Association: Pacific Northwest |
|
|
|
|
| 930cabman |
May 2 2026, 05:26 PM
Post
#225
|
|
Advanced Member Group: Members Posts: 4,664 Joined: 12-November 20 From: Buffalo Member No.: 24,877 Region Association: North East States |
Great work, the things we put ourselves through??
Do you have a target completion |
|
|
|
| Montreal914 |
May 2 2026, 07:46 PM
Post
#226
|
|
Advanced Member Group: Members Posts: 2,107 Joined: 8-August 10 From: Claremont, CA Member No.: 12,023 Region Association: Southern California |
QUOTE(930cabman @ May 2 2026, 04:26 PM) Do you have a target completion I wrapped up the driver side at the end of last year and thought I could complete the passenger side by end of June. Like many projects, it looks like this upcoming milestone will shift to the right on the schedule. I wish I could drive it to the next Rennsport but I am doubting this will happen. My dad has a saying that goes something like; If your hobby interferes with your career, quit your job! (IMG:style_emoticons/default/laugh.gif) That would increase the pace of the work but unfortunately I can’t retire just yet… (IMG:style_emoticons/default/headbang.gif) |
|
|
|
| Superhawk996 |
May 2 2026, 10:42 PM
Post
#227
|
|
914 Guru Group: Members Posts: 7,842 Joined: 25-August 18 From: Woods of N. Idaho Member No.: 22,428 Region Association: Galt's Gulch |
|
|
|
|
| nivekdodge |
May 3 2026, 07:13 PM
Post
#228
|
|
Member Group: Members Posts: 335 Joined: 28-August 21 From: Pittsburgh Pa Member No.: 25,860 Region Association: MidAtlantic Region |
QUOTE(Montreal914 @ May 2 2026, 09:46 PM) QUOTE(930cabman @ May 2 2026, 04:26 PM) Do you have a target completion I wrapped up the driver side at the end of last year and thought I could complete the passenger side by end of June. Like many projects, it looks like this upcoming milestone will shift to the right on the schedule. I wish I could drive it to the next Rennsport but I am doubting this will happen. My dad has a saying that goes something like; If your hobby interferes with your career, quit your job! (IMG:style_emoticons/default/laugh.gif) That would increase the pace of the work but unfortunately I can’t retire just yet… (IMG:style_emoticons/default/headbang.gif) It is so true that when you retire, you can't imagine how you got things done when you worked Kevin |
|
|
|
| nivekdodge |
May 4 2026, 07:26 PM
Post
#229
|
|
Member Group: Members Posts: 335 Joined: 28-August 21 From: Pittsburgh Pa Member No.: 25,860 Region Association: MidAtlantic Region |
I don't like to past things here, but do a search for nylon brushes. especially 5/8' arbor. I see those pics and I want to come do that. They clean exceptionally well and don't hrow wires at you.
Kevin |
|
|
|
| Montreal914 |
May 17 2026, 10:25 AM
Post
#230
|
|
Advanced Member Group: Members Posts: 2,107 Joined: 8-August 10 From: Claremont, CA Member No.: 12,023 Region Association: Southern California |
More recent work to share. (IMG:style_emoticons/default/smile.gif)
Time to prepare the replacement inner layer of the elbow area of the long, that corrugated metal section. My repair will requires a faily long section of it and looking at my rusted inventory of pieces (IMG:style_emoticons/default/rolleyes.gif) ,this will be composed of three sections again. Two from donor and one fabricated. This post will show the preparation of the two donor pieces. Using the rusted orange donor piece that came with my extra rear fender (shown in post #216), I dissected the inner and outer layer to see what could be used. Clearly, the outer portion of the hell hole is gone, but there may be some hope with the inner corrugated piece. 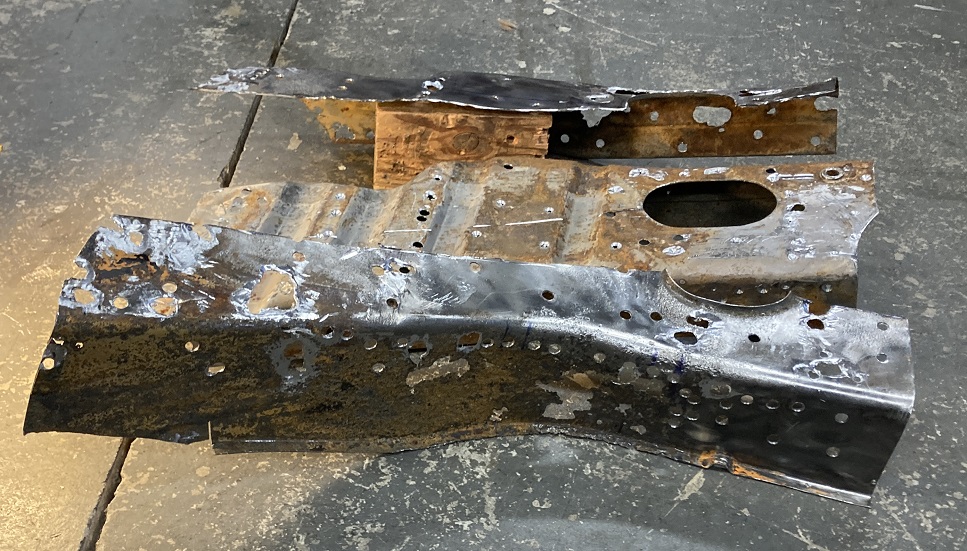 Well, looking at it in a different angle, the bottom portion of the inner corrugated layer is not great either. We'll see what can be used.  If you remember, I also had a smaller donor section of the elbow. I did use it to repair the outer layer of the long described in my previous post. Here is a picture of that separated donor piece. The outer portion is already welded on the car (last post) and the inner layer is in good condition too. 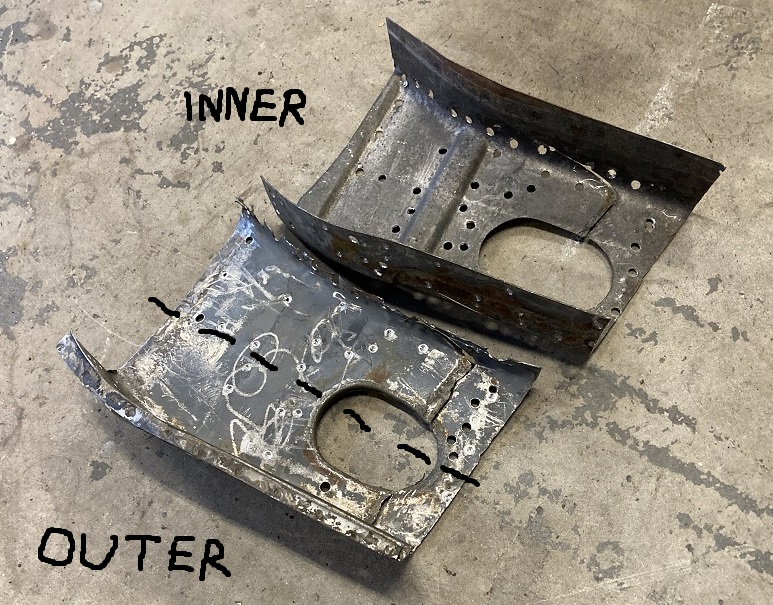 Shown below is after derusting in citric acid and cleaded up. Just like its outer sibling, it also suffered a nasty cut during its life.  Nothing that can’t be fixed. (IMG:style_emoticons/default/welder.gif) A little welding later. 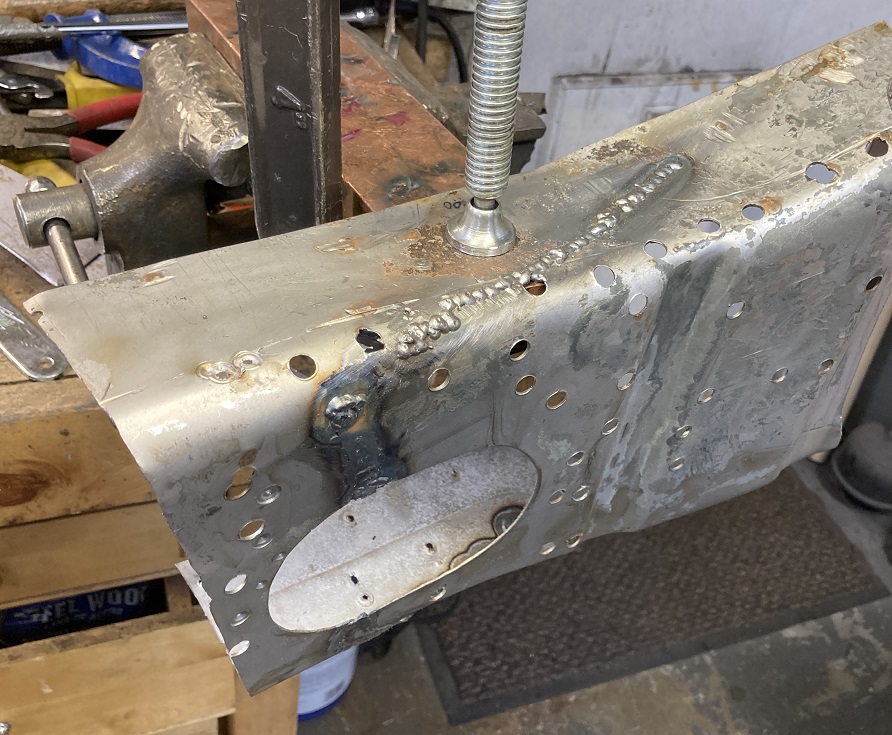 And now, all cleaned up! 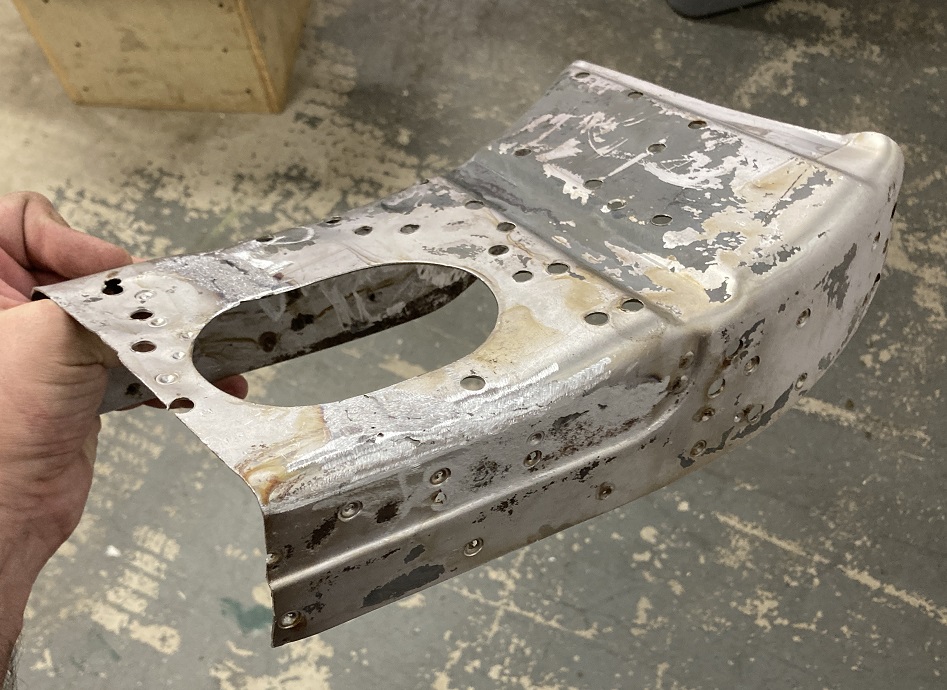 Here we can see both pieces. Although the longer piece doesn’t seem that bad in this angle, the bottom is pretty pitted. The short section is in great shape. So, the line is pretty self explanatory of what is bout to happen at this point. (IMG:style_emoticons/default/biggrin.gif) 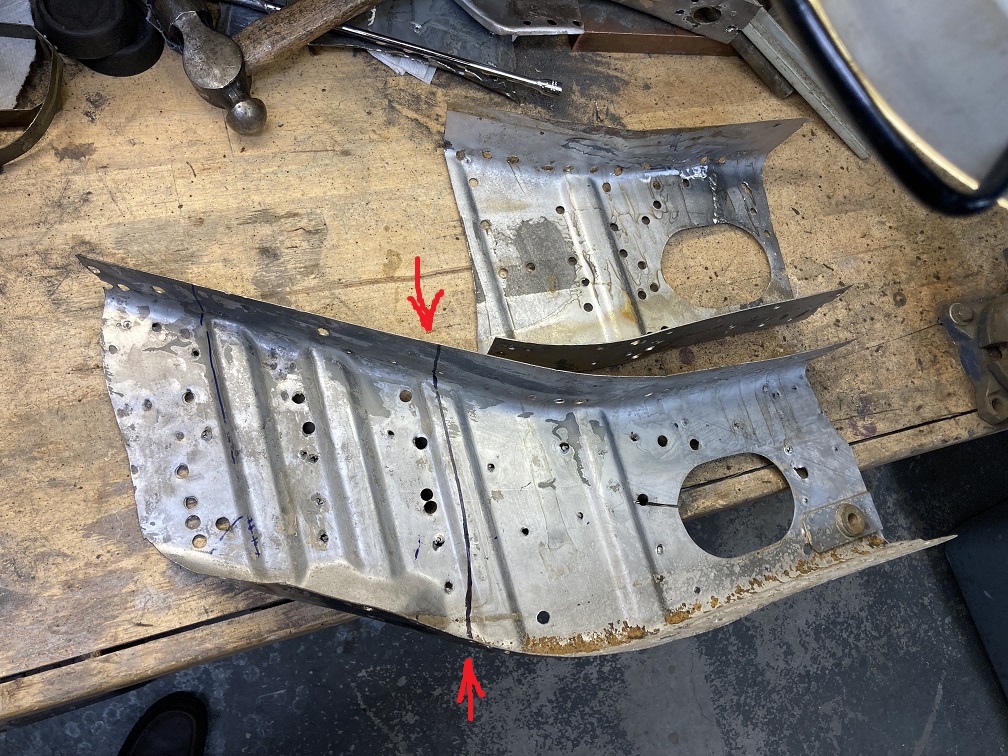 Moving on to the car. I vertically cut about 1 1/4 back of the corrugated layer in the middle of the embossing. When I will tie back the repair piece, I will be able to place a backing layer for a little overlap. 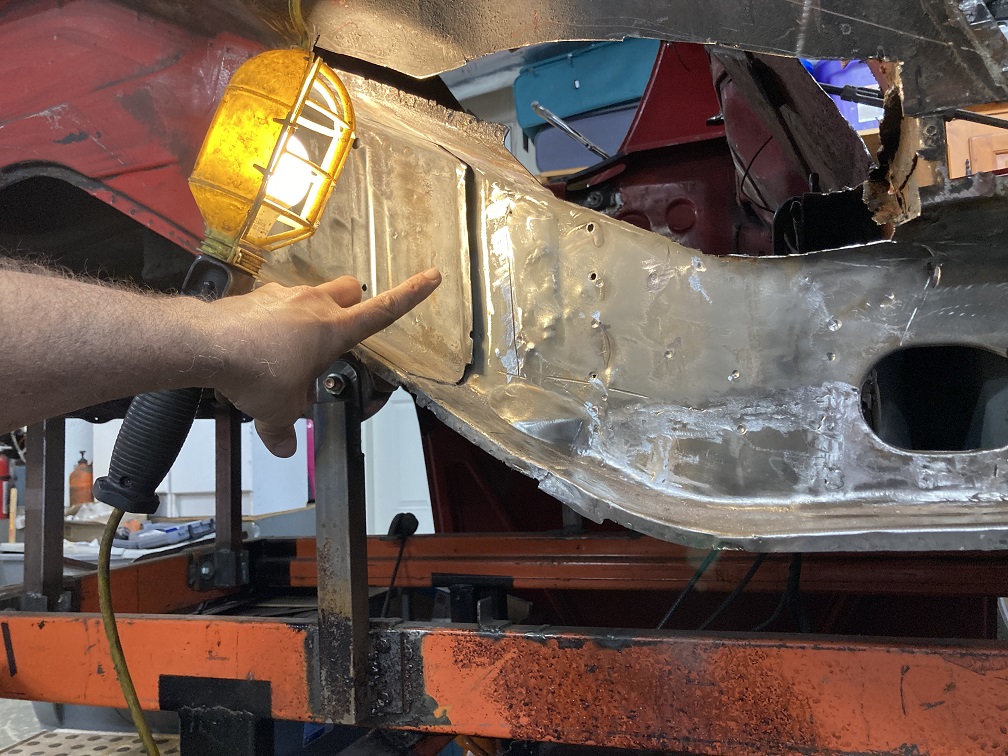 I then trimmed the the upper piece to match the car. This is the only section that will be kept from that initial long piece. 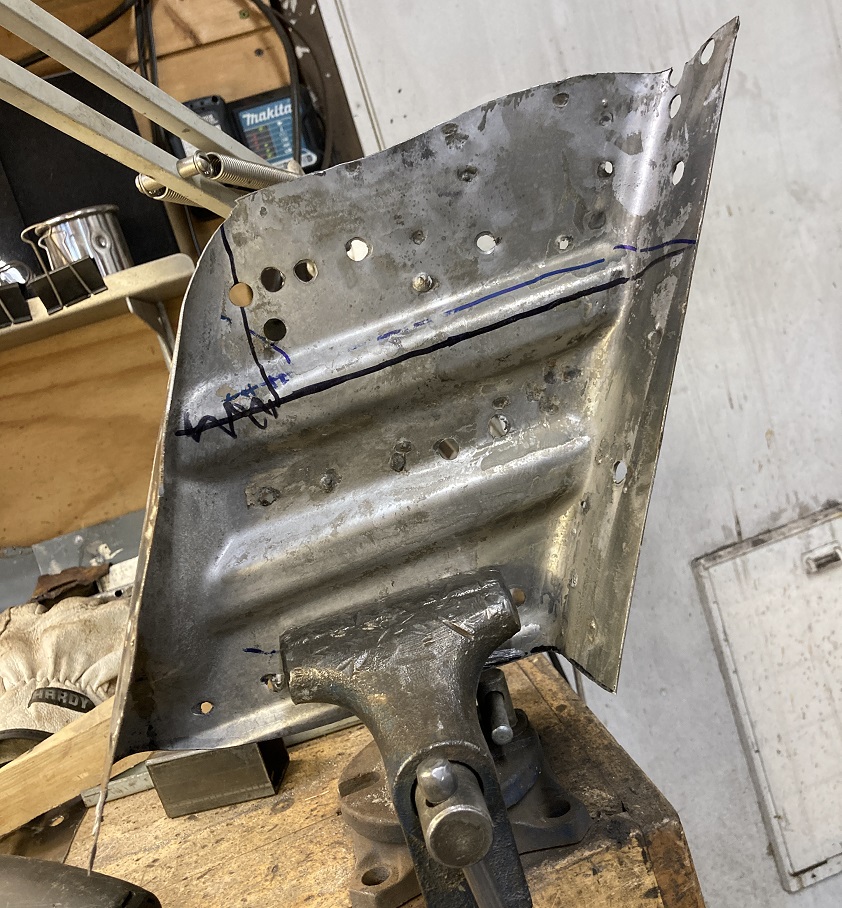 Almost all fitted, but it is missing a corner...  Now fixed. 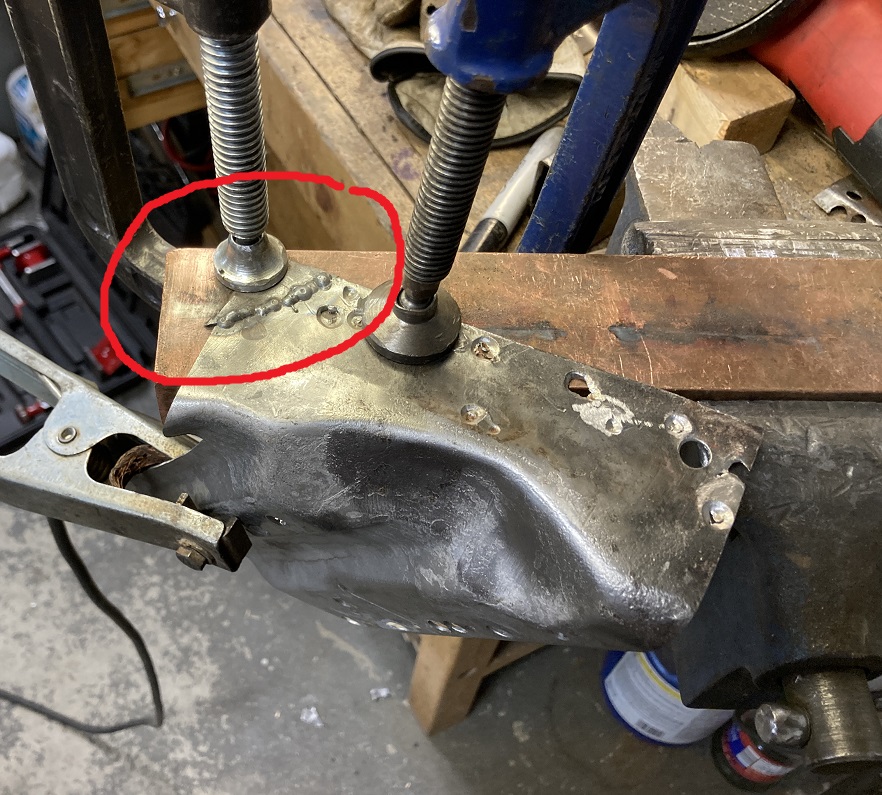 That little section is now completed, ready to later be welded on the car. 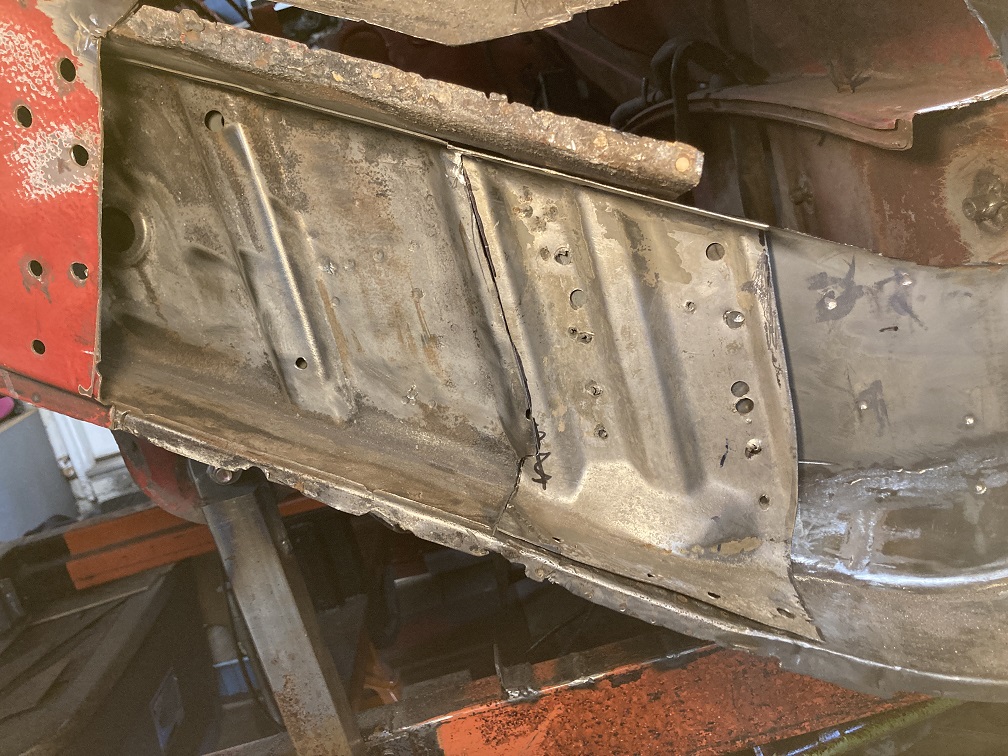 And with similar fitting work, check, trim, fit, check, sand, fit, rinse, repeat, the second piece is also test fitted to the car. My fingers are pointing at the two joint lines. Missing is still a front section that includes the seat belt anchor point. This section needs to be made from scratch and will be described in the next post. (IMG:style_emoticons/default/smile.gif) 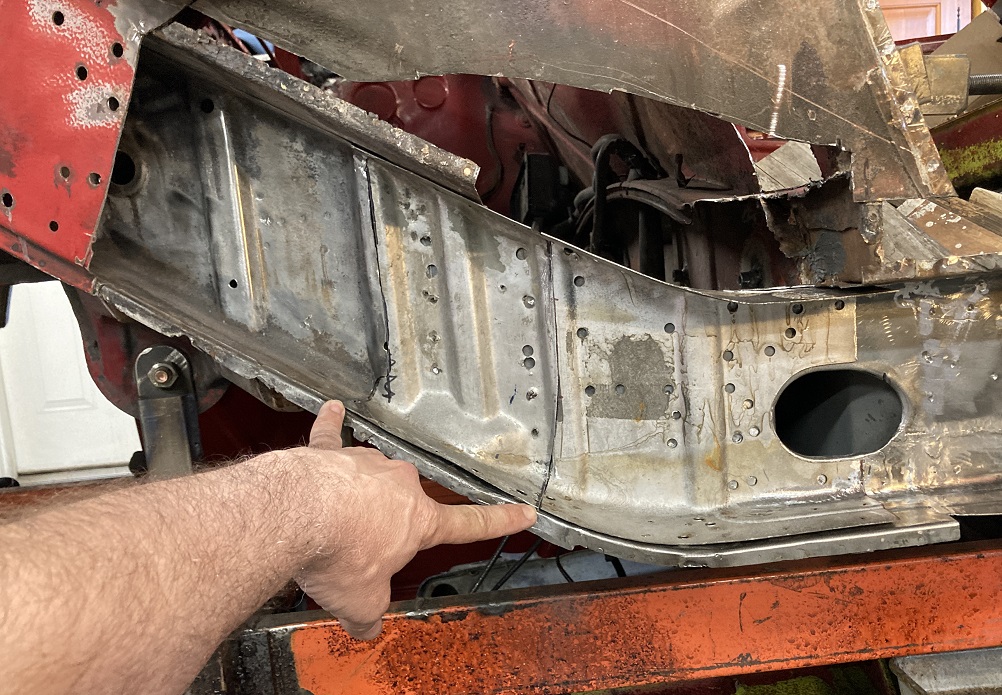 |
|
|
|
| Montreal914 |
May 17 2026, 08:05 PM
Post
#231
|
|
Advanced Member Group: Members Posts: 2,107 Joined: 8-August 10 From: Claremont, CA Member No.: 12,023 Region Association: Southern California |
And here is how I fabricated the front part of the inner layer.
Having recently acquired a used hydraulic press I used it to create the step bend that we see on the lower part of the long "C" shaped section. After cutting a 12"x12" piece of 18ga. from my sheet stock, I set it in my press with a couple of strips so that once all pressed, the 12x12 piece would have a step bend. Here is the setup. Arrow is pointing to the step bend. 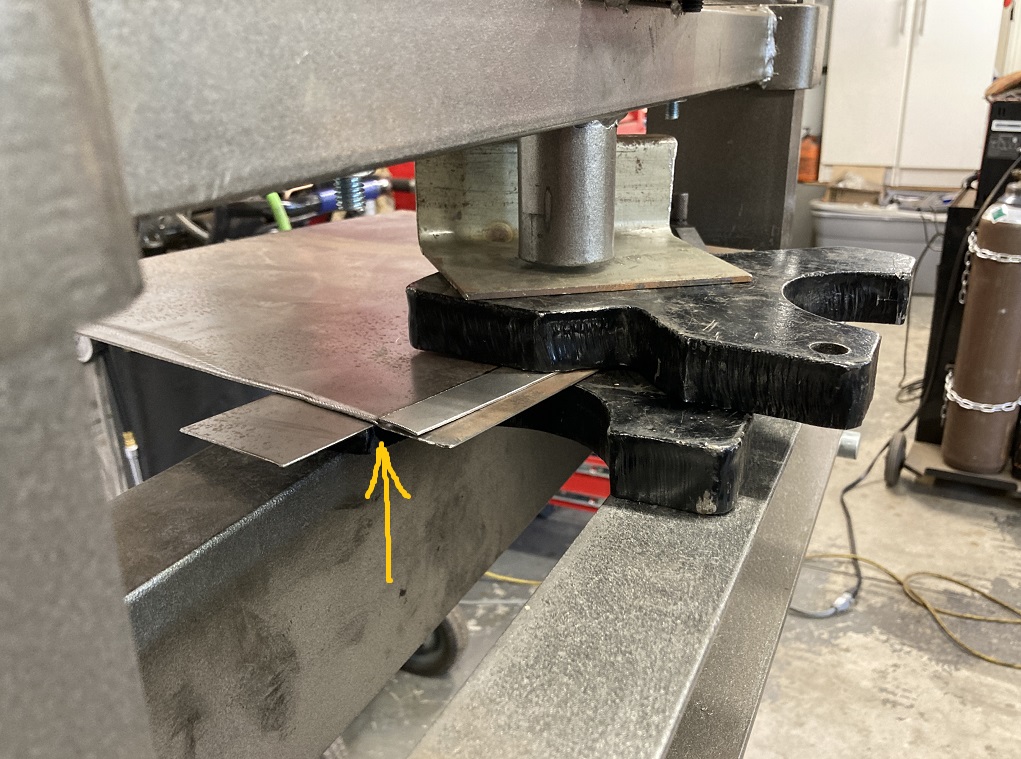 And here is the step once removed from the press. This turned out to be really easy to do and got me motivated in reproducing the rest of the piece. (IMG:style_emoticons/default/smash.gif) 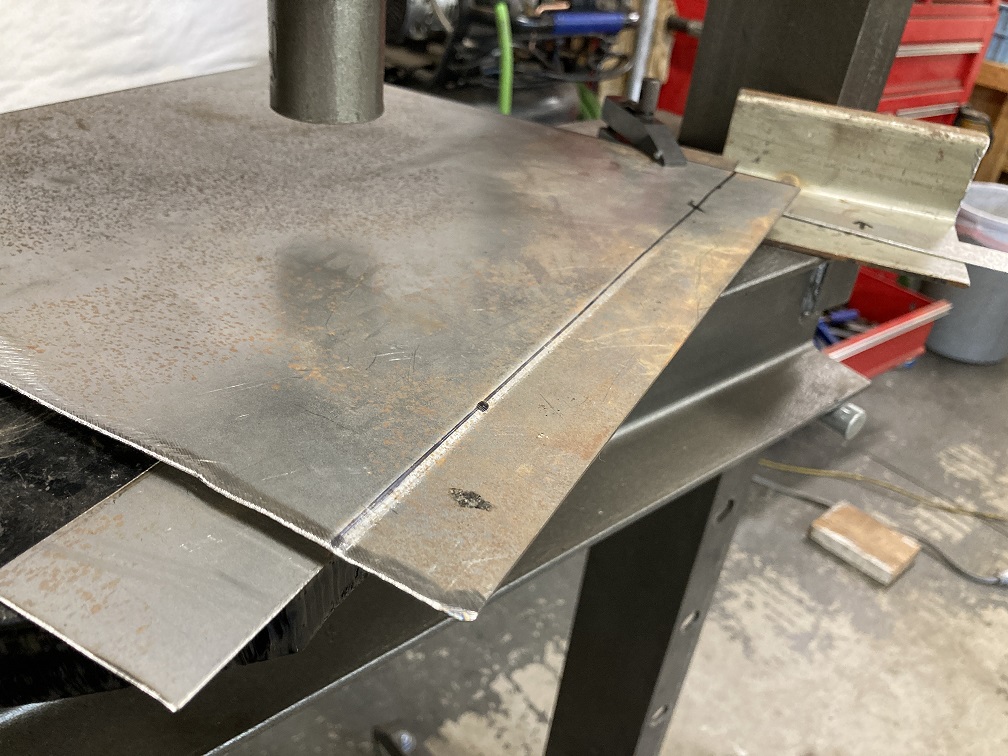 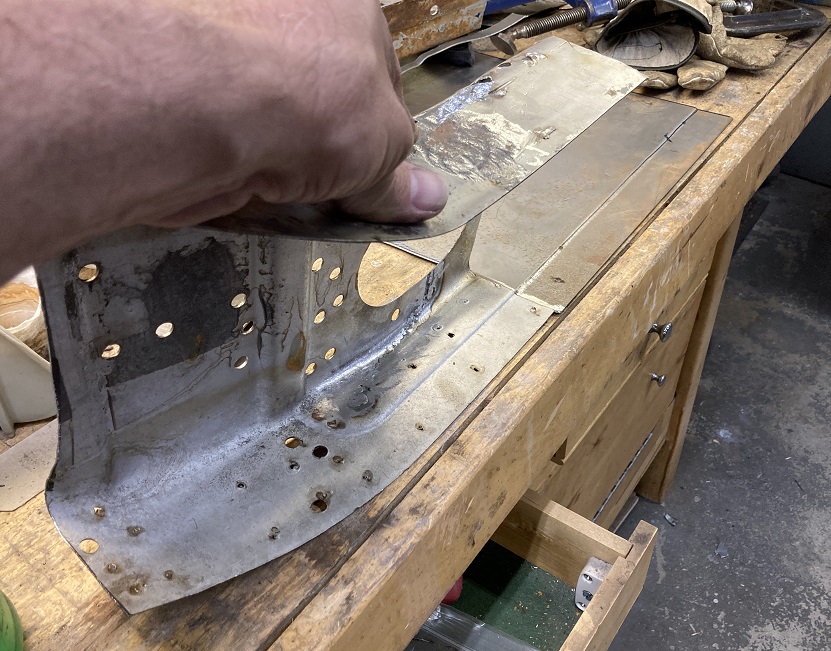 Next comes the lower 90 degree bend. The lower inside radius happens to be very close to 1/4" so a 1/2" round bar will be perfect to wrap the flat sheet around and make the bend. Here we can see the fit of the 1/2 rod on the original part. 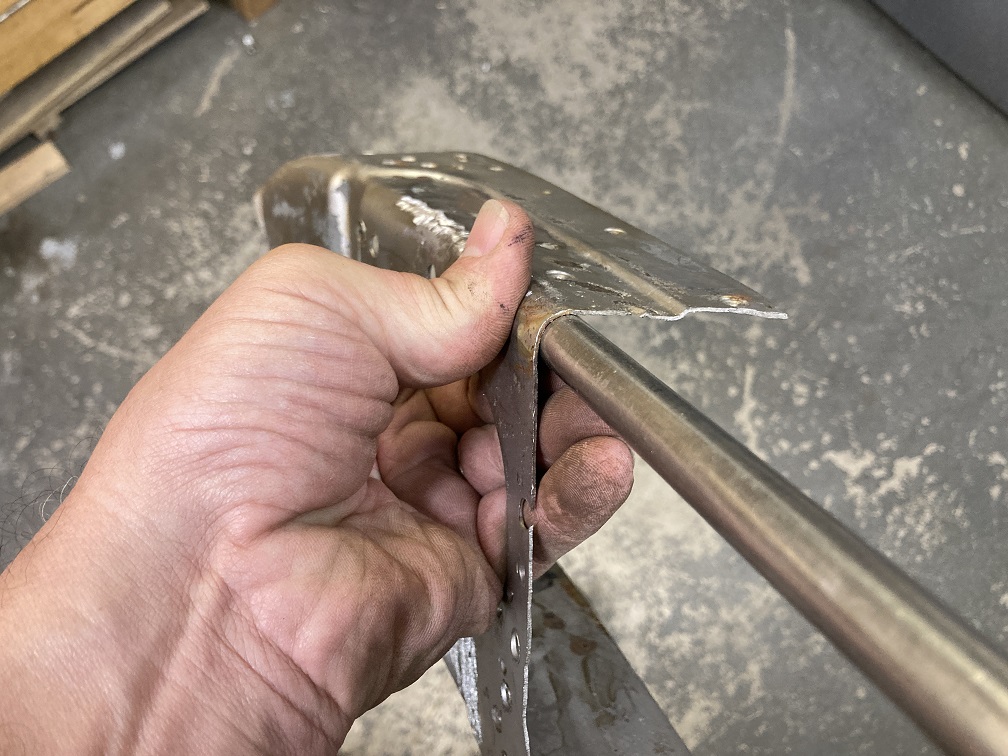 I tack welded the ends of the rod to the sheet so the rod would stay in its location, then I clamped it in my Craftsman work table. Using a 2x4, I folded the sheet metal around the rod to 90 degrees.  The part is starting to take shape! 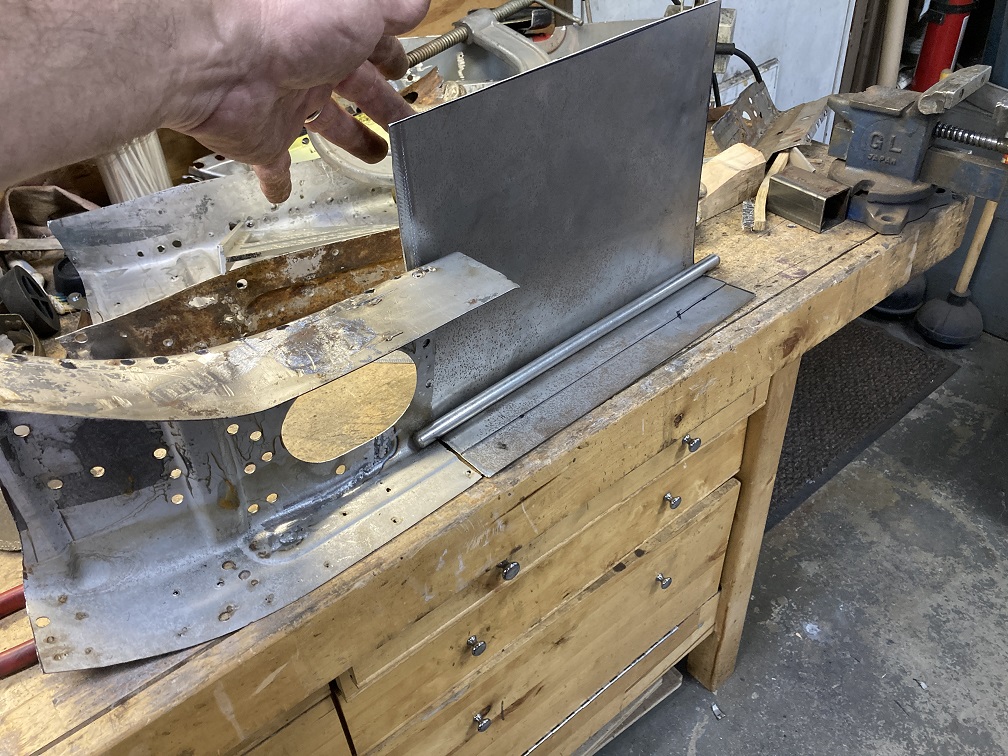 Next, I needed to do the same thing for the upper bend. Although similar at first glance, the upper radius is actually larger. Fortunately, I had a piece of 3/4" thick wall tube laying around that was pretty close. (IMG:style_emoticons/default/smile.gif) Same story, here we see the fit on the original part.  With the ends tacked on the part and ready to clamp in my Workmate. 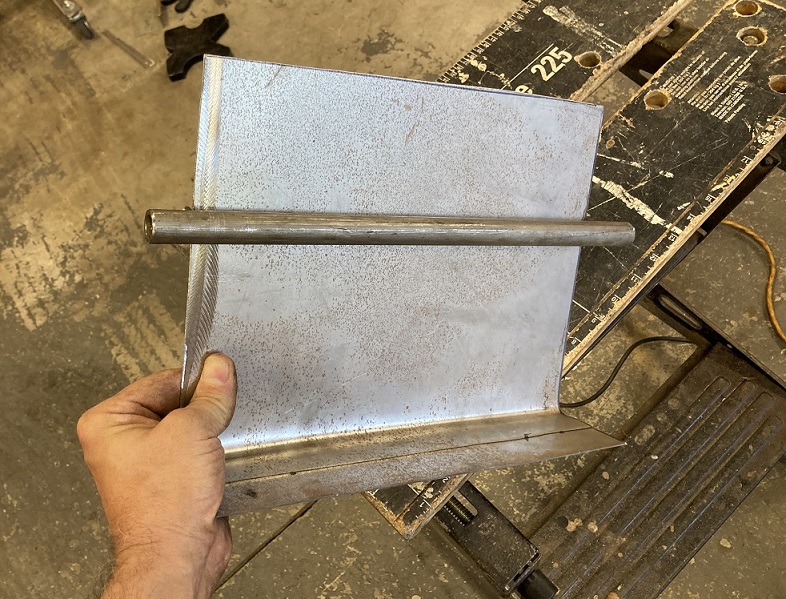 Here is the result part way to 90 degrees. I manualy got to this point and stopped. Arrow points at a good view of the steb bend done first. 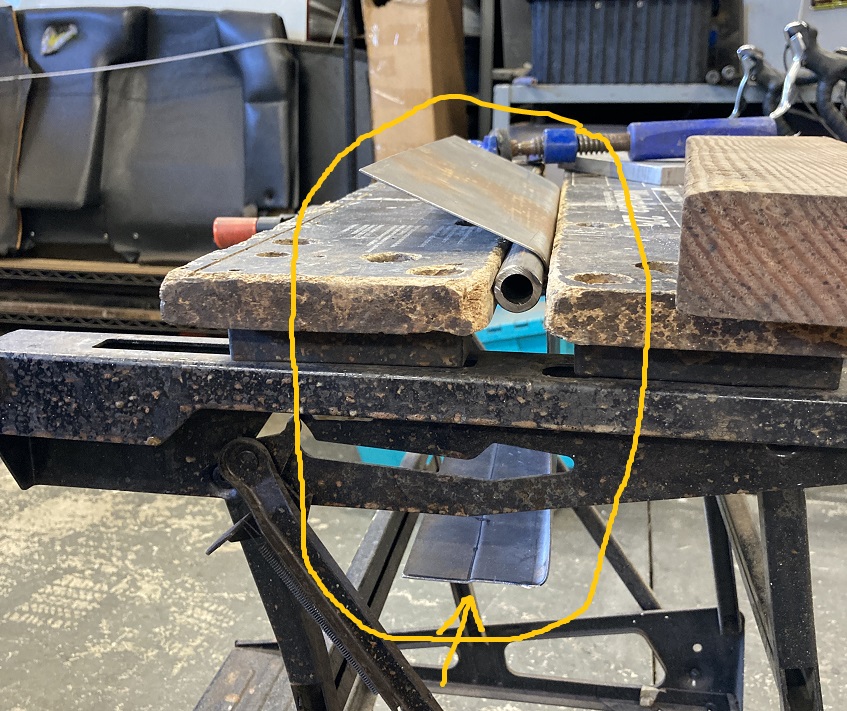 I decided to finish the last step with the press to ensure the sheet would nicely conform to the tube. Setup below. The tube is supported by the cross 2x4 and the vertical section of the piece is C-clamped to the back press cross member. 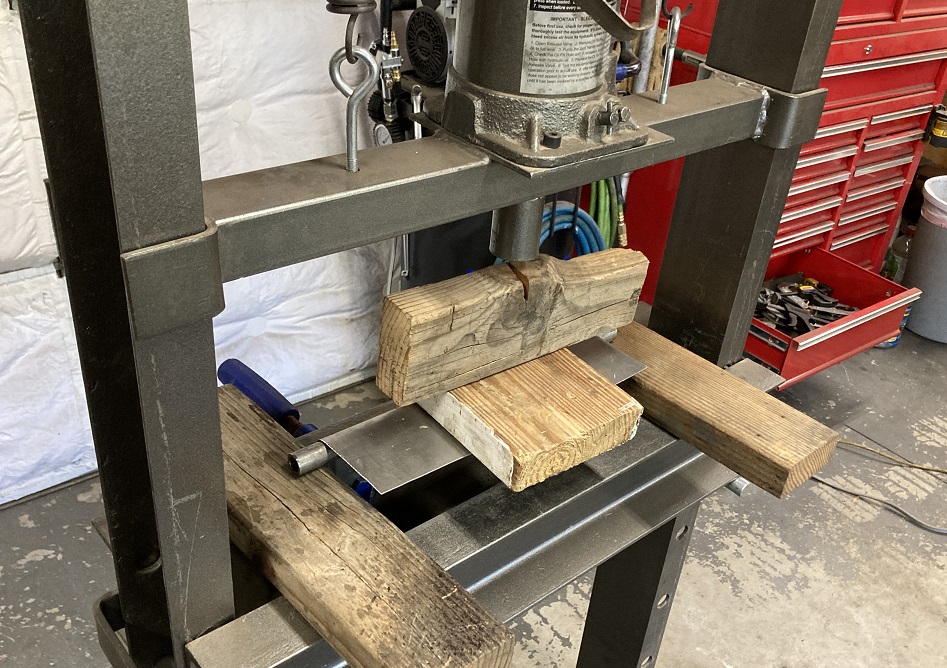 And the second bend is done. 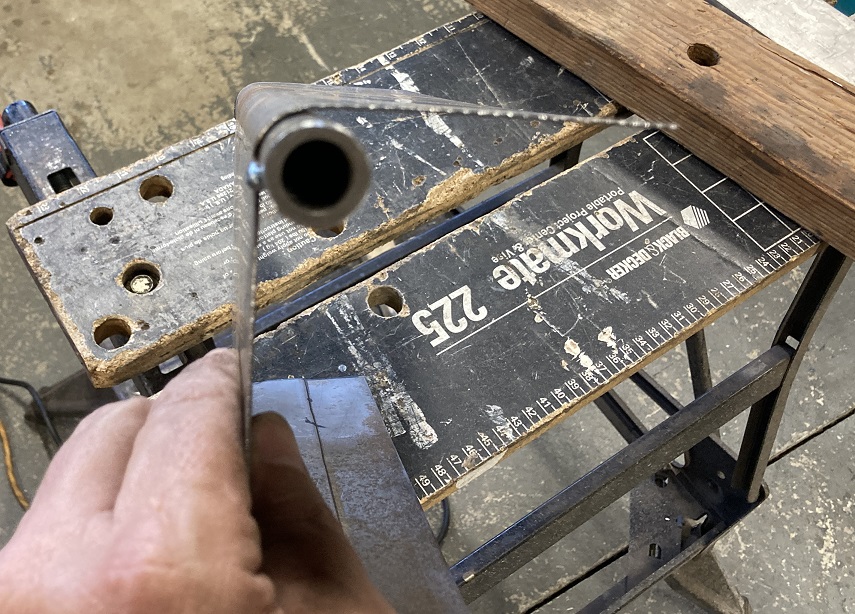 Let's see how it fits is the long. 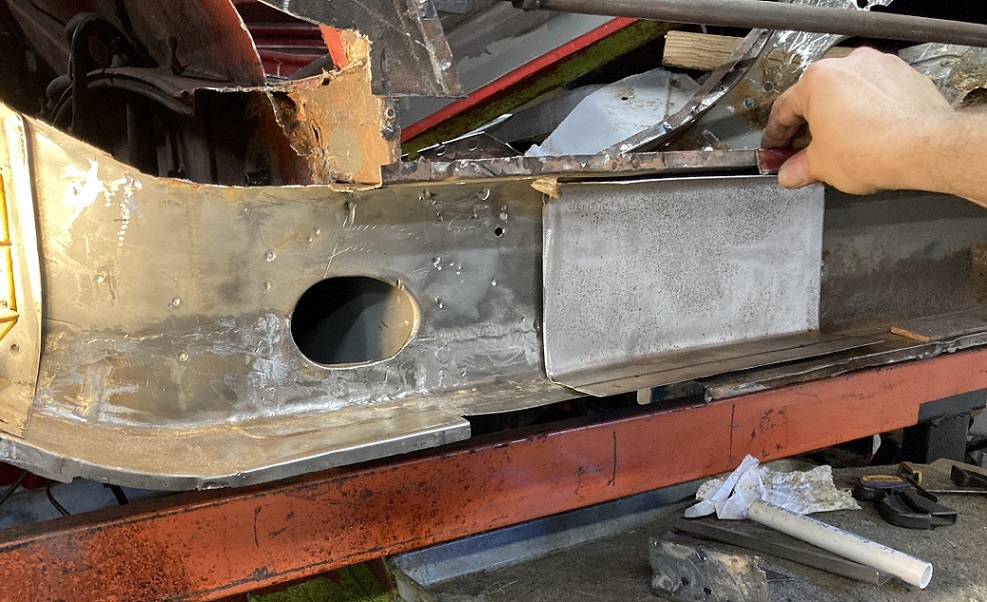 Next, I created the various required openings and welded the safety belt anchor. 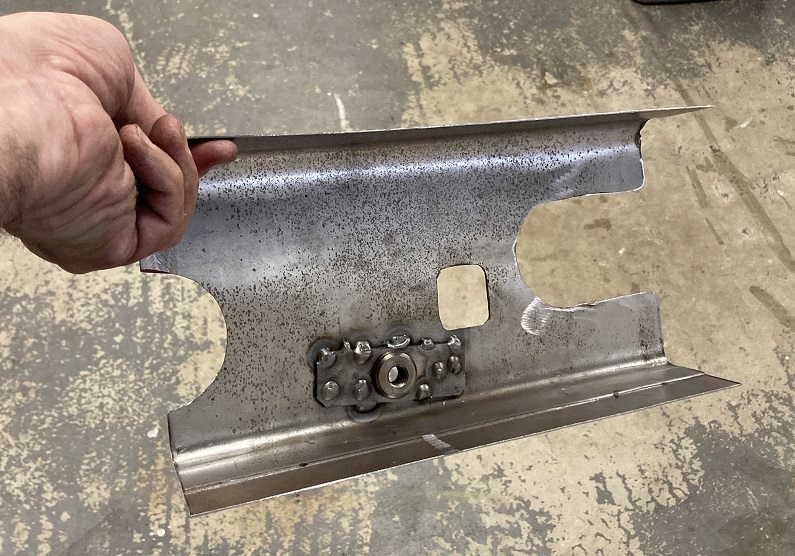 And here is the final fitting result. This piece normally doesn't extend this far forward but I wanted to reinforce this area so the stiffening will be carried forward with the inner kit that will be installed later. 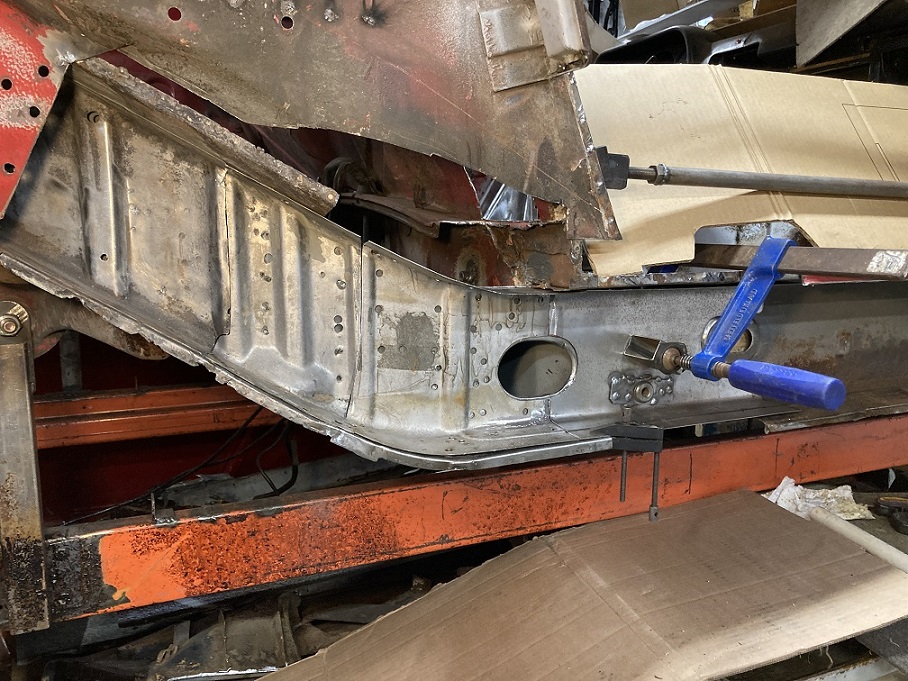 I am pleased with the fit and overall shape match of this repair section piece. None of the three pieces presented in the two posts are welded yet, they were simply prepared and fitted at this point. 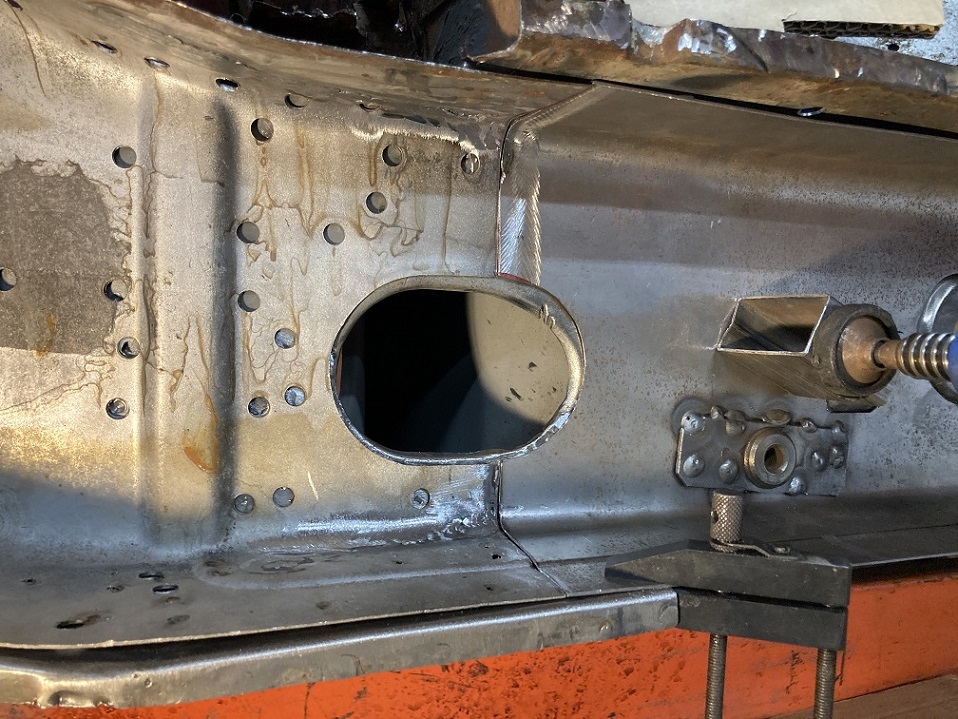 More repair steps planning are needed before moving forward. Among them, the top piece to repair the hell hole will need to be manually shaped, which is upcoming work. (IMG:style_emoticons/default/smash.gif) |
|
|
|
|
3 User(s) are reading this topic (3 Guests and 0 Anonymous Users)
0 Members:

|
Lo-Fi Version | Time is now: 18th May 2026 - 11:16 PM |
Invision Power Board
v9.1.4 © 2026 IPS, Inc.