|
|

|
Porsche, and the Porsche crest are registered trademarks of Dr. Ing. h.c. F. Porsche AG.
This site is not affiliated with Porsche in any way. Its only purpose is to provide an online forum for car enthusiasts. All other trademarks are property of their respective owners. |
|
|
  |
| 930cabman |
 Sep 27 2022, 11:59 AM Sep 27 2022, 11:59 AM
Post
#81
|
|
Advanced Member     Group: Members Posts: 4,501 Joined: 12-November 20 From: Buffalo Member No.: 24,877 Region Association: North East States 
|
Really nice work Eric. I agree with replacing the complete driver's rear quarter panel. The end result will be worth the additional work where it was cut short. Pretty soon all that rust and old damage will be a distant memory. (IMG:style_emoticons/default/beerchug.gif) (IMG:style_emoticons/default/agree.gif) Will give you the best odds of a long lasting good repair |
| Montreal914 |
 Sep 27 2022, 08:03 PM Sep 27 2022, 08:03 PM
Post
#82
|
|
Advanced Member     Group: Members Posts: 2,031 Joined: 8-August 10 From: Claremont, CA Member No.: 12,023 Region Association: Southern California 
|
All good inputs!! (IMG:style_emoticons/default/smilie_pokal.gif)
@nathanxnathan I have a drier outlet nearby not sure if this could work. But I have another option too (IMG:style_emoticons/default/biggrin.gif) , the shell is still a roller, even better, it is registered and insured, and to top it off, it has the tow bar bracket on and can be pulled by the family minivan. And yes the drive shafts have been removed and the stubs put back in to save the rear bearings. (IMG:style_emoticons/default/beer3.gif) (IMG:style_emoticons/default/sunglasses.gif) |
| nivekdodge |
 Sep 27 2022, 08:18 PM Sep 27 2022, 08:18 PM
Post
#83
|
|
Member   Group: Members Posts: 330 Joined: 28-August 21 From: Pittsburgh Pa Member No.: 25,860 Region Association: MidAtlantic Region 
|
Eric
I meant in the gap beside the trunk lid. I would leave the bottom of the original and add the replacement to it as much as I could Kevin OOps loooking now you dont have the bottom |
| nathanxnathan |
 Sep 28 2022, 11:31 PM Sep 28 2022, 11:31 PM
Post
#84
|
|
Member   Group: Members Posts: 294 Joined: 16-February 18 From: Laguna Beach, CA Member No.: 21,899 Region Association: Southern California |
All good inputs!! (IMG:style_emoticons/default/smilie_pokal.gif) @nathanxnathan I have a drier outlet nearby not sure if this could work. But I have another option too (IMG:style_emoticons/default/biggrin.gif) , the shell is still a roller, even better, it is registered and insured, and to top it off, it has the tow bar bracket on and can be pulled by the family minivan. And yes the drive shafts have been removed and the stubs put back in to save the rear bearings. (IMG:style_emoticons/default/beer3.gif) (IMG:style_emoticons/default/sunglasses.gif) The drier outlet probably isn't the best option as they're rated at 15 amp. The spot welder only has 1 setting. Each weld only takes about a second, but it's fully onm, and may trip the breaker... That seems like a good option, if you can get it here for the day/a few hours. I can totally make space right in front of my studio as my project is mobile now on the rotisserie/dolly. Depending on how together it is when you bring it, it might be pretty quick — spot welding is really nice that way. Let me know if you need help with anything. I have a pretty decent number of c-clamps, which this sort of stuff always needs. I would use 3m weld-through primer on both sides for the spot welding. You'll want to look into what others have used to do the seal which is at the base of the sail panel. The fenders I have taken off it is a foam seal — which seems pretty bad like it would trap water. Is there some better, like rubber/adhesive option? I was thinking maybe 3M NVH Dampening Material? — it's an adhesive gap filler that is often recommended to bond like hood and door skins to their frames. I was thinking about what I said, about the top of the targa being the only area you can't spot weld. This is I think true. I was thinking though about how the factory attached the front/lower of the inner/door jamb to the sill panel. They actually braze it, like with a torch and bronze there. I guess capillary action allows the bronze to flow between the 2 layers which overlap quite a bit. I don't have an oxy acetylene torch unfortunately, and I've never done it. I guess we could spot weld there as well. Maybe someone else has input on joining that area. maybe I'm overthinking it? |
| Montreal914 |
 Sep 29 2022, 06:53 PM Sep 29 2022, 06:53 PM
Post
#85
|
|
Advanced Member     Group: Members Posts: 2,031 Joined: 8-August 10 From: Claremont, CA Member No.: 12,023 Region Association: Southern California 
|
I would probably attach the fender using a few self tapping screws. Yes the surfaces would be weld through primed.
Jamb, I was simply thinking of mig welding it. Spot weld will not be an option as I have a Brad Meyer panel that will not allow to reach the actual back side of the sill where the jamb comes tangent to it. As for the base of the sail panel, everywhere Karmann sprayed on or applied any kind of goop, rust tends to be there. I am not sure I would even want to seal the sail area. Sealing also means trapping moisture that could make it though. This car will be in SoCal and rarely seeing the rain. (IMG:style_emoticons/default/idea.gif) I really appreciate your help, and feel more comfortable in bringing the car to your known working environment vs running into issues at my house. (IMG:style_emoticons/default/smash.gif) I will keep you posted with my progress. This should still take a few weeks, I work slow... (IMG:style_emoticons/default/rolleyes.gif) |
| nivekdodge |
 Nov 8 2022, 08:16 PM Nov 8 2022, 08:16 PM
Post
#86
|
|
Member   Group: Members Posts: 330 Joined: 28-August 21 From: Pittsburgh Pa Member No.: 25,860 Region Association: MidAtlantic Region 
|
I removed the tubes and almost welded the holes up solid. Hopefully no one closes the doors together.
|
| Montreal914 |
 Dec 4 2022, 12:45 PM Dec 4 2022, 12:45 PM
Post
#87
|
|
Advanced Member     Group: Members Posts: 2,031 Joined: 8-August 10 From: Claremont, CA Member No.: 12,023 Region Association: Southern California 
|
OK, time for some update. The current work is focused on preparing the donor fender to make it whole again before removing the damaged one from the car.
A couple of areas will need attention. The first one I have been working on is the gutter area where the trunk seal lives. As shown before, unfortunately that area was removed during the fender's salvage yard days. I actually hesitated a week before getting this fender but the rest of its condition made me get it and deal with this down the road. 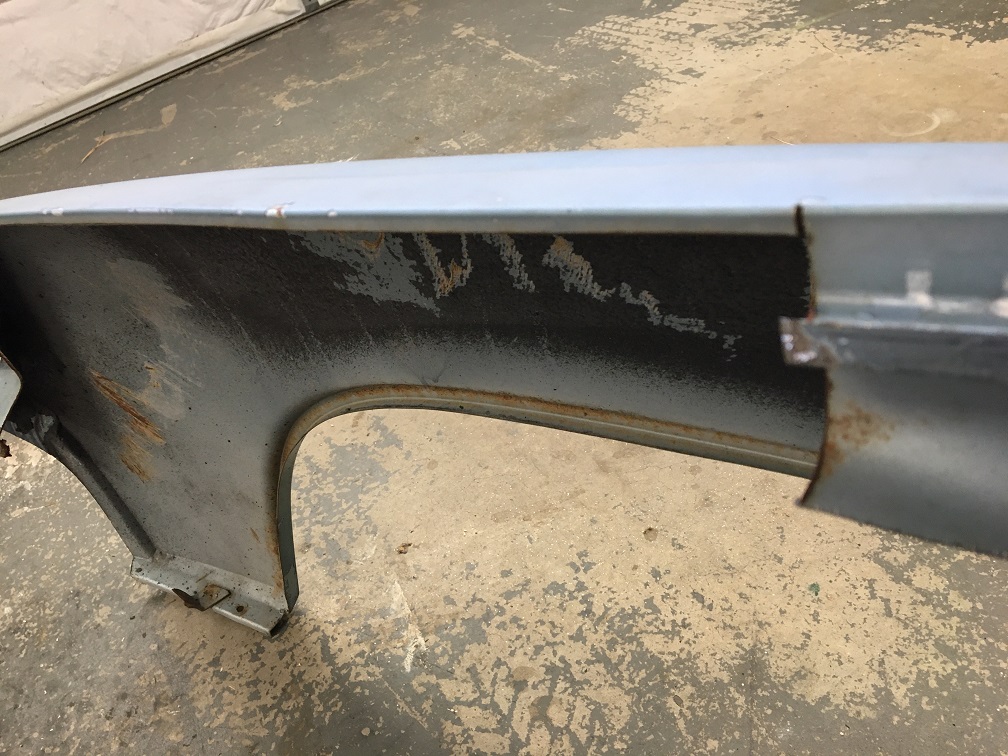 Using the yellow rear fender portion I have, I first removed the gutter section by cutting near the bend of the exterior surface so I can line the yellow piece over the new (old) fender. 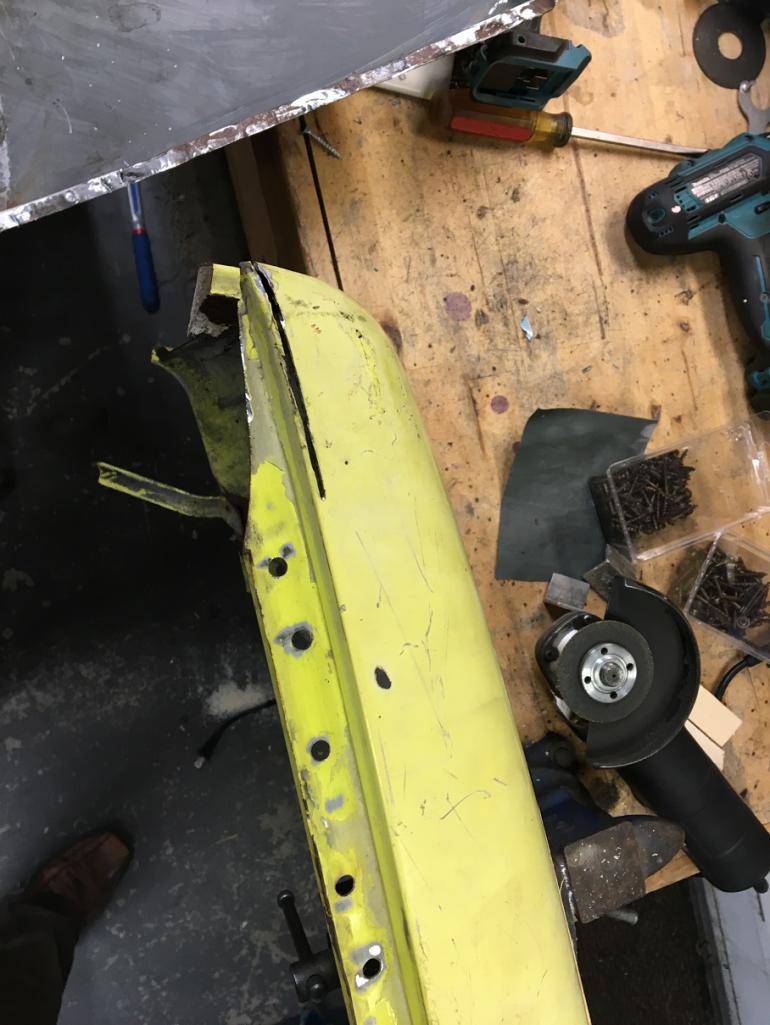 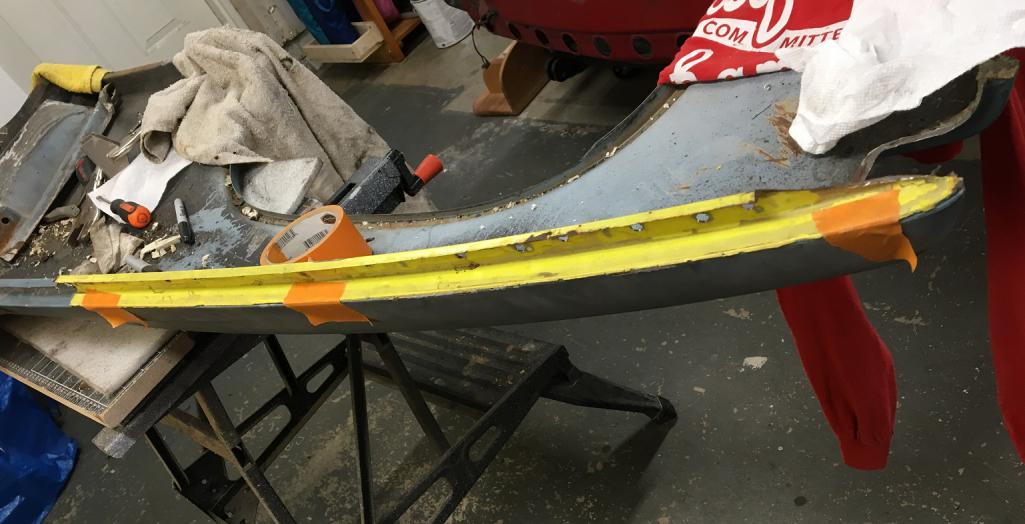 With both parts nicely lining up, I was able to trace on the yellow piece where it should be trimmed. 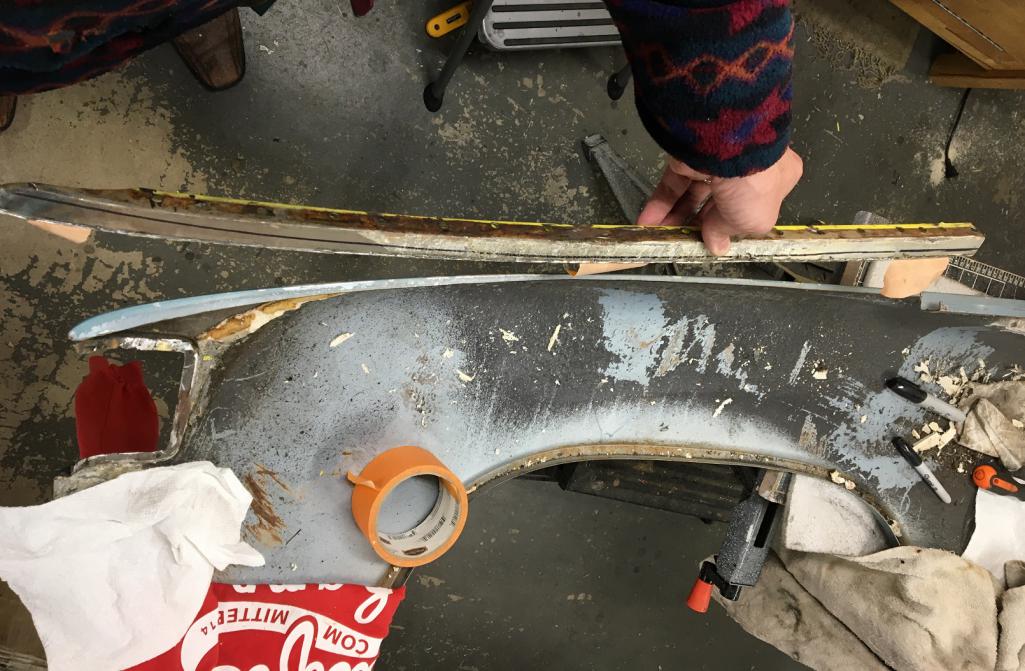 But before trimming it, I decided to plug the holes I had previously drilled out when preparing this fender section as one of my potential option for this whole fender repair. That was before @nathanxnathan 's very kind offer of using his spot welder (IMG:style_emoticons/default/beerchug.gif) for the installation. I had originally planned on plug welding the repair sheet metal in place. So now I need to plug all these holes back! (IMG:style_emoticons/default/lol-2.gif) (IMG:style_emoticons/default/rolleyes.gif) 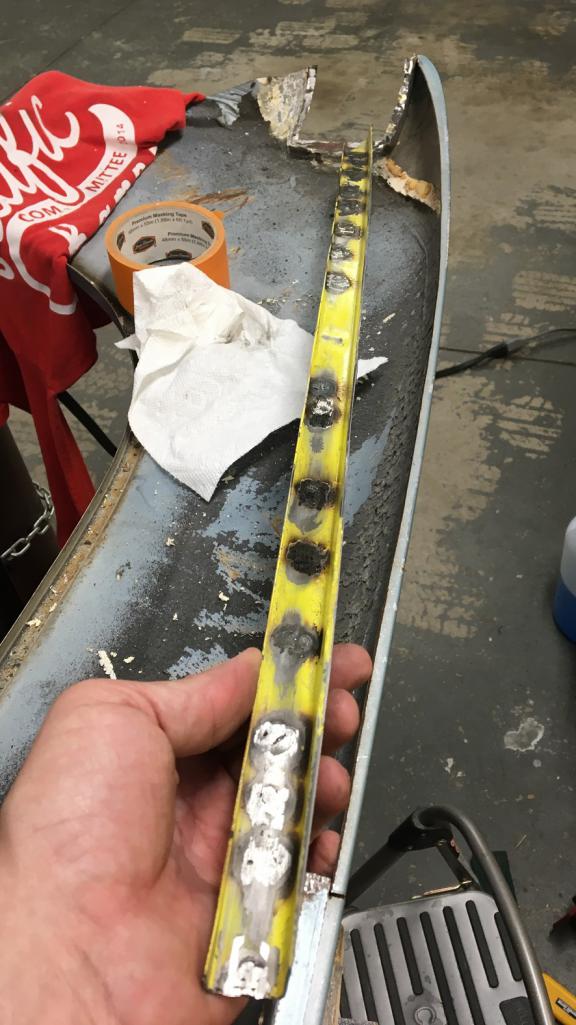 After trimming and removing the paint for welding. I positioned the piece using magnets. 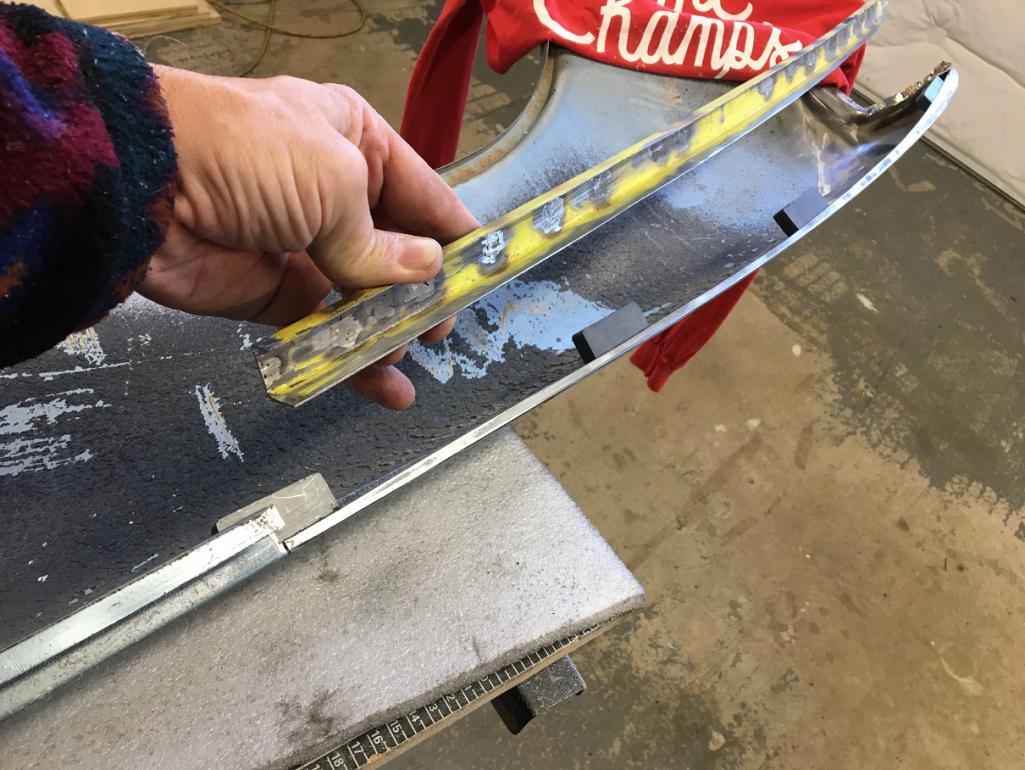 Measuring on my car, I established the depth of the gutter at about 19.5mm, so before putting any tacks down, measure three times, and weld! (IMG:style_emoticons/default/welder.gif) 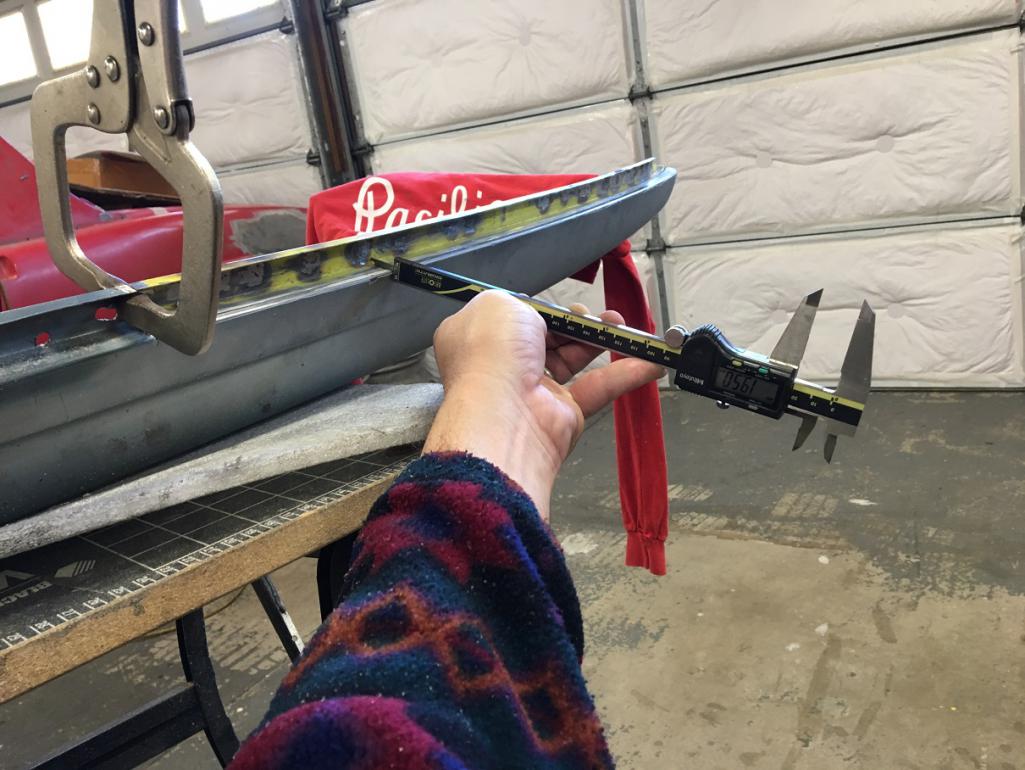 Current state of fabrication! (IMG:style_emoticons/default/smile.gif) 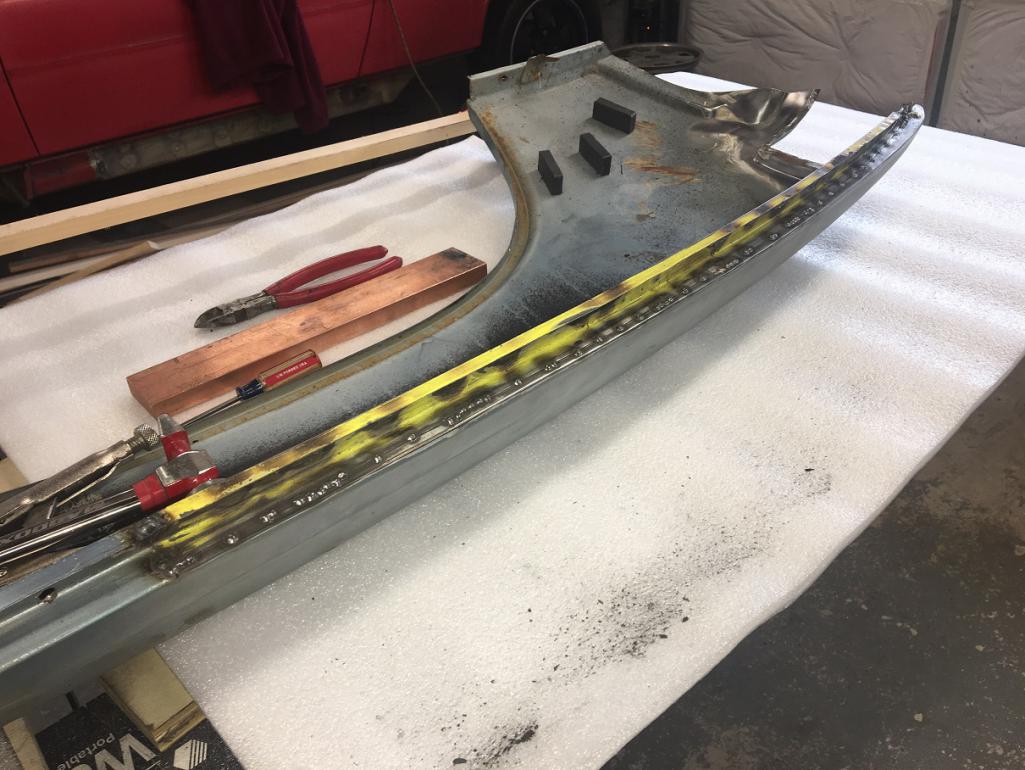 |
| Cairo94507 |
 Dec 4 2022, 03:48 PM Dec 4 2022, 03:48 PM
Post
#88
|
|
Michael           Group: Members Posts: 10,575 Joined: 1-November 08 From: Auburn, CA Member No.: 9,712 Region Association: Northern California 
|
Very nicely done. (IMG:style_emoticons/default/beerchug.gif)
|
| nathanxnathan |
 Dec 4 2022, 07:35 PM Dec 4 2022, 07:35 PM
Post
#89
|
|
Member   Group: Members Posts: 294 Joined: 16-February 18 From: Laguna Beach, CA Member No.: 21,899 Region Association: Southern California |
Lookin' good (IMG:style_emoticons/default/welder.gif) @Montreal914
|
| nivekdodge |
 Dec 4 2022, 09:04 PM Dec 4 2022, 09:04 PM
Post
#90
|
|
Member   Group: Members Posts: 330 Joined: 28-August 21 From: Pittsburgh Pa Member No.: 25,860 Region Association: MidAtlantic Region 
|
Yes it does, it looks great! make sure to clean and sand or even prime tha before you put it on
|
| Montreal914 |
 Dec 17 2022, 05:43 PM Dec 17 2022, 05:43 PM
Post
#91
|
|
Advanced Member     Group: Members Posts: 2,031 Joined: 8-August 10 From: Claremont, CA Member No.: 12,023 Region Association: Southern California 
|
I was able to continue the slow process of making one stitch at a time while cooling everything and moving around. Eventually, I closed all the gaps. (IMG:style_emoticons/default/smile.gif)
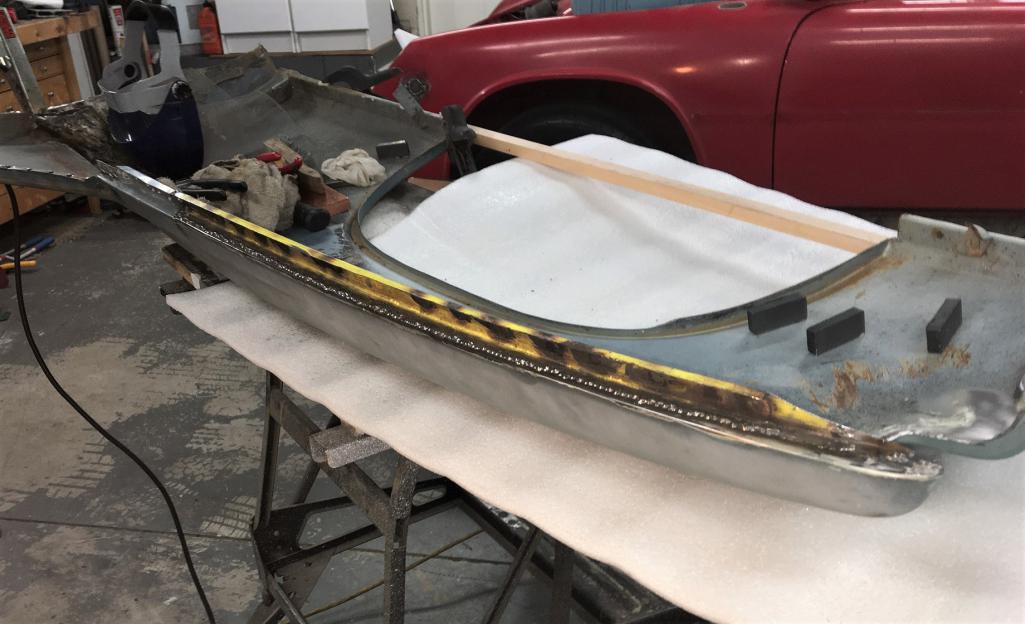 Then, time to grind down this long string, still trying to keep the metal cool with a wet towel stuffed in the back. Finally got to this. 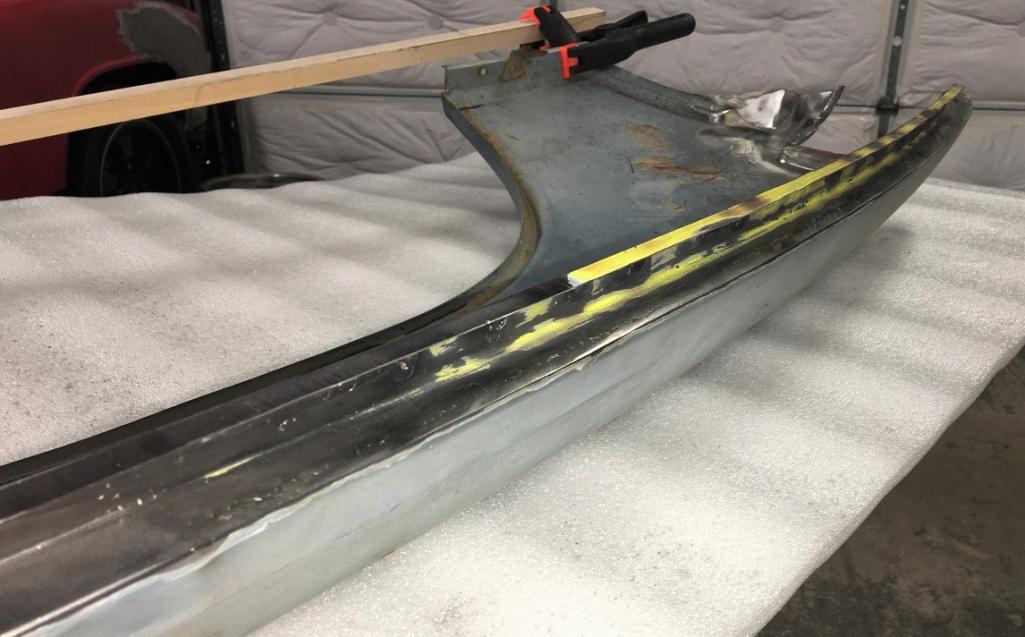 Another angle. 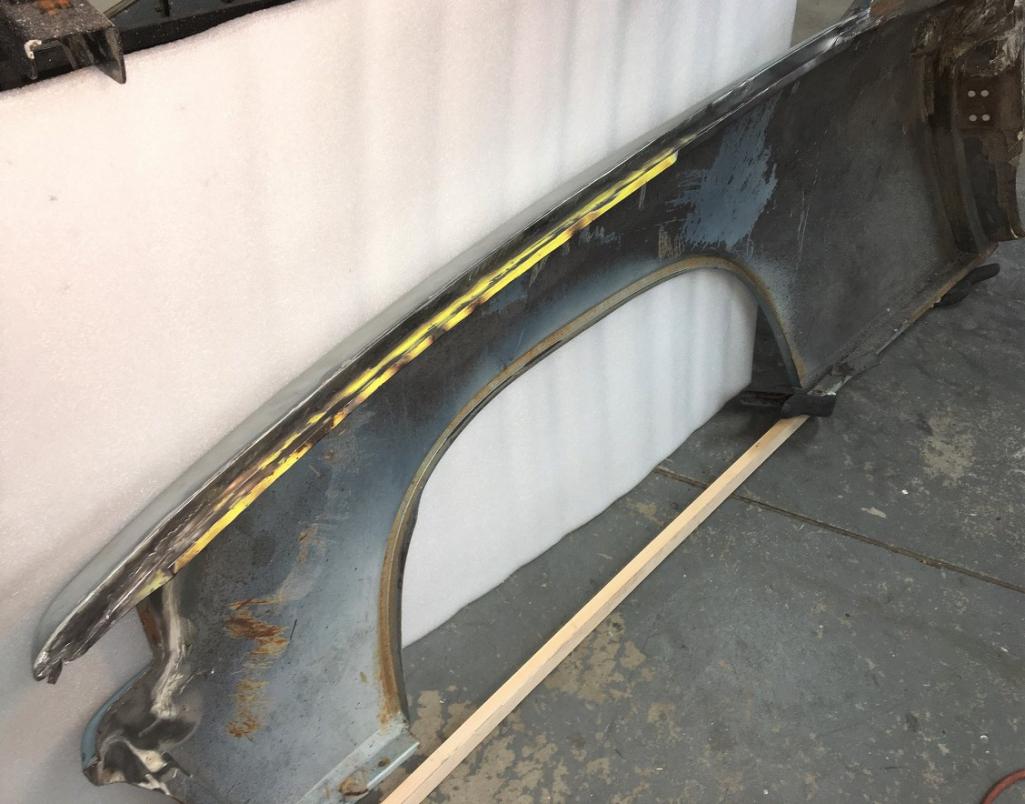 And just to make sure everyone understands... (IMG:style_emoticons/default/rolleyes.gif) 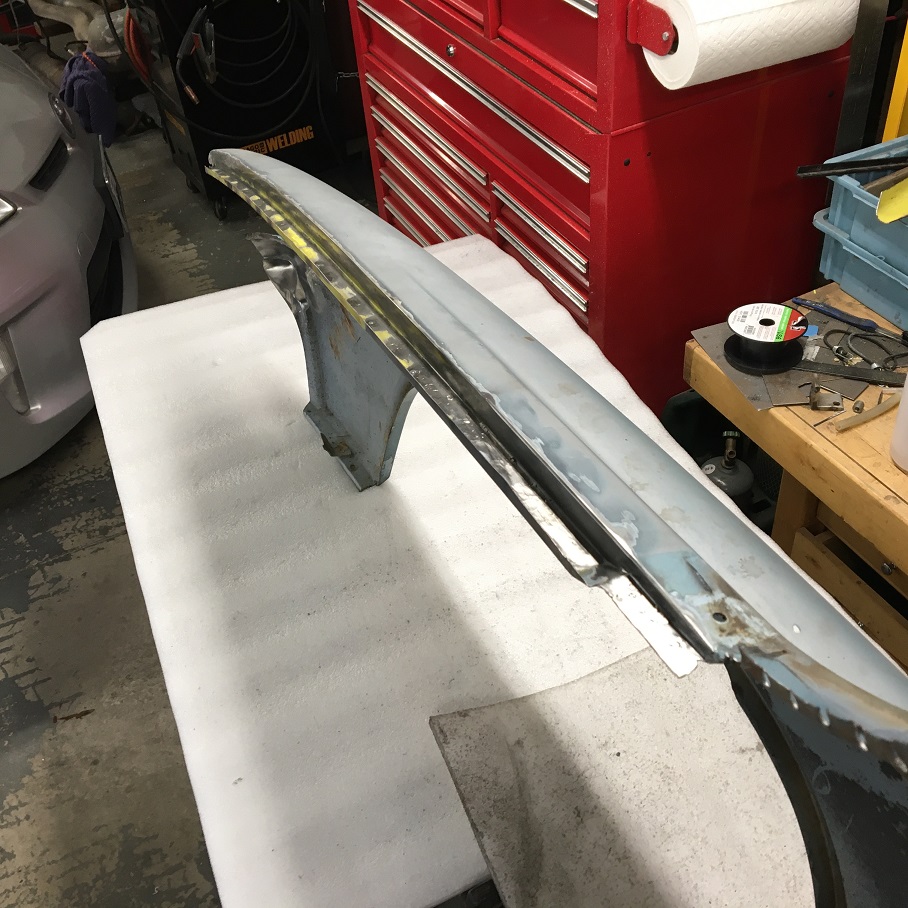 Needless to say that the fender is a lot stiffer now on its tail end. I think this area is pretty much done with metal work. (IMG:style_emoticons/default/cheer.gif) Now moving on to the other area needing attention before I can start thinking about installing this donor fender on my car. As shown before, the lower part of the door jamb was unfortunately cut where the fender mounts to the body. (IMG:style_emoticons/default/dry.gif) 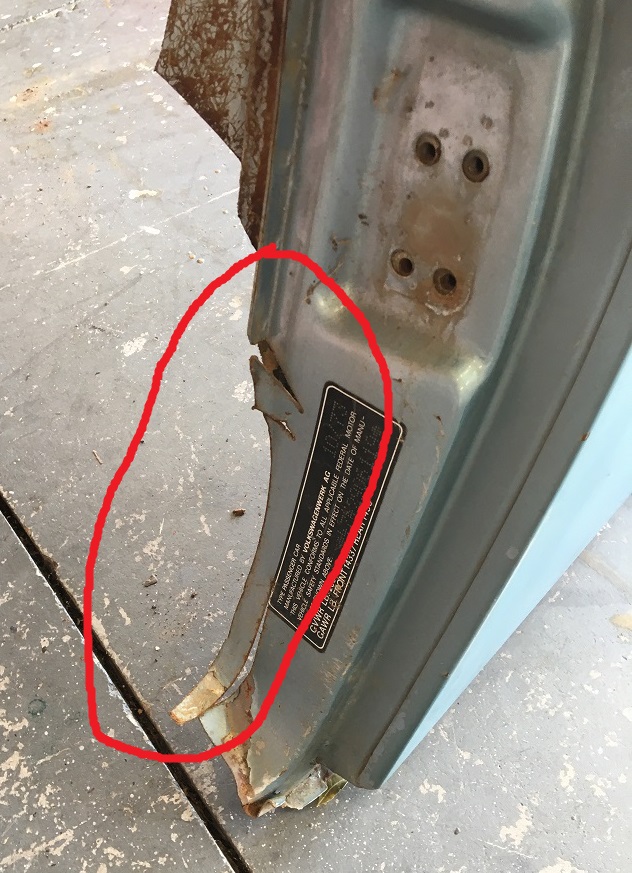 Luckily, when purchasing the fender, I was able to get this lower door jamb from another wreck. 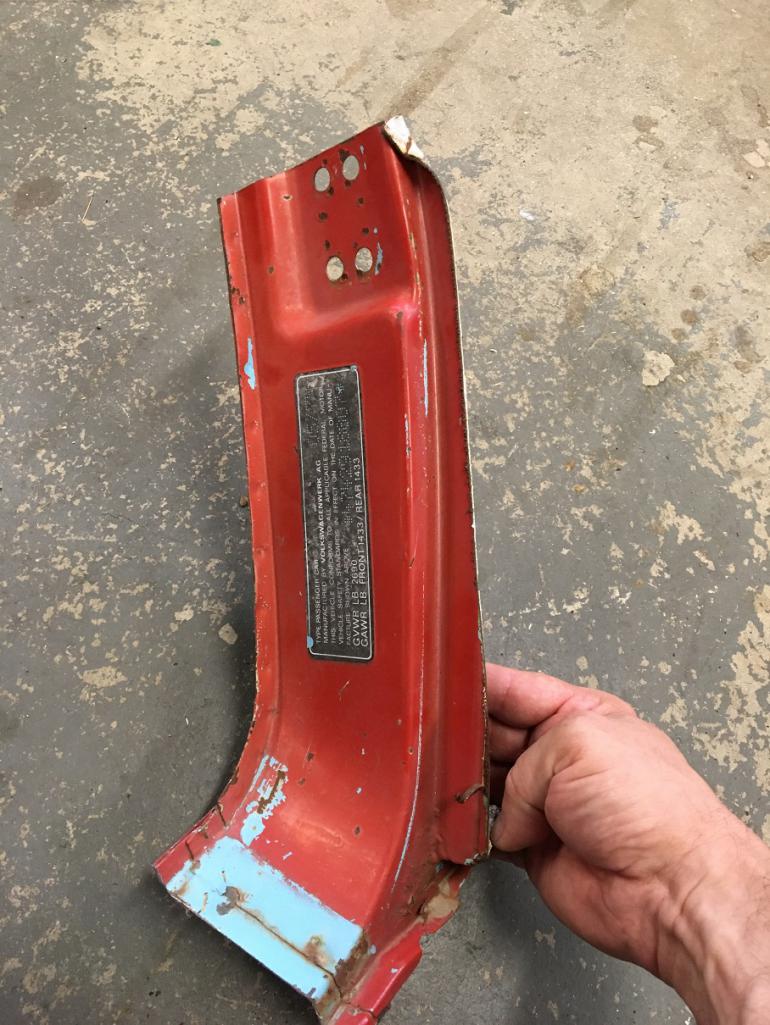 Time to remove the non-needed extra metal (IMG:style_emoticons/default/smash.gif) 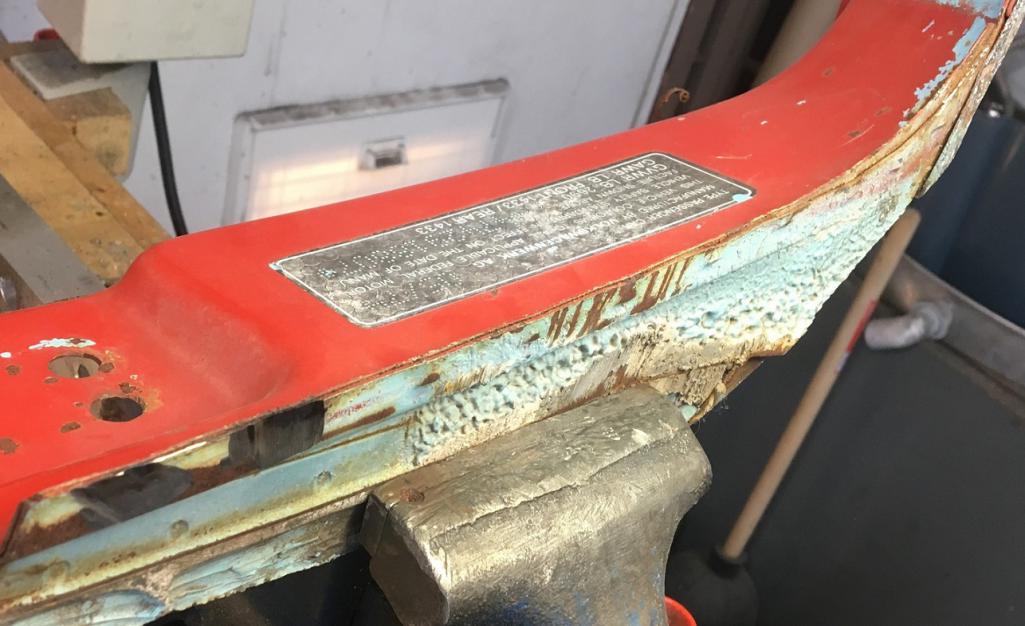 Now the part can be used. 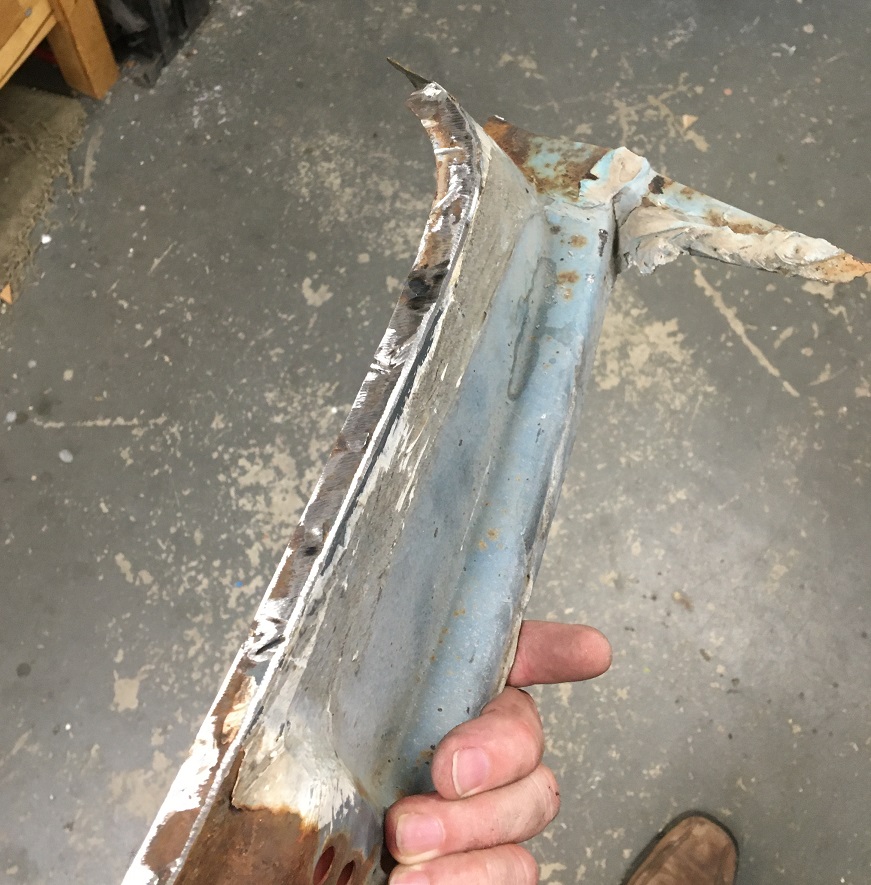 Here both the "new" door jamb area and the fender have been cut to be put together. The idea was to have a good portion of the jointed area to be hidden behind the VIN decal ( that I need to get...). You can also see the template I traced on the thin sheet of wood from the the car as a reference. When welding the repair piece in, the fender flange will lay flat on a 1/2" aluminum plate that is underneath. This part of the car being straight (vertical door jamb weld flange) makes that alignment portion easier when set on a flat plate. The gaps are a little larger than what I like them to be, but at this point, unfortunately, there is no going back. I will have to weld the two pieces like this, just a little more challenging for an beginner welder like myself (IMG:style_emoticons/default/headbang.gif) 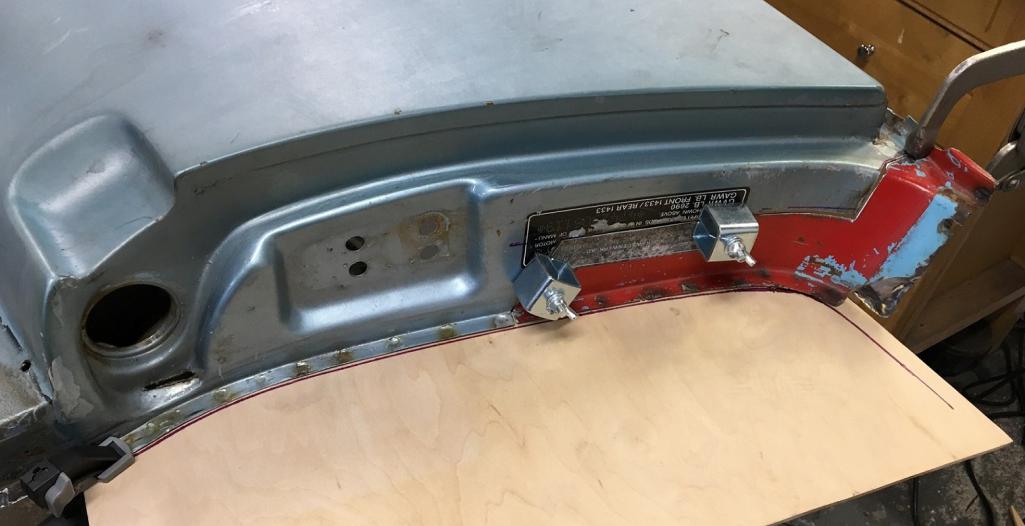 Second important view point, the lower curve. 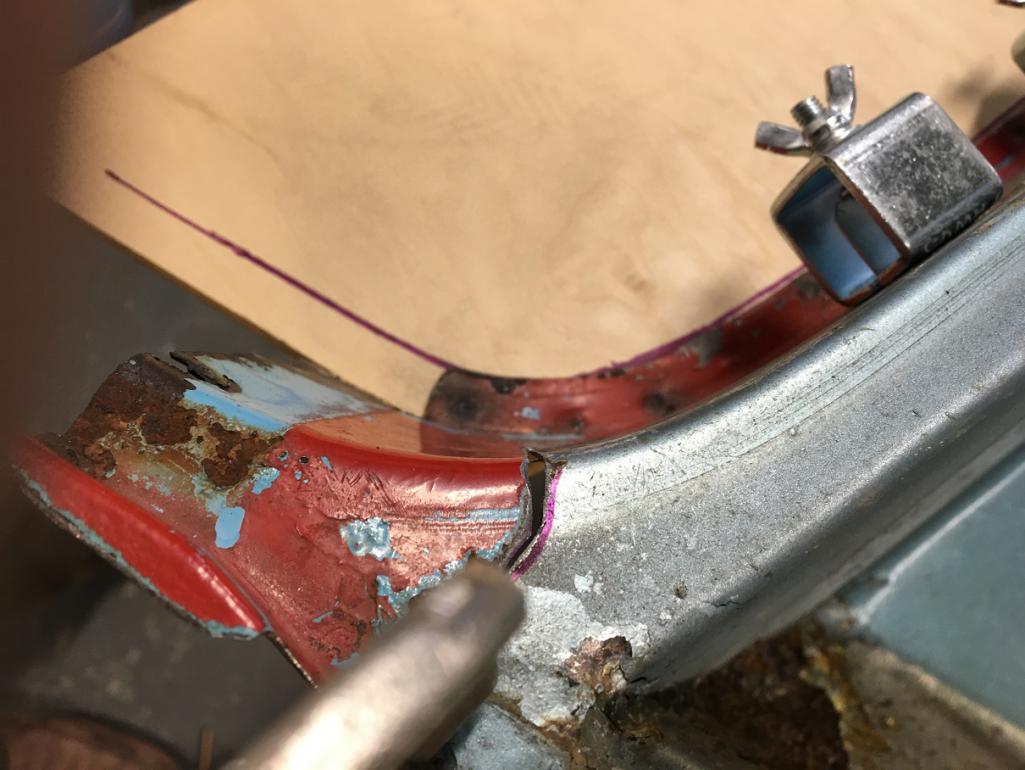 Looks like we are ready to go! (IMG:style_emoticons/default/smile.gif) (IMG:style_emoticons/default/welder.gif) And the result... (IMG:style_emoticons/default/wacko.gif) 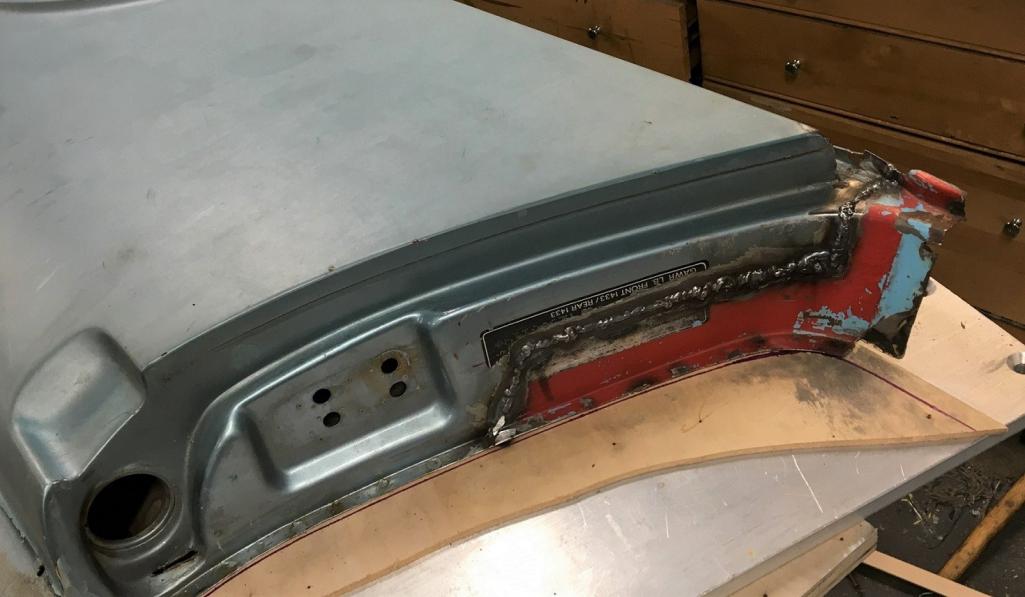 As they say, that'll buff out (IMG:style_emoticons/default/rolleyes.gif) . Well after grinding, I ended up with this. The jamb area did not give as good a result than the trunk seal fix, but overall I am happy. A few more areas to be looked at and it will be time to remove the car's original fender in preparation for the spot welding of this one! (IMG:style_emoticons/default/smile.gif) (IMG:style_emoticons/default/beer3.gif) 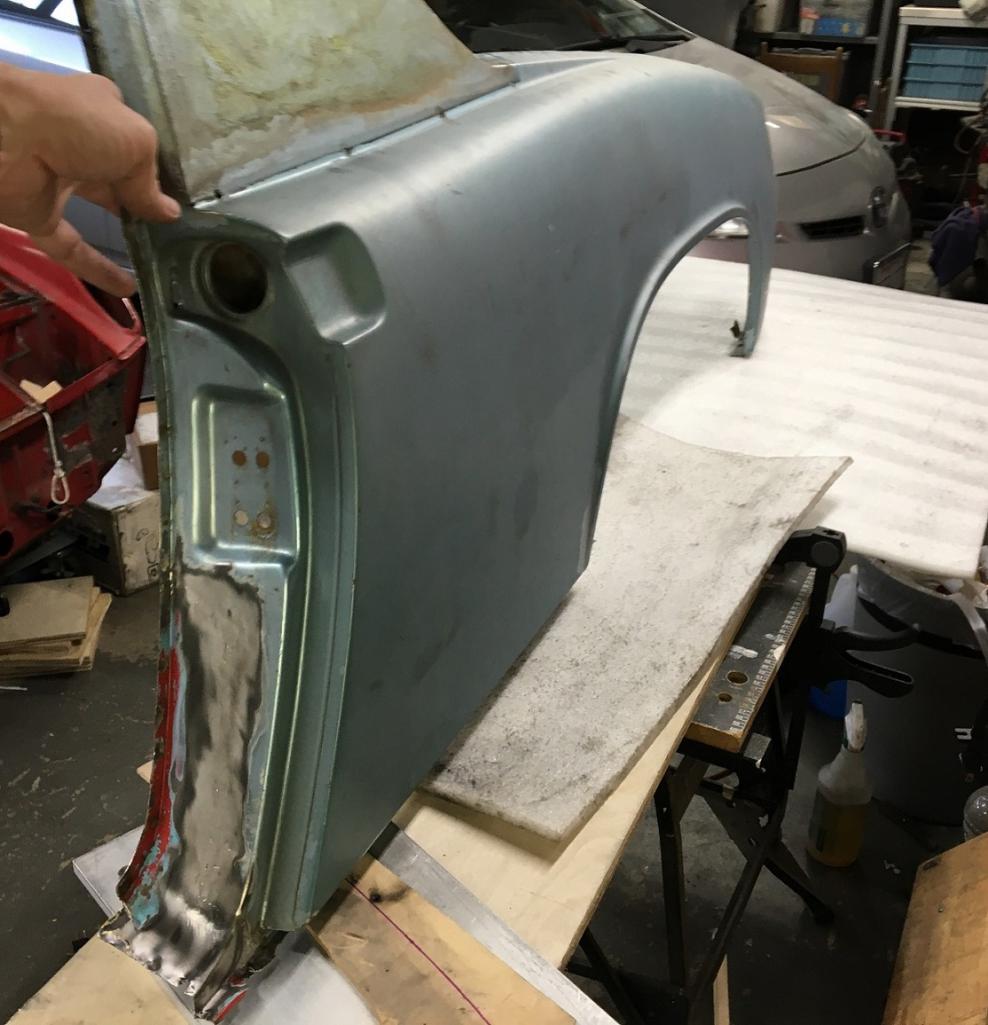 |
| nathanxnathan |
 Dec 18 2022, 02:39 AM Dec 18 2022, 02:39 AM
Post
#92
|
|
Member   Group: Members Posts: 294 Joined: 16-February 18 From: Laguna Beach, CA Member No.: 21,899 Region Association: Southern California |
Coming along nicely. (IMG:style_emoticons/default/smile.gif)
I'll have to take another look at the back of the trunk seal area to see how that ties in with the rear panel above the tail light. Other areas to think about... the bottom of the door jamb, how to tie that to the sill. The factory I think gas welded that joint with bronze, as there's an overlap of the 2 panels. The top of the sail panel where the flange goes I think under the top of the targa bar. Plug welding that seems like the best option. It's a tricky area because you can't back the weld. The other area to think about is the fresh air inlet. The ones I've seen, the factory mig welded the lip of the 2 layers. I've removed one, and was able to just grind off the lip/weld and carefully separate the tube inner from the flanged hole in the inner fender. What are your thoughts on prepping the inner fender before mounting it? Areas like behind the sail panels or the area where the foam is at the rear of the fender by the tail lights aren't going to be accessible once the fender is in. The factory I think there's just primer there. I've thought about this for my front cross panel project on my car. My thoughts are 3M Weld Thru Primer on both surfaces of the seams where it'll be spot or plug welded. ... tape off the flanges that will be welded, epoxy primer, then tape off and spray weld thru primer on just the flanges — seems like the best way. I'm not sure what others do? |
| Montreal914 |
 Dec 18 2022, 02:41 PM Dec 18 2022, 02:41 PM
Post
#93
|
|
Advanced Member     Group: Members Posts: 2,031 Joined: 8-August 10 From: Claremont, CA Member No.: 12,023 Region Association: Southern California 
|
@nathanxnathan Thank you!
My comments in italic in your post (IMG:style_emoticons/default/smile.gif) Coming along nicely. (IMG:style_emoticons/default/smile.gif) I'll have to take another look at the back of the trunk seal area to see how that ties in with the rear panel above the tail light. Yes, that will need further investigation. My donor fender insn't 100% complete on the rear end either and there will be some butt welds needed there. So overall the installation will be a composition of spot and butt welds. Other areas to think about... the bottom of the door jamb, how to tie that to the sill. The factory I think gas welded that joint with bronze, as there's an overlap of the 2 panels. I was thinking just weld and grind. This gets hidden by the aluminum door sill. The top of the sail panel where the flange goes I think under the top of the targa bar. Plug welding that seems like the best option. It's a tricky area because you can't back the weld. Yes, plug welding seems to be the only option as the fender flange does go under the Targa bar panel. I made sure I didn't drill through the donor fender when I prepped that area. On the car those spot welds are more of an elongated shape instead of round and they are at an angle (Pictures below). Not sure yet how I will proceed to remove that part. I might try to grind from underneath to leave the Targa piece exempt from holes. Then, planned holes could be done for the plug welds. The other area to think about is the fresh air inlet. The ones I've seen, the factory mig welded the lip of the 2 layers. I've removed one, and was able to just grind off the lip/weld and carefully separate the tube inner from the flanged hole in the inner fender. The donor fender came with all of this and I had to proceed in grinding the factory weld to clean it up. I plan on doing the same on the car when removing its fender. I didn't do the cleanest job (IMG:style_emoticons/default/rolleyes.gif) (pictures below) but it is done. Once the "new" fender is in, I will put a few tacks. What are your thoughts on prepping the inner fender before mounting it? Areas like behind the sail panels or the area where the foam is at the rear of the fender by the tail lights aren't going to be accessible once the fender is in. The factory I think there's just primer there. I've thought about this for my front cross panel project on my car. My thoughts are 3M Weld Thru Primer on both surfaces of the seams where it'll be spot or plug welded. ... tape off the flanges that will be welded, epoxy primer, then tape off and spray weld thru primer on just the flanges — seems like the best way. I'm not sure what others do? AHHH YES! That is a great question that I have been asking myself... (IMG:style_emoticons/default/wacko.gif) How to prep the inner fender. If I was to apply epoxy paint, it would have to be with a brush or roller. I don't have a compressor/gun and any experience in painting. For under the car, I have been considering using those truck bed liner product and roll it on. Could this be used for both the inner fender and the fender back side? (IMG:style_emoticons/default/confused24.gif) I have seen that some can be colored to match(!) the car color. A lot of questions to be answered on everything prep and paint related... (IMG:style_emoticons/default/unsure.gif) Here is the sail panel top flange when I was cleaning up the extra metal from the donor fender. 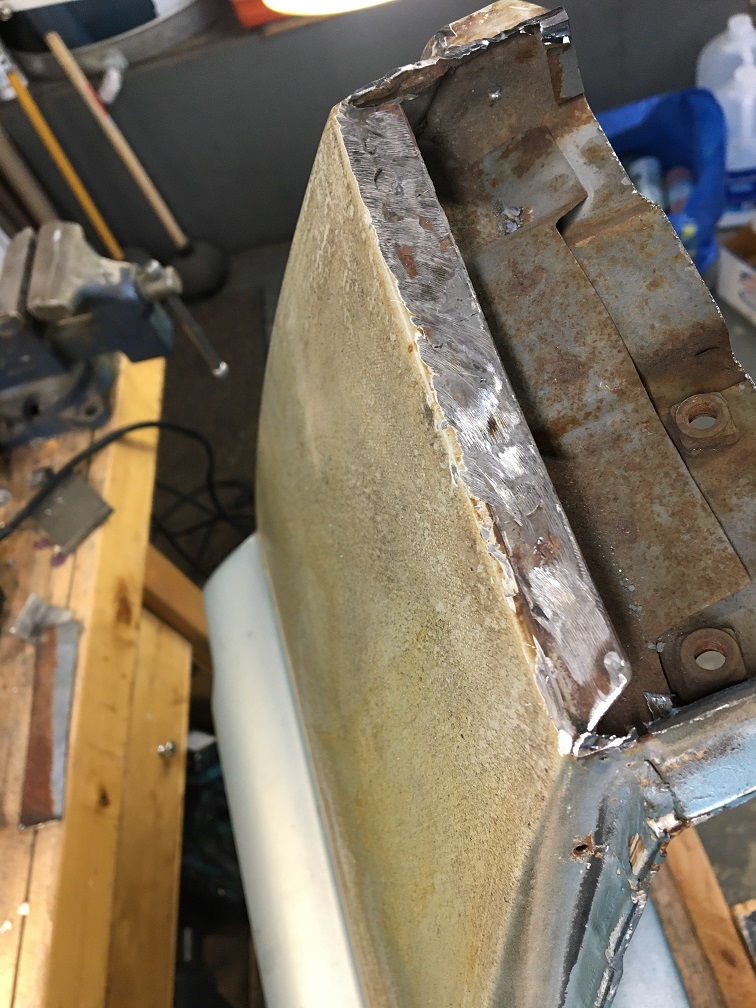 And this is the top of the Targa corner on the car. 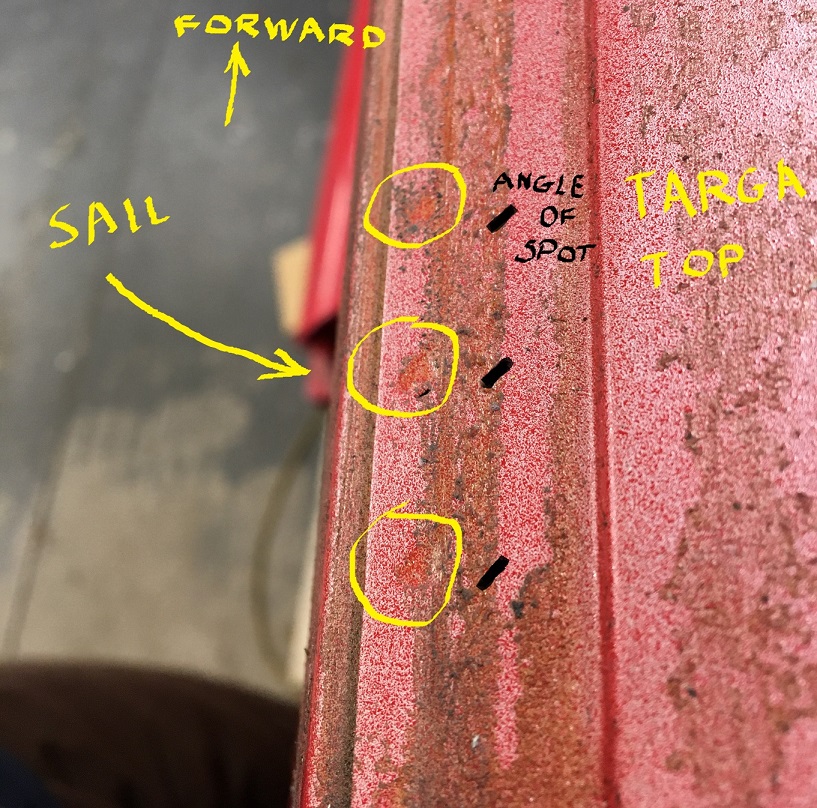 As for the vent tube, this is what I started with on the donor fender: 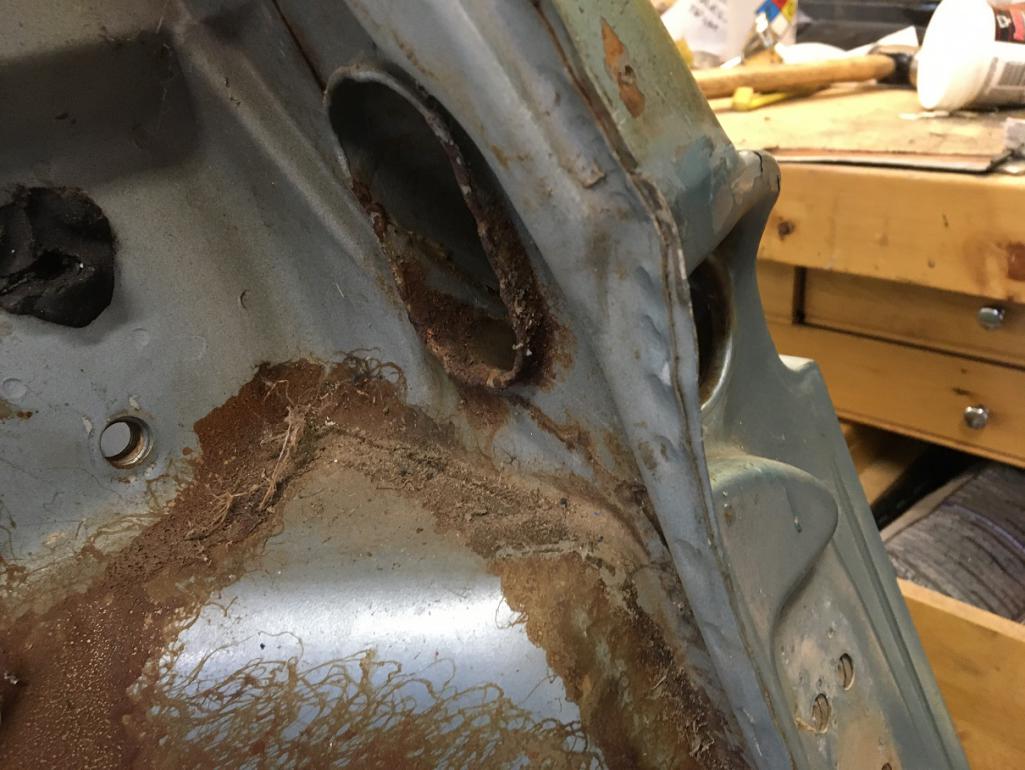 During the dismantling (IMG:style_emoticons/default/wacko.gif) A bit of a wrestle... I will try to do better when removing the fender from the car. 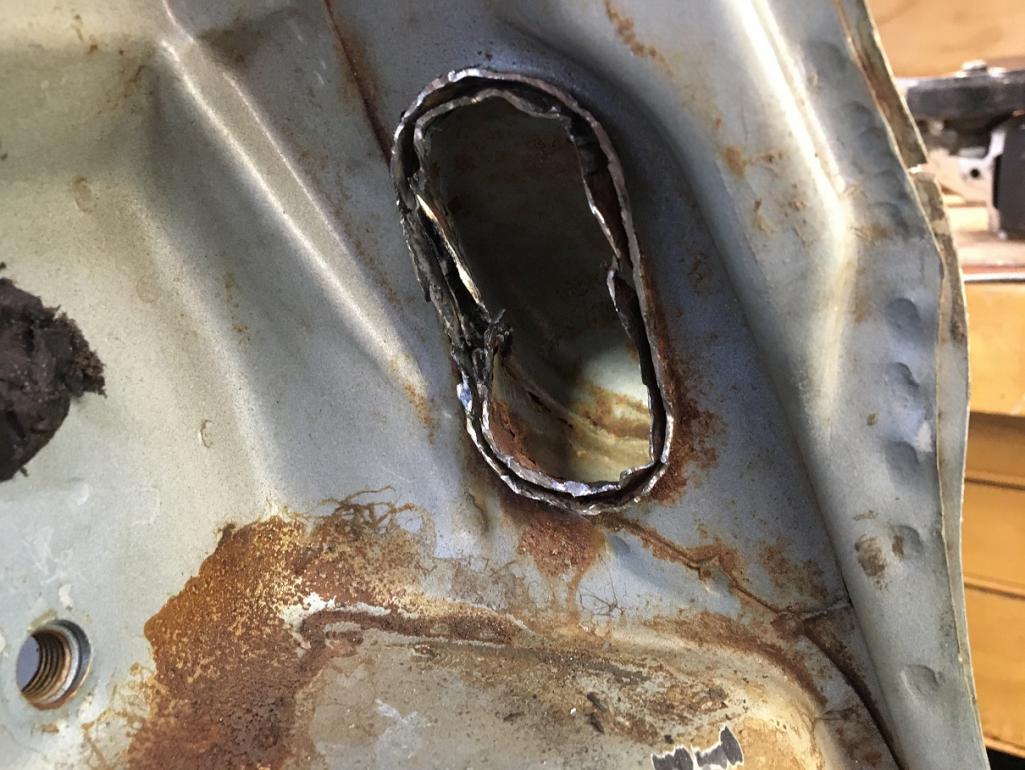 Once free and reshaped, this is what I am working with. 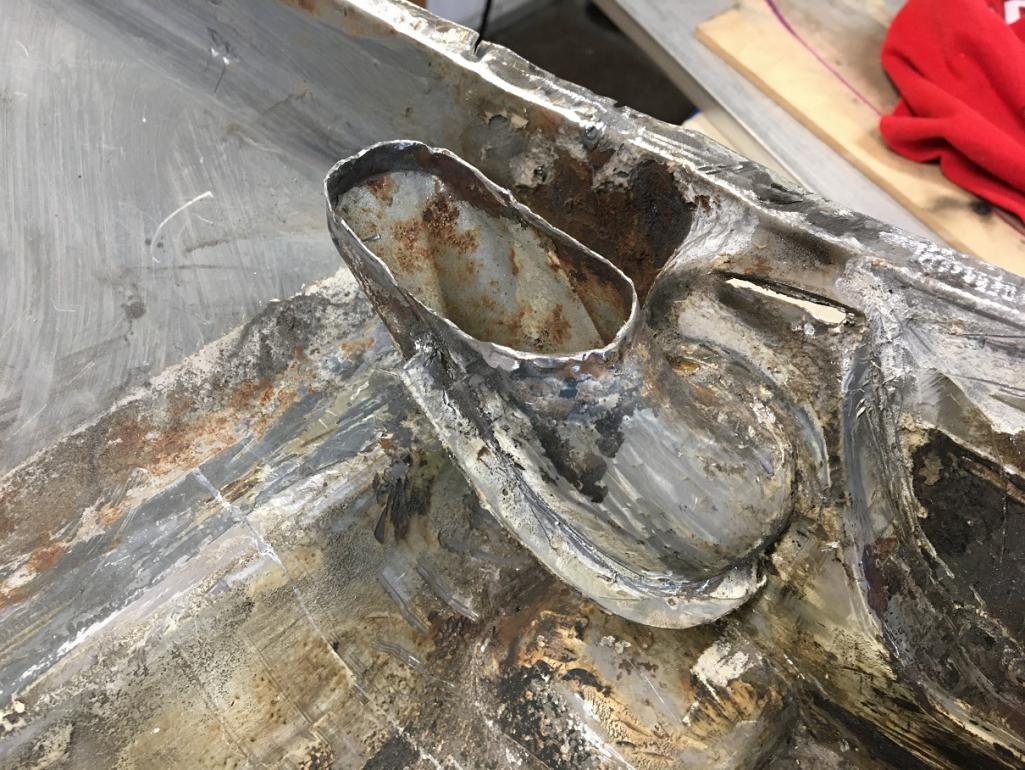 |
| nivekdodge |
 Dec 18 2022, 08:21 PM Dec 18 2022, 08:21 PM
Post
#94
|
|
Member   Group: Members Posts: 330 Joined: 28-August 21 From: Pittsburgh Pa Member No.: 25,860 Region Association: MidAtlantic Region 
|
https://www.semproducts.com/product/rust-sh.../28104#product-
For the insides . it can go on over rust and can be brushed. Se if there's a local jobber who can put stuff in spray cans. Kevin |
| Montreal914 |
 Feb 24 2023, 06:21 PM Feb 24 2023, 06:21 PM
Post
#95
|
|
Advanced Member     Group: Members Posts: 2,031 Joined: 8-August 10 From: Claremont, CA Member No.: 12,023 Region Association: Southern California 
|
https://www.semproducts.com/product/rust-sh.../28104#product- For the insides . it can go on over rust and can be brushed. Se if there's a local jobber who can put stuff in spray cans. Kevin Thank you Kevin! (IMG:style_emoticons/default/smile.gif) Will definitely look into this! |
| Montreal914 |
 Feb 24 2023, 07:04 PM Feb 24 2023, 07:04 PM
Post
#96
|
|
Advanced Member     Group: Members Posts: 2,031 Joined: 8-August 10 From: Claremont, CA Member No.: 12,023 Region Association: Southern California 
|
Another overdue update...
As mentioned in the previous post, the donor fender is pretty much ready (we'll get back to this...) so it was time to remove the original fender from the car. So here is the current situation which should seem 100% familiar to everyone, except the mess... (IMG:style_emoticons/default/rolleyes.gif) 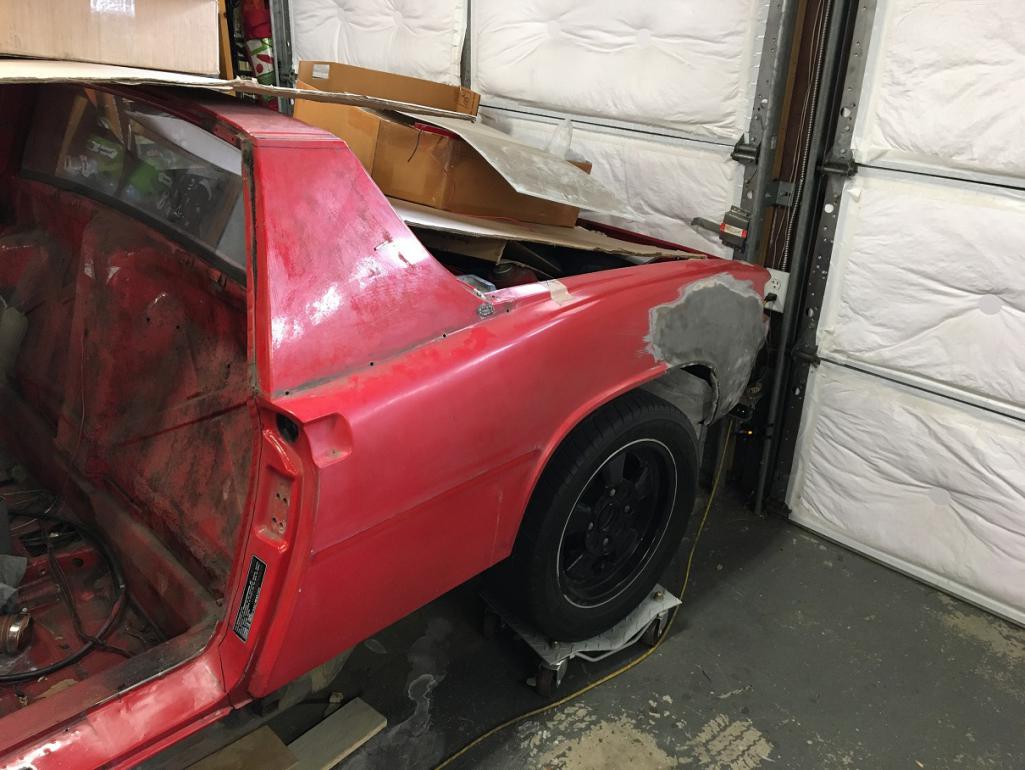 First, the vent tube in the door jamb needs to be freed. By grinding the edge weld, it allowed me to pry away the inner tube which is attached to the fender. 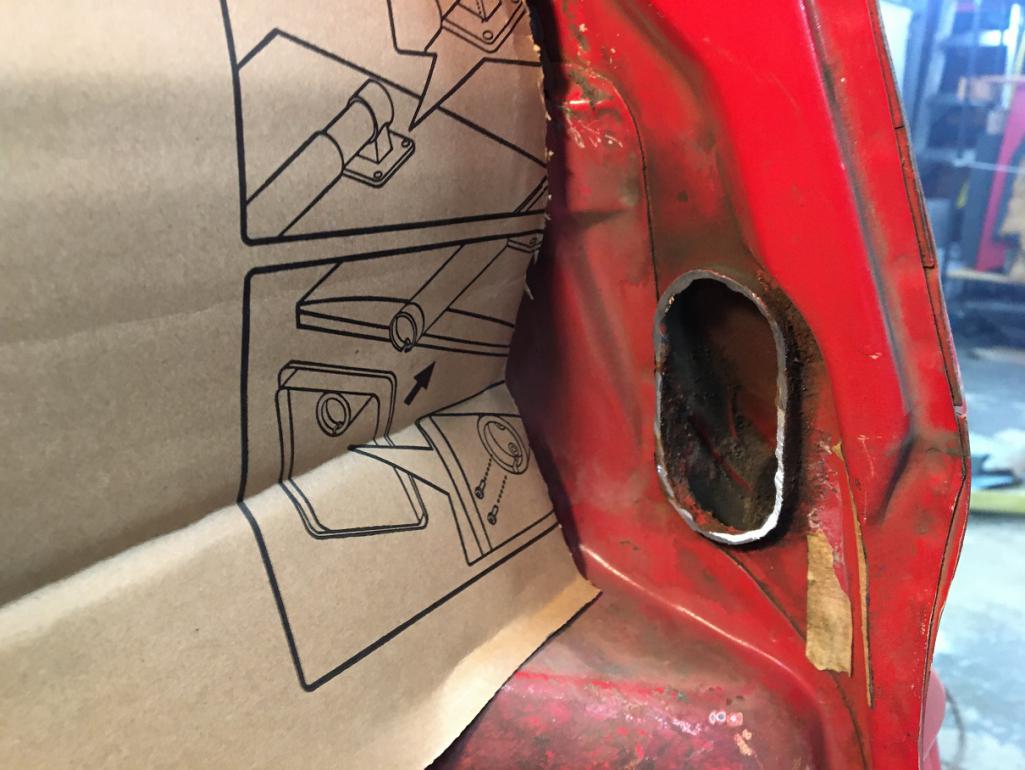 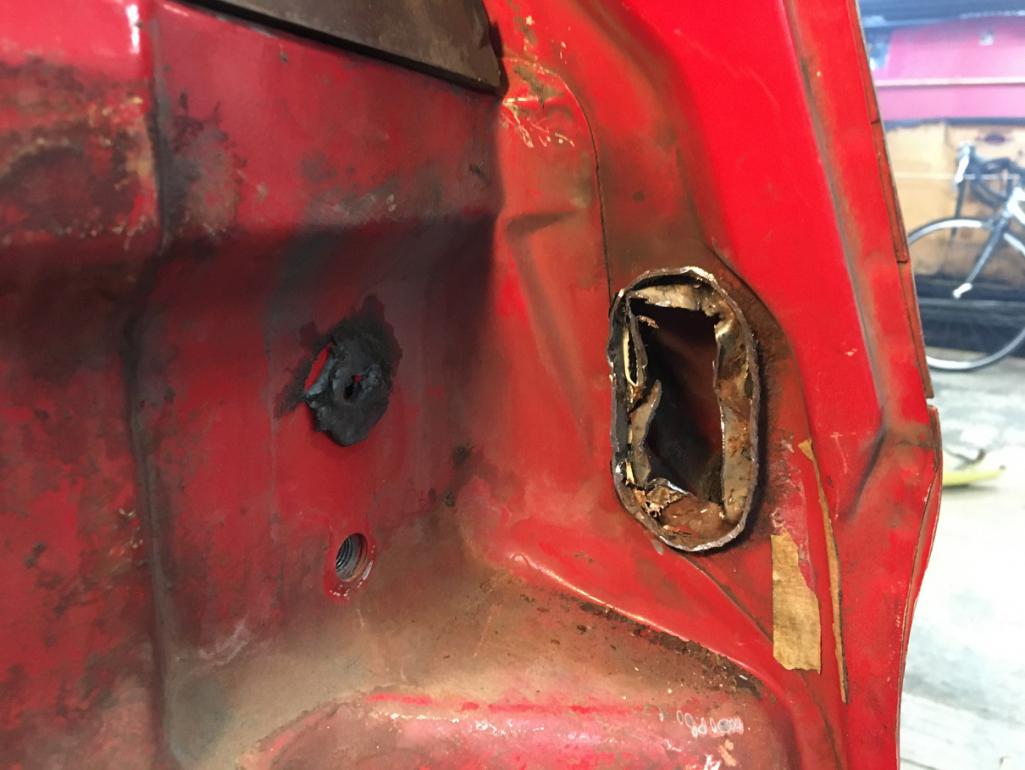 Then I cut the whole fender with a thin disk on a cheap angle grinder to leave only the spot welded strip attached to the car. This clears the access to grind the rest off in a second step. So here we go, rough cut, and out! (IMG:style_emoticons/default/smile.gif) 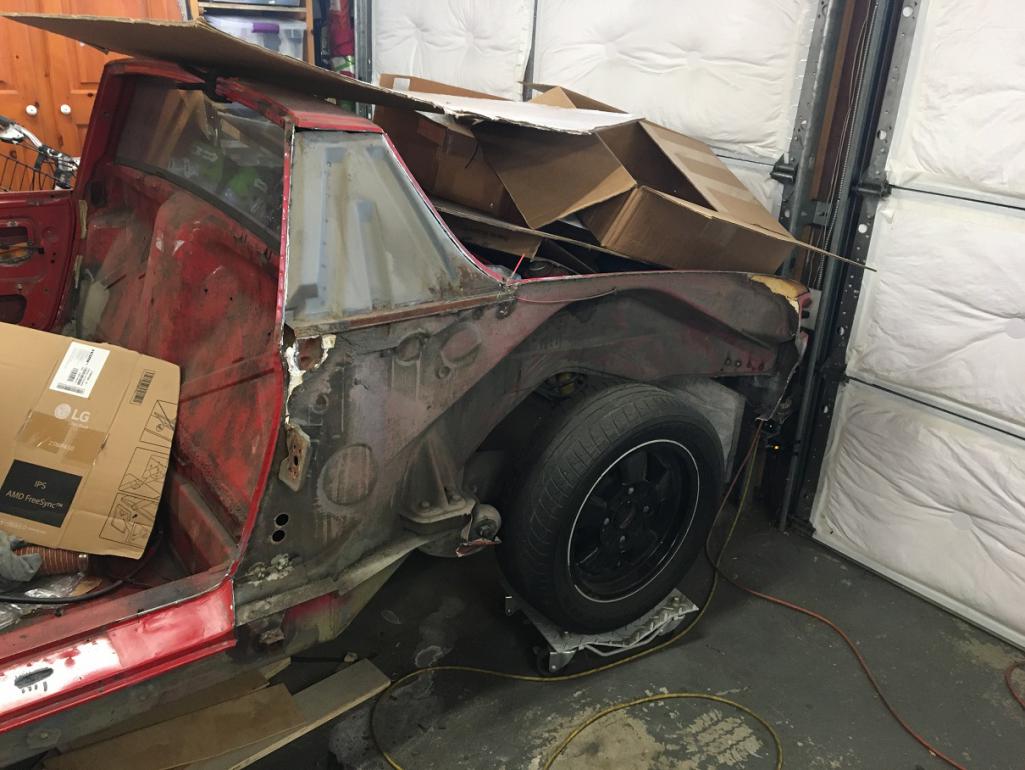 Next, I started on the top of the Targa bar. The spot welds have to be drilled here because the replacement fender will go underneath, and therefore will be plug welded in place. After drilling the welds I carefully pryed off the remnants. 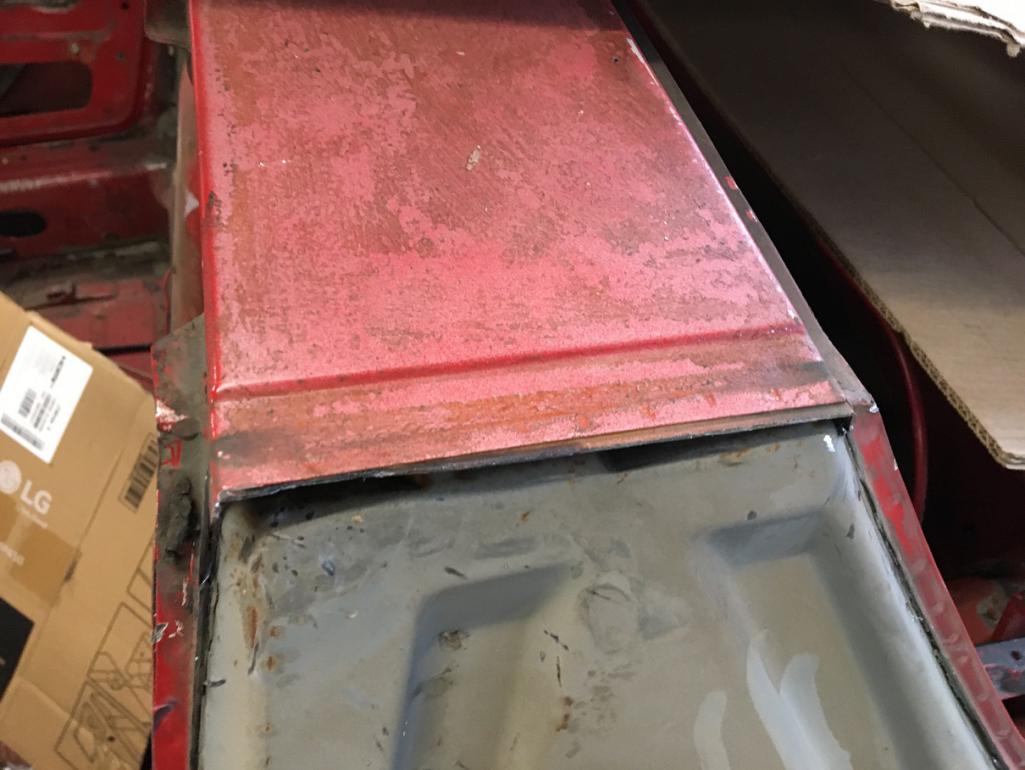 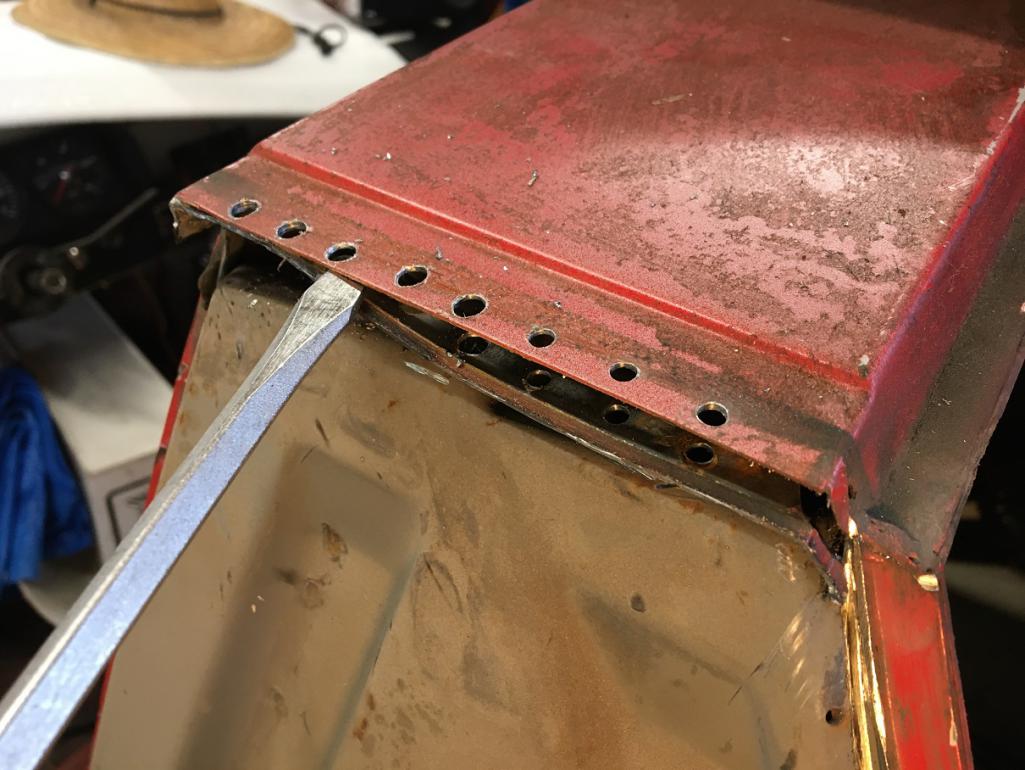 And here you have that segment pretty much done. (IMG:style_emoticons/default/smile.gif) 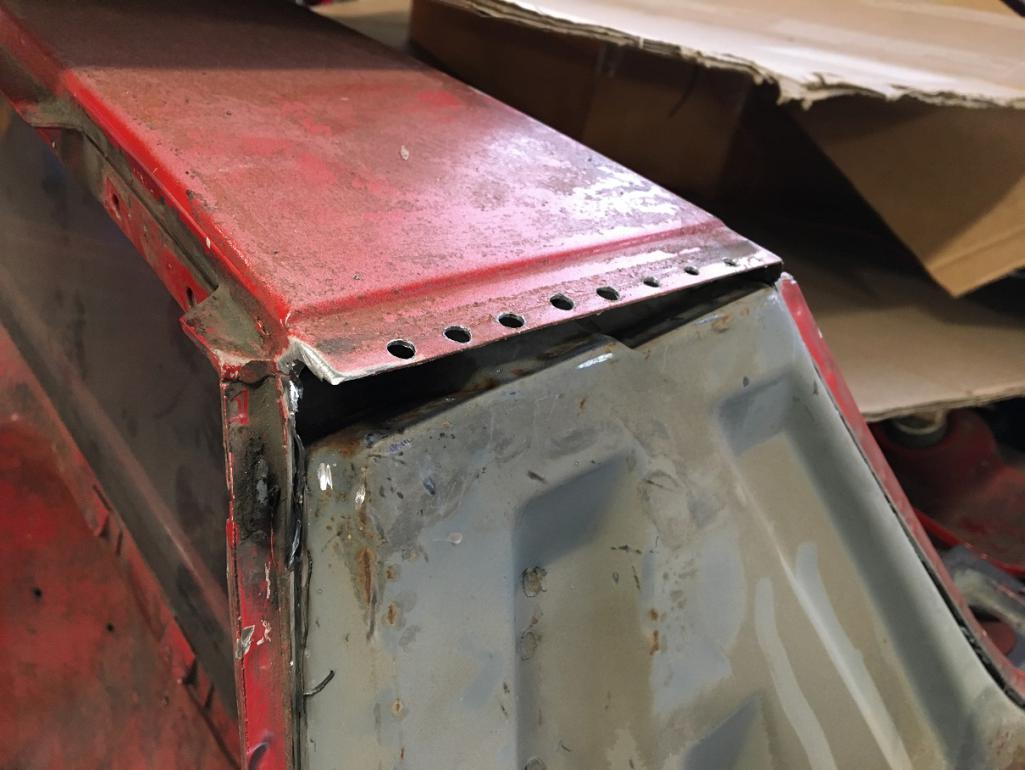 Next going down the edge on the door side. Along the Targa, there are actually three layers of metal, the inner fender/Targa panel, the corrugated reinforcement piece, and the fender. This transitions to only layers the inner fender and fender itself from the door down until the very bottom where there is again three layers. Carefully grinding away each spot weld, I was able to cleanup this flange to receive the donner fender flange. 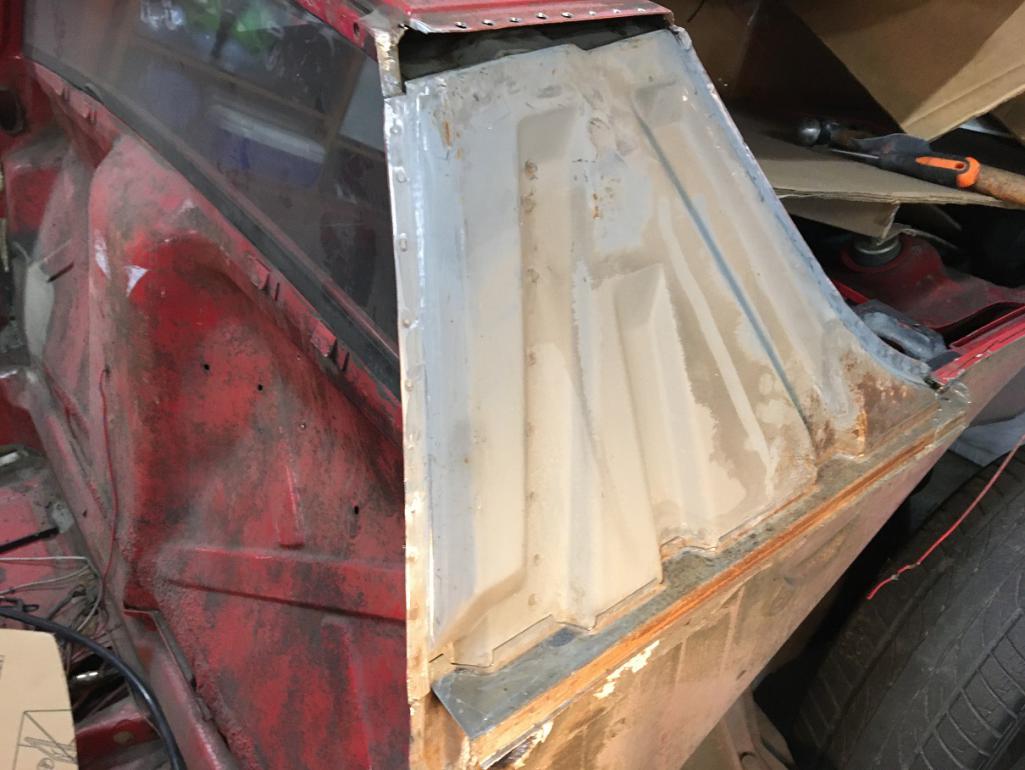 Cleanup almost finished. Note that the latch bracket is actually not attached to the fender. The fender gets sandwiched between it and the door latch. 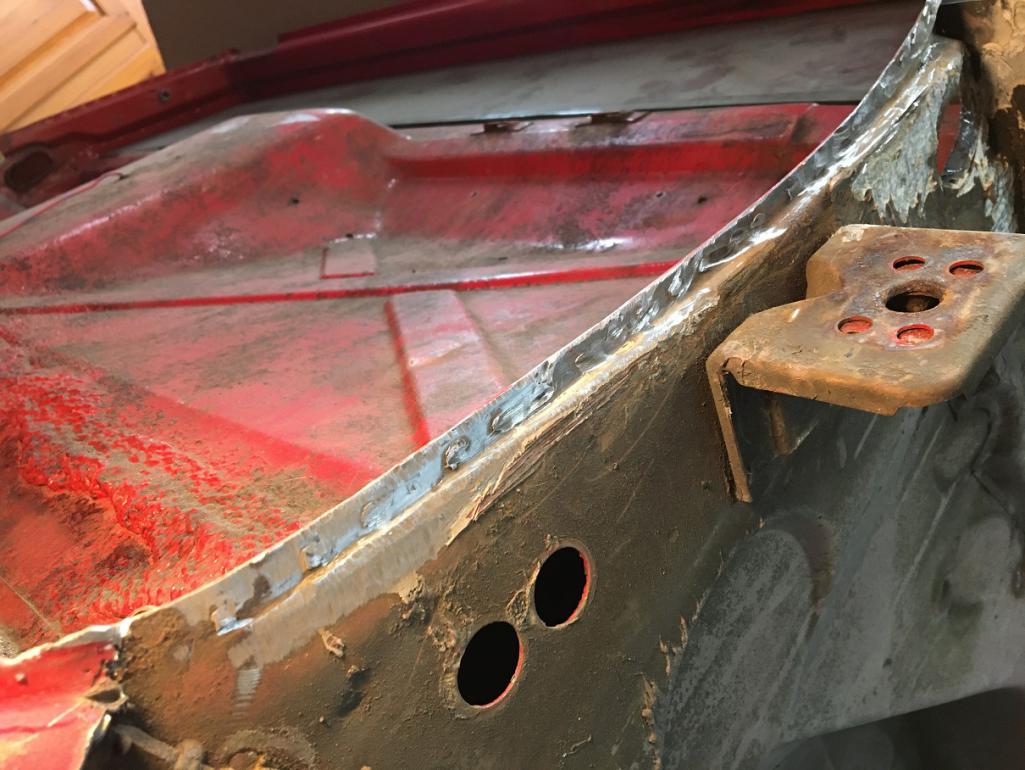 Now working my way along the trunk seal area, removing about 1 1/4" at time grinding each spot weld. 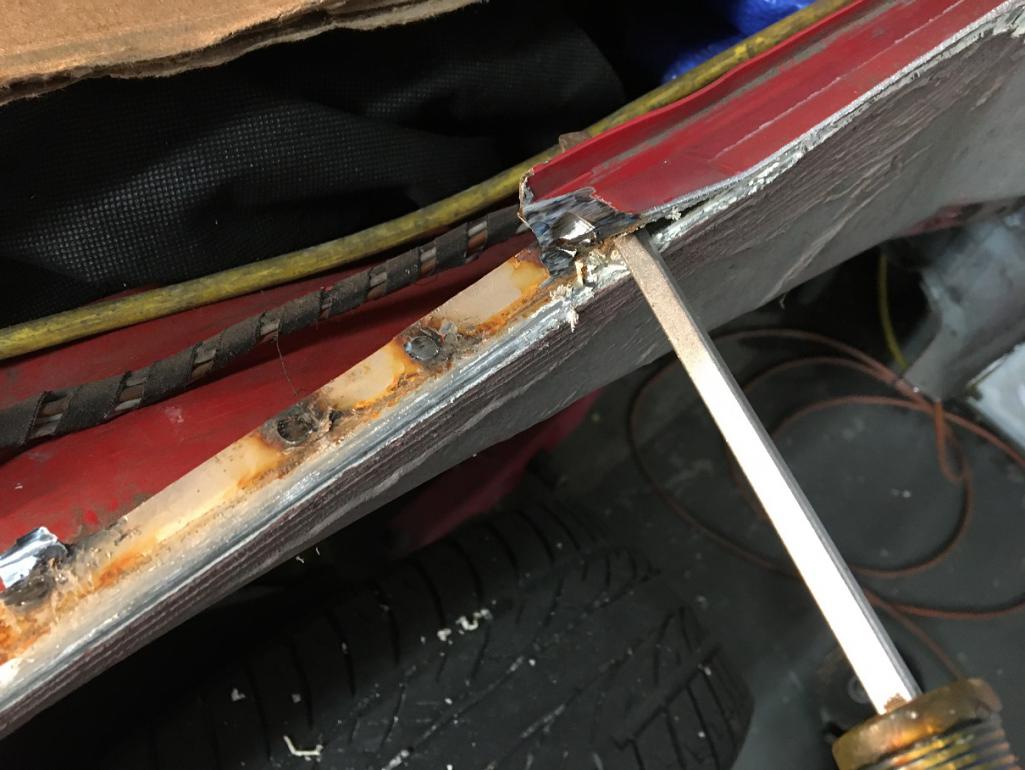 And there we have it! (IMG:style_emoticons/default/smile.gif) Well the rear corner will be addressed when the fender grafting strategy has been established... (IMG:style_emoticons/default/idea.gif) 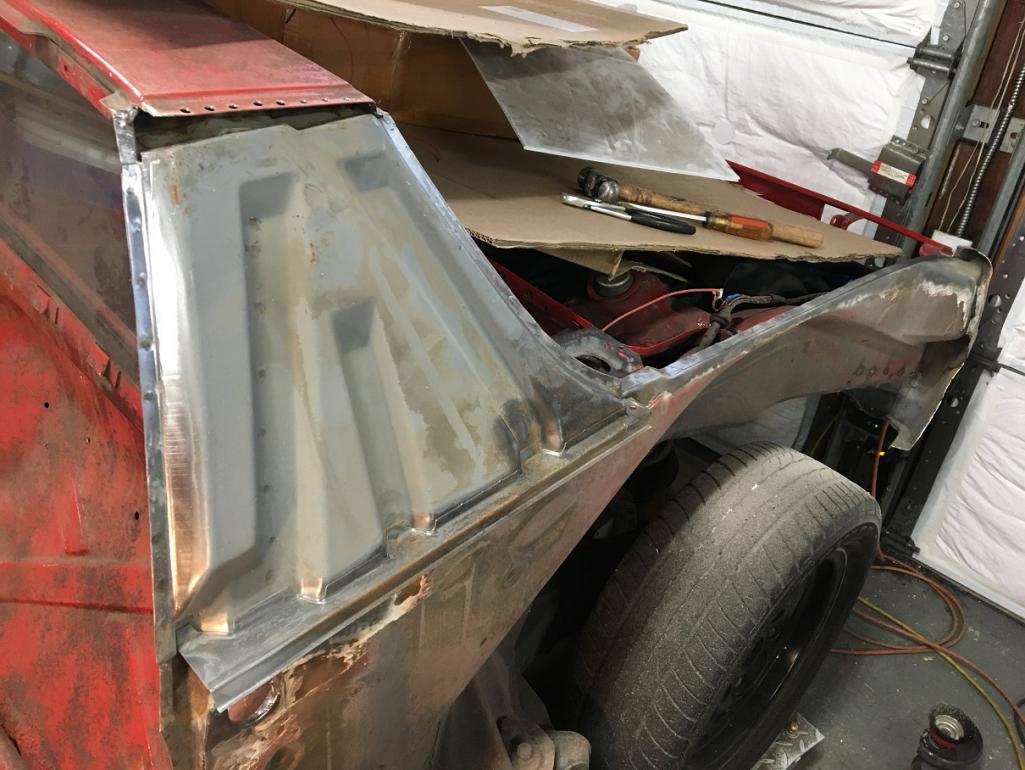 |
| Montreal914 |
 Feb 24 2023, 07:37 PM Feb 24 2023, 07:37 PM
Post
#97
|
|
Advanced Member     Group: Members Posts: 2,031 Joined: 8-August 10 From: Claremont, CA Member No.: 12,023 Region Association: Southern California 
|
Next, time to fix some of the scars created during the rough fender cut. (IMG:style_emoticons/default/dry.gif)
The cutting disk actually cut a little in the trailing edge of the sail panel. Nothing that a little welding can't fix (IMG:style_emoticons/default/smile.gif). 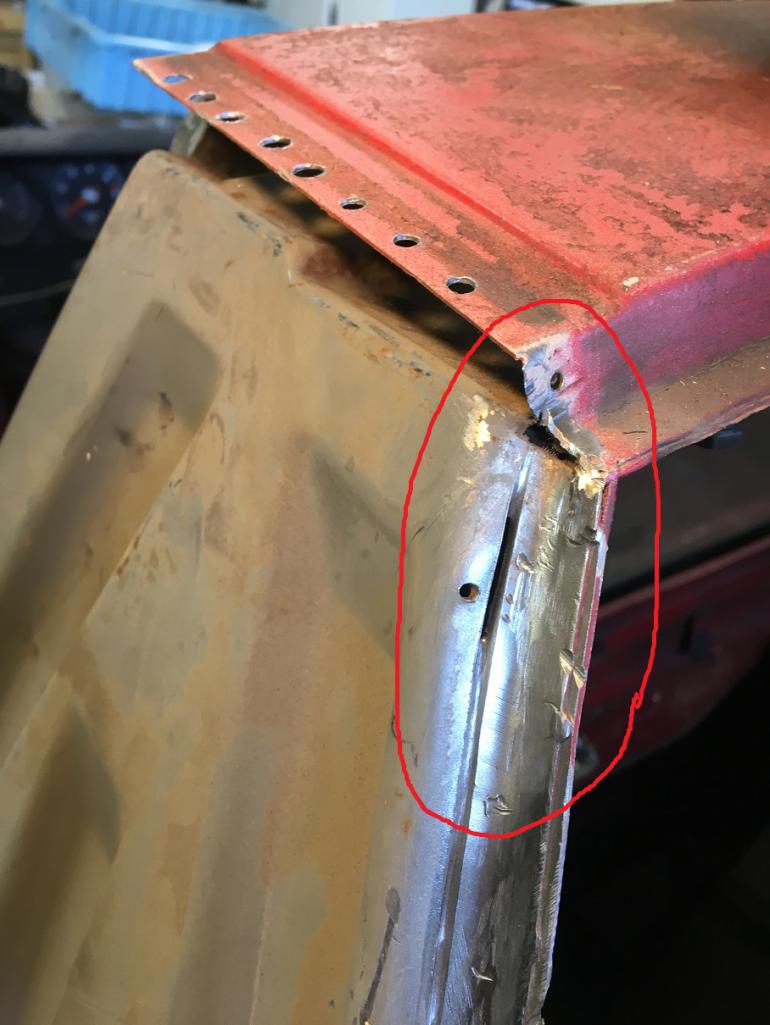 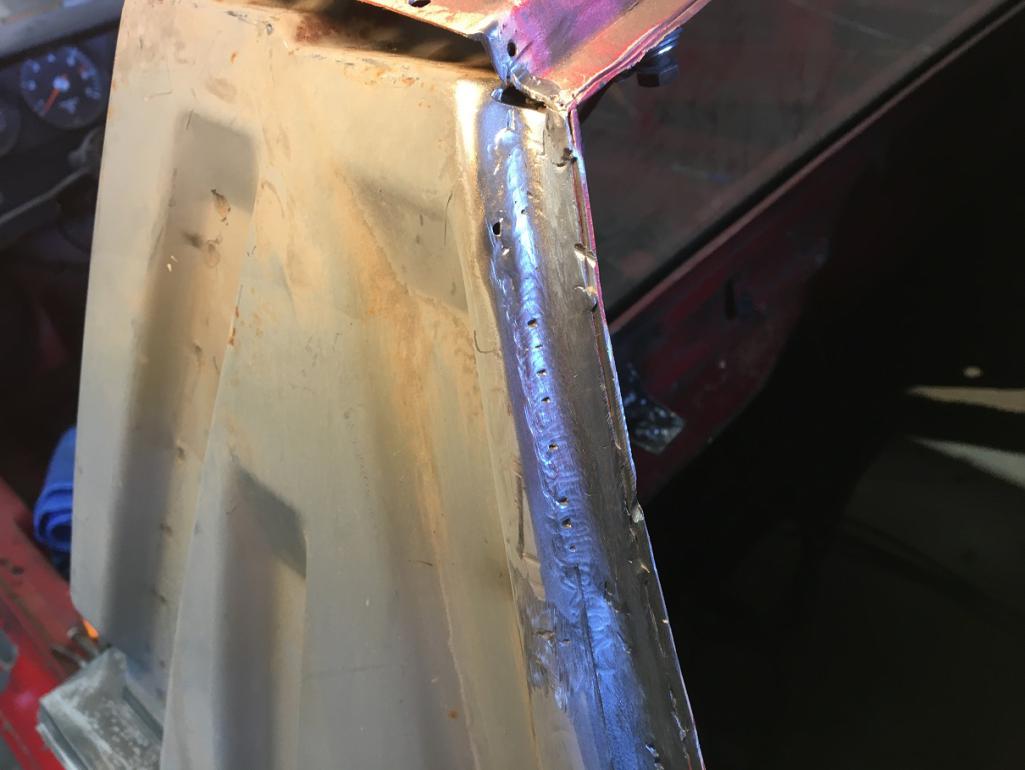 Moving along to the rear corner. Current situation, and donor fender current end cuts... 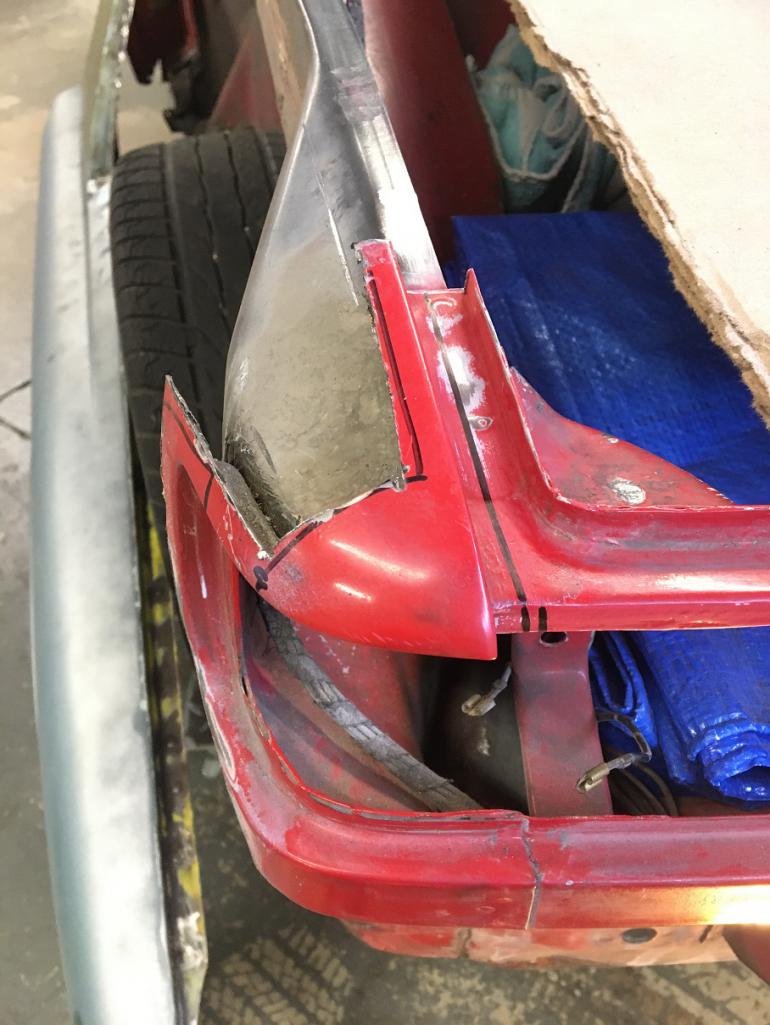 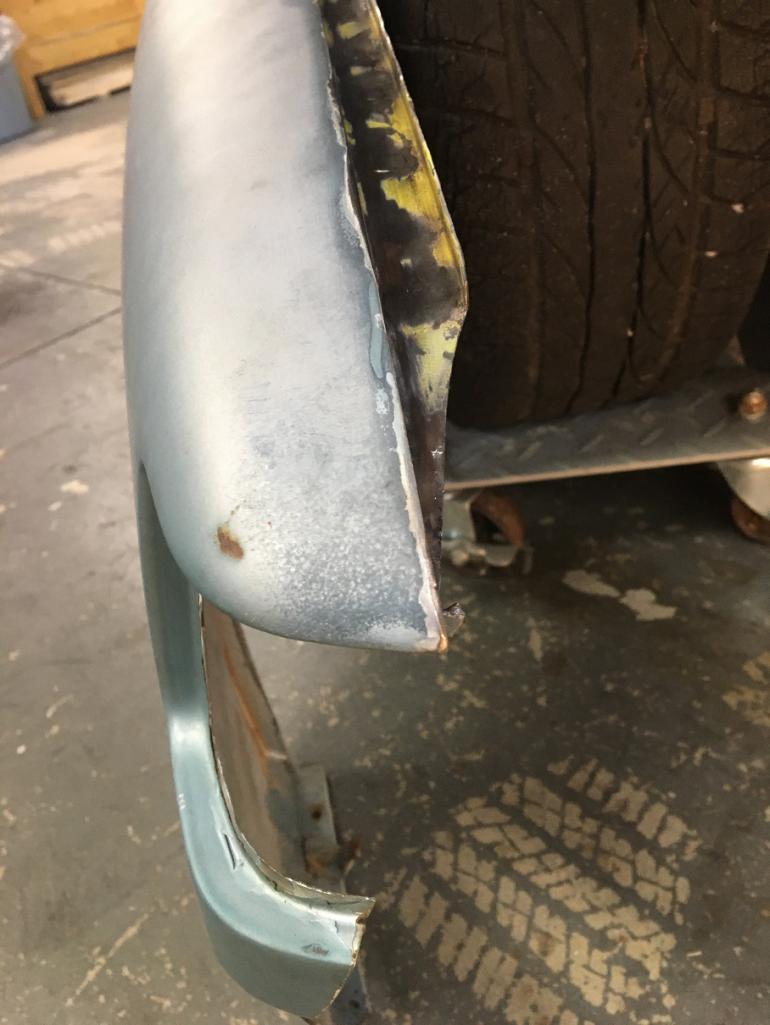 But what is hidden in the donor fender corner is the underside corner cut. (IMG:style_emoticons/default/headbang.gif) 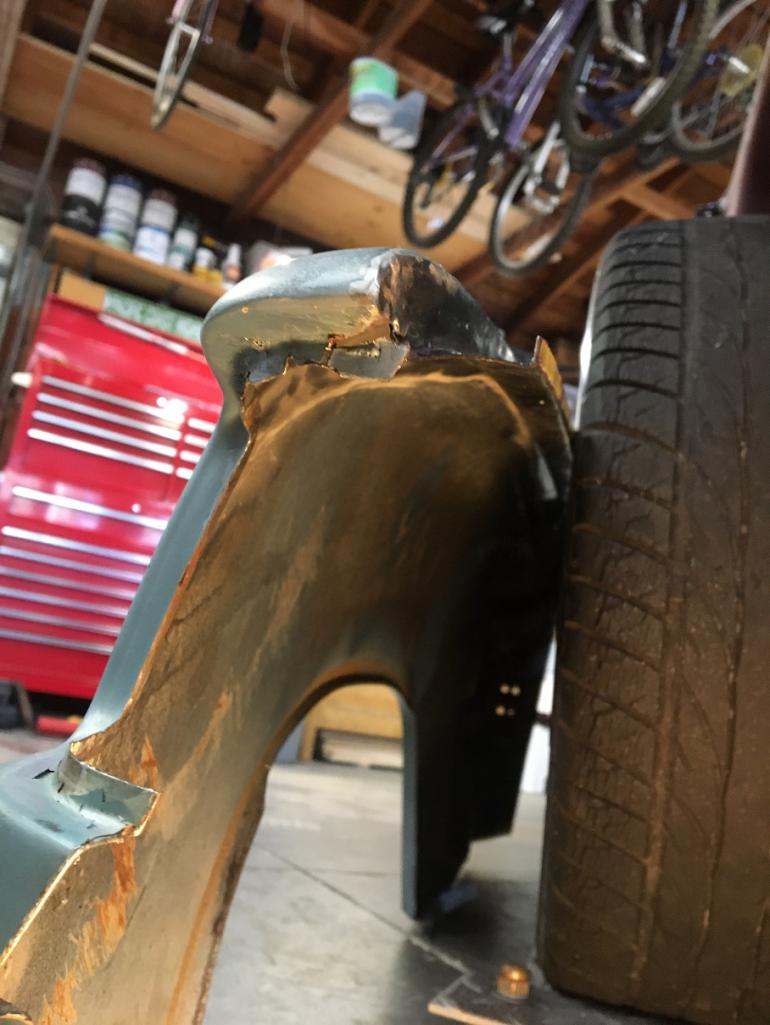 So before going any further, this needs to be addressed somehow... 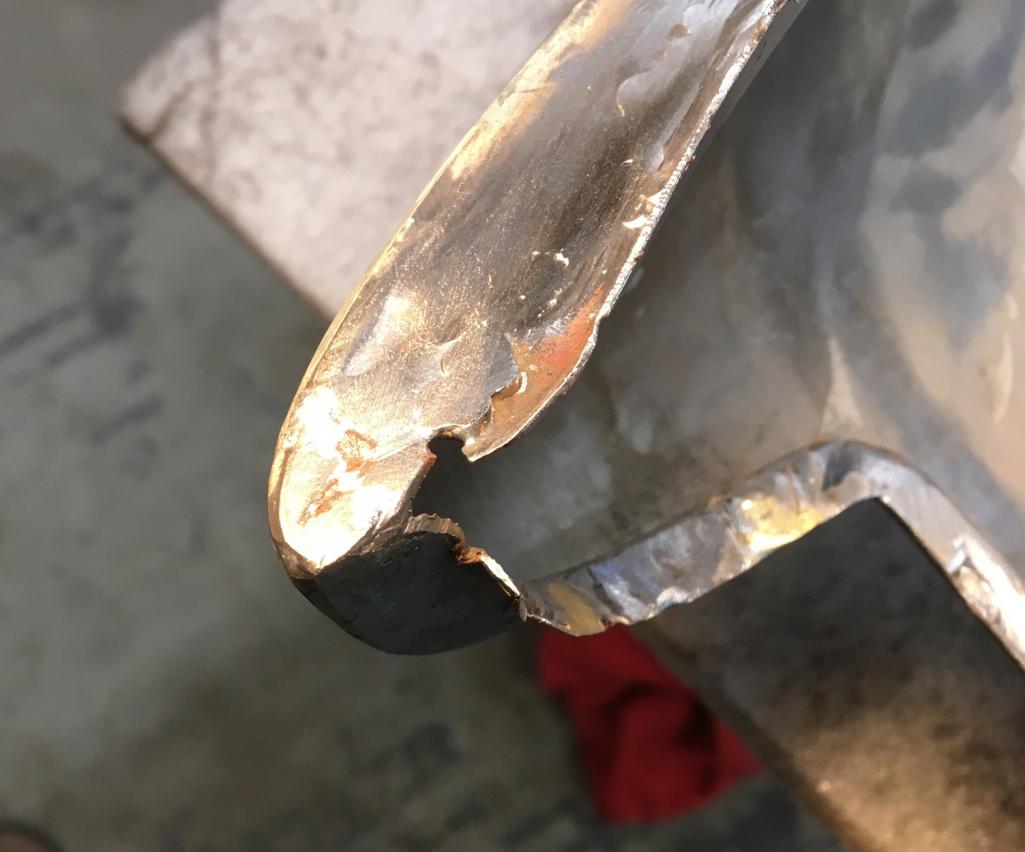 So I delicately cut off that missing portion from the removed original fender, now the "easy" task of welding this on the fender... (IMG:style_emoticons/default/wacko.gif) 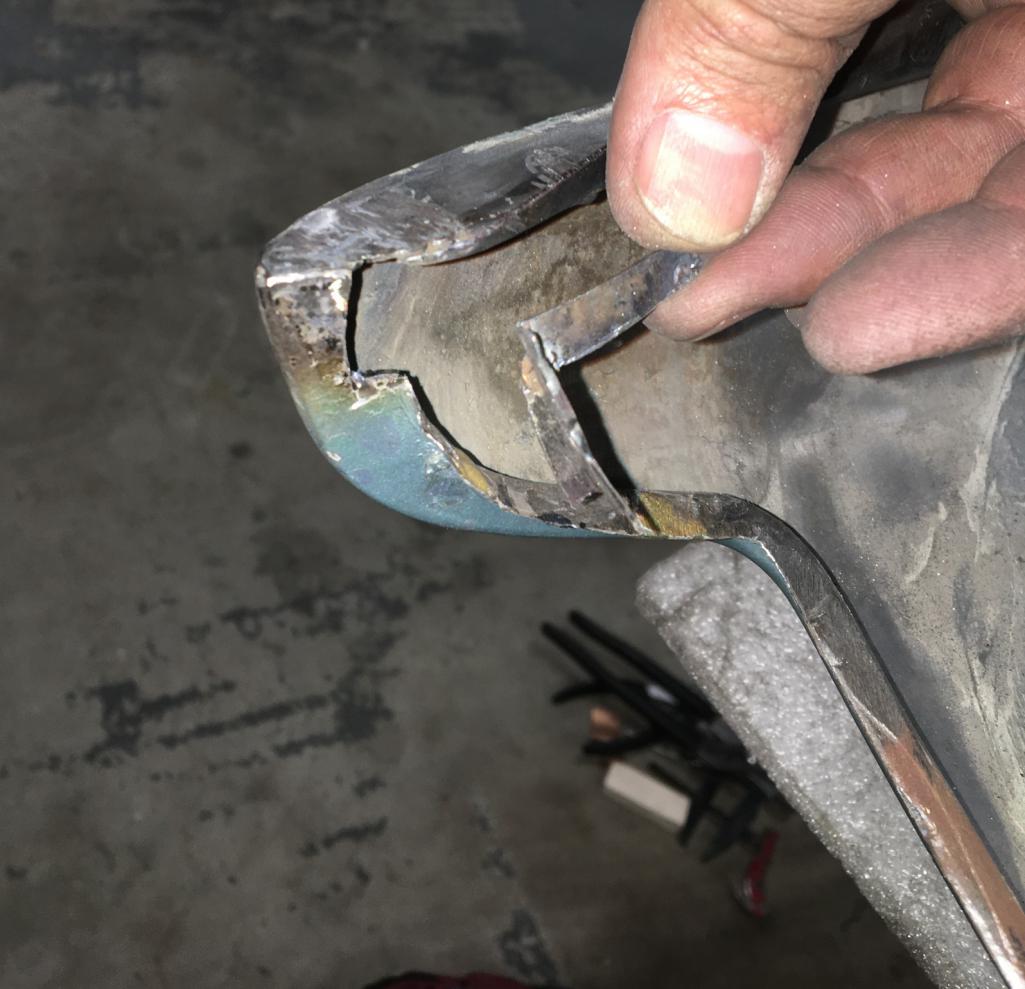 Crazy the amount of time one can spend fixing such a small area... (IMG:style_emoticons/default/rolleyes.gif) But it got done in the end... 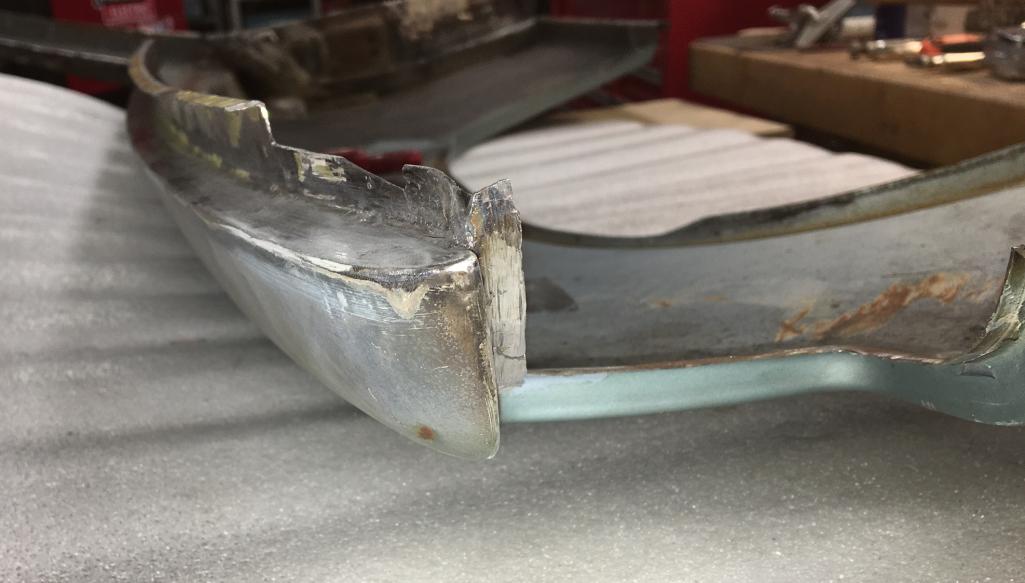 OK, now back to fitting the fender on the car. Very first placement is definitely very encouraging! (IMG:style_emoticons/default/smile.gif) 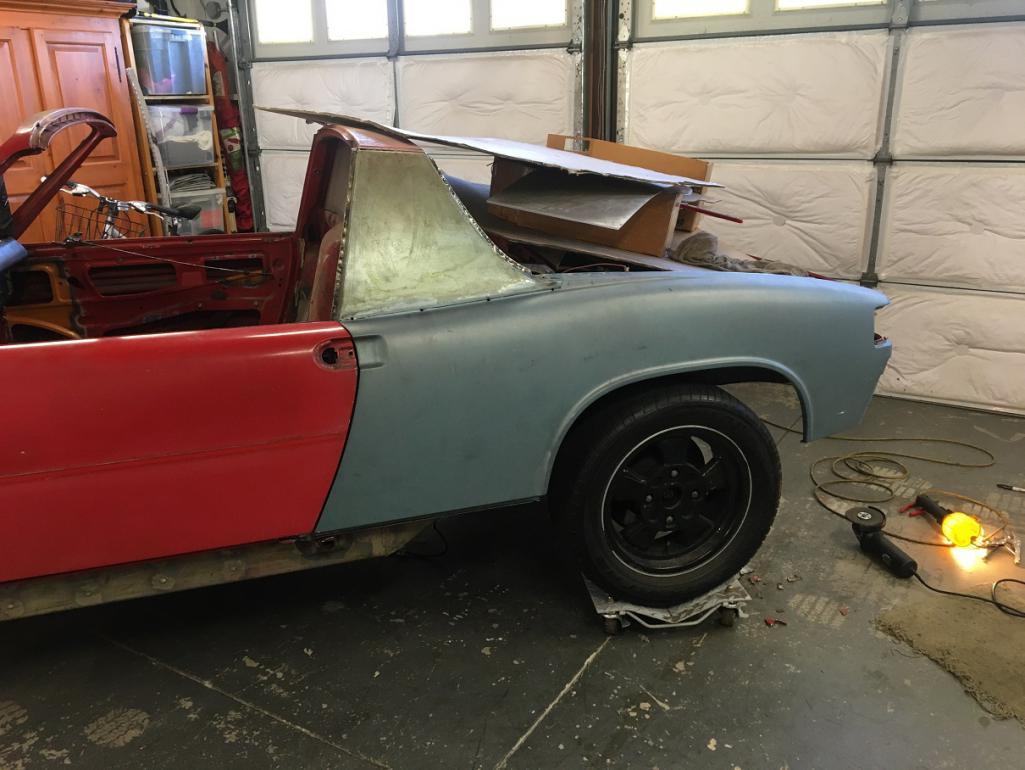 That being said the rear end still needs to be figured out. Now all of this wouldn't have been an issue if the donor fender was 100% complete, but it isn't, so we need to improvise a little. That corner (yellow arrow) has been deformed and isn't part of the fender... 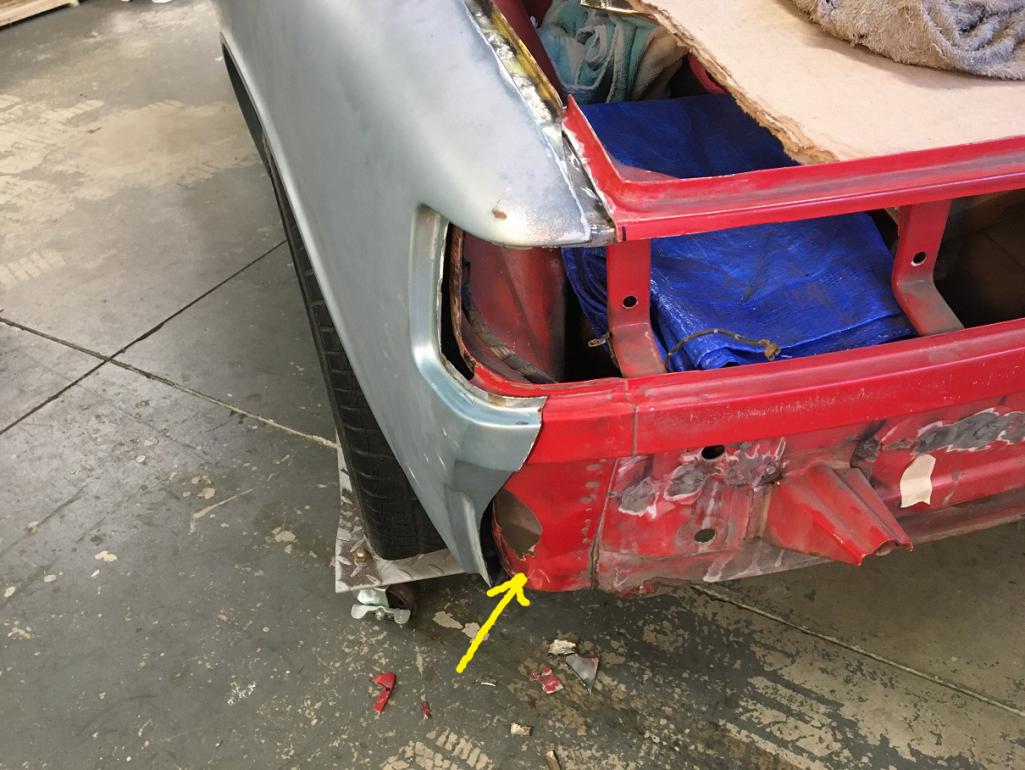 ...out of space for more pictures, to be continued! (IMG:style_emoticons/default/bye1.gif) |
| Montreal914 |
 Feb 24 2023, 08:03 PM Feb 24 2023, 08:03 PM
Post
#98
|
|
Advanced Member     Group: Members Posts: 2,031 Joined: 8-August 10 From: Claremont, CA Member No.: 12,023 Region Association: Southern California 
|
OK, so let's continue with this problematic lower dented corner. After trying to hammer it back to match the shape of the fender, I realiazed I had cut to much material off of it and was left with too large of a gap. (IMG:style_emoticons/default/rolleyes.gif) (IMG:style_emoticons/default/headbang.gif)
So, luckily among my various sheet metal parts, I had one from the yellow fender piece. So here it is now attached to the car and nicely matching the new fender. 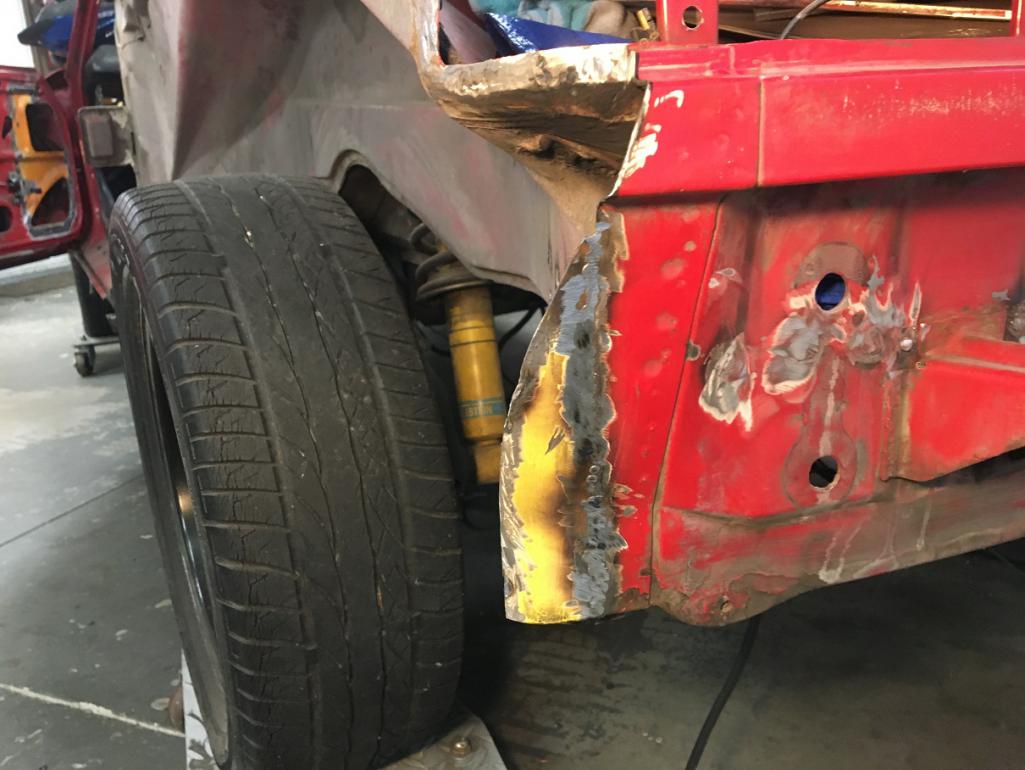 And now with the fender nicely matching ready for the butt weld. 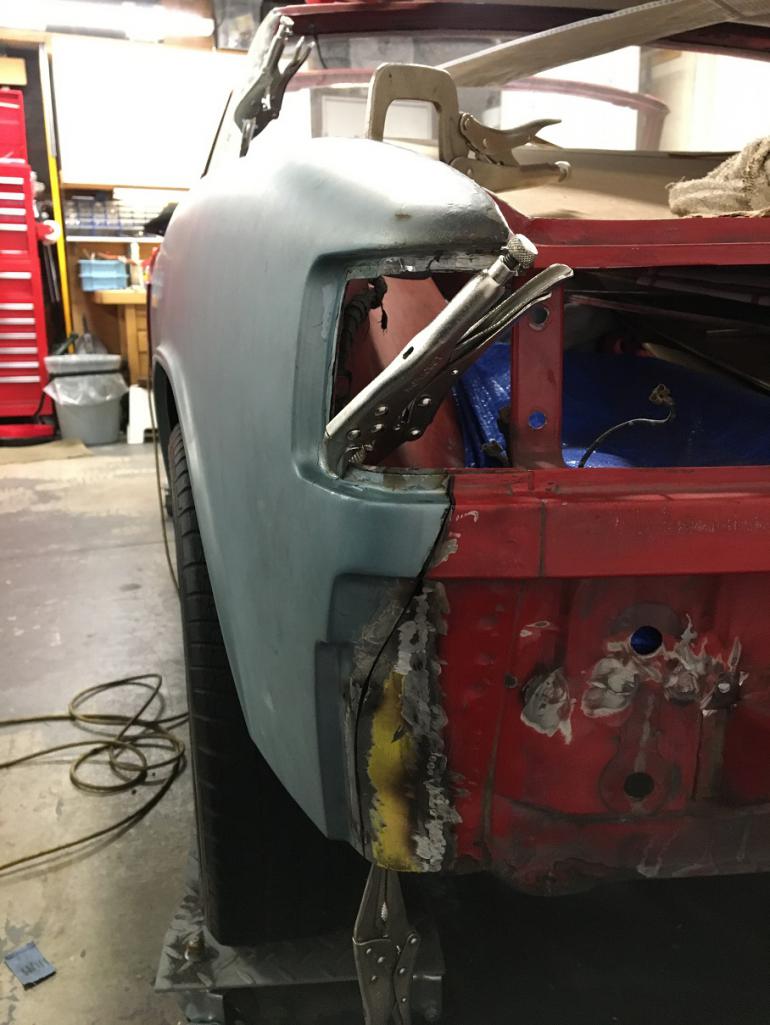 After many subtle little adjustments and on and off, I want to think the fit is pretty much ready for welding! (IMG:style_emoticons/default/smile.gif) The door gap is pretty uniform at 5.27mm near the top and 5.08 at the bottom held by a few vise grips. Let's hope it stays during welding... 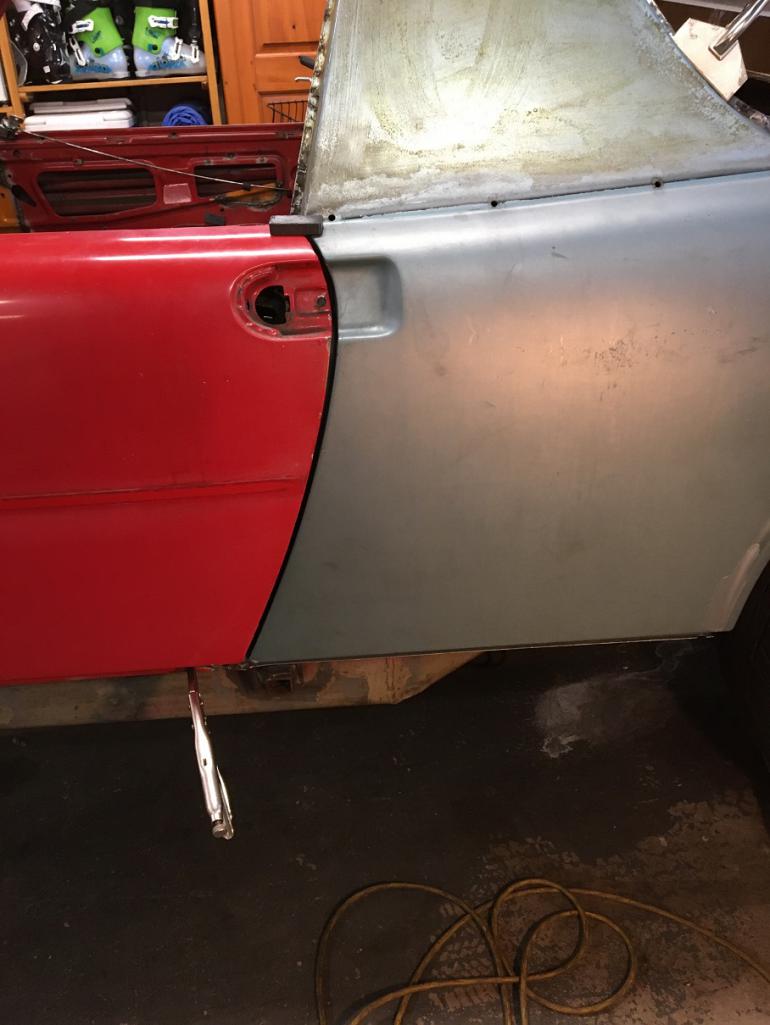 More pictures of it simply held by a few clamps. 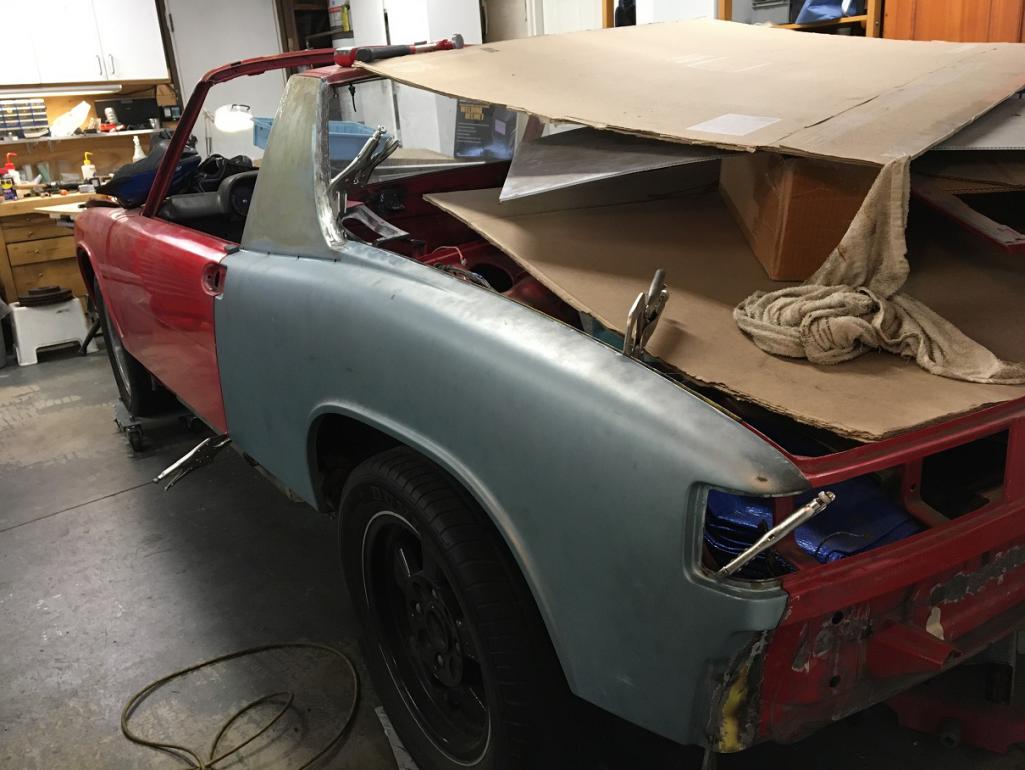 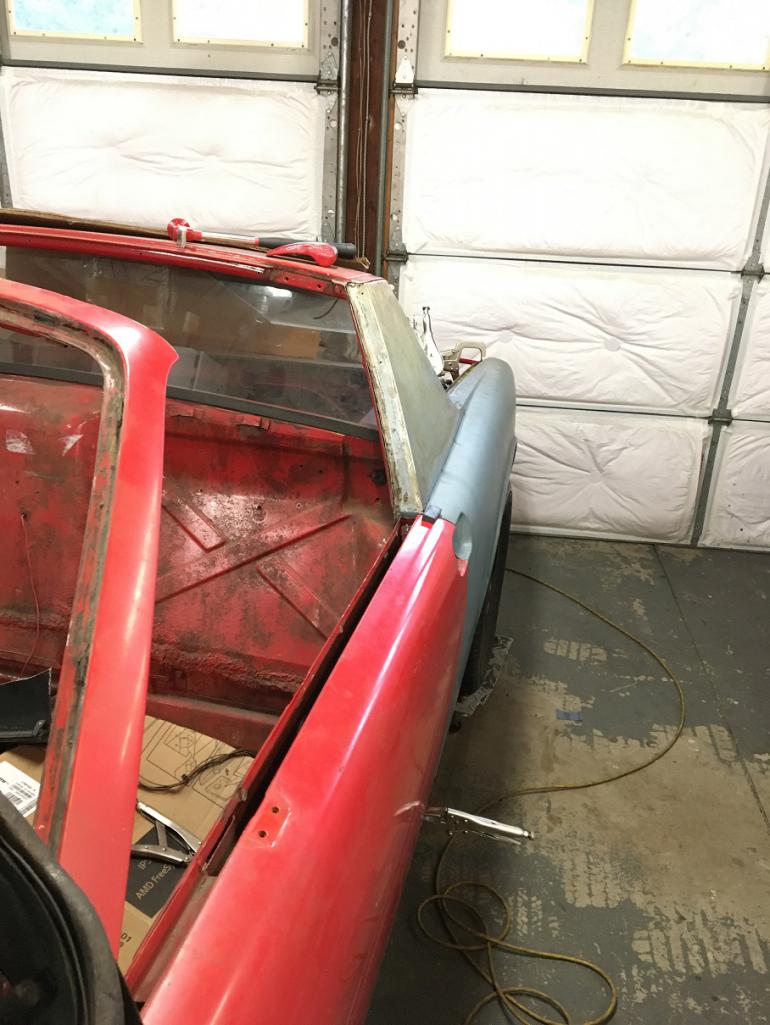 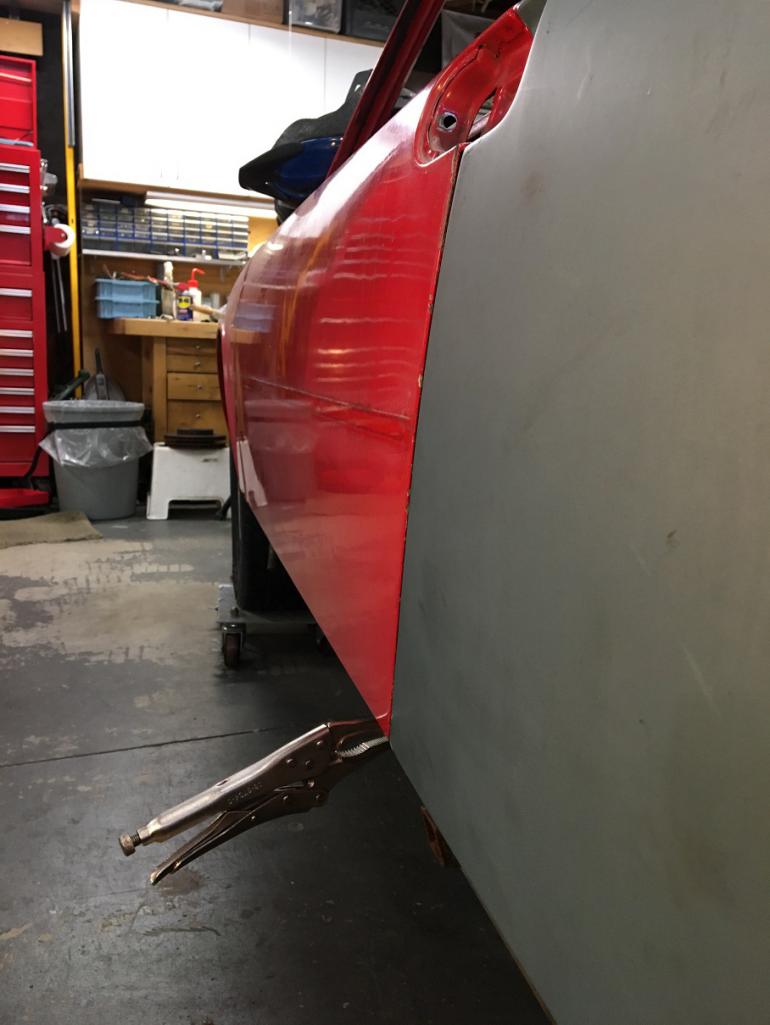 Next, prepping the surfaces and weld! (IMG:style_emoticons/default/smile.gif) (IMG:style_emoticons/default/beer3.gif) |
| bob164 |
 Feb 24 2023, 08:05 PM Feb 24 2023, 08:05 PM
Post
#99
|
|
Member   Group: Members Posts: 102 Joined: 10-February 18 From: Seal Beach Member No.: 21,877 Region Association: Southern California 
|
Great progress Eric, thanks for the detailed photos, you are an inspiration.
|
| Cairo94507 |
 Feb 25 2023, 08:57 AM Feb 25 2023, 08:57 AM
Post
#100
|
|
Michael           Group: Members Posts: 10,575 Joined: 1-November 08 From: Auburn, CA Member No.: 9,712 Region Association: Northern California 
|
Great work Eric; a thing of beauty when the new quarter goes on and lines up nicely. All that careful removal and prep pays off in perfection. (IMG:style_emoticons/default/beerchug.gif)
|
  |
2 User(s) are reading this topic (2 Guests and 0 Anonymous Users)
0 Members:

|
Lo-Fi Version | Time is now: 20th February 2026 - 11:16 AM |
Invision Power Board
v9.1.4 © 2026 IPS, Inc.


