
 Rust repair before paint, Front of the passenger long - 73 narrow body/4, now 6 conversion rebuild thread Rust repair before paint, Front of the passenger long - 73 narrow body/4, now 6 conversion rebuild thread |
|
|

|
Porsche, and the Porsche crest are registered trademarks of Dr. Ing. h.c. F. Porsche AG.
This site is not affiliated with Porsche in any way. Its only purpose is to provide an online forum for car enthusiasts. All other trademarks are property of their respective owners. |
|
|

| Montreal914 |
 Oct 24 2020, 05:59 PM Oct 24 2020, 05:59 PM
Post
#1
|
|
Advanced Member  Group: Members Posts: 2,190 Joined: 8-August 10 From: Claremont, CA Member No.: 12,023 Region Association: Southern California 
 |
Edit: I might as well make this my rebuild thread...
Original post; I got side tracked on my Microsquirt build as I have decided, after 11 years of ownership, to finally get my car painted to get her ready for her upcoming 50th birthday. (IMG:style_emoticons/default/smile.gif) Knowing these endeavors can take a lot more time than initially planned, I hope to make it in time... (IMG:style_emoticons/default/wacko.gif) Well that date has long past now... (IMG:style_emoticons/default/rolleyes.gif) Originally bahia red 73 1.7. The goal is a narrow body Front: 914-4 A arms with Rear: But before I get the pleasure of installing all of these beautiful fresh goodies, I need to tackle the not so fun stuff... (IMG:style_emoticons/default/headbang.gif) I have already started fixing some of the rust issues and will share that progress in the near future but right now, I wanted to post some of the issues i have on the passenger side front fender. (IMG:style_emoticons/default/sad.gif) I have searched and read many of the builds here but I would like some inputs from the people who have gone through this mess. I am trying to understand the construction of the rear part of the fender, more precisely the area joining the front cowling. Below is a sketch of how I think it is made but i would like someone to confirm... 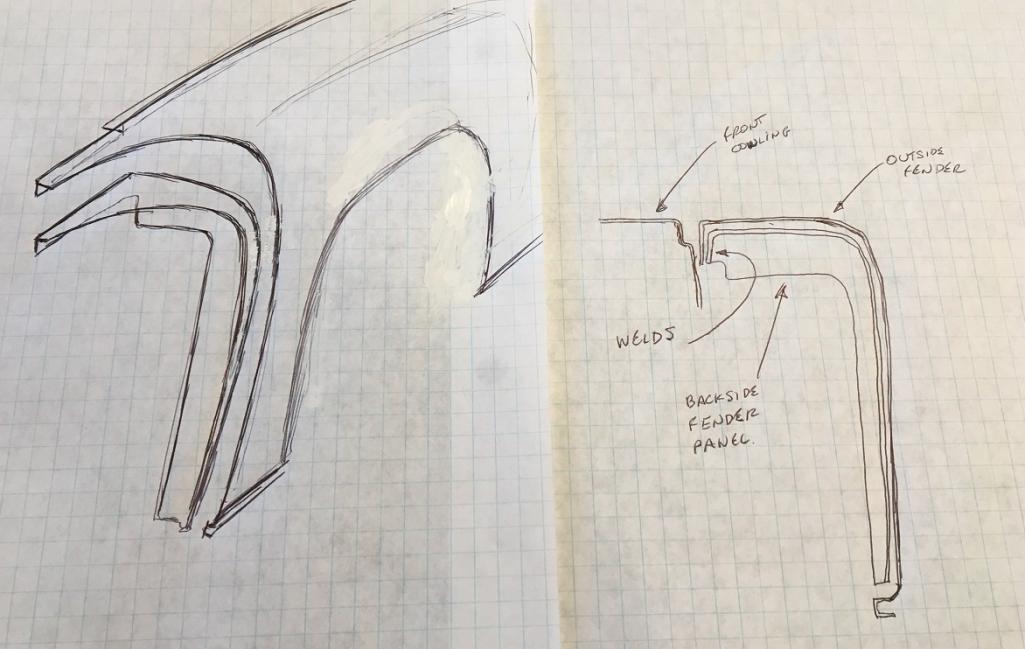 Having removed the seam sealer in the upper rear area, I have discovered "this" (IMG:style_emoticons/default/dry.gif) which is not really unusual, but clearly a pain to fix. I am not sure though what I am looking at. If my sketch is correct, I guess the inner rusted layer is from the fender rear bulkhead that actually becomes an inner layer on the rear upper point of the fender by the door and cowling junction. 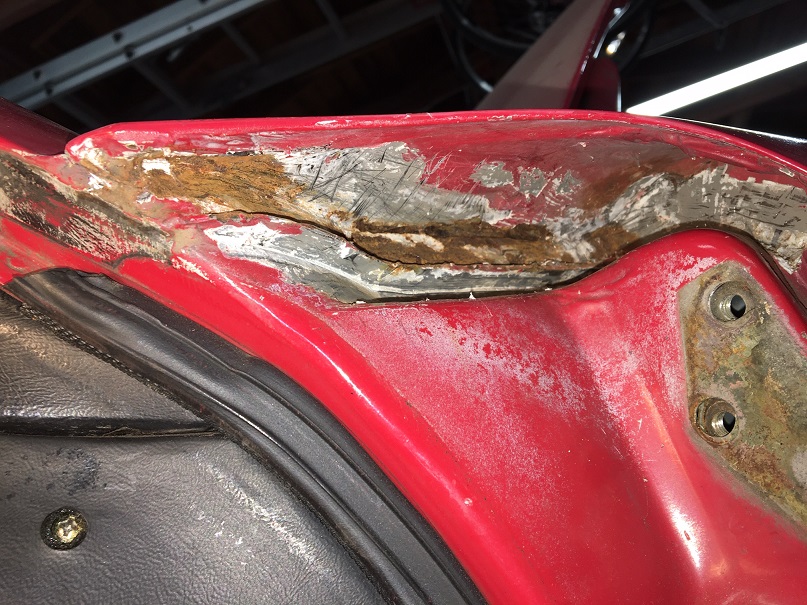 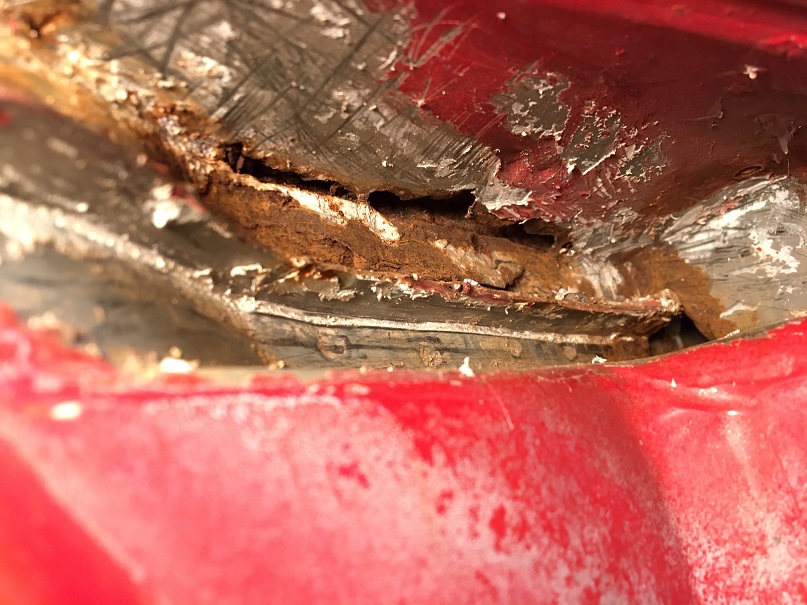 I might be able to cut this from the underside preventing me from cutting the outer surface of the fender. But I would like to better understand what is happening at the junction to the body. How many layers are there from the fender, one or two? Is the metal peeling off at the joint to the body the metal from the bulkhead/inner layer, or is it the outer fender layer? As a reference, this if the situation of the channel, surface rust, but how bad? Is there a way to better know without destroying? Maybe poke with a screwdriver? (IMG:style_emoticons/default/confused24.gif) 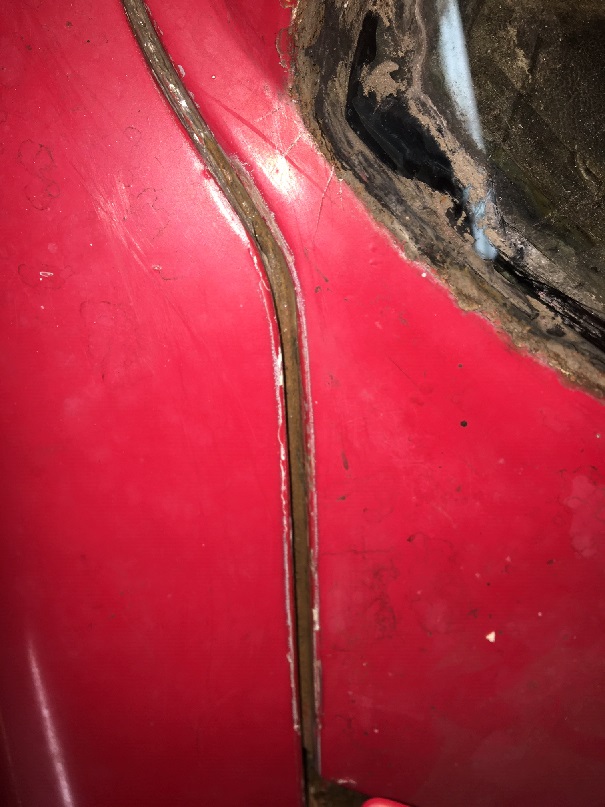 Comments appreciated (IMG:style_emoticons/default/smile.gif) |
   |

 
|
Posts in this topic
Montreal914 Rust repair before paint Oct 24 2020, 05:59 PM didenpx Beautiful work! Jan 1 2026, 07:58 AM slowrodent Wow! Super-impressive! Seems to be just ... Jan 1 2026, 09:31 AM friethmiller Eric,
There’s a lot to unpack but here’s a fe... Jan 1 2026, 02:38 PM Montreal914 Fred, thank you for all these inputs! Definite... Jan 13 2026, 10:13 PM seanpaulmc Way to get after it! :trophy: :cheer:
I... Jan 14 2026, 07:12 AM
didenpx Beautiful work! Jan 1 2026, 07:58 AM slowrodent Wow! Super-impressive! Seems to be just ... Jan 1 2026, 09:31 AM friethmiller Eric,
There’s a lot to unpack but here’s a fe... Jan 1 2026, 02:38 PM Montreal914 Fred, thank you for all these inputs! Definite... Jan 13 2026, 10:13 PM seanpaulmc Way to get after it! :trophy: :cheer:
I... Jan 14 2026, 07:12 AM
 Montreal914
Way to get after it! :trophy: :cheer:
... Jan 14 2026, 08:58 AM friethmiller Nice! Your longitudinal looks to be in fair c... Jan 14 2026, 09:26 AM 930cabman Great progress, I too will be dealing with the tai... Jan 14 2026, 10:15 AM Superhawk996 You’ve got some work cut out for you but it is a... Jan 14 2026, 11:33 AM Montreal914 Time for another small update. We went on vacation... Feb 21 2026, 11:31 AM 930cabman Not for the weak by any means
AFAIK both inner an... Feb 21 2026, 04:08 PM Montreal914 Not for the weak by any means
AFAIK both inner an... Feb 21 2026, 09:32 PM Patrick_139 Eric, after following your work for some time I ha... Feb 22 2026, 03:04 PM Montreal914
Eric, after following your work for some time I h... Feb 22 2026, 03:42 PM Montreal914 Productive week-end. :smash:
I began to remove ... Feb 22 2026, 05:05 PM HFC3 With out a doubt your work is to be admired and ap... Feb 22 2026, 08:02 PM nivekdodge wow,
I am truly impressed. you've come a l... Mar 12 2026, 07:26 PM Montreal914 Time for some overdue update. Although I did work ... Mar 29 2026, 08:54 PM porschetub
Time for some overdue update. Although I did work... Mar 29 2026, 10:20 PM porschetub
Time for some overdue update. Although I did work... Mar 29 2026, 10:51 PM Montreal914 Some progress...
Before installing any repair pie... Apr 29 2026, 09:40 PM friethmiller Great job! Enjoying the pics and reminiscing ... Apr 30 2026, 05:48 AM Root_Werks Love the pics! Keep them coming.
:welder: Apr 30 2026, 08:59 AM 930cabman Great work, the things we put ourselves through??
... May 2 2026, 05:26 PM Montreal914 Do you have a target completion
I wrapped up the d... May 2 2026, 07:46 PM nivekdodge
Do you have a target completion
I wrapped up the ... May 3 2026, 07:13 PM worn The Amazon pump and chemical shower reminds me of ... May 30 2026, 06:31 PM Superhawk996 :welder: :smash: :D May 2 2026, 10:42 PM nivekdodge I don't like to past things here, but do a sea... May 4 2026, 07:26 PM Montreal914 More recent work to share. :)
Time to prepare t... May 17 2026, 10:25 AM Montreal914 And here is how I fabricated the front part of the... May 17 2026, 08:05 PM Montreal914 Today's update will focus on the hell hole are... May 26 2026, 12:00 AM Montreal914 Part deux. :)
After more cleaning up of the are... May 26 2026, 12:32 AM Montreal914 I had some time to work on the car this week. :) ... May 29 2026, 09:25 PM 930cabman man O man, we sure have some patience!!
g... May 30 2026, 06:19 AM Montreal914 Yes, a few images doesn't translate much of th... May 30 2026, 09:43 AM worn I use my 3.2 for pretty long drives and really lik... May 30 2026, 06:36 PM Montreal914
I use my 3.2 for pretty long drives and really li... May 30 2026, 08:56 PM 930cabman
[quote name='worn' post='3259367' date='May 30 20... May 31 2026, 06:07 AM worn
[quote name='worn' post='3259367' date='May 30 20... Jun 2 2026, 06:11 PM 930cabman Very cool, you appear to have your ducks in a row,... May 30 2026, 10:55 AM nivekdodge Wow that's coming around like all get out
kev... May 31 2026, 07:39 PM Montreal914 Back to the rust... :rolleyes:
The next step wil... Jun 7 2026, 12:55 AM DennisV
Here is a printout to scale of the lines, fitting... Jun 29 2026, 07:24 AM mepstein Amazing amount of work. :beer2: Jun 7 2026, 04:56 AM friethmiller I smile inside when I see this type of cardboard f... Jun 7 2026, 06:18 AM Montreal914 I smile inside when I see this type of cardboard f... Jun 7 2026, 04:22 PM 930cabman Ah, the custom work is where the fun exists
looki... Jun 7 2026, 04:00 PM Montreal914 Weekend update and work documentation. :)
It is... Jun 14 2026, 11:32 AM Montreal914 More cleaning-up of that front area of the long. ... Jun 28 2026, 09:29 PM Cairo94507 Amazing work - really like the oil line design. ... Jun 29 2026, 07:10 AM friethmiller My favorite build thread! :popcorn: I enjo... Jun 29 2026, 07:22 AM tygaboy Wow. REALLY, really great work and attention to de... Jun 29 2026, 07:42 AM HFC3 Great build! Jun 29 2026, 08:11 AM 930cabman The stuff we get accomplished on these buggies is ... Jun 29 2026, 09:56 AM nivekdodge I see it and want to start over with #1 but only b... Jun 30 2026, 07:49 PM
Montreal914
Way to get after it! :trophy: :cheer:
... Jan 14 2026, 08:58 AM friethmiller Nice! Your longitudinal looks to be in fair c... Jan 14 2026, 09:26 AM 930cabman Great progress, I too will be dealing with the tai... Jan 14 2026, 10:15 AM Superhawk996 You’ve got some work cut out for you but it is a... Jan 14 2026, 11:33 AM Montreal914 Time for another small update. We went on vacation... Feb 21 2026, 11:31 AM 930cabman Not for the weak by any means
AFAIK both inner an... Feb 21 2026, 04:08 PM Montreal914 Not for the weak by any means
AFAIK both inner an... Feb 21 2026, 09:32 PM Patrick_139 Eric, after following your work for some time I ha... Feb 22 2026, 03:04 PM Montreal914
Eric, after following your work for some time I h... Feb 22 2026, 03:42 PM Montreal914 Productive week-end. :smash:
I began to remove ... Feb 22 2026, 05:05 PM HFC3 With out a doubt your work is to be admired and ap... Feb 22 2026, 08:02 PM nivekdodge wow,
I am truly impressed. you've come a l... Mar 12 2026, 07:26 PM Montreal914 Time for some overdue update. Although I did work ... Mar 29 2026, 08:54 PM porschetub
Time for some overdue update. Although I did work... Mar 29 2026, 10:20 PM porschetub
Time for some overdue update. Although I did work... Mar 29 2026, 10:51 PM Montreal914 Some progress...
Before installing any repair pie... Apr 29 2026, 09:40 PM friethmiller Great job! Enjoying the pics and reminiscing ... Apr 30 2026, 05:48 AM Root_Werks Love the pics! Keep them coming.
:welder: Apr 30 2026, 08:59 AM 930cabman Great work, the things we put ourselves through??
... May 2 2026, 05:26 PM Montreal914 Do you have a target completion
I wrapped up the d... May 2 2026, 07:46 PM nivekdodge
Do you have a target completion
I wrapped up the ... May 3 2026, 07:13 PM worn The Amazon pump and chemical shower reminds me of ... May 30 2026, 06:31 PM Superhawk996 :welder: :smash: :D May 2 2026, 10:42 PM nivekdodge I don't like to past things here, but do a sea... May 4 2026, 07:26 PM Montreal914 More recent work to share. :)
Time to prepare t... May 17 2026, 10:25 AM Montreal914 And here is how I fabricated the front part of the... May 17 2026, 08:05 PM Montreal914 Today's update will focus on the hell hole are... May 26 2026, 12:00 AM Montreal914 Part deux. :)
After more cleaning up of the are... May 26 2026, 12:32 AM Montreal914 I had some time to work on the car this week. :) ... May 29 2026, 09:25 PM 930cabman man O man, we sure have some patience!!
g... May 30 2026, 06:19 AM Montreal914 Yes, a few images doesn't translate much of th... May 30 2026, 09:43 AM worn I use my 3.2 for pretty long drives and really lik... May 30 2026, 06:36 PM Montreal914
I use my 3.2 for pretty long drives and really li... May 30 2026, 08:56 PM 930cabman
[quote name='worn' post='3259367' date='May 30 20... May 31 2026, 06:07 AM worn
[quote name='worn' post='3259367' date='May 30 20... Jun 2 2026, 06:11 PM 930cabman Very cool, you appear to have your ducks in a row,... May 30 2026, 10:55 AM nivekdodge Wow that's coming around like all get out
kev... May 31 2026, 07:39 PM Montreal914 Back to the rust... :rolleyes:
The next step wil... Jun 7 2026, 12:55 AM DennisV
Here is a printout to scale of the lines, fitting... Jun 29 2026, 07:24 AM mepstein Amazing amount of work. :beer2: Jun 7 2026, 04:56 AM friethmiller I smile inside when I see this type of cardboard f... Jun 7 2026, 06:18 AM Montreal914 I smile inside when I see this type of cardboard f... Jun 7 2026, 04:22 PM 930cabman Ah, the custom work is where the fun exists
looki... Jun 7 2026, 04:00 PM Montreal914 Weekend update and work documentation. :)
It is... Jun 14 2026, 11:32 AM Montreal914 More cleaning-up of that front area of the long. ... Jun 28 2026, 09:29 PM Cairo94507 Amazing work - really like the oil line design. ... Jun 29 2026, 07:10 AM friethmiller My favorite build thread! :popcorn: I enjo... Jun 29 2026, 07:22 AM tygaboy Wow. REALLY, really great work and attention to de... Jun 29 2026, 07:42 AM HFC3 Great build! Jun 29 2026, 08:11 AM 930cabman The stuff we get accomplished on these buggies is ... Jun 29 2026, 09:56 AM nivekdodge I see it and want to start over with #1 but only b... Jun 30 2026, 07:49 PM  |
2 User(s) are reading this topic (2 Guests and 0 Anonymous Users)
0 Members:

|
Lo-Fi Version | Time is now: 3rd September 2026 - 02:12 AM |
Invision Power Board
v9.1.4 © 2026 IPS, Inc.