|
|
|
Porsche, and the Porsche crest are registered trademarks of Dr. Ing. h.c. F. Porsche AG.
This site is not affiliated with Porsche in any way. Its only purpose is to provide an online forum for car enthusiasts. All other trademarks are property of their respective owners. |
|
|

  |

| rfinegan |
 Jan 26 2021, 08:08 AM Jan 26 2021, 08:08 AM
Post
#21
|
|
Senior Member  Group: Members Posts: 1,204 Joined: 8-February 13 From: NC Member No.: 15,499 Region Association: MidAtlantic Region |
Thanks for the Tip: I think I am going to use the yoke for the initial build of the lower end (crank and rods, bearings and engine halfs)
When the Pistons come out and the Cylinders/heads. It bench work from there Best -Robert QUOTE(VaccaRabite @ Jan 26 2021, 06:00 AM)  Though I have built an engine on that type of yolk, its made for T1 engines and for a T4 engine it puts a LOT of stress on the engine case especially when the engine is more dressed. The better kind had a ring to let the case bear against. There is a very expensive one ($300) and a cheaper on like I have that has three spokes and a 1/2 ring. And for the life of me I can't remember who made mine. :/ Either way, I would not use that yolk for your engine build. Its rolling dice. You may be fine, or you may have a broken case. At the very least, weld a 1/2 ring around it for the case to bear against. Zach |
   |

 
|
| ValcoOscar |
Jan 26 2021, 08:22 AM
Post
#22
|
|
Garage Life Group: Members Posts: 2,625 Joined: 19-November 13 From: SoCal Member No.: 16,669 Region Association: Southern California |
QUOTE(rfinegan @ Jan 25 2021, 04:50 AM) UPDATE: Just received the Engine yoke for the HF stand from [url=https://ljaircooledengines.com[/url]. for under 40.00 (less shipping) bolted right on and woks fine with cheep engine stand or option to mount Desk top. ALSO. I purchased a set of used Early Weber 44 IDF carbs with the roller accelerator pumps ( Italian ) I think they will clean up nicely . I also have set of IDF 40 with 32 vents from previous build to choose for this build. The 44 IDF have 36 vents. The last set of 44 with big vents really made the top end on the 2L pull hard. The camshaft for my 2056 is the VW Type 4 Porsche 914 912E Basic 9530 Cam Kit and leaning towards the IDF 44 carbs. But not sure what vents to start with? Should work well with the Kerry hunter heads and Evo 2 muffler (still working out the details for the heads) (IMG:style_emoticons/default/popcorn[1].gif) (IMG:style_emoticons/default/popcorn[1].gif) (IMG:style_emoticons/default/popcorn[1].gif) Robert- I have some new leftover IDF Weber 44 pcs like stacks, gaskets, filters & rain hats. Yours for FREE, you pay shipping. PM me if interested. Oscar |
|
|
|
| rfinegan |
Jan 26 2021, 08:24 AM
Post
#23
|
|
Senior Member Group: Members Posts: 1,204 Joined: 8-February 13 From: NC Member No.: 15,499 Region Association: MidAtlantic Region |
Woohoo..thanks Oscar QUOTE(ValcoOscar @ Jan 26 2021, 06:22 AM) QUOTE(rfinegan @ Jan 25 2021, 04:50 AM) UPDATE: Just received the Engine yoke for the HF stand from [url=https://ljaircooledengines.com[/url]. for under 40.00 (less shipping) bolted right on and woks fine with cheep engine stand or option to mount Desk top. ALSO. I purchased a set of used Early Weber 44 IDF carbs with the roller accelerator pumps ( Italian ) I think they will clean up nicely . I also have set of IDF 40 with 32 vents from previous build to choose for this build. The 44 IDF have 36 vents. The last set of 44 with big vents really made the top end on the 2L pull hard. The camshaft for my 2056 is the VW Type 4 Porsche 914 912E Basic 9530 Cam Kit and leaning towards the IDF 44 carbs. But not sure what vents to start with? Should work well with the Kerry hunter heads and Evo 2 muffler (still working out the details for the heads) (IMG:style_emoticons/default/popcorn[1].gif) (IMG:style_emoticons/default/popcorn[1].gif) (IMG:style_emoticons/default/popcorn[1].gif) Robert- I have some new leftover IDF Weber 44 pcs like stacks, gaskets, filters & rain hats. Yours for FREE, you pay shipping. PM me if interested. Oscar |
|
|
|
| VaccaRabite |
Jan 26 2021, 08:34 AM
Post
#24
|
|
En Garde! Group: Admin Posts: 13,882 Joined: 15-December 03 From: Dallastown, PA Member No.: 1,435 Region Association: MidAtlantic Region |
QUOTE(rfinegan @ Jan 26 2021, 09:08 AM) Thanks for the Tip: I think I am going to use the yoke for the initial build of the lower end (crank and rods, bearings and engine halfs) When the Pistons come out and the Cylinders/heads. It bench work from there Best -Robert The entire engine should be built on the engine stand. You don't want to build 1/2 an then un-bolt it. And you really don't want to build the engine on a bench top. Being able to rotate the engine is very important especially when you are doing valve train geometry. Here is the GOOD 5 arm kind over on Ebay for under $100. You should buy this before you go much further and the engine gets heavy and awkward to mount. https://www.ebay.com/itm/VW-ALLEY-PORSCHE-9...Y4AAOxySE9Q8yfe I can't find who made mine (EMPI maybe?) and I can't google it up so it may no longer be available. On mine you had to cut the head off the engine stand and weld on the head that came with the yolk. No big deal. Just don't use the kind that you have. Zach |
|
|
|
| Mark Henry |
Jan 26 2021, 12:24 PM
Post
#25
|
|
that's what I do! Group: Members Posts: 20,065 Joined: 27-December 02 From: Port Hope, Ontario Member No.: 26 Region Association: Canada |
(IMG:style_emoticons/default/agree.gif)
You can bend up and weld in another arm and make a 1/3 ring out of some bar stock. If you do, weld the 3rd arm in off-center as it could interfere with installing the one piston pin. I built or modified 5 out of the 7 stands I now have, one is for 996/7 and I'll be building another MY96 shortly. Note this interference issue might just be type one, or is it 911....I forget offhand. |
|
|
|
| rfinegan |
Jan 27 2021, 09:09 AM
Post
#26
|
|
Senior Member Group: Members Posts: 1,204 Joined: 8-February 13 From: NC Member No.: 15,499 Region Association: MidAtlantic Region |
Today I started the engine balancing of the pistons. These are Keith Black 96 mm Pistons and were pretty close.
1) Weigh the pistons and list lightest to heaviest 2) Weigh the piston pins and list lightest to heaviest 3) Match pins to rods for average weights All in grams Pins: 1)104.85 2)104.82 3)104.75 4)104.93 KB Pistons 1)397.63 2)399.16 3)398.30 4)397.90 Final Piston and pins (after a little work) 1) 502.46 2) 502.70 3) 502.70 4) 502.69 For those with time on their hands , Will get the last .2 grams on the next pass of balancing because I have Free Covid time at home 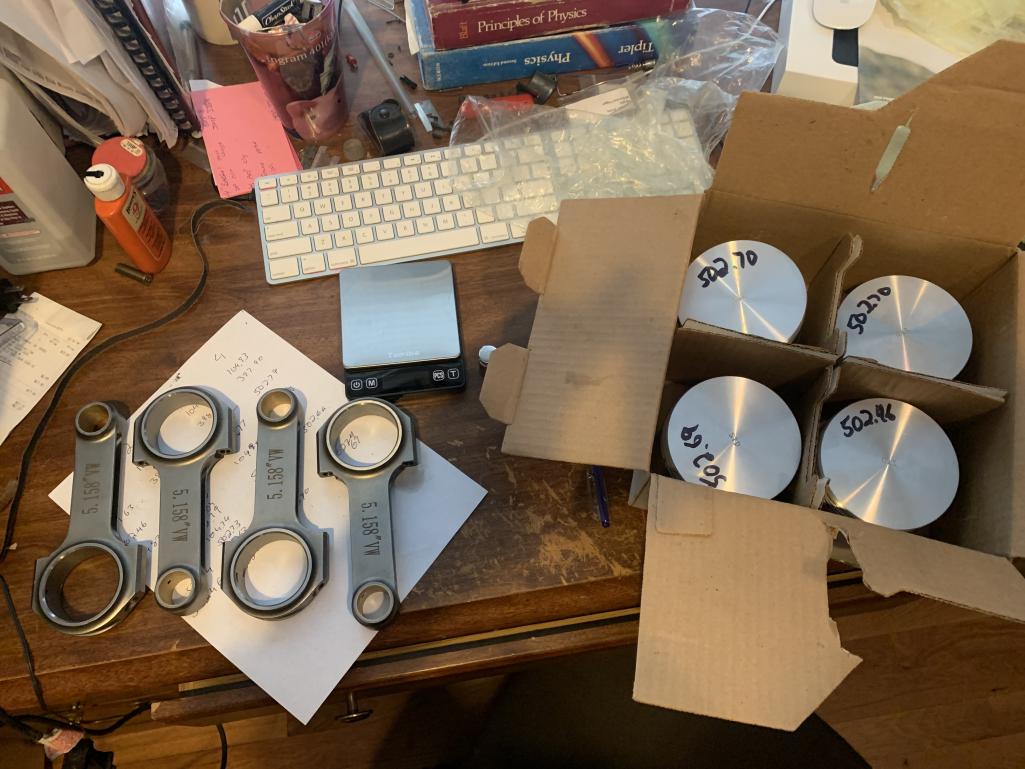 |
|
|
|
| Cairo94507 |
Jan 27 2021, 01:42 PM
Post
#27
|
|
Michael Group: Members Posts: 10,670 Joined: 1-November 08 From: Auburn, CA Member No.: 9,712 Region Association: Northern California |
Very nice. (IMG:style_emoticons/default/beerchug.gif)
|
|
|
|
| rfinegan |
Jan 27 2021, 06:40 PM
Post
#28
|
|
Senior Member Group: Members Posts: 1,204 Joined: 8-February 13 From: NC Member No.: 15,499 Region Association: MidAtlantic Region |
Cutting 0.002 in of trimming pads of KB pistons for final weight matching lightest piston
https://www.youtube.com/watch?v=zL80ndQkf1k |
|
|
|
| rfinegan |
Jan 27 2021, 06:42 PM
Post
#29
|
|
Senior Member Group: Members Posts: 1,204 Joined: 8-February 13 From: NC Member No.: 15,499 Region Association: MidAtlantic Region |
Final weight of trimmed KB piston..
Next up, making a jig for Split weighing the Connecting Rod... Big ends/ Small End/gross weight https://www.youtube.com/watch?v=TSKvXyK0LeI |
|
|
|
| barefoot |
Jan 27 2021, 06:51 PM
Post
#30
|
|
Senior Member Group: Members Posts: 1,517 Joined: 19-March 13 From: Charleston SC Member No.: 15,673 Region Association: South East States |
QUOTE(rfinegan @ Jan 27 2021, 07:40 PM) Cutting 0.002 in of trimming pads of FB pistons for final weight matching lightest piston https://www.youtube.com/watch?v=zL80ndQkf1k I did mine by machining an ID chamfer on the pins in the lathe. easier set-up |
|
|
|
| rfinegan |
Jan 27 2021, 06:57 PM
Post
#31
|
|
Senior Member Group: Members Posts: 1,204 Joined: 8-February 13 From: NC Member No.: 15,499 Region Association: MidAtlantic Region |
Tuning on the Piston pins is a great plan.. I decided to keep the pins neutral and easily swapped on replacement, tear down or inspection if needed.. Great tip for next time
-Robert |
|
|
|
| 930cabman |
Jan 27 2021, 07:23 PM
Post
#32
|
|
Advanced Member Group: Members Posts: 4,704 Joined: 12-November 20 From: Buffalo Member No.: 24,877 Region Association: North East States |
I was watching this thread close, until my recent purchase of a nice new oil tank and engine tin combo from MB911 for a /6 conversion. Guess I just ratcheted things up a bit. I will still be watching though
Thanks for posting |
|
|
|
| rfinegan |
Jan 28 2021, 04:18 PM
Post
#33
|
|
Senior Member Group: Members Posts: 1,204 Joined: 8-February 13 From: NC Member No.: 15,499 Region Association: MidAtlantic Region |
Today started making a test fixture for Split weight connecting rod measurements .Big end , small end ,and gross weight. Big + small = Gross If we have no loss in the set up ( easy enough to check)
I purchased my Rods from http://www.europeanmotorworks.com/pvw/024-...0%22+-+Set+of+4 after preliminary testing they seem good out of the box (only weighed the Big ends so far) The gross weight on the rods seem to be within +- 1 Gram on a kitchen scale (mine scale goes t o. 500 grams with a resolution of 0.01 grams) so I had to borrow my "cheff" son's scale Big ends weight : 1)251.62 g 2)251.56 g 3)251.30 g 4)251.40 g Small ends weight: 1)177.87 g 2)177.65 g 3)177.41 g 4)177.44 g The ARP bolts seem to be with .07 grams of each other https://www.youtube.com/watch?v=/fyrX9nuf7Ys |
|
|
|
| rfinegan |
Feb 2 2021, 06:05 AM
Post
#34
|
|
Senior Member Group: Members Posts: 1,204 Joined: 8-February 13 From: NC Member No.: 15,499 Region Association: MidAtlantic Region |
UPDATE:
I have the internals all sorted and balanced and turning to the Crankshaft , Flywheel and pressure plate, and fan. I decided I WILL have each Zero balanced dynamically and together. This needs special equipment typically found a good speed shop/ machine shop. I think I have a local source. I decide on a new flywheel. I have 2 older ones that look pretty good , but finding the spec the minimum machine to thickness shows some ?? Is the minimum 9mm or 11 mm (0.354331 or 0.433071 ) The two I measure came in at about the same @ 0.355 ( this would be minimum ) and should not be cut again. With the new one on the way I will measure the same way and post back my findings. No sense balancing a flywheel that will need to replaced in the near future or next clutch service. The crank is still standard on the journals. I will get a light polish on them to get them ready for the new bearings. |
|
|
|
| rfinegan |
Feb 2 2021, 04:46 PM
Post
#35
|
|
Senior Member Group: Members Posts: 1,204 Joined: 8-February 13 From: NC Member No.: 15,499 Region Association: MidAtlantic Region |
FWIW:
While waiting on the next round of parts and machining.... This 1.7 to 2.0 to 2056 upgraded started with a little knock at idle. With some hard street use the noise/knock increased. In a time, over 2 years and 20 to 25 k miles later I found bearing babbitt in the oil strainer. Thinking this was a rod knock that I was unable to isolate but pulling the spark on the rod with the noise. And the fact I now KNOW it was a bearing failure at this point the engine was pulled an retired and a stock 2.0l with Factory Djet was installed in its place This replacement engine runs good and starts in all weather on first try but the fun spirited driving was missed, so the tear down started on this 2.0l weber carbed track engine and this turned out to be the only failure noted so far  The Cam thrust bearing shown above has no babbitt material on the timing gear side. The cam was walking back and forth with each change of engine load. Under power it seemed OK. So while in there the plan to swap cam and bearings, this now turn into new pistons and rods. Now a full 2056 with rods cylinders pistons, lifters and heads. fuel by Kerry Hunter headers and Evo ii muffler and webber 44 IDFs. And to help ensure this failure is not going to happen any time soon an double cam thrust bearing is already in the purchased parts box. |
|
|
|
| rfinegan |
Feb 4 2021, 06:22 PM
Post
#36
|
|
Senior Member Group: Members Posts: 1,204 Joined: 8-February 13 From: NC Member No.: 15,499 Region Association: MidAtlantic Region |
Tonight I had some time to kill....
Matched balanced the flywheel bolts, pressure plate bolts and rod bolts( these were really close already). All to .5 gram or better. Now I do not have to number the bolts when I send the crank flywheel and pressure plate and fan for balance. The bolts can be installed in any of the holes and balance will be maintained. |
|
|
|
| barefoot |
Feb 5 2021, 01:25 PM
Post
#37
|
|
Senior Member Group: Members Posts: 1,517 Joined: 19-March 13 From: Charleston SC Member No.: 15,673 Region Association: South East States |
https://www.youtube.com/watch?v=/fyrX9nuf7Ys [/quote] Nice set-up for end to end balancing.! (IMG:style_emoticons/default/beer.gif) I tried using a much less sophisticated technique and gave up as i couldn't repeat results, just did overall rod weight balance |
|
|
|
| rfinegan |
Feb 5 2021, 03:08 PM
Post
#38
|
|
Senior Member Group: Members Posts: 1,204 Joined: 8-February 13 From: NC Member No.: 15,499 Region Association: MidAtlantic Region |
Today: Some of my parts are arriving....
My Flywheel shipped from LJ engineering , Pressure plate and disk are in transit and this arrived today;  This may be the Proverbial Cart before the Horse But was too good a deal to pass up! With Weber tuning this will give the user a MAJOR leg up, and save me the inverstment cost in jets and parts! |
|
|
|
| rfinegan |
Feb 13 2021, 05:48 PM
Post
#39
|
|
Senior Member Group: Members Posts: 1,204 Joined: 8-February 13 From: NC Member No.: 15,499 Region Association: MidAtlantic Region |
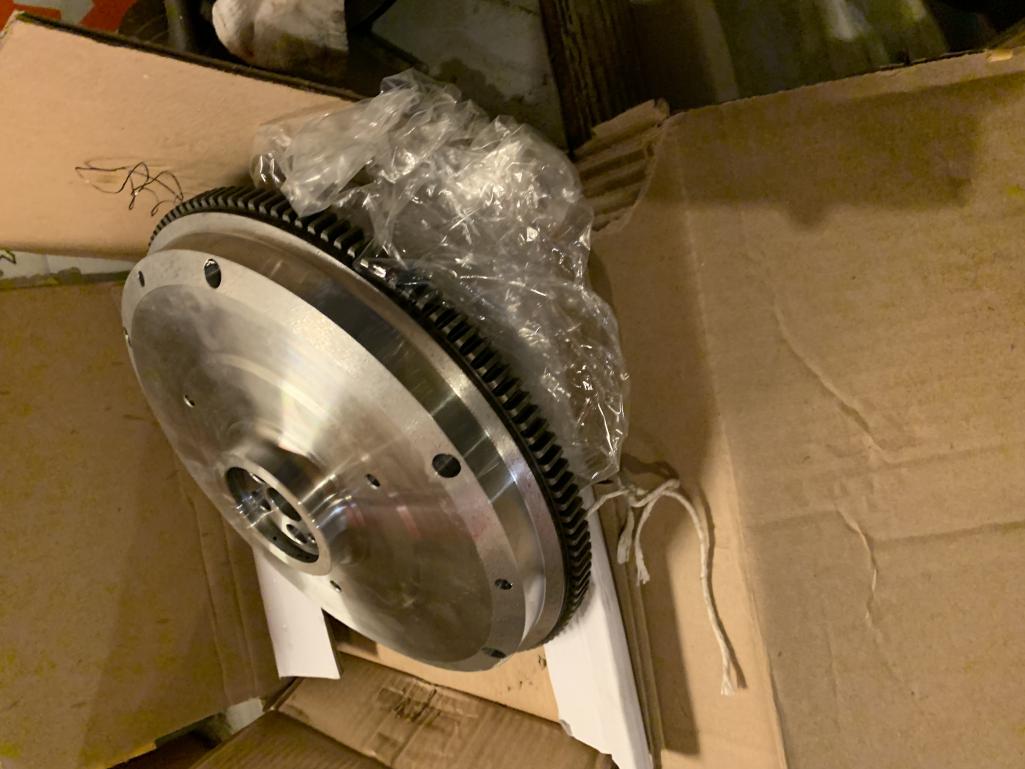
Fly wheel arrived from http://ljaircooledengines.com I was inspired by Jake to shed a few LBS.
Here is the untouched fly wheel on the lathe. It came in at a healthy 18.7 pounds before I started in on it... 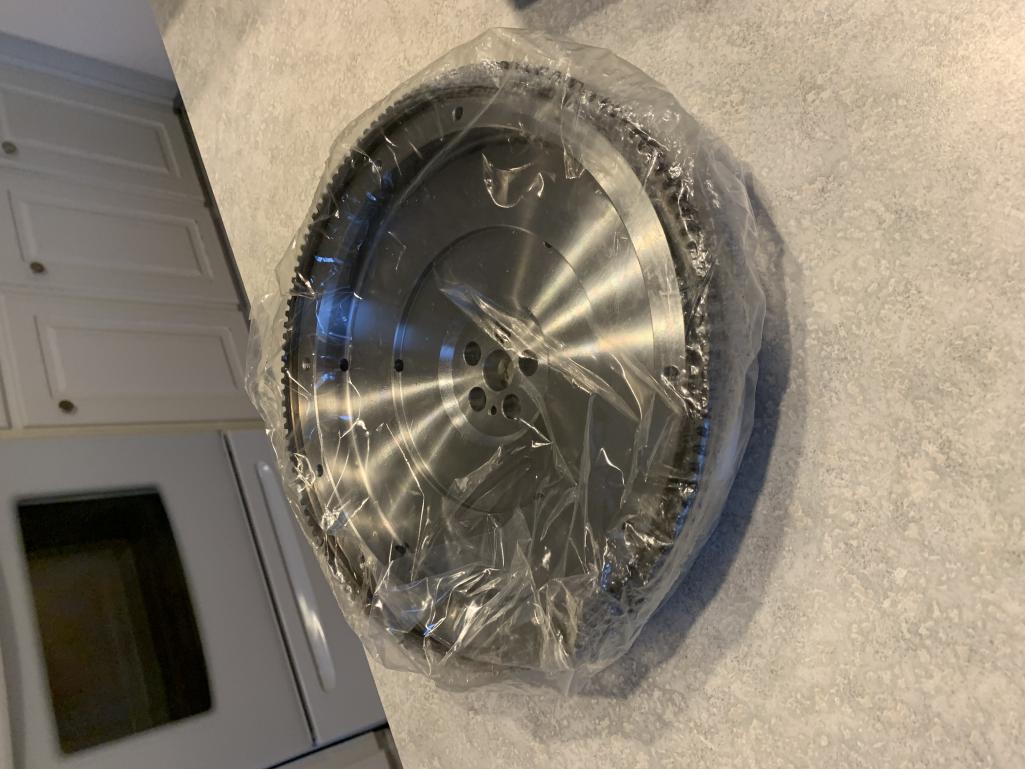 https://www.youtube.com/watch?v=7BGFDnC200M |
|
|
|
| rfinegan |
Feb 13 2021, 05:54 PM
Post
#40
|
|
Senior Member Group: Members Posts: 1,204 Joined: 8-February 13 From: NC Member No.: 15,499 Region Association: MidAtlantic Region |
Finished weight at just under 16 lbs. For a weight savings of almost 3 pounds . Not bad for my first DIY lighten flywheel (conservative approach)
 |
|
|
|
|
1 User(s) are reading this topic (1 Guests and 0 Anonymous Users)
0 Members:

|
Lo-Fi Version | Time is now: 15th June 2026 - 02:55 AM |
Invision Power Board
v9.1.4 © 2026 IPS, Inc.