|
|
|
Porsche, and the Porsche crest are registered trademarks of Dr. Ing. h.c. F. Porsche AG.
This site is not affiliated with Porsche in any way. Its only purpose is to provide an online forum for car enthusiasts. All other trademarks are property of their respective owners. |
|
|

  |

| Cairo94507 |
 Mar 24 2021, 07:27 AM Mar 24 2021, 07:27 AM
Post
#61
|
|
Michael  Group: Members Posts: 10,670 Joined: 1-November 08 From: Auburn, CA Member No.: 9,712 Region Association: Northern California |
@rfinegan That looks and sounds very nice. Perfect placement of the tailpipe. (IMG:style_emoticons/default/beerchug.gif)
|
   |

 
|
| rfinegan |
Mar 24 2021, 07:40 AM
Post
#62
|
|
Senior Member Group: Members Posts: 1,204 Joined: 8-February 13 From: NC Member No.: 15,499 Region Association: MidAtlantic Region |
Thank you @Cairo94507 . I went back to make sure of the muffler location before the final tack weld of the transition pipe (IMG:style_emoticons/default/beerchug.gif) I think the set up is quieter then the SS heat exchangers and the Bursche muffler I had previous. But now I can feel the power band of the (stock cam/engine) start to pull in the upper ranges
QUOTE(Cairo94507 @ Mar 24 2021, 05:27 AM)  @rfinegan That looks and sounds very nice. Perfect placement of the tailpipe. (IMG:style_emoticons/default/beerchug.gif) |
|
|
|
| rfinegan |
Mar 25 2021, 02:05 PM
Post
#63
|
|
Senior Member Group: Members Posts: 1,204 Joined: 8-February 13 From: NC Member No.: 15,499 Region Association: MidAtlantic Region |
While waiting on my parts I started with the cam and gear and clearance for the 30mm Schadek oil pump (T1)
Shortened the cam bolts for extra clearance : 1) 0.020 off the face of the cam bolt heads 2) Trimmed the rear of the cam bolts about flush with back of cam 3) Opened the oil pump outlet to match pump outlet 4) Hone cam thrust bearing for 0.002 end play 5) Cam spins freely on distributor side case half I used a 3 sided hand scraper to scrape/carve the aluminum in the hole to the line and blended the rest back down into the hole. EZ small bits removed and little chance of messing up the pump saddle with a power tool Also keeps the aluminum dust down till the final hone with a pencil wrapped with 600 https://www.youtube.com/watch?v=iX5ODEERDkg 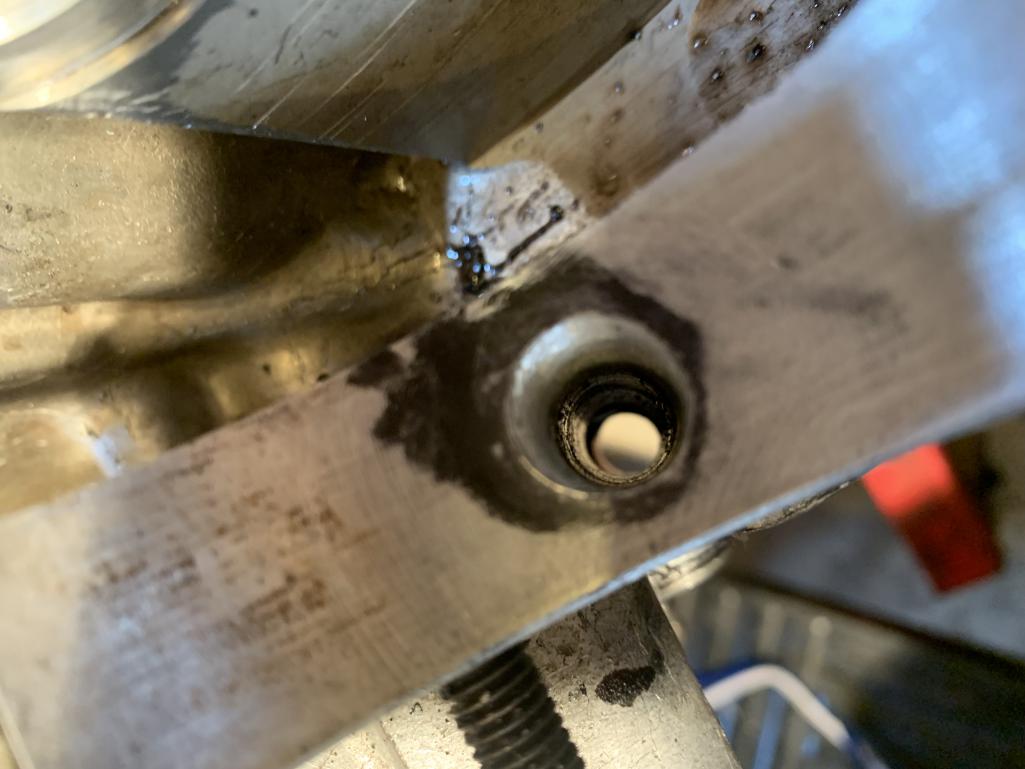 |
|
|
|
| rfinegan |
Mar 26 2021, 06:48 PM
Post
#64
|
|
Senior Member Group: Members Posts: 1,204 Joined: 8-February 13 From: NC Member No.: 15,499 Region Association: MidAtlantic Region |
Tonight, I fitted the second thrust bearing in the other case half. ( thrust bearing with tang) along with the center and rear cam bearings.
1) Remember to stone the back sides of the bearings. The stamped part numbers and sizes will displace material from the stamps and the bearing will sit higher there, deform and run tight. 2) The second thrust was tight and did not fit in the cam. I had to hone the thrust with 600 grit and flat surface. My Kurt Vice is a flat as I can get, hard steel surface. Hone with light spray oil 4-6 stokes on each side and try to install again. I keep with this procedure until the cam turns with no tight spots. Then proceed till I get 0.002 end play. Clean each time and light oil 3) Return to the other case half on the engine stand and stone the backs of the bearings.( I forgot about this) 4) Also remember to Tap the cam lightly with a soft brass or aluminum punch and dead blow hammer. 5 taps on each end to seat the thrust bearings in the case. Cam spins better with this and less drag! 5) Assemble cam and both case half. Test cam for spinning free. Mine would turn with screw driver OK..but more then before 5) Hand tight bold for case halfs. Same spin test. Light drag with large screwdriver in pump slot. OK but not great. 6) Tighten case bolts to 14 lbs. Spin test again. Same as above a little tight by hand and OK with screwdriver 7) 5 taps on end of cam wit head blow and soft punch. Spin test again. EVERYTHING GREAT. Spins EZ by hand. Check end shake. Small play of .002 Perfect Tomorrow: (IMG:style_emoticons/default/drooley.gif) Bolt stretch of the ARP bold and plsti-gage the rod bearings. Install gear, bearings and pins. IF all well install cam, crank and case halfs. (IMG:style_emoticons/default/beer.gif) |
|
|
|
| rfinegan |
Mar 28 2021, 07:41 AM
Post
#65
|
|
Senior Member Group: Members Posts: 1,204 Joined: 8-February 13 From: NC Member No.: 15,499 Region Association: MidAtlantic Region |
ARP bolt stretch:
Following the instructions for messing bolt stretch required a $60.00 to $200.00 bolt stretch dial indicator. I will do my best to user a micrometer for this. peeps just a little better them guessing and generic number. 0.0005 to 0.00055 torque 30 lbs. I also plastigaged the cleansed the rods too. 1) Clean rod ends and mating faceless 2) Remove grease from threaded rod ends 3) Apply arp molly lube rod threads faces, bolts 4) Assemble cap and rod 5) Torque bolts to 15 lbs 6) Losen first bolt and measure base rod boot length. Tighten to to rod stretch is achieved. repeat for other rod bolt MY results were: base bolt measure : 1.8640 bolt stretch : 1.8580 difference : 0.00060 @ 28lbs very close I used 27 for my final torque and bearing clearance of 0.0015 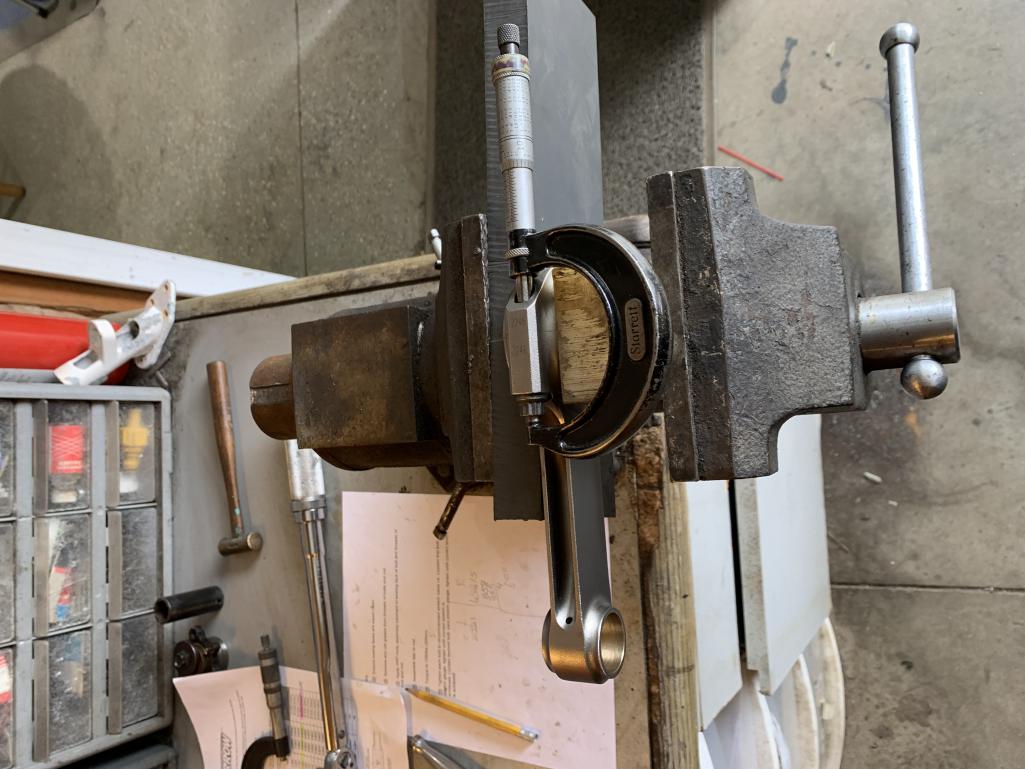 |
|
|
|
| rfinegan |
Mar 28 2021, 07:43 AM
Post
#66
|
|
Senior Member Group: Members Posts: 1,204 Joined: 8-February 13 From: NC Member No.: 15,499 Region Association: MidAtlantic Region |
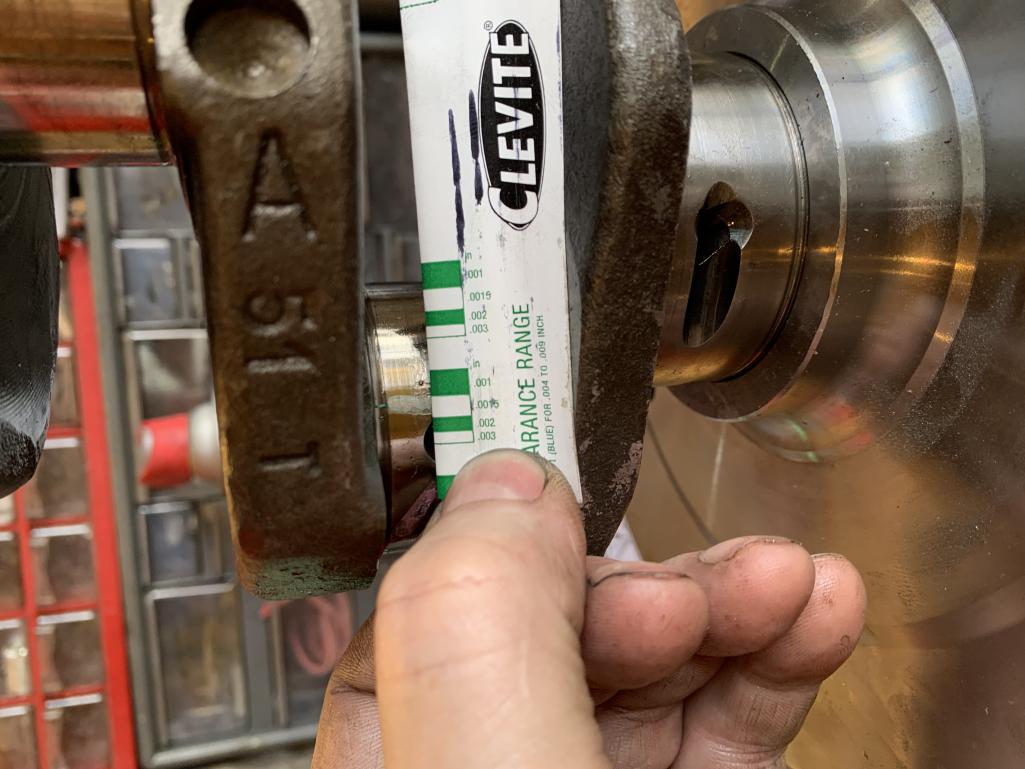
plasigage:
 |
|
|
|
| rfinegan |
Mar 28 2021, 07:46 AM
Post
#67
|
|
Senior Member Group: Members Posts: 1,204 Joined: 8-February 13 From: NC Member No.: 15,499 Region Association: MidAtlantic Region |
|
|
|
|
| ValcoOscar |
Mar 28 2021, 08:35 AM
Post
#68
|
|
Garage Life Group: Members Posts: 2,625 Joined: 19-November 13 From: SoCal Member No.: 16,669 Region Association: Southern California |
|
|
|
|
| rfinegan |
Mar 28 2021, 08:37 AM
Post
#69
|
|
Senior Member Group: Members Posts: 1,204 Joined: 8-February 13 From: NC Member No.: 15,499 Region Association: MidAtlantic Region |
@ValcoOscar It feels like I'm finally getting somewhere....Starting to go back together!
(IMG:style_emoticons/default/beerchug.gif) |
|
|
|
| Mark Henry |
Mar 28 2021, 09:59 AM
Post
#70
|
|
that's what I do! Group: Members Posts: 20,065 Joined: 27-December 02 From: Port Hope, Ontario Member No.: 26 Region Association: Canada |
QUOTE(rfinegan @ Mar 28 2021, 09:41 AM) ARP bolt stretch: Following the instructions for messing bolt stretch required a $60.00 to $200.00 bolt stretch dial indicator. I will do my best to user a micrometer for this. peeps just a little better them guessing and generic number. 0.0005 to 0.00055 torque 30 lbs. I also plastigaged the cleansed the rods too. 1) Clean rod ends and mating faceless 2) Remove grease from threaded rod ends 3) Apply arp molly lube rod threads faces, bolts 4) Assemble cap and rod 5) Torque bolts to 15 lbs 6) Losen first bolt and measure base rod boot length. Tighten to to rod stretch is achieved. repeat for other rod bolt MY results were: base bolt measure : 1.8640 bolt stretch : 1.8580 difference : 0.00060 @ 28lbs very close I used 27 for my final torque and bearing clearance of 0.0015 You torqued and used the stretch gauge? I've tested VW and Porsche ARP rod fasteners between 25 to 40 lbs and have found that I get the same result with both methods. 996 bolts (Carrillo and stock rods with ARP bolts) are 40 lbs, good thing the torque is accurate as 3 of 6 rods you can't get the stretch gauge on the bolt. |
|
|
|
| Mark Henry |
Mar 28 2021, 10:07 AM
Post
#71
|
|
that's what I do! Group: Members Posts: 20,065 Joined: 27-December 02 From: Port Hope, Ontario Member No.: 26 Region Association: Canada |
BTW good work! (IMG:style_emoticons/default/biggrin.gif)
|
|
|
|
| rfinegan |
Mar 28 2021, 02:27 PM
Post
#72
|
|
Senior Member Group: Members Posts: 1,204 Joined: 8-February 13 From: NC Member No.: 15,499 Region Association: MidAtlantic Region |
Mark Henry , I did both. The first rod i did the bolt stretch method on the 2 bolts as I outlined. I used a User recommended 28lbs and both were 0.0006. (5 tenths too much). Being new to bolt stretch and not having the proper tool for reproducible results. I decided to do one rod with new stretch methods and compare with the traditional torque method. In the end I ended in used a torque of 27 pound feet on all the bolts. and only experimented with the first 2 rod bolts. All the others were installed one time with the torque method and done. Even the plastigage was done on the first 2 bolts
|
|
|
|
| 930cabman |
Mar 28 2021, 02:50 PM
Post
#73
|
|
Advanced Member Group: Members Posts: 4,704 Joined: 12-November 20 From: Buffalo Member No.: 24,877 Region Association: North East States |
I know there are no dumb questions, but,
I also have used Plasticgage for checking bearing clearance's and feel this method is reasonably sound. Bolt stretch: once a bolt is stretched with X# ft/lbs. and released does it return to it's untorqued length? and can you repeat the process and obtain the same result with the same bolt? Does the stretch measurement include any stretching with the internal threads in the nut? BTW: thanks for documenting and good luck with the build |
|
|
|
| rfinegan |
Mar 28 2021, 03:34 PM
Post
#74
|
|
Senior Member Group: Members Posts: 1,204 Joined: 8-February 13 From: NC Member No.: 15,499 Region Association: MidAtlantic Region |
Torque-to-yield fastener
From Wikipedia, the free encyclopedia A torque to yield fastener (TTY) or stretch bolt is a fastener which is torqued beyond the state of elasticity and therefore undergoes plastic deformation, causing it to become permanently elongated.[1][2] Fastener[edit] Torquing a fastener to its yield point results in a high preloading of the fastener which, depending on the load frequency and amplitude, can significantly increase the fatigue life of the fastener. When the applied load doesn't surpass the clamping force of the fastener, the strain of the fastener will be lower than when the preloading is smaller than the applied load. It is therefore beneficial in high-frequency high-load situations with a higher risk of fatigue related failure, like a bolted down cylinder head, to use torque to yield bolts.[citation needed] Advantage: Compared to normally tightened hardware, a smaller sized TTY bolt/screw may be used while still maintaining the same clamping force. Disadvantage: A drawback with TTY hardware is that it normally has to be replaced when loosened, for example when the cylinder head is removed.[3] SO...I may have not followed the process of torque stretch or TTY as I did a bench test on the stretch method with just the rod. And I believe the bolts are one time use but the advantages above may be with it. Anyone feel I should replace the 2 ARP bolts I did the stretch test on prior to installing? This is the same rod as the one I Plasti-gaged too QUOTE(930cabman @ Mar 28 2021, 12:50 PM) I know there are no dumb questions, but, I also have used Plasticgage for checking bearing clearance's and feel this method is reasonably sound. Bolt stretch: once a bolt is stretched with X# ft/lbs. and released does it return to it's untorqued length? and can you repeat the process and obtain the same result with the same bolt? Does the stretch measurement include any stretching with the internal threads in the nut? BTW: thanks for documenting and good luck with the build |
|
|
|
| rfinegan |
Mar 28 2021, 03:39 PM
Post
#75
|
|
Senior Member Group: Members Posts: 1,204 Joined: 8-February 13 From: NC Member No.: 15,499 Region Association: MidAtlantic Region |
Also the bolt has a shaft that is designed to stretch, the head and threads should be maintained
|
|
|
|
| jd74914 |
Mar 29 2021, 09:00 AM
Post
#76
|
|
Its alive Group: Members Posts: 4,880 Joined: 16-February 04 From: CT Member No.: 1,659 Region Association: North East States |
QUOTE(rfinegan @ Mar 28 2021, 04:34 PM) Torque-to-yield fastener From Wikipedia, the free encyclopedia A torque to yield fastener (TTY) or stretch bolt is a fastener which is torqued beyond the state of elasticity and therefore undergoes plastic deformation, causing it to become permanently elongated.[1][2] Fastener[edit] Torquing a fastener to its yield point results in a high preloading of the fastener which, depending on the load frequency and amplitude, can significantly increase the fatigue life of the fastener. When the applied load doesn't surpass the clamping force of the fastener, the strain of the fastener will be lower than when the preloading is smaller than the applied load. It is therefore beneficial in high-frequency high-load situations with a higher risk of fatigue related failure, like a bolted down cylinder head, to use torque to yield bolts.[citation needed] Advantage: Compared to normally tightened hardware, a smaller sized TTY bolt/screw may be used while still maintaining the same clamping force. Disadvantage: A drawback with TTY hardware is that it normally has to be replaced when loosened, for example when the cylinder head is removed.[3] SO...I may have not followed the process of torque stretch or TTY as I did a bench test on the stretch method with just the rod. And I believe the bolts are one time use but the advantages above may be with it. Anyone feel I should replace the 2 ARP bolts I did the stretch test on prior to installing? This is the same rod as the one I Plasti-gaged too QUOTE(930cabman @ Mar 28 2021, 12:50 PM) I know there are no dumb questions, but, I also have used Plasticgage for checking bearing clearance's and feel this method is reasonably sound. Bolt stretch: once a bolt is stretched with X# ft/lbs. and released does it return to it's untorqued length? and can you repeat the process and obtain the same result with the same bolt? Does the stretch measurement include any stretching with the internal threads in the nut? BTW: thanks for documenting and good luck with the build As far as I know, ARP rod bolts are not torque to yield (only their head bolts). Per their website you can reuse rod bolts which have not been permanently yielded more than 0.001" or otherwised look damaged. I wouldn't worry about replacing them personally. (IMG:style_emoticons/default/smile.gif) Edit: Should add I've never used them on a TIV, only bike motors (GSX-R600 and CBR600RR) and have reused multiple times without issue. |
|
|
|
| rfinegan |
Mar 29 2021, 09:17 AM
Post
#77
|
|
Senior Member Group: Members Posts: 1,204 Joined: 8-February 13 From: NC Member No.: 15,499 Region Association: MidAtlantic Region |
@jd74914 Thanks for the feedback
|
|
|
|
| 930cabman |
Mar 29 2021, 11:54 AM
Post
#78
|
|
Advanced Member Group: Members Posts: 4,704 Joined: 12-November 20 From: Buffalo Member No.: 24,877 Region Association: North East States |
QUOTE(rfinegan @ Mar 28 2021, 03:39 PM) Also the bolt has a shaft that is designed to stretch, the head and threads should be maintained So, the shaft of the bolt is reduced in diameter, if so, the stretch probably occurs in this area and not within the threaded portions. Also, look very expensive $110./pair of bolts 3/8" x 1.6" |
|
|
|
| rfinegan |
Mar 29 2021, 11:57 AM
Post
#79
|
|
Senior Member Group: Members Posts: 1,204 Joined: 8-February 13 From: NC Member No.: 15,499 Region Association: MidAtlantic Region |
|
|
|
|
| rfinegan |
Mar 29 2021, 04:52 PM
Post
#80
|
|
Senior Member Group: Members Posts: 1,204 Joined: 8-February 13 From: NC Member No.: 15,499 Region Association: MidAtlantic Region |
Main bearing time:
ALWAYS measure your crank journals, case and thrust I reviewed my previous owners receipts and build list and found the crank was installed with standard/.025 rod bearings no cuts to the case. So this is what i ordered. WRONG 1) The bearings I ordered were correct for the rods. I looked a set of shells on the old rods and confirmed the stampings on them at .25 and the rods fit perfect as seen owt the .0015 plastigage. 2) The mains had 2 problems: a) The Silverline bearings I order were for the mains were wrong. Std, Std, Std. I needed .25, std, std and it ends up the mains were also cut to .25 mm b) The box appeared to be unopened with a small cellophane tap in place keeping the box closed. I had an oil spill on my bench and the box soaked it up very well. soggy Opening the box revealed the center bearing with multiple deep scratches in the babbit. Easily felt with finger nail and seen (see Photo) This is the 3rd issue I had with the parts supplier for my 2.0l 914 and will not return or order from them any more... The SOLUTION I now purchase all my parts from EMW (which I should have done in the first place). THEY ARE AWESOME! I have a set on .25 mains on the way from Jorge at EMW and will be here in a few days While these may be useable (if they fit) But so were my originals and getting the crank polished deserves some good NEW bearings IF anyone needs a set or part set of Standard main 2.0l baering please reach out to me. I can hook you up. 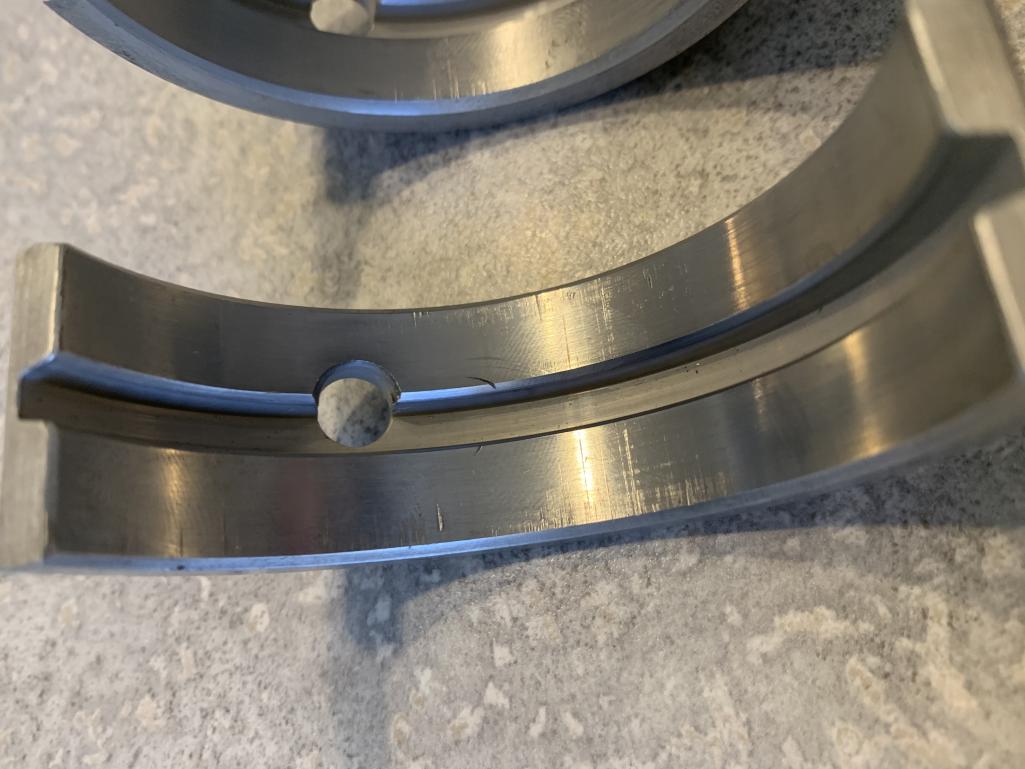 |
|
|
|
|
1 User(s) are reading this topic (1 Guests and 0 Anonymous Users)
0 Members:

|
Lo-Fi Version | Time is now: 15th June 2026 - 04:14 AM |
Invision Power Board
v9.1.4 © 2026 IPS, Inc.