|
|
|
Porsche, and the Porsche crest are registered trademarks of Dr. Ing. h.c. F. Porsche AG.
This site is not affiliated with Porsche in any way. Its only purpose is to provide an online forum for car enthusiasts. All other trademarks are property of their respective owners. |
|
|

  |

| john77 |
 Jan 20 2021, 03:54 PM Jan 20 2021, 03:54 PM
Post
#1
|
|
Senior Member  Group: Members Posts: 621 Joined: 21-February 14 From: Los Angeles Member No.: 17,027 Region Association: Southern California |
(IMG:http://www.914world.com/bbs2/uploads_offsite/live.staticflickr.com-17027-1611179651.1.jpg)
(IMG:http://www.914world.com/bbs2/uploads_offsite/live.staticflickr.com-17027-1611179652.2.jpg) Finally got the front flares welded on, metal finished, and covered with a couple of coats of epoxy primer. Before I move on to welding up the rears I want to fit the fiberglass front bumper. What's the best way to fit the brackets to the bumper... 1. Mount the brackets to the car, and then epoxy the bumper to the brackets and just hold in place with tape until the epoxy sets? 2. Test mount the bumper, mark where the brackets should be, and then attach them to the bumper off the car? (Not sure if there's even clearance behind to do this.) 3. Some obvious way I'm too stupid to think of? I'm assuming two-part epoxy is the best way to attach the brackets to the bumper... although, after losing other car parts on I-405 I figure I should double check. |
   |

 
|
| dhuckabay |
Jan 20 2021, 04:03 PM
Post
#2
|
|
Member Group: Members Posts: 222 Joined: 14-June 20 From: Idaho Member No.: 24,379 Region Association: Pacific Northwest |
QUOTE(john77 @ Jan 20 2021, 01:54 PM)  (IMG:http://www.914world.com/bbs2/uploads_offsite/live.staticflickr.com-17027-1611179651.1.jpg) (IMG:http://www.914world.com/bbs2/uploads_offsite/live.staticflickr.com-17027-1611179652.2.jpg) Finally got the front flares welded on, metal finished, and covered with a couple of coats of epoxy primer. Before I move on to welding up the rears I want to fit the fiberglass front bumper. What's the best way to fit the brackets to the bumper... 1. Mount the brackets to the car, and then epoxy the bumper to the brackets and just hold in place with tape until the epoxy sets? 2. Test mount the bumper, mark where the brackets should be, and then attach them to the bumper off the car? (Not sure if there's even clearance behind to do this.) 3. Some obvious way I'm too stupid to think of? I'm assuming two-part epoxy is the best way to attach the brackets to the bumper... although, after losing other car parts on I-405 I figure I should double check. No clue what the brackets are. If metal epoxy sticks poorly. If FRP then no problem. If they are metal you are going to need to do it with bolts. Have had to fiberglass an angle to the main part and then run bolts through the leg out. Nice looking job on the fender. |
|
|
|
| john77 |
Jan 20 2021, 04:16 PM
Post
#3
|
|
Senior Member Group: Members Posts: 621 Joined: 21-February 14 From: Los Angeles Member No.: 17,027 Region Association: Southern California |
[/quote]
No clue what the brackets are. If metal epoxy sticks poorly. If FRP then no problem. If they are metal you are going to need to do it with bolts. Have had to fiberglass an angle to the main part and then run bolts through the leg out. Nice looking job on the fender. [/quote] Thanks man. They're basically u-shaped fiberglass brackets that you have to attach to the back of the bumper and then bolt into the stock bumper mount holes. Which reminds me, anyone know if I also need to use the rubber bone shaped piece that the stock steel bumpers mount through? |
|
|
|
| Rleog |
Jan 20 2021, 04:45 PM
Post
#4
|
|
Senior Member Group: Members Posts: 608 Joined: 12-October 03 From: Middleton, MA Member No.: 1,239 Region Association: North East States |
I bolted the brackets on, using the donuts. Then held the bumper in position for test fit. If there is a large gap between bumper and body, the donuts can be shaved.
When I was satisfied with positioning, I mixed a small amount of body filler and covered the ends of the brackets, then pressed the bumper in position until the body filler set. You’re not trying to permanently cement the bumper onto the bracket here, only trying to accurately mark bracket positions on the bumper. Next remove the brackets and bumper and securely fix the brackets to the well marked locations on the bumper with whatever fixation material you choose. Someone else may have a better procedure, but this worked for me. |
|
|
|
| wysri9 |
Jan 20 2021, 04:47 PM
Post
#5
|
|
Member Group: Members Posts: 199 Joined: 23-August 13 From: Aberdeen, Scotland Member No.: 16,291 Region Association: England |
My fibreglass bumpers came with studs glasses in. I made up 2 part brackets that allowed adjustment to fit (on the basis that getting a single bracket measured up and made was too ambitious) and then used the conventional mounting bolts and dog bones. I’ll take some pics tomorrow of the finished set up.
|
|
|
|
| Krieger |
Jan 20 2021, 10:21 PM
Post
#6
|
|
Advanced Member Group: Members Posts: 4,704 Joined: 24-May 04 From: Santa Rosa CA Member No.: 2,104 Region Association: None |
QUOTE(john77 @ Jan 20 2021, 01:54 PM) (IMG:http://www.914world.com/bbs2/uploads_offsite/live.staticflickr.com-17027-1611179651.1.jpg) (IMG:http://www.914world.com/bbs2/uploads_offsite/live.staticflickr.com-17027-1611179652.2.jpg) Finally got the front flares welded on, metal finished, and covered with a couple of coats of epoxy primer. Before I move on to welding up the rears I want to fit the fiberglass front bumper. What's the best way to fit the brackets to the bumper... 1. Mount the brackets to the car, and then epoxy the bumper to the brackets and just hold in place with tape until the epoxy sets? 2. Test mount the bumper, mark where the brackets should be, and then attach them to the bumper off the car? (Not sure if there's even clearance behind to do this.) 3. Some obvious way I'm too stupid to think of? I'm assuming two-part epoxy is the best way to attach the brackets to the bumper... although, after losing other car parts on I-405 I figure I should double check. Do #1 then remove the bumper after the epoxy sets and put a few layers of fiberglass on the backside of the bumper and brackets. It doesn't have to be pretty. |
|
|
|
| Retroracer |
Jan 20 2021, 10:32 PM
Post
#7
|
|
Senior Member Group: Members Posts: 609 Joined: 7-July 13 From: Bend OR Member No.: 16,100 Region Association: Pacific Northwest |
Nice looking build!
Yes, my bumpers (QRS I think?) came with fiberglass brackets glassed on. The depth was such that I didn't need to use the dog bones, but I did have to shim one side slightly to get the shut lines side-to-side somewhere near matching.... FWIW, I believe the original factory fiberglass GT bumpers had metal brackets attached. - Tony |
|
|
|
| wysri9 |
Jan 21 2021, 06:31 AM
Post
#8
|
|
Member Group: Members Posts: 199 Joined: 23-August 13 From: Aberdeen, Scotland Member No.: 16,291 Region Association: England |
Here are pics of the brackets I made up. By tightening the adjustment bolt to the point where the two halves would just slide, I could mount the bumpers, move the bumper around to get best fit and then remove the bumper prior to locking the adjustment bolt. Worked for me (IMG:style_emoticons/default/smile.gif)
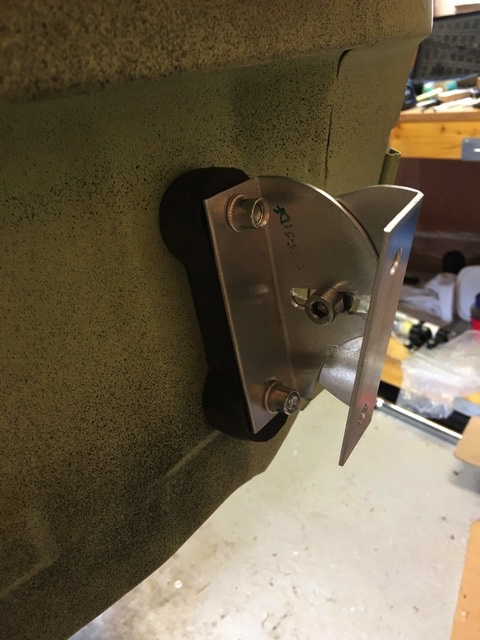  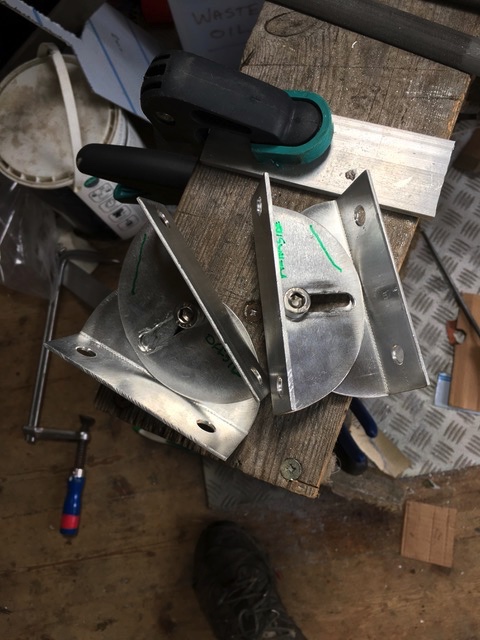 The outer bracket needed relieving as shown to allow the range of adjustment, and I used Rivnuts on the inner bracket to allow easy installation once the full bracket was finally adjusted and fixed to the bumper. |
|
|
|
| john77 |
Jan 21 2021, 12:03 PM
Post
#9
|
|
Senior Member Group: Members Posts: 621 Joined: 21-February 14 From: Los Angeles Member No.: 17,027 Region Association: Southern California |
QUOTE(wysri9 @ Jan 21 2021, 04:31 AM) Here are pics of the brackets I made up. By tightening the adjustment bolt to the point where the two halves would just slide, I could mount the bumpers, move the bumper around to get best fit and then remove the bumper prior to locking the adjustment bolt. Worked for me (IMG:style_emoticons/default/smile.gif) The outer bracket needed relieving as shown to allow the range of adjustment, and I used Rivnuts on the inner bracket to allow easy installation once the full bracket was finally adjusted and fixed to the bumper. Damn, that's the kind of over-engineering I can get behind. Great job! |
|
|
|
| mepstein |
Jan 21 2021, 12:11 PM
Post
#10
|
|
914-6 GT in waiting Group: Members Posts: 19,247 Joined: 19-September 09 From: Landenberg, PA/Wilmington, DE Member No.: 10,825 Region Association: MidAtlantic Region |
QUOTE(wysri9 @ Jan 21 2021, 07:31 AM) Here are pics of the brackets I made up. By tightening the adjustment bolt to the point where the two halves would just slide, I could mount the bumpers, move the bumper around to get best fit and then remove the bumper prior to locking the adjustment bolt. Worked for me (IMG:style_emoticons/default/smile.gif) The outer bracket needed relieving as shown to allow the range of adjustment, and I used Rivnuts on the inner bracket to allow easy installation once the full bracket was finally adjusted and fixed to the bumper. Best solution I’ve ever seen. |
|
|
|
| porschetub |
Jan 21 2021, 01:08 PM
Post
#11
|
|
Advanced Member Group: Members Posts: 4,697 Joined: 25-July 15 From: New Zealand Member No.: 18,995 Region Association: None |
Crude but effective for my speedster replica I shaped blocks of wood to fit the inside profile ,glued them on then glassed over them then added a steel plate with studs ,glassed them in.
Polyester resin will stick well to steel if you sandblast it or grind it will a very course sanding disk,been doing this for years and never had an issue. Seen many fiberglass parts with poorly made fastening points...seems to be industry standard (IMG:style_emoticons/default/lol-2.gif) . |
|
|
|
|
1 User(s) are reading this topic (1 Guests and 0 Anonymous Users)
0 Members:

|
Lo-Fi Version | Time is now: 1st May 2024 - 10:35 AM |
Invision Power Board
v9.1.4 © 2024 IPS, Inc.