|
|
|
Porsche, and the Porsche crest are registered trademarks of Dr. Ing. h.c. F. Porsche AG.
This site is not affiliated with Porsche in any way. Its only purpose is to provide an online forum for car enthusiasts. All other trademarks are property of their respective owners. |
|
|

  |

| Mikey914 |
 Feb 8 2021, 05:21 PM Feb 8 2021, 05:21 PM
Post
#81
|
|
The rubber man  Group: Members Posts: 12,782 Joined: 27-December 04 From: Hillsboro, OR Member No.: 3,348 Region Association: None |
Go ahead and post up some pics. I will also be including some more new hardware you didn't know you need that were not included in the 1st package
Go ahead and keep it if you will use it. Mark |
   |

 
|
| DRPHIL914 |
Feb 13 2021, 02:38 PM
Post
#82
|
|
Dr. Phil Group: Members Posts: 5,947 Joined: 9-December 09 From: Kennesaw, GA Member No.: 11,106 Region Association: South East States |
@Mikey914
@Superhawk996 here is my first batch of hardware and seals from 914rubber!! now the fun can begin- i will need a second set of stuff to do the other box, but i am going to install a brand new fan into one unit, and a known good oem one in the other. both need all new seals and will have a nice clean and restored fan housing (lowered half) i need a replacement top half if anyone has a mint one please PM me it’s the late type with the screen, the air/ water diverter part. tonight i will do one rebuild and post the pics of the during and after . - first pic is of the fan seal no one makes until now! all the ones i have opened had these seals in very poor shape, it’s a porous seal not solid like the new 914rubber seal. Thanks again Mark and Matt! Attached thumbnail(s) 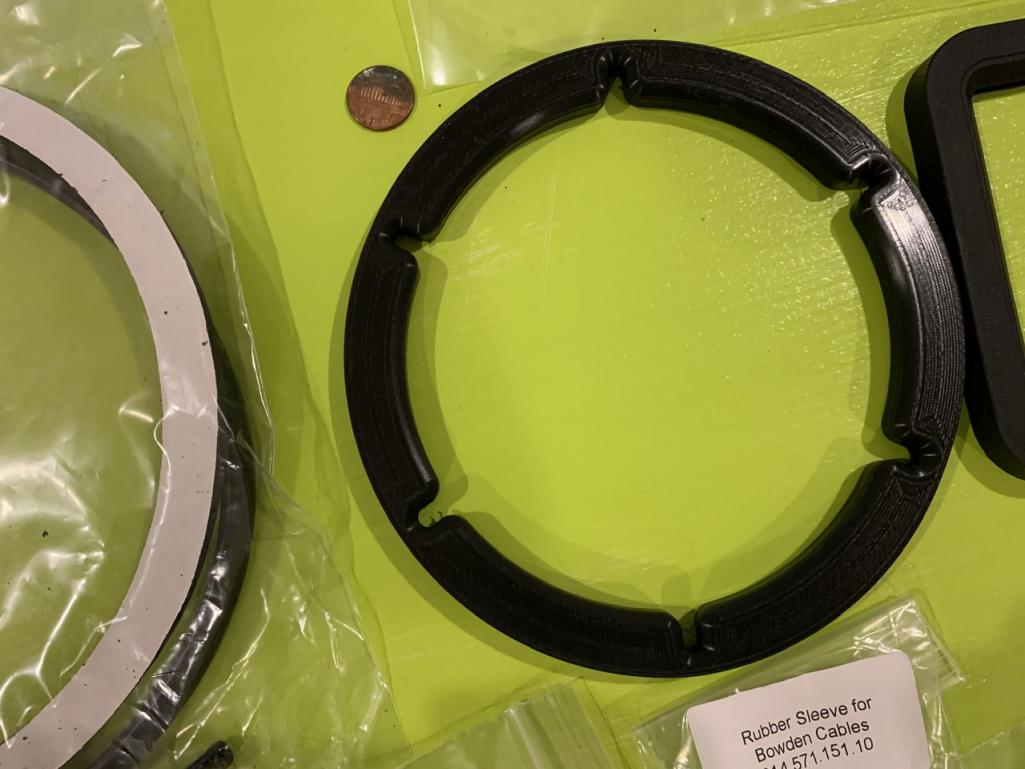 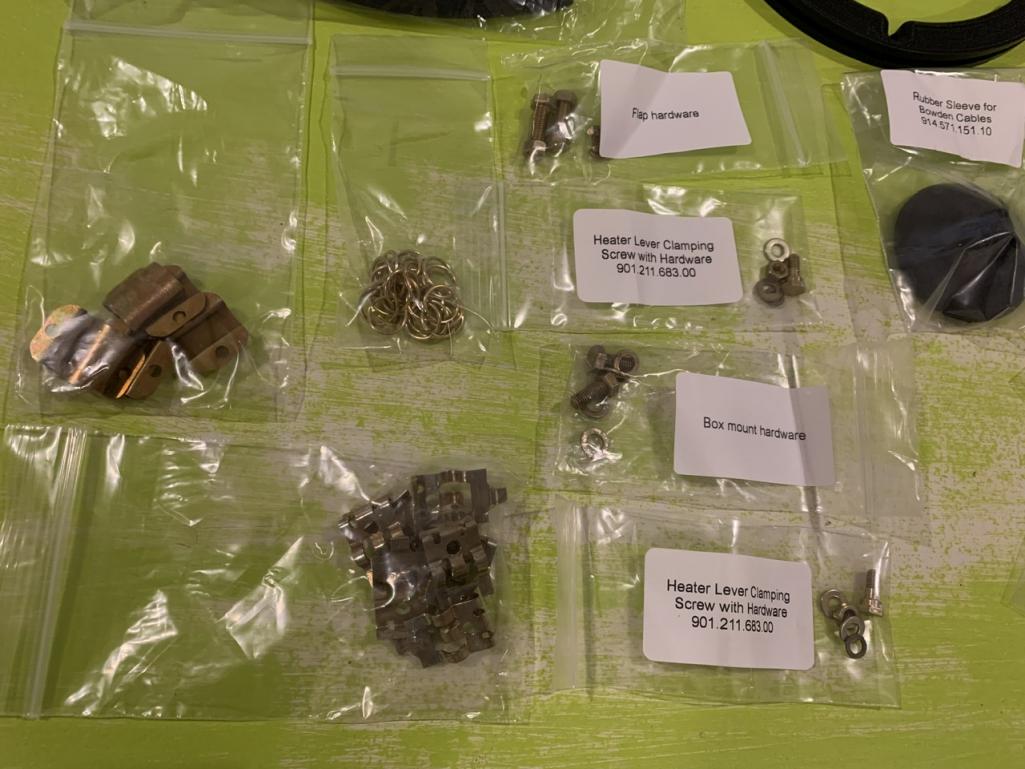 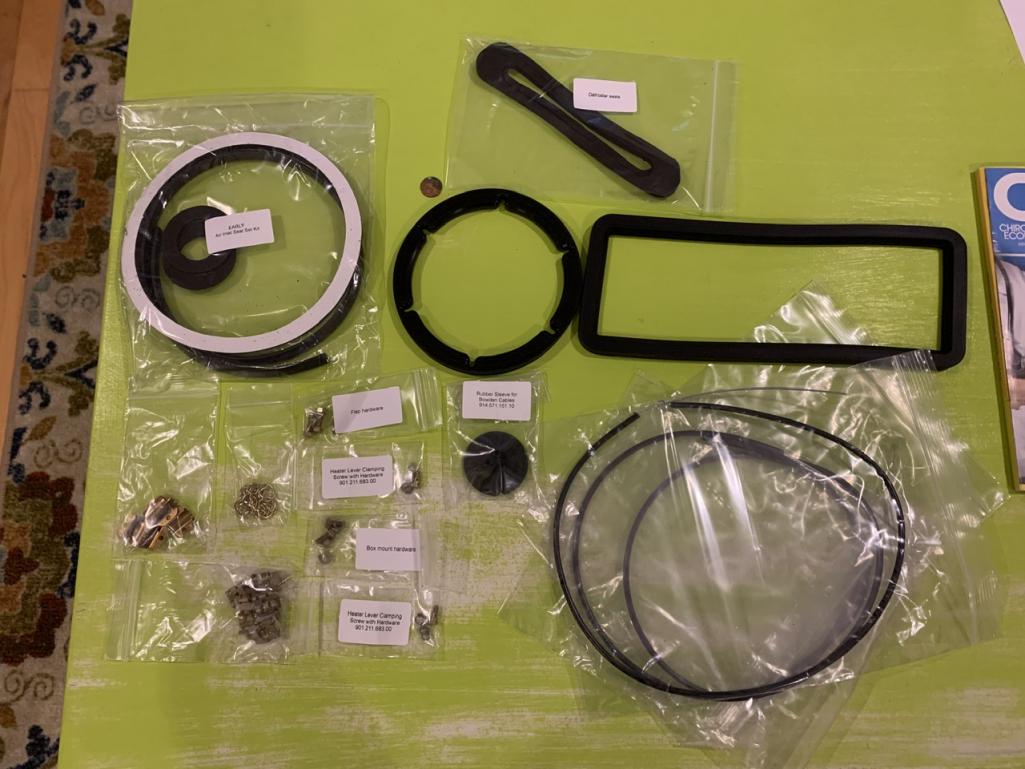
|
|
|
|
| Superhawk996 |
Feb 14 2021, 11:29 AM
Post
#83
|
|
914 Guru Group: Members Posts: 7,888 Joined: 25-August 18 From: Woods of N. Idaho Member No.: 22,428 Region Association: Galt's Gulch |
@Mikey914
(IMG:style_emoticons/default/drooley.gif) You're killing me. How do we get our hands on these goodies. Freshly plated omega clips would be outstanding. Same for the circular clips that hold the blower housing together. Blower frame to blower housing seal. Not shown on website. Group buy? |
|
|
|
| DRPHIL914 |
Feb 14 2021, 11:50 AM
Post
#84
|
|
Dr. Phil Group: Members Posts: 5,947 Joined: 9-December 09 From: Kennesaw, GA Member No.: 11,106 Region Association: South East States |
QUOTE(Superhawk996 @ Feb 14 2021, 12:29 PM)  @Mikey914 (IMG:style_emoticons/default/drooley.gif) You're killing me. How do we get our hands on these goodies. Freshly plated omega clips would be outstanding. Same for the circular clips that hold the blower housing together. Blower frame to blower housing seal. Not shown on website. Group buy? yes he said there will be a group but soon, and should be listed both individually and as a kit soon, not sure of the timeframe but i’m sure he’ll chime in soon |
|
|
|
| DRPHIL914 |
Feb 14 2021, 09:51 PM
Post
#85
|
|
Dr. Phil Group: Members Posts: 5,947 Joined: 9-December 09 From: Kennesaw, GA Member No.: 11,106 Region Association: South East States |
i’ve had this apart for some time and finally had the time today to really clean it up and reassemble it now that the resistor pack has been verified as working. this one got the brand new URO motor and 914rubber seal and hardware.
also i cleaned it and decreased it , used a green scotch-brite pad and then polished with 5 step just like a paint correction, went from very dull to like new. new flapper seals, the old ones were falling apart like dust . will ah e to drive the car this week to empty tank and then i can install the new fan box. Attached thumbnail(s) 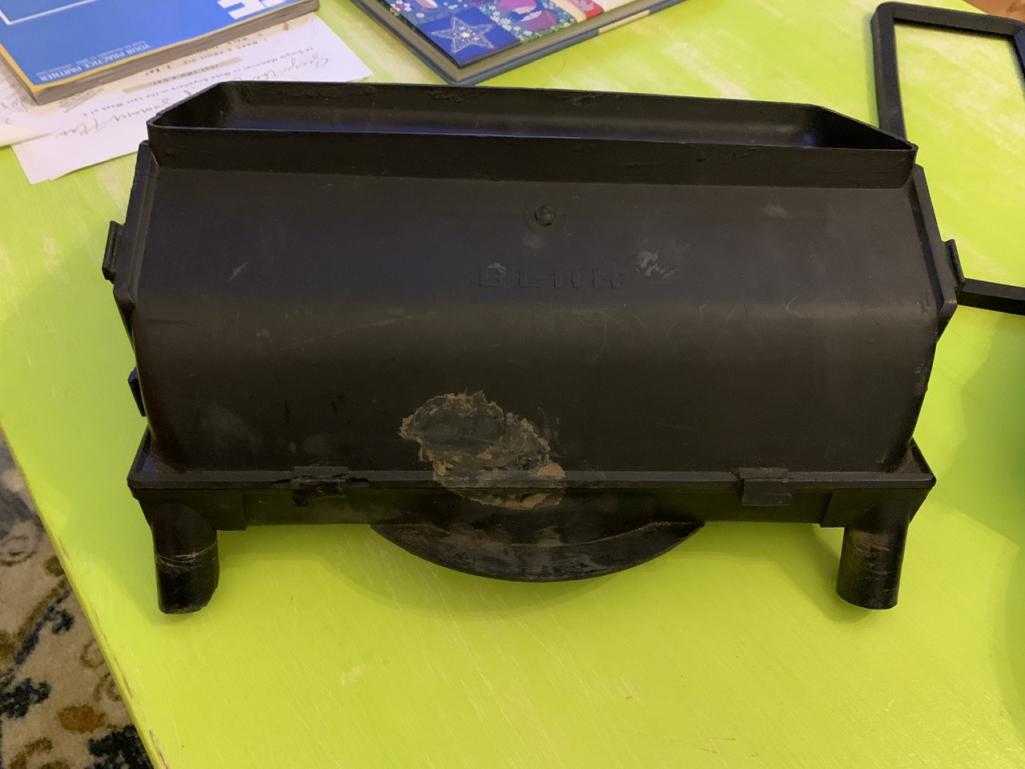   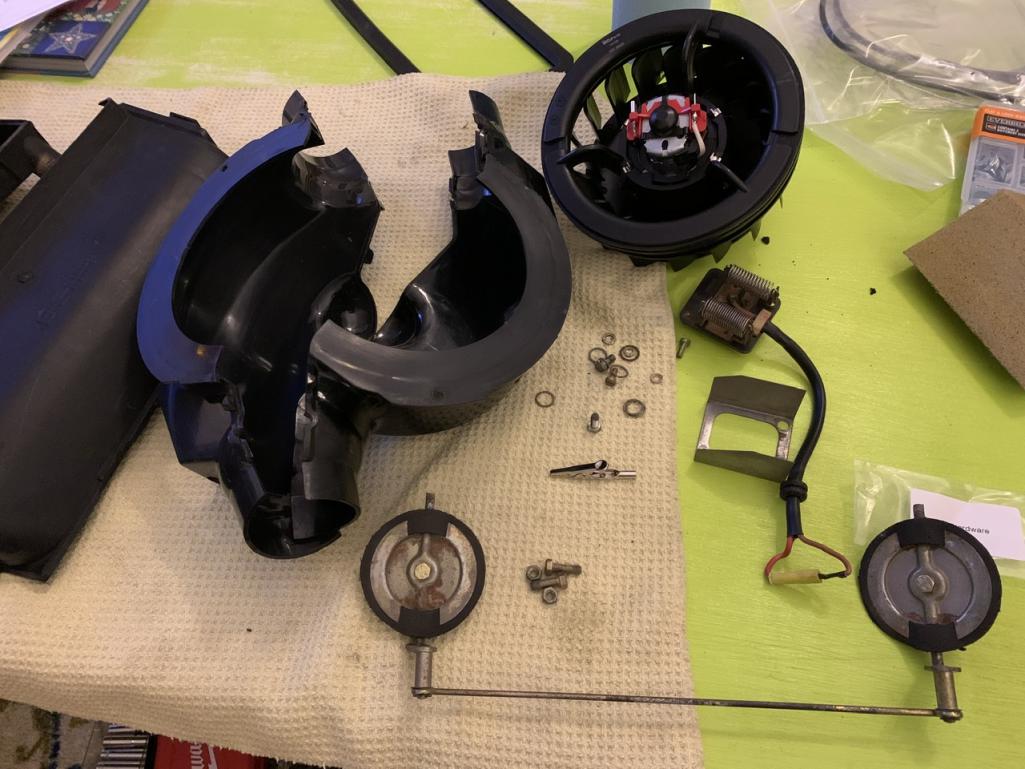     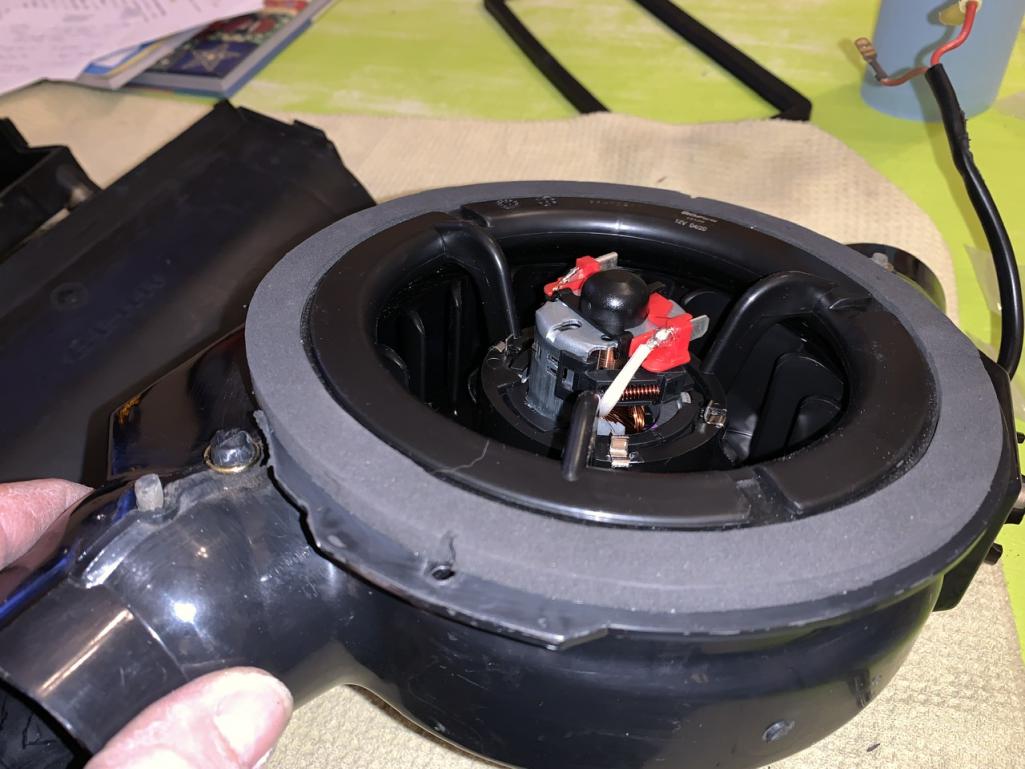 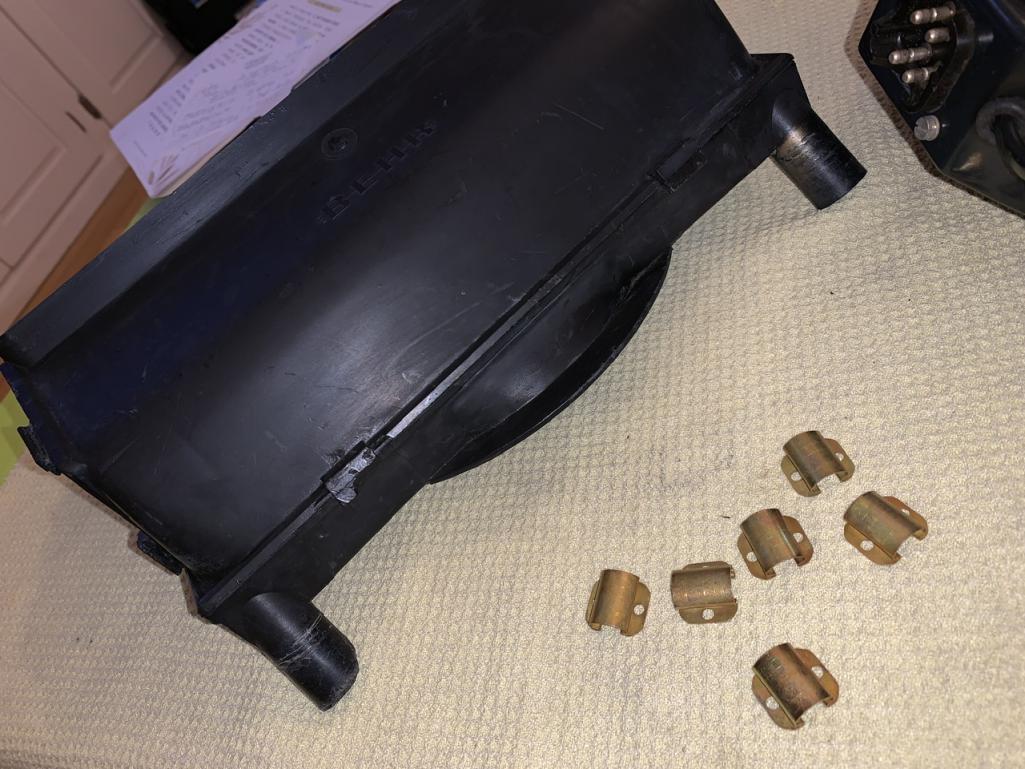 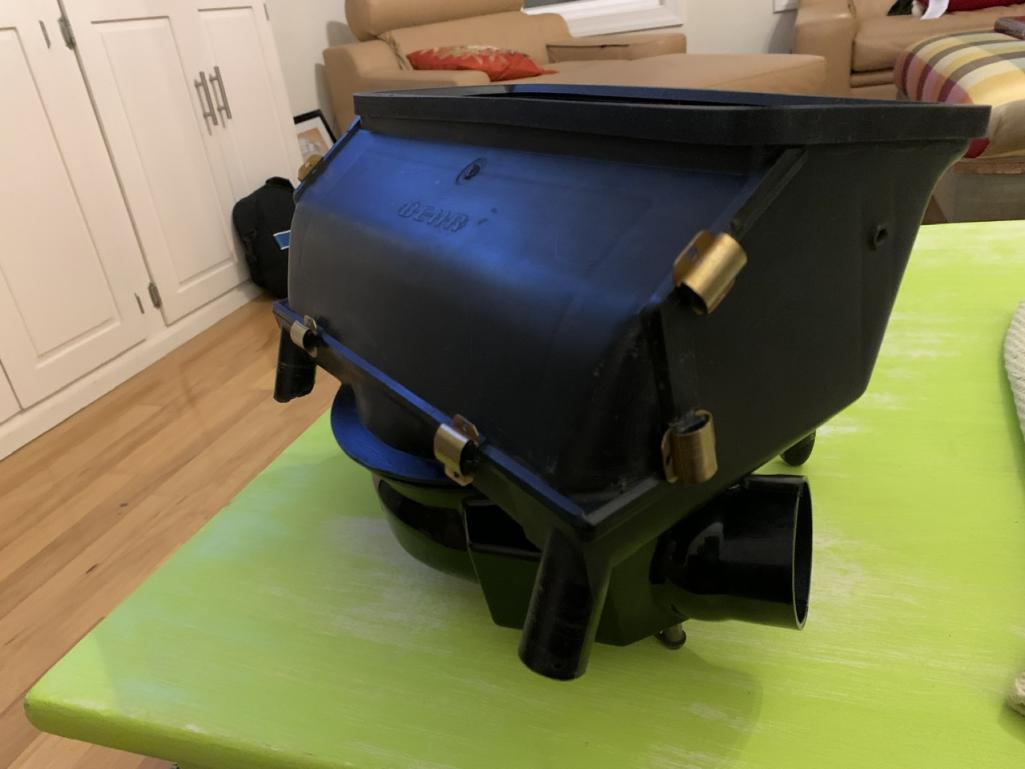 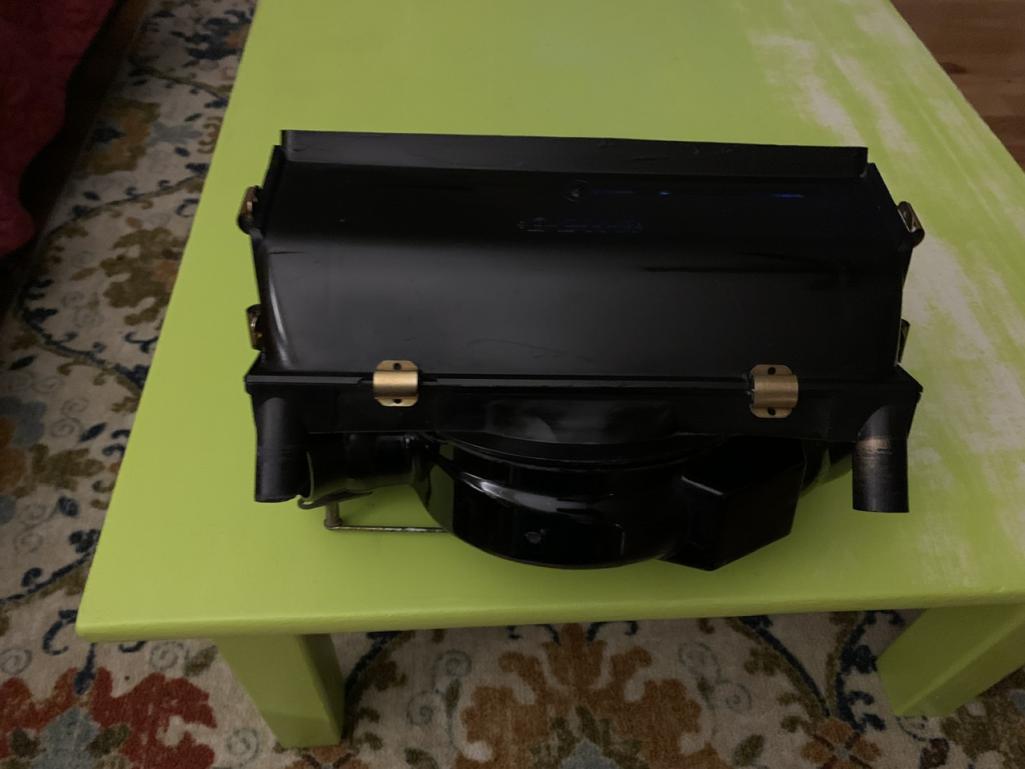
|
|
|
|
| DRPHIL914 |
Feb 14 2021, 10:03 PM
Post
#86
|
|
Dr. Phil Group: Members Posts: 5,947 Joined: 9-December 09 From: Kennesaw, GA Member No.: 11,106 Region Association: South East States |
after polishing , overkill i know but might as well make it look as stood on the outside as on the inside. once i get to the point of installing it i will post again, i hAvr to change sour my controller and cables, which Mark also has and supplied with this kit.
the only thing i’ve not located that may keep some from restoring their box is new resistor assembly . in the end i found 2 boxes that had good ones. i have another box i will rebuild when i get new seals for it too, this one will go in my car , that one will be offered up for sale. Attached thumbnail(s)  
|
|
|
|
| DRPHIL914 |
Mar 23 2021, 08:19 AM
Post
#87
|
|
Dr. Phil Group: Members Posts: 5,947 Joined: 9-December 09 From: Kennesaw, GA Member No.: 11,106 Region Association: South East States |
UPDATE: finally got around to installing this new refurbished box, well not quite , i tested it first, and i only get one speed, same as before , and this is a new fan, resistor pack was tested for proper values, etc. ok, first step i thought must be the controls, so i connected 2 other controllers that have cleaned contacts, and were tested before i bought them from the p.o. , same results. the only explanation is that the wiring for the other 2 speeds is compromised, only the white/green wire allows for acompleted circuit once the slider attaches to that contact it is connected to. If i move the wire from the low to high connector then the fan will turn on but not on the other 2, so tonight i will experiment with a couple temp wires from the controls to the fan, i do think for some reason - So the power goes from the fuse box to the fan and is hot from #8 fuse, and on with ignition. the circuit is completed when the lever is slid to right and the feeler contacts the selected connector and completes the circuit, low is just one wire, medium and high will have 2 feelers touching either #1&2 or #2&3. thus completing the circuit thru the different resistors , thru those and to the fan motor. and one else ever have this senario? |
|
|
|
| DRPHIL914 |
Mar 23 2021, 08:24 AM
Post
#88
|
|
Dr. Phil Group: Members Posts: 5,947 Joined: 9-December 09 From: Kennesaw, GA Member No.: 11,106 Region Association: South East States |
tank up and box accessed- pretty clean under there.
box is out and i am not putting anything back until i have it figured out, and it’s tested . it may require in complete new wiring. Attached thumbnail(s) 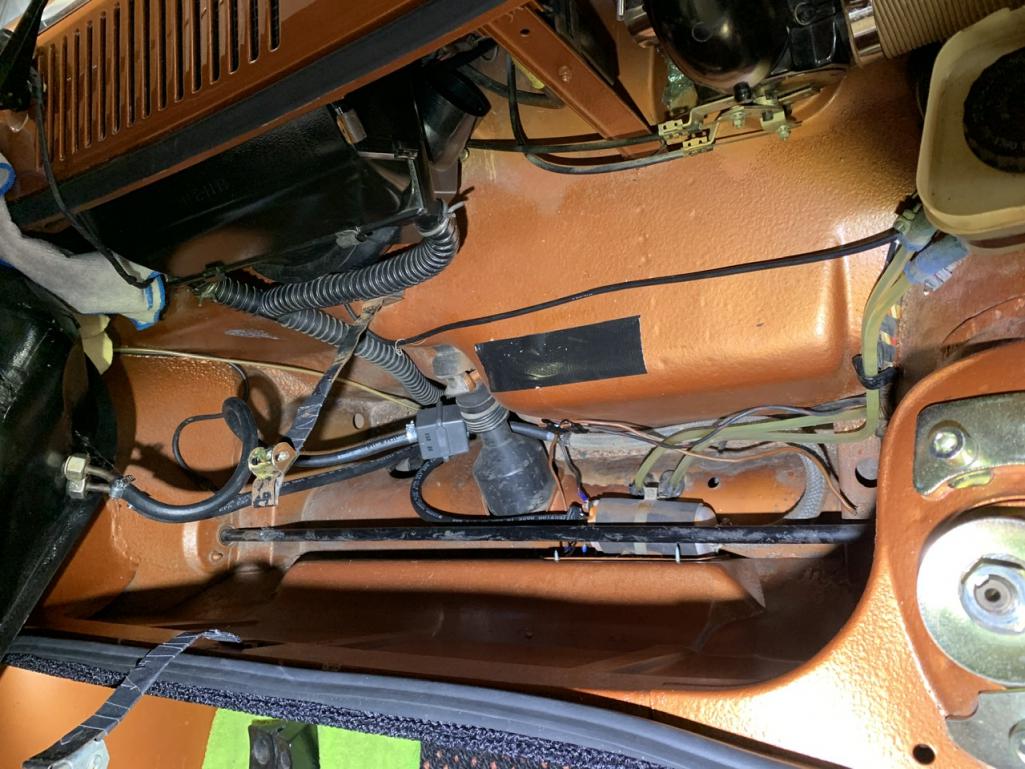 
|
|
|
|
| bob164 |
Mar 23 2021, 02:39 PM
Post
#89
|
|
Member Group: Members Posts: 106 Joined: 10-February 18 From: Seal Beach Member No.: 21,877 Region Association: Southern California |
Don't think this is the issue with the fans, but the top picture shows a brown wire (usually a ground) that is just laying on the sheetmetal near the drivers side strut mount. You might look around for more loose wires and correctly attach them.
|
|
|
|
| DRPHIL914 |
Mar 24 2021, 04:59 AM
Post
#90
|
|
Dr. Phil Group: Members Posts: 5,947 Joined: 9-December 09 From: Kennesaw, GA Member No.: 11,106 Region Association: South East States |
QUOTE(bob164 @ Mar 23 2021, 04:39 PM) Don't think this is the issue with the fans, but the top picture shows a brown wire (usually a ground) that is just laying on the sheetmetal near the drivers side strut mount. You might look around for more loose wires and correctly attach them. brown wire at bottom by the fuel pump is the ground for the pump, |
|
|
|
| bob164 |
Mar 24 2021, 11:22 AM
Post
#91
|
|
Member Group: Members Posts: 106 Joined: 10-February 18 From: Seal Beach Member No.: 21,877 Region Association: Southern California |
The picture isn't that clear, was referring to the other end of the wire, can't tell if it is bolted to a ground point, or just dangling.
|
|
|
|
| DRPHIL914 |
Mar 25 2021, 06:39 AM
Post
#92
|
|
Dr. Phil Group: Members Posts: 5,947 Joined: 9-December 09 From: Kennesaw, GA Member No.: 11,106 Region Association: South East States |
QUOTE(bob164 @ Mar 24 2021, 01:22 PM) The picture isn't that clear, was referring to the other end of the wire, can't tell if it is bolted to a ground point, or just dangling. good eye, i had not yet moved that wire, it was the original ground wire for the pump, i had installed the tank 2 years ago after restoration , had everything in place and discovered that the ground wire to the pump had come loose, so rather than pull the tank to get at the ground i ran a different wire for ground by accessing the pump thru the small access hole in the bulk head where the pump mounts on a '75 car. but i will get this one properly re attached before putting the tank back now. |
|
|
|
| DRPHIL914 |
Mar 25 2021, 06:52 AM
Post
#93
|
|
Dr. Phil Group: Members Posts: 5,947 Joined: 9-December 09 From: Kennesaw, GA Member No.: 11,106 Region Association: South East States |
ok update from trouble shooting last night,
after getting into this and finding i still could only get one speed on the fan, @Superhawk996 reached out to me and he suggested a few other things to check before moving forward, so i wanted to eliminate the medium and high speed wires as being the issue by testing them for continuity. Right now i do have the low speed working, the white/green wire. both the white(medium) and the white/yellow(high) both test same resistance, 2.8-3.0 ohms same as the one that does work , so that seems to eliminate the wires as the issue. i also ran a long jumper wire from the controller/sliders on each of those ground connections so with a new wire i get same result. which also in another way rules out the wires, and i have also hooked up 2 separate control mechanisms to rule that out and same issue there same result. this leaves me thinking i am back to considering the resistor pack as the issue. now when i had the unit out for restoration and installation of the new fan and seals we tested the resistance of those and they seem to have passed the test being at the correct ohm readings but maybe not. so--- i am going to look for a second resistor pack , if anyone had one that has bench tested please let me know, but until then i have 2 choices, one is just leave this in like it is and deal with it- hey i have one speed, a new fan that does work, but not on all 3 speeds, its just frustrating i cant get this 100% working. i am about to just say screw it. - i am probably saying this due to being up until 2:30 am this morning doing this and then trying to get the f-ing box back into place- now the mounting screw on left side stripped out. - way too tight on the seal fit- @Mikey914 this seal needs to be snug but not this tight, about 2mm less thick would help a lot in not having to use an f-ing crow bar to get the box squeezed up into place and bolted in...... |
|
|
|
| Rob-O |
Mar 25 2021, 07:27 AM
Post
#94
|
|
Senior Member Group: Members Posts: 1,317 Joined: 5-December 03 From: Mansfield, TX Member No.: 1,419 Region Association: Southwest Region |
Quick question and I don’t have a schematic in front of me to verify. But are the controls fully installed in the dash? And by that I mean is it bolted to the firewall using the 10mm bolt? It’s a bit foggy but I seem to recall only having one speed until I bolted the controls to the firewall.
|
|
|
|
| DRPHIL914 |
Mar 25 2021, 10:22 AM
Post
#95
|
|
Dr. Phil Group: Members Posts: 5,947 Joined: 9-December 09 From: Kennesaw, GA Member No.: 11,106 Region Association: South East States |
QUOTE(Rob-O @ Mar 25 2021, 09:27 AM) Quick question and I don’t have a schematic in front of me to verify. But are the controls fully installed in the dash? And by that I mean is it bolted to the firewall using the 10mm bolt? It’s a bit foggy but I seem to recall only having one speed until I bolted the controls to the firewall. yes, it is. oh and after reviewing again the schematic and my pictures and referencing another source, Superhawk996 had me go back and compare and due to my plug housing being cracked and gone, the wire had been crossed and i am pretty sure that they are not on the correct pin locations on the fan housing SO.... when i get home these will be moved, but i will test the unit first by using aligator clip to a chassis ground and test each separate ground on the pins, taking the control unit out of the equation. will see how this test goes , along with just verifying i have a full 12v at the fan coming from the fuse board. if its not, i have other issues.. |
|
|
|
| DRPHIL914 |
Mar 26 2021, 08:25 AM
Post
#96
|
|
Dr. Phil Group: Members Posts: 5,947 Joined: 9-December 09 From: Kennesaw, GA Member No.: 11,106 Region Association: South East States |
OK finally last night i was able to sort thru the wiring issues, figure out the proper positions for the fan wires, verified all the connections, the DAPO had list the plug housing and had not put them back in correct positions, with that corrected the new fan tested out and all 3 speeds work perfectly. before reinstalling i tested the other controllers and verified working along with my other 2 fans, those do work but not as well as brand new, so those will get rebuilt with new fans and hardware and seals. i will have 2 lower fan units that will be available and i can vouch for the resistor packs in both testing and bench tested and fully functional. this will be for sale soon if anyone needs one.
i struggled with one upper box unit that had a crack and was slightly warped, so the seal would not fit, that one had to be trashed, luckily i have a couple, 2 good ones so back together with new seals and clips. i used Ian’s video suggestions of using rubber bands to hold the sucker in place when reinstalling the box. the seals are tight but my biggest issue was the warping of the top edge of the box. the other issue with this is you have to pull the tank that’s a pain. a few pointers: 1. don’t forget to put the connection for the fuel level sender back on before the expansion tank is reattached. 2. put the air duct hoses on before the tank and expansion tank because the passenger side is almost impossible to do otherwise. 3. new cable slide so nice and smooth, put them in , it’s worth the time. - and the air box cable must be attached before box is installed . installing thie box would be a lot easier if that cable were longer, due to its length it’s so tight it’s hard to angle the box or pull it out far enough to get the box at the right angle to slide it into place. 4. use a clamp like Ian did in his video or a pry bar for leverage to push the box up into place far enough to ge the box mount screws into place. So i hope i don’t have to do this in this car again, but i am glad after 12 years i finally have a full functional defrost fan, and wiper mechanisms, and soon to be a new 911 motorized windshield washer pump conversion too. , while all this was open i added the wiring and the washer tubing, which no longer goes into the cabin. i installed a Carmagic switch into the column with my new levers i got from 914sixer. so that can be installed this week too! Done!! @Mike914 Mark thanks for making all the great parts and seals for the air box, 914rubber is the only company that makes the fan to housing seal, the big round one, and the vent seals and flapper seals! these are now in their site for sale. @UROpartsguy Drew, thanks for the info on the fans and making an affordable part! the fan is perfectly balanced. Attached thumbnail(s)  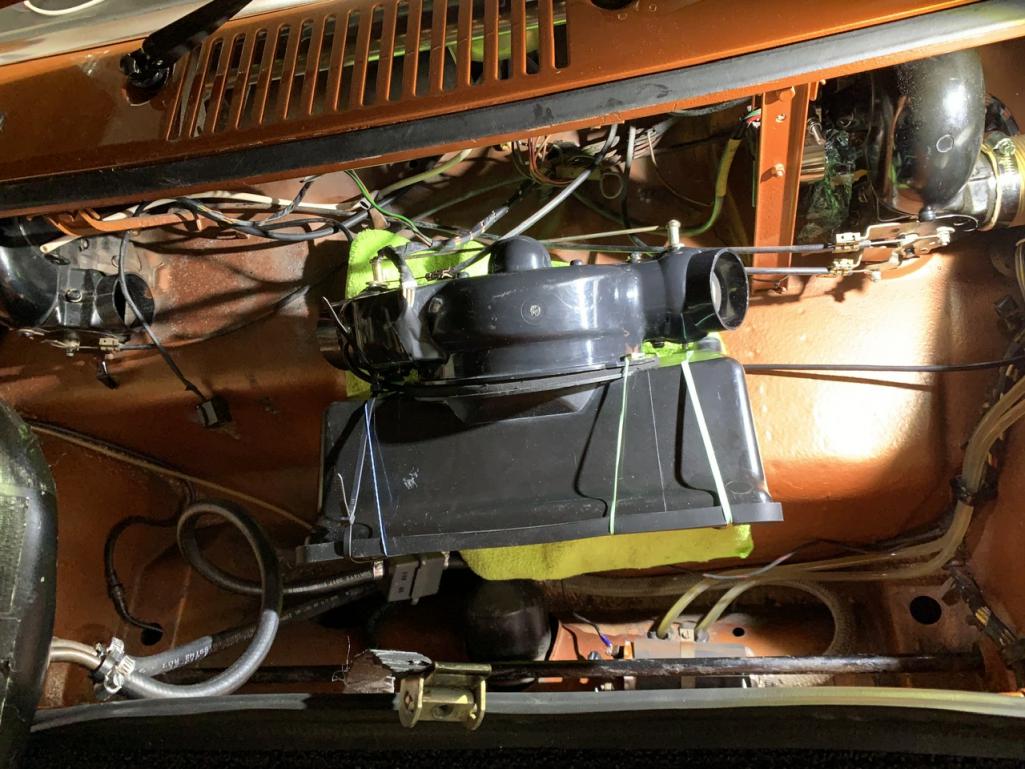 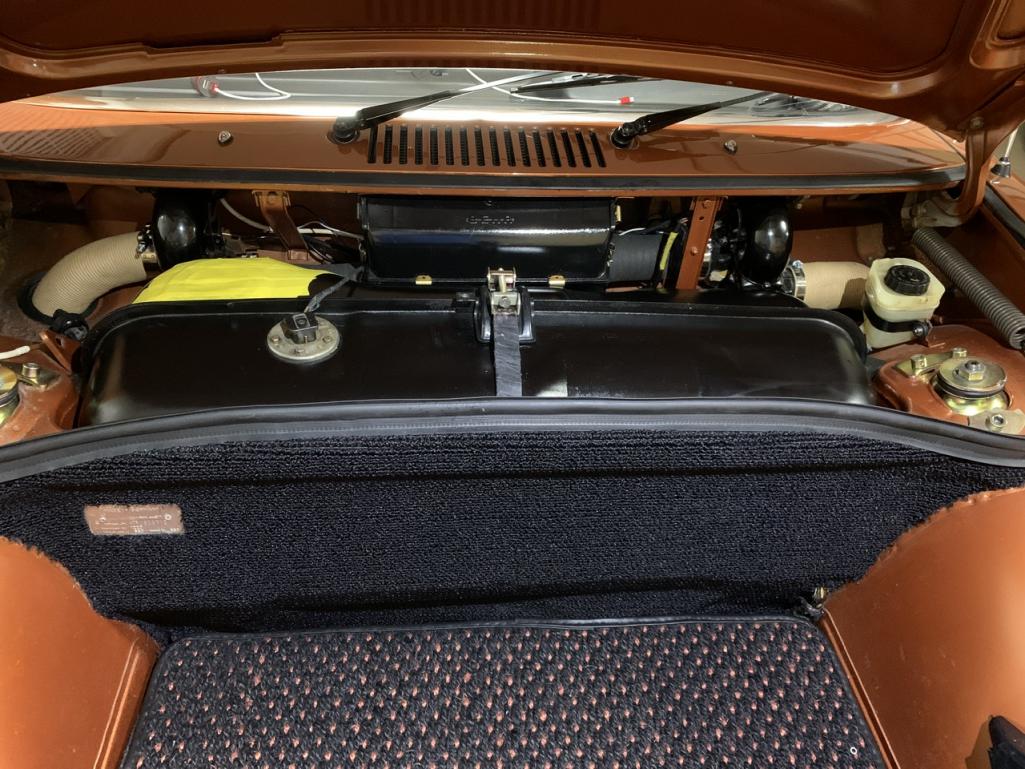 
|
|
|
|
| DRPHIL914 |
Mar 26 2021, 08:35 AM
Post
#97
|
|
Dr. Phil Group: Members Posts: 5,947 Joined: 9-December 09 From: Kennesaw, GA Member No.: 11,106 Region Association: South East States |
this is how the wiring should be connected.
i am missing the plastic plug so it was all messed up Attached thumbnail(s) 
|
|
|
|
| Mikey914 |
Mar 26 2021, 02:42 PM
Post
#98
|
|
The rubber man Group: Members Posts: 12,782 Joined: 27-December 04 From: Hillsboro, OR Member No.: 3,348 Region Association: None |
Doing some research. Looks like we can form these easy enough.
To get the correct wire seems to be the issue. I'd have to buy a coil of it and its not cheap. |
|
|
|
| Bullethead |
May 11 2023, 06:46 AM
Post
#99
|
|
Oil Cooled heart Group: Members Posts: 968 Joined: 24-June 10 From: South Florida Member No.: 11,875 Region Association: South East States |
A huge thank you to all the contributors of this thread! Currently attacking the blower restoration on my 6 and feel much more confident after reading this... 914 World rules. (IMG:style_emoticons/default/smilie_pokal.gif)
|
|
|
|
|
1 User(s) are reading this topic (1 Guests and 0 Anonymous Users)
0 Members:

|
Lo-Fi Version | Time is now: 15th June 2026 - 04:05 PM |
Invision Power Board
v9.1.4 © 2026 IPS, Inc.