|
|
|
Porsche, and the Porsche crest are registered trademarks of Dr. Ing. h.c. F. Porsche AG.
This site is not affiliated with Porsche in any way. Its only purpose is to provide an online forum for car enthusiasts. All other trademarks are property of their respective owners. |
|
|

  |

| windforfun |
 Feb 6 2021, 07:25 PM Feb 6 2021, 07:25 PM
Post
#21
|
|
Advanced Member  Group: Members Posts: 2,113 Joined: 17-December 07 From: Blackhawk, CA Member No.: 8,476 Region Association: None |
QUOTE(raynekat @ Feb 3 2021, 09:21 PM)  Here's the small hole through the bulkhead that the shift rod goes through. The diameter of the hole in the bulkhead is barely twice the diameter of the shift rod itself. Not much margin for error there. In the R-1st shift plane, the shift rod is severely scraping the passenger side of that hole. Already making plans with Cary at Middleworks to get this addressed. Where's the bushing? You can slice one side of the bushing on a diagonal & push it over & in. No disassembly required. |
   |

 
|
| raynekat |
Feb 6 2021, 09:10 PM
Post
#22
|
|
Advanced Member Group: Members Posts: 2,171 Joined: 30-December 14 From: Coeur d'Alene, Idaho Member No.: 18,263 Region Association: Pacific Northwest |
QUOTE(windforfun @ Feb 6 2021, 05:25 PM) QUOTE(raynekat @ Feb 3 2021, 09:21 PM) Here's the small hole through the bulkhead that the shift rod goes through. The diameter of the hole in the bulkhead is barely twice the diameter of the shift rod itself. Not much margin for error there. In the R-1st shift plane, the shift rod is severely scraping the passenger side of that hole. Already making plans with Cary at Middleworks to get this addressed. Where's the bushing? You can slice one side of the bushing on a diagonal & push it over & in. No disassembly required. Not sure you can put a bushing there for the side shift conversion. Because of the later shift assembly that used, the rod needs to be able to swing left and right. A bushing would prevent that. |
|
|
|
| raynekat |
Feb 6 2021, 09:15 PM
Post
#23
|
|
Advanced Member Group: Members Posts: 2,171 Joined: 30-December 14 From: Coeur d'Alene, Idaho Member No.: 18,263 Region Association: Pacific Northwest |
Carpeting pealed back revealing the sound deadening I used.
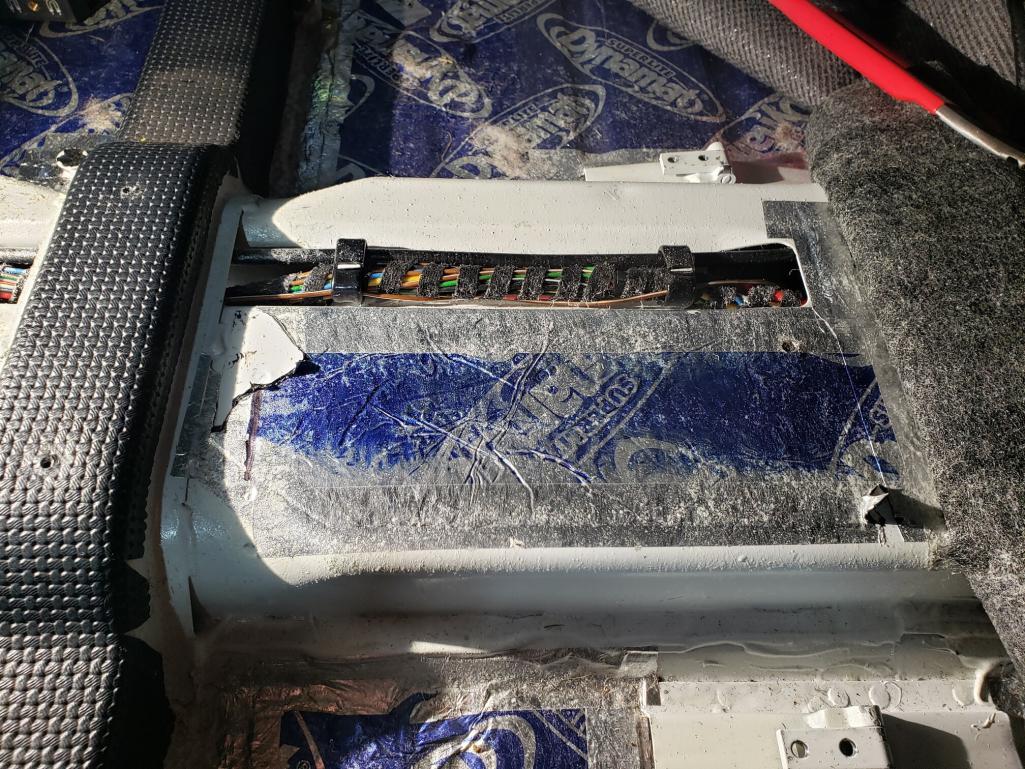 Removed the sound deadening with some of the thick tar stuff left behind. 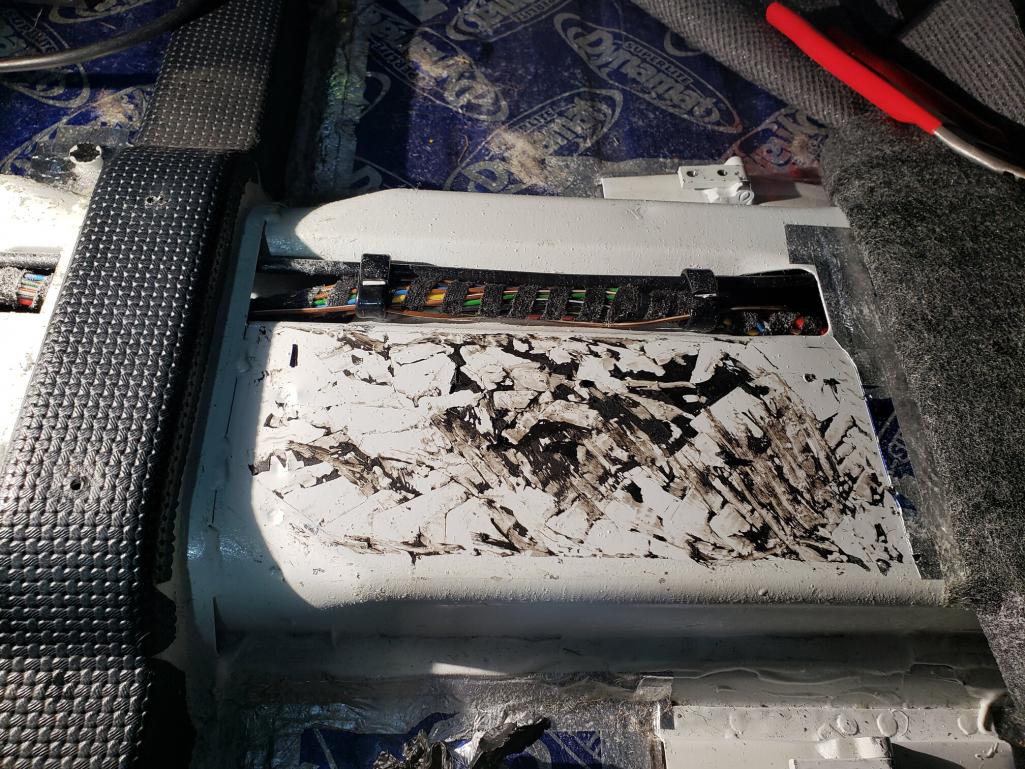 Had to clean that up so it didn't get all over me, the cutting tools, etc that were coming later. My favorite chemical, 3M Adhesive Remover, made quick work of that mess. 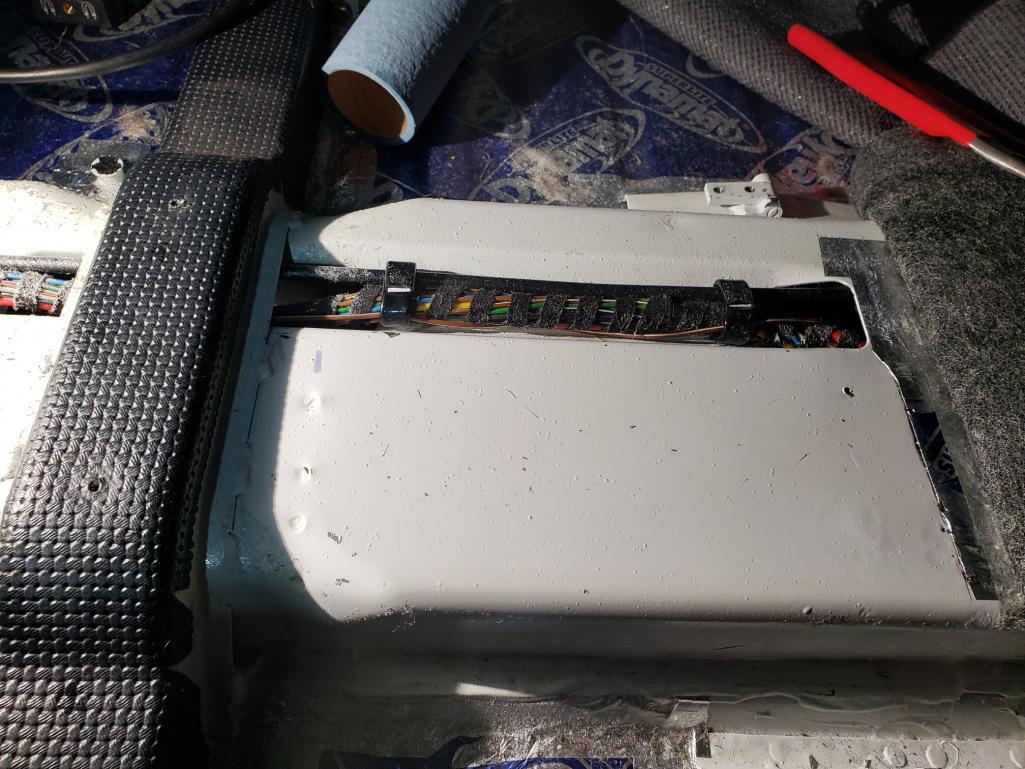 Plotted out where the bulkhead wall/hoop was located and where I was going to cut my access hatch. Don't surgeons draw on you before they make their cuts??? (IMG:style_emoticons/default/wink.gif) You can easily see all the spot welds that are used by the factory to keep this bulkhead in place. 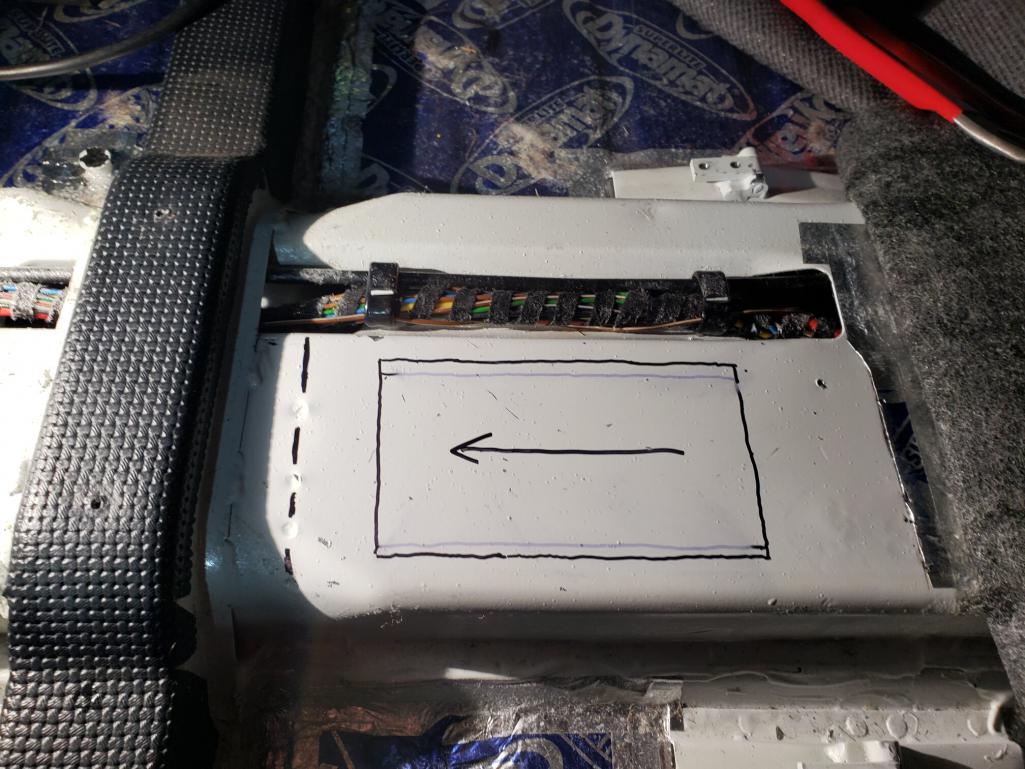 |
|
|
|
| raynekat |
Feb 6 2021, 09:27 PM
Post
#24
|
|
Advanced Member Group: Members Posts: 2,171 Joined: 30-December 14 From: Coeur d'Alene, Idaho Member No.: 18,263 Region Association: Pacific Northwest |
So how to cut the hole???
Many options. Jigsaw, circular cutting wheel, plasma cutter (no, heck no), etc. When I was in Harbor Freight today, I noticed something that just might be the ticket. I wanted safe, effective, somewhat quick, non messy. Here's what I came up with and I already had the tool. It's the same vibratory scraper I used to remove all the undercoating underneath the car and all the sound deadening inside the car when I first embarked on this restoration journey 3 years ago. 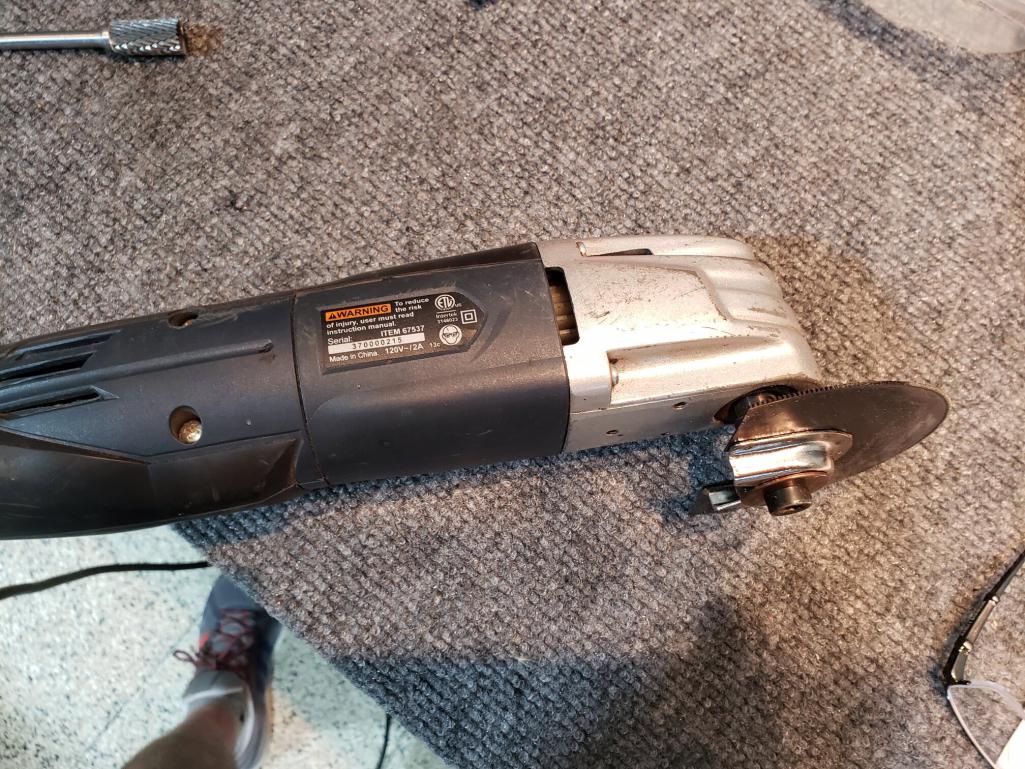 All the tool needed was a different blade....a cutting blade vs the scraping blade. Harbor Freight had a few different ones for cutting metal. Here's a close up of what the blade looks like. 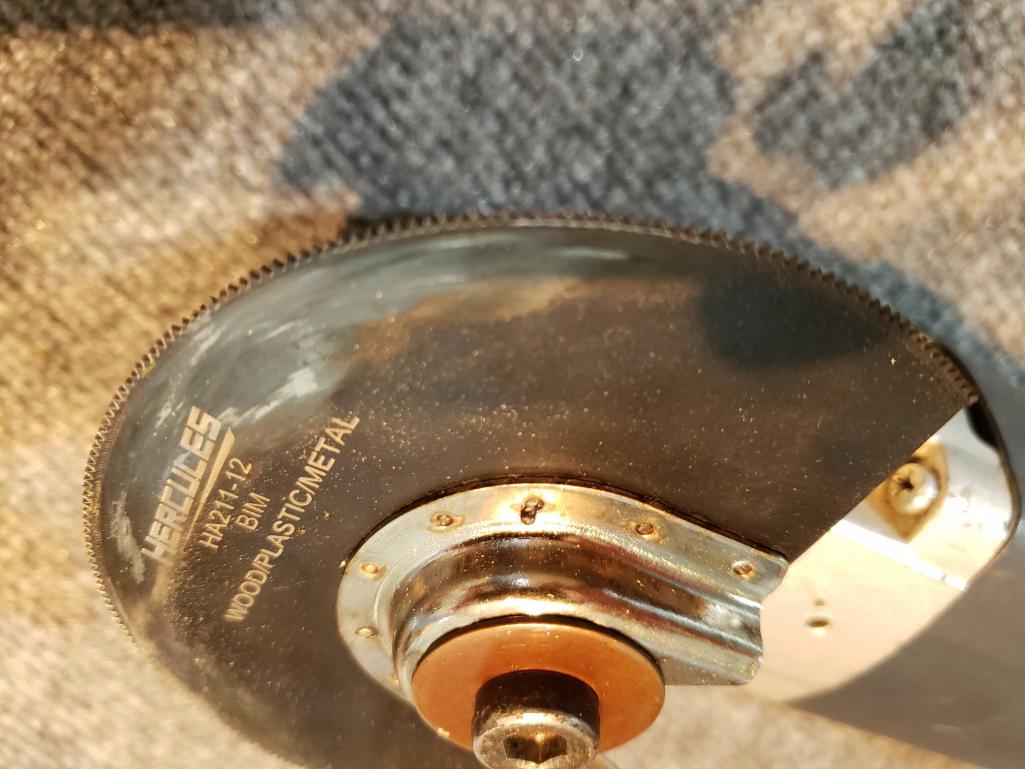 End result was perfection. A very safe tool that wasn't going cut my finger off. Minimal mess. You can image where a cutting wheel was going to be throwing stuff all over the car. This tool just vibrates as it cuts. I made the 4 cuts around the perimeter of my access panel in less than 10 minutes. It was slick. Image a circular hack saw where you don't have to saw....the machine does all the sawing for you. You just hold it and guide it. It is also easy to control the depth of the cut, so this method had that going for it as well. Voila: 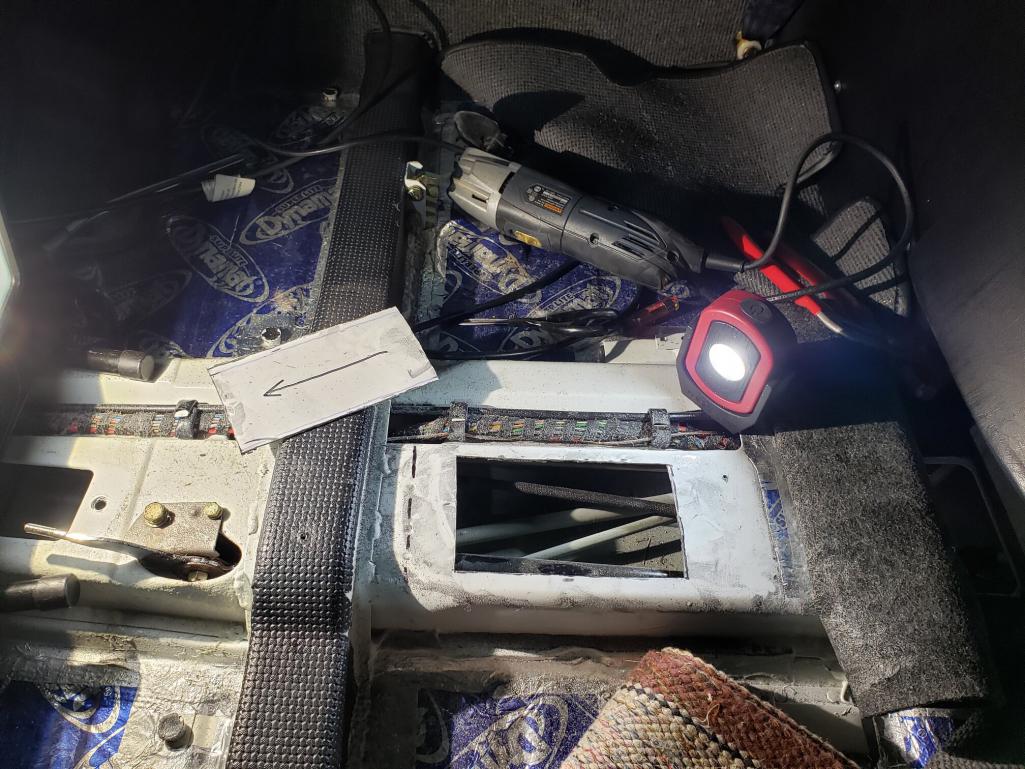 |
|
|
|
| raynekat |
Feb 6 2021, 09:34 PM
Post
#25
|
|
Advanced Member Group: Members Posts: 2,171 Joined: 30-December 14 From: Coeur d'Alene, Idaho Member No.: 18,263 Region Association: Pacific Northwest |
So how'd we do?
Here's the money shot. 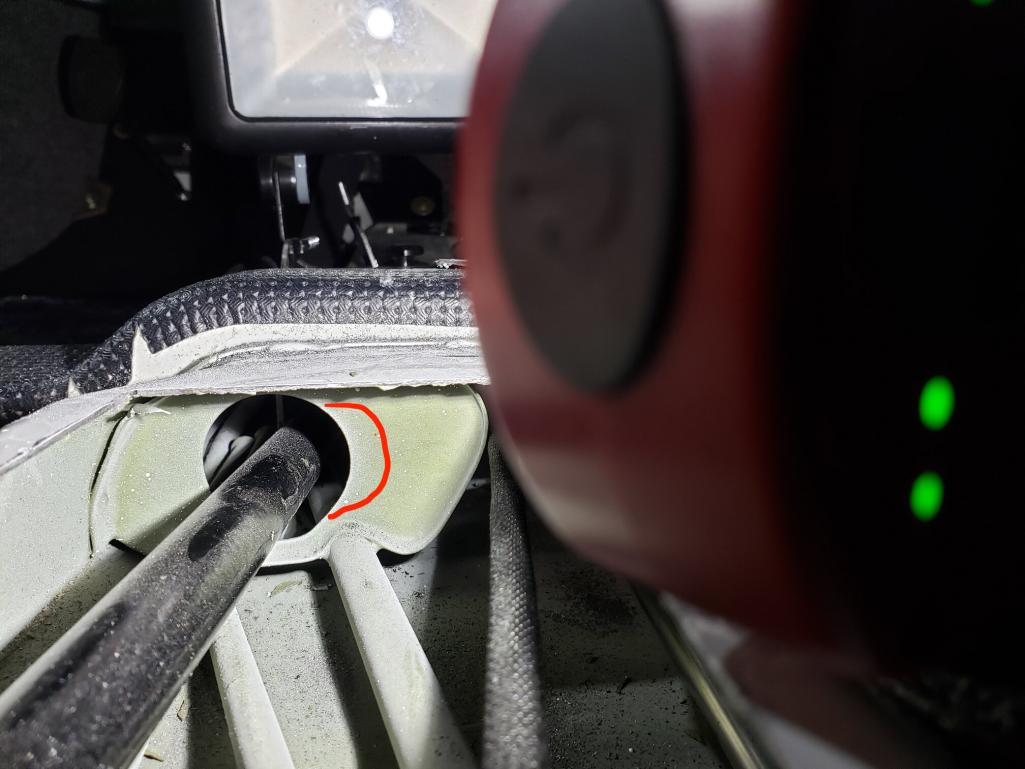 Tomorrow I will clearance some of the area I've got highlighted in the red. Just enough so that the rod doesn't scrape across this bulkhead opening when in the R-1st shift plane. This view gives you a good idea where all the cables and tubes are inside the tunnel. None were directly above the shift rod area (which I knew already by looking in from the shifter opening) and everything is well to the passenger side of the opening or below it. I'll push the shift rod as far to the driver side as possible to give me clearance I need. Should be able to make the opening bigger with the shift rod in place. I'll be using these bad boys to do that. And they are a bit more dangerous to be sure. Luckily the cutter will be in the tunnel while me and my body are outside the tunnel. (IMG:style_emoticons/default/wink.gif) The rest of the story with pics tomorrow..... 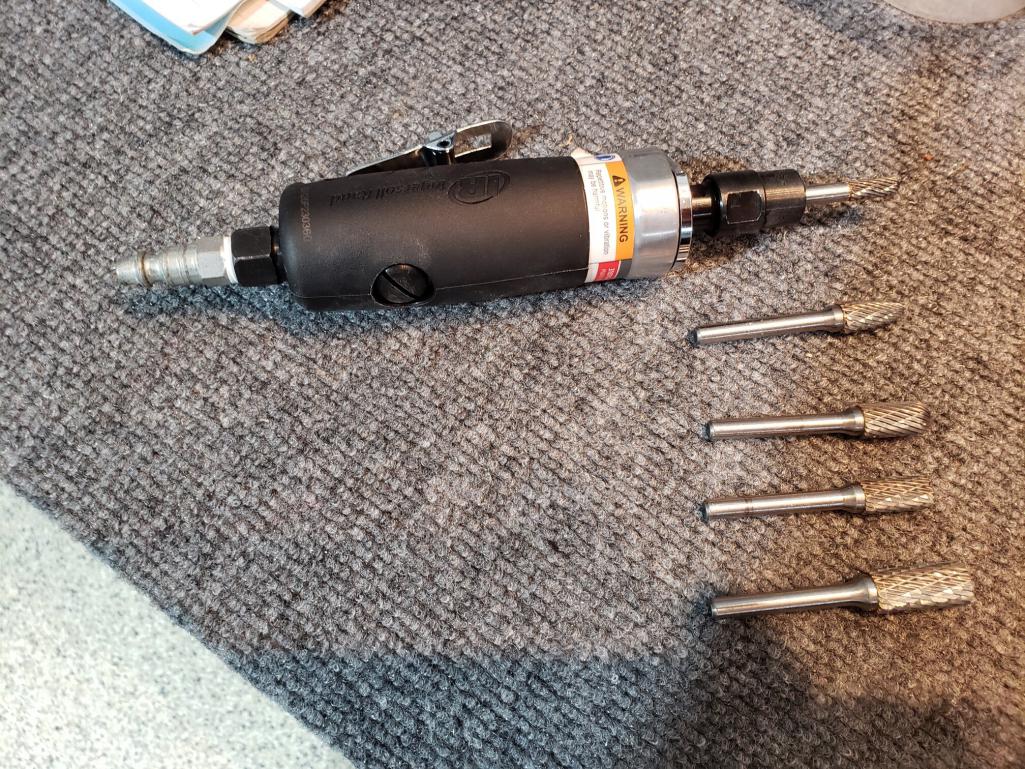 |
|
|
|
| PlaysWithCars |
Feb 6 2021, 11:24 PM
Post
#26
|
|
Senior Member Group: Members Posts: 544 Joined: 9-November 03 From: Southeast of Seattle Member No.: 1,323 Region Association: Pacific Northwest |
Thanks to Raynecat for pointing me to his thread. I've been experiencing this same thing for a while now and only just discovered the root cause of the shift rod dragging on the bulkhead that he described.
So... my big question. How much better is the Tangerine Racing firewall bushing compared to a brand new conversion bushing? Willing to put the better bushing in, but I don't see how it can be much better than the brand new conversion bushing I just put in that is pretty much a zero clearance fit to the rod and I still have the problem. Trying REALLY hard not make too many irreversible changes to the chassis since its an original six. (I know, I know... it has GT flares. But... I LIKE them. (IMG:style_emoticons/default/biggrin.gif) ) |
|
|
|
| Cairo94507 |
Feb 7 2021, 08:44 AM
Post
#27
|
|
Michael Group: Members Posts: 10,723 Joined: 1-November 08 From: Auburn, CA Member No.: 9,712 Region Association: Northern California |
@rayneKat - Excellent photos and work. Looking forward to the end result. (IMG:style_emoticons/default/beerchug.gif)
|
|
|
|
| zoomCat |
Feb 7 2021, 01:33 PM
Post
#28
|
|
Member Group: Members Posts: 201 Joined: 13-August 04 From: Cincinnati, OH Member No.: 2,526 Region Association: None |
What does this bulkhead look like on side shift cars? Anybody have some pictures?
|
|
|
|
| raynekat |
Feb 7 2021, 01:49 PM
Post
#29
|
|
Advanced Member Group: Members Posts: 2,171 Joined: 30-December 14 From: Coeur d'Alene, Idaho Member No.: 18,263 Region Association: Pacific Northwest |
That die grinder made quick work out of opening up the opening in the bulkhead.
Only took a couple of minutes. Making good progress, almost there. 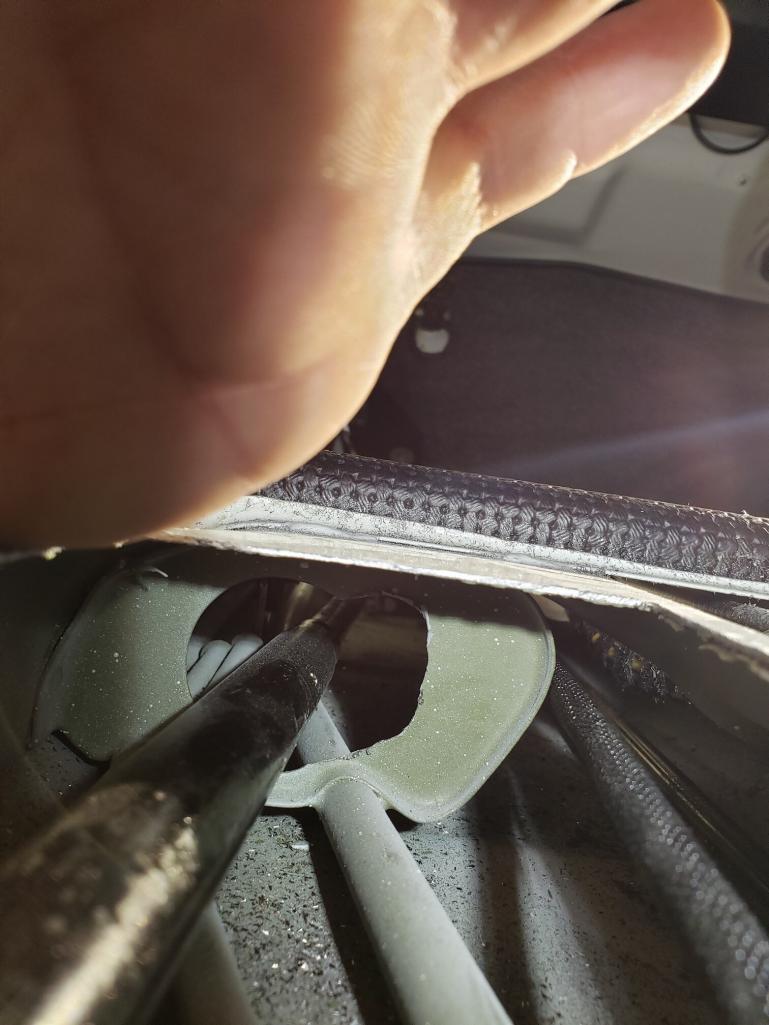 Made sure not to cut away too much metal close to this tube that is welded to the bulkhead. 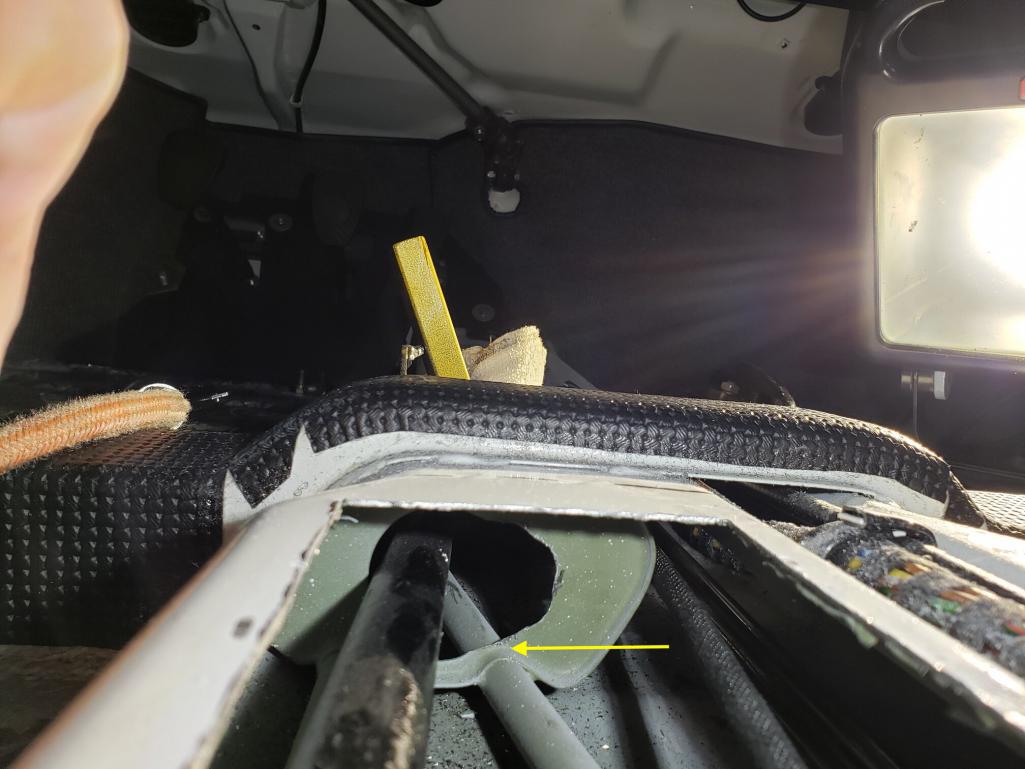 This is the finished hole with the shifter in the R-1st plane. I noticed a small "V" of metal at the top of the hole. Although it wasn't touching the shift rod, I didn't want to have to come back if the rod did start hitting the top of the opening. 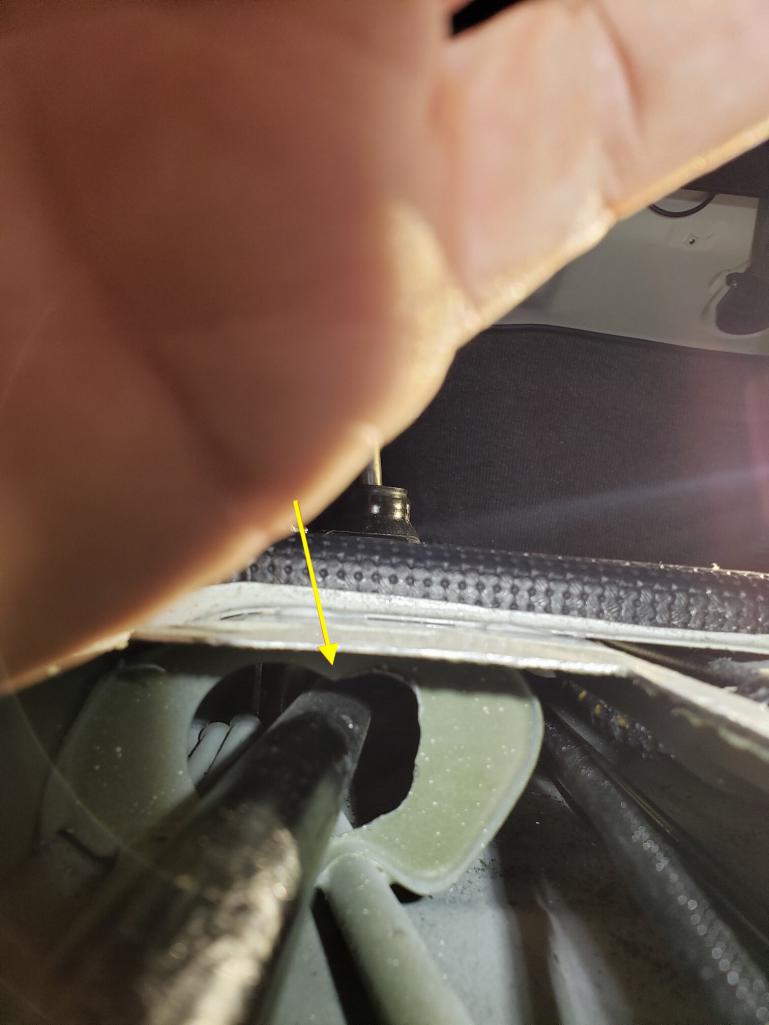 Just touched up the point of the "V" with a hand file enough to smooth it out. No way the top of the shift rod will hit any part of top of the opening in the bulkhead. 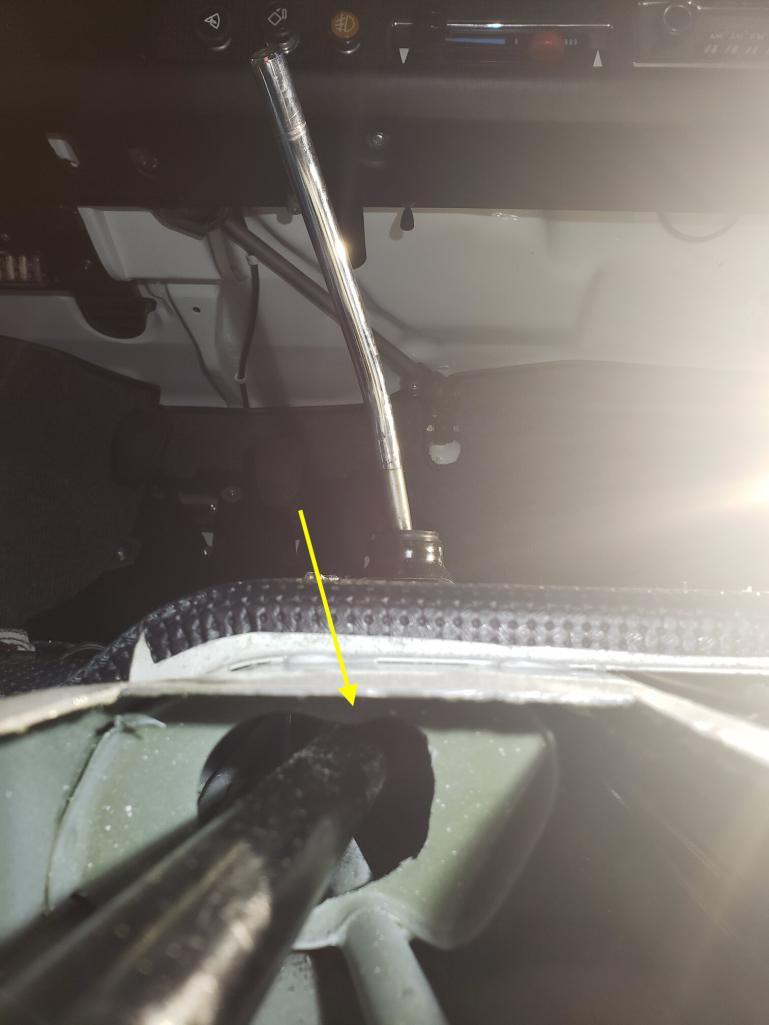 All that's left to do now is vacuum out the the inside of the tunnel of all the metal shavings and re-fit the access panel I cut out. Then replace the interior that was removed earlier. Man....it's so nice for that annoying scraping/squeaking to be gone. Total cost was a couple of days fiddling a few hours here and there and the $10 cutting blade from Harbor Freight. Another job knocked off of the "post build" punch list. Just a few thousand more to go.....and I'll be there. Ha (IMG:style_emoticons/default/smilie_pokal.gif) We've got some dry weather this coming week in Portland, so I'll get the car out and enjoy the silent shifting. (IMG:style_emoticons/default/aktion035.gif) |
|
|
|
| mepstein |
Feb 7 2021, 01:51 PM
Post
#30
|
|
914-6 GT in waiting Group: Members Posts: 20,841 Joined: 19-September 09 From: Landenberg, PA/Wilmington, DE Member No.: 10,825 Region Association: MidAtlantic Region |
QUOTE(Cairo94507 @ Feb 7 2021, 09:44 AM) @rayneKat - Excellent photos and work. Looking forward to the end result. (IMG:style_emoticons/default/beerchug.gif) Yes. Great solution using the vibrating tool to make that careful cut. I'll have to remember that. So much safer (at least for me) than a disk. |
 |
|
| raynekat |
Feb 7 2021, 02:04 PM
Post
#31
|
|
Advanced Member Group: Members Posts: 2,171 Joined: 30-December 14 From: Coeur d'Alene, Idaho Member No.: 18,263 Region Association: Pacific Northwest |
QUOTE(mepstein @ Feb 7 2021, 11:51 AM) QUOTE(Cairo94507 @ Feb 7 2021, 09:44 AM) @rayneKat - Excellent photos and work. Looking forward to the end result. (IMG:style_emoticons/default/beerchug.gif) Yes. Great solution using the vibrating tool to make that careful cut. I'll have to remember that. So much safer (at least for me) than a disk. The more I thought about a cutting disc, the less I liked that idea. It is dangerous especially if a disc breaks at speed. This vibrating tool is super safe and still cut the tunnel very easily, very effectively. |
|
|
|
| mepstein |
Feb 7 2021, 02:40 PM
Post
#32
|
|
914-6 GT in waiting Group: Members Posts: 20,841 Joined: 19-September 09 From: Landenberg, PA/Wilmington, DE Member No.: 10,825 Region Association: MidAtlantic Region |
A magnet might work well to clean up the shavings.
|
|
|
|
| raynekat |
Feb 7 2021, 04:07 PM
Post
#33
|
|
Advanced Member Group: Members Posts: 2,171 Joined: 30-December 14 From: Coeur d'Alene, Idaho Member No.: 18,263 Region Association: Pacific Northwest |
QUOTE(mepstein @ Feb 7 2021, 12:40 PM) A magnet might work well to clean up the shavings. Yes, have been using that as well as a shop vac and small paint brush to move all the chips to the suction. Comical how much the vacuum misses that the magnet finds. Must have pulled the magnet out of the tunnel 10 times with this amount of metal filings attached. Good to get most of that out of there. 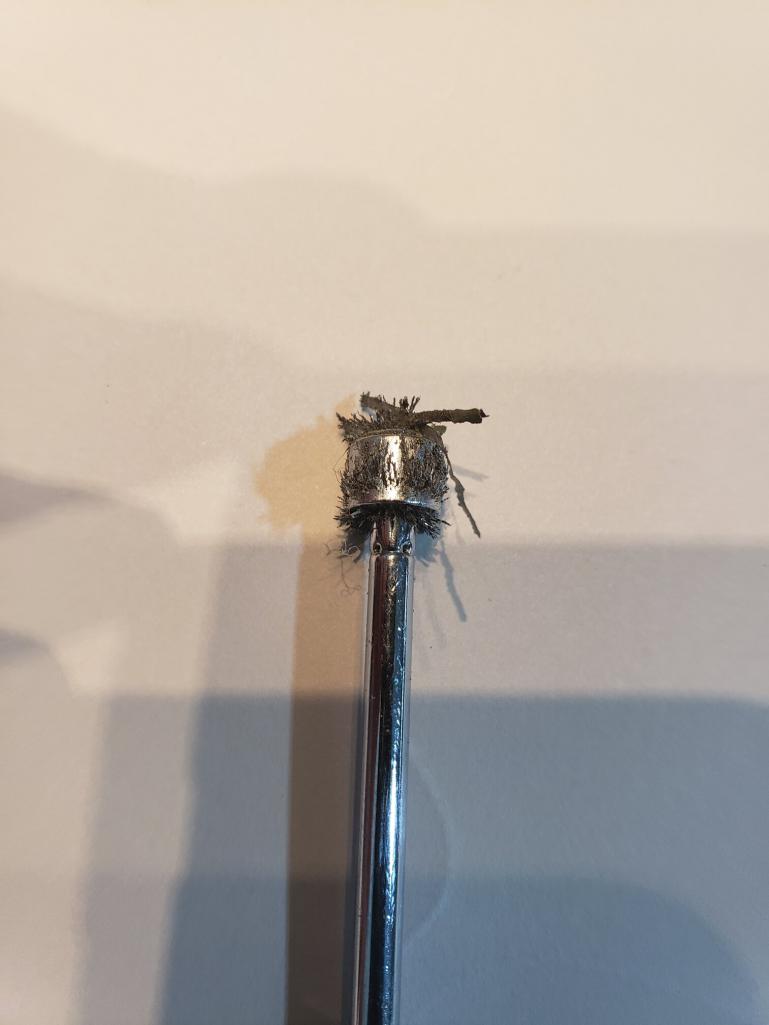 Afterwards I used a small paint brush and applied a couple of coats of etching metal primer to the edge of the hole I enlarged in the bulkhead and also along the edges of the access panel I cut out. Then went in with some of my "touch up" paint in a spray can and hit the tunnel and the access hatch. 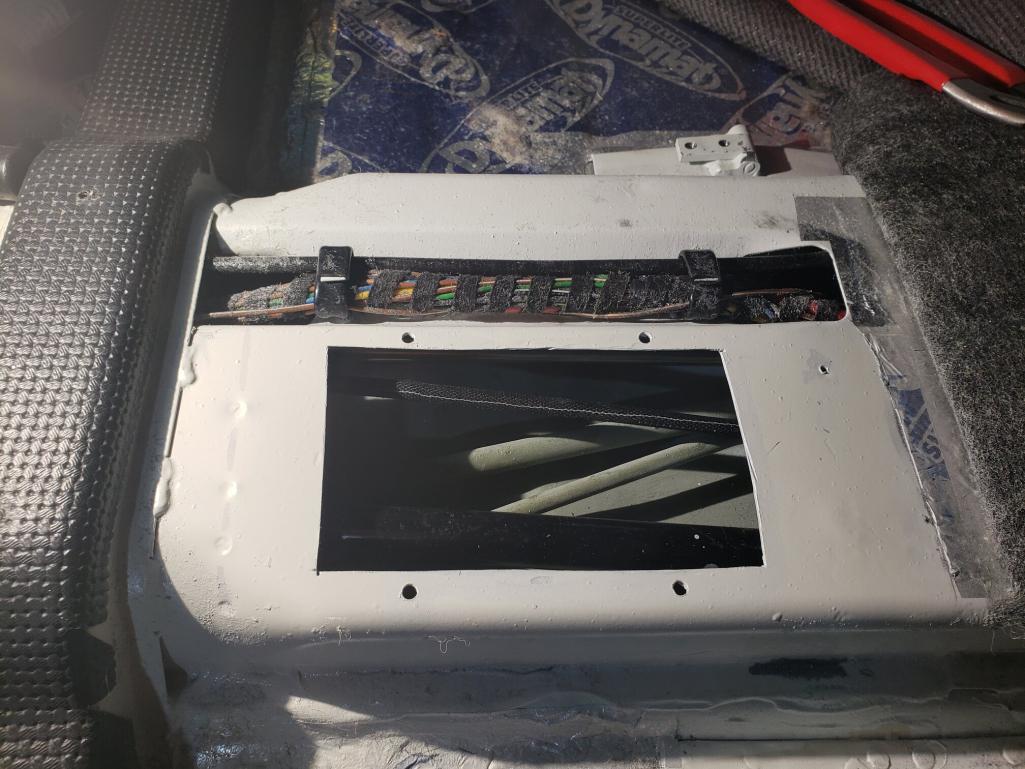 After this all dries, I'll install the access hatch top and begin putting the interior back together. Nice to get this job behind me. Have needed to get this done for over a year since picking up my completed project. Always thought the scraping/squeak was in the shifter itself, but multiple times greasing it never eliminated the noise. Now the reason is apparent why that never worked. |
|
|
|
| raynekat |
Feb 7 2021, 06:30 PM
Post
#34
|
|
Advanced Member Group: Members Posts: 2,171 Joined: 30-December 14 From: Coeur d'Alene, Idaho Member No.: 18,263 Region Association: Pacific Northwest |
I'll have to admit that this is a pretty crude solution for putting back cover on my access hatch into the tunnel, but I don't have a welder (or know how to weld for that matter) and I wanted something easy to access in the future if necessary.
It was going to be hidden under some carpet and the center cushion. Plus I wanted to use materials I had on hand. So I installed a couple of aluminum straps for the tunnel lid to sit on. Speed nuts were used where the hex head screws would be installed. Each aluminum strap had 4 speed nuts. Like this: 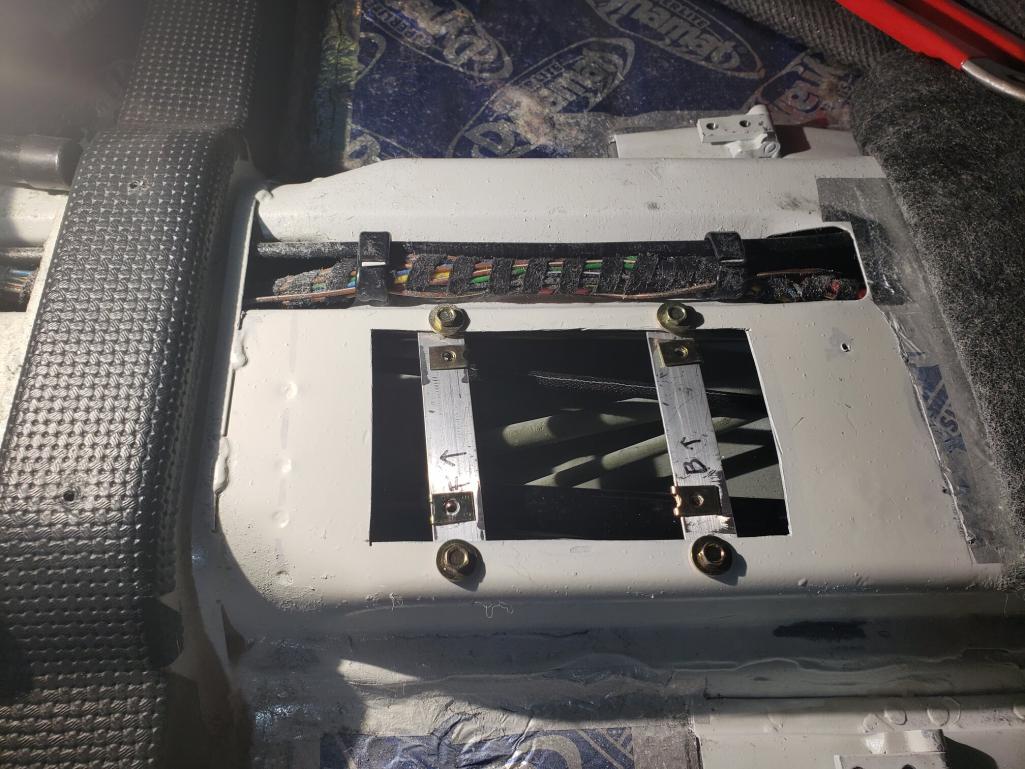 Then the tunnel lid was screwed into place: 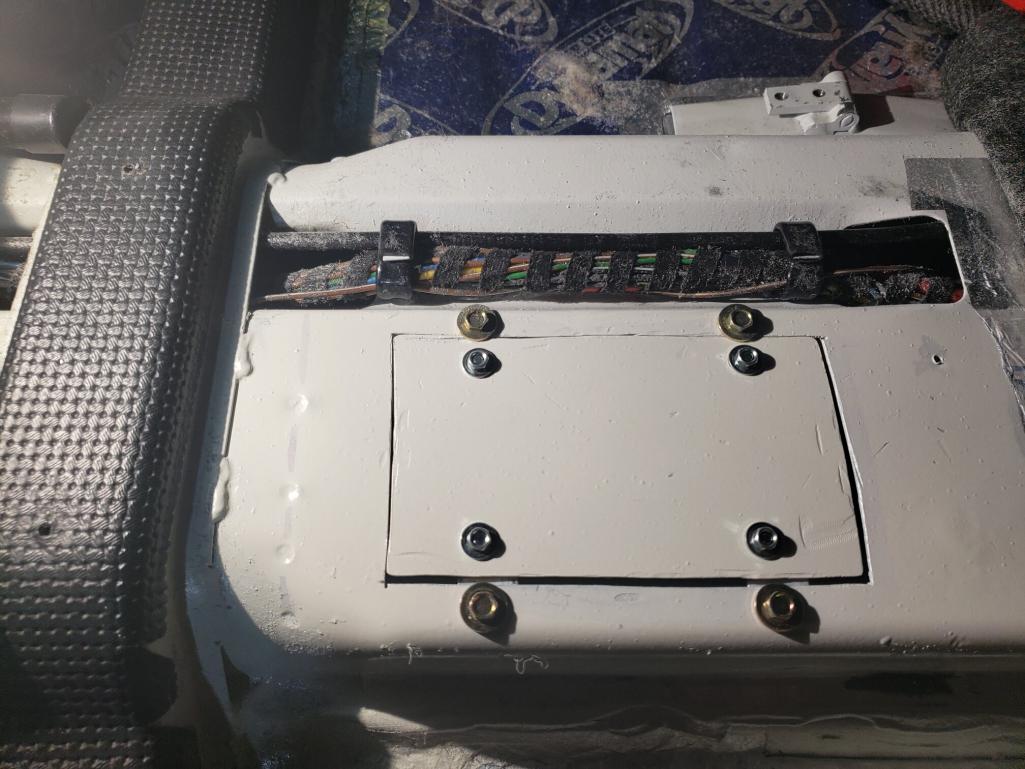 After that came some of my carpeting next: 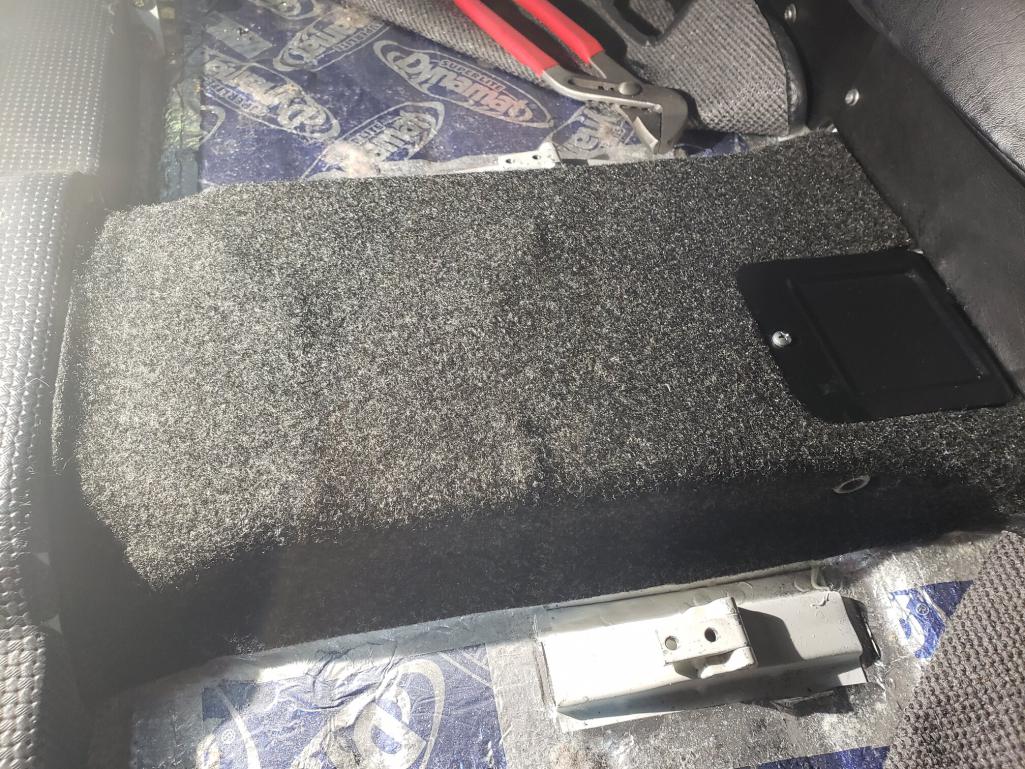 Then finally the center arm rest cushion/depository and the remainder of the interior will follow: 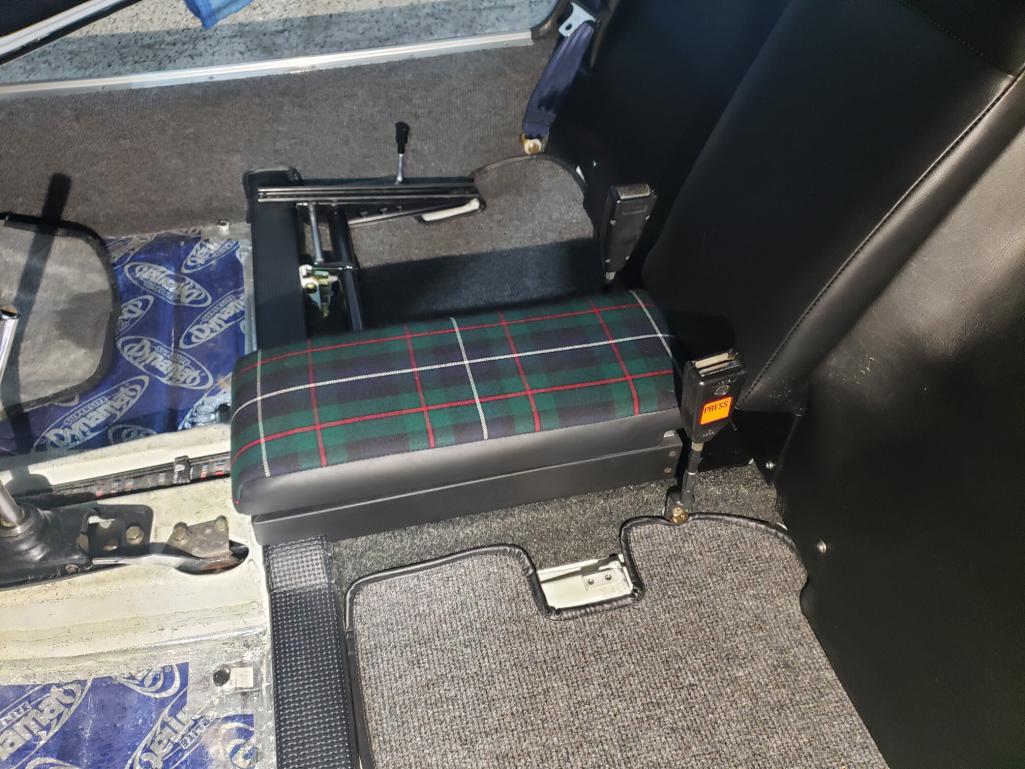 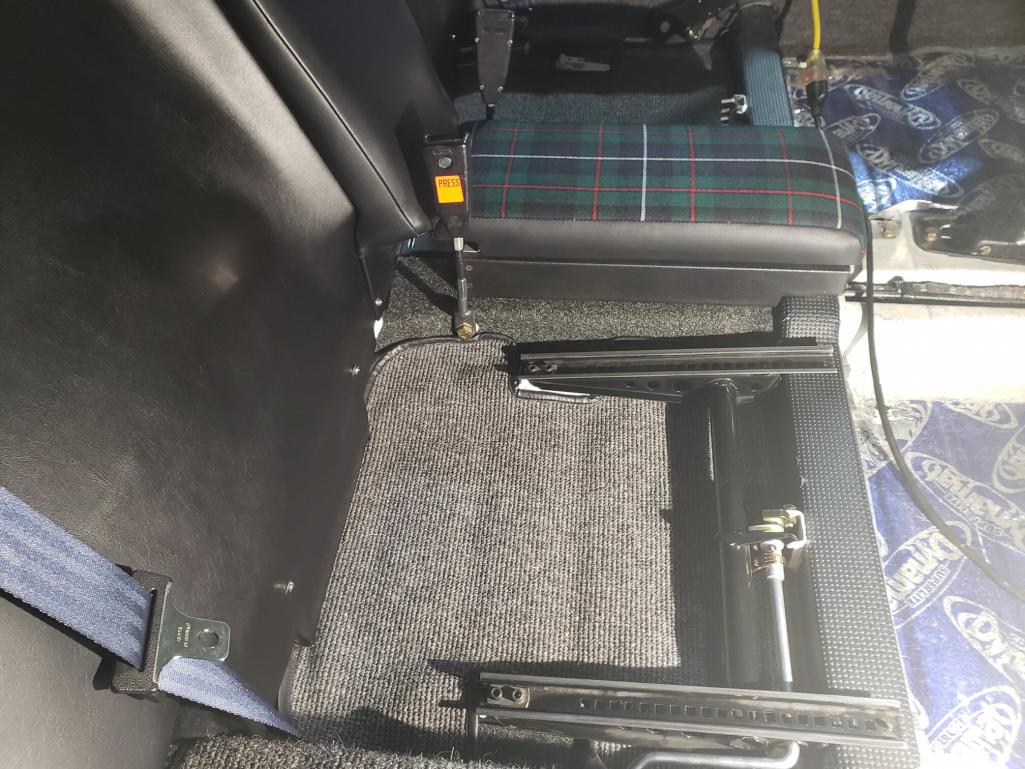 Almost like nobody had even been there...... hehehehe Again it is so nice to be done with this job and be done with that annoying scraping sound while shifting. |
|
|
|
| bkrantz |
Feb 7 2021, 08:06 PM
Post
#35
|
|
914 Guru Group: Members Posts: 8,746 Joined: 3-August 19 From: SW Colorado Member No.: 23,343 Region Association: Rocky Mountains |
Doug, just a thought. How much bigger/wider do you need the hole to be? Could you do that by forcing a wedge into the hole (with the rod removed)? I can imagine a wedge attached to a 1/2 inch rod long enough to stick out through the fire wall. And then hit with a hammer? Or some other way to pry the hole wider?
Might not need to cut a hatch in the tunnel. (Oops, I just noticed the second page of the thread and your documentation of the job done. Maybe next time.) |
|
|
|
| raynekat |
Feb 7 2021, 08:25 PM
Post
#36
|
|
Advanced Member Group: Members Posts: 2,171 Joined: 30-December 14 From: Coeur d'Alene, Idaho Member No.: 18,263 Region Association: Pacific Northwest |
I likely needed more space than hitting a wedge in there could provide.
Plus a couple of tubes are welded to that bulkhead and I'd not want to chance breaking it loose from inside the tunnel by hitting it with a hammer. |
|
|
|
| PlaysWithCars |
Feb 7 2021, 08:41 PM
Post
#37
|
|
Senior Member Group: Members Posts: 544 Joined: 9-November 03 From: Southeast of Seattle Member No.: 1,323 Region Association: Pacific Northwest |
@bdstone914
Honestly I'm not sure if my car uses a late model front rod or a modified early rod. I do know that it has the late style connection to the shifter and fits into the conversion bushing at the firewall. But what's in between (IMG:style_emoticons/default/confused24.gif). Seems like a lot of work to modify the front and the back and keep the middle for no apparent value. So I'm going to guess that its a late rod. |
|
|
|
| raynekat |
Feb 7 2021, 09:26 PM
Post
#38
|
|
Advanced Member Group: Members Posts: 2,171 Joined: 30-December 14 From: Coeur d'Alene, Idaho Member No.: 18,263 Region Association: Pacific Northwest |
My car was a 1971 914-4 chassis with the original transmission converted to side shifter.
Additionally, I have a Tangerine Racing engine firewall shift rod bushing and a late factory shifter assembly, along with a stock early thick shift rod in the tunnel. My solution above resolved completely my scraping/squeaking in the R-1st shift plane. |
|
|
|
| raynekat |
Feb 8 2021, 07:30 PM
Post
#39
|
|
Advanced Member Group: Members Posts: 2,171 Joined: 30-December 14 From: Coeur d'Alene, Idaho Member No.: 18,263 Region Association: Pacific Northwest |
Took the car out for a quick spin today.
So very nice not to hear the horrid scraping/screeching when shifting into reverse or 1st gear. Seems like there is a lot more room now in the R-1st "gate" as well. Was kind of a PITA job, but very doable for anyone experiencing this exact problem. |
|
|
|
|
1 User(s) are reading this topic (1 Guests and 0 Anonymous Users)
0 Members:

|
Lo-Fi Version | Time is now: 29th July 2026 - 05:27 PM |
Invision Power Board
v9.1.4 © 2026 IPS, Inc.