|
|
|
Porsche, and the Porsche crest are registered trademarks of Dr. Ing. h.c. F. Porsche AG.
This site is not affiliated with Porsche in any way. Its only purpose is to provide an online forum for car enthusiasts. All other trademarks are property of their respective owners. |
|
|

  |

| Superhawk996 |
 Feb 17 2021, 06:11 PM Feb 17 2021, 06:11 PM
Post
#21
|
|
914 Guru  Group: Members Posts: 5,778 Joined: 25-August 18 From: Woods of N. Idaho Member No.: 22,428 Region Association: Galt's Gulch |
QUOTE(mteovr @ Feb 17 2021, 06:42 PM)  Also, any advice on a solvent for the floor mat tar? Or just a good scrubbing? If it is absolutely solidily adhered to the sheetmetal I wouldn't disturb it. However, that is rarely the case as @bbrock alluded to. If if needs to come off due to rust underneath it will either come off in big chunks easily with a putty knife, or it won't, and you'll be hating life. Trying to disolve it with chemicals like laquer thinner is a huge mess. Heating it with a propane torch is a huge stinky mess. I've heard of some freezing it (bags of ice) and smacking it so it cracks delaminates. Never tried it personally. Personally, I've found best tool is vibratory multi-tool with a wide scraper blade. Something like this. HF has cheaper version of both the tool and blades. Still takes hours of work. 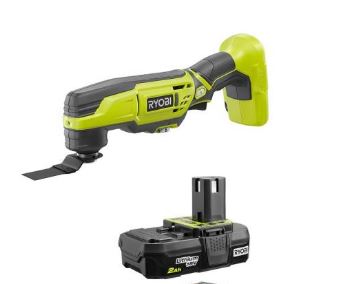 |
   |

 
|
| 930cabman |
Feb 17 2021, 06:14 PM
Post
#22
|
|
Advanced Member Group: Members Posts: 3,007 Joined: 12-November 20 From: Buffalo Member No.: 24,877 Region Association: North East States |
QUOTE(Mikey914 @ Feb 17 2021, 12:53 PM) Looks pretty rust free. That will cut your restoration time and cost in half. (IMG:style_emoticons/default/welcome.png) True and True. With your savings you can do a /6 conversion. Welcome aboard |
 |
|
| Jonathan Livesay |
Feb 17 2021, 06:31 PM
Post
#23
|
|
Senior Member Group: Members Posts: 741 Joined: 13-March 10 From: La Canada CA Member No.: 11,461 Region Association: None |
QUOTE(mteovr @ Feb 17 2021, 03:42 PM) The jack points are obviously hard to show when the car's up on the lift but amazingly, they're all pretty pristine. It's truly wild how some things on the car are in great shape and some aren't. The battery cables and block/clamp unit could very well be in the parts pile somewhere, will have to scour the web for what they actually look like. So far a perfunctory Googling doesn't ring any bells. But can't trust my memory... Also, any advice on a solvent for the floor mat tar? Or just a good scrubbing? @all - I'm keeping every and all suggestions as a list in a spreadsheet, so please, keep 'em coming! If none of the floor looks worse than what I could see in the video and there's no rust spots visible from underneath (when it's on the lift take an awl or icepick to any suspect looking areas of the floor pan from underneath) I would be tempted to leave the tar stuff in place. Unless you need to do any rust repair why remove the original soundproofing material (which is a lot of work) only to then replace it with new soundproofing material? This isn't it exactly but what you are looking for for the battery + clamp is something like this. https://www.stoddard.com/91461131100.html.html |
|
|
|
| Coondog |
Feb 17 2021, 06:38 PM
Post
#24
|
|
Advanced Member Group: Members Posts: 2,089 Joined: 24-September 15 From: Apple Valley Calif Member No.: 19,195 Region Association: Southern California |
QUOTE(mteovr @ Feb 17 2021, 03:45 PM) Oh, and I split time between Santa Monica and the high desert near Pearblossom... Which will only contribute to extensive confusion, work delays, and my typical pastime of hoarding parts bought online and then installing in bunches. Oh boy. Yes, Vince lives in Wrightwood but his shop is in Hesperia. He is a great guy and his parts are very reasonable. Just need to give him a little time as he has several conex box’s full of parts. |
|
|
|
| bbrock |
Feb 17 2021, 07:57 PM
Post
#25
|
|
914 Guru Group: Members Posts: 5,269 Joined: 17-February 17 From: Montana Member No.: 20,845 Region Association: Rocky Mountains |
QUOTE(mteovr @ Feb 17 2021, 04:42 PM) Also, any advice on a solvent for the floor mat tar? Or just a good scrubbing? It can be a tough call whether to remove the tar but here is why I would always remove for an extensive resto. My floor was rusted badly and it was obvious by looking from the bottom the floor would need replaced. But notice the rust forming at the bottom of the bead channel to the left of the drain plug. 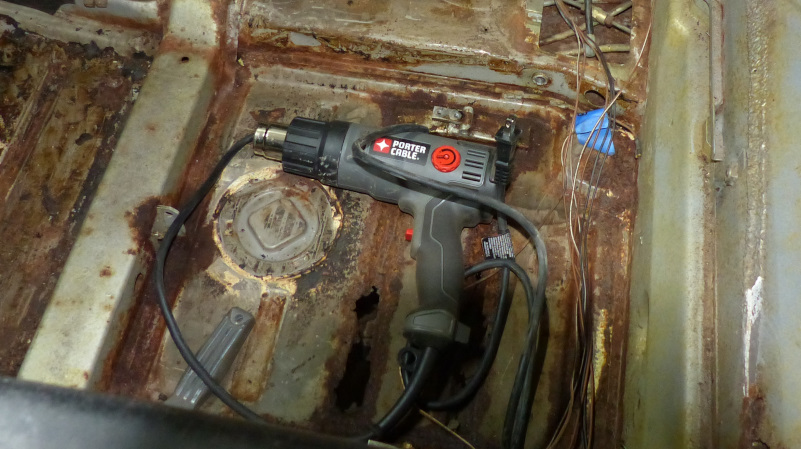 That area looked solid from the bottom of the car and the tar looked pristine and well-adhered on top. However, removing the tar revealed surface rust forming underneath. I cannot say if the same kind of surface rust would be found in a car with a fully solid floor, or how long it would have taken for that surface rust to cause any problems. But with the amount of time I spent restoring the car, removing the tar and knowing I was starting with a clean floor would have been worth the minimal time spent even if the floor was otherwise pristine. A plus is it gives an excuse to replace the tar with a modern constrained layer sound deadening product like Noico. The best way I've heard for removing the tar is to toss dry ice on the floor and bust the tar up with a hammer. @TINKERGINEERING has hands down the best video you will ever see on the subject (notice the rust under her tar too): https://www.youtube.com/watch?v=5CkzsJjp6yI I went a different route and it wasn't bad. I used a heat gun and putty knife but you don't want to melt the tar. Instead, you just warm it up enough you can pry it off with a putty knife. When you get the temp right, it comes up in big flakes. |
|
|
|
| flipb |
Feb 17 2021, 08:31 PM
Post
#26
|
|
Senior Member Group: Members Posts: 1,721 Joined: 2-September 09 From: Fairfax, VA Member No.: 10,752 Region Association: MidAtlantic Region |
Welcome to the madness, @mteovr
I commented on your IG post a while back about the site. Your teener looks like it'll clean up pretty well. You can look forward to the indelible grin you'll have driving it one day with the added satisfaction of having gotten it serviceable through your own sweat equity. |
|
|
|
| bkrantz |
Feb 17 2021, 08:37 PM
Post
#27
|
|
914 Guru Group: Members Posts: 7,749 Joined: 3-August 19 From: SW Colorado Member No.: 23,343 Region Association: Rocky Mountains |
QUOTE(Mikey914 @ Feb 17 2021, 10:53 AM) Looks pretty rust free. That will cut your restoration time and cost in half. (IMG:style_emoticons/default/welcome.png) True, Mark, but that misses out on the true 914 restoration fun. (IMG:style_emoticons/default/barf.gif) |
|
|
|
| Charles Freeborn |
Feb 17 2021, 09:56 PM
Post
#28
|
|
Member Group: Members Posts: 245 Joined: 21-May 14 From: United States Member No.: 17,377 Region Association: Pacific Northwest |
QUOTE(mteovr @ Feb 17 2021, 08:47 AM) Thanks all for the comments and advice already! Since I filmed the vid, have done much more internet sleuthing, deduced the extra engine crossbar is for the side-shift conversion, and already planning to have the calipers rebuilt by PMB. Placed a few orders with 914Rubber for interior and bushings and etcs, planning to have the motor and side-shift trans rebuilt by pros, especially as unsure what all is going on in there and absolutely zero records from previous owner. @Charles Freeborn - excellent to learn about European Motorworks, will contact them immediately. My priority is getting the mechanicals sorted balancing between budget and performance as much as possible. Then move on to cosmetics and correctness over time. For the engine rebuild, had been previously debating Brothers VW Machine Shop in Ontario or BajaWorx in Yucca Valley. For transaxle was planning to drive it down to California Motorsports in Havasu. Trying to keep it as local as possible, but do you know where Dr. Evil might be located? @mark04usa - great to know about the shift linkage cover and horn, have ordered new shocks all around, plus mounts, bushings, etc for the rear to get that done before the drivetrain returns. @Jonathan Livesay - already tugged out one of the axles in the vid. That was entirely unexpected, though, you shoulda seen my face! But good advice for the stubs, will get on that ASAP, thank you. @coondog - no, but I'm close to Hesperia and there's someone on Craigslist selling lots of 914 parts there, perhaps this is Vince? In the plans to get in touch. @bbrock - don't like the sound of that, uh oh! @all - the warm welcome helps a lot and please keep the advice coming. I'm an absolute amateur and this will no doubt take much longer and cost much more than expected, so anything and everything that can save me headaches is greatly appreciated. Ask George at European about trans work too. He'll know. Or, here's a thread about 914 boxes with Dr. Evil contact, etc. http://www.914world.com/bbs2/index.php?showtopic=257269 |
|
|
|
| TINKERGINEERING |
Feb 24 2021, 11:44 AM
Post
#29
|
|
Member Group: Members Posts: 177 Joined: 15-March 20 From: Sierra Madre, CA Member No.: 24,031 Region Association: Southern California |
Good Luck!
In the end a heat gun and a putty knife. should have tried that first. definitely wasn't as much fun though! |
|
|
|
| TINKERGINEERING |
Feb 24 2021, 11:44 AM
Post
#30
|
|
Member Group: Members Posts: 177 Joined: 15-March 20 From: Sierra Madre, CA Member No.: 24,031 Region Association: Southern California |
QUOTE(bbrock @ Feb 17 2021, 05:57 PM) QUOTE(mteovr @ Feb 17 2021, 04:42 PM) Also, any advice on a solvent for the floor mat tar? Or just a good scrubbing? It can be a tough call whether to remove the tar but here is why I would always remove for an extensive resto. My floor was rusted badly and it was obvious by looking from the bottom the floor would need replaced. But notice the rust forming at the bottom of the bead channel to the left of the drain plug. That area looked solid from the bottom of the car and the tar looked pristine and well-adhered on top. However, removing the tar revealed surface rust forming underneath. I cannot say if the same kind of surface rust would be found in a car with a fully solid floor, or how long it would have taken for that surface rust to cause any problems. But with the amount of time I spent restoring the car, removing the tar and knowing I was starting with a clean floor would have been worth the minimal time spent even if the floor was otherwise pristine. A plus is it gives an excuse to replace the tar with a modern constrained layer sound deadening product like Noico. The best way I've heard for removing the tar is to toss dry ice on the floor and bust the tar up with a hammer. @TINKERGINEERING has hands down the best video you will ever see on the subject (notice the rust under her tar too): https://www.youtube.com/watch?v=5CkzsJjp6yI I went a different route and it wasn't bad. I used a heat gun and putty knife but you don't want to melt the tar. Instead, you just warm it up enough you can pry it off with a putty knife. When you get the temp right, it comes up in big flakes. Thanks it was fun!! |
|
|
|
| mrholland2 |
Feb 24 2021, 04:40 PM
Post
#31
|
|
Senior Member Group: Members Posts: 750 Joined: 7-September 11 From: Santa Maria,CA Member No.: 13,531 Region Association: Central California |
QUOTE(bbrock @ Feb 17 2021, 05:57 PM) QUOTE(mteovr @ Feb 17 2021, 04:42 PM) Also, any advice on a solvent for the floor mat tar? Or just a good scrubbing? It can be a tough call whether to remove the tar but here is why I would always remove for an extensive resto. My floor was rusted badly and it was obvious by looking from the bottom the floor would need replaced. But notice the rust forming at the bottom of the bead channel to the left of the drain plug. That area looked solid from the bottom of the car and the tar looked pristine and well-adhered on top. However, removing the tar revealed surface rust forming underneath. I cannot say if the same kind of surface rust would be found in a car with a fully solid floor, or how long it would have taken for that surface rust to cause any problems. But with the amount of time I spent restoring the car, removing the tar and knowing I was starting with a clean floor would have been worth the minimal time spent even if the floor was otherwise pristine. A plus is it gives an excuse to replace the tar with a modern constrained layer sound deadening product like Noico. The best way I've heard for removing the tar is to toss dry ice on the floor and bust the tar up with a hammer. @TINKERGINEERING has hands down the best video you will ever see on the subject (notice the rust under her tar too): https://www.youtube.com/watch?v=5CkzsJjp6yI I went a different route and it wasn't bad. I used a heat gun and putty knife but you don't want to melt the tar. Instead, you just warm it up enough you can pry it off with a putty knife. When you get the temp right, it comes up in big flakes. So this is ultimately cool. One of the (if not the) currently youngest members is now an example for a new member on how to do stuff. . I don't know about y'all, but I think that's terrific!! (IMG:style_emoticons/default/piratenanner.gif) |
|
|
|
| bbrock |
Feb 24 2021, 05:52 PM
Post
#32
|
|
914 Guru Group: Members Posts: 5,269 Joined: 17-February 17 From: Montana Member No.: 20,845 Region Association: Rocky Mountains |
QUOTE(TINKERGINEERING @ Feb 24 2021, 10:44 AM) Good Luck! In the end a heat gun and a putty knife. should have tried that first. definitely wasn't as much fun though! It wouldn't have been as much fun for us either! I love all your vids, but that one is my favorite. |
|
|
|
|
2 User(s) are reading this topic (2 Guests and 0 Anonymous Users)
0 Members:

|
Lo-Fi Version | Time is now: 5th May 2024 - 12:37 PM |
Invision Power Board
v9.1.4 © 2024 IPS, Inc.