|
|
|
Porsche, and the Porsche crest are registered trademarks of Dr. Ing. h.c. F. Porsche AG.
This site is not affiliated with Porsche in any way. Its only purpose is to provide an online forum for car enthusiasts. All other trademarks are property of their respective owners. |
|
|

  |

| Alain V. |
 May 31 2021, 04:39 PM May 31 2021, 04:39 PM
Post
#1
|
|
Member  Group: Members Posts: 161 Joined: 15-March 13 From: Kansas Member No.: 15,655 Region Association: None |
I need a little input here, please.
I’m replacing the suspension console with a new piece from RD and have hit a stumbling block. Before I removed the original unit, I took a number of measurements, and made a jig/fixture to locate the bolt hole right on the money. The car I bolted to a cart and supported at the front and rear suspension and the trans mount area and the rear firewall,also have door braces installed. Yes, I plan to completely sandblast the area and make sure there isn’t more damage, and Yes, I am going to make a patch for the skin portion I removed. I was doing some quick test fitting of the new console and when I bolt my jig to it and make sure the bolt hole is on it’s proper position,,,,,,,the front of the console has about a 3/8 inch gap between it and the long. I’m wondering if anyone else had run into this issue? I’m sure I can cut & modify the piece to make it fit and close the gap,,,,,but I hate to do that if this is just. “Blemish” part & I should maybe just get another one? I’ll try to post pics to show what is happening. Attached thumbnail(s) 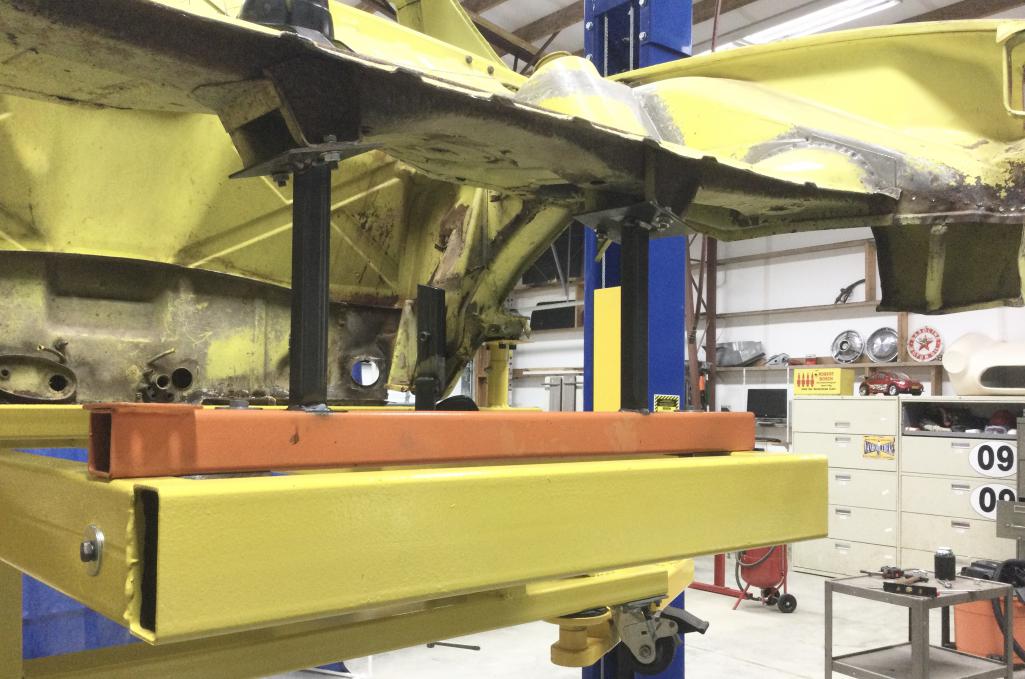
|
   |

 
|
| Alain V. |
May 31 2021, 04:41 PM
Post
#2
|
|
Member Group: Members Posts: 161 Joined: 15-March 13 From: Kansas Member No.: 15,655 Region Association: None |
Jig Attached thumbnail(s) 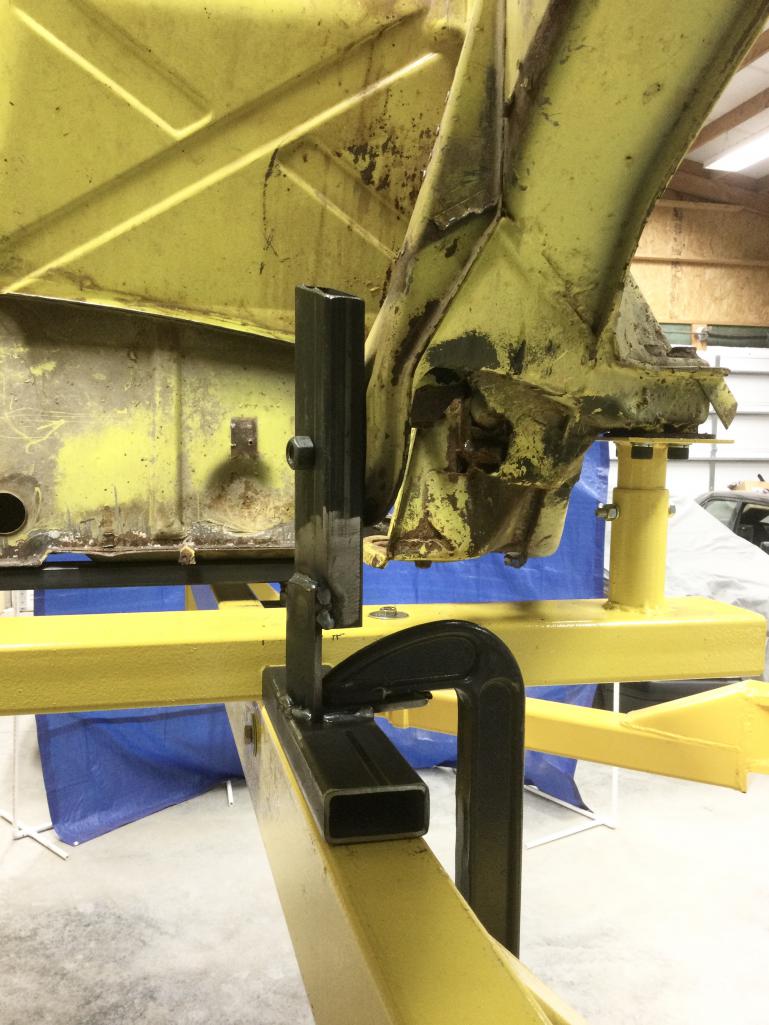
|
|
|
|
| Alain V. |
May 31 2021, 04:43 PM
Post
#3
|
|
Member Group: Members Posts: 161 Joined: 15-March 13 From: Kansas Member No.: 15,655 Region Association: None |
Firewall support
Attached thumbnail(s) 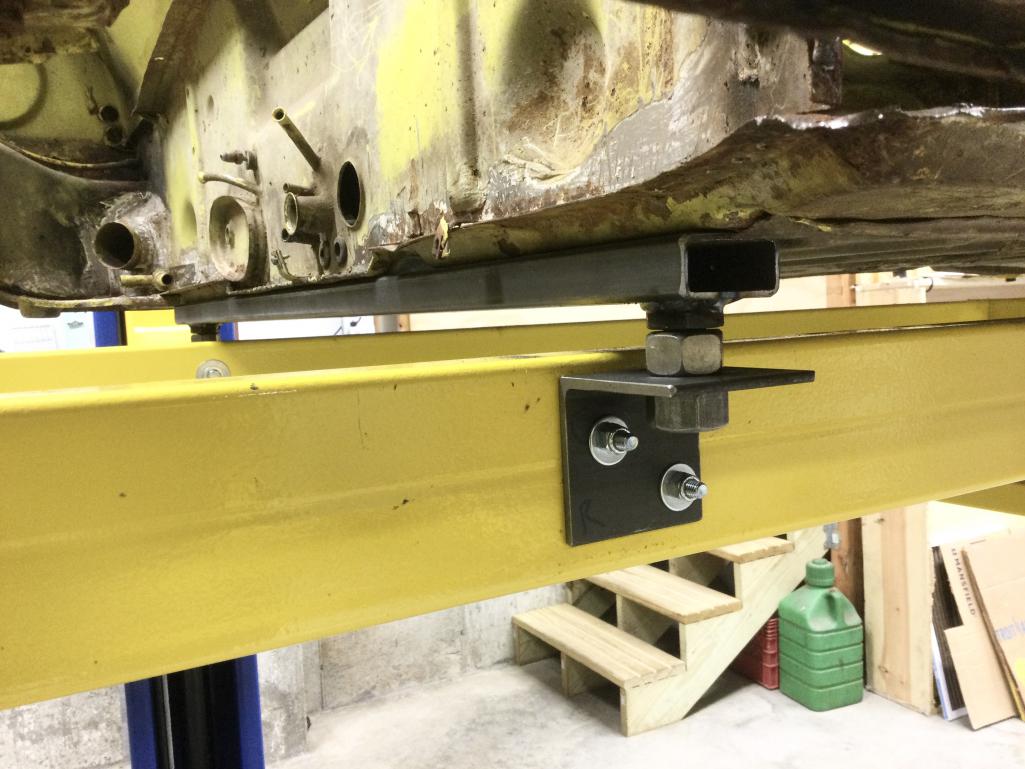
|
|
|
|
| Alain V. |
May 31 2021, 04:44 PM
Post
#4
|
|
Member Group: Members Posts: 161 Joined: 15-March 13 From: Kansas Member No.: 15,655 Region Association: None |
Bracing
Attached thumbnail(s) 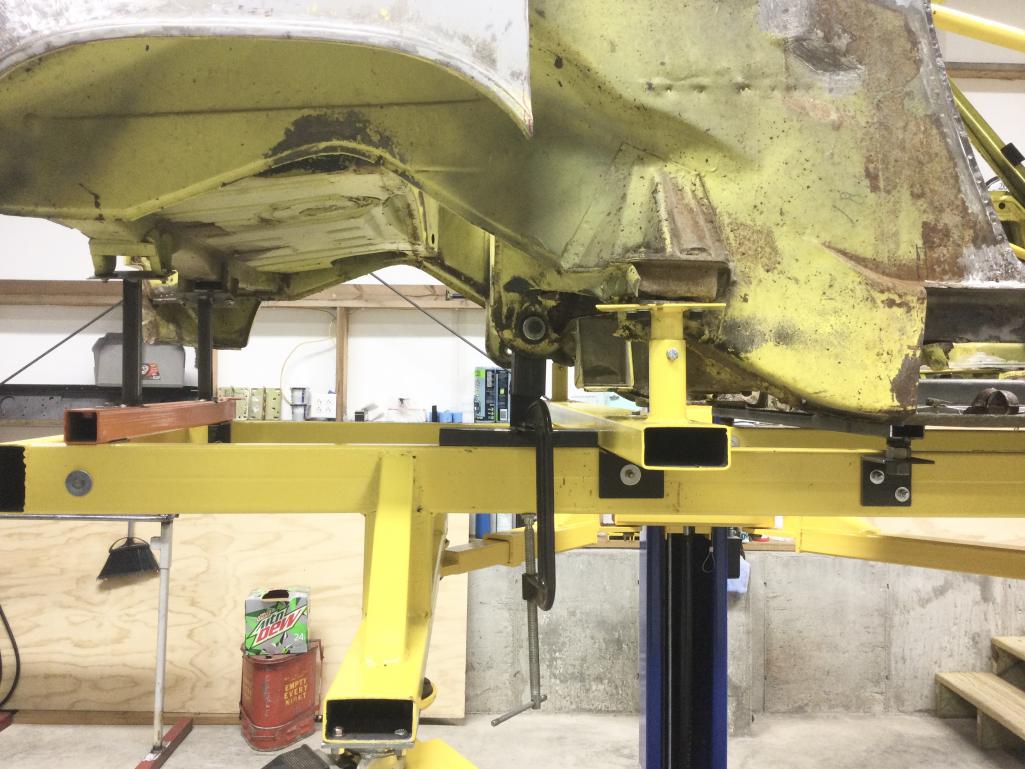
|
|
|
|
| Alain V. |
May 31 2021, 04:46 PM
Post
#5
|
|
Member Group: Members Posts: 161 Joined: 15-March 13 From: Kansas Member No.: 15,655 Region Association: None |
Top view
Attached thumbnail(s) 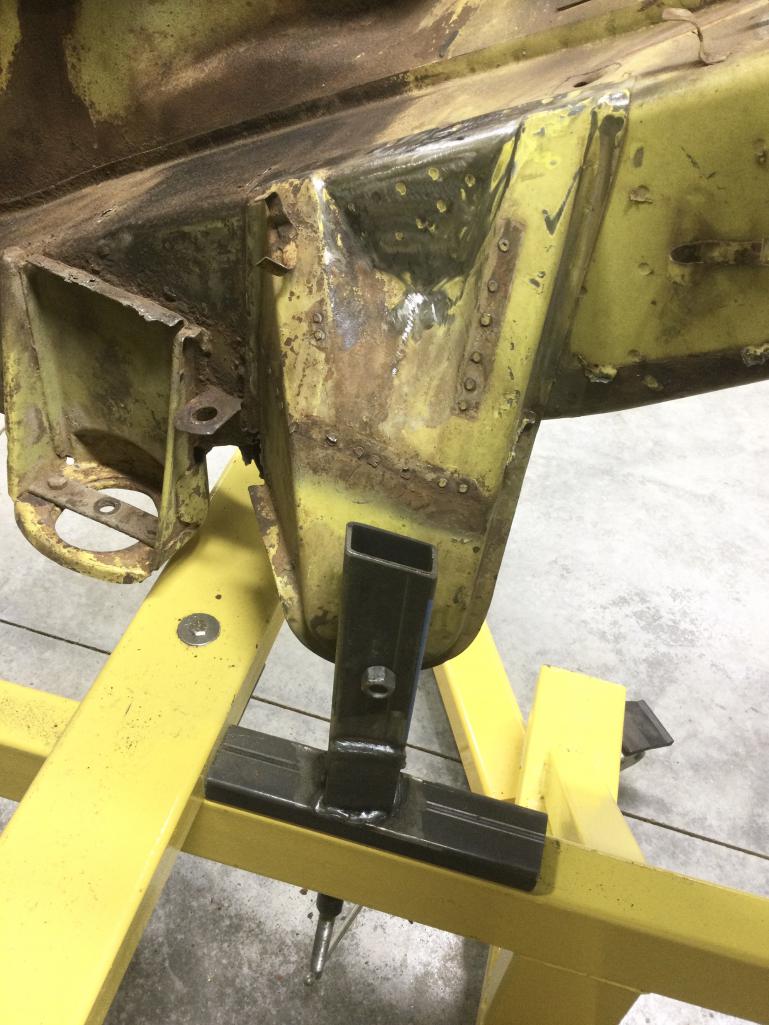
|
|
|
|
| Alain V. |
May 31 2021, 04:46 PM
Post
#6
|
|
Member Group: Members Posts: 161 Joined: 15-March 13 From: Kansas Member No.: 15,655 Region Association: None |
Old one
Attached thumbnail(s) 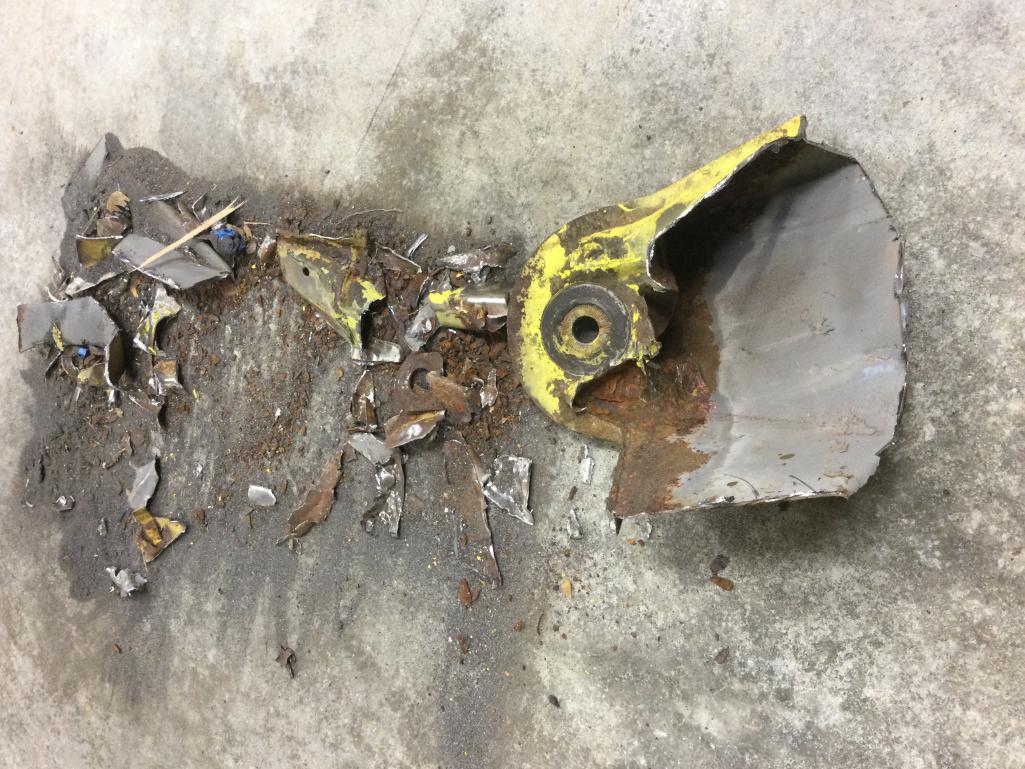
|
|
|
|
| Alain V. |
May 31 2021, 04:47 PM
Post
#7
|
|
Member Group: Members Posts: 161 Joined: 15-March 13 From: Kansas Member No.: 15,655 Region Association: None |
Yeah I need to make a patch
Attached thumbnail(s) 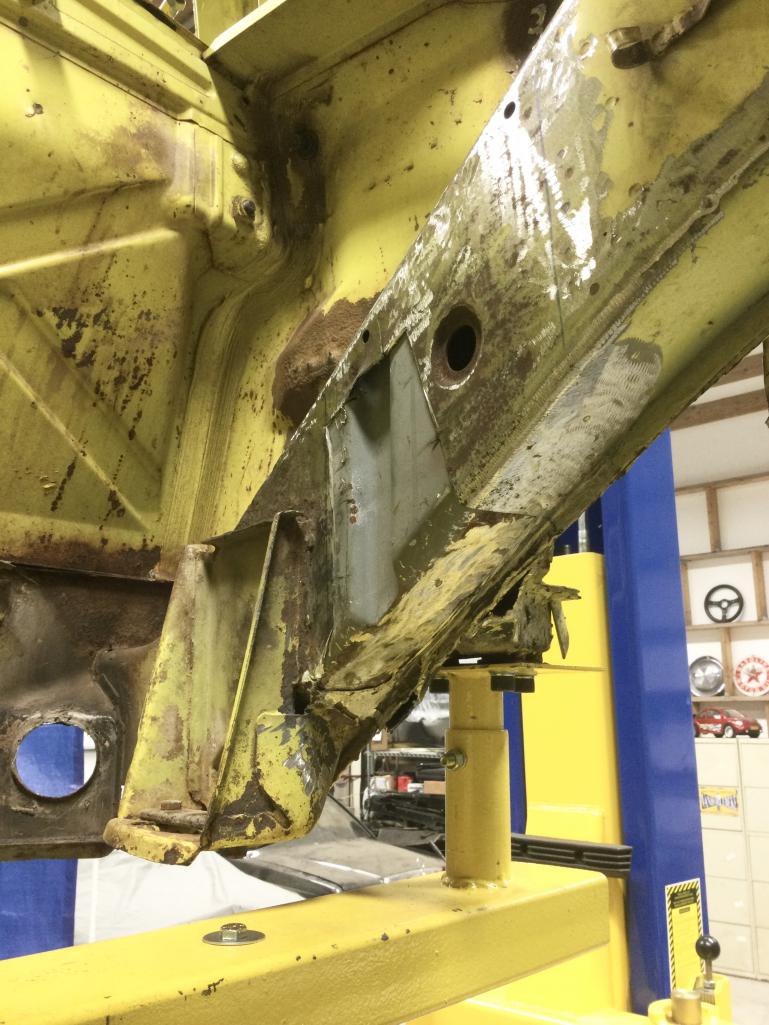
|
|
|
|
| Alain V. |
May 31 2021, 04:49 PM
Post
#8
|
|
Member Group: Members Posts: 161 Joined: 15-March 13 From: Kansas Member No.: 15,655 Region Association: None |
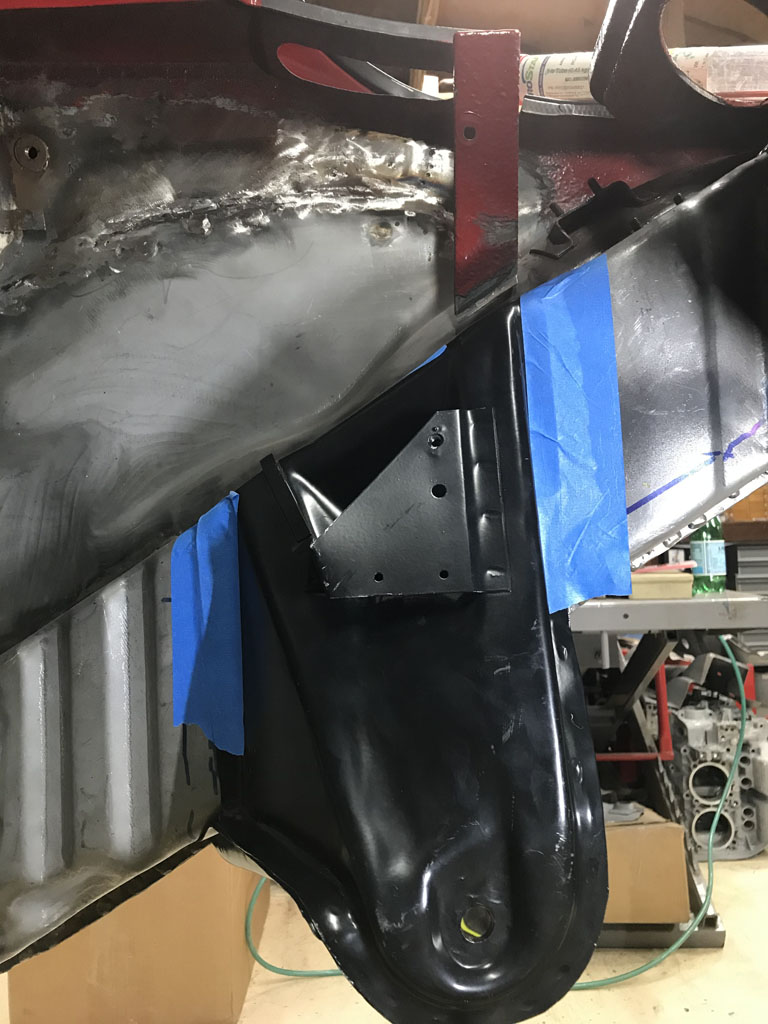
New piece
Attached thumbnail(s) 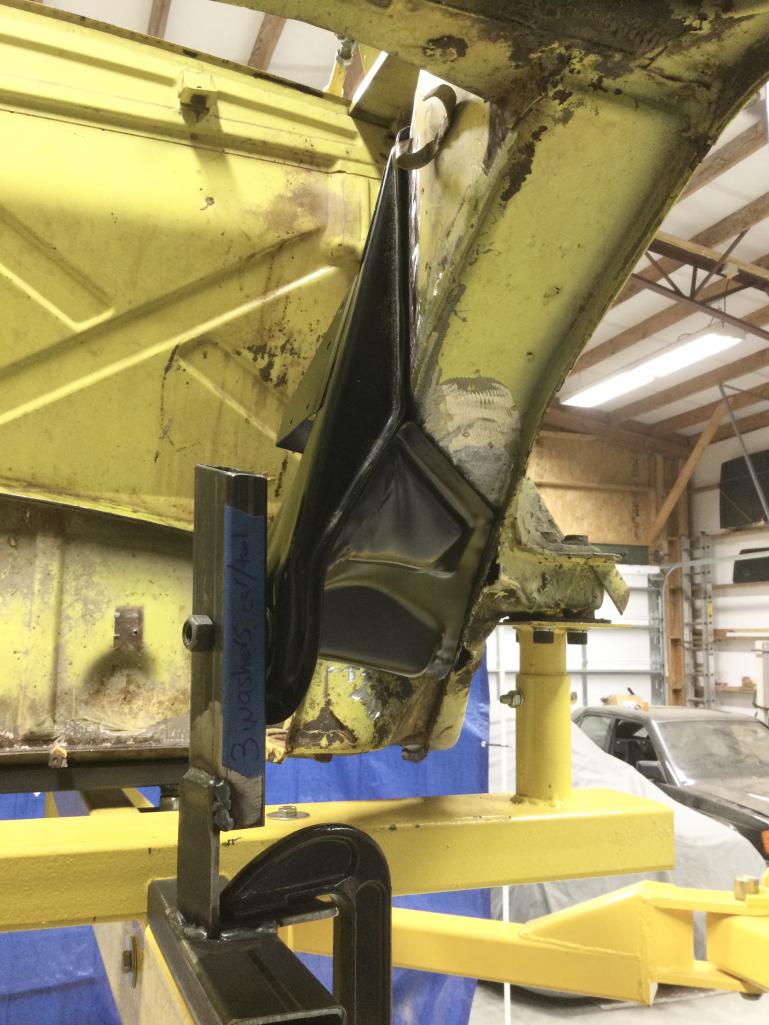
|
|
|
|
| Alain V. |
May 31 2021, 04:50 PM
Post
#9
|
|
Member Group: Members Posts: 161 Joined: 15-March 13 From: Kansas Member No.: 15,655 Region Association: None |
Gap
Attached thumbnail(s) 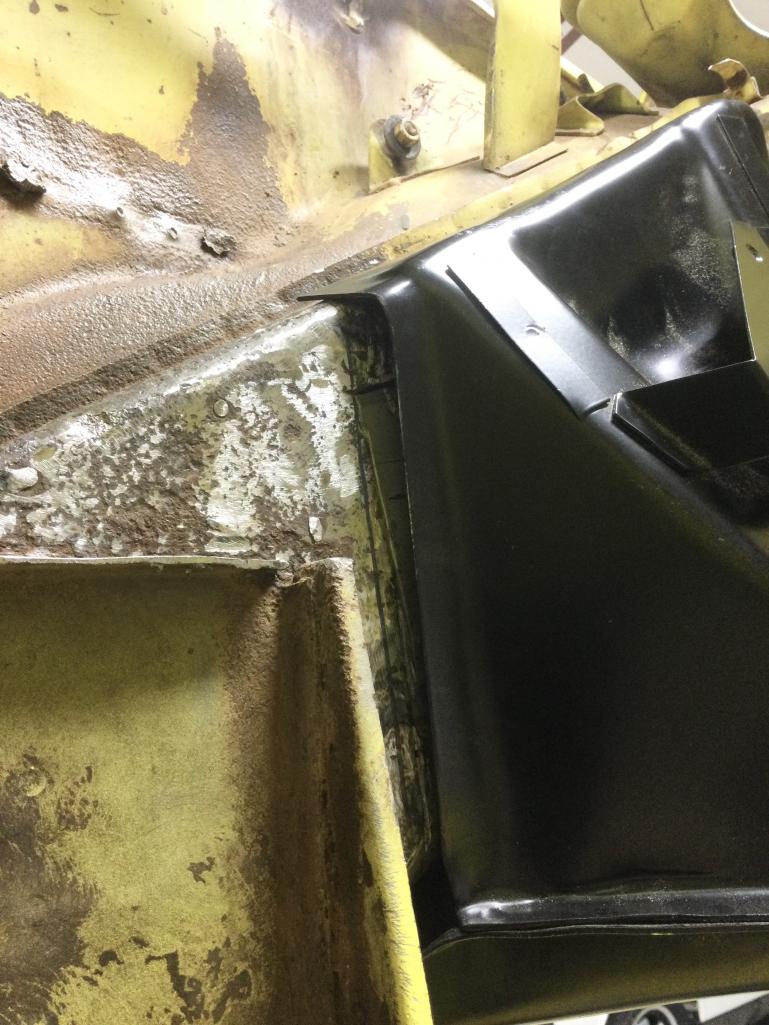
|
|
|
|
| Alain V. |
May 31 2021, 04:51 PM
Post
#10
|
|
Member Group: Members Posts: 161 Joined: 15-March 13 From: Kansas Member No.: 15,655 Region Association: None |
Set in place
Attached thumbnail(s) 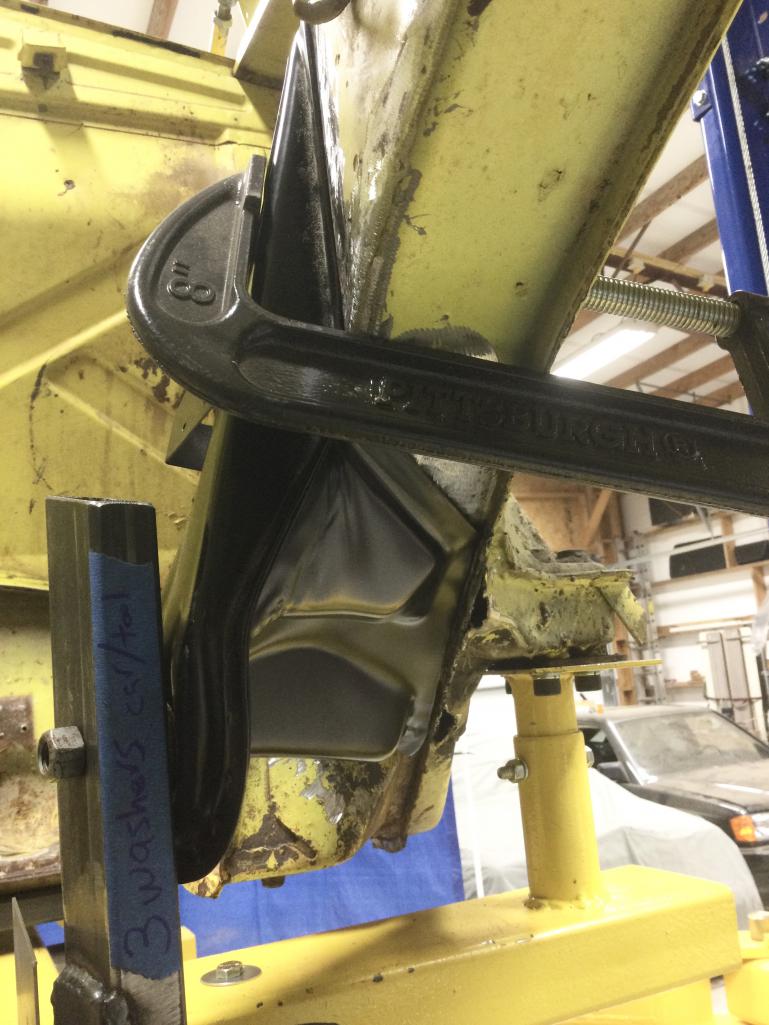
|
|
|
|
| Alain V. |
May 31 2021, 04:52 PM
Post
#11
|
|
Member Group: Members Posts: 161 Joined: 15-March 13 From: Kansas Member No.: 15,655 Region Association: None |
Top view
Attached thumbnail(s) 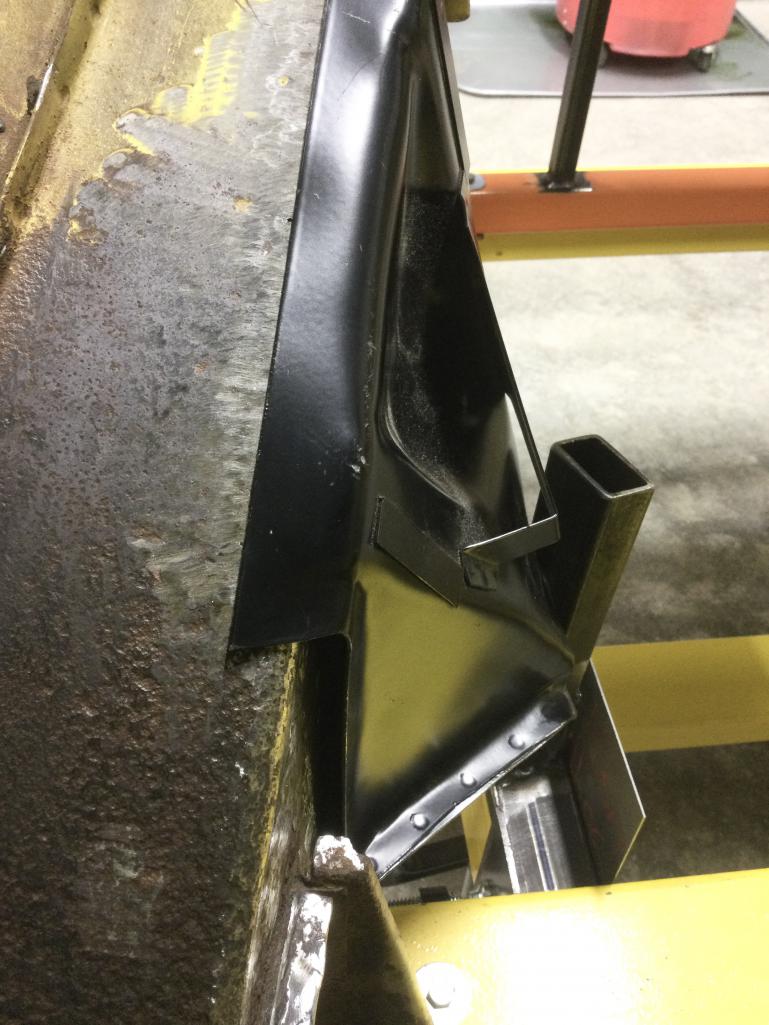
|
|
|
|
| dhuckabay |
May 31 2021, 04:58 PM
Post
#12
|
|
Member Group: Members Posts: 222 Joined: 14-June 20 From: Idaho Member No.: 24,379 Region Association: Pacific Northwest |
No real comment to your question. Can't imagine anything moved around with the jig you built, a beautiful job.
|
|
|
|
| partwerks |
May 31 2021, 05:07 PM
Post
#13
|
|
Senior Member Group: Members Posts: 1,593 Joined: 7-September 06 From: Grand Island, NE Member No.: 6,787 |
Is the new part made right?
|
|
|
|
| mepstein |
May 31 2021, 05:33 PM
Post
#14
|
|
914-6 GT in waiting Group: Members Posts: 19,271 Joined: 19-September 09 From: Landenberg, PA/Wilmington, DE Member No.: 10,825 Region Association: MidAtlantic Region |
Pretty common with any reproduction piece that you will need to modify to fit.
|
|
|
|
| windforfun |
May 31 2021, 05:40 PM
Post
#15
|
|
Senior Member Group: Members Posts: 1,785 Joined: 17-December 07 From: Blackhawk, CA Member No.: 8,476 Region Association: None |
Get a bigger keyboard. 8^)
|
|
|
|
| tygaboy |
May 31 2021, 05:42 PM
Post
#16
|
|
914 Guru Group: Members Posts: 5,292 Joined: 6-October 15 From: Petaluma, CA Member No.: 19,241 Region Association: Northern California |
My $0.02. First, I'd contact RD, tell them what you're seeing and send the key pics that show that gap. I'm not suggesting the part is incorrect, just that I'd want them to review it to be sure it's OK. We all know there is a fair bit of variation across individual chassis and repro parts often need massaging so this sort of thing isn't really a surprise, as @mepstein points out.
I replaced my suspension consoles with the Tangerine Racing pick up point kit. It's a bit different design than stock but... On one side, I have to add a strip of material about 3/16" wide to close a gap. So, assuming RD says the part looks OK AND you're confident in your fixture (which looks really nice, BTW), I'd feel comfortable slicing the console and moving things around until it all sits nicely against the long. I'm sure you're aware of this but I'll mention it anyway: Be sure the console fit is relaxed against the long when it's bolted firmly to your jig and not being forced into place, else it'll move when you unbolt things. Hope this helps. And again, awesome jig! |
|
|
|
| Alain V. |
May 31 2021, 05:50 PM
Post
#17
|
|
Member Group: Members Posts: 161 Joined: 15-March 13 From: Kansas Member No.: 15,655 Region Association: None |
QUOTE(dhuckabay @ May 31 2021, 05:58 PM)  No real comment to your question. Can't imagine anything moved around with the jig you built, a beautiful job. Thanks, bit I can't take the credit for the cart. I got the idea from reading through Jeff Hail's build thread. I've got 40 years experience as an indy Mercedes tech, but this is my first dive into body/rust repair. |
|
|
|
| Alain V. |
May 31 2021, 06:04 PM
Post
#18
|
|
Member Group: Members Posts: 161 Joined: 15-March 13 From: Kansas Member No.: 15,655 Region Association: None |
QUOTE(tygaboy @ May 31 2021, 06:42 PM) My $0.02. First, I'd contact RD, tell them what you're seeing and send the key pics that show that gap. I'm not suggesting the part is incorrect, just that I'd want them to review it to be sure it's OK. We all know there is a fair bit of variation across individual chassis and repro parts often need massaging so this sort of thing isn't really a surprise, as @mepstein points out. I replaced my suspension consoles with the Tangerine Racing pick up point kit. It's a bit different design than stock but... On one side, I have to add a strip of material about 3/16" wide to close a gap. So, assuming RD says the part looks OK AND you're confident in your fixture (which looks really nice, BTW), I'd feel comfortable slicing the console and moving things around until it all sits nicely against the long. I'm sure you're aware of this but I'll mention it anyway: Be sure the console fit is relaxed against the long when it's bolted firmly to your jig and not being forced into place, else it'll move when you unbolt things. Hope this helps. And again, awesome jig! Thanks to You and Mark for responding. I know I don't ever post much, but I've been reading/studying here for years as I've owned this 914 for over a decade and am just now getting time to work on it. I know that most aftermarket body pieces need a little "work" to fit.... It's just that I searched about 15 different threads on replacing this piece and nearly everyone says the part pretty much "falls" into place. I'm confident I can cut & mod the part to fit, and I'm up to the challenge. I just hate to do that if this happens to be a flawed one and a different unit would truly "fall" into place. I'll contact RD and see what they think. I'm not complaining at all, as they have been great to deal with and I am thankful that parts like this are available. I was a bit surprised with the many hours I have scoured the highly detailed builds here that I've never seen anyone mention having to tweek one of these to get a good fit. |
|
|
|
| Superhawk996 |
May 31 2021, 07:05 PM
Post
#19
|
|
914 Guru Group: Members Posts: 5,819 Joined: 25-August 18 From: Woods of N. Idaho Member No.: 22,428 Region Association: Galt's Gulch |
Recently had the same issue. Bottom return flange was too long in my case. Was hitting the down standing flange on the bottom of the long before the front of the console could seat to the side of the long. Yours looks to be doing the same.
 Still doing rough fit and needed my trailing arms back from powdercoat before I can even think about final position. Likewise, I still need to add the 2nd layer of "wrap" to the new long. So a ways to go on my part. I haven't final welded mine yet until I can add that 2nd layer, and after I can mock-up my rear trailing arm and make sure I have proper geometry, wheel base, and range of toe. |
|
|
|
| Alain V. |
Jun 1 2021, 06:12 AM
Post
#20
|
|
Member Group: Members Posts: 161 Joined: 15-March 13 From: Kansas Member No.: 15,655 Region Association: None |
QUOTE(Superhawk996 @ May 31 2021, 08:05 PM) Recently had the same issue. Bottom return flange was too long in my case. Was hitting the down standing flange on the bottom of the long before the front of the console could seat to the side of the long. Yours looks to be doing the same. Still doing rough fit and needed my trailing arms back from powdercoat before I can even think about final position. Likewise, I still need to add the 2nd layer of "wrap" to the new long. So a ways to go on my part. I haven't final welded mine yet until I can add that 2nd layer, and after I can mock-up my rear trailing arm and make sure I have proper geometry, wheel base, and range of toe. I agree. I believe a little trimming of the bottom flange will get me a better fit, but it will also move the control arm mounting bolt "outwards" too. Maybe I'm being overly paranoid since this piece locates the inboard side of the control arm. I was also thinking a 2 step fix. #1 slightly trim the bottom flange of the new part #2 go ahead and scab in an extra patch to the skin of the long to help fill the gap. We'll see. This type of work is all new to me, but I'm learning a lot and it's great therapy. Thanks for the input. (IMG:style_emoticons/default/14.gif) |
|
|
|
|
1 User(s) are reading this topic (1 Guests and 0 Anonymous Users)
0 Members:

|
Lo-Fi Version | Time is now: 16th May 2024 - 03:16 AM |
Invision Power Board
v9.1.4 © 2024 IPS, Inc.