|
|
|
Porsche, and the Porsche crest are registered trademarks of Dr. Ing. h.c. F. Porsche AG.
This site is not affiliated with Porsche in any way. Its only purpose is to provide an online forum for car enthusiasts. All other trademarks are property of their respective owners. |
|
|

  |

| 914Toy |
 Nov 28 2021, 01:43 PM Nov 28 2021, 01:43 PM
Post
#1
|
|
Senior Member  Group: Members Posts: 716 Joined: 12-November 17 From: Laguna beach Member No.: 21,596 Region Association: Southern California |
As most of you know, removing/installing an alternator in our 6's without dropping the engine is a challenge, due to the engine firewall and fan shroud minimum access configuration. I have accomplished this in the past with the aid of a good sized hatch in the firewall - even so, it was still a challenge.
My alternator failed (probably voltage regulator problem) on the way to the recent "Unstock event". Fortunately Pelican Parts suggested I return this 175 amp (WASP) alternator under warranty (installed a year ago) for full value replacement with a new one. The high amp is to accommodate the electric AC i have installed in my car. It took a couple of weeks to complete return and delivery of the alternators. During this time started by the challenge of removing the used alternator, I decided to research and make modifications to the fan shroud to accommodate an easier exchange of the alternator. I did not find much in my research, so i proceeded to modify the fibre glass shroud cover to give access to the alternator. The following pics show what I did, and after a test run proved as successful. 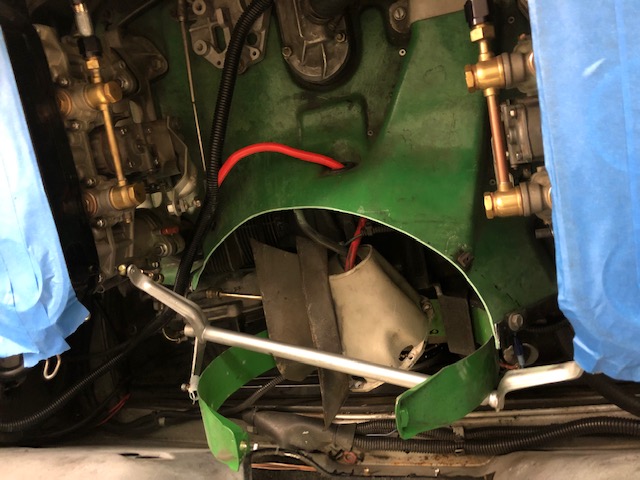 Shows where I cut (Dremel with thin cutting wheel) the fibre glass shroud. 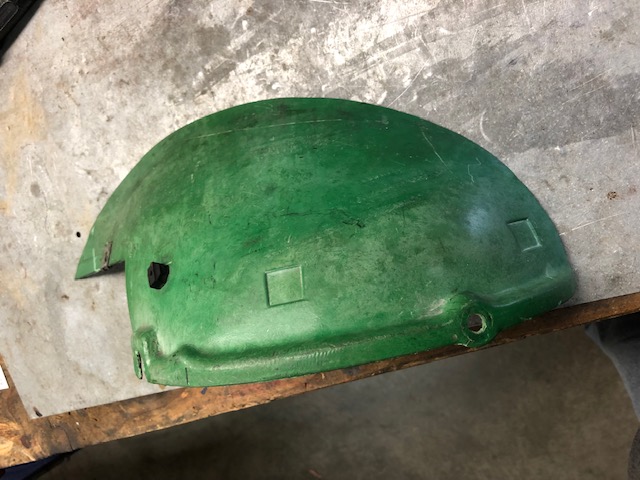 Shows the piece removed. Shows the piece removed.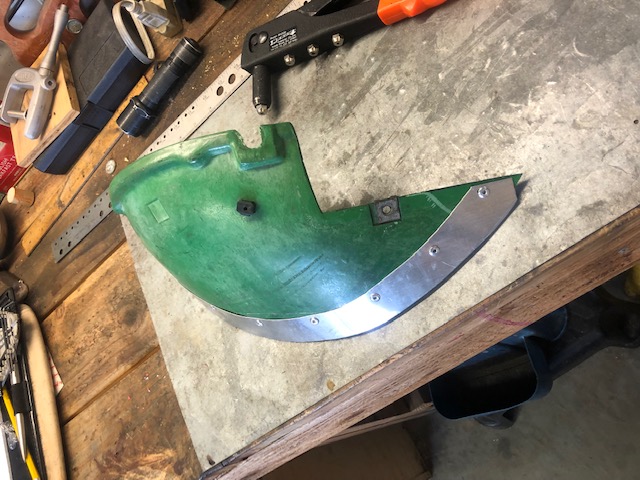 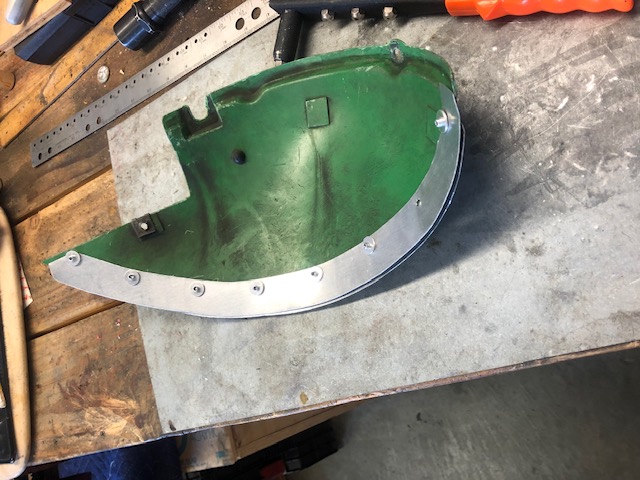 Shows the strips of thin aluminum sheet riveted to both sides of the shroud piece, with a 1/4" overlap to sandwich the large remaining shroud edge in place. 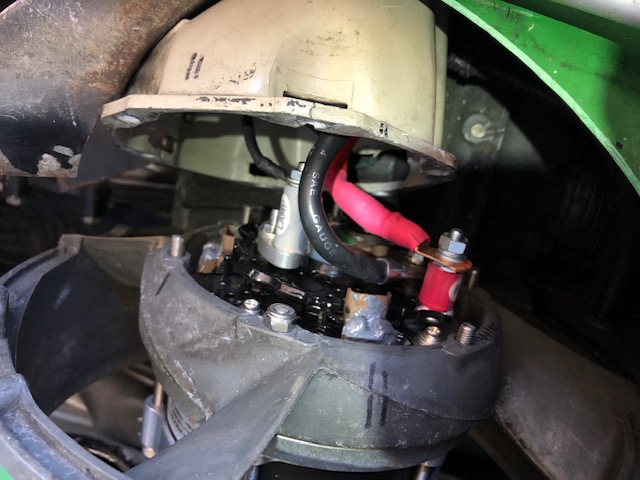 Shows access to the alternator and it's wiring before returning the now removable piece of shroud for such access. 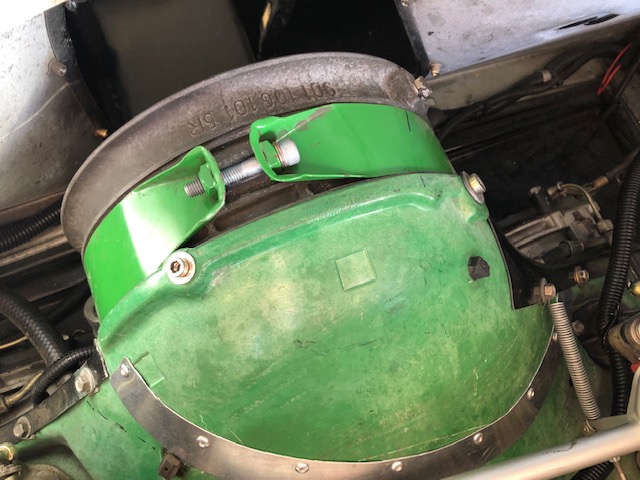 Finished installation. This was worth the effort, which greatly reduced the challenge of remove/replace alternators in our 914/6's. |
   |

 
|
| johnhora |
Nov 28 2021, 02:32 PM
Post
#2
|
|
Senior Member Group: Members Posts: 866 Joined: 7-January 03 From: Derby City KY Member No.: 107 Region Association: None |
I admire your fortitude and determination....it's not the easiest task with the engine out...heck just to get that cut on the shroud is amazing.
Very cool! |
|
|
|
| mlindner |
Nov 28 2021, 03:31 PM
Post
#3
|
|
Senior Member Group: Members Posts: 1,512 Joined: 11-November 11 From: Merrimac, WI Member No.: 13,770 Region Association: Upper MidWest |
That is a great idea 914Toy, I'm sure down the road I'll be doing that. Love it. Mark
|
|
|
|
| roblav1 |
Nov 28 2021, 03:34 PM
Post
#4
|
|
Senior Member Group: Members Posts: 528 Joined: 18-September 12 From: KY Member No.: 14,943 Region Association: MidAtlantic Region |
Why can't you remove the entire fan shroud? 12 carb nuts, throttle, and fuel disconnect sure seems easier than cutting the shroud.
|
|
|
|
| Luke M |
Nov 28 2021, 06:18 PM
Post
#5
|
|
Senior Member Group: Members Posts: 1,369 Joined: 8-February 05 From: WNY Member No.: 3,574 Region Association: North East States |
QUOTE(roblav1 @ Nov 28 2021, 02:34 PM)  Why can't you remove the entire fan shroud? 12 carb nuts, throttle, and fuel disconnect sure seems easier than cutting the shroud. It's a big PIA either way. For us that have done this in the car know how much of a pain it is. Yeah you could pull the whole upper end off and remove the shroud with the alt housing. I for one would rather just drop the engine. I can have the engine on the ground and alt off by the time you would have the fan housing ready to come off. Been there, done that so I know which is faster. If you look at the 3.6 shrouds it looks similar to what 914toy did to his. Nice job.. Attached image(s) 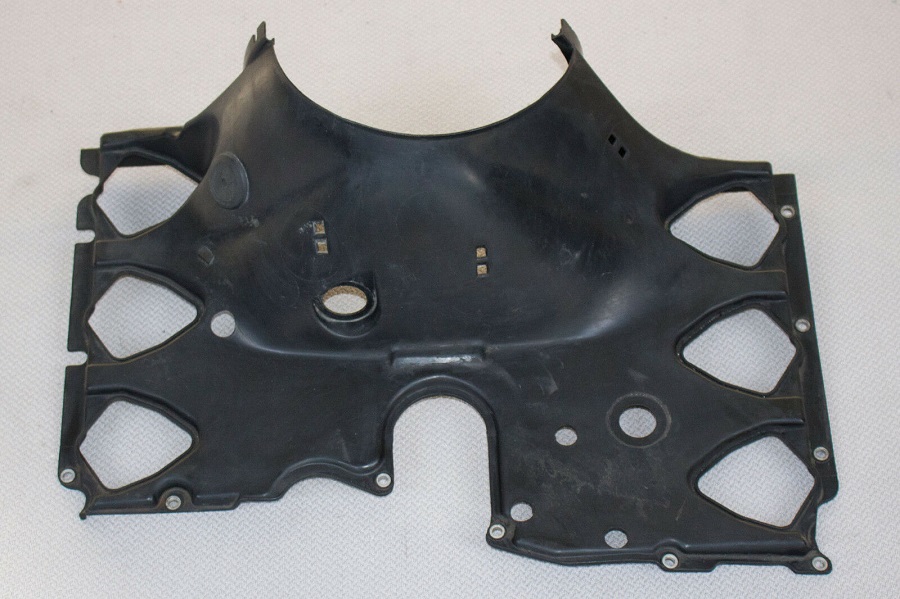
|
|
|
|
| jim_hoyland |
Nov 28 2021, 07:00 PM
Post
#6
|
|
Get that VIN ? Group: Members Posts: 9,263 Joined: 1-May 03 From: Sunset Beach, CA Member No.: 643 Region Association: Southern California |
Nice Keith (IMG:style_emoticons/default/smile.gif)
|
 |
|
| ClayPerrine |
Nov 29 2021, 09:05 AM
Post
#7
|
|
Life's been good to me so far..... Group: Admin Posts: 15,415 Joined: 11-September 03 From: Hurst, TX. Member No.: 1,143 Region Association: NineFourteenerVille |
There is a thread in the classics forum that tells how to change an alternator on a /6 with the engine in the car.
http://www.914world.com/bbs2/index.php?showtopic=10187 It is not hard to do. Clay |
|
|
|
| forrestkhaag |
Nov 29 2021, 01:50 PM
Post
#8
|
|
Senior Member Group: Members Posts: 935 Joined: 21-April 14 From: Scottsdale, Arizona Member No.: 17,273 Region Association: Southwest Region |
I'm still looking for the fan shroud on my car..............
It must be in theere somewhere..... (IMG:style_emoticons/default/beerchug.gif) Attached image(s) 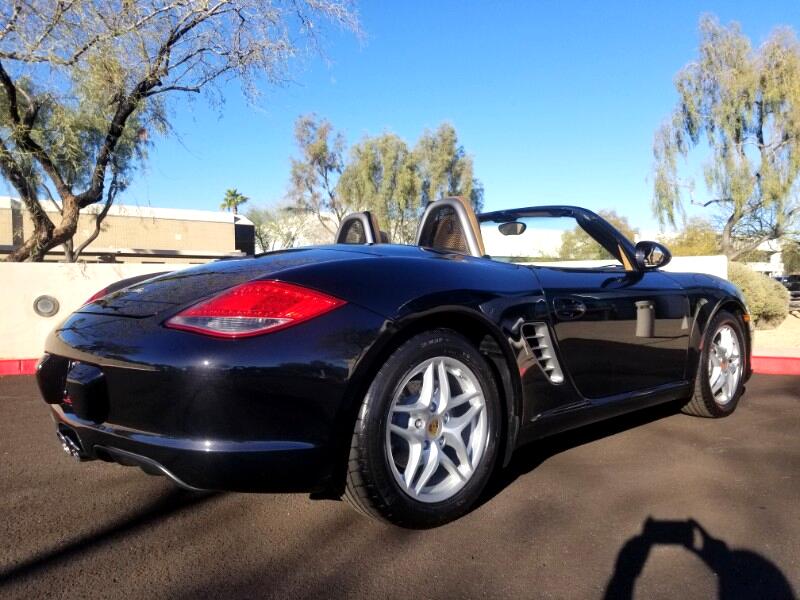
|
|
|
|
| Steve |
Nov 29 2021, 02:30 PM
Post
#9
|
|
914 Guru Group: Members Posts: 5,570 Joined: 14-June 03 From: Orange County, CA Member No.: 822 Region Association: Southern California |
QUOTE(forrestkhaag @ Nov 29 2021, 11:50 AM) I'm still looking for the fan shroud on my car.............. It must be in theere somewhere..... (IMG:style_emoticons/default/beerchug.gif) I think its up front behind the radiator!! (IMG:style_emoticons/default/beerchug.gif) |
|
|
|
| rgalla9146 |
Nov 29 2021, 09:33 PM
Post
#10
|
|
Advanced Member Group: Members Posts: 4,545 Joined: 23-November 05 From: Paramus NJ Member No.: 5,176 Region Association: None |
I'm with Luke and Clay.
It's not fun either way but in the end you get satifaction from a correct job. I also get to look around and catch other things that can be better or need attention. In thirty seven years and a few 914 6s I've only needed to do this job twice. We're gluttons I guess. The OPs solution is very clever and well done (IMG:style_emoticons/default/thumb3d.gif) |
|
|
|
| rgalla9146 |
Nov 30 2021, 07:26 AM
Post
#11
|
|
Advanced Member Group: Members Posts: 4,545 Joined: 23-November 05 From: Paramus NJ Member No.: 5,176 Region Association: None |
QUOTE(914Toy @ Nov 28 2021, 02:43 PM) As most of you know, removing/installing an alternator in our 6's without dropping the engine is a challenge, due to the engine firewall and fan shroud minimum access configuration. I have accomplished this in the past with the aid of a good sized hatch in the firewall - even so, it was still a challenge. My alternator failed (probably voltage regulator problem) on the way to the recent "Unstock event". Fortunately Pelican Parts suggested I return this 175 amp (WASP) alternator under warranty (installed a year ago) for full value replacement with a new one. The high amp is to accommodate the electric AC i have installed in my car. It took a couple of weeks to complete return and delivery of the alternators. During this time started by the challenge of removing the used alternator, I decided to research and make modifications to the fan shroud to accommodate an easier exchange of the alternator. I did not find much in my research, so i proceeded to modify the fibre glass shroud cover to give access to the alternator. The following pics show what I did, and after a test run proved as successful. Shows where I cut (Dremel with thin cutting wheel) the fibre glass shroud. Shows the piece removed.Shows the strips of thin aluminum sheet riveted to both sides of the shroud piece, with a 1/4" overlap to sandwich the large remaining shroud edge in place. Shows access to the alternator and it's wiring before returning the now removable piece of shroud for such access. Finished installation. This was worth the effort, which greatly reduced the challenge of remove/replace alternators in our 914/6's. Hey Keith Please tell us about your carburator plumbing....looks like a great solution to another early 911 / 914 6 quirky issue. |
|
|
|
| 914Toy |
Nov 30 2021, 09:45 AM
Post
#12
|
|
Senior Member Group: Members Posts: 716 Joined: 12-November 17 From: Laguna beach Member No.: 21,596 Region Association: Southern California |
I have Tangerine's plumbing through the tunnel into the engine bay, and up through the tin on the passenger side. Then I had a local hose shop make flexible high pressure hose to a fuel filter, on to a pressure regulator, and then on to the carbs, all with pressure hose end fittings. Given low pressure for carbs (3lb/in sq.) pressure fittings are not needed, but are safer and user friendly when removing and installing this equipment. The metal plumbing on the carbs was supplied by a local fellow.
|
|
|
|
| rgalla9146 |
Nov 30 2021, 10:27 AM
Post
#13
|
|
Advanced Member Group: Members Posts: 4,545 Joined: 23-November 05 From: Paramus NJ Member No.: 5,176 Region Association: None |
QUOTE(914Toy @ Nov 30 2021, 10:45 AM) I have Tangerine's plumbing through the tunnel into the engine bay, and up through the tin on the passenger side. Then I had a local hose shop make flexible high pressure hose to a fuel filter, on to a pressure regulator, and then on to the carbs, all with pressure hose end fittings. Given low pressure for carbs (3lb/in sq.) pressure fittings are not needed, but are safer and user friendly when removing and installing this equipment. The metal plumbing on the carbs was supplied by a local fellow. The sweated banjos on the carbs are neat and easy solution to the often leaky (and clunky) connecting hose and clamps. Another unique idea.... well done ! |
|
|
|
|
1 User(s) are reading this topic (1 Guests and 0 Anonymous Users)
0 Members:

|
Lo-Fi Version | Time is now: 26th April 2024 - 06:30 PM |
Invision Power Board
v9.1.4 © 2024 IPS, Inc.