
 72 rustoration / subaru 6cyl project in Kansas, Mild resto-mod build, my idea of a “true” sportscar 72 rustoration / subaru 6cyl project in Kansas, Mild resto-mod build, my idea of a “true” sportscar |
|
|

|
Porsche, and the Porsche crest are registered trademarks of Dr. Ing. h.c. F. Porsche AG.
This site is not affiliated with Porsche in any way. Its only purpose is to provide an online forum for car enthusiasts. All other trademarks are property of their respective owners. |
|
|

| Alain V. |
 Jan 2 2022, 03:40 PM Jan 2 2022, 03:40 PM
Post
#181
|
|
Member  Group: Members Posts: 212 Joined: 15-March 13 From: Kansas Member No.: 15,655 Region Association: None 
 |
Well, I suppose I’ve put it off long enough.
I’m finally starting a build/progress page on my 72 914 project. About the car: I’ve owned it for over a decade, and had it set aside as a quick & easy restoration project, because I “fooled” myself into thinking I had a fairly “rust free” example. I work, a lot of hours (self employed) and own multiple project cars, so I didn’t start working on this car until recently. ...once I did “start” on it,,,, I became painfully aware of just how bad the car actually was. The plan, since I ended up stripping the car down to the bare tub, I decided to build my idea/vision of a true sports car..... In my opinion, the 914 is a perfect “canvas” for such a build. Focus will be on: Light weight, handling, simplicity, and fun t o drive. Goal weight is around 1800 pounds, using some carbon deck lids, GT style engine cover, etc. Goal HP around 250 plus, will come from a Subaru 6cyl. About me, My background is as an Indy mercedes mechanic for just over 40 years. I’ve never done rust repair or bodywork myself though, as I’ve always hired out those types of jobs. This little 914 is going to be my “tech school” into metal work as a spare time project. Hopefully I’ll be able to work on it one day per weekend on it and possible make monthly updates. I guess we’ll have to see........... Here she is... when I initially started 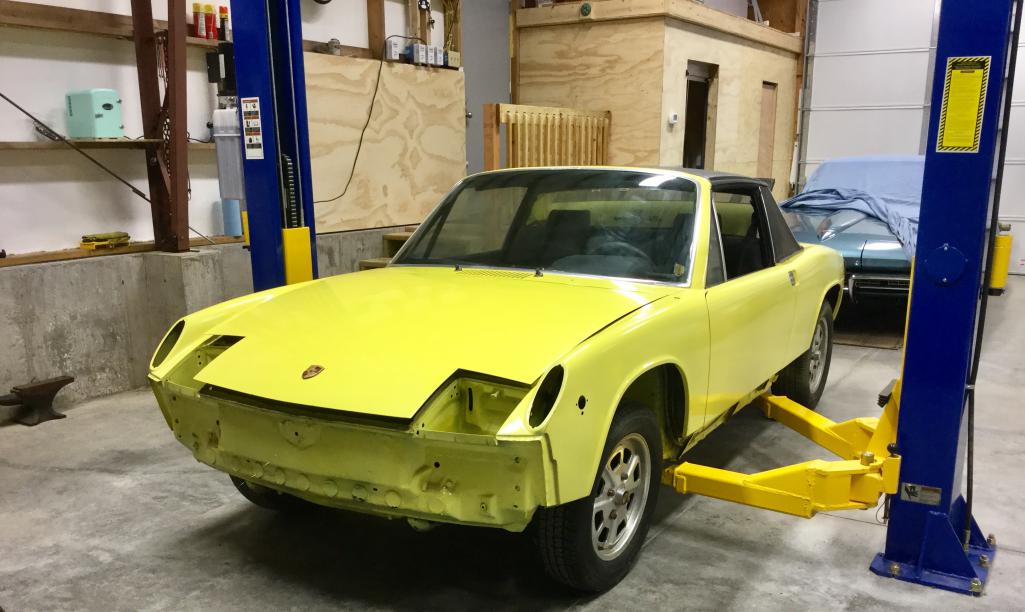 |
   |

 
|
Posts in this topic
Alain V. 72 rustoration / subaru 6cyl project in Kansas Jan 2 2022, 03:40 PM Alain V. “Hell hole” area didn’t look too bad, at fir... Jan 2 2022, 03:42 PM Alain V. Outside of jack pad area looked a little rough Jan 2 2022, 03:45 PM Alain V. Had typical holes across the rear of the trunk flo... Jan 2 2022, 03:46 PM Alain V. Rear of floor pan looked not too bad. Jan 2 2022, 03:48 PM Alain V. First little surprise was bondo hiding a hole here... Jan 2 2022, 03:50 PM Alain V. Dropping the drivetrain out. Jan 2 2022, 03:51 PM Alain V. Yup, both sides had little bubbles that just grew ... Jan 2 2022, 03:54 PM Alain V. RE: 72 rustoration / subaru 6cyl project in Kansas Jan 2 2022, 03:55 PM Alain V. This stuff is “The Devil” boooooo! Eats 91... Jan 2 2022, 03:57 PM Alain V. I even yanked out the old crusty wiring harness. I... Jan 2 2022, 03:59 PM Alain V. Floor pan actually seems saveable. Just has a bad ... Jan 2 2022, 04:01 PM Alain V. Trunk floor is Swiss cheese Jan 2 2022, 04:02 PM Alain V. It must have been in a small rear end collision at... Jan 2 2022, 04:05 PM Alain V. Went ahead and made up some door opening braces. I... Jan 2 2022, 04:08 PM Alain V. Starting to make cross braces and supports for a c... Jan 2 2022, 04:11 PM Alain V. Cart construction Jan 2 2022, 04:12 PM Alain V. Rear suspension mount. Also added one at the trans... Jan 2 2022, 04:15 PM Alain V. Time to start the rust hunt Jan 2 2022, 04:17 PM Alain V. First “lesson learned”. I should have left the... Jan 2 2022, 04:19 PM Alain V. My first attempt at installing a patch that I cut ... Jan 2 2022, 04:21 PM Alain V. RE: 72 rustoration / subaru 6cyl project in Kansas Jan 2 2022, 04:22 PM Alain V. RE: 72 rustoration / subaru 6cyl project in Kansas Jan 2 2022, 04:23 PM Alain V. RE: 72 rustoration / subaru 6cyl project in Kansas Jan 2 2022, 04:25 PM Alain V. Uh oh, suspension console is toast. Jan 2 2022, 04:27 PM Alain V. Made a simple jig to locate the hole for the contr... Jan 2 2022, 04:28 PM Alain V. Removed old console piece Jan 2 2022, 04:30 PM Alain V. Need to make a small patch for the skin behind the... Jan 2 2022, 04:31 PM Alain V. RE: 72 rustoration / subaru 6cyl project in Kansas Jan 2 2022, 04:33 PM Alain V. RE: 72 rustoration / subaru 6cyl project in Kansas Jan 2 2022, 04:34 PM Alain V. RE: 72 rustoration / subaru 6cyl project in Kansas Jan 2 2022, 04:35 PM Alain V. RE: 72 rustoration / subaru 6cyl project in Kansas Jan 2 2022, 04:36 PM Alain V. Test fitting new piece Jan 2 2022, 04:37 PM Alain V. Decided to put the whole thing on an auto twirler ... Jan 2 2022, 04:41 PM Alain V. Starting to prep my new trunk panel and donor car ... Jan 2 2022, 04:43 PM Alain V. In additi9on to the original tail panel being full... Jan 2 2022, 04:46 PM Alain V. In order to get a decent fit, I made a “flexible... Jan 2 2022, 04:52 PM Alain V. “Flexible shape pattern” set onto the body wit... Jan 2 2022, 04:54 PM
 sechszylinder
“Flexible shape pattern” set onto the body wi... Jul 18 2022, 07:45 AM Alain V.
[quote name='Alain V.' post='2971416' date='Jan 2... Aug 28 2022, 08:43 PM Alain V. Cuts made. Before I install the rear pieces perman... Jan 2 2022, 04:56 PM Alain V. Aaand, voila! It fits pretty good. Needs sligh... Jan 2 2022, 04:57 PM Alain V. RE: 72 rustoration / subaru 6cyl project in Kansas Jan 2 2022, 04:58 PM Alain V. I’m going to be installing two of the upper tran... Jan 2 2022, 05:01 PM Alain V. Got an idea for cleaning surface rust out of hard ... Jan 2 2022, 05:45 PM Alain V. I’m going to flush the area with a rust solution... Jan 2 2022, 05:48 PM lesorubcheek
I’m going to flush the area with a rust solutio... Jan 2 2022, 08:31 PM Alain V. RE: 72 rustoration / subaru 6cyl project in Kansas Jan 2 2022, 05:49 PM Alain V. RE: 72 rustoration / subaru 6cyl project in Kansas Jan 2 2022, 05:51 PM Alain V. After flushing.
Jan 2 2022, 05:52 PM Alain V. RE: 72 rustoration / subaru 6cyl project in Kansas Jan 2 2022, 05:52 PM Alain V. RE: 72 rustoration / subaru 6cyl project in Kansas Jan 2 2022, 05:53 PM krazykonrad :wttc:
It looks like you've already made som... Jan 2 2022, 05:56 PM Mayne Quite the thread start! You’re going to have... Jan 2 2022, 07:39 PM gereed75 I really like to see the innovative repair ideas.
... Jan 3 2022, 09:47 AM Superhawk996 Nice progress. Keep going! :trophy: Jan 3 2022, 10:18 AM cali914 Very nice work. I envy you guys that know how to w... Jan 3 2022, 11:02 AM Alain V. I'm going to do my best to reach that goal wei... Jan 3 2022, 09:35 PM Alain V. RE: 72 rustoration / subaru 6cyl project in Kansas Jan 3 2022, 09:36 PM Alain V. I'm also going to try and come up with a light... Jan 3 2022, 09:46 PM djway Don't need no stinking badges :lol4:
This is... Jan 3 2022, 09:52 PM TRS63 Love the spirit here as I am basically tending in ... Jan 4 2022, 02:56 AM brant Nice thread
My 6 cylinder race car weighs in arou... Jan 4 2022, 08:34 AM Alain V. Well, not much progress to report..........
But I ... Jan 16 2022, 05:30 PM Alain V. I also had to wait for a fresh gallon of rust trea... Jan 16 2022, 05:34 PM Alain V. Well, making tiny amounts of progress,,,,,,,but at... Jan 30 2022, 06:38 PM Alain V. Still needs a little finesse work on the side mark... Jan 30 2022, 06:40 PM Superhawk996 Glad to see this one is still moving along. :D
... Jan 30 2022, 07:06 PM Alain V. Thanks for the tip about using copper.
Not too mu... Feb 13 2022, 05:12 PM Alain V. Welding it in.
Feb 13 2022, 05:13 PM Alain V. Also found a bad spot in the left front fender wel... Feb 13 2022, 05:17 PM Zaffer It looks great, IMHO. What rotisserie are you usin... Feb 13 2022, 06:07 PM Alain V. Thanks, the rotisserie is an Auto twirler "PR... Feb 13 2022, 09:58 PM 76-914 I agree with your view on the Turbo 4. The sound o... Feb 13 2022, 11:42 PM Alain V. It’s a 67. Survivor car. Never been restored, o... Feb 14 2022, 11:25 AM 76-914
It’s a 67. Survivor car. Never been restored, ... Feb 14 2022, 01:59 PM Chris H.
It’s a 67. Survivor car. Never been restored, ... Feb 15 2022, 09:49 AM Zaffer I appreciate the well thought out reply! It de... Feb 15 2022, 04:29 AM Alain V. Thanks guys. Here it is all cleaned up and in the... Feb 15 2022, 06:39 PM Alain V. Well, back to the 914. Still making small steps f... Feb 20 2022, 05:20 PM Alain V. Antenna hole filled.
Feb 20 2022, 05:20 PM Alain V. Tail panel emblem holes filled.
Feb 20 2022, 05:21 PM Alain V. Well, after getting sidetracked by work and other ... Jul 17 2022, 07:39 PM Alain V. RE: 72 rustoration / subaru 6cyl project in Kansas Jul 17 2022, 07:40 PM 76-914 Earlier I missed your comment on having pinholes g... Jul 19 2022, 07:46 AM Alain V.
Earlier I missed your comment on having pinholes ... Aug 28 2022, 08:45 PM Alain V. Well, I decided the best way to get the rust out o... Aug 28 2022, 08:50 PM Alain V. Was able to blast the area so I can treat it with ... Aug 28 2022, 08:52 PM Pezz Your clean workshop is dialed in and your work des... Aug 29 2022, 06:59 AM 76-914 Perfect workshop! :beer2: Aug 29 2022, 08:46 AM 914GTSTI Soda blasting ? Aug 29 2022, 10:23 AM Alain V.
Soda blasting ?
Nah, I had some stubborn rust th... Aug 29 2022, 05:25 PM Alain V. Well, I have made a little progress.
Oct 16 2022, 06:04 PM Alain V. RE: 72 rustoration / subaru 6cyl project in Kansas Oct 16 2022, 06:05 PM Alain V. RE: 72 rustoration / subaru 6cyl project in Kansas Oct 16 2022, 06:09 PM Alain V. RE: 72 rustoration / subaru 6cyl project in Kansas Oct 16 2022, 06:10 PM tygaboy That's a nice, tidy repair! You're doi... Oct 17 2022, 08:40 AM Alain V. I bought a used spot welder on Facebook marketplac... Nov 7 2022, 06:52 PM Alain V. I did a little “testing” to figure out where t... Nov 7 2022, 06:54 PM Alain V. I used it where the rear floor pan meets the lower... Nov 7 2022, 06:56 PM
sechszylinder
“Flexible shape pattern” set onto the body wi... Jul 18 2022, 07:45 AM Alain V.
[quote name='Alain V.' post='2971416' date='Jan 2... Aug 28 2022, 08:43 PM Alain V. Cuts made. Before I install the rear pieces perman... Jan 2 2022, 04:56 PM Alain V. Aaand, voila! It fits pretty good. Needs sligh... Jan 2 2022, 04:57 PM Alain V. RE: 72 rustoration / subaru 6cyl project in Kansas Jan 2 2022, 04:58 PM Alain V. I’m going to be installing two of the upper tran... Jan 2 2022, 05:01 PM Alain V. Got an idea for cleaning surface rust out of hard ... Jan 2 2022, 05:45 PM Alain V. I’m going to flush the area with a rust solution... Jan 2 2022, 05:48 PM lesorubcheek
I’m going to flush the area with a rust solutio... Jan 2 2022, 08:31 PM Alain V. RE: 72 rustoration / subaru 6cyl project in Kansas Jan 2 2022, 05:49 PM Alain V. RE: 72 rustoration / subaru 6cyl project in Kansas Jan 2 2022, 05:51 PM Alain V. After flushing.
Jan 2 2022, 05:52 PM Alain V. RE: 72 rustoration / subaru 6cyl project in Kansas Jan 2 2022, 05:52 PM Alain V. RE: 72 rustoration / subaru 6cyl project in Kansas Jan 2 2022, 05:53 PM krazykonrad :wttc:
It looks like you've already made som... Jan 2 2022, 05:56 PM Mayne Quite the thread start! You’re going to have... Jan 2 2022, 07:39 PM gereed75 I really like to see the innovative repair ideas.
... Jan 3 2022, 09:47 AM Superhawk996 Nice progress. Keep going! :trophy: Jan 3 2022, 10:18 AM cali914 Very nice work. I envy you guys that know how to w... Jan 3 2022, 11:02 AM Alain V. I'm going to do my best to reach that goal wei... Jan 3 2022, 09:35 PM Alain V. RE: 72 rustoration / subaru 6cyl project in Kansas Jan 3 2022, 09:36 PM Alain V. I'm also going to try and come up with a light... Jan 3 2022, 09:46 PM djway Don't need no stinking badges :lol4:
This is... Jan 3 2022, 09:52 PM TRS63 Love the spirit here as I am basically tending in ... Jan 4 2022, 02:56 AM brant Nice thread
My 6 cylinder race car weighs in arou... Jan 4 2022, 08:34 AM Alain V. Well, not much progress to report..........
But I ... Jan 16 2022, 05:30 PM Alain V. I also had to wait for a fresh gallon of rust trea... Jan 16 2022, 05:34 PM Alain V. Well, making tiny amounts of progress,,,,,,,but at... Jan 30 2022, 06:38 PM Alain V. Still needs a little finesse work on the side mark... Jan 30 2022, 06:40 PM Superhawk996 Glad to see this one is still moving along. :D
... Jan 30 2022, 07:06 PM Alain V. Thanks for the tip about using copper.
Not too mu... Feb 13 2022, 05:12 PM Alain V. Welding it in.
Feb 13 2022, 05:13 PM Alain V. Also found a bad spot in the left front fender wel... Feb 13 2022, 05:17 PM Zaffer It looks great, IMHO. What rotisserie are you usin... Feb 13 2022, 06:07 PM Alain V. Thanks, the rotisserie is an Auto twirler "PR... Feb 13 2022, 09:58 PM 76-914 I agree with your view on the Turbo 4. The sound o... Feb 13 2022, 11:42 PM Alain V. It’s a 67. Survivor car. Never been restored, o... Feb 14 2022, 11:25 AM 76-914
It’s a 67. Survivor car. Never been restored, ... Feb 14 2022, 01:59 PM Chris H.
It’s a 67. Survivor car. Never been restored, ... Feb 15 2022, 09:49 AM Zaffer I appreciate the well thought out reply! It de... Feb 15 2022, 04:29 AM Alain V. Thanks guys. Here it is all cleaned up and in the... Feb 15 2022, 06:39 PM Alain V. Well, back to the 914. Still making small steps f... Feb 20 2022, 05:20 PM Alain V. Antenna hole filled.
Feb 20 2022, 05:20 PM Alain V. Tail panel emblem holes filled.
Feb 20 2022, 05:21 PM Alain V. Well, after getting sidetracked by work and other ... Jul 17 2022, 07:39 PM Alain V. RE: 72 rustoration / subaru 6cyl project in Kansas Jul 17 2022, 07:40 PM 76-914 Earlier I missed your comment on having pinholes g... Jul 19 2022, 07:46 AM Alain V.
Earlier I missed your comment on having pinholes ... Aug 28 2022, 08:45 PM Alain V. Well, I decided the best way to get the rust out o... Aug 28 2022, 08:50 PM Alain V. Was able to blast the area so I can treat it with ... Aug 28 2022, 08:52 PM Pezz Your clean workshop is dialed in and your work des... Aug 29 2022, 06:59 AM 76-914 Perfect workshop! :beer2: Aug 29 2022, 08:46 AM 914GTSTI Soda blasting ? Aug 29 2022, 10:23 AM Alain V.
Soda blasting ?
Nah, I had some stubborn rust th... Aug 29 2022, 05:25 PM Alain V. Well, I have made a little progress.
Oct 16 2022, 06:04 PM Alain V. RE: 72 rustoration / subaru 6cyl project in Kansas Oct 16 2022, 06:05 PM Alain V. RE: 72 rustoration / subaru 6cyl project in Kansas Oct 16 2022, 06:09 PM Alain V. RE: 72 rustoration / subaru 6cyl project in Kansas Oct 16 2022, 06:10 PM tygaboy That's a nice, tidy repair! You're doi... Oct 17 2022, 08:40 AM Alain V. I bought a used spot welder on Facebook marketplac... Nov 7 2022, 06:52 PM Alain V. I did a little “testing” to figure out where t... Nov 7 2022, 06:54 PM Alain V. I used it where the rear floor pan meets the lower... Nov 7 2022, 06:56 PM  |
2 User(s) are reading this topic (2 Guests and 0 Anonymous Users)
0 Members:

|
Lo-Fi Version | Time is now: 24th September 2026 - 07:36 PM |
Invision Power Board
v9.1.4 © 2026 IPS, Inc.