|
|
|
Porsche, and the Porsche crest are registered trademarks of Dr. Ing. h.c. F. Porsche AG.
This site is not affiliated with Porsche in any way. Its only purpose is to provide an online forum for car enthusiasts. All other trademarks are property of their respective owners. |
|
|

  |

| Arno914 |
 Jun 3 2022, 07:23 AM Jun 3 2022, 07:23 AM
Post
#21
|
|
Member  Group: Members Posts: 233 Joined: 13-May 20 From: near Frankfurt, Germany Member No.: 24,260 Region Association: Germany |
Your 914 looks like a really solid basis! Congratulations.
The rockers seem to be quite good. No major rust here. Keep us posted. (IMG:style_emoticons/default/beerchug.gif) I have a late ´71. Has the plate for the handbrake cable cover + cover, but no spring. Additional spring came somewhere during the ´72 MJ. |
   |

 
|
| bbrock |
Jun 3 2022, 07:44 AM
Post
#22
|
|
914 Guru Group: Members Posts: 5,269 Joined: 17-February 17 From: Montana Member No.: 20,845 Region Association: Rocky Mountains |
It doesn't look too bad to me. Should be able to address it with a patch rather than full long replacement. You'll be able to get inside and really clean things out. Do some poking on your passenger side with a screw driver. Looks like you have some rot started there too that you'll want to patch before it gets worse. It doesn't look like either side will require you to go too deep. How does under the battery look?
Don't fret. It could be much worse. Here's what I started with: (IMG:http://www.914world.com/bbs2/uploads/post-20845-1513794304.jpg) |
|
|
|
| rgalla9146 |
Jun 3 2022, 07:54 AM
Post
#23
|
|
Advanced Member Group: Members Posts: 4,545 Joined: 23-November 05 From: Paramus NJ Member No.: 5,176 Region Association: None |
The passenger side jack receiver is so good.......it makes the drivers side a surprise. |
|
|
|
| Dion |
Jun 3 2022, 08:39 AM
Post
#24
|
|
RN Group: Members Posts: 2,764 Joined: 16-September 04 From: Audubon,PA Member No.: 2,766 Region Association: MidAtlantic Region |
Agree with Brent. Not too horrible. Hope the battery area is decent for you.
Keep at it! |
|
|
|
| nathanxnathan |
Jun 3 2022, 10:24 AM
Post
#25
|
|
Member Group: Members Posts: 274 Joined: 16-February 18 From: Laguna Beach, CA Member No.: 21,899 Region Association: Southern California |
thanks for the reassurance, it is definitely not like "bringing out the dead" levels of rust. (IMG:style_emoticons/default/smile.gif) ..more than I would have liked but I'm not gonna give up.
It's interesting how these cars get it in varying areas per car. This car I've been very impressed with, the cowl area is really good, the air inlets by the doors are nice, suspension console ears look good, trunks are not too bad, the hellhole itself looks not too bad. My 72, though I'm always impressed by just how nice a lot of that car was had some real doozy areas that required going really into it. 914's are like a box of chocolates, you never know what you're going to get (IMG:style_emoticons/default/smile.gif) So I bought a mig welder this morning, a Hobart handler 140. I haven't mig welded in 20 years. My dad got me a I think that same welder back in the 90's. I've just had my tig for the past 10 years or so and as much as I like it and as comfortable as I am with it, it's not good for the way these cars are sandwiched together. It wants everything to be clean, spotlessly clean. Areas like the brackets for the seats, the way the reinforcement plates are under the car, the only way to get that clean enough would be to remove those which would mess them all up. It seems to me that mig is better in this way. I'll need some gas and solid wire and it's shipping in the next week or so. Plenty to do in the meantime, I'm going to see if I can save these rockers... |
|
|
|
| nathanxnathan |
Jun 3 2022, 10:36 AM
Post
#26
|
|
Member Group: Members Posts: 274 Joined: 16-February 18 From: Laguna Beach, CA Member No.: 21,899 Region Association: Southern California |
 Coming along with the floor repair. Weird the dapo drilled those holes, through the brackets, through the floor, but not through the reinforcements beneath. I can't really see the point. A bit more blasting to do. |
|
|
|
| nathanxnathan |
Jun 15 2022, 11:49 PM
Post
#27
|
|
Member Group: Members Posts: 274 Joined: 16-February 18 From: Laguna Beach, CA Member No.: 21,899 Region Association: Southern California |
I've been busy getting into the car, getting in further than I thought I might have to (IMG:style_emoticons/default/huh.gif)
Things snowballed a bit, what I was trying to avoid, but I'm trying to focus on the front half at least for now. I started stripping off the black in the front trunk, just cleaning it up.  Both headlight motors seems to have something going on  The steering wheel being loose and working on getting a key to fit the locks and ignition switch got me into taking out the steering column I think the housing being cracked is a lot of the issue  I wanted to fix the dash frame there is a big cut out of it above the heater controls, so that's come out.  Seems the wiring has some issues. 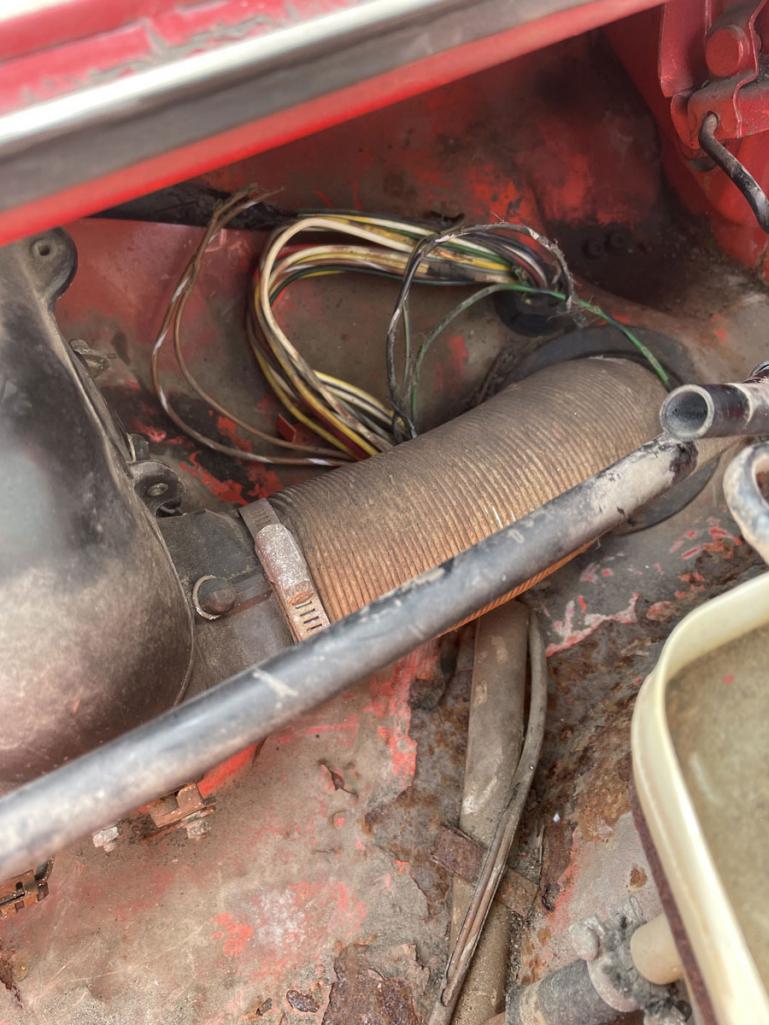 The brake fluid reservoir has things pretty gross in its vicinity 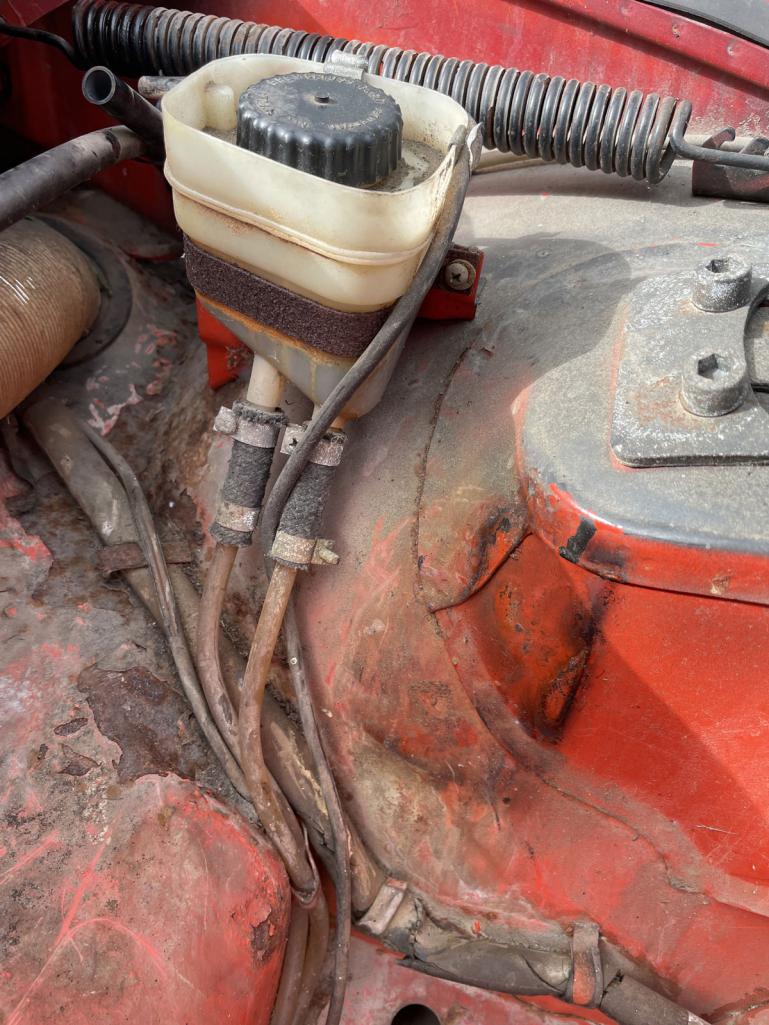 More cleaning 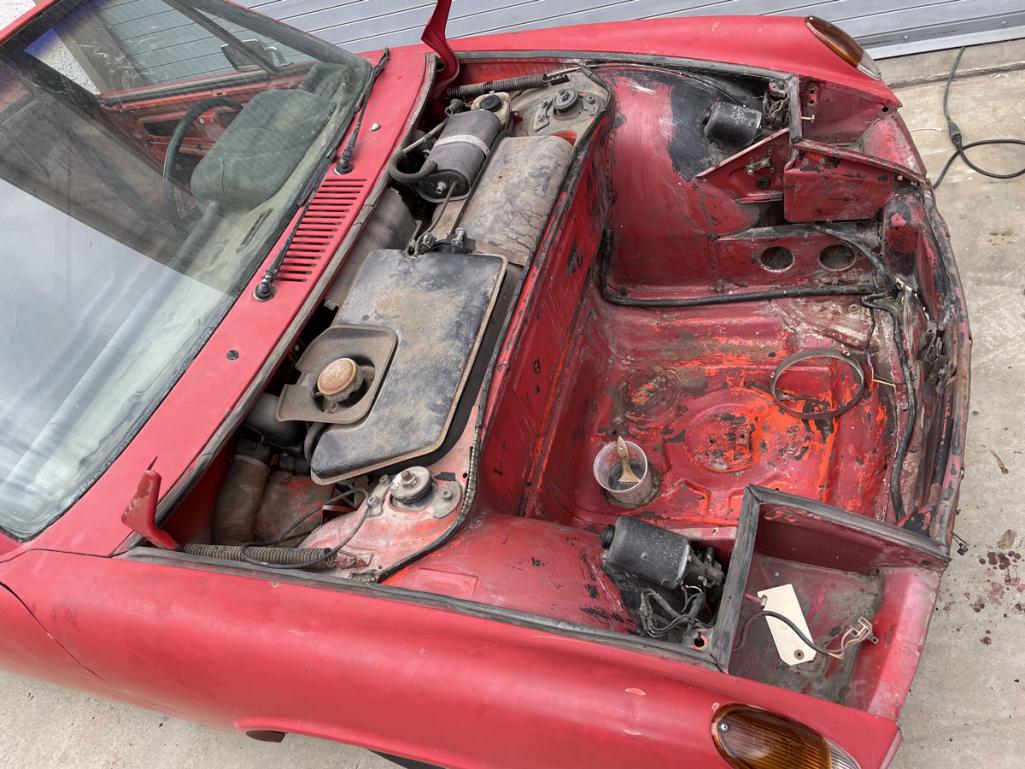 I'm not sure how I got to and decided I needed to cross the line and take out the fuel tank. I think access to the wire issue forward of the dash. 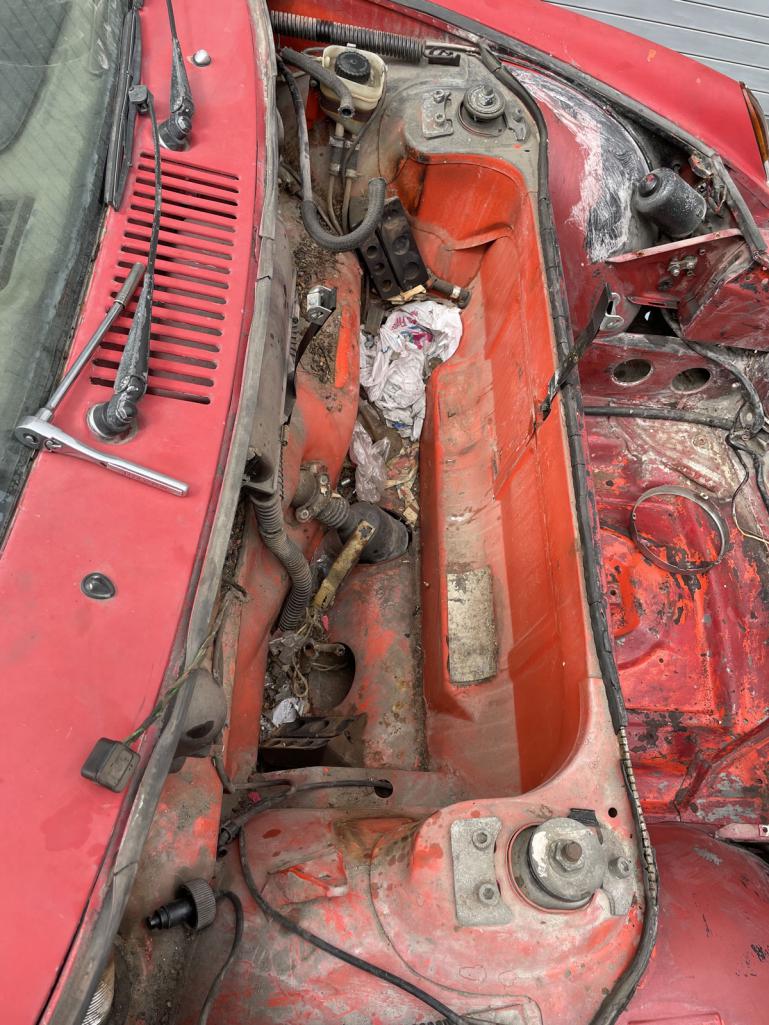 pretty nasty under there, and the steering cover panel thing also, the mice just having at it 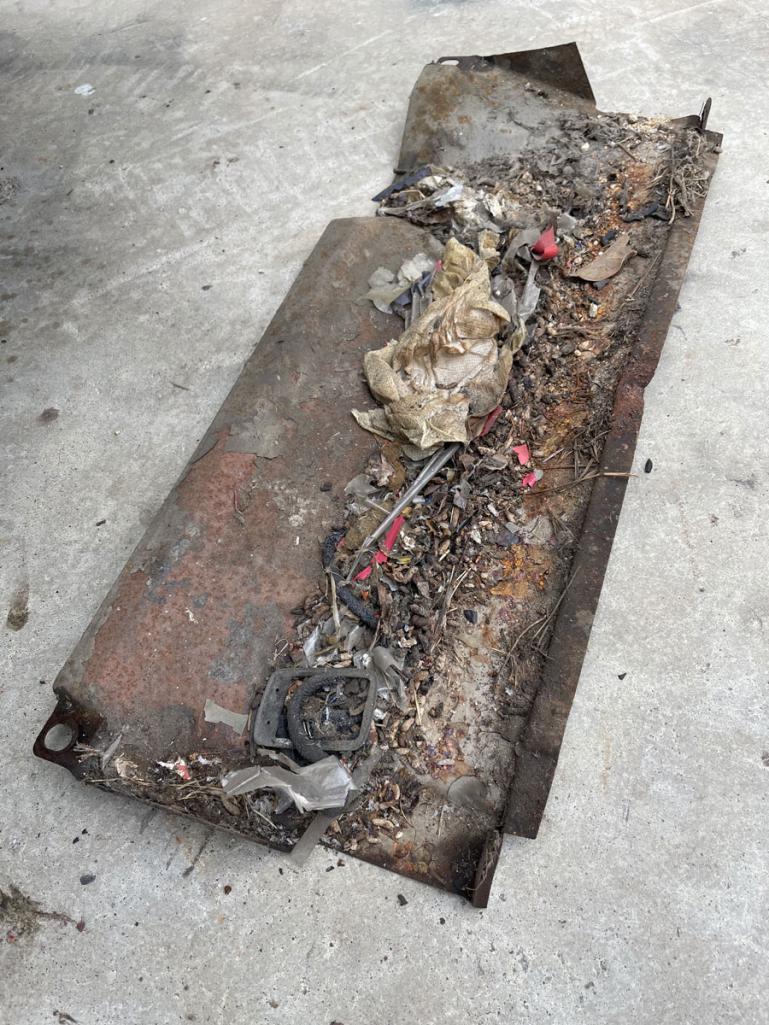 So more cleaning 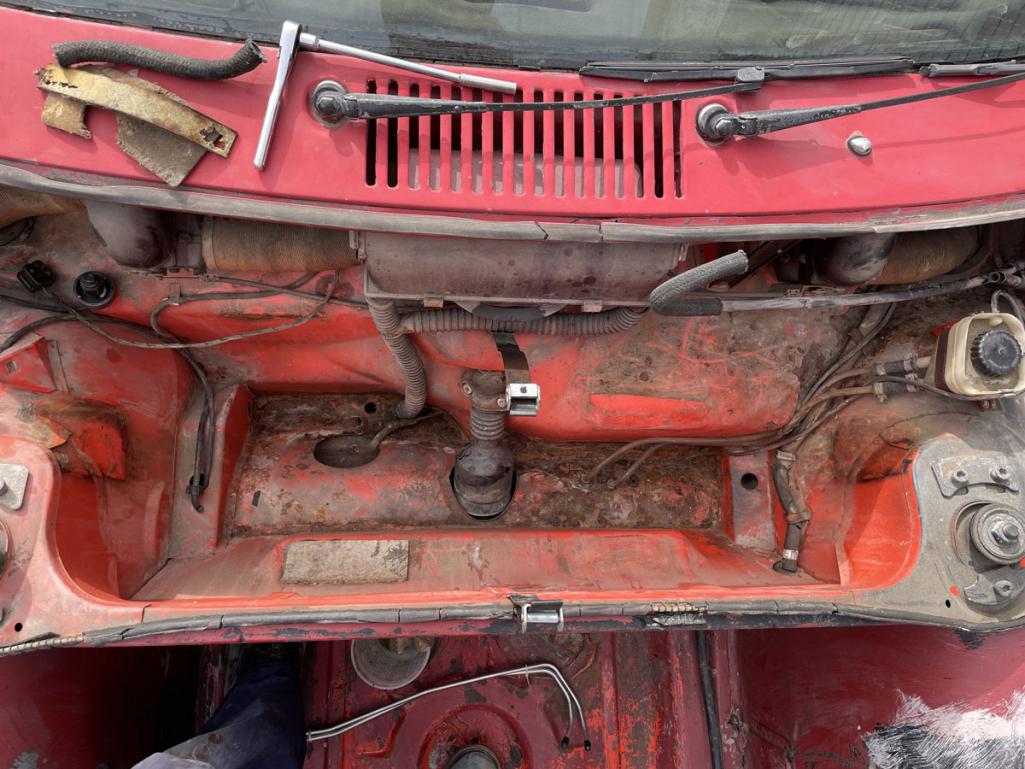 sucks the mice chewed holes in the steering rack cover and in the rubber bellows. I may have extra... the iphone "pano" feature is pretty crazy.. it does tend to make some distortions but it can feel pretty immersive the shots it gets 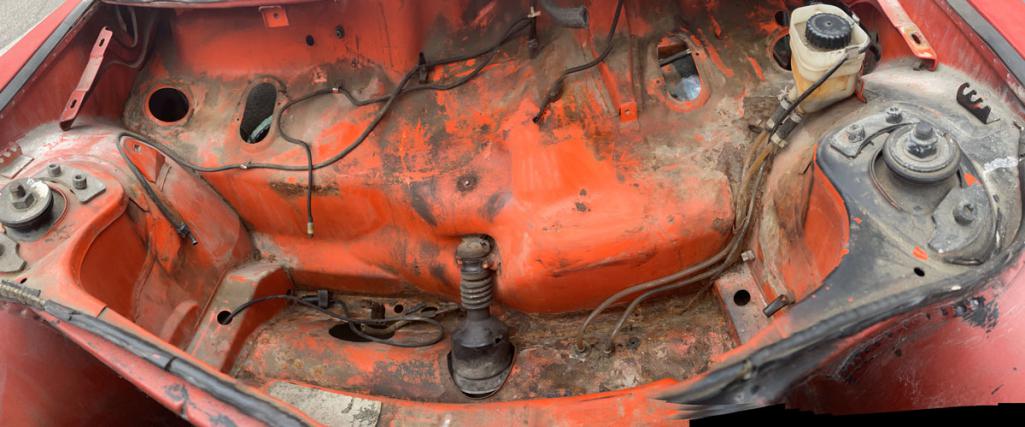 more cleaning. I'm kind of liking the Tangerine more and more 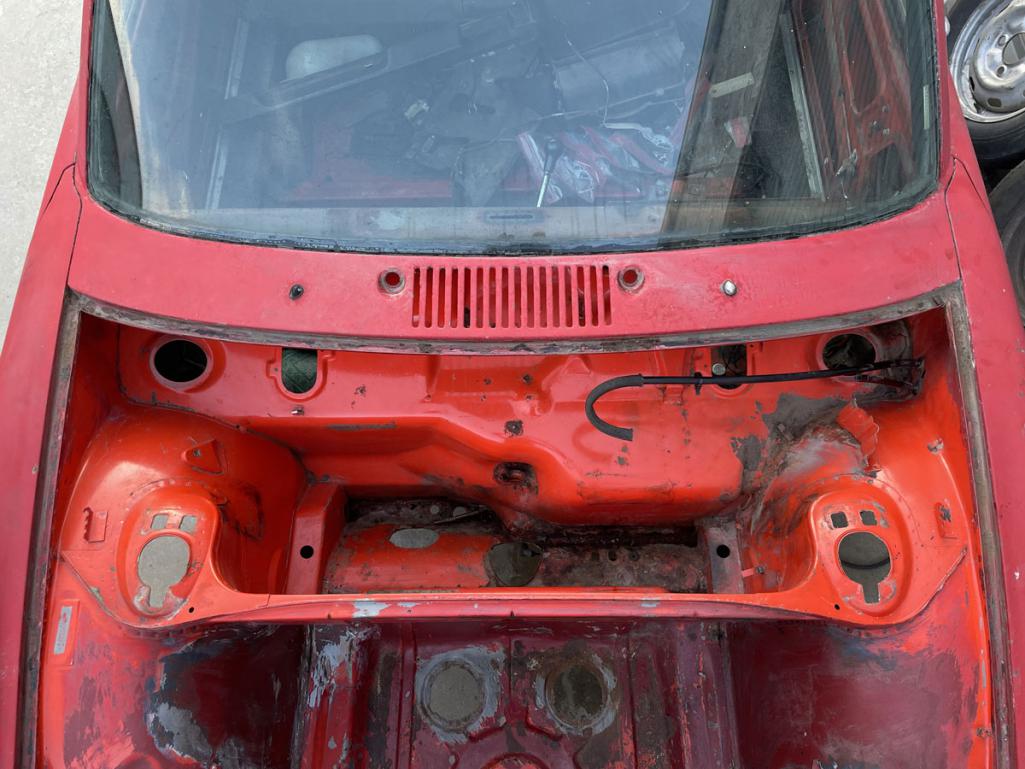 The rust beneath the fuel tank and in the front trunk area I resolved to do some blasting, but I wanted everything out of the way so I pulled the wiring harness out of the whole front of the car and dropped the whole front suspension/steering rack assembly 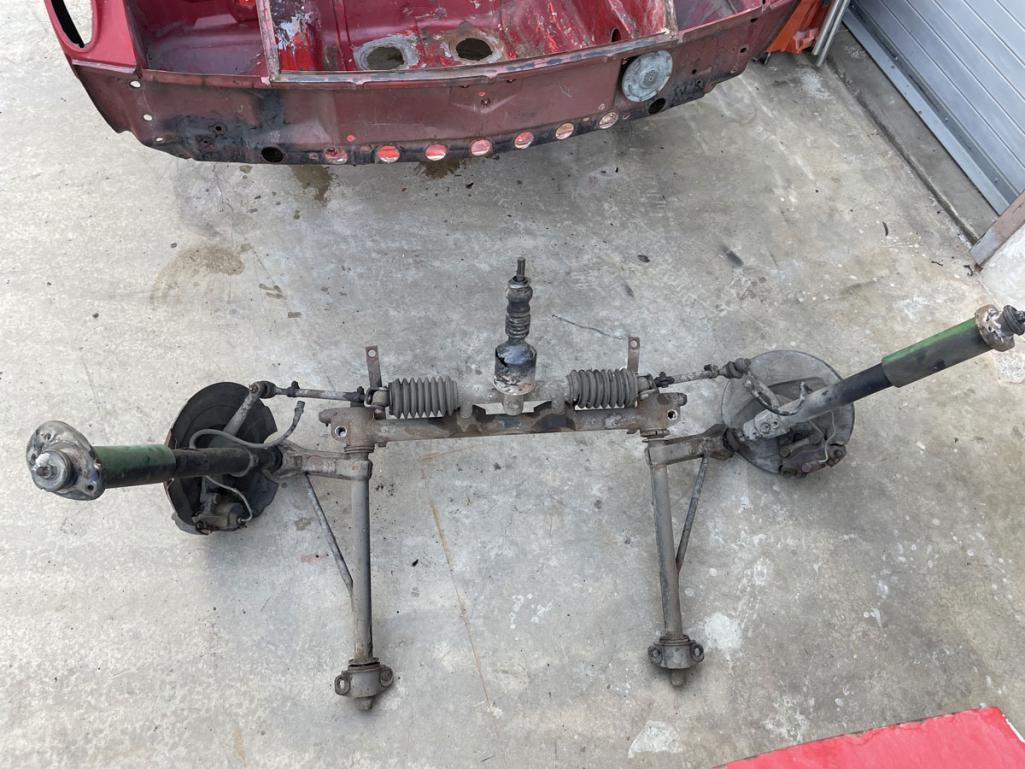 The balljoint boots are torn, tie rod end boots are torn A arm bushings look pretty rough. Worse than that though I come to find that the passenger side upright is late and the driver is early. I have an early and a late brake shield, an early and a late caliper, rotor, etc, like wtf lol 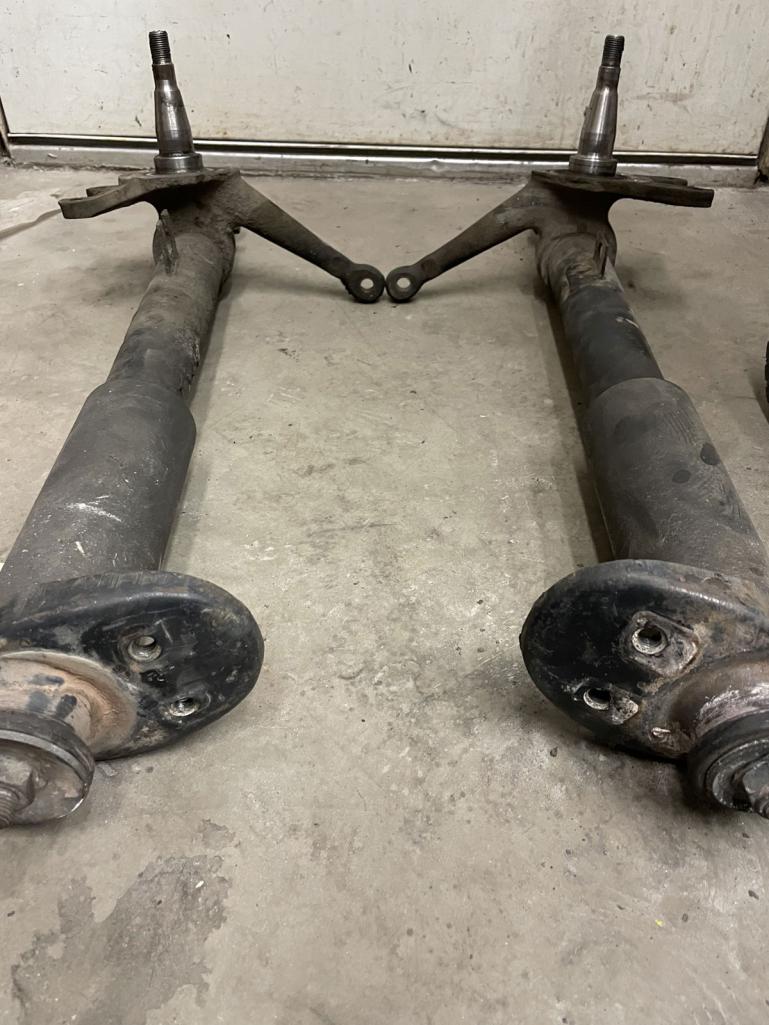 I have a spare set of early uprights with inserts that I can use, spare calipers from a 71 that I had, I think I have a spare early brake shield. I'm working on refinishing the front suspension, blasting, painting. I need to get some parts... Working on blasting the front trunk and under the fuel tank earlier.. I'll post about that in its own post here. I'm debating on what to do about some issues there... |
|
|
|
| nathanxnathan |
Jun 16 2022, 12:03 AM
Post
#28
|
|
Member Group: Members Posts: 274 Joined: 16-February 18 From: Laguna Beach, CA Member No.: 21,899 Region Association: Southern California |
So blasting under the fuel tank earlier, found some pinholes.
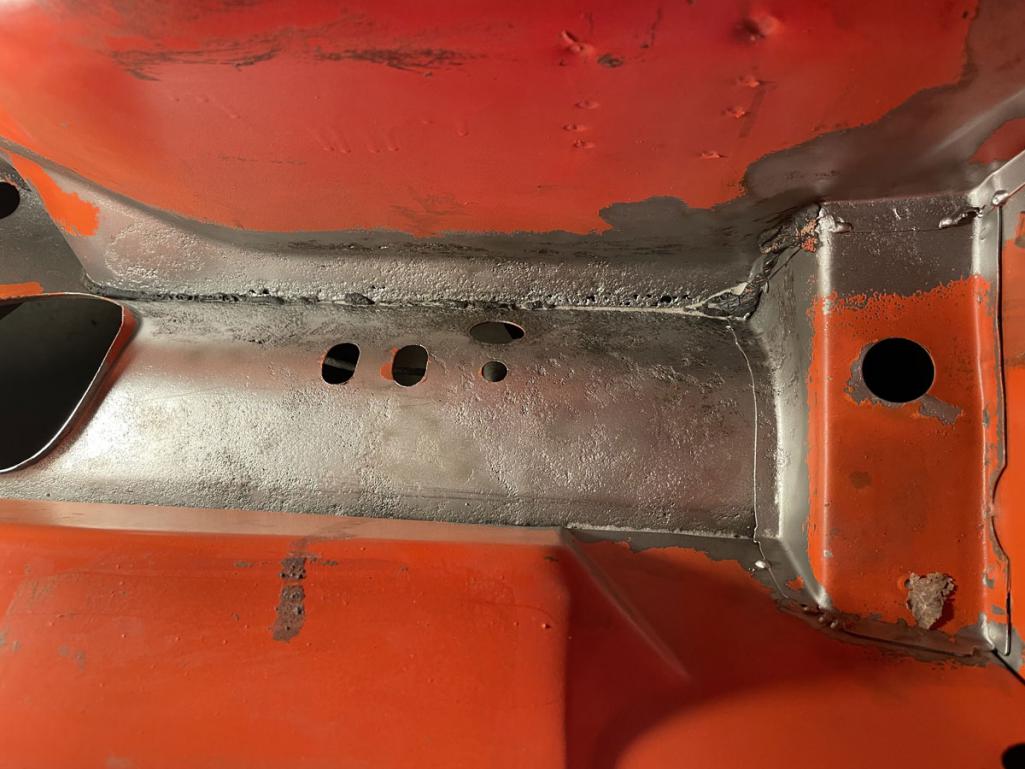 They're all on the piece to the rear which is to the inside above the pedal assembly (also taken out at this point, I just can't help myself)  kind of a lot when you look at it this way ^ with flash it looks not so bad 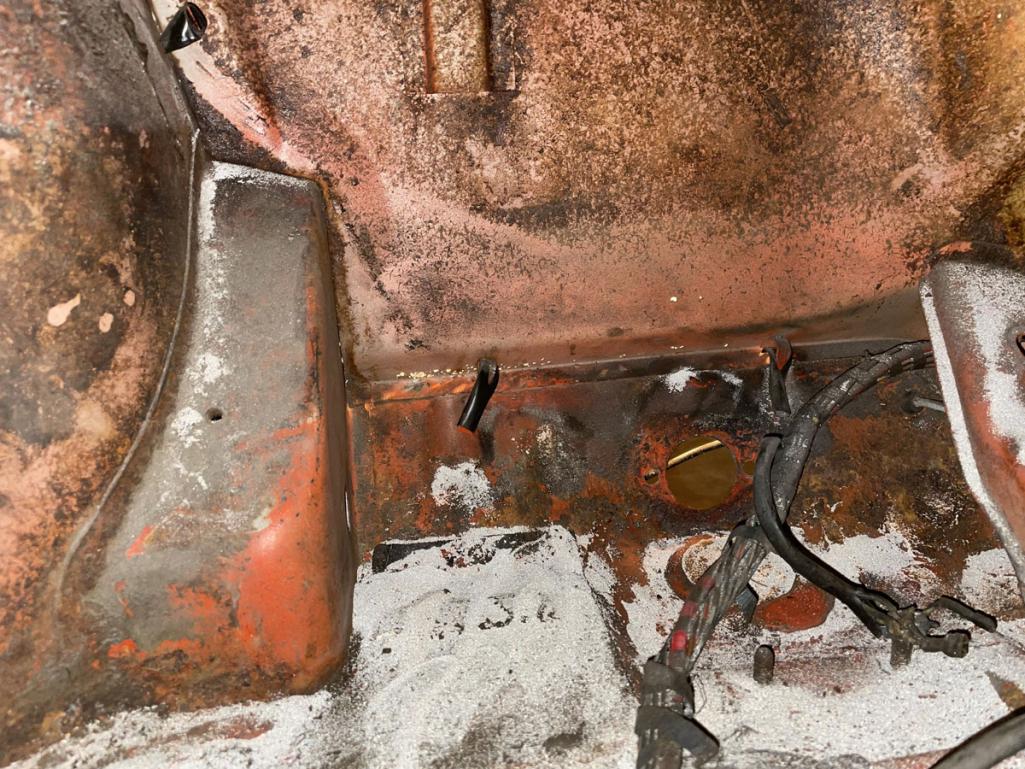 Glass bead inevitably everywhere... It seems not a hard piece to make, like cut it out, a bend, some welding... I'm pretty slow though. I could use seam sealer? I don't know, thinking about options here. I'm trying to blast the rust (I'll have to get pics tomorrow of progress on that) and sand in the front trunk and under the fuel tank, primer, seam sealer, and paint, meanwhile get the whole front suspension and steering and brakes sorted, refinished and installed. I want to have it sitting on the ground again before I get into the stuff at the back. 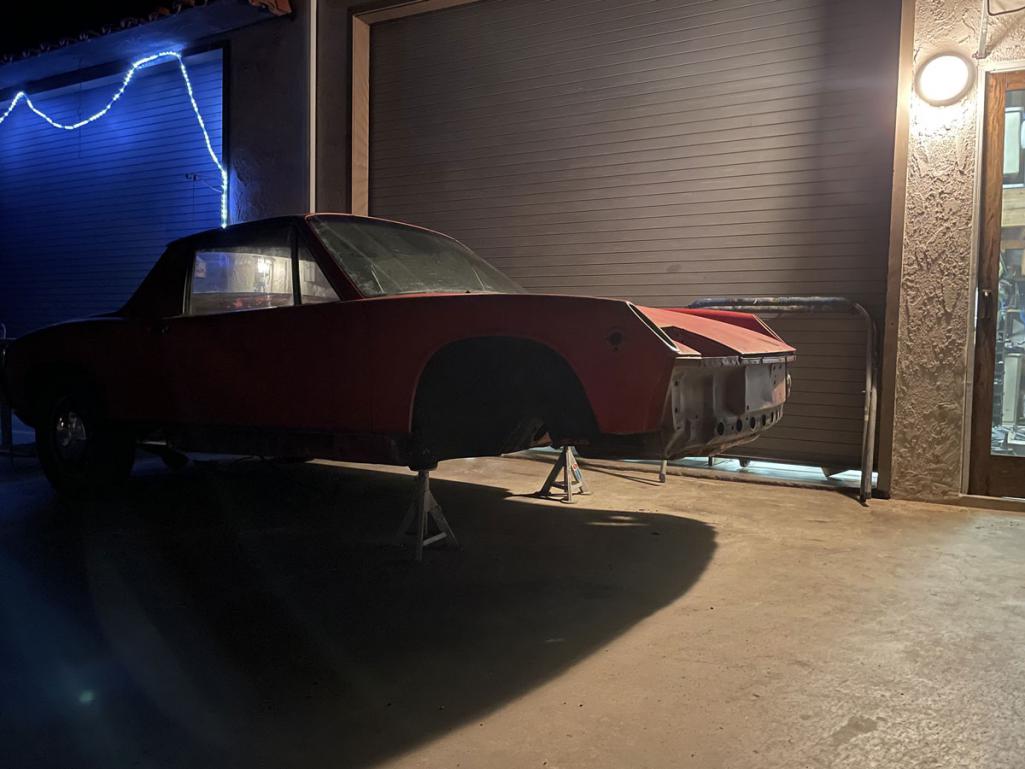 I'll post more pics of the front trunk soon. Some findings, the front panel/clip is a replacement I think. Maybe factory replacement as the holes for the rubber plugs at the lower front are all there. It has no orange paint and it is brazed in at the bottom which I don't think is standard. Also it explains why there are wires for fog lights but no holes to mount them. |
|
|
|
| autopro |
Jun 16 2022, 09:45 AM
Post
#29
|
|
Member Group: Members Posts: 306 Joined: 14-January 18 From: San Diego / Tijuana Member No.: 21,797 Region Association: Southern California |
The more you take off the more you find and that will lead you to a full restoration. Mind you it will be a good thing if you have the time. In the end you will know you have a sound car that you will enjoy for a long time.
|
|
|
|
| nathanxnathan |
Jun 26 2022, 01:18 PM
Post
#30
|
|
Member Group: Members Posts: 274 Joined: 16-February 18 From: Laguna Beach, CA Member No.: 21,899 Region Association: Southern California |
Progressing slowly, but keeping at it.
Let's see, some progress on the dash. 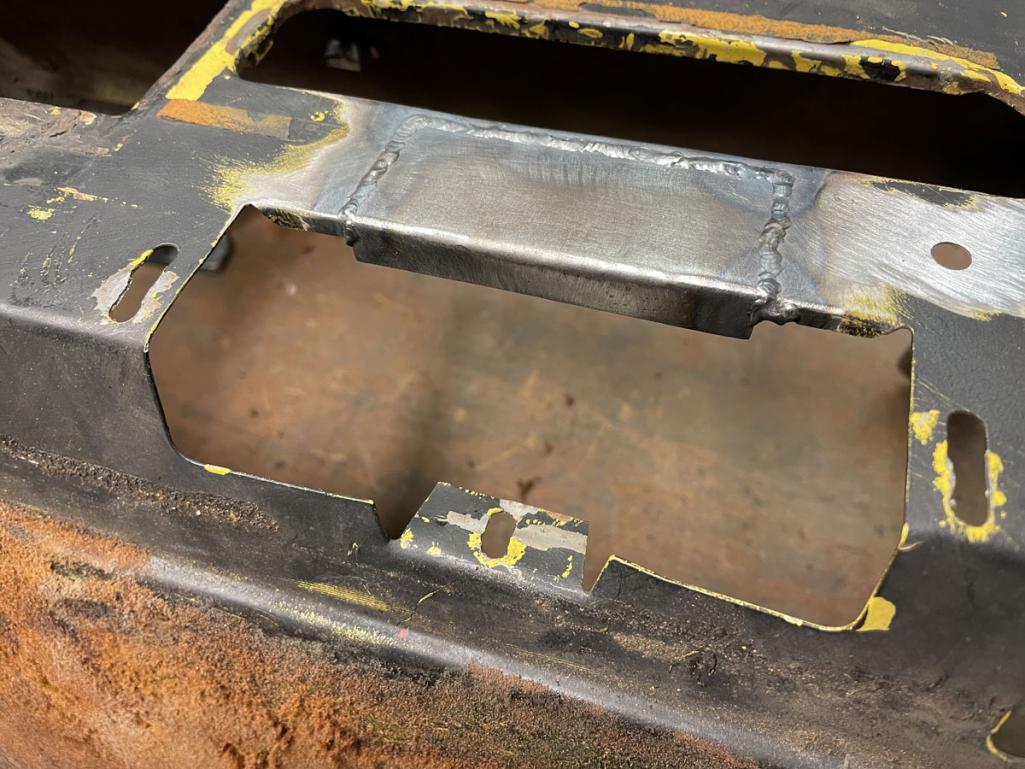 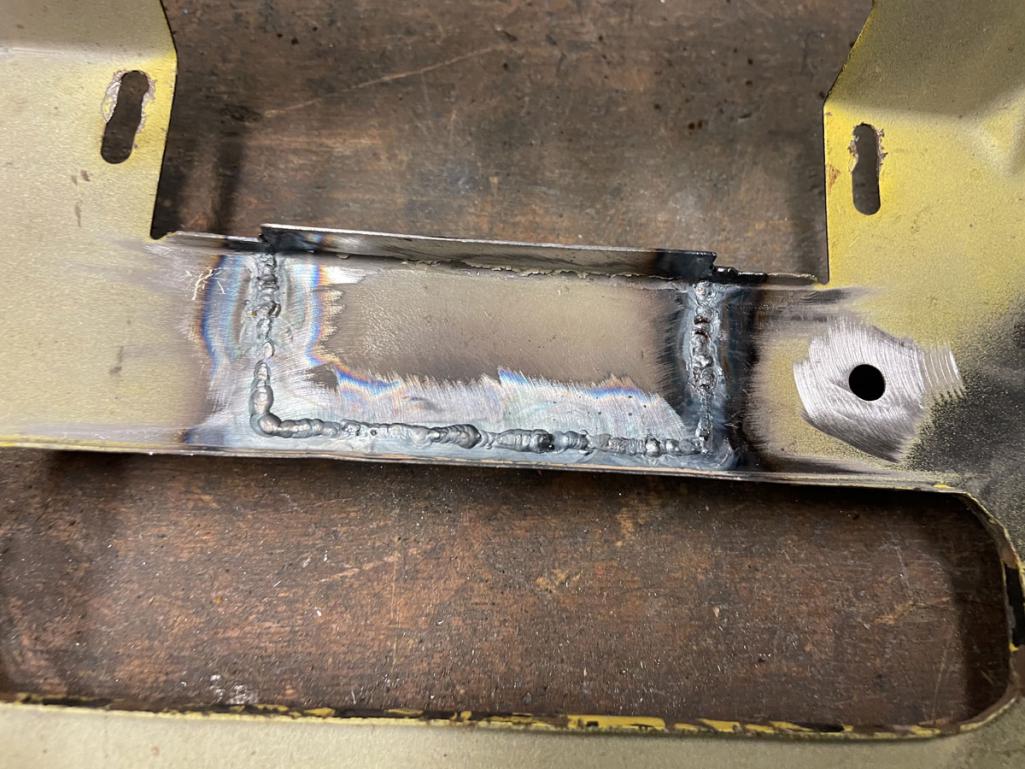 I sanded the black off with 220 grit. The whole thing needs some love like some surface rust at the bottom of the inside, and this patch. I'm thinking about using a 2k paint, go for a satin on the dash, rocker panels and valances when the time comes. 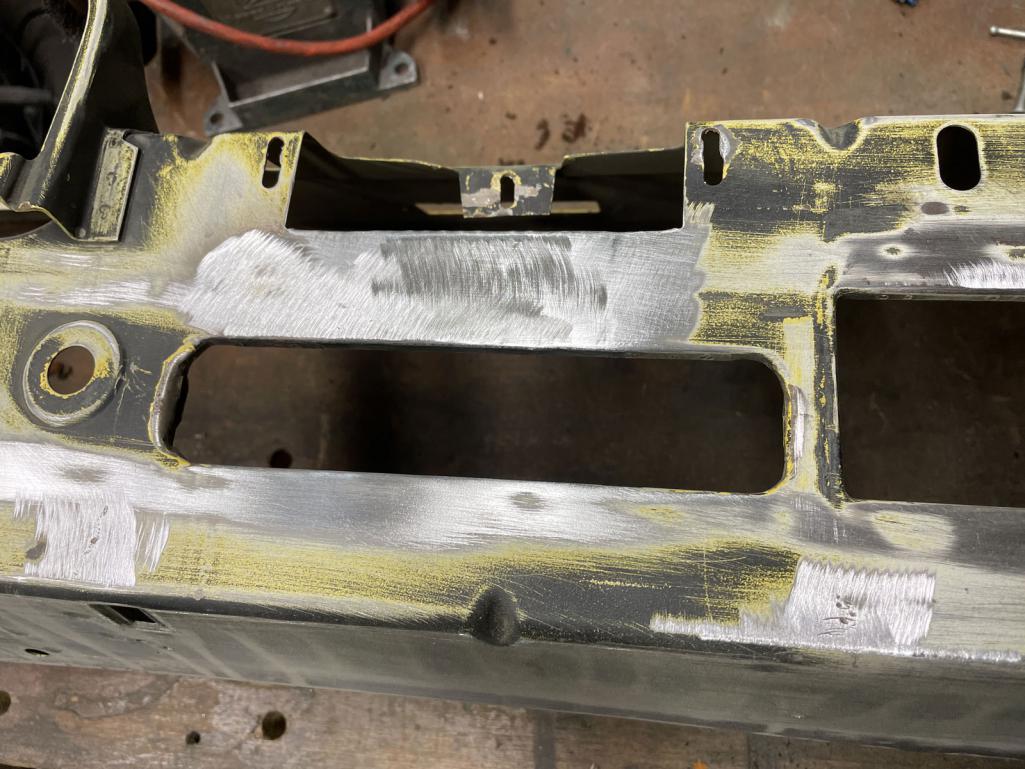 For now I put some high temp paint on it to keep rust at bay, it's easy to sand off being totally flat. I like black high temp paint for this and use it often as a guide coat also, but I only had white on hand. 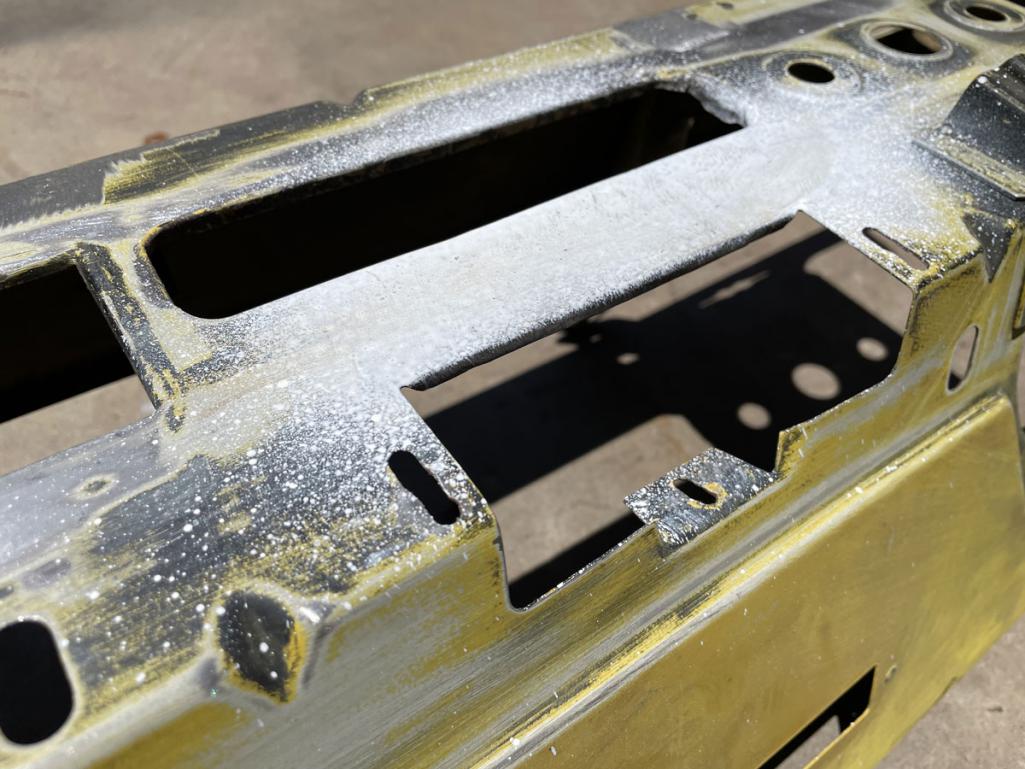 The back I sprayed some Oshpo on, testing how well it works for preventing rust bare. 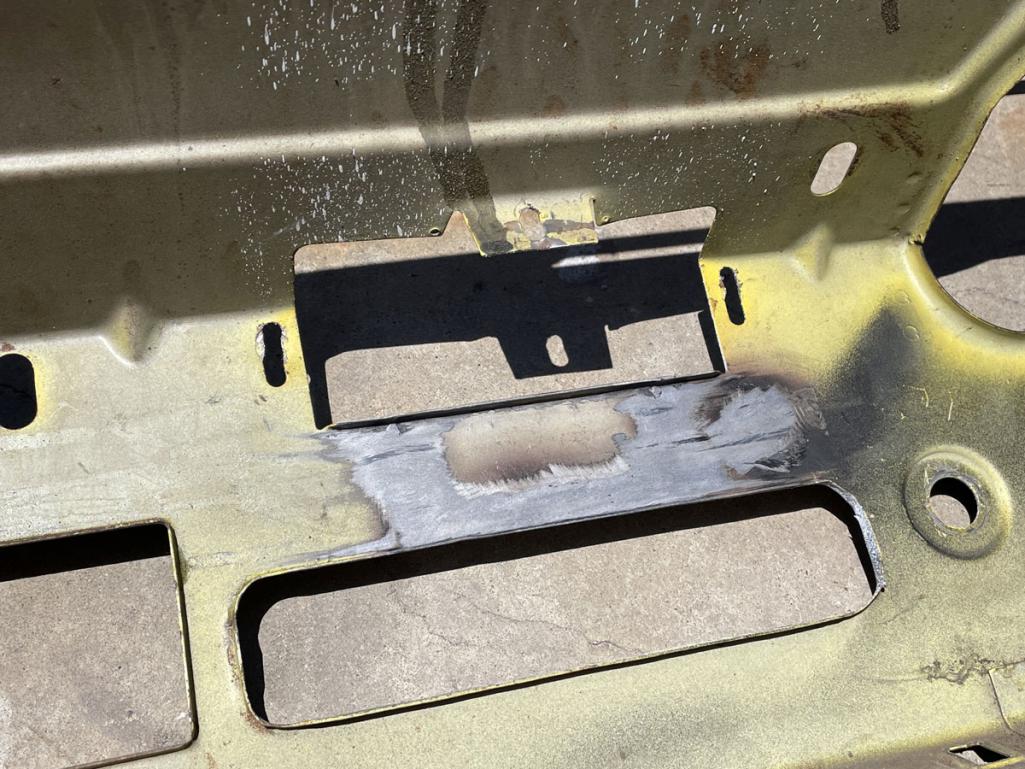 I uncovered this interesting bit of writing. I'm not sure what it says. I was thinking on top it might be "IO" like the in order stamps they do. The backside of the dash doesn't have anything, no chassis number — maybe early cars they didn't do that. 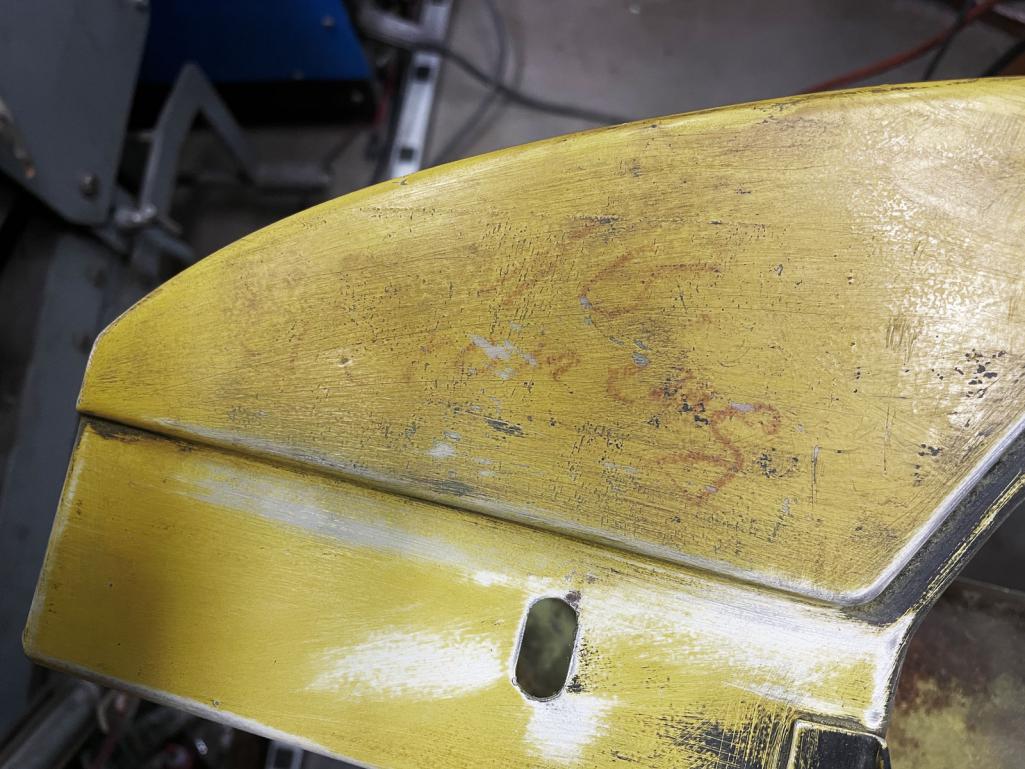 Still some finish sanding to do on it, but I'm happy with how the hole patching came out. |
|
|
|
| nathanxnathan |
Jun 26 2022, 01:38 PM
Post
#31
|
|
Member Group: Members Posts: 274 Joined: 16-February 18 From: Laguna Beach, CA Member No.: 21,899 Region Association: Southern California |
I'm focusing on the front trunk and Fuel tank areas currently. I stripped out the black spray paint easily with Citrus Strip. It works ok on the resprayed reddish paint if left for awhile. There are 2 coats of red — a brighter red over the factory paint and then a darker red which is what is on the exterior, both with a layer of dark primer beneath.
Here's the current situation in the front trunk. Working of feathering in the bare metal to what remains of the factory coat. 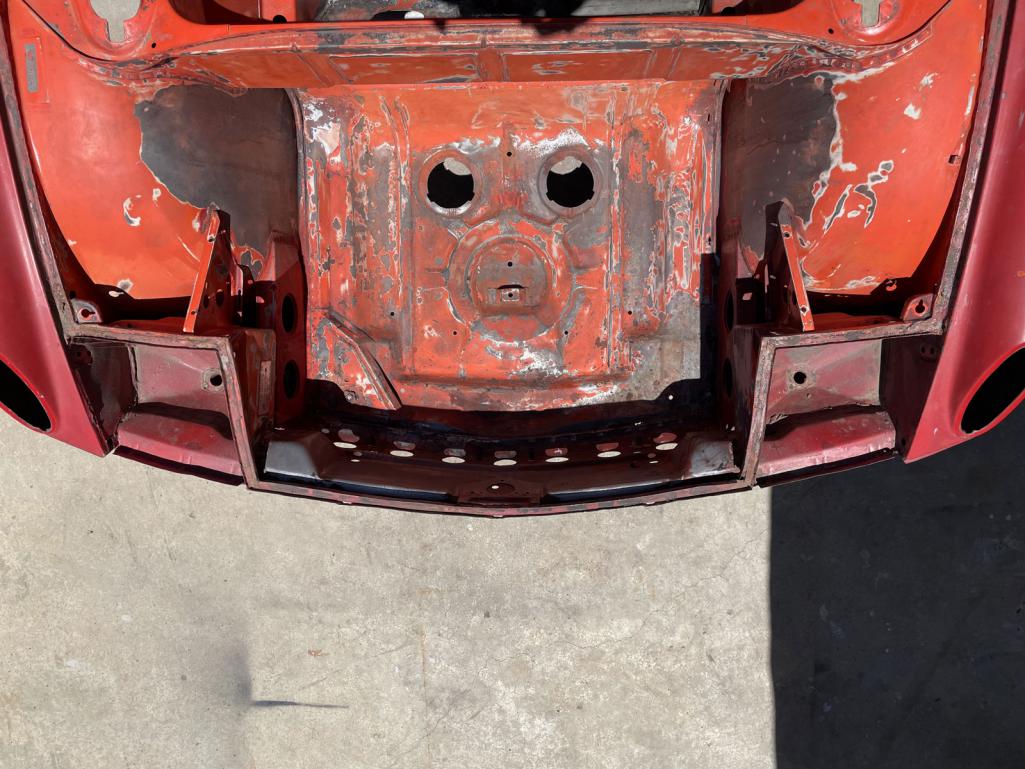 I'm not sure exactly why the inner fender wells had a lot of bondo and had been taken down to bare metal. There are a few dings, and the passenger side was pushed in from the inside. I removed all bondo, pushed the fender back in from the outside in and set it, and I think it's in good shape. no need for a half inch of bondo, maybe a few spots. I think I mentioned the front panel is I think a factory replacement. sort of poorly installed with brazing. The driver suspension reinforcement was barely hanging on just brazed in a few placed. I ground it out as rust underneath seemed wanting attention. Will have to weld it back in... I think the outer of the front panel they didn't even paint, the factory reddish finish they left bare.  There are 3 parts where it juts out that help it drain under the seal at the front. I'm not sure if that's an early thing or late? My 72 doesn't have it. 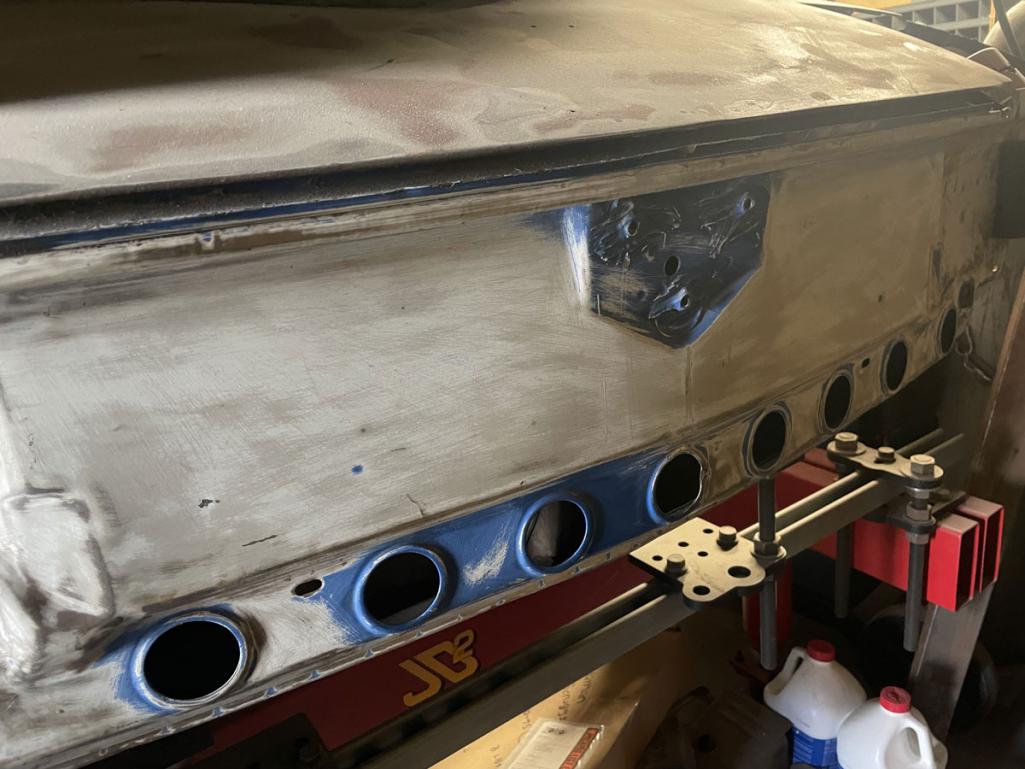 I've been working out a lot of the dents and such in the front panel — not sure if they were driving it with no bumper or what. Also using a jack to back the bottom of the trunk with a dolly to put that back in shape, dents on the underside. 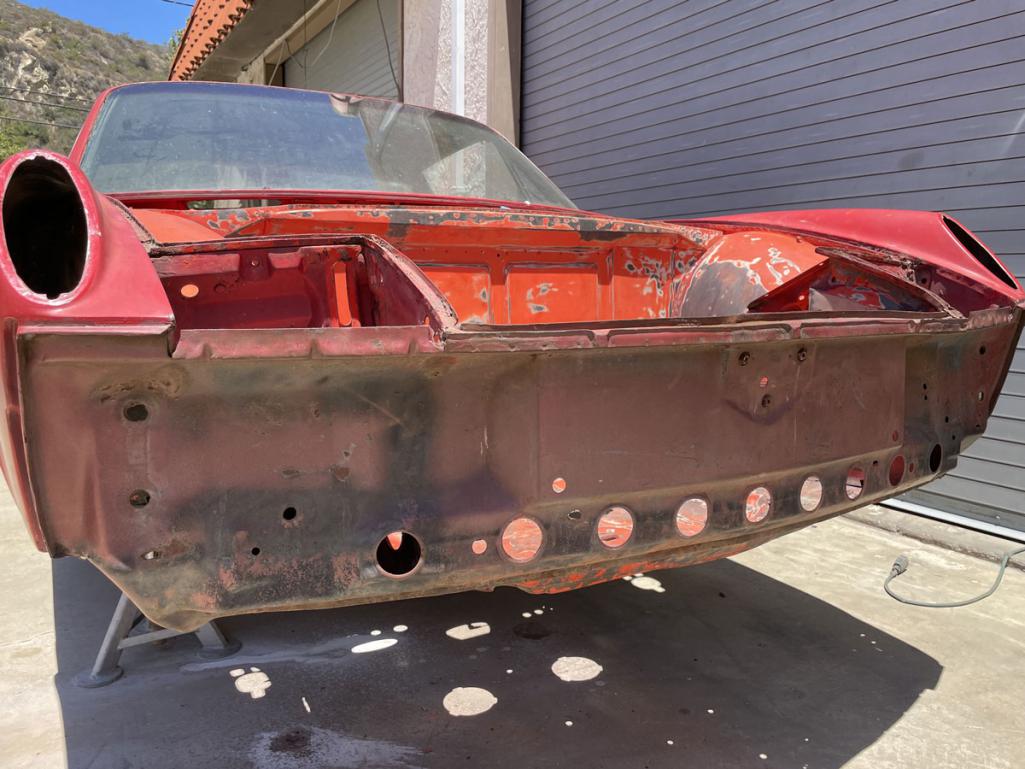 |
|
|
|
| nathanxnathan |
Jun 26 2022, 02:15 PM
Post
#32
|
|
Member Group: Members Posts: 274 Joined: 16-February 18 From: Laguna Beach, CA Member No.: 21,899 Region Association: Southern California |
This weekend I decided to dive in to the dirty stuff, the rust at the bottom of the fuel tank area. I had thought about maybe a coat of seam sealer, or maybe fiberglass. After blasting it you wonder if replacing the metal is necessary. Mulled it over a few weeks and decided I have access, let's do this. (IMG:style_emoticons/default/ar15.gif)
Seems easy enough.. 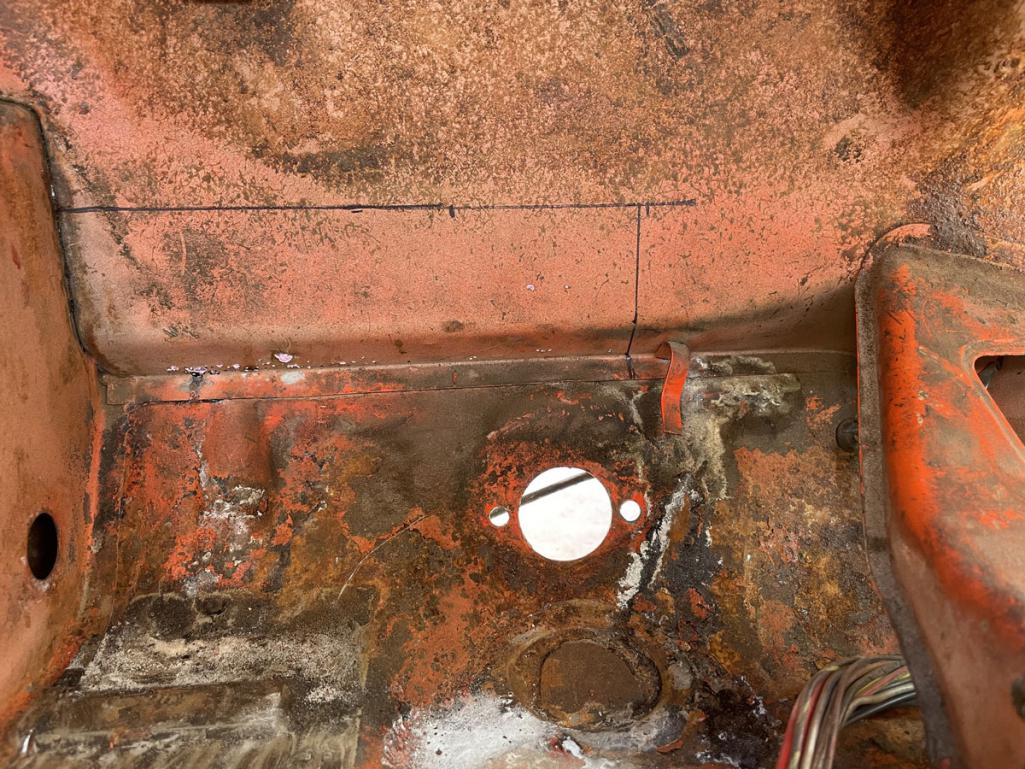 No turning back now  sure is a big hole  Really does feel nice to have that out though.  I wish spot weld drill bit were smaller, it's like too much destruction. I think using a regular bit and just not going deep, you can weaken the weld enough to pop it with some persuasion and get a better finish. Made a paper template before cutting began.  Years ago I bought a roof clip of a VW bus to patch this Riviera Small poptop dealer converted camper bus that was my first VW. I ended up selling that bus and getting a deluxe bus, same year, same month actually, and I've been using the metal from that top for patches and such ever since. I have about half left. It's 1 mm thick German steel — a little thicker than what's on a 914 I think, but it allows some room for working welds in/burnishing and such. I've still got a bit of finagling to do to get it to sit just right. 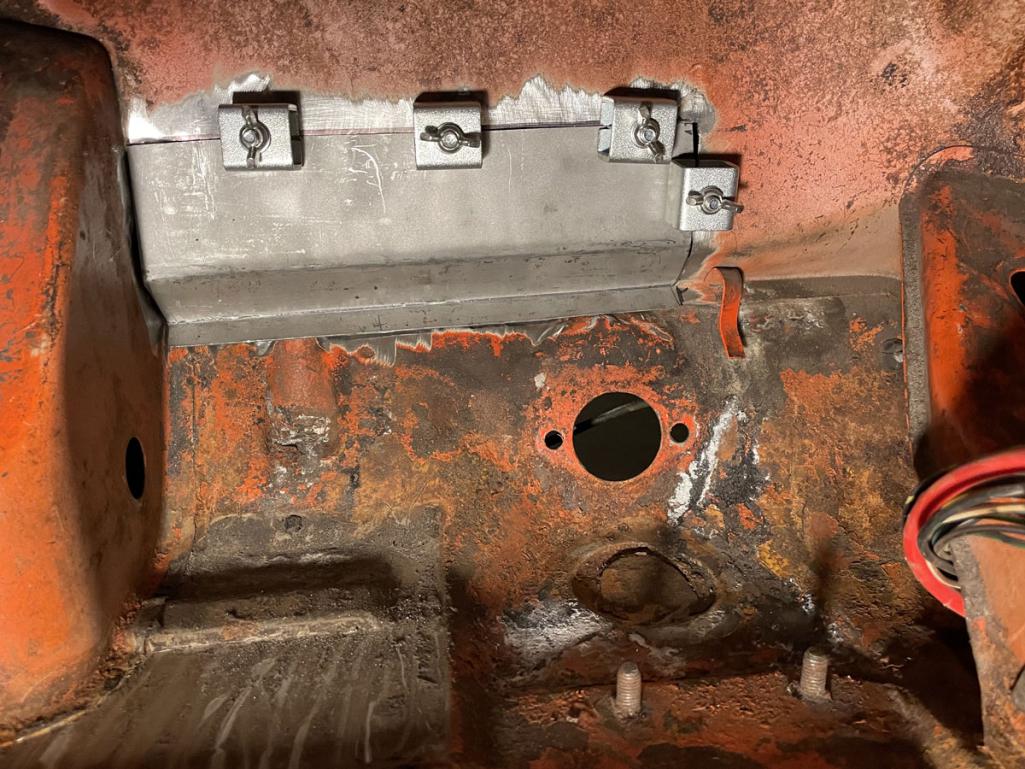 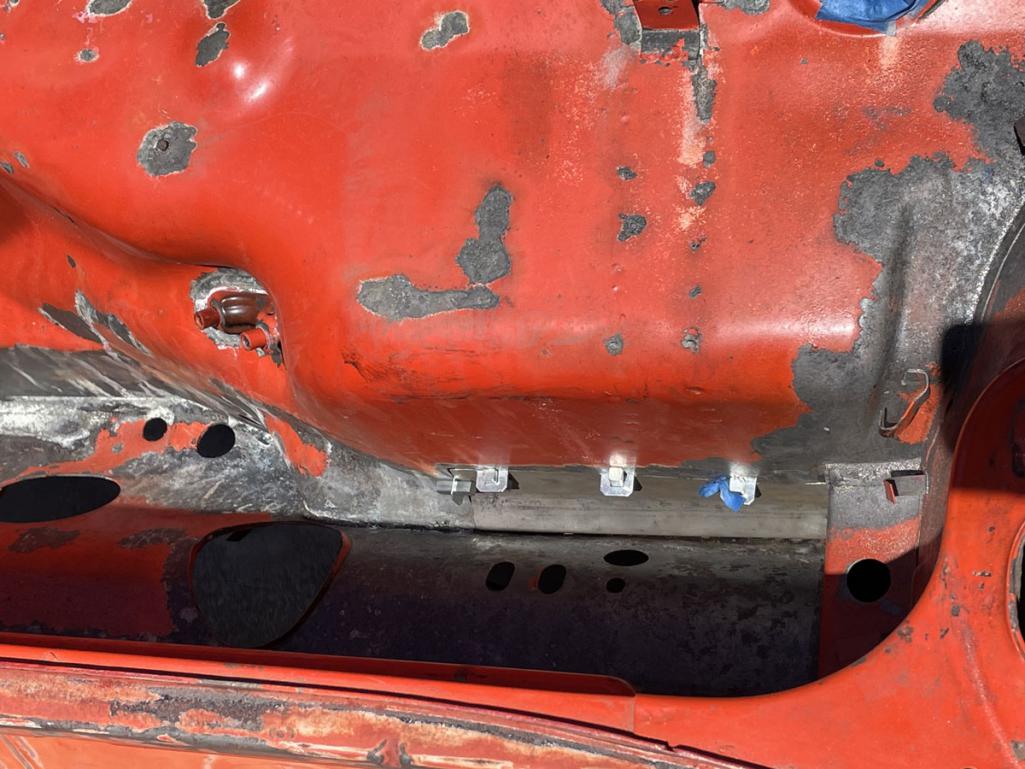 I've been practicing my plug welds with the mig for the bottom and side, the rest I think I can tig it. (IMG:style_emoticons/default/welder.gif) There are some spots in the floor and the bottom of the inner fender well that will need patching, also I need to assess the channel for the front lid seal which may need some love. The plan presently is to get the front trunk, fuel tank, headlight buckets, seal channel, and front panel exterior solid and sprayed in the factory orange. The front suspension and most of what I've taken off the car are getting powdercoated this past week. I'm working on getting my copy cad Caswell setup functioning, to do a the parts that were finished as such. Figured out the wheels are a mix of probably beetle rims. the black ones are dated 9/68 4 1/2 J x 15.. I'm not sure what the offset is, but can't be actual 914 wheels with that date. The fronts are 4J x 15 dated 10/71 so not 914 either. I'd like a set of 4 1/2 J x 15 as the car had originally. I don't know what the offset is supposed to be, ET36? I think 914 wheels have it stamped but idk. Anyway, it's a lot currently, trying to keep focused on the task at hand. (IMG:style_emoticons/default/smash.gif) |
|
|
|
| Al Meredith |
Jun 27 2022, 09:48 AM
Post
#33
|
|
Senior Member Group: Members Posts: 960 Joined: 4-November 04 From: Atlanta, ga Member No.: 3,061 |
Automobile Atlanta has the seat hinge and bracket you need to repair your drivers seat.
|
|
|
|
| Literati914 |
Jun 27 2022, 09:51 AM
Post
#34
|
|
Senior Member Group: Members Posts: 1,443 Joined: 16-November 06 From: Dallas, TX Member No.: 7,222 Region Association: Southwest Region |
This is coming along well Nathan! it reminds me so much of the project I currently have up on the rotisserie ... a ratty red paint job over factory tangerine (why would anyone do that?) and with a replaced front clip too!! keep chipping away and you'll be (IMG:style_emoticons/default/driving.gif) soon!!
|
 |
|
| Superhawk996 |
Jun 27 2022, 10:38 AM
Post
#35
|
|
914 Guru Group: Members Posts: 5,769 Joined: 25-August 18 From: Woods of N. Idaho Member No.: 22,428 Region Association: Galt's Gulch |
QUOTE(nathanxnathan @ Jun 3 2022, 03:16 AM)  I thought the driver was gonna be better,I was expecting it to be like clean. sad (IMG:style_emoticons/default/sad.gif) some poking, it's through both layers and the jack plate I don't know if there's much I can do about it. It seems to address it would entail going sooo deep. It's a bit heartbreakibng, like why do I do this to myselfbuying 914's thinking it's going to be different (IMG:style_emoticons/default/huh.gif) Don't panic. On my project I replaced the driver side jack point without needing to cut the rear quarter panel. Not much much drama. Jacking point can be pretty gone but the rest of the long still in great shape. The jack triangle drain holes get blocked and then it takes out the pyramid and the 1st layer of metal behind the pyramid. Based on the other work you've already done, the replacement of the driver side jack point is easy. See my build thread post #510 on page 26 |
|
|
|
| nathanxnathan |
Jun 27 2022, 10:53 AM
Post
#36
|
|
Member Group: Members Posts: 274 Joined: 16-February 18 From: Laguna Beach, CA Member No.: 21,899 Region Association: Southern California |
QUOTE(Al Meredith @ Jun 27 2022, 08:48 AM) Automobile Atlanta has the seat hinge and bracket you need to repair your drivers seat. I got Restoration Design brackets from Pelican, and hinges from 914Rubber, also Restoration Design. They are pretty nice. 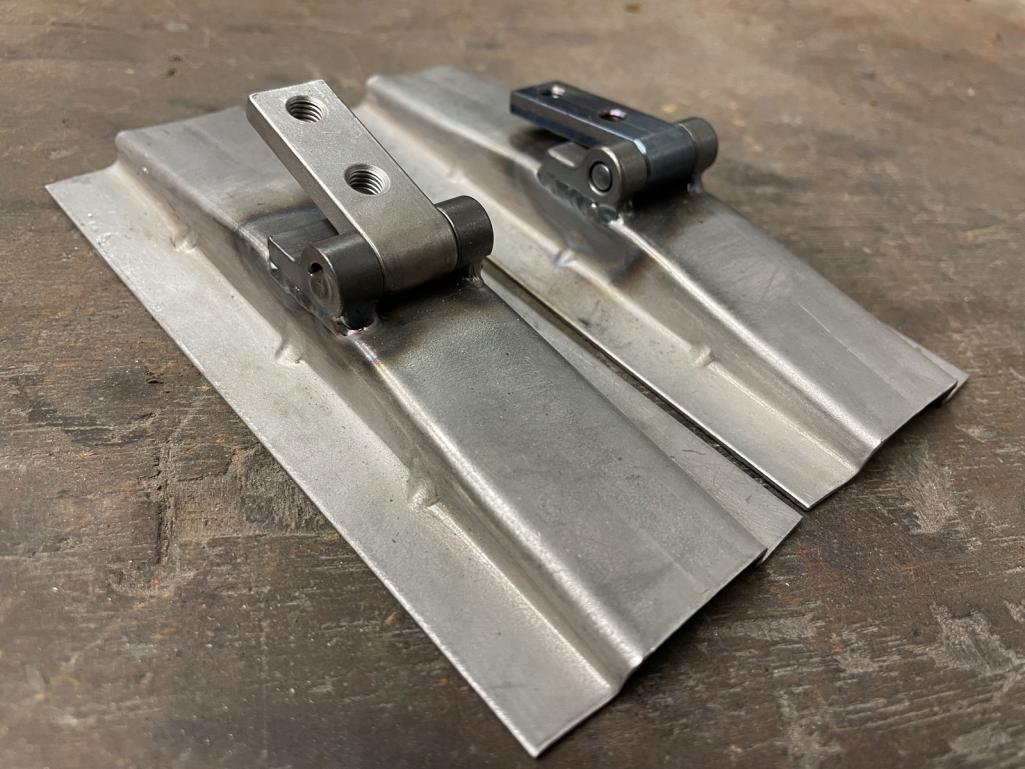 The brackets the bends are a little bigger radius so the sides of the hinges hung over a little, and I felt like I should weld the sides to bridge the gap. I'm mulling over how I want to go about the driver floor. The hole drilled through the seat reinforcement and the floor, and the dent there etc, it's kind of a problem area. I'm fighting the urge to remove the seat reinforcement and get full on into that area.  Not the greatest shot.. I was concentrating on the trouble at the back when I took it... 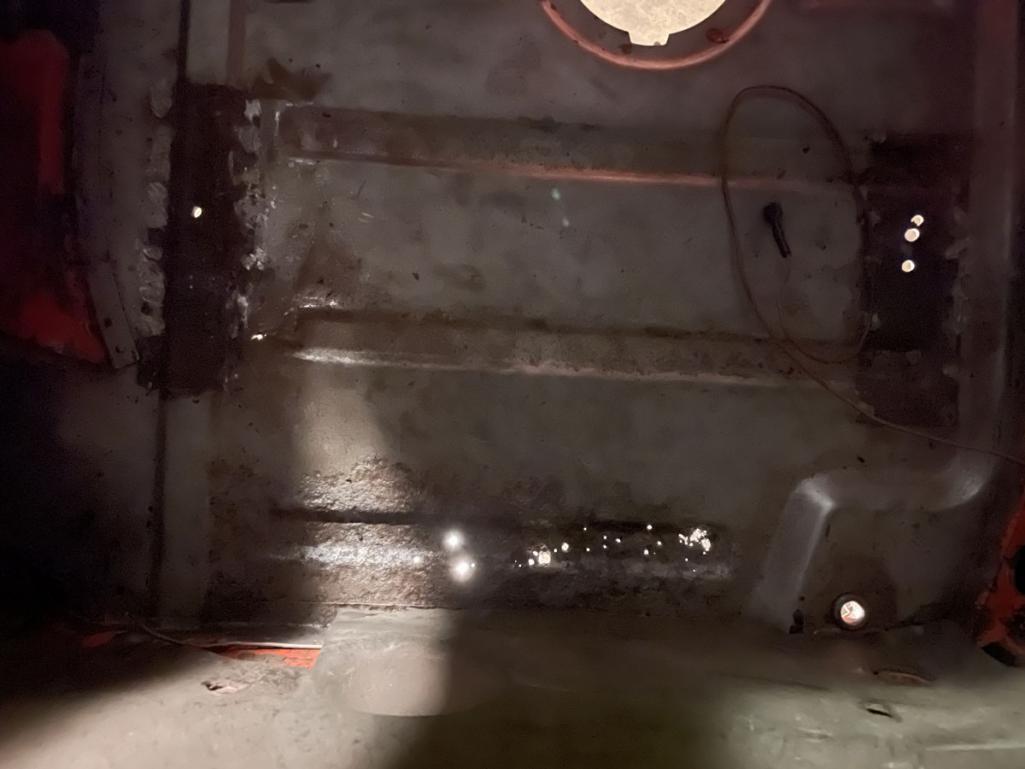 |
|
|
|
| nathanxnathan |
Jun 27 2022, 11:02 AM
Post
#37
|
|
Member Group: Members Posts: 274 Joined: 16-February 18 From: Laguna Beach, CA Member No.: 21,899 Region Association: Southern California |
QUOTE(Literati914 @ Jun 27 2022, 08:51 AM) This is coming along well Nathan! it reminds me so much of the project I currently have up on the rotisserie ... a ratty red paint job over factory tangerine (why would anyone do that?) and with a replaced front clip too!! keep chipping away and you'll be (IMG:style_emoticons/default/driving.gif) soon!! The further I get, the further it seems to bring it back (IMG:style_emoticons/default/unsure.gif) I'm trying to remain vigilant, though. That's so funny with these cars. I was looking at Montreal914's build thread and his red driver door with the whole front support cut out for a speaker, was like, "I've seen this before" (IMG:style_emoticons/default/huh.gif) Like echos of the same recurring issues. My girlfriend has a fixation with cherries I guess because her name is Cher, and wants it red. I keep calling it "the orange car" and she makes this classic disapproving expression (IMG:style_emoticons/default/biggrin.gif) |
|
|
|
| Superhawk996 |
Jun 27 2022, 11:08 AM
Post
#38
|
|
914 Guru Group: Members Posts: 5,769 Joined: 25-August 18 From: Woods of N. Idaho Member No.: 22,428 Region Association: Galt's Gulch |
QUOTE(nathanxnathan @ Jun 27 2022, 12:53 PM) I'm fighting the urge to remove the seat reinforcement and get full on into that area. Don't fight it . . . come to the rustoration side. (IMG:style_emoticons/default/happy11.gif) You have the skills to fix it right. I don't think I've ever heard anyone lament "I shouldn't have done that the right way!" |
|
|
|
| nathanxnathan |
Jun 27 2022, 11:30 AM
Post
#39
|
|
Member Group: Members Posts: 274 Joined: 16-February 18 From: Laguna Beach, CA Member No.: 21,899 Region Association: Southern California |
QUOTE(Superhawk996 @ Jun 27 2022, 09:38 AM) QUOTE(nathanxnathan @ Jun 3 2022, 03:16 AM) I thought the driver was gonna be better,I was expecting it to be like clean. sad (IMG:style_emoticons/default/sad.gif) some poking, it's through both layers and the jack plate I don't know if there's much I can do about it. It seems to address it would entail going sooo deep. It's a bit heartbreakibng, like why do I do this to myselfbuying 914's thinking it's going to be different (IMG:style_emoticons/default/huh.gif) Don't panic. On my project I replaced the driver side jack point without needing to cut the rear quarter panel. Not much much drama. Jacking point can be pretty gone but the rest of the long still in great shape. The jack triangle drain holes get blocked and then it takes out the pyramid and the 1st layer of metal behind the pyramid. Based on the other work you've already done, the replacement of the driver side jack point is easy. See my build thread post #510 on page 26 I'm fighting the urge to cut it open, trying to focus on the car in zones. Currently on the front 2 of the 5 zones, the frunk and fuel tank compartment. I strayed a bit to zone 3 already with the floors, removed all the tar and got the seat brackets off except 1.. will showcase that in a bit.. Jack points after that. The layers kind of haunt me. I know the 4 sided pyramid of the outer layer of the long is spot welded to the inner layer which iirc has the circle cutout for the recessed square that the jack tube is welded to. It's good to think about the contingencies beforehand though. like if it's just the outer, cut out the pyramid, probably new jack post, plug weld it to the inner layer. I need to work on using the mig to do butt welds without backing. If it's really a mess I might go full DWD, I don't want to think about it if it comes to that. (IMG:style_emoticons/default/wacko.gif) Interesting job with the sectioning of the cover plate. I'm gonna have to do some soul searching about how to deal with it.. probably that is the worst repair of the car, I think the hellhole area maybe will to be easier even. |
|
|
|
| nathanxnathan |
Jul 17 2022, 11:03 AM
Post
#40
|
|
Member Group: Members Posts: 274 Joined: 16-February 18 From: Laguna Beach, CA Member No.: 21,899 Region Association: Southern California |
I've been focusing on prepping the front trunk and fuel tank area. I want to get them in at least 2k primer. The original plan was to reinstall the front suspension and tank and such before moving further back, to go start to finish on each section of the car so it doesn't end up like my other car. I'm wavering on that plan, thinking about rotisseries.
For now just trying to focus on an area at a time and thought addressing the channels in the front trunk would be a next step. It turned into a pretty epic project, stretching the limits of how big 1 post can be on 914world (IMG:style_emoticons/default/biggrin.gif) Passenger side above the headlight bucket didn't look too terrible.  Driver side seemed worse 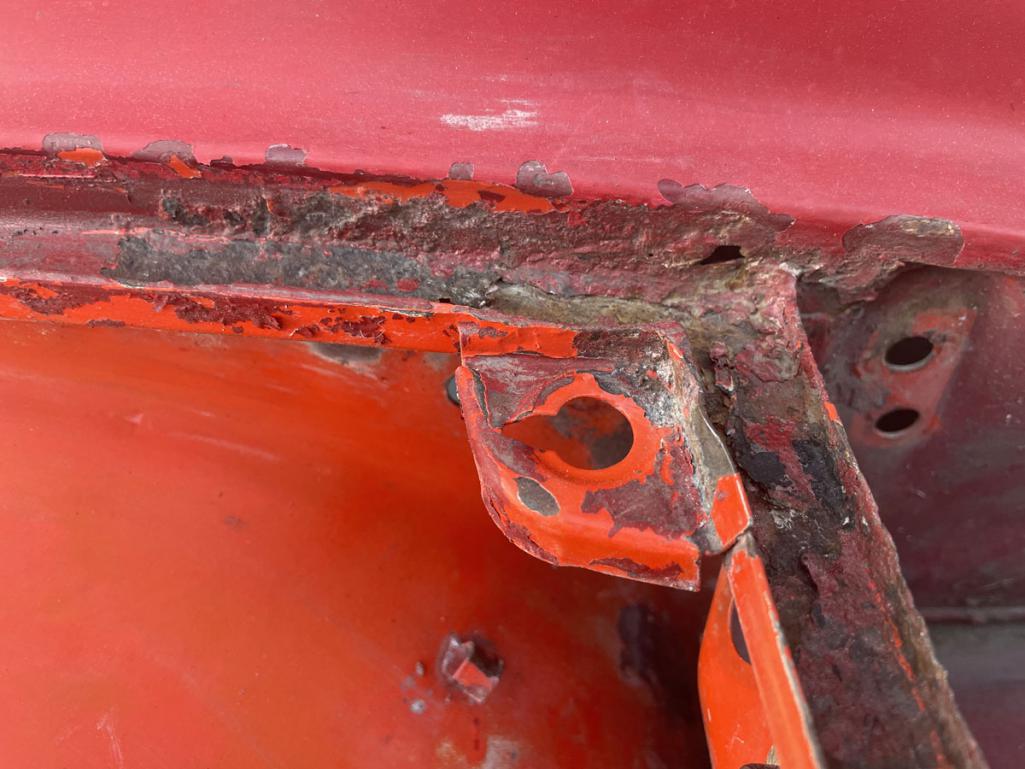 But a bit of glass bead revealed that seam sealer had been used as a coverup. The passenger side was indeed more terrible than the driver.   I'd removed the front lid adjustment brackets and the forward lips at this point. A few layers to be addressed and those are the first that needed to come off. I decided to do both sides at the same time in steps. Before I cut I made paper templates in order to make patch pieces from. Removed the top layer.   The second layer, didn't take a pic of the passenger side at these steps.  And the final step of the deconstruction 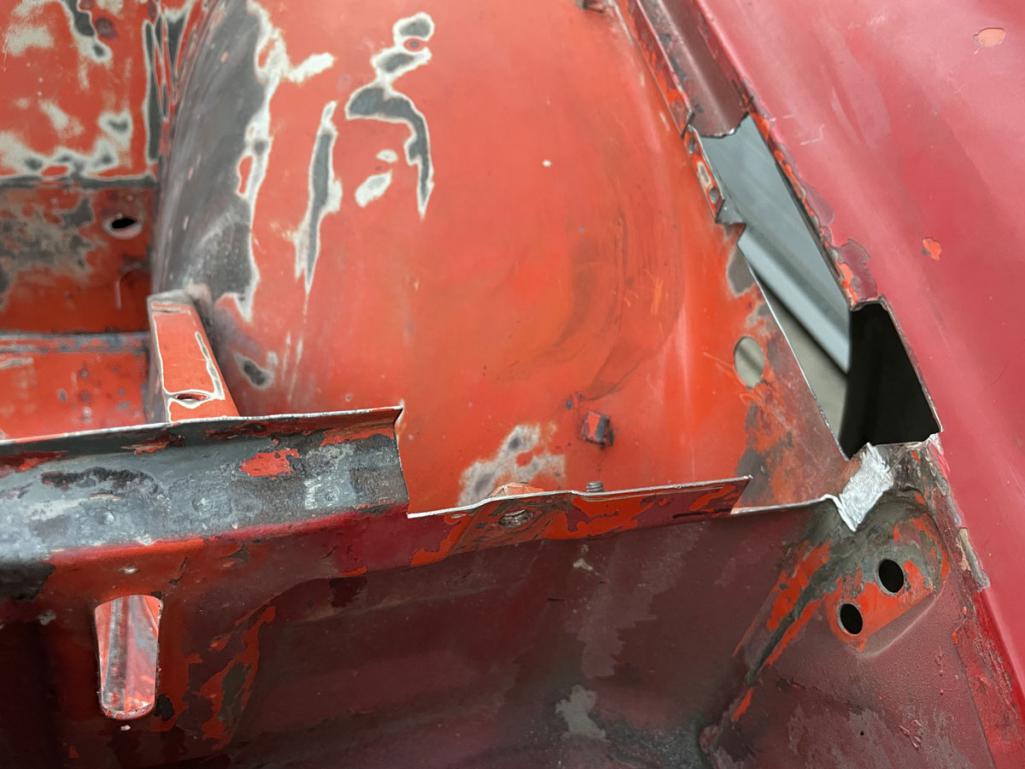 I'd made the pieces to fit as I was taking them off. I don't have a break, and I just used clamped plate steel and a body hammer to do the bends. I ground a few radiuses on the plates to get the radiuses to match. I had a hard time getting 2 and even more so 3 bends aligned. The templates were made of the top, to fit inside, and it was tricky to fudge the modulus of elasticity and take into account the panel thickness to get the bend in the right spot. For the 3-bend topmost piece on the passenger side which has a radius to follow the hood line, I formed it with the first bend by itself and then welded it to the 2 bend channel part. The joggles in the 3rd layer I welded 1 of the seams 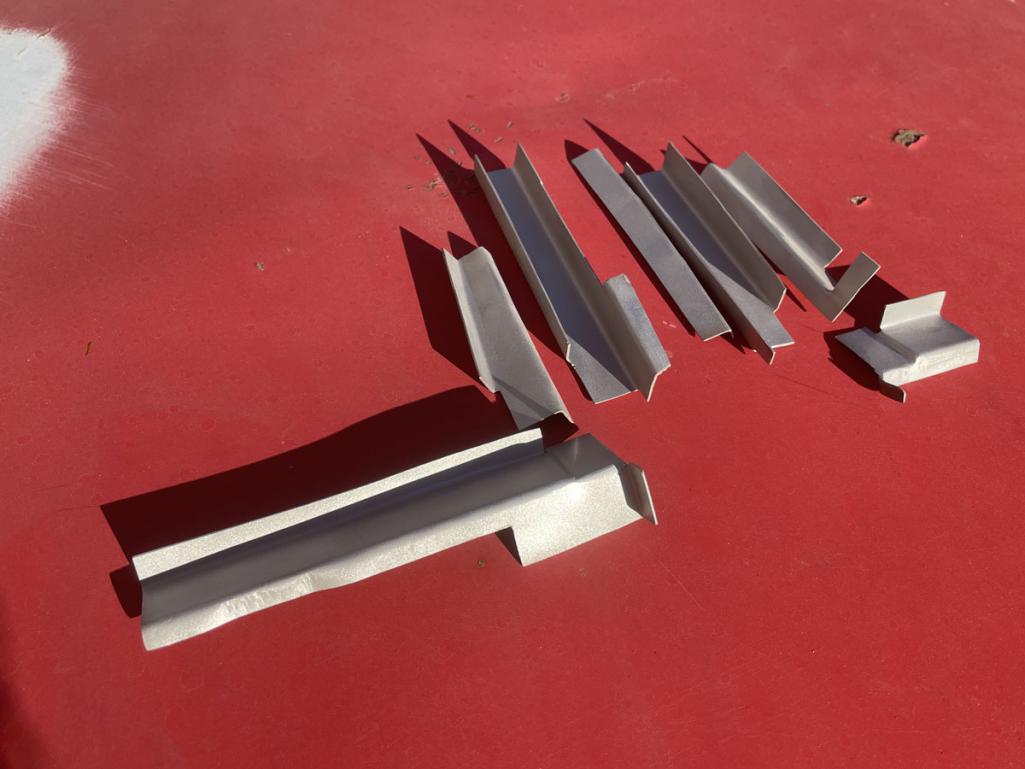 2-part piece assembled. The radius I did by notching it into 3 individually bent sections, welded the notches and smoothed the curve on a dolly.  Prepped the back of both sides from beneath 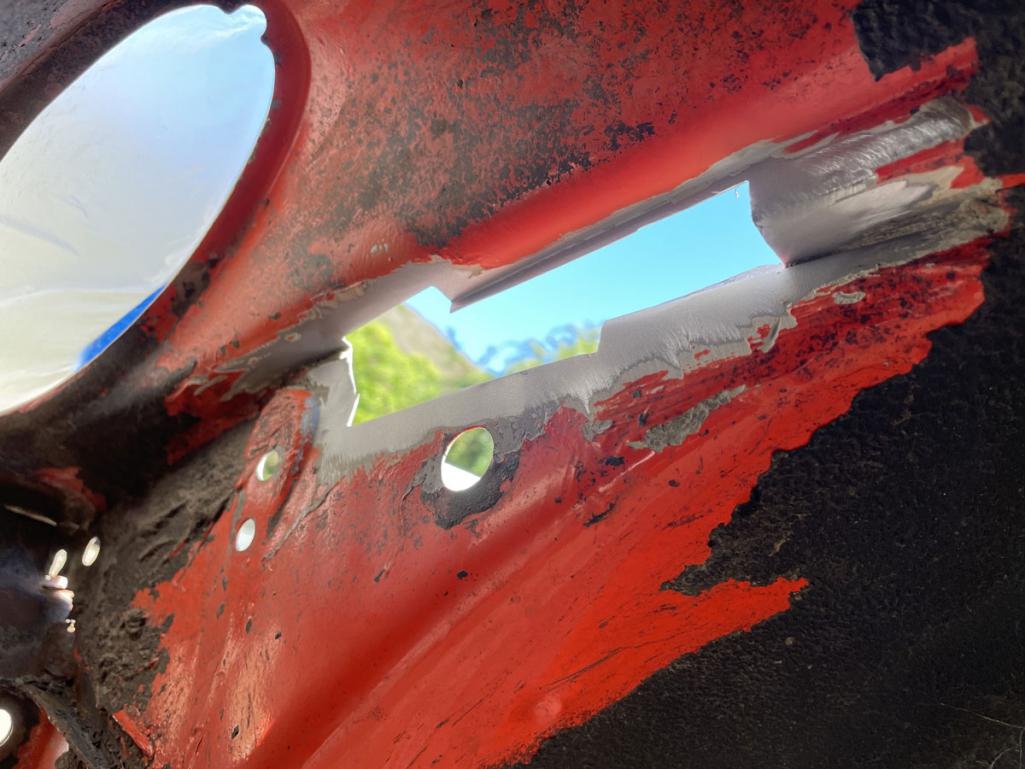 And putting it all back together Gap was a bit wide here, but manageable. 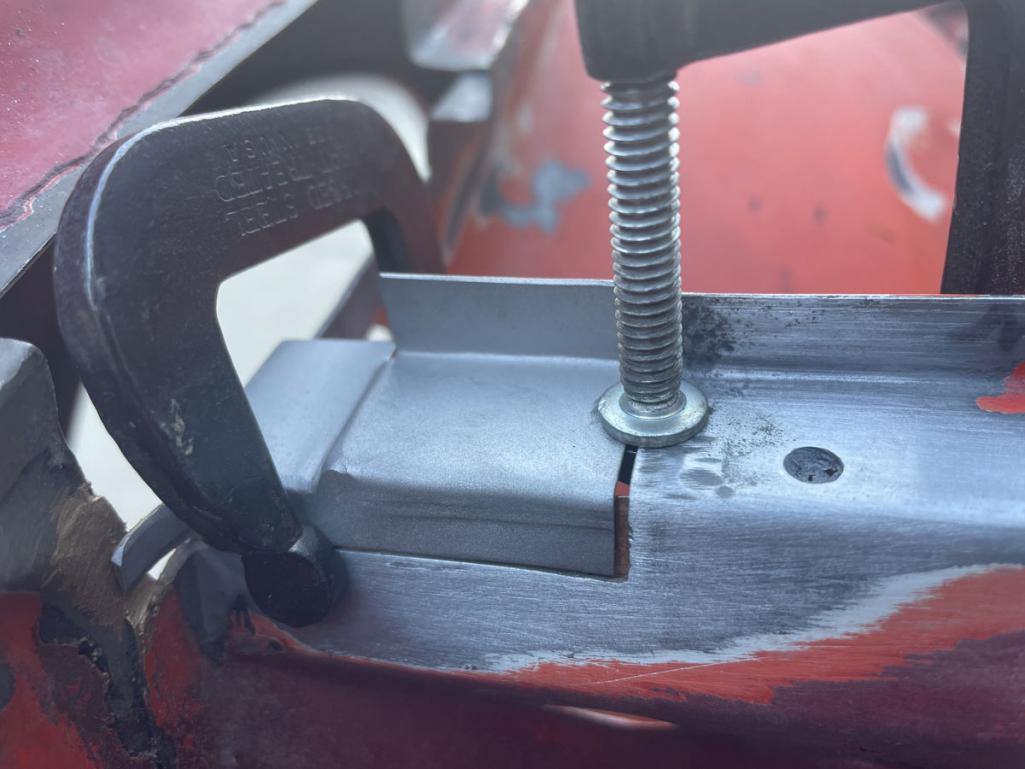 I tried using SEM Copperweld at first but I found 3M Rust Thru primer to not start on fire for the spot welds and did most with that. 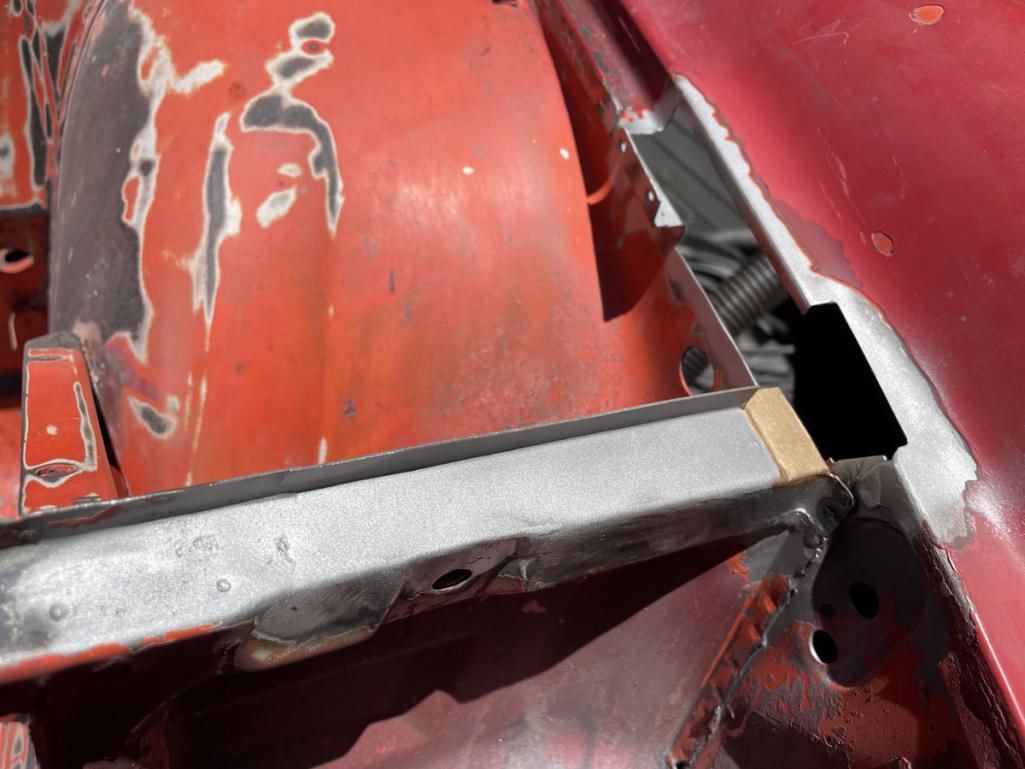 2nd Piece felt good filling the gaping hole. Did both sides, only got pics of the 1. 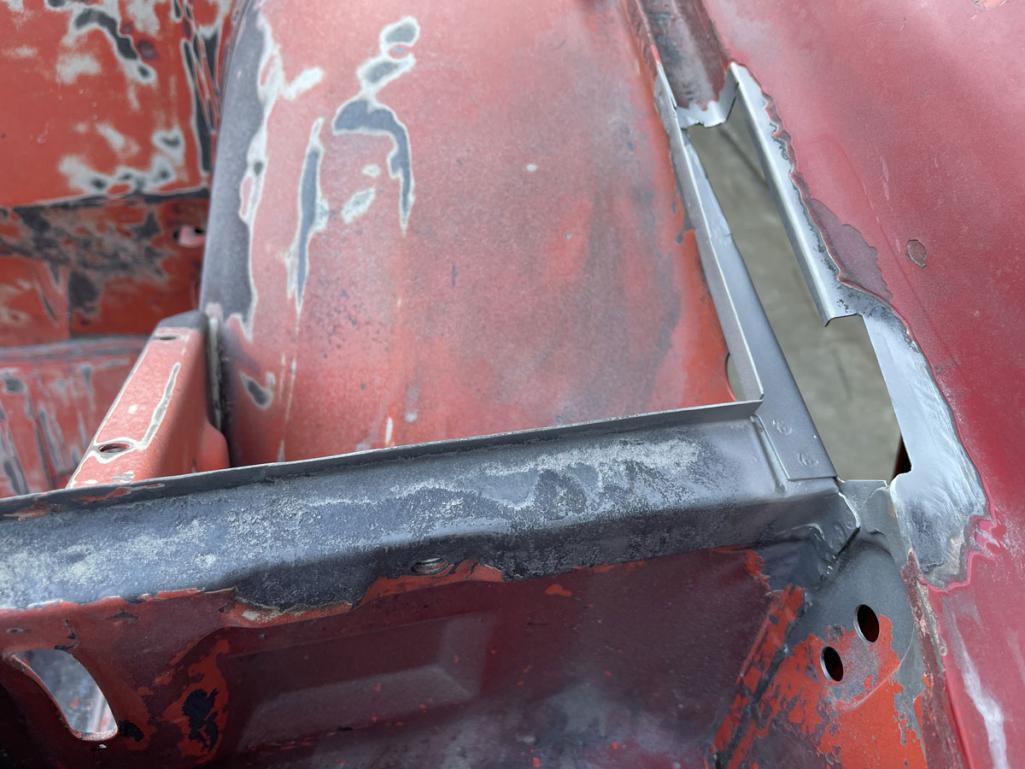 I spot welded where I could, the inner seal channel, the special tongs installed. 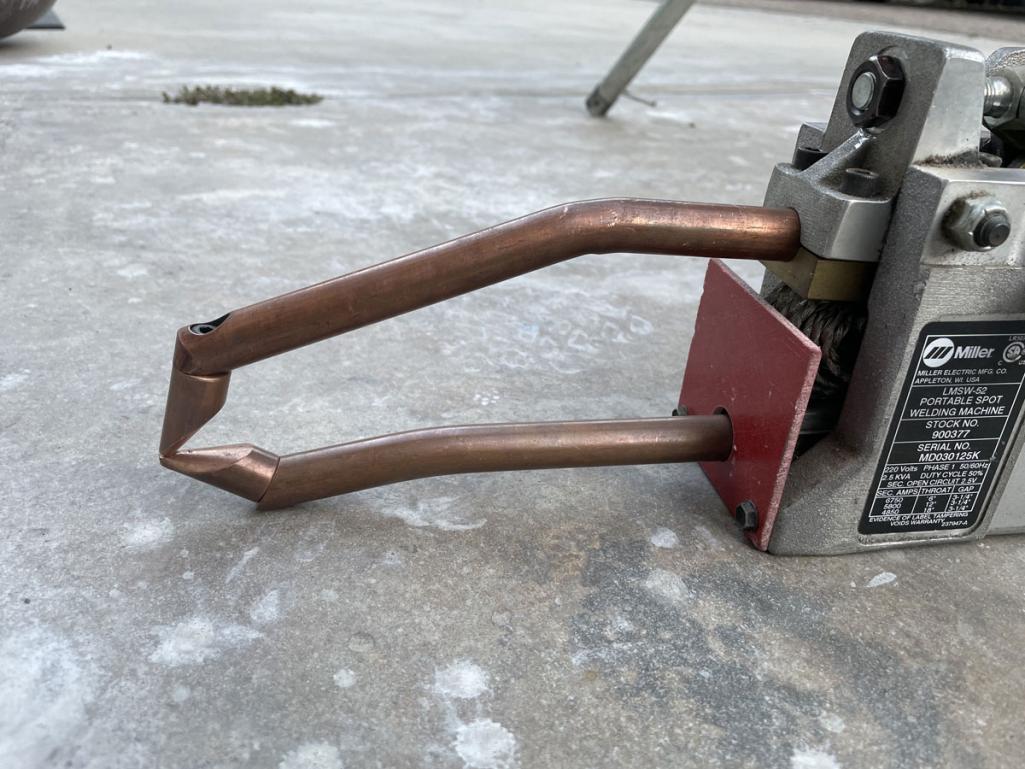 And the final piece 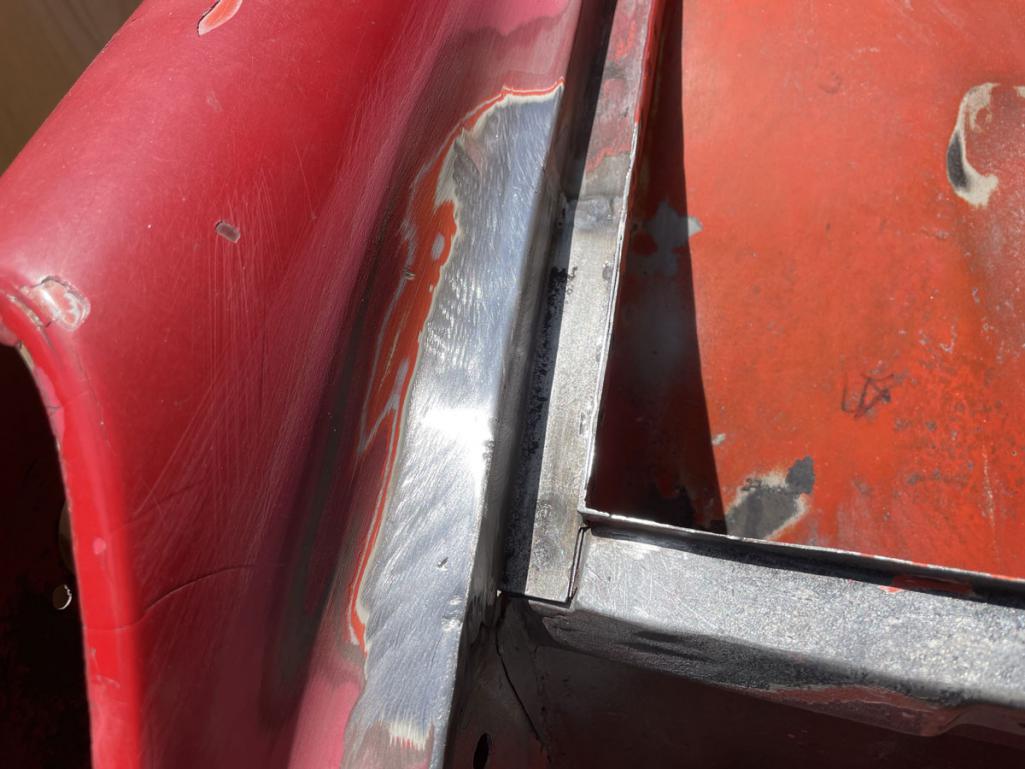 Working on the driver side revealed some damage that had been done previously. The welds started melting the nearby bondo and uncovered some tortured metal looks like it was ground with 24 grit. I sprayed rattle can black and sanded to reveal low spots and worked out what I could with a dolly. It will need some filler still. 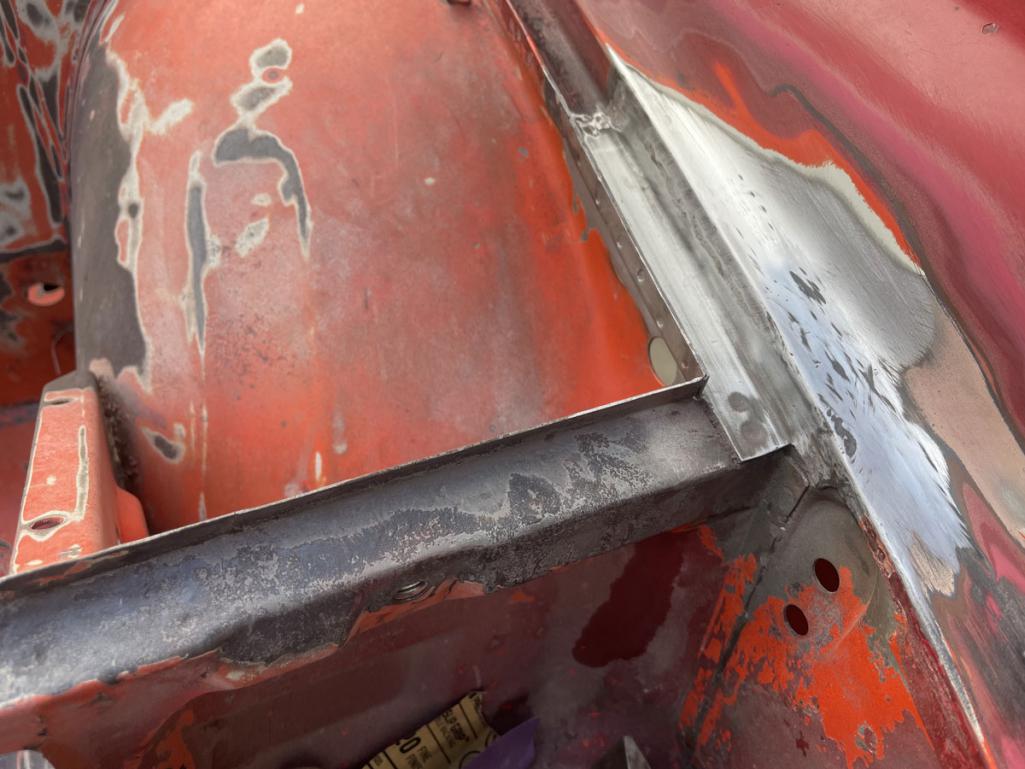 The gray blotchy metal is the Ospho. As I'm doing this outside I spray it to keep the rust from forming on the bare pieces. Not perfect, but it's solid. I've been watching Wray Schelin Proshaper videos and I'm sure he'd have done it differently, flanging the joggles and such. I haven't seen him work any parts so small and finicky to see how he would do it. I wish there was a class like his workshop out here. Anyway, building the skill set. I don't think I botched anything that was salvageable, I cut out only the bad and one could always cut out what I did and do over if the work isn't satisfactory. I've still got the hood adjustment brackets to get back in. The lower lips as well but I may want to address the front cross panel before I do that. |
|
|
|
|
1 User(s) are reading this topic (1 Guests and 0 Anonymous Users)
0 Members:

|
Lo-Fi Version | Time is now: 2nd May 2024 - 08:50 PM |
Invision Power Board
v9.1.4 © 2024 IPS, Inc.