|
|
|
Porsche, and the Porsche crest are registered trademarks of Dr. Ing. h.c. F. Porsche AG.
This site is not affiliated with Porsche in any way. Its only purpose is to provide an online forum for car enthusiasts. All other trademarks are property of their respective owners. |
|
|


| DennisV |
 Sep 10 2022, 12:51 PM Sep 10 2022, 12:51 PM
Post
#1
|
|
Senior Member  Group: Members Posts: 886 Joined: 8-August 20 From: Santa Rosa, CA Member No.: 24,575 Region Association: Northern California |
How are folks going about restoring original flapper boxes?
I had intended to bead blast and powder coat ours. Preparing to degrease them today, I see that they have a spring mechanism inside and what I think is a rubber sealing ring. I don't think those would much like the powder coating and required heat. Some other styles talked about on other forums get disassembled, but I don't see a way to get those components out without destroying the housing. Perhaps bead blast and spray can is the best bet, and just accept the spring and sealing ring will get painted? Thank you. P.S. I've seem some discussion suggesting 914-6 were gray rather than black. Was that ever definitively answered? The color of ours is rust. (IMG:style_emoticons/default/sad.gif) 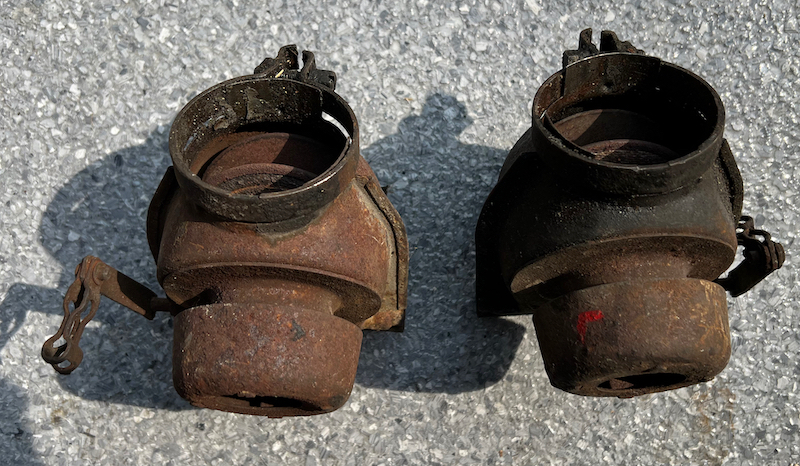 |
   |

 
|
  |
Replies(1 - 19)
| Mikey914 |
Sep 10 2022, 05:01 PM
Post
#2
|
|
The rubber man Group: Members Posts: 12,772 Joined: 27-December 04 From: Hillsboro, OR Member No.: 3,348 Region Association: None |
May want to rethink the powder coat for this application. Unless you have a higher temp version you are running. Enamel works well here. They will see a fair bit of heat. A ceramic coat material is also a good option.
The powder may work, but over time it may get brittle. |
|
|
|
| DennisV |
Sep 10 2022, 05:59 PM
Post
#3
|
|
Senior Member Group: Members Posts: 886 Joined: 8-August 20 From: Santa Rosa, CA Member No.: 24,575 Region Association: Northern California |
QUOTE(Mikey914 @ Sep 10 2022, 04:01 PM)  Enamel works well here. They will see a fair bit of heat. A ceramic coat material is also a good option. Thanks for your reply. Unless I get a better suggestion, I'll do something similar to what I did on our 356 preheat shaft with flaps, which is bead blast and then spray primer then paint with Dupli-Color Engine Enamel. It's not ideal for the rubber or moving parts, but I can't leave it like it is. |
|
|
|
| Mikey914 |
Sep 10 2022, 06:06 PM
Post
#4
|
|
The rubber man Group: Members Posts: 12,772 Joined: 27-December 04 From: Hillsboro, OR Member No.: 3,348 Region Association: None |
That's what I'd do.
|
|
|
|
| bbrock |
Sep 10 2022, 06:07 PM
Post
#5
|
|
914 Guru Group: Members Posts: 5,269 Joined: 17-February 17 From: Montana Member No.: 20,845 Region Association: Rocky Mountains |
I replaced the gaskets on one using some exhaust gasket from the FLAPS and high temperature adhesive. You can't really restore them exactly like original because the gaskets are crimped into the flapper around the edge. But mine have held up and make a good seal.
Here's a bit on the process from my build thread, but pretty straight forward. |
|
|
|
| DennisV |
Sep 10 2022, 06:19 PM
Post
#6
|
|
Senior Member Group: Members Posts: 886 Joined: 8-August 20 From: Santa Rosa, CA Member No.: 24,575 Region Association: Northern California |
QUOTE(bbrock @ Sep 10 2022, 05:07 PM) I replaced the gaskets on one using some exhaust gasket from the FLAPS and high temperature adhesive. You can't really restore them exactly like original because the gaskets are crimped into the flapper around the edge. But mine have held up and make a good seal. Here's a bit on the process from my build thread, but pretty straight forward. Holy crap! I thought I was obsessive. Nicely done Brent. I like your initialism QUOTE NSPs (New Shit Parts) Did you coin that? I hadn't seen it before. Has wide applicability unfortunately. |
|
|
|
| mepstein |
Sep 10 2022, 07:46 PM
Post
#7
|
|
914-6 GT in waiting Group: Members Posts: 20,587 Joined: 19-September 09 From: Landenberg, PA/Wilmington, DE Member No.: 10,825 Region Association: MidAtlantic Region |
I’ve blasted and powder coated a bunch of them. The air flow isn’t crazy hot and it seems to hold up great. I believe Bruce/bdstone does the same on the ones he restores.
|
 |
|
| bbrock |
Sep 10 2022, 10:07 PM
Post
#8
|
|
914 Guru Group: Members Posts: 5,269 Joined: 17-February 17 From: Montana Member No.: 20,845 Region Association: Rocky Mountains |
QUOTE(DennisV @ Sep 10 2022, 06:19 PM) QUOTE(bbrock @ Sep 10 2022, 05:07 PM) I replaced the gaskets on one using some exhaust gasket from the FLAPS and high temperature adhesive. You can't really restore them exactly like original because the gaskets are crimped into the flapper around the edge. But mine have held up and make a good seal. Here's a bit on the process from my build thread, but pretty straight forward. Holy crap! I thought I was obsessive. Nicely done Brent. I like your initialism (IMG:style_emoticons/default/lol-2.gif) Yes, I've noticed you are afflicted with the same disease in your posts. (IMG:style_emoticons/default/beerchug.gif) QUOTE QUOTE NSPs (New Shit Parts) Did you coin that? I hadn't seen it before. Has wide applicability unfortunately. I forgot about that. As far as I know, that's an original. (IMG:style_emoticons/default/shades.gif) |
|
|
|
| rgalla9146 |
Sep 11 2022, 12:35 AM
Post
#9
|
|
Advanced Member Group: Members Posts: 4,950 Joined: 23-November 05 From: Paramus NJ Member No.: 5,176 Region Association: None |
You heard right, there has been discussion on color of the 914 6 valves but there is no
question that they are originally grey. I have had some showing plenty of the original paint. Same color as original HEs I dont have access to pics of them right now. On the left HE in th picture the original color can be seen. Attached thumbnail(s) 
|
|
|
|
| DennisV |
Sep 11 2022, 06:13 AM
Post
#10
|
|
Senior Member Group: Members Posts: 886 Joined: 8-August 20 From: Santa Rosa, CA Member No.: 24,575 Region Association: Northern California |
QUOTE(rgalla9146 @ Sep 10 2022, 11:35 PM) You heard right, there has been discussion on color of the 914 6 valves but there is no question that they are originally grey. I have had some showing plenty of the original paint. Same color as original HEs Hmm. From your photo that looks roughly the same as the gray that came on our 356 muffler. It's a very dull. I guess I'd call it flat primer gray. Does that seem like a decent description? Would love to see more photos if you have them. What I can find via the Google machine, even for 914-6, are black or really poorly lit. Here are the two best I can find that one might call gray: Heater Flappers for 914-6 (IMG:http://www.914world.com/bbs2/uploads_offsite/www.pelicanparts.com-24575-1662898389.1.jpg) |
|
|
|
| rgalla9146 |
Sep 11 2022, 07:03 AM
Post
#11
|
|
Advanced Member Group: Members Posts: 4,950 Joined: 23-November 05 From: Paramus NJ Member No.: 5,176 Region Association: None |
Yes, that grey Stoddard sells it. |
|
|
|
| johnhora |
Sep 11 2022, 12:59 PM
Post
#12
|
|
Senior Member Group: Members Posts: 902 Joined: 7-January 03 From: Derby City KY Member No.: 107 Region Association: None |
Years ago before the Stoddard type paint a friend of mine who was a 356 restorer and made 356 mufflers showed me how to use cold galvanizing compound spray paint. His mufflers were on many 356 concours cars.
The prep was to blast the part then spray with cold galvanizing compound spray paint and then take the gas torch to the parts to bake.....I did this on a number of 911 mufflers and headers....worked great and the color was a perfect grey.... The flapper gets very hot since it directs air from the heat exchangers so you need something that can take high heat. 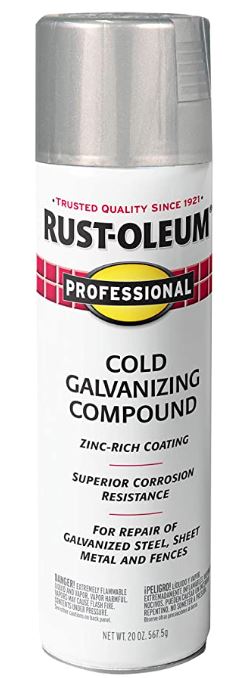 |
|
|
|
| mb911 |
Sep 11 2022, 01:31 PM
Post
#13
|
|
914 Guru Group: Members Posts: 7,729 Joined: 2-January 09 From: Burlington wi Member No.: 9,892 Region Association: Upper MidWest |
Powder would be fine. It melts at of 400 degrees in most cases.
I like the rustoluem high heat gray primer. Works and looks perfect  |
|
|
|
| DennisV |
Sep 11 2022, 03:58 PM
Post
#14
|
|
Senior Member Group: Members Posts: 886 Joined: 8-August 20 From: Santa Rosa, CA Member No.: 24,575 Region Association: Northern California |
QUOTE(rgalla9146 @ Sep 11 2022, 06:03 AM) Yes, that grey I had hoped that the Dupli-color Engine Enamel with Ceramic primer would be a good match. Assuming our 356 muffler is the correct hue, the Dupli-color is a bit too blue. Muffler in background as purchased from Porsche. Dupli-color primed starter body in foreground. 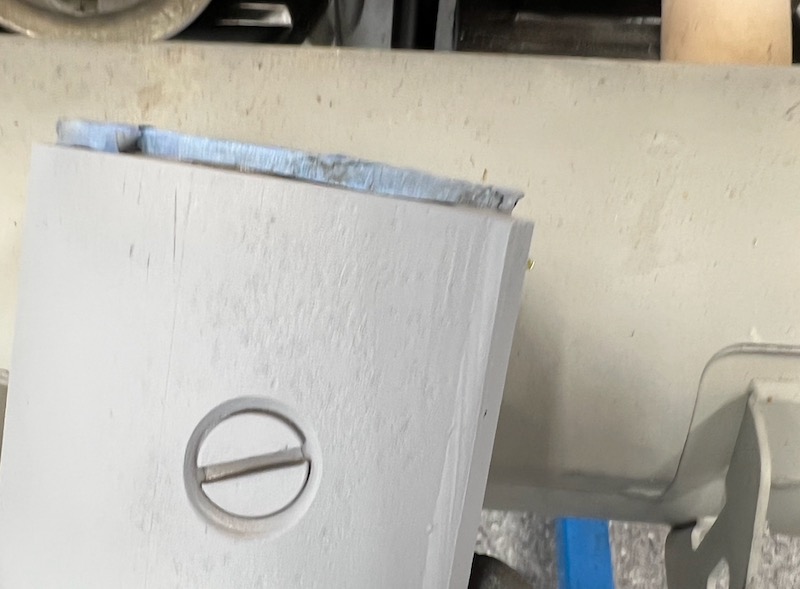 |
|
|
|
| DennisV |
Sep 12 2022, 06:46 AM
Post
#15
|
|
Senior Member Group: Members Posts: 886 Joined: 8-August 20 From: Santa Rosa, CA Member No.: 24,575 Region Association: Northern California |
QUOTE(johnhora @ Sep 11 2022, 11:59 AM) The prep was to blast the part then spray with cold galvanizing compound spray paint and then take the gas torch to the parts to bake.....I did this on a number of 911 mufflers and headers....worked great and the color was a perfect grey.... Thanks for sharing @johnhora That is some interesting stuff. I had not seen it before. Why did you torch it? I'm reading their spec sheet and is says: QUOTE Do not apply to surfaces, when heated, exceed 200°F (93°C). Based on what little I know, I think 200°F would be right at the edge of the engine operating temperature. FWIW - The Dupli-color folks suggest the engine enamel with ceramic will resist temperatures up to 500°F intermittently. |
|
|
|
| johnhora |
Sep 12 2022, 08:35 AM
Post
#16
|
|
Senior Member Group: Members Posts: 902 Joined: 7-January 03 From: Derby City KY Member No.: 107 Region Association: None |
Dennis...
that's the way he taught me to do it and he was a true master at his craft....I never questioned him...I just did what he told me to do (IMG:style_emoticons/default/smile.gif) It seemed that baked on it made it very durable. Just spraying it on with out the baking it could scratch easier.....and the color came out better baked. I'm trying to see if I have one of the 911 mufflers around. The color is like what you show in you picture above....it's like a white/grey but with out any blue hue. I remember buying VW beetle mufflers years ago from the dealer and they were the same color |
|
|
|
| DennisV |
Sep 16 2022, 04:02 PM
Post
#17
|
|
Senior Member Group: Members Posts: 886 Joined: 8-August 20 From: Santa Rosa, CA Member No.: 24,575 Region Association: Northern California |
I got around to glass bead blasting these last night. A couple surprises.
First: I thought under the rust I'd get to at least a chip of original paint. I went from rust to bare metal. Not a trace of paint. Second: I assume the flapper inside would have a ring of rubber like substance for the seal. Similar to what our 356 had. Instead I found mesh screen. Went easy in the interior areas in the vicinity of that flap. So I don't think I simply blew it away without a trace. 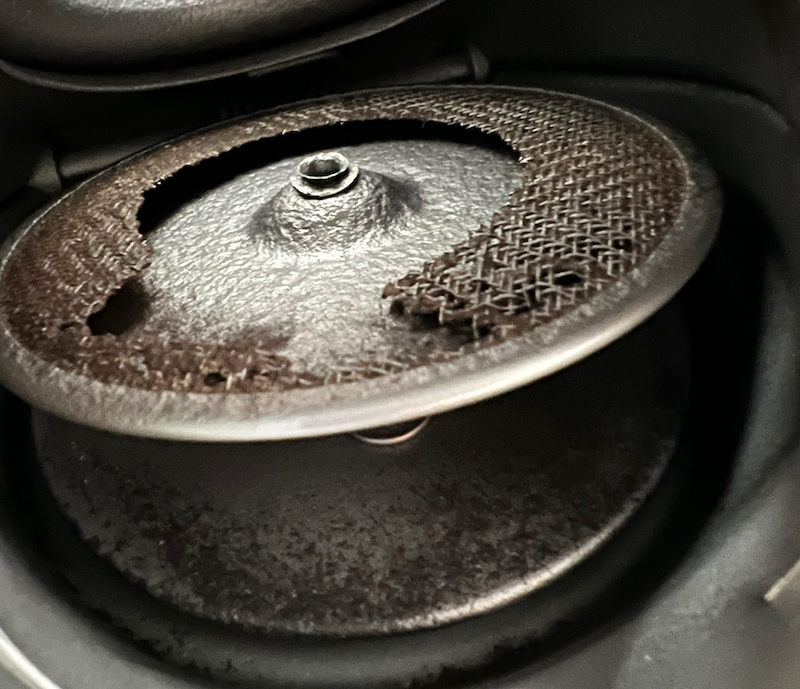 Has anyone had success getting the caps off that are held down by the 4 bent over metal tabs? I would sure like to take them apart for better prep and paint, but it's not worth breaking them. 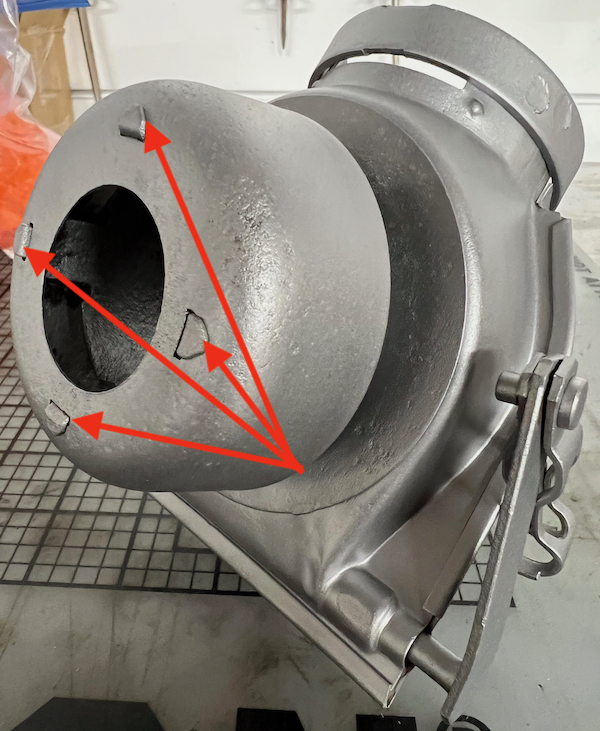 |
|
|
|
| bbrock |
Sep 16 2022, 06:22 PM
Post
#18
|
|
914 Guru Group: Members Posts: 5,269 Joined: 17-February 17 From: Montana Member No.: 20,845 Region Association: Rocky Mountains |
QUOTE(DennisV @ Sep 16 2022, 04:02 PM) Second: I assume the flapper inside would have a ring of rubber like substance for the seal. Similar to what our 356 had. Instead I found mesh screen. Went easy in the interior areas in the vicinity of that flap. So I don't think I simply blew it away without a trace. The mesh is what's left of a fiber gasket like your basic exhaust gasket material. I have assumed asbestos given the era they were made. Now you can see how those gaskets were crimped on to the flapper too. |
|
|
|
| DennisV |
Sep 17 2022, 05:56 AM
Post
#19
|
|
Senior Member Group: Members Posts: 886 Joined: 8-August 20 From: Santa Rosa, CA Member No.: 24,575 Region Association: Northern California |
QUOTE(bbrock @ Sep 16 2022, 05:22 PM) The mesh is what's left of a fiber gasket like your basic exhaust gasket material. I have assumed asbestos given the era they were made. Now you can see how those gaskets were crimped on to the flapper too. Hrm. So maybe even with a light touch the glass bead was too much. My guess is I couldn't tell the rust from the fiber and I unknowingly destroyed it. Given where we're at, perhaps I should really attack it now with the bead blaster just to try to get any remaining material out of it for safety reasons. At least the media gets filtered in the cabinet and I was wearing a mask when I did it. I guess the next question is can I salvage these flappers. It looks like @bbrock found a path. Guess there's nothing stoping me from powder coating now if I can get them apart. If anyone has any additional restoration tips or tales of caution, now is the time to share! |
|
|
|
| DennisV |
May 21 2023, 08:23 AM
Post
#20
|
|
Senior Member Group: Members Posts: 886 Joined: 8-August 20 From: Santa Rosa, CA Member No.: 24,575 Region Association: Northern California |
Has anyone been successful in disassembling this style of flapper box for repainting and getting it back together without destroying it? Those crimps are really tight.
I don't see how I'll ever get good paint coverage inside while they're together, unless I dip them in something. |
|
|
|
|
1 User(s) are reading this topic (1 Guests and 0 Anonymous Users)
0 Members:

|
Lo-Fi Version | Time is now: 2nd April 2026 - 01:07 PM |
Invision Power Board
v9.1.4 © 2026 IPS, Inc.