|
|
|
Porsche, and the Porsche crest are registered trademarks of Dr. Ing. h.c. F. Porsche AG.
This site is not affiliated with Porsche in any way. Its only purpose is to provide an online forum for car enthusiasts. All other trademarks are property of their respective owners. |
|
|


| DennisV |
 Oct 1 2022, 07:54 AM Oct 1 2022, 07:54 AM
Post
#1
|
|
Member  Group: Members Posts: 468 Joined: 8-August 20 From: Santa Rosa, CA Member No.: 24,575 Region Association: Northern California |
Does anyone have first-hand experience refurbishing their engine shroud that they can share? Best practices? Lessons learned?
I bought the best (err only) original engine shroud that I could find that I think is correct for our engine. Thanks for the guidance on that. It might work as is, but it could sure use some help. Faded. Cracks. Etc. I've done some searching, but the best resources I've found so far are boat repair videos. 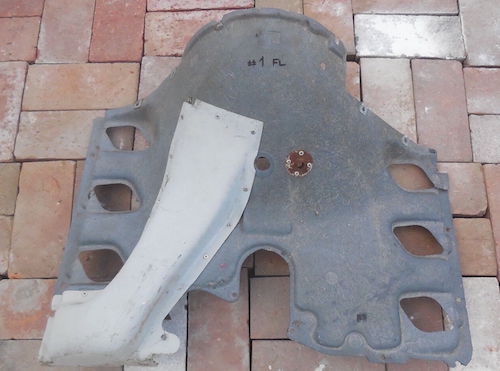 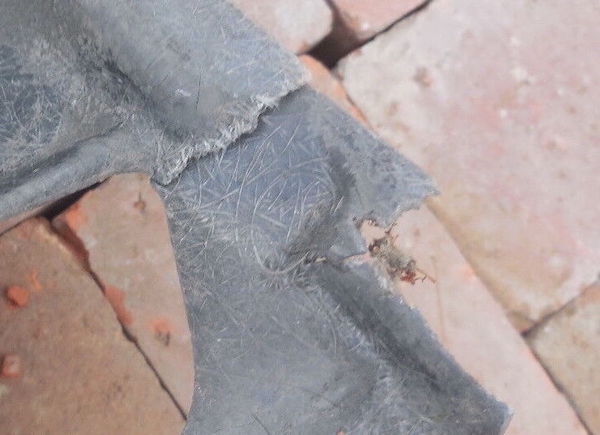 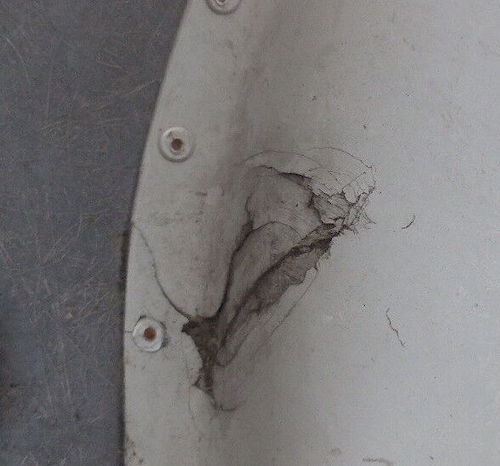 |
   |

 
|
  |
Replies
| porschetub |
Oct 1 2022, 03:43 PM
Post
#2
|
|
Advanced Member Group: Members Posts: 4,699 Joined: 25-July 15 From: New Zealand Member No.: 18,995 Region Association: None |
QUOTE(DennisV @ Oct 2 2022, 01:54 AM)  Does anyone have first-hand experience refurbishing their engine shroud that they can share? Best practices? Lessons learned? I bought the best (err only) original engine shroud that I could find that I think is correct for our engine. Thanks for the guidance on that. It might work as is, but it could sure use some help. Faded. Cracks. Etc. I've done some searching, but the best resources I've found so far are boat repair videos. Ok having worked in most types of fiberglass for a fair while I suggest remove the broken cooler duct and repair it first,grind out the hole from the inside and remove all the fractured area's with a grinder,clean the part as much as possible then apply several layers of painters tape on the outside to get the shape back for your repair. Them mix up polyester resin and apply to the inside with chopped strand matt layed into it,just a few layers to hold the shape,you can build it up later to get the original thickness,when thats done remove the tape and apply a thin layer of filler to correct the shape. Leave the part off for the meanwhile as it makes the rest of the shroud repair and painting easier,apply the same process of repair to that part in area's that are damaged. It is very important to clean these area's as oil can be present on these parts and will effect the quality of the repair and final painting. I used acrylic enamel on my shroud and it has lasted well and provides a shine similar to the original gelcoat that was used when this part was molded. You will need the following ; small tin of 1k paint thinner/reducer for cleaning, a small fiberglass boat repair kit with will usually include some chopped strand matt,the GP resin and hardener (MEKP) ,will be in that kit, a small tin of acetone for cleaning parts ,brushes,hands etc, drylube sand paper ,80 grit,220 ,320 the 400 for final sanding before primer, 1 x colour matched grey spray can for cooler ducting , 1 x black spray can, 1 x spray can of Ik primer, masking tape, small tin of lightweight polyester filler, pop-rivets and backing washers to refit ducting after painting, throw away cloves and other consumables. Make sure your working temp is suitable and the humidity is low,resin is generally 1-2 % dependent on temperature,take your time and you will get good results,mine came out really nice,good luck Dennis. |
|
|
|
| DennisV |
Oct 2 2022, 06:43 AM
Post
#3
|
|
Member Group: Members Posts: 468 Joined: 8-August 20 From: Santa Rosa, CA Member No.: 24,575 Region Association: Northern California |
QUOTE(porschetub @ Oct 1 2022, 02:43 PM) Ok having worked in most types of fiberglass for a fair while I suggest remove the broken cooler duct and repair it first,grind out the hole from the inside and remove all the fractured area's with a grinder,clean the part as much as possible then apply several layers of painters tape on the outside to get the shape back for your repair. Thank you for this detailed post. It is really helpful. A couple follow up questions: Is it normal to be able to see the fibers so prominently, or is this indicative of the material eroding? I have never tried to rivet fiberglass before. Will I have trouble getting a tight fit without damaging it? It has been a long time time I had to rivet anything, but I seem to recall it wants to sandwich the material quite firmly before snapping off. Why did you choose to paint rather than take the original gelcoat approach? Thanks again. |
|
|
|
| porschetub |
Oct 2 2022, 01:17 PM
Post
#4
|
|
Advanced Member Group: Members Posts: 4,699 Joined: 25-July 15 From: New Zealand Member No.: 18,995 Region Association: None |
QUOTE(DennisV @ Oct 3 2022, 12:43 AM) QUOTE(porschetub @ Oct 1 2022, 02:43 PM) Ok having worked in most types of fiberglass for a fair while I suggest remove the broken cooler duct and repair it first,grind out the hole from the inside and remove all the fractured area's with a grinder,clean the part as much as possible then apply several layers of painters tape on the outside to get the shape back for your repair. Thank you for this detailed post. It is really helpful. A couple follow up questions: Is it normal to be able to see the fibers so prominently, or is this indicative of the material eroding? I have never tried to rivet fiberglass before. Will I have trouble getting a tight fit without damaging it? It has been a long time time I had to rivet anything, but I seem to recall it wants to sandwich the material quite firmly before snapping off. Why did you choose to paint rather than take the original gelcoat approach? Thanks again. The fibres show up because the gelcoat has failed,mine had a few area's like this and,thats common as they are old and this area is subject to heat,the black ones are generally the worst. Gelcoat repair is still possible but it would be expensive and gelcoat is difficult to spray when thinned as it is designed to be sprayed into a mold to achieve a nice shine. My choice of paint was only because I had some I wanted to use up,you could improve things by using a 2k black spray can but not sure of it in this application. The factory used pop-rivets so you should be fine,you could still leave the duct on but that will make repair more difficult just depends on if you can get to the damaged area to grind it out,maybe you could show a pic of the underside ..that would help. Cheers. |
|
|
|
| DennisV |
Oct 3 2022, 12:06 PM
Post
#5
|
|
Member Group: Members Posts: 468 Joined: 8-August 20 From: Santa Rosa, CA Member No.: 24,575 Region Association: Northern California |
QUOTE(porschetub @ Oct 2 2022, 12:17 PM) Gelcoat repair is still possible but it would be expensive and gelcoat is difficult to spray when thinned as it is designed to be sprayed into a mold to achieve a nice shine. This is good to know. QUOTE(porschetub @ Oct 2 2022, 12:17 PM) maybe you could show a pic of the underside ..that would help. This is it after 2+ hours of degreasing. I knew this was going to take some effort, but it's turning into a real project. It's got several major cracks and some holes. Thanks everyone for sharing their experience. I never imagined I'd be learning about fiberglass to work on a Porsche. (IMG:style_emoticons/default/wacko.gif) 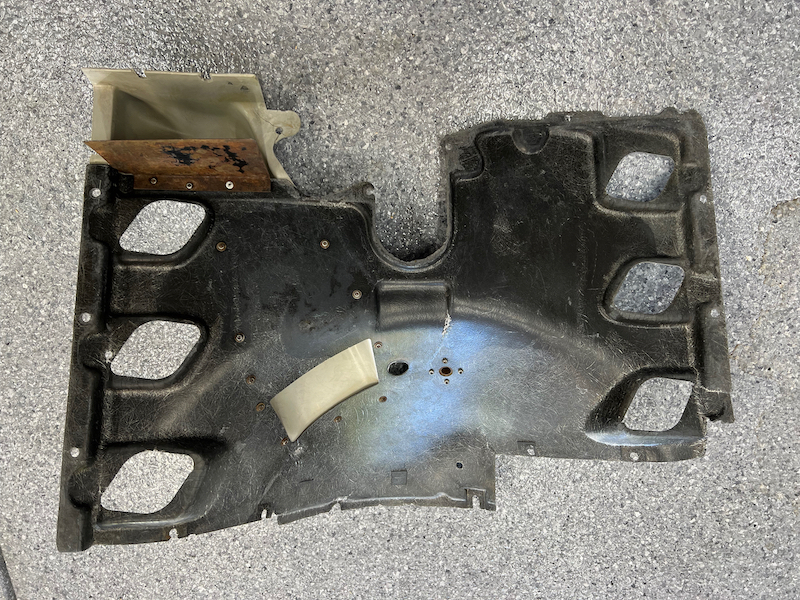 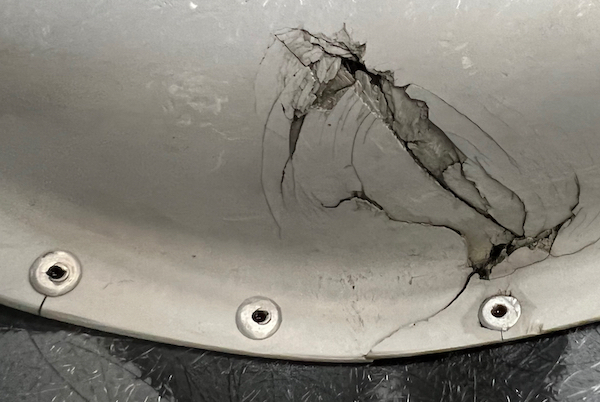 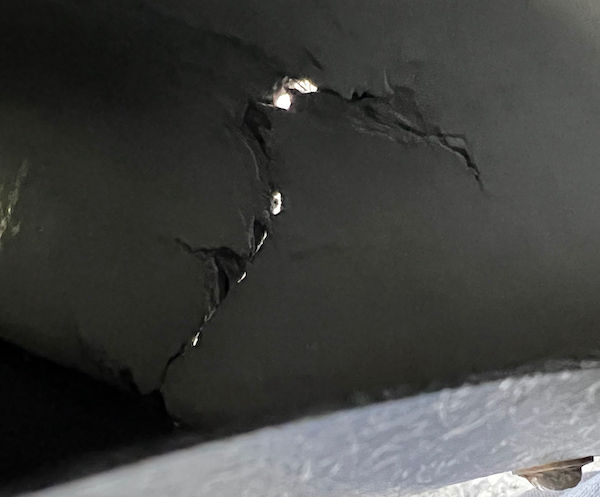 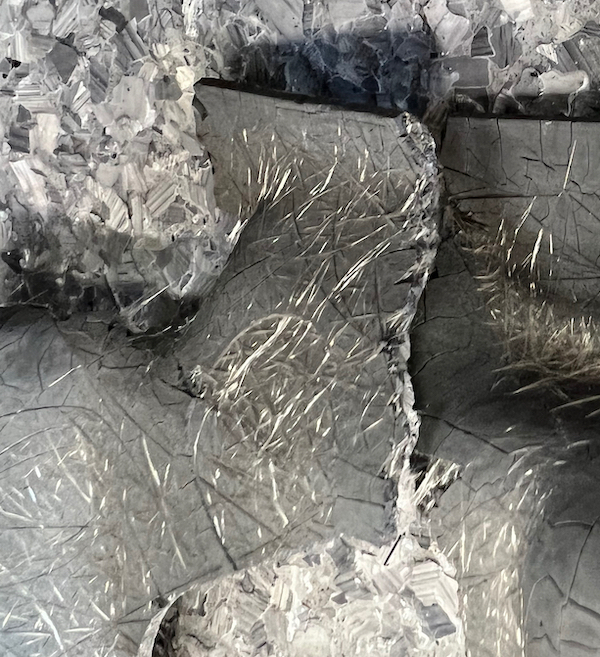 |
|
|
|
Posts in this topic
 DennisV Engine Shroud Refurbishment Oct 1 2022, 07:54 AM
 Front yard mechanic Easy and fun, best done outside and wear long slee... Oct 1 2022, 10:43 AM
 Olympic 914
Does anyone have first-hand experience refurbish... Oct 2 2022, 06:38 AM Robarabian Fiberglass can be messy. If you are not fiberglass... Oct 1 2022, 08:15 PM mlindner Using the stranded glass is very easy to apply, th... Oct 3 2022, 05:45 AM mlindner Found a picture of mine. It had more problems than... Oct 3 2022, 05:51 AM
Olympic 914
Does anyone have first-hand experience refurbish... Oct 2 2022, 06:38 AM Robarabian Fiberglass can be messy. If you are not fiberglass... Oct 1 2022, 08:15 PM mlindner Using the stranded glass is very easy to apply, th... Oct 3 2022, 05:45 AM mlindner Found a picture of mine. It had more problems than... Oct 3 2022, 05:51 AM DennisV
Found a picture of mine. It had more problems tha... Oct 3 2022, 12:08 PM roundtwo Great thread as very useful since I’m going thro... Oct 3 2022, 12:27 PM DennisV
Great thread as very useful since I’m going thr... Oct 3 2022, 01:16 PM porschetub
Great thread as very useful since I’m going th... Oct 3 2022, 04:16 PM roundtwo
[quote name='DennisV' post='3034031' date='Oct 4 ... Oct 3 2022, 05:46 PM roundtwo
Great thread as very useful since I’m going th... Oct 3 2022, 05:40 PM ValcoOscar
Great thread as very useful since I’m going thr... Oct 4 2022, 01:46 PM brant Drill the rivets out Oct 3 2022, 01:22 PM mlindner I did find one shot, most of the repairs are alrea... Oct 3 2022, 01:27 PM roundtwo
I did find one shot, most of the repairs are alre... Oct 3 2022, 05:41 PM DennisV
I do remember most of the bolt holes broken out..... Oct 4 2022, 07:18 AM mlindner That looks great round two. Oct 3 2022, 01:36 PM brant I agree with the high build primer!!
I san... Oct 3 2022, 05:49 PM Superhawk996 Check into SprayMax 2k primer and it can also be h... Oct 3 2022, 08:21 PM porschetub
Check into SprayMax 2k primer and it can also be ... Oct 3 2022, 09:57 PM Retroracer RE: "I have never tried to rivet fiberglass b... Oct 4 2022, 01:16 PM mlindner use the correct size aluminum washer on the back ... Oct 4 2022, 01:40 PM DennisV End result...ran out of time / patience on the rep... Apr 13 2023, 03:35 PM tygaboy Bring your damaged shroud down to The Red Barn som... Apr 13 2023, 04:11 PM technicalninja If you don't mind answering...
What did the n... Apr 13 2023, 06:00 PM
DennisV
Found a picture of mine. It had more problems tha... Oct 3 2022, 12:08 PM roundtwo Great thread as very useful since I’m going thro... Oct 3 2022, 12:27 PM DennisV
Great thread as very useful since I’m going thr... Oct 3 2022, 01:16 PM porschetub
Great thread as very useful since I’m going th... Oct 3 2022, 04:16 PM roundtwo
[quote name='DennisV' post='3034031' date='Oct 4 ... Oct 3 2022, 05:46 PM roundtwo
Great thread as very useful since I’m going th... Oct 3 2022, 05:40 PM ValcoOscar
Great thread as very useful since I’m going thr... Oct 4 2022, 01:46 PM brant Drill the rivets out Oct 3 2022, 01:22 PM mlindner I did find one shot, most of the repairs are alrea... Oct 3 2022, 01:27 PM roundtwo
I did find one shot, most of the repairs are alre... Oct 3 2022, 05:41 PM DennisV
I do remember most of the bolt holes broken out..... Oct 4 2022, 07:18 AM mlindner That looks great round two. Oct 3 2022, 01:36 PM brant I agree with the high build primer!!
I san... Oct 3 2022, 05:49 PM Superhawk996 Check into SprayMax 2k primer and it can also be h... Oct 3 2022, 08:21 PM porschetub
Check into SprayMax 2k primer and it can also be ... Oct 3 2022, 09:57 PM Retroracer RE: "I have never tried to rivet fiberglass b... Oct 4 2022, 01:16 PM mlindner use the correct size aluminum washer on the back ... Oct 4 2022, 01:40 PM DennisV End result...ran out of time / patience on the rep... Apr 13 2023, 03:35 PM tygaboy Bring your damaged shroud down to The Red Barn som... Apr 13 2023, 04:11 PM technicalninja If you don't mind answering...
What did the n... Apr 13 2023, 06:00 PM |
1 User(s) are reading this topic (1 Guests and 0 Anonymous Users)
0 Members:

|
Lo-Fi Version | Time is now: 17th May 2024 - 03:23 PM |
Invision Power Board
v9.1.4 © 2024 IPS, Inc.