|
|
|
Porsche, and the Porsche crest are registered trademarks of Dr. Ing. h.c. F. Porsche AG.
This site is not affiliated with Porsche in any way. Its only purpose is to provide an online forum for car enthusiasts. All other trademarks are property of their respective owners. |
|
|

  |

| Type 47 |
 Nov 27 2022, 09:43 PM Nov 27 2022, 09:43 PM
Post
#1
|
|
Senior Member  Group: Members Posts: 782 Joined: 1-June 10 From: St. Louis, MO Member No.: 11,790 Region Association: None |
we have followed the videos and tried to mallet them in "like the factory" but they just won't go in...either side.
A lot of the seals, have had to be adjusted/trimmed. Is there some trick to getting these in and the window track far enough to bolt in? |
   |

 
|
| Mikey914 |
Nov 27 2022, 10:25 PM
Post
#2
|
|
The rubber man Group: Members Posts: 12,667 Joined: 27-December 04 From: Hillsboro, OR Member No.: 3,348 Region Association: None |
|
|
|
|
| hndyhrr |
Nov 28 2022, 07:06 PM
Post
#3
|
|
Senior Member Group: Members Posts: 555 Joined: 1-September 13 From: central point,oregon Member No.: 16,332 Region Association: Pacific Northwest |
Those are more than a PITA. We put them in according to 914 rubber instructions. Had to Take em in and out a couple of times but finally got it. The biggest hard part to me was getting them adjusted after seal was on. Patience, Pirate language, Beers, and remember to step away for a bit and then go back to it.
good luck |
|
|
|
| Superhawk996 |
Nov 28 2022, 07:31 PM
Post
#4
|
|
914 Guru Group: Members Posts: 5,822 Joined: 25-August 18 From: Woods of N. Idaho Member No.: 22,428 Region Association: Galt's Gulch |
QUOTE(Type 47 @ Nov 27 2022, 10:43 PM)  we have followed the videos and tried to mallet them in "like the factory" but they just won't go in...either side. A lot of the seals, have had to be adjusted/trimmed. Is there some trick to getting these in and the window track far enough to bolt in? Had to trim material off the bottom of mine to get them to sit deep enough. Lots of rework necessary to get proper fit. Lots of trial fitting - trim a little at a time - assess fit, trim some more. Repeat over and over. |
 |
|
| Type 47 |
Nov 29 2022, 07:01 PM
Post
#5
|
|
Senior Member Group: Members Posts: 782 Joined: 1-June 10 From: St. Louis, MO Member No.: 11,790 Region Association: None |
QUOTE(hndyhrr @ Nov 28 2022, 05:06 PM) Those are more than a PITA. We put them in according to 914 rubber instructions. Had to Take em in and out a couple of times but finally got it. The biggest hard part to me was getting them adjusted after seal was on. Patience, Pirate language, Beers, and remember to step away for a bit and then go back to it. good luck made 2 feeble attempts but now getting advice...thanks! going back with real shrink wrap tomorrow |
|
|
|
| bkrantz |
Nov 29 2022, 10:17 PM
Post
#6
|
|
914 Guru Group: Members Posts: 7,763 Joined: 3-August 19 From: SW Colorado Member No.: 23,343 Region Association: Rocky Mountains |
I never got the repro seals to fit evenly. I bought new "factory" seals (probably also a reproduction compared to 1973 originals) and got a better fit.
|
|
|
|
| pfreiburger |
Nov 30 2022, 12:56 AM
Post
#7
|
|
Member Group: Members Posts: 110 Joined: 6-October 20 From: Fond du Lac, WI Member No.: 24,738 Region Association: None |
QUOTE(bkrantz @ Nov 29 2022, 10:17 PM) I never got the repro seals to fit evenly. I bought new "factory" seals (probably also a reproduction compared to 1973 originals) and got a better fit. I also installed new factory seals on my 1973. Not a fun job but not horrible either - no trimming was necessary, just lots of silicone and tape covered tools. I did compare the old and new ones beforehand and they looked identical. I guess some parts are worth getting from Porsche. |
|
|
|
| Type 47 |
Dec 3 2022, 11:08 AM
Post
#8
|
|
Senior Member Group: Members Posts: 782 Joined: 1-June 10 From: St. Louis, MO Member No.: 11,790 Region Association: None |
QUOTE(Mikey914 @ Nov 27 2022, 08:25 PM) Thanks for the link. A couple things that sparked a different approach and finally getting them in. 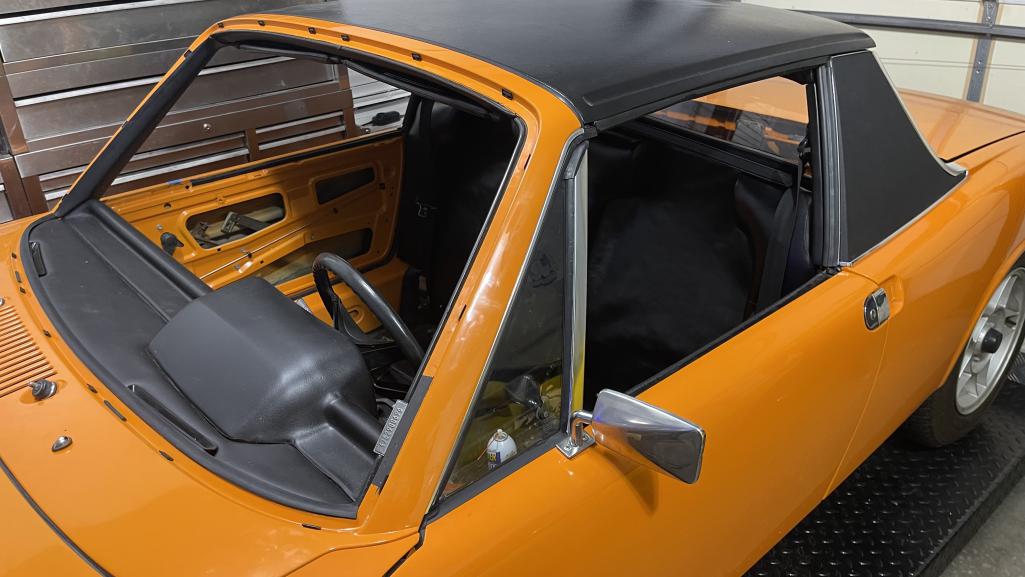 |
|
|
|
| raynekat |
Dec 3 2022, 11:04 PM
Post
#9
|
|
Advanced Member Group: Members Posts: 2,158 Joined: 30-December 14 From: Coeur d'Alene, Idaho Member No.: 18,263 Region Association: Pacific Northwest |
I pride myself in doing a lot of the "fiddly" crap on these cars. This was right up there with the air box in the frunk. A royal PITA.
Takes time and patience and understanding. And a few IPA's doesn't hurt either. |
|
|
|
| Type 47 |
Dec 4 2022, 03:10 PM
Post
#10
|
|
Senior Member Group: Members Posts: 782 Joined: 1-June 10 From: St. Louis, MO Member No.: 11,790 Region Association: None |
QUOTE(raynekat @ Dec 3 2022, 09:04 PM) I pride myself in doing a lot of the "fiddly" crap on these cars. This was right up there with the air box in the frunk. A royal PITA. Takes time and patience and understanding. And a few IPA's doesn't hurt either. that reminds be I have to get some extra-large rubber bands. |
|
|
|
| Type 47 |
Dec 5 2022, 08:42 PM
Post
#11
|
|
Senior Member Group: Members Posts: 782 Joined: 1-June 10 From: St. Louis, MO Member No.: 11,790 Region Association: None |
QUOTE(raynekat @ Dec 3 2022, 09:04 PM) I pride myself in doing a lot of the "fiddly" crap on these cars. This was right up there with the air box in the frunk. A royal PITA. Takes time and patience and understanding. And a few IPA's doesn't hurt either. got that in today 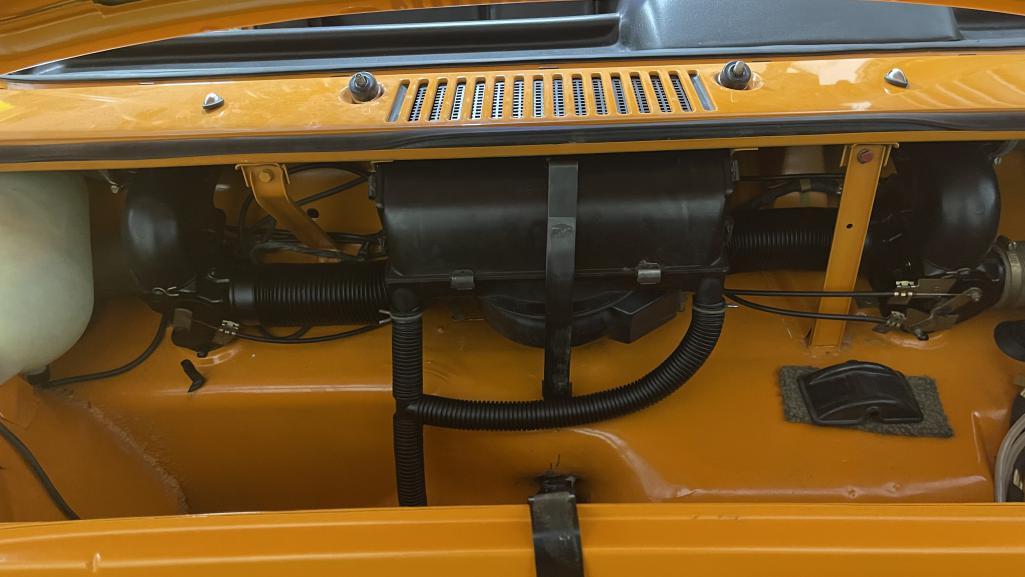 |
|
|
|
| 914rrr |
Dec 7 2022, 02:24 PM
Post
#12
|
|
Senior Member Group: Members Posts: 1,830 Joined: 1-July 03 From: Knoxville, TN Member No.: 874 Region Association: South East States |
QUOTE(Type 47 @ Dec 5 2022, 09:42 PM) QUOTE(raynekat @ Dec 3 2022, 09:04 PM) I pride myself in doing a lot of the "fiddly" crap on these cars. This was right up there with the air box in the frunk. A royal PITA. Takes time and patience and understanding. And a few IPA's doesn't hurt either. got that in today I've often wondered how to get those air deflectors in without destroying them and/or the surrounding new paint. My Olympic Blue 73 2.0 had NOS ones installed by the OG PO during an obvious full in-out repaint. I tried removing them from previous parts cars, mostly unsuccessfully. IIRC, somebody told me the factory kinda lined them up and "smacked" them into place until they popped in. |
|
|
|
|
1 User(s) are reading this topic (1 Guests and 0 Anonymous Users)
0 Members:

|
Lo-Fi Version | Time is now: 16th May 2024 - 10:00 AM |
Invision Power Board
v9.1.4 © 2024 IPS, Inc.