|
|
|
Porsche, and the Porsche crest are registered trademarks of Dr. Ing. h.c. F. Porsche AG.
This site is not affiliated with Porsche in any way. Its only purpose is to provide an online forum for car enthusiasts. All other trademarks are property of their respective owners. |
|
|

  |

| Deusexmachina77 |
 Dec 16 2022, 08:16 PM Dec 16 2022, 08:16 PM
Post
#1
|
|
Member  Group: Members Posts: 90 Joined: 30-March 22 From: Chicago Member No.: 26,426 Region Association: Upper MidWest |
Hello,
Does someone have a photo of a finished repair to the AC hole? I'm taking a welding class, and this will be my first project. 1. Should I try a butt weld or do an overlap? 2. I'm not going for a Concours job. Someone else would be doing it if I were, but I would like it to look decent and not look like a hack job. 3. Where should I try to blend this in? Any advice would be greatly appreciated. I figure if I mess it up I can then hire someone to bail me out. Many thanks for considering my request. Victor 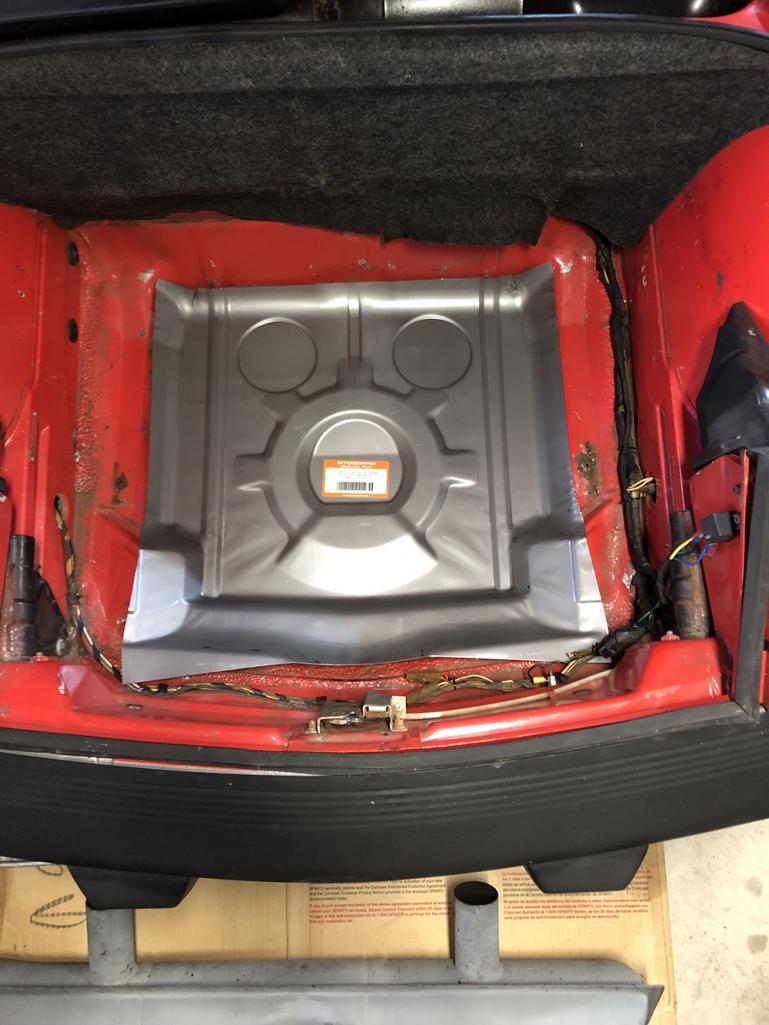 Attached thumbnail(s) 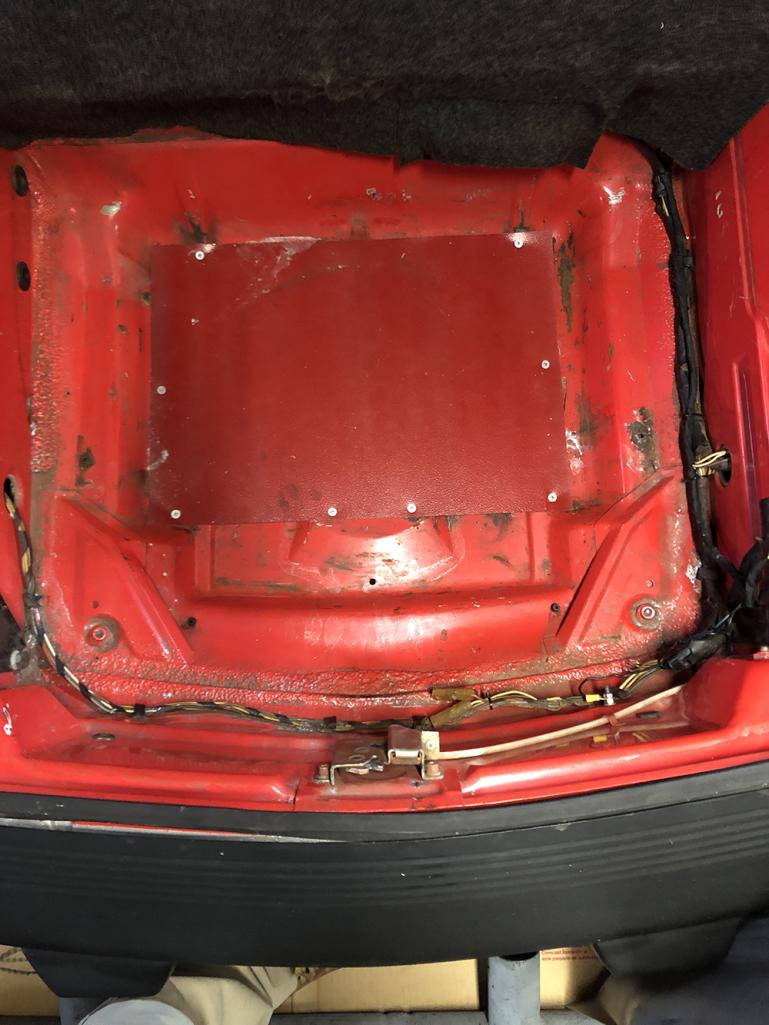
|
   |

 
|
| 930cabman |
Dec 16 2022, 08:20 PM
Post
#2
|
|
Advanced Member Group: Members Posts: 3,058 Joined: 12-November 20 From: Buffalo Member No.: 24,877 Region Association: North East States |
My vote would be 100% butt weld. take you time fitting the new panel with a very small gap and TIG her together, taking time to avoid distortion.
|
 |
|
| Superhawk996 |
Dec 16 2022, 08:25 PM
Post
#3
|
|
914 Guru Group: Members Posts: 5,816 Joined: 25-August 18 From: Woods of N. Idaho Member No.: 22,428 Region Association: Galt's Gulch |
(IMG:style_emoticons/default/agree.gif)
Butt weld. Lap joints on body work are a sign of a low quality repair. Lap welds create future corrosion when moisture gets trapped between the layers of the lap. Where to trim is highly dependent on how your original sheet metal is below the panel. Generally try to trim to keep as much OEM metal and just fill the hole that AC damage created. I’d suggest something in the area roughly smaller than the red lines if your OEM metal is still there and solid. 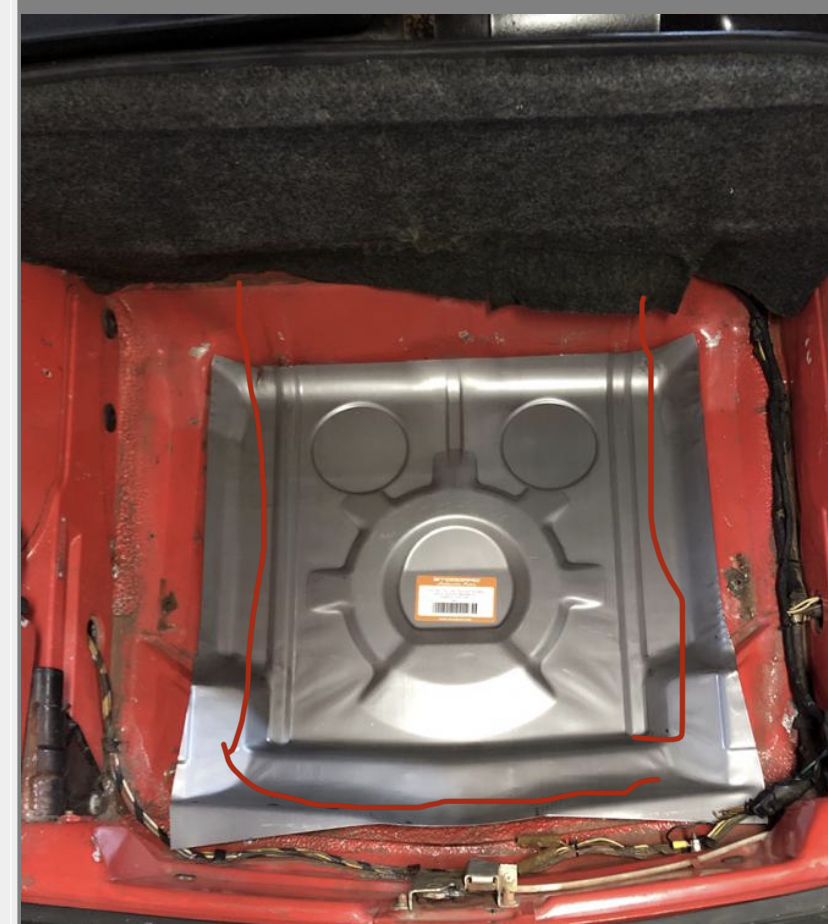 |
|
|
|
| friethmiller |
Dec 16 2022, 08:50 PM
Post
#4
|
|
Member Group: Members Posts: 474 Joined: 10-February 19 From: Austin, TX Member No.: 22,863 Region Association: Southwest Region |
(IMG:style_emoticons/default/agree.gif)
Make sure the existing metal is good and trim the repair panel down (not the other way around). Use these type of clamps (or the like) to ensure the proper gap for weld penetration and to keep the panels even. 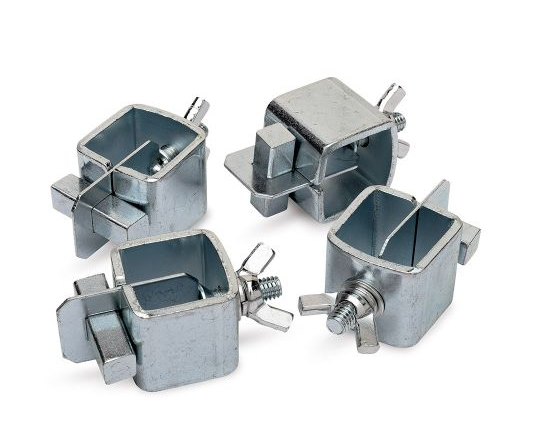 |
|
|
|
| rhodyguy |
Dec 16 2022, 09:01 PM
Post
#5
|
|
Chimp Sanctuary NW. Check it out. Group: Members Posts: 22,080 Joined: 2-March 03 From: Orion's Bell. The BELL! Member No.: 378 Region Association: Galt's Gulch |
Have you removed the red cover yet? The hole is smaller than you think. It’s myriad of other holes, AC lines, that are time consuming. Is your engine tin and shelve still cut for the compressor?
|
|
|
|
| Deusexmachina77 |
Dec 17 2022, 08:05 AM
Post
#6
|
|
Member Group: Members Posts: 90 Joined: 30-March 22 From: Chicago Member No.: 26,426 Region Association: Upper MidWest |
QUOTE(930cabman @ Dec 16 2022, 08:20 PM)  My vote would be 100% butt weld. take you time fitting the new panel with a very small gap and TIG her together, taking time to avoid distortion. (IMG:style_emoticons/default/welder.gif) Thank you! |
|
|
|
| Deusexmachina77 |
Dec 17 2022, 08:10 AM
Post
#7
|
|
Member Group: Members Posts: 90 Joined: 30-March 22 From: Chicago Member No.: 26,426 Region Association: Upper MidWest |
QUOTE(rhodyguy @ Dec 16 2022, 09:01 PM) Have you removed the red cover yet? The hole is smaller than you think. It’s myriad of other holes, AC lines, that are time consuming. Is your engine tin and shelve still cut for the compressor? @rhodyguy , I haven't removed it yet. The hack job on the long is going to be the hardest I think. The engine tin is gone but getting replaced with the rebuild I'm having done. I don't know about the shelf. Thank you. |
|
|
|
| Deusexmachina77 |
Dec 17 2022, 08:11 AM
Post
#8
|
|
Member Group: Members Posts: 90 Joined: 30-March 22 From: Chicago Member No.: 26,426 Region Association: Upper MidWest |
QUOTE(friethmiller @ Dec 16 2022, 08:50 PM) (IMG:style_emoticons/default/agree.gif) Make sure the existing metal is good and trim the repair panel down (not the other way around). Use these type of clamps (or the like) to ensure the proper gap for weld penetration and to keep the panels even. @friethmiller , Thanks for the tip. (IMG:style_emoticons/default/welder.gif) |
|
|
|
| Deusexmachina77 |
Dec 17 2022, 08:13 AM
Post
#9
|
|
Member Group: Members Posts: 90 Joined: 30-March 22 From: Chicago Member No.: 26,426 Region Association: Upper MidWest |
|
|
|
|
| 914GT |
Dec 17 2022, 09:55 AM
Post
#10
|
|
Senior Member Group: Members Posts: 1,100 Joined: 11-October 04 From: Tucson Member No.: 2,923 Region Association: Southwest Region |
Here are a few shots from a restore project 10 years ago, if it's of any help. There were a lot of other holes in the wheelwell and long that had to be welded in, but the trunk was the most work.
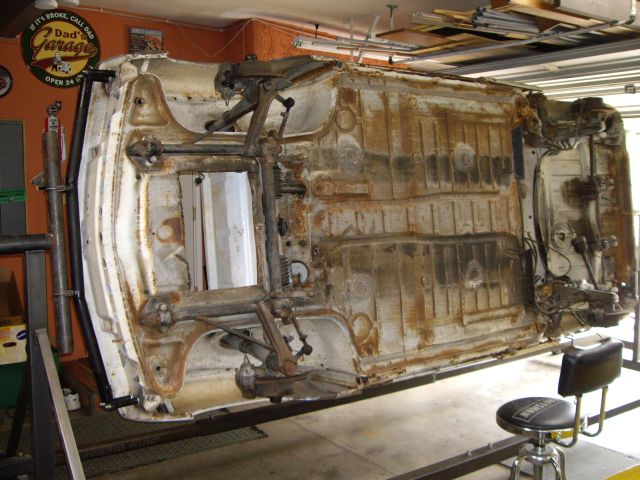 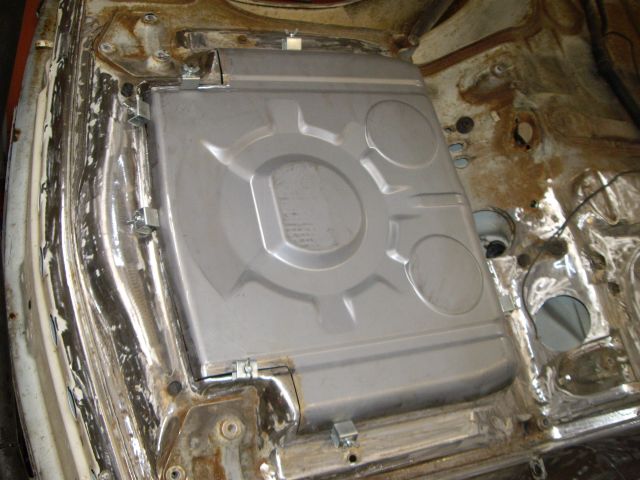 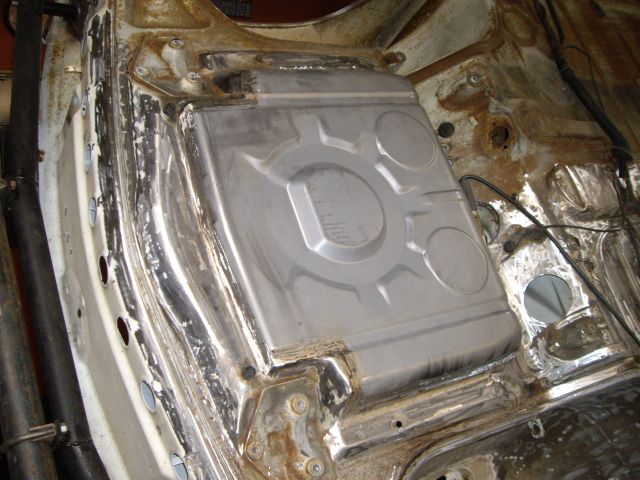 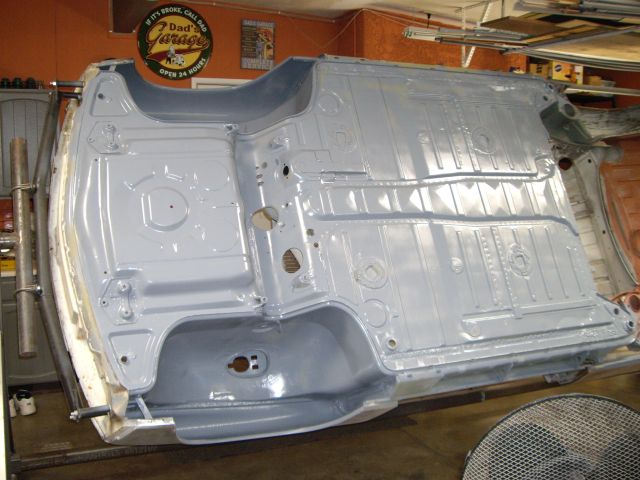 [attachmentid=860 [attachmentid=860159] Attached image(s) 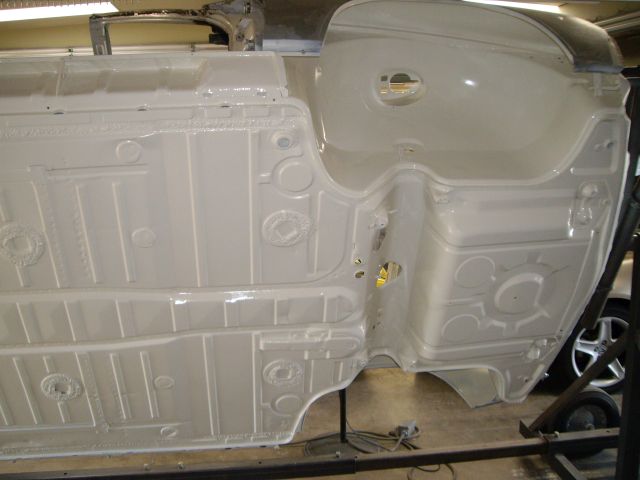
|
|
|
|
| Montreal914 |
Dec 17 2022, 11:40 AM
Post
#11
|
|
Senior Member Group: Members Posts: 1,557 Joined: 8-August 10 From: Claremont, CA Member No.: 12,023 Region Association: Southern California |
I am currently restoring my 914 and she is where I am learning how to weld (every weld along the way) (IMG:style_emoticons/default/rolleyes.gif). My MIG is a basic 110V Lincoln with gas and 0.025" wire. I have read a lot about everything I could find here (IMG:style_emoticons/default/smilie_pokal.gif) and watched a lot of YouTube videos on welding.
I have butt welded almost every part I have replaced on my car and take my sweet time making sure the new part is almost perfect to the opening. I did try the clamps shown above but I find they leave quite a gap between the two pieces which can create holes if you weld like me... (IMG:style_emoticons/default/rolleyes.gif) . I am sure a good welder can go at it all day without any issues though. I prefer having the two parts touching or practically. I use magnets or any method to make sure the panels are in the same plane, then tack. From what I have experienced, the more time you spend on preparing a panel that fits perfectly, the easier it will be to weld it in. Good luck! It is a wonderful feeling to install a new panel in! (IMG:style_emoticons/default/smash.gif) (IMG:style_emoticons/default/welder.gif) |
|
|
|
| 930cabman |
Dec 17 2022, 01:49 PM
Post
#12
|
|
Advanced Member Group: Members Posts: 3,058 Joined: 12-November 20 From: Buffalo Member No.: 24,877 Region Association: North East States |
QUOTE(Montreal914 @ Dec 17 2022, 12:40 PM) I am currently restoring my 914 and she is where I am learning how to weld (every weld along the way) (IMG:style_emoticons/default/rolleyes.gif). My MIG is a basic 110V Lincoln with gas and 0.025" wire. I have read a lot about everything I could find here (IMG:style_emoticons/default/smilie_pokal.gif) and watched a lot of YouTube videos on welding. I have butt welded almost every part I have replaced on my car and take my sweet time making sure the new part is almost perfect to the opening. I did try the clamps shown above but I find they leave quite a gap between the two pieces which can create holes if you weld like me... (IMG:style_emoticons/default/rolleyes.gif) . I am sure a good welder can go at it all day without any issues though. I prefer having the two parts touching or practically. I use magnets or any method to make sure the panels are in the same plane, then tack. From what I have experienced, the more time you spend on preparing a panel that fits perfectly, the easier it will be to weld it in. Good luck! It is a wonderful feeling to install a new panel in! (IMG:style_emoticons/default/smash.gif) (IMG:style_emoticons/default/welder.gif) Exactly, taking your time will pay off in the finish product, AND do not overheat the panel. Short tack welds are the order of the day. Experience is the best teacher for much of this restoration business. |
|
|
|
| porschetub |
Dec 17 2022, 09:03 PM
Post
#13
|
|
Advanced Member Group: Members Posts: 4,698 Joined: 25-July 15 From: New Zealand Member No.: 18,995 Region Association: None |
QUOTE(Montreal914 @ Dec 18 2022, 05:40 AM) I am currently restoring my 914 and she is where I am learning how to weld (every weld along the way) (IMG:style_emoticons/default/rolleyes.gif). My MIG is a basic 110V Lincoln with gas and 0.025" wire. I have read a lot about everything I could find here (IMG:style_emoticons/default/smilie_pokal.gif) and watched a lot of YouTube videos on welding. I have butt welded almost every part I have replaced on my car and take my sweet time making sure the new part is almost perfect to the opening. I did try the clamps shown above but I find they leave quite a gap between the two pieces which can create holes if you weld like me... (IMG:style_emoticons/default/rolleyes.gif) . I am sure a good welder can go at it all day without any issues though. I prefer having the two parts touching or practically. I use magnets or any method to make sure the panels are in the same plane, then tack. From what I have experienced, the more time you spend on preparing a panel that fits perfectly, the easier it will be to weld it in. Good luck! It is a wonderful feeling to install a new panel in! (IMG:style_emoticons/default/smash.gif) (IMG:style_emoticons/default/welder.gif) (IMG:style_emoticons/default/agree.gif) those clamps didn't work for me also,the 1mm gap is to much and I normality attempt to a very close fit or I make another patch. I'am currently dealing in this area with a horrible PO patchup which is nasty ,thinking I should chop it out but not going there...for the time being (IMG:style_emoticons/default/confused24.gif) . One pic of this hack job but will post more soon. 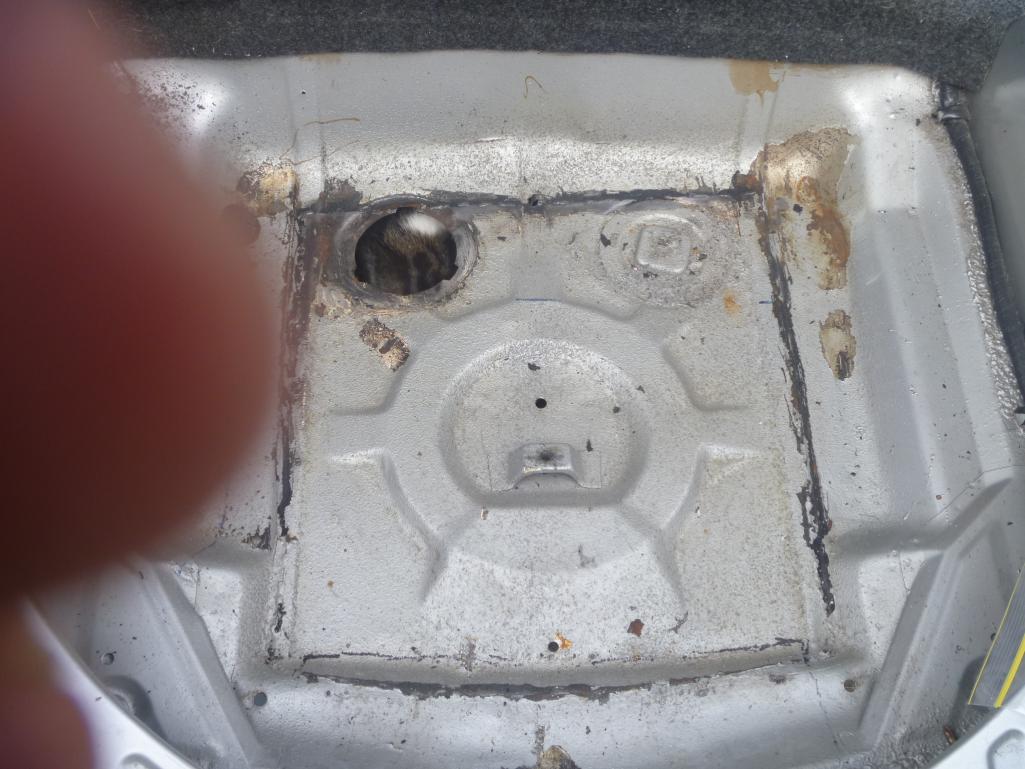 |
|
|
|
| porschetub |
Dec 18 2022, 02:50 PM
Post
#14
|
|
Advanced Member Group: Members Posts: 4,698 Joined: 25-July 15 From: New Zealand Member No.: 18,995 Region Association: None |
QUOTE(porschetub @ Dec 18 2022, 03:03 PM) QUOTE(Montreal914 @ Dec 18 2022, 05:40 AM) I am currently restoring my 914 and she is where I am learning how to weld (every weld along the way) (IMG:style_emoticons/default/rolleyes.gif). My MIG is a basic 110V Lincoln with gas and 0.025" wire. I have read a lot about everything I could find here (IMG:style_emoticons/default/smilie_pokal.gif) and watched a lot of YouTube videos on welding. I have butt welded almost every part I have replaced on my car and take my sweet time making sure the new part is almost perfect to the opening. I did try the clamps shown above but I find they leave quite a gap between the two pieces which can create holes if you weld like me... (IMG:style_emoticons/default/rolleyes.gif) . I am sure a good welder can go at it all day without any issues though. I prefer having the two parts touching or practically. I use magnets or any method to make sure the panels are in the same plane, then tack. From what I have experienced, the more time you spend on preparing a panel that fits perfectly, the easier it will be to weld it in. Good luck! It is a wonderful feeling to install a new panel in! (IMG:style_emoticons/default/smash.gif) (IMG:style_emoticons/default/welder.gif) (IMG:style_emoticons/default/agree.gif) those clamps didn't work for me also,the 1mm gap is to much and I normality attempt to a very close fit or I make another patch. I'am currently dealing in this area with a horrible PO patchup which is nasty ,thinking I should chop it out but not going there...for the time being (IMG:style_emoticons/default/confused24.gif) . One pic of this hack job but will post more soon. More nasty work,body plate cover had a section chopped out it for no reason that I can see (IMG:style_emoticons/default/confused24.gif) ,cut a section and welded that on,you can see from the second pic how bad the welding is,currently trying to remove the black silicone sealer which stuck very well (IMG:style_emoticons/default/headbang.gif) (IMG:style_emoticons/default/headbang.gif) . Surface rust under some of the laps....how hard it is it to put some primer on the area's before sealer is applied (IMG:style_emoticons/default/slap.gif) .  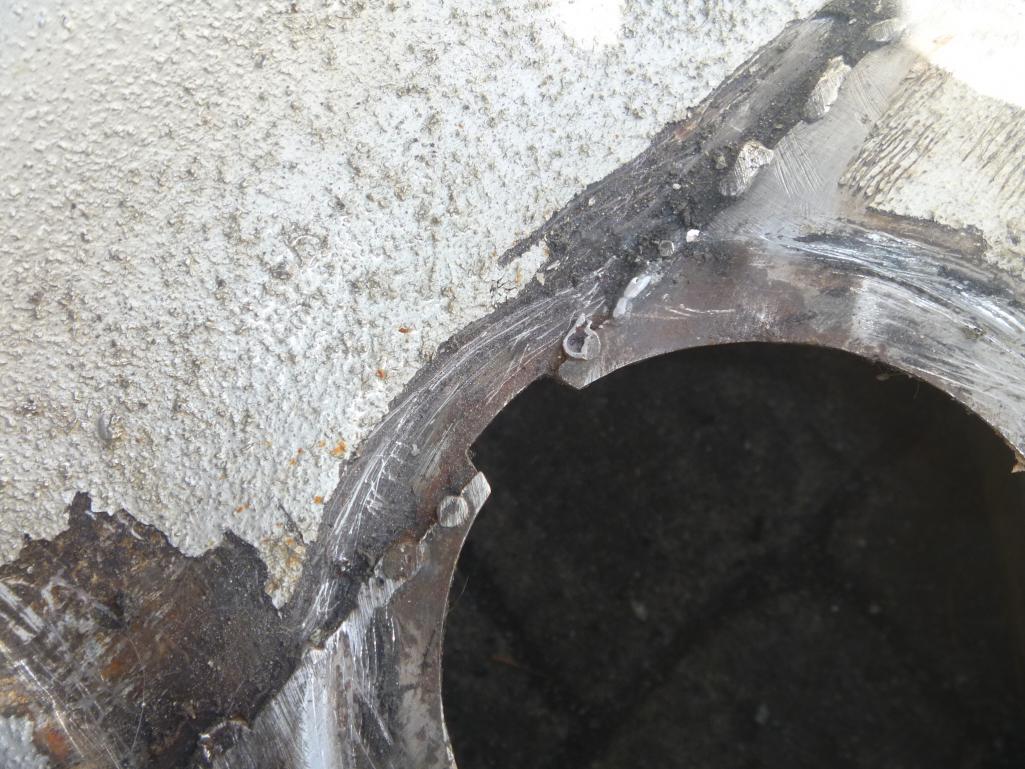 I noticed the replacement RD panel has no holes cut for the body cover plate covers which IMO is a good thing ,however if a show car perhaps that's not right,also noticed 914gt didn't add the tow bracket underneath ?. |
|
|
|
| Root_Werks |
Dec 19 2022, 10:56 AM
Post
#15
|
|
Village Idiot Group: Members Posts: 8,319 Joined: 25-May 04 From: About 5NM from Canada Member No.: 2,105 Region Association: Pacific Northwest |
Others have said it, butt weld everything.
I cleaned up the trunk hole keeping it as small as possible. Cut out from the new trunk floor piece and butt welded in. Attached image(s) 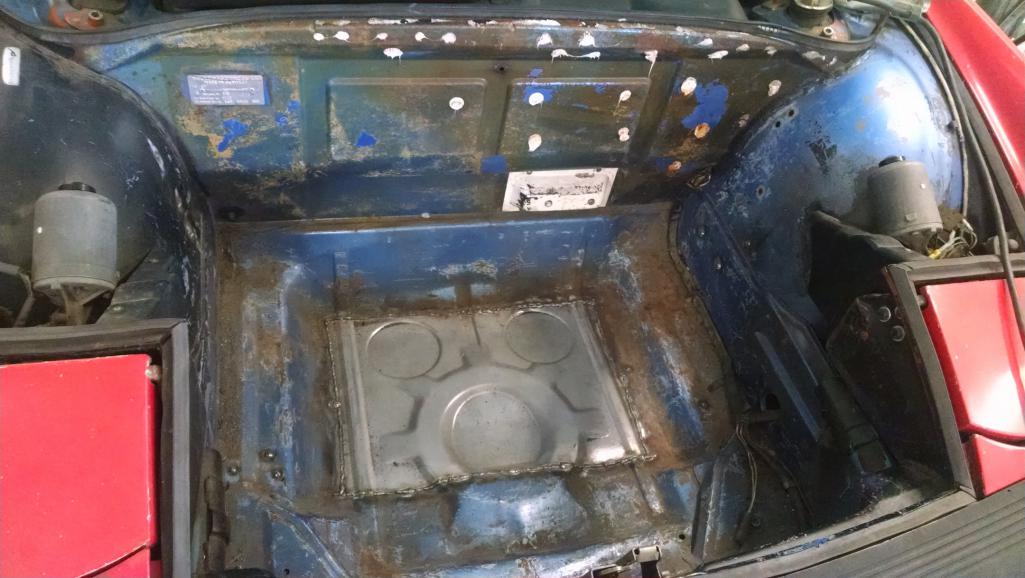
|
|
|
|
| Root_Werks |
Dec 19 2022, 10:58 AM
Post
#16
|
|
Village Idiot Group: Members Posts: 8,319 Joined: 25-May 04 From: About 5NM from Canada Member No.: 2,105 Region Association: Pacific Northwest |
Did the same for every AC line hole as well. These took the longest to trim/fit, weld, grind smooth.
When done, can't even tell there was a hole. (IMG:style_emoticons/default/welder.gif) Attached image(s) 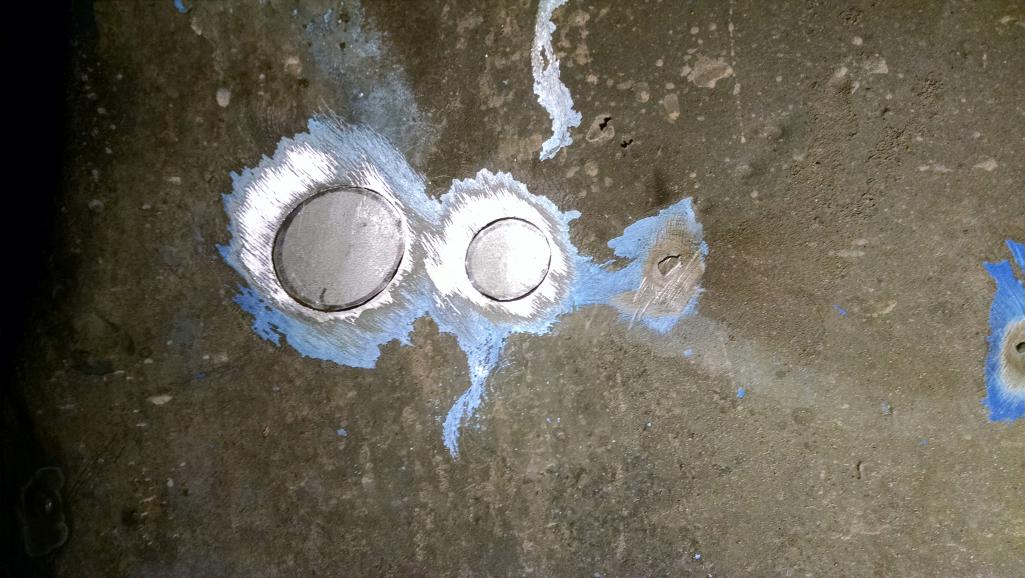
|
|
|
|
| Deusexmachina77 |
Dec 19 2022, 09:50 PM
Post
#17
|
|
Member Group: Members Posts: 90 Joined: 30-March 22 From: Chicago Member No.: 26,426 Region Association: Upper MidWest |
@Root_Werks , @Montreal914 , @porschetub , @930cabman , @914GT
Thank you for your opinions, guidance, encouragement, and especially the photos. Appreciate all the help. (IMG:style_emoticons/default/red914.jpg) |
|
|
|
| 930cabman |
Dec 20 2022, 06:38 AM
Post
#18
|
|
Advanced Member Group: Members Posts: 3,058 Joined: 12-November 20 From: Buffalo Member No.: 24,877 Region Association: North East States |
QUOTE(Deusexmachina77 @ Dec 19 2022, 10:50 PM) @Root_Werks , @Montreal914 , @porschetub , @930cabman , @914GT Thank you for your opinions, guidance, encouragement, and especially the photos. Appreciate all the help. (IMG:style_emoticons/default/red914.jpg) Glad to be of assistance |
|
|
|
| mgarrison |
Dec 20 2022, 11:11 AM
Post
#19
|
|
Member Group: Members Posts: 351 Joined: 14-February 20 From: Chandler, AZ Member No.: 23,922 Region Association: Southwest Region |
Here's my effort:
http://www.914world.com/bbs2/index.php?s=&...t&p=2883421 I'm using a cheap HF flux core welder with no gas. If I can pull it off reasonably successfully, I'm guessing most anybody can! I also used the butt-weld clamps to get it tacked in place. |
|
|
|
| porschetub |
Dec 20 2022, 01:12 PM
Post
#20
|
|
Advanced Member Group: Members Posts: 4,698 Joined: 25-July 15 From: New Zealand Member No.: 18,995 Region Association: None |
QUOTE(Deusexmachina77 @ Dec 20 2022, 03:50 PM) @Root_Werks , @Montreal914 , @porschetub , @930cabman , @914GT Thank you for your opinions, guidance, encouragement, and especially the photos. Appreciate all the help. (IMG:style_emoticons/default/red914.jpg) No thanks required as I was helping folks not to do it the WRONG way like the PO did mine. Car was original going to have a 3.0 in it but I purchased the restored roller with g/box,oil tank etc as he give up on the project to restore a rusty 911. |
|
|
|
|
1 User(s) are reading this topic (1 Guests and 0 Anonymous Users)
0 Members:

|
Lo-Fi Version | Time is now: 14th May 2024 - 06:50 PM |
Invision Power Board
v9.1.4 © 2024 IPS, Inc.