|
|
|
Porsche, and the Porsche crest are registered trademarks of Dr. Ing. h.c. F. Porsche AG.
This site is not affiliated with Porsche in any way. Its only purpose is to provide an online forum for car enthusiasts. All other trademarks are property of their respective owners. |
|
|

  |

| rfinegan |
 Feb 1 2023, 06:49 AM Feb 1 2023, 06:49 AM
Post
#21
|
|
Senior Member  Group: Members Posts: 1,207 Joined: 8-February 13 From: NC Member No.: 15,499 Region Association: MidAtlantic Region |
Did the adjuster come out off the inner Long(turbo end)?
Perhaps the adjuster is bottomed out or turning the wrong way? |
   |

 
|
| jvmarino |
Feb 1 2023, 10:16 AM
Post
#22
|
|
Member Group: Members Posts: 101 Joined: 22-March 09 From: Baltimore Member No.: 10,188 Region Association: None |
Well if the entire tie-rod is already off and you have a new one coming, nothing to lose if you take a cutting wheel to it and slit it lengthwise about 1/8" deep and then use a chisel and split it open.
|
 |
|
| BeatNavy |
Feb 4 2023, 12:13 PM
Post
#23
|
|
Certified Professional Scapegoat Group: Members Posts: 2,965 Joined: 26-February 14 From: Easton, MD Member No.: 17,042 Region Association: MidAtlantic Region |
Got the new tie rod / end combo on Thursday (nice job, Pelican, two day order fulfillment from West Coast is pretty sweet). Friday I used the old tie rod to measure the length. This all started when I was trying to adjust the tie rod end to get 1/8th in of toe-in. Installed new one without issue, but my string alignment setup now tells me I'm about 1/4 in toe-in, so I need to back it off again. Problem is, the tie rod end is stuck in the control arm. I've tried the BFH method without success. I don't want to use the pickle fork method again and destroy a brand new tie rod end. Purchased the only one they had at FLAPS and of course it's the kind that doesn't fit (IMG:style_emoticons/default/headbang.gif)
Currently waiting for delivery of the tie rod separator that kind of looks like the VW special tool (266h). 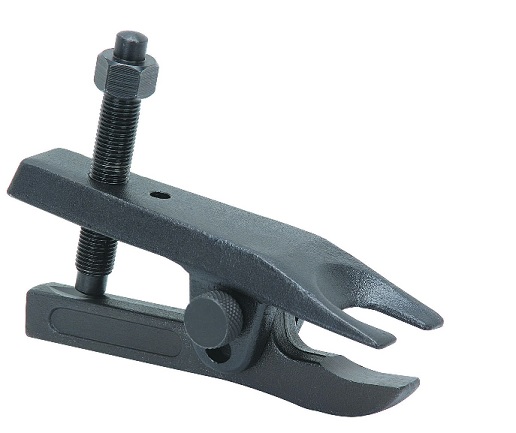 But I'm curious: car didn't even make it out of my garage. I torqued the nut to 33 ft lbs which I believe is correct. And that sucker is STILL in that control arm very tightly. It's a pinch fit, right? Is this normal? I was hoping I could coax it back out without too much force, but no luck without that tool I guess. For those that are interested, I "unzipped" the threaded section of the old tie rod end to get it off the rod. Even with one side cut and banging with chisel and hammer it wouldn't come off. I had to slice both sides before it would give way. I don't see any obvious issues in the threads, so I'm still confused as to why it was so badly frozen on there. 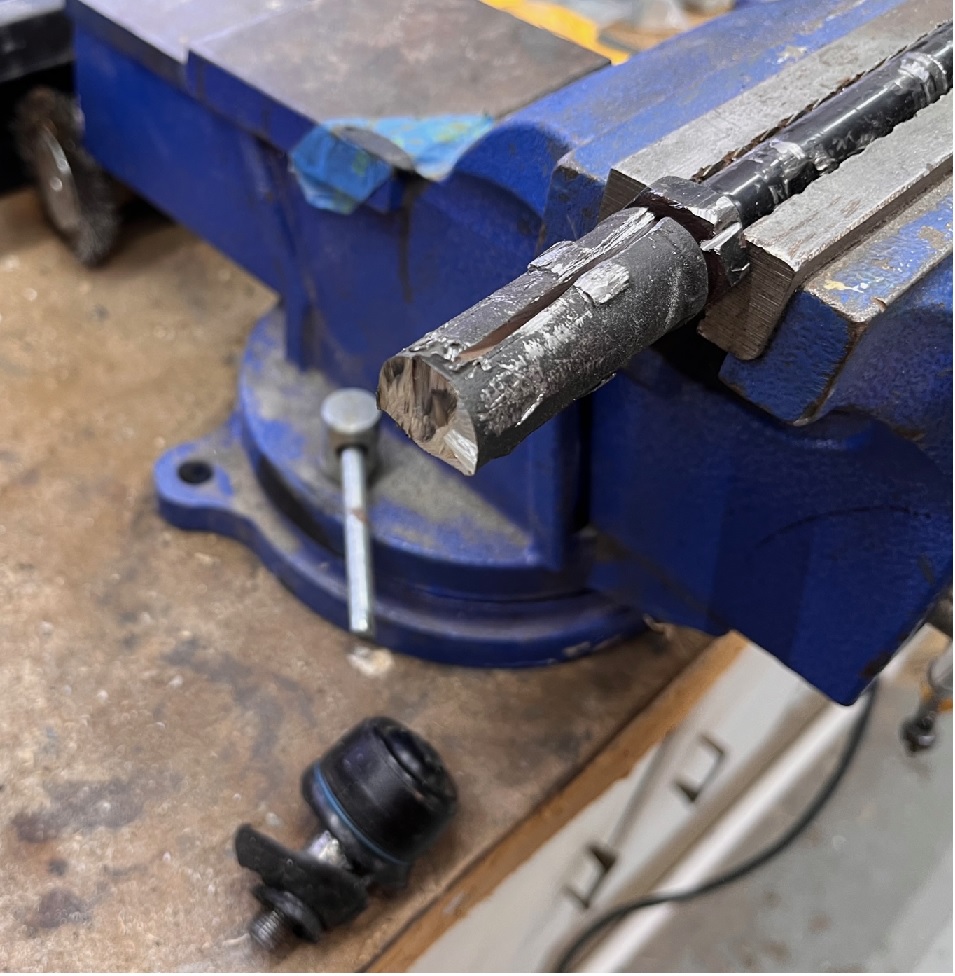  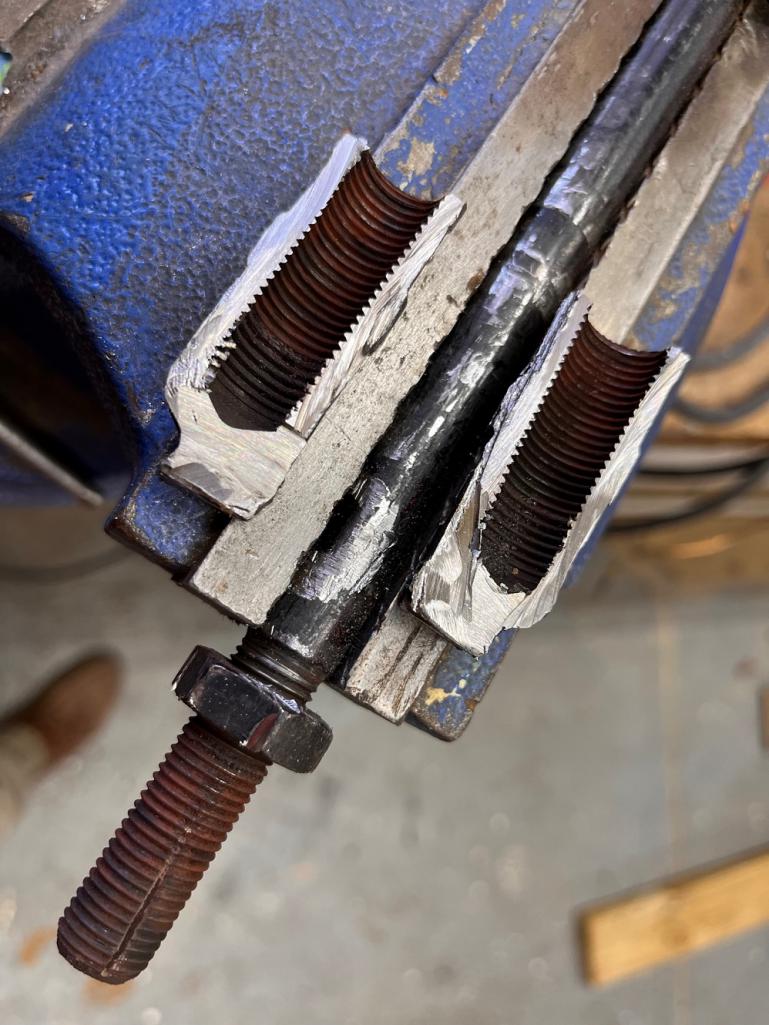 |
|
|
|
| rhodyguy |
Feb 4 2023, 12:20 PM
Post
#24
|
|
Chimp Sanctuary NW. Check it out. Group: Members Posts: 22,252 Joined: 2-March 03 From: Orion's Bell. The BELL! Member No.: 378 Region Association: Galt's Gulch |
Rust frozen? It doesn’t look like the penetrant made it to the threads.
|
|
|
|
| BeatNavy |
Feb 4 2023, 12:28 PM
Post
#25
|
|
Certified Professional Scapegoat Group: Members Posts: 2,965 Joined: 26-February 14 From: Easton, MD Member No.: 17,042 Region Association: MidAtlantic Region |
QUOTE(rhodyguy @ Feb 4 2023, 01:20 PM)  Rust frozen? It doesn’t look like the penetrant made it to the threads. Yeah, that's the only thing I can think of. It LOOKED like it was getting in there, but looking at it now it doesn't look like the PB blaster got in there. |
|
|
|
| SirAndy |
Feb 4 2023, 06:21 PM
Post
#26
|
|
Resident German Group: Admin Posts: 42,485 Joined: 21-January 03 From: Oakland, Kalifornia Member No.: 179 Region Association: Northern California |
I'd be tempted to add a dab of grease to the threads of the new one to prevent that kind of rust.
(IMG:style_emoticons/default/idea.gif) |
|
|
|
| Superhawk996 |
Feb 4 2023, 06:24 PM
Post
#27
|
|
914 Guru Group: Members Posts: 7,922 Joined: 25-August 18 From: Woods of N. Idaho Member No.: 22,428 Region Association: Galt's Gulch |
Ball joint is a taper. It is normal for it to be a tight fit (non release after fastener removal) after torquing the fastener.
In reality the joint is held by the interference fit of the taper, not by the fastener. |
|
|
|
| Superhawk996 |
Feb 4 2023, 06:34 PM
Post
#28
|
|
914 Guru Group: Members Posts: 7,922 Joined: 25-August 18 From: Woods of N. Idaho Member No.: 22,428 Region Association: Galt's Gulch |
I’m not sure what BFH approach was used. Did you try hitting the side of the knuckle while backing it up with a 2nd hammer? Basically using the 2nd hammer like a body dolly.
Usually that approach will get it to release pretty easily. I usually back it with a 2lb ball peen and hit it on the knuckle side with a 3lb brass hammer. Not a good method if you have pretty powder coated / painted struts. More effective than simply hitting it downward on the threaded section of the ball joint. Doesn’t risk damaging the threads or the nut as occurs when hitting directly on the ball joint. |
|
|
|
| bkrantz |
Feb 4 2023, 09:11 PM
Post
#29
|
|
914 Guru Group: Members Posts: 8,729 Joined: 3-August 19 From: SW Colorado Member No.: 23,343 Region Association: Rocky Mountains |
Wow. I wonder if the rod or the socket threads were raw (uncoated or unplated) and the rust got extra stuck.
I agree for the new stuff: some grease or ant-seize. |
|
|
|
| Van B |
Feb 4 2023, 09:19 PM
Post
#30
|
|
Senior Member Group: Members Posts: 1,621 Joined: 20-October 21 From: WR, GA Member No.: 26,011 Region Association: None |
Actually a great thread despite all the frustration. This is a good reminder for me to use anti seize on all my adjuster threads!
|
|
|
|
| technicalninja |
Feb 5 2023, 09:55 AM
Post
#31
|
|
Advanced Member Group: Members Posts: 2,531 Joined: 31-January 23 From: Granbury Texas Member No.: 27,135 Region Association: Southwest Region |
The best release agent I've found for ferrous on ferrous is "Pimp Juice".
Pimp Juice is an old school hot rodder trick... 1/2 acetone and 1/2 old school Dexron III. It separates in the bottle. Shake it like you mean it and it turns Pepto Dismol pink. Super thin and will wick upwards about a 1/2 inch into a vertical fastener. Tested against all of the custom release agents (PB blaster, Kroil, etc) it kicks ass. I had an exhaust stud with a locked fastener and this stuff took 4 SECONDS to go through the nut. It then screwed out with minimal effort. I was shocked! Works great. It will damage any plastic you get it on. I have completely negated the need to beat stuck rotors off axle flanges with this stuff. Put a little squirt in each lug blot hole and 10 minutes later the rotor will fall off the flange by itself. For dissimilar metals I use wintergreen oil (you buy it from health products supplier-Amazon). This trick comes from the technicians on our aircraft carriers. Imagine working on a F15/F18 in a 100% salt environment... Your shop smells like Christmas when you use this stuff. |
|
|
|
| mepstein |
Feb 5 2023, 10:07 AM
Post
#32
|
|
914-6 GT in waiting Group: Members Posts: 20,786 Joined: 19-September 09 From: Landenberg, PA/Wilmington, DE Member No.: 10,825 Region Association: MidAtlantic Region |
One of the techs showed me his trick. He heats up the part and then uses a piece of paraffin wax. The wax wicks up the threads but unlike penetrating oils, doesn’t burn off easily. Pro techs don’t have all day (or days) to wait around for penetrating oil to work. This does it in minutes.
|
|
|
|
| technicalninja |
Feb 5 2023, 10:52 AM
Post
#33
|
|
Advanced Member Group: Members Posts: 2,531 Joined: 31-January 23 From: Granbury Texas Member No.: 27,135 Region Association: Southwest Region |
QUOTE(mepstein @ Feb 5 2023, 10:07 AM) One of the techs showed me his trick. He heats up the part and then uses a piece of paraffin wax. The wax wicks up the threads but unlike penetrating oils, doesn’t burn off easily. Pro techs don’t have all day (or days) to wait around for penetrating oil to work. This does it in minutes. Yep, this works great as well. Even better if you light the candle and let the already liquid wax hit your threads. This does require a torch (propane torch works fine) and can damage the paint. The pimp juice works in seconds as well. It does work better the longer you leave it on. I have been a professional technician for 4 decades... This is my current business. http://granburyautoac.com/ And yes, I still do R12 work. The car has to be special, and the AC system has to be perfect before I'll charge it. The 1970 Chevelle SS on my website had been converted to R134 and I back dated it to R12 seven years ago. It still blows 35 degrees on a 100-degree day... |
|
|
|
| Superhawk996 |
Feb 5 2023, 11:04 AM
Post
#34
|
|
914 Guru Group: Members Posts: 7,922 Joined: 25-August 18 From: Woods of N. Idaho Member No.: 22,428 Region Association: Galt's Gulch |
QUOTE(mepstein @ Feb 5 2023, 11:07 AM) One of the techs showed me his trick. He heats up the part and then uses a piece of paraffin wax. The wax wicks up the threads but unlike penetrating oils, doesn’t burn off easily. Pro techs don’t have all day (or days) to wait around for penetrating oil to work. This does it in minutes. (IMG:style_emoticons/default/agree.gif) Has its limitations but works extremely well especially good at preventing galling once it’s loosened. |
|
|
|
| Superhawk996 |
Feb 5 2023, 11:09 AM
Post
#35
|
|
914 Guru Group: Members Posts: 7,922 Joined: 25-August 18 From: Woods of N. Idaho Member No.: 22,428 Region Association: Galt's Gulch |
I’m late to this thread but to me it looks like original problem was that the threaded road was likely forced down into the ball joint far enough that it began to engage with the partially cut threads near the bottom.
Then add a smidge of corrosion after the original alignment had been done. Not enough heat and not enough leverage to back the rod out of the ball joint. Partially cut threads circled. 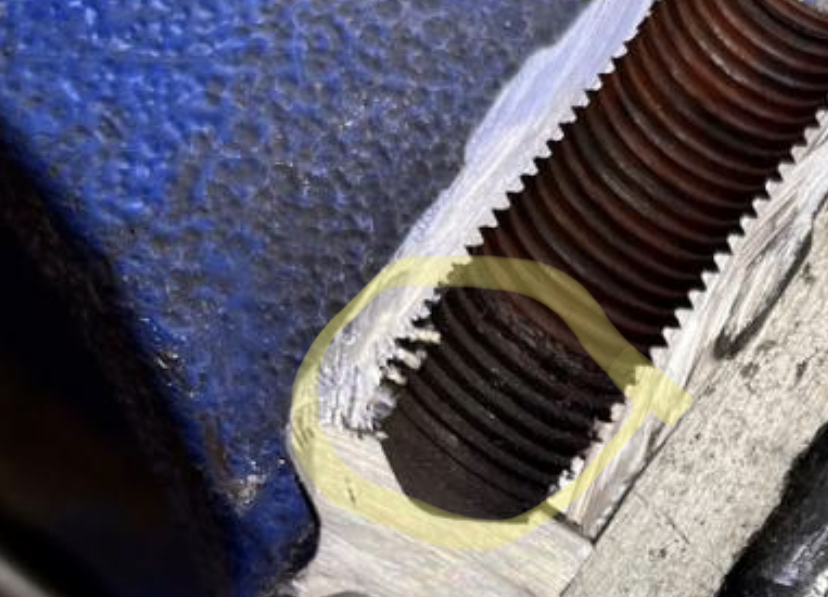 |
|
|
|
| BeatNavy |
Feb 7 2023, 02:15 PM
Post
#36
|
|
Certified Professional Scapegoat Group: Members Posts: 2,965 Joined: 26-February 14 From: Easton, MD Member No.: 17,042 Region Association: MidAtlantic Region |
I don't think the rod extended that far into the area of the threads that looked damaged. I can tell based on the color of the rust. But you could be right, as I don't have a better explanation other than rust.
Anyway, finally got my tie rod separator tool. That thing is substantial -- it probably weighs 10 lbs. And it made short work of removing the end without damaging the boot like that damn pickle fork. Thanks for everyone's help and support on this. Today I: 1. Put some rust inhibitor on the rod threads. 2. Dialed the toe-in back a bit 3. Took her for a test drive -- alignment / toe is darn near perfect. This was all part of a deep-dive I did to try to get my alignment / balance more in line with spirited street driving. Everything seems good to go! (IMG:style_emoticons/default/thumb3d.gif) |
|
|
|
| 914_teener |
Feb 7 2023, 03:21 PM
Post
#37
|
|
914 Guru Group: Members Posts: 5,270 Joined: 31-August 08 From: So. Cal Member No.: 9,489 Region Association: Southern California |
QUOTE(BeatNavy @ Feb 7 2023, 01:15 PM) I don't think the rod extended that far into the area of the threads that looked damaged. I can tell based on the color of the rust. But you could be right, as I don't have a better explanation other than rust. Anyway, finally got my tie rod separator tool. That thing is substantial -- it probably weighs 10 lbs. And it made short work of removing the end without damaging the boot like that damn pickle fork. Thanks for everyone's help and support on this. Today I: 1. Put some rust inhibitor on the rod threads. 2. Dialed the toe-in back a bit 3. Took her for a test drive -- alignment / toe is darn near perfect. This was all part of a deep-dive I did to try to get my alignment / balance more in line with spirited street driving. Everything seems good to go! (IMG:style_emoticons/default/thumb3d.gif) Hey Rob....just had to ask. With the Turbo Tie Rod set up....did you use the spacer washer? Looks like fun wrenching in any case. |
|
|
|
| BeatNavy |
Feb 7 2023, 03:36 PM
Post
#38
|
|
Certified Professional Scapegoat Group: Members Posts: 2,965 Joined: 26-February 14 From: Easton, MD Member No.: 17,042 Region Association: MidAtlantic Region |
Hey Rob! Hope all is well (IMG:style_emoticons/default/beer.gif)
I used A spacer washer. I don't think it was the thick one you see in the 911 kit. I used a much narrower one that either came with the kit I purchased or swapped in for that thicker washer. I can't remember now, but I'm sure I did it based on threads I read here. |
|
|
|
| Montreal914 |
Feb 7 2023, 10:30 PM
Post
#39
|
|
Advanced Member Group: Members Posts: 2,159 Joined: 8-August 10 From: Claremont, CA Member No.: 12,023 Region Association: Southern California |
Excellent thread with good tricks! (IMG:style_emoticons/default/beer.gif)
That drive after the work... (IMG:style_emoticons/default/driving.gif) Priceless (IMG:style_emoticons/default/smile.gif) |
|
|
|
|
1 User(s) are reading this topic (1 Guests and 0 Anonymous Users)
0 Members:

|
Lo-Fi Version | Time is now: 30th June 2026 - 04:59 AM |
Invision Power Board
v9.1.4 © 2026 IPS, Inc.