|
|
|
Porsche, and the Porsche crest are registered trademarks of Dr. Ing. h.c. F. Porsche AG.
This site is not affiliated with Porsche in any way. Its only purpose is to provide an online forum for car enthusiasts. All other trademarks are property of their respective owners. |
|
|


| rfinegan |
 Feb 6 2023, 07:38 AM Feb 6 2023, 07:38 AM
Post
#41
|
|
Senior Member  Group: Members Posts: 1,083 Joined: 8-February 13 From: NC Member No.: 15,499 Region Association: MidAtlantic Region |
Here is a link to part one:
http://www.914world.com/bbs2/index.php?sho...117&hl=2056 I decide my t1 oil pump in my 2056 was doing me no favors with a smaller than ideal OD. I still had the T4 oil pump from the 2.0 that was doing its job when I had a cam thrust bearing fail /knock, so I decided to pull it a part for inspection. I will perform some measurements and get it cleaned up, if it turns out to be in good shape. The pics look like a great core. 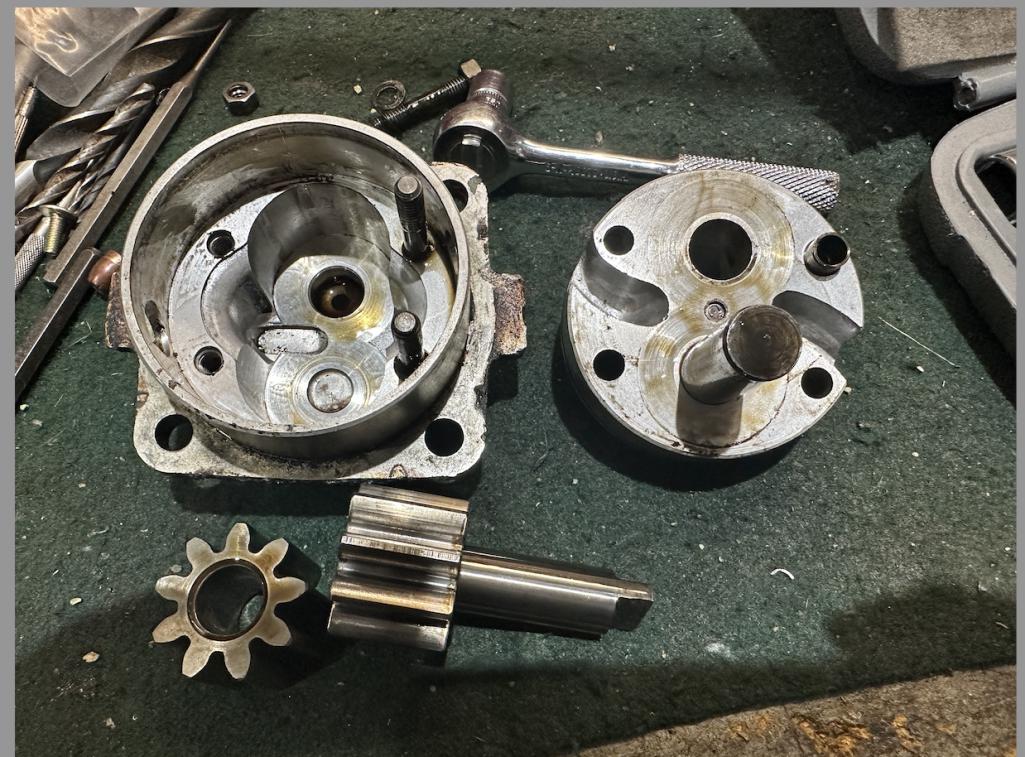 |
   |

 
|
Posts in this topic
 rfinegan 2056 rebuild part THREE Feb 6 2023, 07:38 AM
 Superhawk996 Agree - looks like a pretty good core.
Pin the ... Feb 6 2023, 07:50 AM
Superhawk996 Agree - looks like a pretty good core.
Pin the ... Feb 6 2023, 07:50 AM
 rfinegan Great link, this should be a sticky if its not the... Feb 6 2023, 08:04 AM rfinegan Here are come pics of case split and inspections Feb 6 2023, 08:33 AM rfinegan another of the saddle and low pin locator
Feb 6 2023, 08:35 AM rfinegan rear thrust again Feb 6 2023, 08:37 AM rfinegan and a video :
dJ_iKZHldNk Feb 6 2023, 08:44 AM DRPHIL914 so what are your impressions of your observations ... Feb 6 2023, 09:09 AM rfinegan Phil,
This build and the last build had a total o... Feb 6 2023, 09:42 AM DRPHIL914
Phil,
This build and the last build had a total ... Feb 6 2023, 10:13 AM rfinegan Here is the worst of the intake guide #1. The exha... Feb 6 2023, 09:45 AM 914sgofast2
Here is the worst of the intake guide #1. The exh... Feb 6 2023, 12:36 PM rfinegan I have a new local shop add new intake guides and ... Feb 6 2023, 09:48 AM rfinegan My summary of this build:
1) OIL pressure problems... Feb 6 2023, 09:53 AM Jack Standz Crankshaft float s/b .004" plus or minus .001... Feb 6 2023, 11:31 AM rfinegan check in without seal and again once the seal is i... Feb 6 2023, 11:32 AM Geezer914 Rear main seal tool, use a block of wood. Go easy... Feb 6 2023, 02:56 PM porschetub
Rear main seal tool, use a block of wood. Go eas... Feb 7 2023, 03:23 PM rfinegan GREAT info on the rear main seal. ..with mods
ht... Feb 9 2023, 01:27 PM rfinegan Happy day for a change in the garage
A world memb... Feb 14 2023, 03:16 PM 914sgofast2 From your picture of the engine case mounted in th... Feb 14 2023, 03:51 PM rfinegan I linked to the Raby live stream in post 19
Now th... Feb 14 2023, 04:38 PM NARP74 What were your thoughts on the wrong oil? Why did... Feb 14 2023, 03:46 PM rfinegan I was thinking the VR1 20W50 was not the best oil ... Feb 14 2023, 04:32 PM NARP74
I was thinking the ZR 20W50 was not the best oil ... Feb 14 2023, 04:38 PM rfinegan Trying to keep the motivation up on this holiday w... Feb 19 2023, 01:32 PM rfinegan RE: 2056 rebuild part THREE Feb 19 2023, 01:38 PM barefoot
You keep your tools in the dark ?? Feb 19 2023, 05:47 PM rfinegan Old trick of the trade...no one asks to borrow any... Feb 19 2023, 06:45 PM r_towle This will be the third build?
Curious about break... Feb 19 2023, 07:21 PM rfinegan Rich,
Yep this is # 3 and the $1000 dollar q... Feb 20 2023, 07:04 AM rfinegan Heads are repaired with new intake guides and 3 an... Feb 21 2023, 04:03 PM Cairo94507 I have my fingers and toes crossed this motor purr... Feb 22 2023, 08:35 AM rfinegan I will be having a sale on engine parts it it does... Feb 22 2023, 09:36 AM rfinegan I did some detailed measuring on the con rod journ... Mar 4 2023, 08:24 AM 914rrr Lots of great info on this thread! Good luck... Mar 4 2023, 08:59 AM rfinegan It took a while but I finally got a set of NOS KS/... Mar 27 2023, 05:24 AM rfinegan Thanks to the generosity of a Kerry, world member... Mar 27 2023, 05:29 AM rfinegan :headbanger: Mar 27 2023, 06:26 AM rfinegan Add a VDO HEAD TEMP thermocouple under the #3 spar... Mar 28 2023, 05:54 PM VaccaRabite Unless things have changed, the VDO head temp gaug... Mar 29 2023, 06:09 AM rfinegan This way the sensor stays in place when servicing ... Mar 29 2023, 07:18 AM rfinegan Never opposed to OE parts if you can get them....
Mar 29 2023, 11:11 AM rfinegan I may be CRAZY, but got a set of ML Cam bearings n... Apr 7 2023, 11:06 AM rfinegan NEW KS 2.0 rod bearing are HERE....
Apr 7 2023, 11:07 AM rfinegan Just got a new tube of valve lapping paste...The o... Jun 21 2023, 04:50 PM porschetub
Just got a new tube of valve lapping paste...The ... Jun 21 2023, 05:36 PM rfinegan KTM 125 top end upgrade in the background.....whil... Jun 21 2023, 05:00 PM r_towle You keep learning all sorts of fun things! Jun 21 2023, 05:33 PM rfinegan heads are disassembled cleaned and lubed and back ... Jul 9 2023, 03:48 PM rfinegan The windage tray had the same old seals, so a new ... Jul 9 2023, 03:56 PM rfinegan vintage bearings too
Jul 9 2023, 03:57 PM rfinegan here is a video of the camshaft end play
WpUDEaOW... Jul 9 2023, 03:59 PM rfinegan Measured the case, bearings and crank journals as ... Jul 9 2023, 04:06 PM Cairo94507 :popcorn: Can't wait for this to be fired-up. ... Jul 9 2023, 05:49 PM rfinegan
:popcorn: Can't wait for this to be fired-up.... Jul 10 2023, 06:57 AM DRPHIL914
:popcorn: Can't wait for this to be fired-up... Jul 17 2023, 06:14 AM rfinegan Lapping the heads can only be a good thing, and yo... Jul 17 2023, 07:30 AM DRPHIL914
Lapping the heads can only be a good thing, and y... Jul 17 2023, 07:57 AM rfinegan I did pin the shaft on the T4 oil pump. Drilled an... Jul 10 2023, 06:02 AM rfinegan Playing with a thermal dispersion paint from Cerak... Jul 17 2023, 05:30 AM rfinegan heads Jul 17 2023, 06:14 AM rfinegan I updated ALL my videos on You tube for Robert Fin... Jul 17 2023, 08:37 AM rfinegan Tonight I cleaned the carbon off the piston tops a... Jul 19 2023, 04:28 PM rfinegan another Jul 19 2023, 04:29 PM rfinegan one more Jul 19 2023, 04:29 PM BeatNavy Looking really good, Robert! :thumbsup: Jul 19 2023, 05:14 PM rfinegan Thanks Rob, Thanks for positive feed back, it is... Jul 20 2023, 08:33 AM r_towle Thank you for doing such a great job documenting b... Jul 20 2023, 07:58 PM r_towle TLDR,
Did you use that paint on everything?
Cool... Jul 20 2023, 08:00 PM rfinegan
TLDR,
Did you use that paint on everything?
I ... Jul 21 2023, 05:35 AM Cairo94507 :popcorn: :beer3: Jul 21 2023, 06:18 AM rfinegan plan for the weekend...
1)Home made Jet Doctors fo... Jul 21 2023, 07:10 AM rfinegan Darn, the engine yoke got me again. its touching t... Jul 23 2023, 07:30 AM rfinegan DIY: Jet Doctor for idle jets or just by them fro... Jul 23 2023, 11:11 AM rfinegan oil primer in progress...
Jul 23 2023, 02:30 PM rfinegan engine update..stubs and tins next...
Jul 23 2023, 02:34 PM rfinegan engine yoke mod...#3 cylinder
Jul 23 2023, 02:36 PM rfinegan cylinders hitting the the yoke frame Jul 23 2023, 03:25 PM rfinegan Today I installer the blower housing, blower front... Jul 24 2023, 04:24 PM rfinegan another pic of the bottom Jul 24 2023, 04:27 PM porschetub
another pic of the bottom
looking great,thermost... Jul 28 2023, 08:32 PM rfinegan Installed and torqued Clutch, Pressure plate and f... Jul 24 2023, 04:29 PM rfinegan Today I recondition push rod tubs to remove dents ... Jul 28 2023, 05:48 PM rfinegan added right tins and distributor
Jul 28 2023, 05:52 PM barefoot
added right tins and distributor
Make sure yo... Jul 29 2023, 06:54 AM rfinegan I may have to try to fit an aftermarket thermostat... Jul 29 2023, 06:38 AM rfinegan Good eye. Not wanting to pull the alternator/cover... Jul 31 2023, 05:45 AM rfinegan Add a PMO fuel regulator (purchased in the classif... Aug 6 2023, 01:53 PM rfinegan install pics..all done under the car.
including Wi... Aug 6 2023, 04:23 PM rfinegan another view of the Tangerine clutch mount Gen 1
... Aug 6 2023, 04:26 PM rfinegan Lets see how I did...
I add 5 gals of 93 octane t... Aug 13 2023, 09:30 AM rfinegan SO...
I think I spiked the module doing power bal... Aug 13 2023, 10:00 AM BeatNavy Nice job, Robert! :Qarl: Aug 13 2023, 11:15 AM rjames Excellent!!
:beer1: Aug 13 2023, 02:27 PM Cairo94507 Congratulations! She sounds good. :beer2: Aug 13 2023, 03:33 PM technicalninja Sounds healthy!
Pretty balanced for a first st... Aug 13 2023, 03:55 PM rfinegan I add a new Malory Module to my ignition system H... Aug 16 2023, 10:45 AM rfinegan 30 min or so run time so I better get some Fresh o... Aug 16 2023, 10:47 AM technicalninja On a first run in like you just did I clean the pi... Aug 16 2023, 03:28 PM
rfinegan Great link, this should be a sticky if its not the... Feb 6 2023, 08:04 AM rfinegan Here are come pics of case split and inspections Feb 6 2023, 08:33 AM rfinegan another of the saddle and low pin locator
Feb 6 2023, 08:35 AM rfinegan rear thrust again Feb 6 2023, 08:37 AM rfinegan and a video :
dJ_iKZHldNk Feb 6 2023, 08:44 AM DRPHIL914 so what are your impressions of your observations ... Feb 6 2023, 09:09 AM rfinegan Phil,
This build and the last build had a total o... Feb 6 2023, 09:42 AM DRPHIL914
Phil,
This build and the last build had a total ... Feb 6 2023, 10:13 AM rfinegan Here is the worst of the intake guide #1. The exha... Feb 6 2023, 09:45 AM 914sgofast2
Here is the worst of the intake guide #1. The exh... Feb 6 2023, 12:36 PM rfinegan I have a new local shop add new intake guides and ... Feb 6 2023, 09:48 AM rfinegan My summary of this build:
1) OIL pressure problems... Feb 6 2023, 09:53 AM Jack Standz Crankshaft float s/b .004" plus or minus .001... Feb 6 2023, 11:31 AM rfinegan check in without seal and again once the seal is i... Feb 6 2023, 11:32 AM Geezer914 Rear main seal tool, use a block of wood. Go easy... Feb 6 2023, 02:56 PM porschetub
Rear main seal tool, use a block of wood. Go eas... Feb 7 2023, 03:23 PM rfinegan GREAT info on the rear main seal. ..with mods
ht... Feb 9 2023, 01:27 PM rfinegan Happy day for a change in the garage
A world memb... Feb 14 2023, 03:16 PM 914sgofast2 From your picture of the engine case mounted in th... Feb 14 2023, 03:51 PM rfinegan I linked to the Raby live stream in post 19
Now th... Feb 14 2023, 04:38 PM NARP74 What were your thoughts on the wrong oil? Why did... Feb 14 2023, 03:46 PM rfinegan I was thinking the VR1 20W50 was not the best oil ... Feb 14 2023, 04:32 PM NARP74
I was thinking the ZR 20W50 was not the best oil ... Feb 14 2023, 04:38 PM rfinegan Trying to keep the motivation up on this holiday w... Feb 19 2023, 01:32 PM rfinegan RE: 2056 rebuild part THREE Feb 19 2023, 01:38 PM barefoot
You keep your tools in the dark ?? Feb 19 2023, 05:47 PM rfinegan Old trick of the trade...no one asks to borrow any... Feb 19 2023, 06:45 PM r_towle This will be the third build?
Curious about break... Feb 19 2023, 07:21 PM rfinegan Rich,
Yep this is # 3 and the $1000 dollar q... Feb 20 2023, 07:04 AM rfinegan Heads are repaired with new intake guides and 3 an... Feb 21 2023, 04:03 PM Cairo94507 I have my fingers and toes crossed this motor purr... Feb 22 2023, 08:35 AM rfinegan I will be having a sale on engine parts it it does... Feb 22 2023, 09:36 AM rfinegan I did some detailed measuring on the con rod journ... Mar 4 2023, 08:24 AM 914rrr Lots of great info on this thread! Good luck... Mar 4 2023, 08:59 AM rfinegan It took a while but I finally got a set of NOS KS/... Mar 27 2023, 05:24 AM rfinegan Thanks to the generosity of a Kerry, world member... Mar 27 2023, 05:29 AM rfinegan :headbanger: Mar 27 2023, 06:26 AM rfinegan Add a VDO HEAD TEMP thermocouple under the #3 spar... Mar 28 2023, 05:54 PM VaccaRabite Unless things have changed, the VDO head temp gaug... Mar 29 2023, 06:09 AM rfinegan This way the sensor stays in place when servicing ... Mar 29 2023, 07:18 AM rfinegan Never opposed to OE parts if you can get them....
Mar 29 2023, 11:11 AM rfinegan I may be CRAZY, but got a set of ML Cam bearings n... Apr 7 2023, 11:06 AM rfinegan NEW KS 2.0 rod bearing are HERE....
Apr 7 2023, 11:07 AM rfinegan Just got a new tube of valve lapping paste...The o... Jun 21 2023, 04:50 PM porschetub
Just got a new tube of valve lapping paste...The ... Jun 21 2023, 05:36 PM rfinegan KTM 125 top end upgrade in the background.....whil... Jun 21 2023, 05:00 PM r_towle You keep learning all sorts of fun things! Jun 21 2023, 05:33 PM rfinegan heads are disassembled cleaned and lubed and back ... Jul 9 2023, 03:48 PM rfinegan The windage tray had the same old seals, so a new ... Jul 9 2023, 03:56 PM rfinegan vintage bearings too
Jul 9 2023, 03:57 PM rfinegan here is a video of the camshaft end play
WpUDEaOW... Jul 9 2023, 03:59 PM rfinegan Measured the case, bearings and crank journals as ... Jul 9 2023, 04:06 PM Cairo94507 :popcorn: Can't wait for this to be fired-up. ... Jul 9 2023, 05:49 PM rfinegan
:popcorn: Can't wait for this to be fired-up.... Jul 10 2023, 06:57 AM DRPHIL914
:popcorn: Can't wait for this to be fired-up... Jul 17 2023, 06:14 AM rfinegan Lapping the heads can only be a good thing, and yo... Jul 17 2023, 07:30 AM DRPHIL914
Lapping the heads can only be a good thing, and y... Jul 17 2023, 07:57 AM rfinegan I did pin the shaft on the T4 oil pump. Drilled an... Jul 10 2023, 06:02 AM rfinegan Playing with a thermal dispersion paint from Cerak... Jul 17 2023, 05:30 AM rfinegan heads Jul 17 2023, 06:14 AM rfinegan I updated ALL my videos on You tube for Robert Fin... Jul 17 2023, 08:37 AM rfinegan Tonight I cleaned the carbon off the piston tops a... Jul 19 2023, 04:28 PM rfinegan another Jul 19 2023, 04:29 PM rfinegan one more Jul 19 2023, 04:29 PM BeatNavy Looking really good, Robert! :thumbsup: Jul 19 2023, 05:14 PM rfinegan Thanks Rob, Thanks for positive feed back, it is... Jul 20 2023, 08:33 AM r_towle Thank you for doing such a great job documenting b... Jul 20 2023, 07:58 PM r_towle TLDR,
Did you use that paint on everything?
Cool... Jul 20 2023, 08:00 PM rfinegan
TLDR,
Did you use that paint on everything?
I ... Jul 21 2023, 05:35 AM Cairo94507 :popcorn: :beer3: Jul 21 2023, 06:18 AM rfinegan plan for the weekend...
1)Home made Jet Doctors fo... Jul 21 2023, 07:10 AM rfinegan Darn, the engine yoke got me again. its touching t... Jul 23 2023, 07:30 AM rfinegan DIY: Jet Doctor for idle jets or just by them fro... Jul 23 2023, 11:11 AM rfinegan oil primer in progress...
Jul 23 2023, 02:30 PM rfinegan engine update..stubs and tins next...
Jul 23 2023, 02:34 PM rfinegan engine yoke mod...#3 cylinder
Jul 23 2023, 02:36 PM rfinegan cylinders hitting the the yoke frame Jul 23 2023, 03:25 PM rfinegan Today I installer the blower housing, blower front... Jul 24 2023, 04:24 PM rfinegan another pic of the bottom Jul 24 2023, 04:27 PM porschetub
another pic of the bottom
looking great,thermost... Jul 28 2023, 08:32 PM rfinegan Installed and torqued Clutch, Pressure plate and f... Jul 24 2023, 04:29 PM rfinegan Today I recondition push rod tubs to remove dents ... Jul 28 2023, 05:48 PM rfinegan added right tins and distributor
Jul 28 2023, 05:52 PM barefoot
added right tins and distributor
Make sure yo... Jul 29 2023, 06:54 AM rfinegan I may have to try to fit an aftermarket thermostat... Jul 29 2023, 06:38 AM rfinegan Good eye. Not wanting to pull the alternator/cover... Jul 31 2023, 05:45 AM rfinegan Add a PMO fuel regulator (purchased in the classif... Aug 6 2023, 01:53 PM rfinegan install pics..all done under the car.
including Wi... Aug 6 2023, 04:23 PM rfinegan another view of the Tangerine clutch mount Gen 1
... Aug 6 2023, 04:26 PM rfinegan Lets see how I did...
I add 5 gals of 93 octane t... Aug 13 2023, 09:30 AM rfinegan SO...
I think I spiked the module doing power bal... Aug 13 2023, 10:00 AM BeatNavy Nice job, Robert! :Qarl: Aug 13 2023, 11:15 AM rjames Excellent!!
:beer1: Aug 13 2023, 02:27 PM Cairo94507 Congratulations! She sounds good. :beer2: Aug 13 2023, 03:33 PM technicalninja Sounds healthy!
Pretty balanced for a first st... Aug 13 2023, 03:55 PM rfinegan I add a new Malory Module to my ignition system H... Aug 16 2023, 10:45 AM rfinegan 30 min or so run time so I better get some Fresh o... Aug 16 2023, 10:47 AM technicalninja On a first run in like you just did I clean the pi... Aug 16 2023, 03:28 PM  |
1 User(s) are reading this topic (1 Guests and 0 Anonymous Users)
0 Members:

|
Lo-Fi Version | Time is now: 14th July 2025 - 01:58 AM |
Invision Power Board
v9.1.4 © 2025 IPS, Inc.